clock Lancia Musa 2010 Owner handbook (in English)
[x] Cancel search | Manufacturer: LANCIA, Model Year: 2010, Model line: Musa, Model: Lancia Musa 2010Pages: 218, PDF Size: 3.71 MB
Page 52 of 218
51
SAFETY
STARTING
AND DRIVING
WARNING
LIGHTS AND
MESSAGES
IN AN
EMERGENCY
MAINTENANCE
AND CARE
TECHNICAL
SPECIFICA-
TIONS
INDEX
DASHBOARD
AND
CONTROLS
HEATED REAR WINDOW AND
DOOR MIRROR
DEMISTING/DEFROSTING
(for versions/markets, where provided)
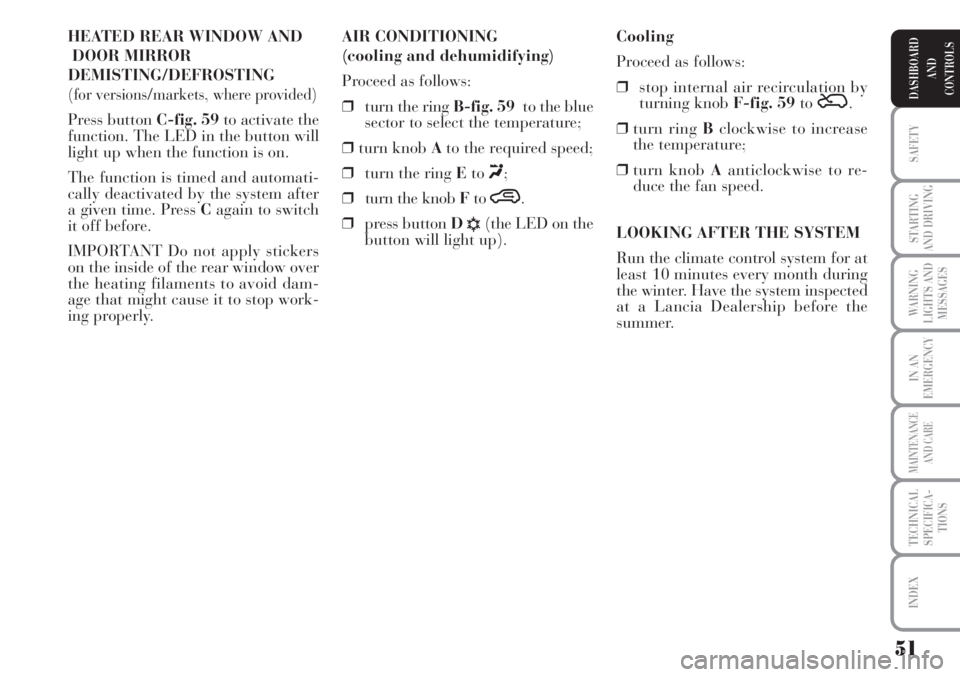
Press button C-fig. 59to activate the
function. The LED in the button will
light up when the function is on.
The function is timed and automati-
cally deactivated by the system after
a given time. Press Cagain to switch
it off before.
IMPORTANT Do not apply stickers
on the inside of the rear window over
the heating filaments to avoid dam-
age that might cause it to stop work-
ing properly.Cooling
Proceed as follows:
❒stop internal air recirculation by
turning knob F-fig. 59to
Ú.
❒turn ring Bclockwise to increase
the temperature;
❒turn knob Aanticlockwise to re-
duce the fan speed.
LOOKING AFTER THE SYSTEM
Run the climate control system for at
least 10 minutes every month during
the winter. Have the system inspected
at a Lancia Dealership before the
summer. AIR CONDITIONING
(cooling and dehumidifying)
Proceed as follows:
❒turn the ring B-fig. 59to the blue
sector to select the temperature;
❒turn knob Ato the required speed;
❒turn the ring Eto
«;
❒turn the knob Fto
….
❒press button D
√(the LED on the
button will light up).
Page 56 of 218
55
SAFETY
STARTING
AND DRIVING
WARNING
LIGHTS AND
MESSAGES
IN AN
EMERGENCY
MAINTENANCE
AND CARE
TECHNICAL
SPECIFICA-
TIONS
INDEX
DASHBOARD
AND
CONTROLS
This function may be used to heat up
the passenger compartment as fast as
possible and exploit the system po-
tential to the maximum. The function
uses the maximum coolant tempera-
ture while air and fan speed distribu-
tion are managed by the system ac-
cording to conditions.
Specifically, if the heating fluid is not
warm enough, the fan will not start
up at the maximum speed immedi-
ately to limit introducing excessively
cool air into the passenger compart-
ment.
All manual settings will be allowed
when this function is on.
To switch the function off, simply turn
the temperature knob anticlockwise
and set the required temperature.
❒LOfunction (maximum cooling):
select by turning the temperature
knob anticlockwise under the mini-
mum value (16 °C). It can be oper-
ated from either by the driver or by
the front passenger (by selecting the
MONOfunction). This function is used to adjust the
temperature in the passenger com-
partment when the driver only is in
the car.
To go back to separate air and tem-
perature distribution in the two zones
of the passenger compartment, sim-
ply turn the knobs Hor press (A-
MONO) when the LED on the button
is on.
Turn the knobs either all to the right
or all to the left to the extreme HIor
LOpositions to use the maximum
heating or maximum cooling func-
tions:
❒HIfunction (maximum heating):
select by turning the temperature
knob clockwise over the maximum
value (32 °C). It can be operated from
either by the driver or by the front
passenger (by selecting the MONO
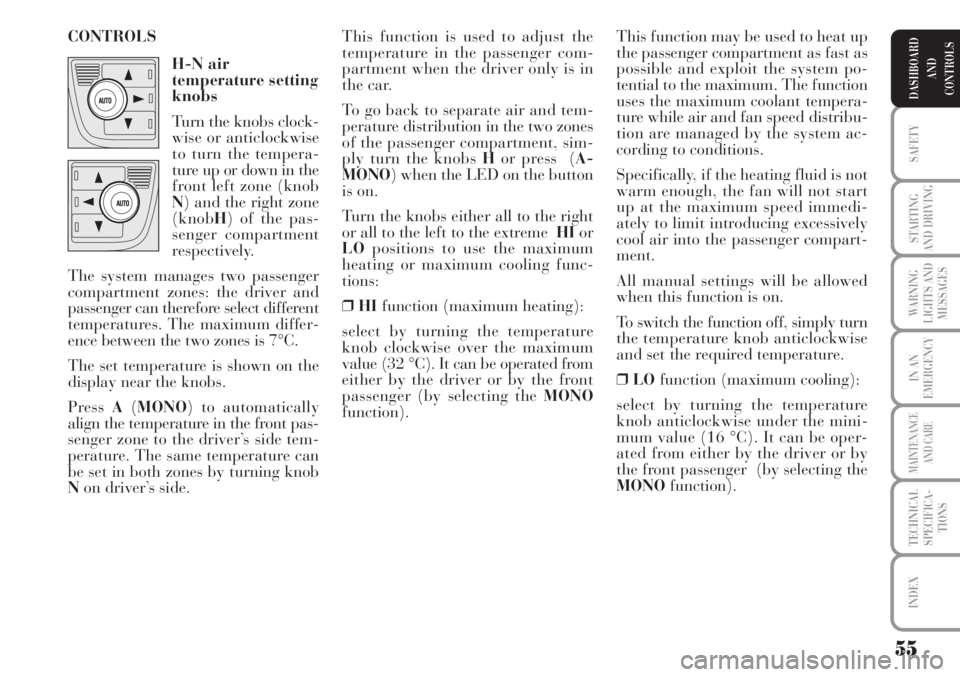
function). CONTROLS
H-N air
temperature setting
knobs
Turn the knobs clock-
wise or anticlockwise
to turn the tempera-
ture up or down in the
front left zone (knob
N) and the right zone
(knobH) of the pas-
senger compartment
respectively.
The system manages two passenger
compartment zones: the driver and
passenger can therefore select different
temperatures. The maximum differ-
ence between the two zones is 7°C.
The set temperature is shown on the
display near the knobs.
Press A(MONO) to automatically
align the temperature in the front pas-
senger zone to the driver’s side tem-
perature. The same temperature can
be set in both zones by turning knob
Non driver’s side.
Page 57 of 218
56
SAFETY
STARTING
AND DRIVING
WARNING
LIGHTS AND
MESSAGES
IN AN
EMERGENCY
MAINTENANCE
AND CARE
TECHNICAL
SPECIFICA-
TIONS
INDEX
DASHBOARD
AND
CONTROLS
˙
▼Air flow between foot well vents
(hotter air) and central and side
dashboard vents (cooler air). This
distribution is particularly useful
in spring and autumn on a sunny
day.
▲
▼Air flow distributed between foot
well vents and windscreen and front
side window defrosting/demisting
vents. This allows an adequate
warming of the passenger com-
partment and prevents the win-
dows from misting up. This function may be used to cool
down the passenger compartment as
fast as possible and exploit the system
potential to the maximum. The func-
tion activates air recirculation and the
climate control compressor, air distri-
bution and fan speed are managed by
the system according to environmen-
tal conditions. All manual settings will
be allowed when this function is on.
To switch the function off, simply turn
the temperature knob anticlockwise
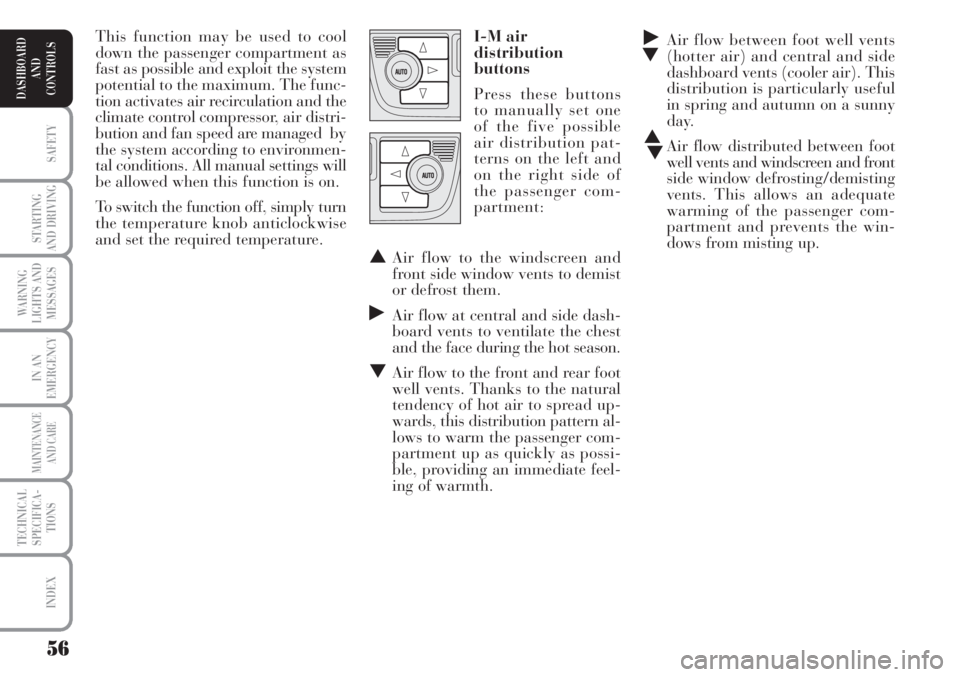
and set the required temperature.I-M air
distribution
buttons
Press these buttons
to manually set one
of the five possible
air distribution pat-
terns on the left and
on the right side of
the passenger com-
partment:
▲Air flow to the windscreen and
front side window vents to demist
or defrost them.
˙Air flow at central and side dash-
board vents to ventilate the chest
and the face during the hot season.
▼Air flow to the front and rear foot
well vents. Thanks to the natural
tendency of hot air to spread up-
wards, this distribution pattern al-
lows to warm the passenger com-
partment up as quickly as possi-
ble, providing an immediate feel-
ing of warmth.
Page 78 of 218
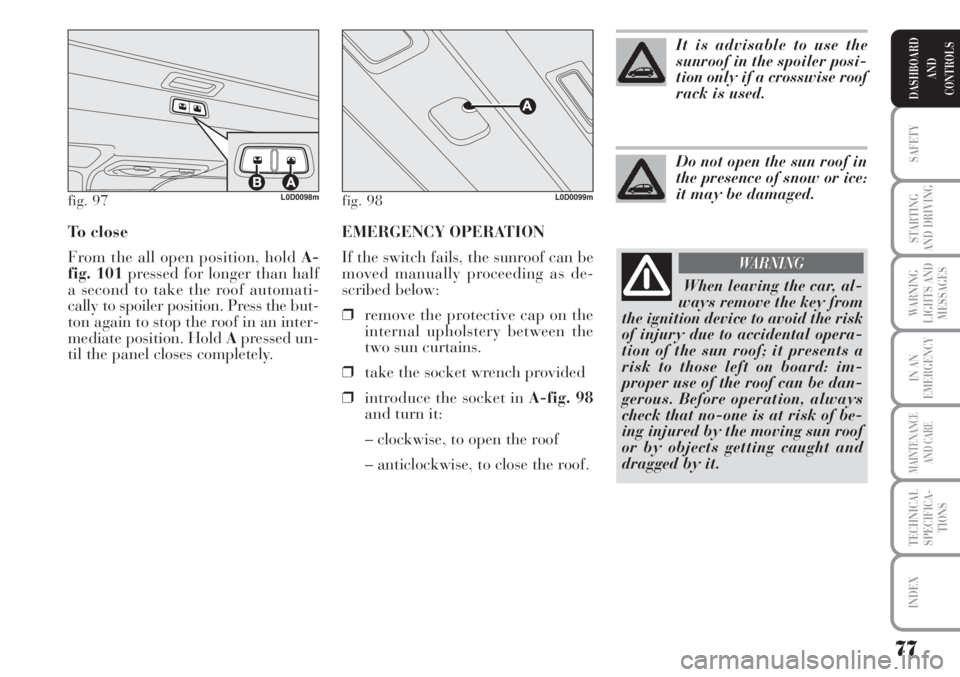
EMERGENCY OPERATION
If the switch fails, the sunroof can be
moved manually proceeding as de-
scribed below:
❒remove the protective cap on the
internal upholstery between the
two sun curtains.
❒take the socket wrench provided
❒introduce the socket in A-fig. 98
and turn it:
– clockwise, to open the roof
– anticlockwise, to close the roof. To close
From the all open position, hold A-
fig. 101pressed for longer than half
a second to take the roof automati-
cally to spoiler position. Press the but-
ton again to stop the roof in an inter-
mediate position. Hold Apressed un-
til the panel closes completely.
77
SAFETY
STARTING
AND DRIVING
WARNING
LIGHTS AND
MESSAGES
IN AN
EMERGENCY
MAINTENANCE
AND CARE
TECHNICAL
SPECIFICA-
TIONS
INDEX
DASHBOARD
AND
CONTROLS
fig. 97L0D0098mfig. 98L0D0099m
It is advisable to use the
sunroof in the spoiler posi-
tion only if a crosswise roof
rack is used.
Do not open the sun roof in
the presence of snow or ice:
it may be damaged.
When leaving the car, al-
ways remove the key from
the ignition device to avoid the risk
of injury due to accidental opera-
tion of the sun roof; it presents a
risk to those left on board: im-
proper use of the roof can be dan-
gerous. Before operation, always
check that no-one is at risk of be-
ing injured by the moving sun roof
or by objects getting caught and
dragged by it.
WARNING
Page 94 of 218
93
SAFETY
STARTING
AND DRIVING
WARNING
LIGHTS AND
MESSAGES
IN AN
EMERGENCY
MAINTENANCE
AND CARE
TECHNICAL
SPECIFICA-
TIONS
INDEX
DASHBOARD
AND
CONTROLS
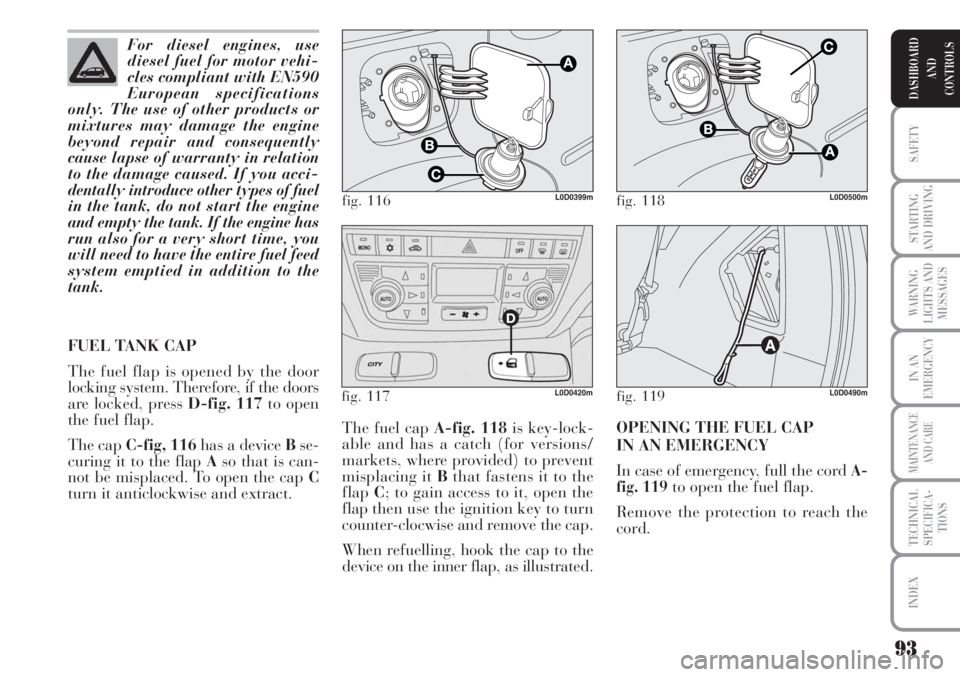
The fuel cap A-fig. 118is key-lock-
able and has a catch (for versions/
markets, where provided) to prevent
misplacing it Bthat fastens it to the
flapC; to gain access to it, open the
flap then use the ignition key to turn
counter-clocwise and remove the cap.
When refuelling, hook the cap to the
device on the inner flap, as illustrated.OPENING THE FUEL CAP
IN AN EMERGENCY
In case of emergency, full the cord
A-
fig. 119to open the fuel flap.
Remove the protection to reach the
cord. For diesel engines, use
diesel fuel for motor vehi-
cles compliant with EN590
European specifications
only. The use of other products or
mixtures may damage the engine
beyond repair and consequently
cause lapse of warranty in relation
to the damage caused. If you acci-
dentally introduce other types of fuel
in the tank, do not start the engine
and empty the tank. If the engine has
run also for a very short time, you
will need to have the entire fuel feed
system emptied in addition to the
tank.
FUEL TANK CAP
The fuel flap is opened by the door
locking system. Therefore, if the doors
are locked, press D-fig. 117to open
the fuel flap.
The cap C-fig, 116has a device Bse-
curing it to the flap Aso that is can-
not be misplaced. To open the cap C
turn it anticlockwise and extract.
fig. 116L0D0399m
fig. 119L0D0490mfig. 117L0D0420m
fig. 118L0D0500m
Page 95 of 218
94
SAFETY
STARTING
AND DRIVING
WARNING
LIGHTS AND
MESSAGES
IN AN
EMERGENCY
MAINTENANCE
AND CARE
TECHNICAL
SPECIFICA-
TIONS
INDEX
DASHBOARD
AND
CONTROLS
late how much particulates has been
trapped by the filter. Since this filter
physically traps particulate, it should
be regenerated (cleaned) at regular in-
tervals by burning carbon particles.
The regeneration procedure is con-
trolled automatically by the engine
management control unit according to
the filter conditions and vehicle use
conditions. The following phenomena
may occur during the regeneration:
limited increase of idle speed, activation
of electric fan, limited increase of
smoke, high temperatures at the ex-
haust. These are not faults; they do not
impair vehicle performance or damage
the environment. If the dedicated mes-
sage is displayed, refer to section
“Warning lights and messages”.PROTECTING THE
ENVIRONMENT
The devices for curtailing petrol engine
emissions are the following:
❒three-way catalytic converter;
❒Lambda sensor;
❒fuel evaporation system.
In addition, do not let the engine run,
even for a test, with one or more spark
plugs disconnected.
The devices for reducing diesel fuel en-
gine emissions are the following:
❒oxidising catalytic converter;
❒exhaust gas recirculation system
(E.G.R.);
❒diesel particulate filter (DPF)
DPF (DIESEL PARTICULATE
FILTER)
(for 1.3 Multijet 90 HP - 1.3 Multijet
95 HP versions)
The Diesel Particulate Filter is a me-
chanical filter, integral with the exhaust
system, that physically traps particu-
lates present in the exhaust gases of
Diesel engines. The diesel particular fil-
ter has been adopted to eliminate al-
most totally particulates in compliance
with current / future law regulations.
During normal use of the vehicle, the
engine control unit records a set of data
(e.g.: travel time, type of route, tem-
peratures, etc.) and it will then calcu- When refuelling, fasten the cap to the
device inside the flap as shown in the
diagram.
IMPORTANT The airtight sealing of
the tank may cause a slight vacuum.
A suction noise when you release the
cap is therefore entirely normal.
After refuelling, fasten the cap by
turning it clockwise until you hear it
click, then turn the key clockwise ad
remove the key from the flap.
Do not approach naked
flames or lit cigarettes to
the fuel filler: fire risk. Keep your
face away from the fuel filler to
prevent breathing in harmful
vapours.
WARNING
The catalytic converter de-
velops high temperature
during operation. Do not park on
grass, dry leaves, pine needles or
other flammable material: fire
risk.
WARNING
Page 112 of 218
111
STARTING
AND DRIVING
WARNING
LIGHTS AND
MESSAGES
IN AN
EMERGENCY
MAINTENANCE
AND CARE
TECHNICAL
SPECIFICA-
TIONS
INDEX
DASHBOARD
AND
CONTROLS
SAFETY
Side bags are not a replacement of but
complementary to the belts, which
you are recommended to always wear,
as specified by law in Europe and
most non-European countries.
IMPORTANT In the event of side
crash, you can obtain the best protec-
tion by the system keeping a correct
position on the seat, allowing thus a
correct window bag unfolding.
IMPORTANT The front air bags
and/or side bags may be deployed if
the car is subject to heavy knocks or
accidents involving the underbody
area, such as for example violent
shocks, against steps, kerbs or low ob-
stacles, falling of the car in big holes
or sags in the road.
IMPORTANT A small amount of dust
will be released when the airbags are
deployed. The dust is not harmful and
does not indicate the beginning of a
fire. Furthermore, the surface of the
deployed bag and the interior of the
car may be covered in a dusty residue:
this dust may irritate the skin and the
eyes. Wash with mild soap and water
in the event of exposure.The airbag system expires after 14
years (charge) and 10 years (clock
contact). Go to a Lancia Dealership to
have the devices replaced when the
expiration date approaches.
IMPORTANT Should an accident oc-
cur in which any of the safety devices
is activated, take the car to a Lancia
Dealership to have the devices acti-
vated replaced and to have the system
checked.
All inspection, repair and replacement
operations concerning the air bags
must only be carried out at a Lancia
Dealership.
If you are having the car scrapped,
have the air bag system deactivated at
a Lancia Dealership first. If the car
changes ownership, the new owner
must be informed of the method of
use of air bags and the above warn-
ings and also be given this “Owner’s
Handbook”.
IMPORTANT Pretensioners, front
airbags and front side bags are de-
ployed according to different logics on
the basic of the type of collision. Non
deployment of one of the devices does
not therefore indicate a system fault.
Do not rest your head,
arms or elbows on the door,
on the windows and in the window
bag area to prevent injury in case of
deployment.
Never lean head, arms and elbows
out of the window.
WARNING
If when turning the key to
MAR the warning light ¬does not turn on or if it stays on
when travelling (together with the
message on the multifunctional
display, for versions/markets,
where provided) there could be a
failure in safety systems; in this
event air bags or pretensioners
may not be deployed in case of im-
pact or, in a minor number of
cases, they be deployed acciden-
tally. Contact Lancia Dealership
immediately to have the system
checked.
Do not cover the backrest of the
front seats with covers which are
not suitable for use with side bags.
WARNING
GENERAL WARNINGS
Page 137 of 218
136
WARNING
LIGHTS AND
MESSAGES
MAINTENANCE
AND CARE
TECHNICAL
SPECIFICA-
TIONS
INDEX
DASHBOARD
AND
CONTROLS
SAFETY
STARTING
AND DRIVING
IN AN
EMERGENCY
OPENING/CLOSING
THE DOORS
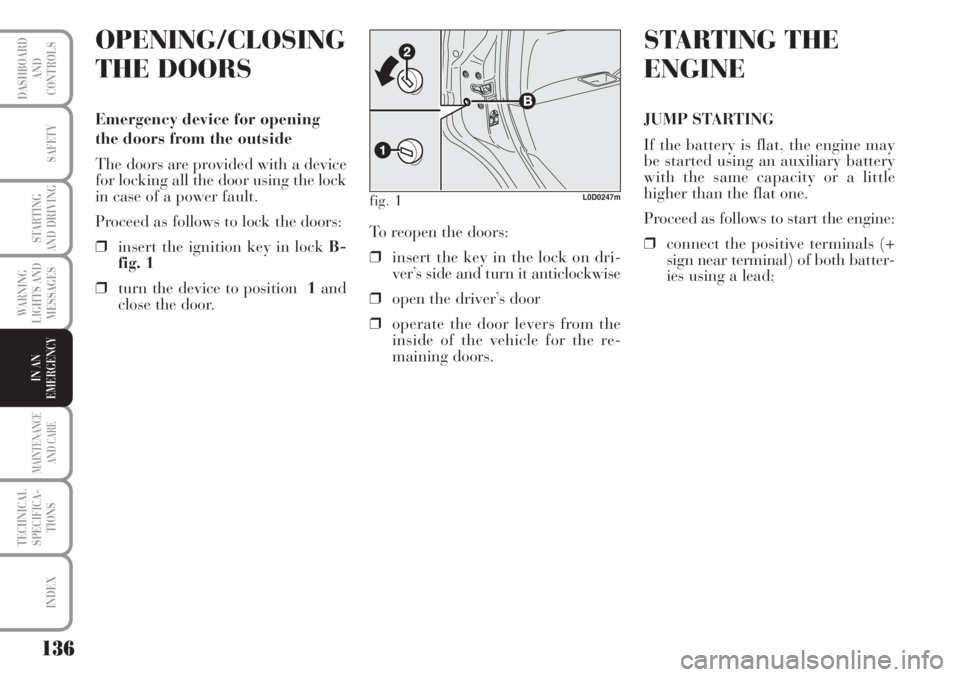
Emergency device for opening
the doors from the outside
The doors are provided with a device
for locking all the door using the lock
in case of a power fault.
Proceed as follows to lock the doors:
❒insert the ignition key in lock B-
fig. 1
❒turn the device to position 1and
close the door.
fig. 1L0D0247m
STARTING THE
ENGINE
JUMP STARTING
If the battery is flat, the engine may
be started using an auxiliary battery
with the same capacity or a little
higher than the flat one.
Proceed as follows to start the engine:
❒connect the positive terminals (+
sign near terminal) of both batter-
ies using a lead; To reopen the doors:
❒insert the key in the lock on dri-
ver’s side and turn it anticlockwise
❒open the driver’s door
❒operate the door levers from the
inside of the vehicle for the re-
maining doors.
Page 143 of 218
142
WARNING
LIGHTS AND
MESSAGES
MAINTENANCE
AND CARE
TECHNICAL
SPECIFICA-
TIONS
INDEX
DASHBOARD
AND
CONTROLS
SAFETY
STARTING
AND DRIVING
IN AN
EMERGENCY
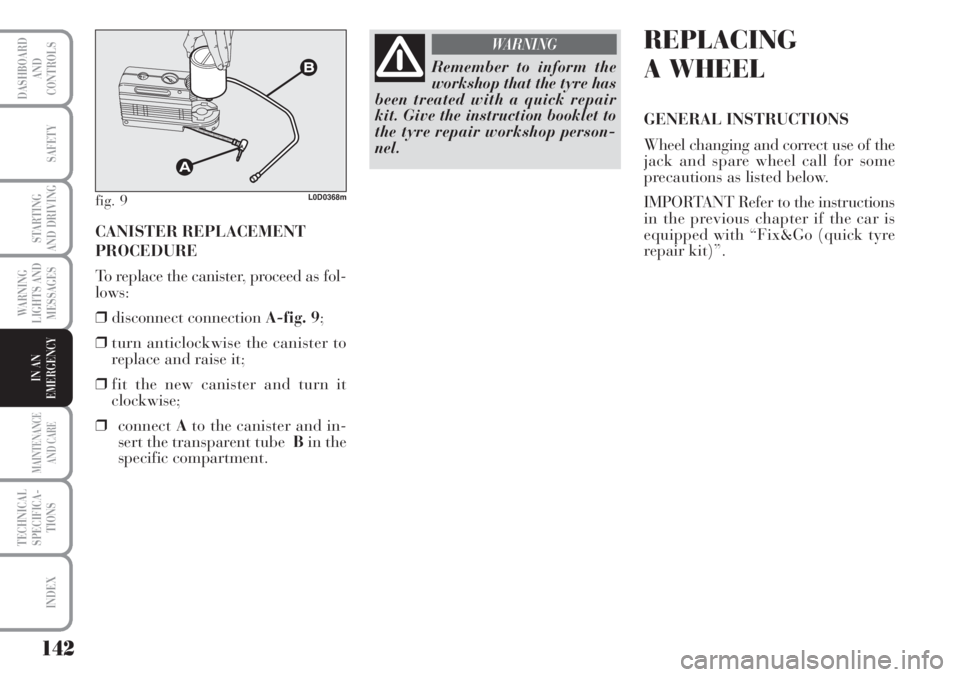
CANISTER REPLACEMENT
PROCEDURE
To replace the canister, proceed as fol-
lows:
❒disconnect connection A-fig. 9;
❒turn anticlockwise the canister to
replace and raise it;
❒fit the new canister and turn it
clockwise;
❒connectAto the canister and in-
sert the transparent tube Bin the
specific compartment.
fig. 9L0D0368m
Remember to inform the
workshop that the tyre has
been treated with a quick repair
kit. Give the instruction booklet to
the tyre repair workshop person-
nel.
WARNINGREPLACING
A WHEEL
GENERAL INSTRUCTIONS
Wheel changing and correct use of the
jack and spare wheel call for some
precautions as listed below.
IMPORTANT Refer to the instructions
in the previous chapter if the car is
equipped with “Fix&Go (quick tyre
repair kit)”.
Page 149 of 218
148
WARNING
LIGHTS AND
MESSAGES
MAINTENANCE
AND CARE
TECHNICAL
SPECIFICA-
TIONS
INDEX
DASHBOARD
AND
CONTROLS
SAFETY
STARTING
AND DRIVING
IN AN
EMERGENCY
Modifications or repairs to
the fuel feed system that
are not carried out properly or do
not take the system’s technical
specifications into account can
cause malfunctions leading to the
risk of fire.
WARNING
Halogen bulbs contain
pressurised gas which, if
broken, may cause small frag-
ments of glass to be projected out-
wards.
WARNING
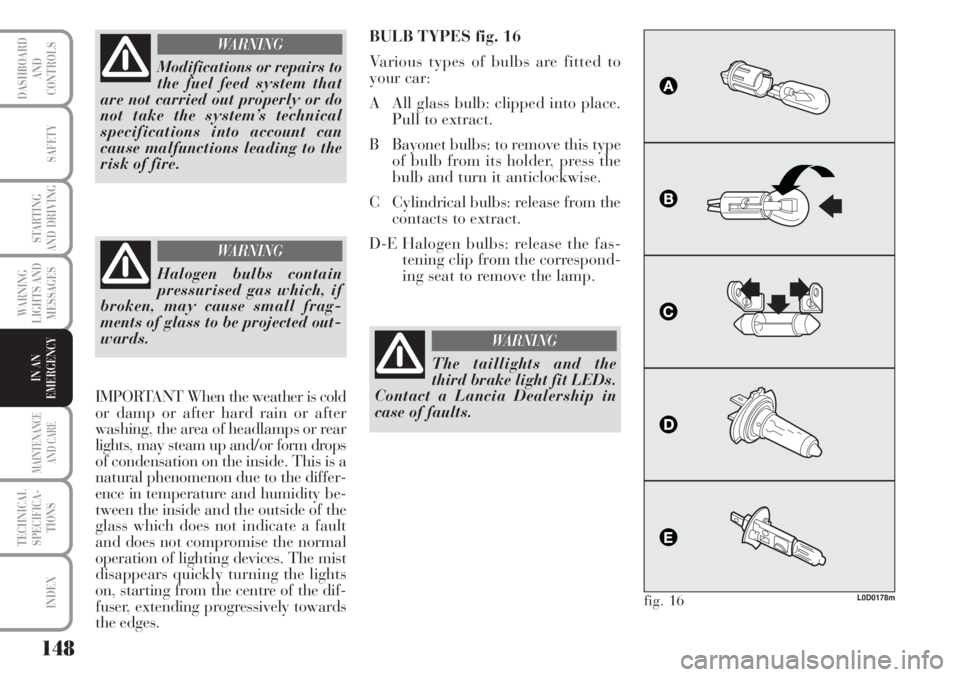
BULB TYPES fig. 16
Various types of bulbs are fitted to
your car:
A All glass bulb: clipped into place.
Pull to extract.
B Bayonet bulbs: to remove this type
of bulb from its holder, press the
bulb and turn it anticlockwise.
C Cylindrical bulbs: release from the
contacts to extract.
D-E Halogen bulbs: release the fas-
tening clip from the correspond-
ing seat to remove the lamp.
L0D0178mfig. 16
The taillights and the
third brake light fit LEDs.
Contact a Lancia Dealership in
case of faults.
WARNING
IMPORTANT When the weather is cold
or damp or after hard rain or after
washing, the area of headlamps or rear
lights, may steam up and/or form drops
of condensation on the inside. This is a
natural phenomenon due to the differ-
ence in temperature and humidity be-
tween the inside and the outside of the
glass which does not indicate a fault
and does not compromise the normal
operation of lighting devices. The mist
disappears quickly turning the lights
on, starting from the centre of the dif-
fuser, extending progressively towards
the edges.