LAND ROVER DISCOVERY 1999 Workshop Manual
Manufacturer: LAND ROVER, Model Year: 1999, Model line: DISCOVERY, Model: LAND ROVER DISCOVERY 1999Pages: 1529, PDF Size: 34.8 MB
Page 141 of 1529

MAINTENANCE
10-18 PROCEDURES
Automatic gearbox
WARNING: Avoid excessive skin contact with
mineral oil. Mineral oils remove the natural fats
from the skin, leading to dryness, irritation and
dermatitis.
Replace oil filter
1.Replace oil filter.
+ AUTOMATIC GEARBOX - ZF4HP22
- 24, REPAIRS, Filter - oil.
Replace oil
1. Ensure that gearbox is cool. Apply
handbrake and securely chock front and rear
wheels.
2.Place a suitable container beneath gearbox.
3.Clean area around oil filler/level and drain
plugs.
4.Remove oil drain plug, remove and discard
sealing washer.
5.Allow oil to drain.
6.Fit new sealing washer to oil drain plug.
7.Fit automatic gearbox drain plug and tighten to
15 Nm (11 lbf.ft).
8.Remove oil filler/level plug, remove and discard
sealing washer.
9.Fill gearbox with recommended oil to bottom of
oil level/filler plug hole.
+ CAPACITIES, FLUIDS,
LUBRICANTS AND SEALANTS,
Lubrication.
10.Select 'P' (Park).
11.Ensure handbrake is applied.
12.Start engine and allow it to idle.
13.Apply footbrake. 14.Move selector lever through all gear positions,
while continuing to fill the gearbox. Select 'P'
(Park).
15.With engine idling, continue filling gearbox until
a 2 mm bead of oil runs from oil filler/level plug
hole.
16.Fit new sealing washer to automatic gearbox
filler/level plug, fit plug and tighten to 30 Nm (22
l b f . f t ) .
17.Stop engine.
18.Remove all traces of oil from gearbox casing.
Page 142 of 1529

MAINTENANCE
PROCEDURES 10-19
Transfer box
WARNING: Avoid excessive skin contact with
mineral oil. Mineral oils remove the natural fats
from the skin, leading to dryness, irritation and
dermatitis.
Check/top-up oil level
1.Release fixings, remove rear underbelly panel.
2.Clean area around oil filler/level plug.
3.Remove oil filler/level plug.
4.Check that oil level is to bottom of filler/level
plug hole.
5.Top-up level (if required) with recommended oil
to bottom of oil filler/level plug hole.
+ CAPACITIES, FLUIDS,
LUBRICANTS AND SEALANTS,
Lubrication.
6. Fit transfer box filler/level plug and tighten to 25
Nm (18 lbf.ft).
7.Remove all traces of oil from main casing.
8.Fit rear underbelly panel (if fitted), secure
fixings.Replace oil
1. Release fixings, remove rear underbelly panel.
2.Place a suitable container beneath transfer box
drain plug.
3.Clean area around oil filler/level and drain
plugs.
4.Remove oil filler/level plug.
5.Remove oil drain plug.
6.Allow oil to drain.
7. Fit transfer box drain plug and tighten to 30
Nm (22 lbf.ft).
8.Fill transfer box with recommended oil to
bottom of oil filler/level plug hole.
+ CAPACITIES, FLUIDS,
LUBRICANTS AND SEALANTS,
Lubrication.
9. Fit transfer box filler/level plug and tighten to 25
Nm (18 lbf.ft).
10. Remove all traces of oil from transfer box.
11.Fit rear underbelly panel (if fitted), secure
fixings.
Page 143 of 1529

MAINTENANCE
10-20 PROCEDURES
Front and rear axle
WARNING: Avoid excessive skin contact with
mineral oil. Mineral oils remove the natural fats
from the skin, leading to dryness, irritation and
dermatitis.
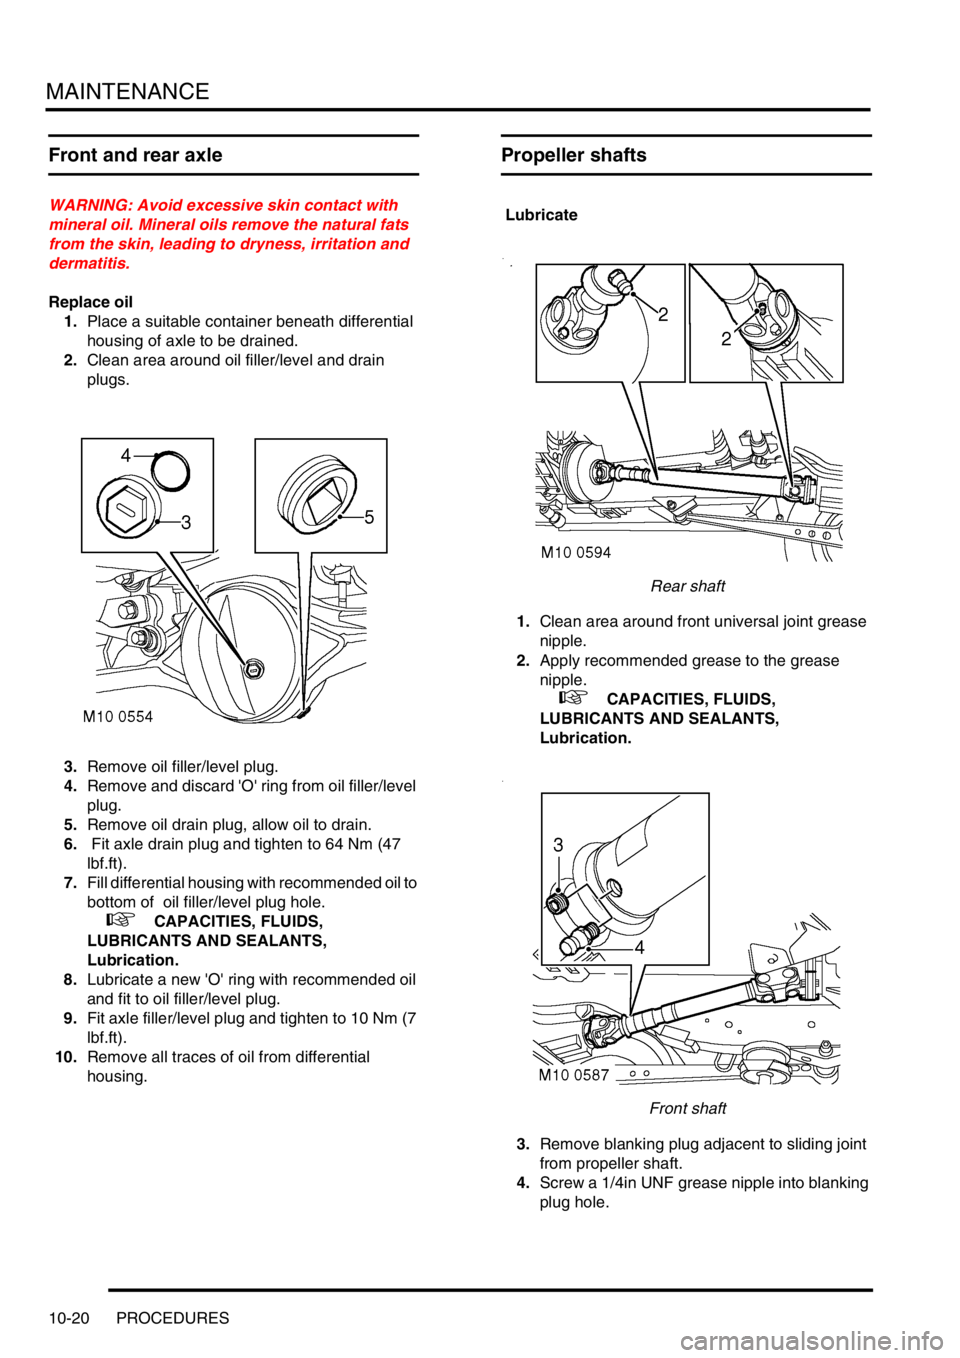
Replace oil
1.Place a suitable container beneath differential
housing of axle to be drained.
2.Clean area around oil filler/level and drain
plugs.
3.Remove oil filler/level plug.
4.Remove and discard 'O' ring from oil filler/level
plug.
5.Remove oil drain plug, allow oil to drain.
6. Fit axle drain plug and tighten to 64 Nm (47
lbf.ft).
7.Fill differential housing with recommended oil to
bottom of oil filler/level plug hole.
+ CAPACITIES, FLUIDS,
LUBRICANTS AND SEALANTS,
Lubrication.
8.Lubricate a new 'O' ring with recommended oil
and fit to oil filler/level plug.
9.Fit axle filler/level plug and tighten to 10 Nm (7
lbf.ft).
10.Remove all traces of oil from differential
housing.
Propeller shafts
Lubricate
Rear shaft
1.Clean area around front universal joint grease
nipple.
2.Apply recommended grease to the grease
nipple.
+ CAPACITIES, FLUIDS,
LUBRICANTS AND SEALANTS,
Lubrication.
Front shaft
3.Remove blanking plug adjacent to sliding joint
from propeller shaft.
4.Screw a 1/4in UNF grease nipple into blanking
plug hole.
Page 144 of 1529

MAINTENANCE
PROCEDURES 10-21
5.Apply recommended grease to the grease
nipple.
+ CAPACITIES, FLUIDS,
LUBRICANTS AND SEALANTS,
Lubrication.
6.Remove grease nipple.
7.Fit blanking plug.
Page 145 of 1529

MAINTENANCE
10-22 PROCEDURES
Anti-roll bar links
Check rear links
Rubber boots
Fixings
1.Check anti-roll bar links for free play.
2.Check rubber boots for splits, damage and
security.Anti-roll bar mountings - front
1.Check condition of mounting rubbers and
security of fixings.
+ TORQUE WRENCH SETTINGS,
Front suspension.
Anti-roll bar mountings - rear
Fixings
Rubber mountings
1.Check condition of mounting rubbers and
security of fixings.
+ TORQUE WRENCH SETTINGS, Rear
suspension.
Page 146 of 1529

MAINTENANCE
PROCEDURES 10-23
ACE actuators
Check
Actuator boots
1.Check ACE actuator gaiters for splits, damage
and clips for security.
ACE filter
Replace
1.Replace ACE filter.
+ FRONT SUSPENSION, REPAIRS,
Filter - high pressure - ACE.
Page 147 of 1529

MAINTENANCE
10-24 PROCEDURES
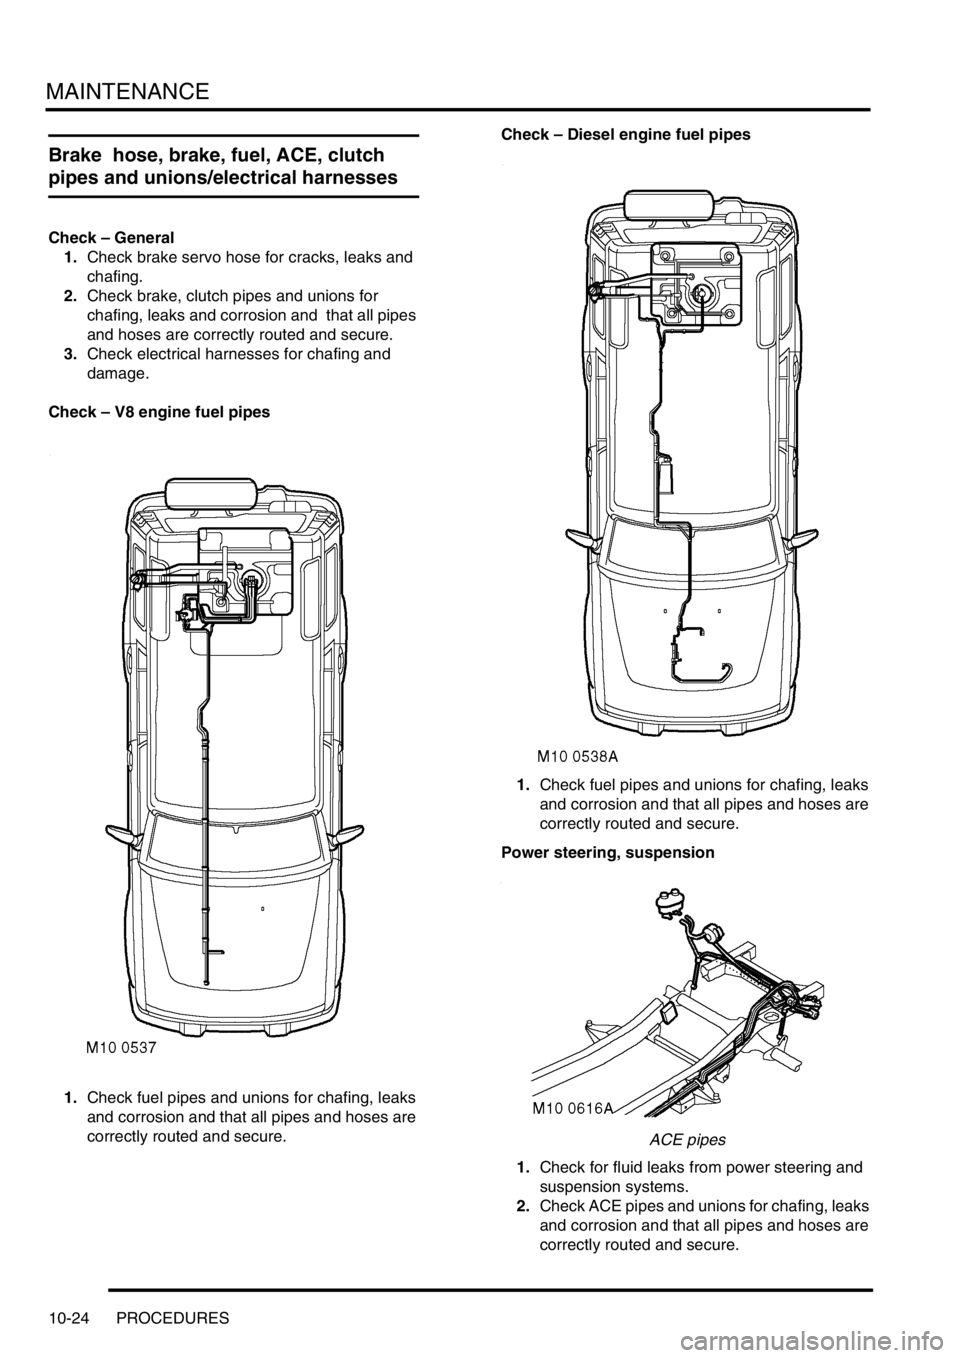
Brake hose, brake, fuel, ACE, clutch
pipes and unions/electrical harnesses
Check – General
1.Check brake servo hose for cracks, leaks and
chafing.
2.Check brake, clutch pipes and unions for
chafing, leaks and corrosion and that all pipes
and hoses are correctly routed and secure.
3.Check electrical harnesses for chafing and
damage.
Check – V8 engine fuel pipes
1.Check fuel pipes and unions for chafing, leaks
and corrosion and that all pipes and hoses are
correctly routed and secure. Check – Diesel engine fuel pipes
1.Check fuel pipes and unions for chafing, leaks
and corrosion and that all pipes and hoses are
correctly routed and secure.
Power steering, suspension
ACE pipes
1.Check for fluid leaks from power steering and
suspension systems.
2.Check ACE pipes and unions for chafing, leaks
and corrosion and that all pipes and hoses are
correctly routed and secure.
Page 148 of 1529

MAINTENANCE
PROCEDURES 10-25
Engine, gearbox, transfer box and axles
Check
1.Check for oil leaks from engine, gearbox
(manual and automatic), transfer box and front
and rear axles; pay particular attention to areas
around oil seals.
Exhaust system
Check
1.Check for signs of exhaust system leaks,
damage and security.
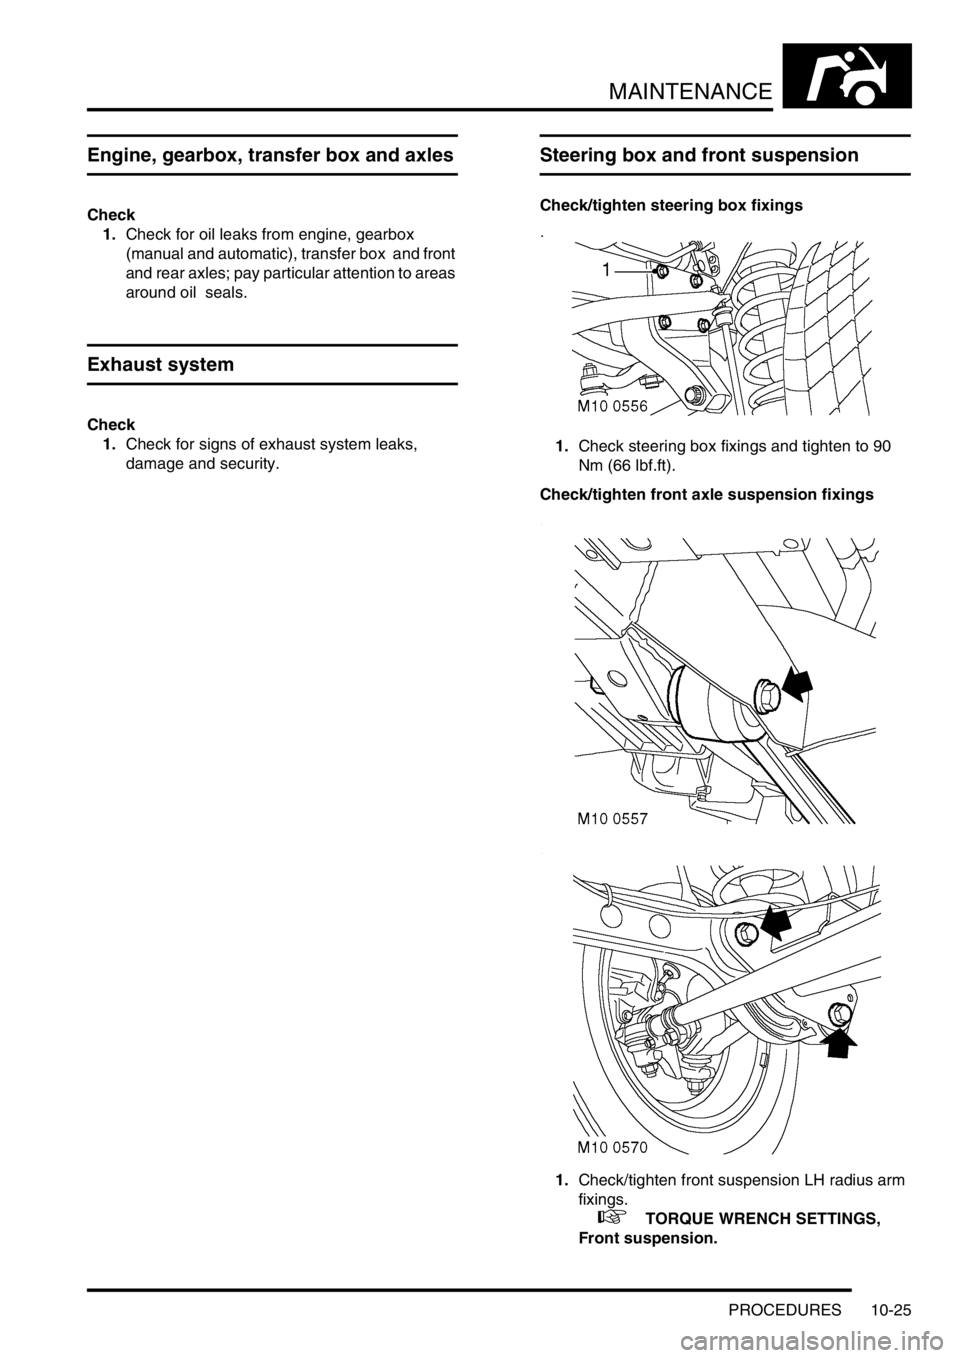
Steering box and front suspension
Check/tighten steering box fixings
1.Check steering box fixings and tighten to 90
Nm (66 lbf.ft).
Check/tighten front axle suspension fixings
1.Check/tighten front suspension LH radius arm
fixings.
+ TORQUE WRENCH SETTINGS,
Front suspension.
Page 149 of 1529

MAINTENANCE
10-26 PROCEDURES
2.Check/tighten front suspension RH radius arm
fixings.
3.Check/tighten front suspension Panhard rod
fixingsCheck rear axle suspension fixings
1.Check and tighten if necessary all rear axle
suspension fixings.
+ TORQUE WRENCH SETTINGS, Rear
suspension.
Page 150 of 1529

MAINTENANCE
PROCEDURES 10-27
Steering rod ball joints
Check
1.Check condition of ball joints and dust covers,
and security of fixings.
+ TORQUE WRENCH SETTINGS,
Steering.
2.Attempt to move the ball joints forwards,
backwards, side to side and up and down. No
end float in any direction should be detected. If
end float is present, the ball joint must be
renewed.
Dampers and SLS height sensors
Check – Dampers
Front dampers
Rear dampers
1.Check dampers for security and signs of
leakage.