LAND ROVER DISCOVERY 2002 Workshop Manual
Manufacturer: LAND ROVER, Model Year: 2002, Model line: DISCOVERY, Model: LAND ROVER DISCOVERY 2002Pages: 1672, PDF Size: 46.1 MB
Page 121 of 1672

MAINTENANCE
10-12 PROCEDURES
Auxiliary drive belt - V8 engine
1.Replace auxiliary drive belt.
+ CHARGING AND STARTING,
REPAIRS, Belt - auxiliary drive.
Auxiliary drive belt - diesel engine
Replace
1.Replace auxiliary drive belt.
+ CHARGING AND STARTING,
REPAIRS, Belt - auxiliary drive.
Fluid reservoirs
Check/top-up — Brake/Clutch reservoir
1.Check fluid level in brake/clutch fluid reservoirs.
2.Clean area around filler cap, remove cap.
3.Top-up if necessary to correct level on reservoir
using recommended fluid.
+ CAPACITIES, FLUIDS AND
LUBRICANTS, Fluids.
4.Fit filler cap.
Check/top-up — PAS/ACE reservoirs
1.Check fluid level in PAS and ACE fluid
reservoirs.
2.Clean area around filler cap, remove cap.
3.Top-up if necessary to correct level on reservoir
using recommended fluid.
+ CAPACITIES, FLUIDS AND
LUBRICANTS, Fluids.
4.Fit filler cap.
Page 122 of 1672

MAINTENANCE
PROCEDURES 10-13
Check/top-up — Washer reservoir
1.Check fluid level in windscreen washer
reservoir.
2.Clean area around filler cap, remove cap.
3.Top-up if necessary to correct level on reservoir
using recommended fluid.
+ CAPACITIES, FLUIDS AND
LUBRICANTS, Fluids.
4.Fit filler cap.
Steering box
Check
1.Check steering box for fluid leaks.
Adjust
1.Check that there is no backlash in steering box
with road wheels in straight ahead position.
Adjust if required.
+ STEERING, ADJUSTMENTS,
Steering box - check and adjust.
Battery
Check
1.Check battery condition by checking colour of
condition indicator.
lGreen = O.K.
lBlack = Battery requires charging.
lClear/white = New battery required.
Clean
1.Clean and grease battery terminals with
petroleum jelly.
Page 123 of 1672

MAINTENANCE
10-14 PROCEDURES
Intercooler - diesel engine
Remove
1.Remove intercooler.
+ ENGINE MANAGEMENT SYSTEM -
Td5, REPAIRS, Intercooler.
Flush
1.Flush intercooler element using Flushing
Solvent Part No. STC 9713, following the
manufacturer's instructions.
2.Thoroughly dry intercooler ensuring that no
trace of solvent remains in the element.
3.Refit intercooler on completion.
+ ENGINE MANAGEMENT SYSTEM -
Td5, REPAIRS, Intercooler.
Engine oil - V8 engine
WARNING: Avoid excessive skin contact with
used engine oil. Used engine oil contains
potentially harmful contaminants which may
cause skin cancer or other serious skin
disorders.
Replace
1.Position suitable container beneath sump.
2.Clean area around oil drain plug.
3.Remove oil drain plug, discard sealing washer.
4.Allow oil to drain.
5.Fit new sealing washer to oil drain plug.
6.Fit engine drain plug and tighten to 33 Nm (24
lbf.ft).
7.Fill engine with recommended grade of oil to
correct mark on dipstick.
+ CAPACITIES, FLUIDS AND
LUBRICANTS, Lubrication.
Engine oil - diesel engine
WARNING: Avoid excessive skin contact with
used engine oil. Used engine oil contains
potentially harmful contaminants which may
cause skin cancer or other serious skin
disorders.
Replace
1.Release fixings, remove underbelly panel.
2.Position suitable container beneath sump.
3.Clean area around drain plug.
4.Remove oil drain plug, discard sealing washer.
5.Allow oil to drain.
6.Fit new sealing washer to oil drain plug.
7.Fit engine drain plug and tighten to 23 Nm (17
lbf.ft).
8.Fill engine with recommended grade of oil to
correct mark on dipstick.
+ CAPACITIES, FLUIDS AND
LUBRICANTS, Lubrication.
9.Fit front underbelly panel, secure fixings.
Page 124 of 1672

MAINTENANCE
PROCEDURES 10-15
Centrifuge rotor – diesel engine
Replace
1.Replace centrifuge rotor.
+ ENGINE - Td5, REPAIRS, Rotor -
centrifuge.
Engine oil filter - diesel engine
Replace
1.Replace oil filter.
+ ENGINE - Td5, REPAIRS, Filter - oil.
Engine oil filter – V8 engine
WARNING: Avoid excessive skin contact with
used engine oil. Used engine oil contains
potentially harmful contaminants which may
cause skin cancer or other serious skin
disorders.
Replace
1.Disconnect battery.
2.Position suitable container beneath oil filter.
3.Using a strap type filter wrench, remove filter
element, discard element.
4.Smear sealing ring of replacement filter
element with engine oil.
5.Fit filter element, tighten two thirds of a turn by
hand or to 17 Nm (13 lbf.ft).
6.Top-up engine with recommended grade of oil
to correct mark on dipstick.
+ CAPACITIES, FLUIDS AND
LUBRICANTS, Lubrication.
7.Connect battery.
8.Run engine and check for oil leaks from filter.
9.Stop engine, wait for oil to return to sump.
10.Re-check oil level and top-up if necessary.
Page 125 of 1672

MAINTENANCE
10-16 PROCEDURES
Manual gearbox
WARNING: Avoid excessive skin contact with
mineral oil. Mineral oils remove the natural fats
from the skin, leading to dryness, irritation and
dermatitis.
Check/top-up oil level
1.Release fixings, remove rear underbelly panel.
2.Clean area around oil filler/level plug.
3.Remove oil filler/level plug.
4.Check that oil level is to bottom of oil filler/level
plug hole.
5.Top-up level (if required) with recommended oil
to bottom of filler/level plug hole.
+ CAPACITIES, FLUIDS AND
LUBRICANTS, Lubrication.
6.Remove all traces of sealant from threads of oil
filler/level plug.
7.Apply Loctite 290 to threads of oil filler/level
plug.
8. Fit manual gearbox filler/level plug and tighten
to 30 Nm (22 lbf.ft).
9.Remove all traces of oil from gearcase.
10.Fit rear underbelly panel, secure fixings.
Replace oil
1.Release fixings, remove rear underbelly panel.
2.Place a suitable container beneath gearbox
drain plug.
3.Clean area around oil filler/level and drain
plugs.4.Remove oil filler/level plug.
5.Remove oil drain plug, remove and discard
sealing washer.
6.Allow oil to drain.
7.Clean magnet in oil drain plug.
8.Fit new sealing washer to oil drain plug.
9.Fit manual gearbox drain plug and tighten to 50
Nm (37 lbf.ft).
10.Fill gearbox with recommended oil to bottom of
filler/level plug hole.
+ CAPACITIES, FLUIDS AND
LUBRICANTS, Lubrication.
11.Remove all traces of sealant from threads of oil
filler/level plug.
12.Apply Loctite 290 to threads of oil filler/level
plug.
13. Fit manual gearbox filler/level plug and tighten
to 30 Nm (22 lbf.ft).
14.Remove all traces of oil from gearcase.
15.Fit rear underbelly panel, secure fixings.
Page 126 of 1672

MAINTENANCE
PROCEDURES 10-17
Automatic gearbox
WARNING: Avoid excessive skin contact with
mineral oil. Mineral oils remove the natural fats
from the skin, leading to dryness, irritation and
dermatitis.
Replace oil filter
1.Replace oil filter.
+ AUTOMATIC GEARBOX - ZF4HP22
- 24, REPAIRS, Filter - oil.
Replace oil
1. Ensure that gearbox is cool. Apply
handbrake and securely chock front and rear
wheels.
2.Place a suitable container beneath gearbox.
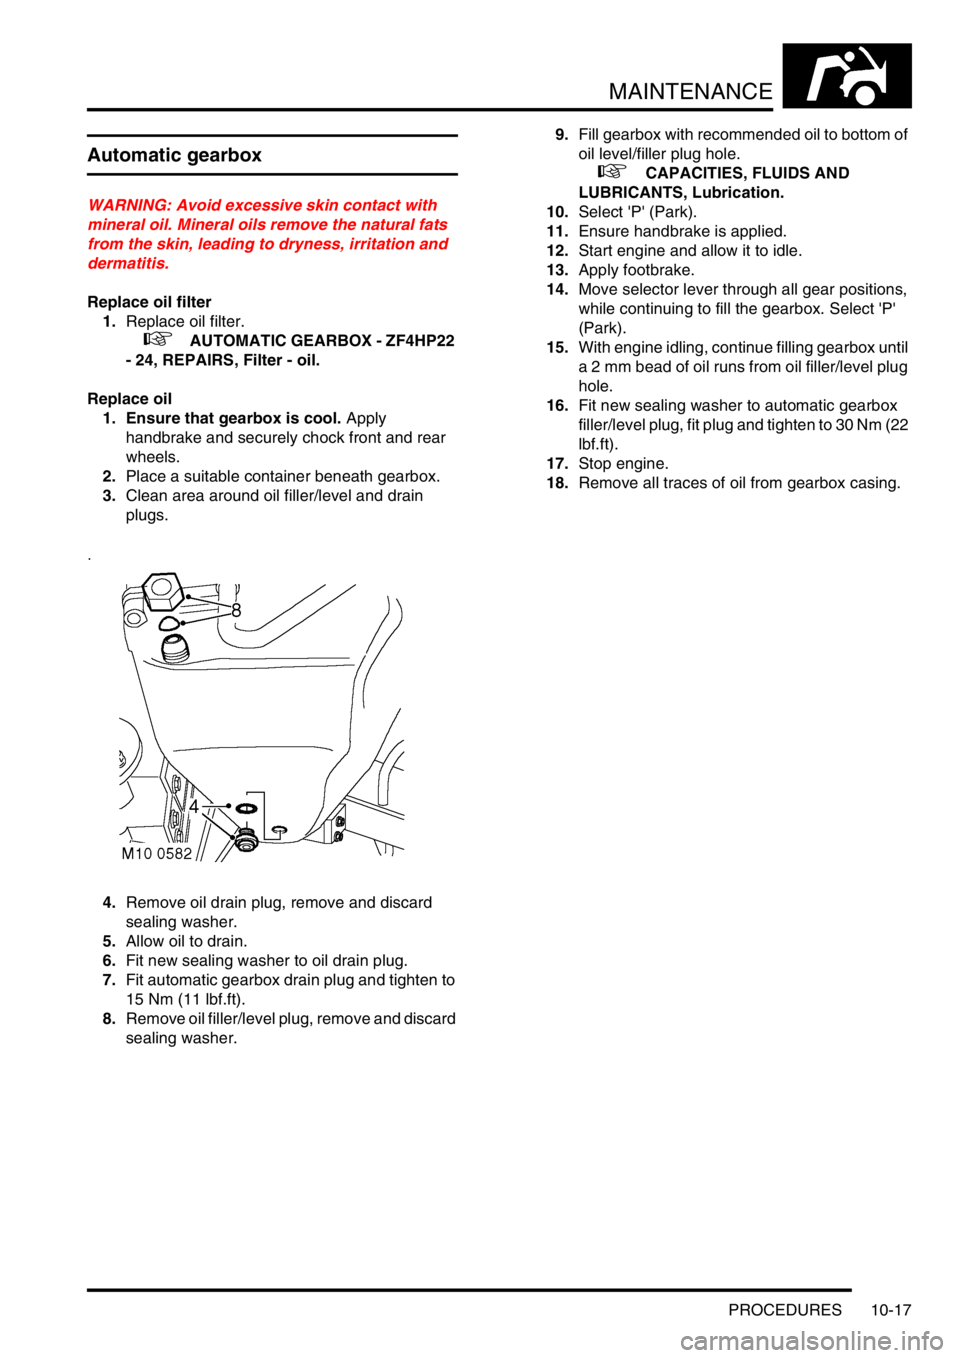
3.Clean area around oil filler/level and drain
plugs.
4.Remove oil drain plug, remove and discard
sealing washer.
5.Allow oil to drain.
6.Fit new sealing washer to oil drain plug.
7.Fit automatic gearbox drain plug and tighten to
15 Nm (11 lbf.ft).
8.Remove oil filler/level plug, remove and discard
sealing washer.9.Fill gearbox with recommended oil to bottom of
oil level/filler plug hole.
+ CAPACITIES, FLUIDS AND
LUBRICANTS, Lubrication.
10.Select 'P' (Park).
11.Ensure handbrake is applied.
12.Start engine and allow it to idle.
13.Apply footbrake.
14.Move selector lever through all gear positions,
while continuing to fill the gearbox. Select 'P'
(Park).
15.With engine idling, continue filling gearbox until
a 2 mm bead of oil runs from oil filler/level plug
hole.
16.Fit new sealing washer to automatic gearbox
filler/level plug, fit plug and tighten to 30 Nm (22
l b f . f t ) .
17.Stop engine.
18.Remove all traces of oil from gearbox casing.
Page 127 of 1672

MAINTENANCE
10-18 PROCEDURES
Transfer box
WARNING: Avoid excessive skin contact with
mineral oil. Mineral oils remove the natural fats
from the skin, leading to dryness, irritation and
dermatitis.
Check/top-up oil level
1.Release fixings, remove rear underbelly panel.
2.Clean area around oil filler/level plug.
3.Remove oil filler/level plug.
4.Check that oil level is to bottom of filler/level
plug hole.
5.Top-up level (if required) with recommended oil
to bottom of oil filler/level plug hole.
+ CAPACITIES, FLUIDS AND
LUBRICANTS, Lubrication.
6.Remove all traces of sealant from threads of oil
filler/level plug.
7.Apply Loctite 290 to threads of oil filler/level
plug.
8. Fit transfer box filler/level plug and tighten to 25
Nm (18 lbf.ft).
9.Remove all traces of oil from main casing.
10.Fit rear underbelly panel (if fitted), secure
fixings.Replace oil
1. Release fixings, remove rear underbelly panel.
2.Place a suitable container beneath transfer box
drain plug.
3.Clean area around oil filler/level and drain
plugs.
4.Remove oil filler/level plug.
5.Remove oil drain plug.
6.Allow oil to drain.
7.Apply Loctite 290 to threads of oil drain plug.
8. Fit transfer box drain plug and tighten to 30
Nm (22 lbf.ft).
9.Fill transfer box with recommended oil to
bottom of oil filler/level plug hole.
+ CAPACITIES, FLUIDS AND
LUBRICANTS, Lubrication.
10.Remove all traces of sealant from threads of oil
filler/level plug.
11.Apply Loctite 290 to threads of oil filler/level
plug.
12. Fit transfer box filler/level plug and tighten to 25
Nm (18 lbf.ft).
13. Remove all traces of oil from transfer box.
14.Fit rear underbelly panel (if fitted), secure
fixings.
Page 128 of 1672

MAINTENANCE
PROCEDURES 10-19
Front and rear axle
WARNING: Avoid excessive skin contact with
mineral oil. Mineral oils remove the natural fats
from the skin, leading to dryness, irritation and
dermatitis.
Replace oil
1.Place a suitable container beneath differential
housing of axle to be drained.
2.Clean area around oil filler/level and drain
plugs.
3.Remove oil filler/level plug.
4.Remove and discard 'O' ring from oil filler/level
plug.
5.Remove oil drain plug, allow oil to drain.
6.Remove all traces of Loctite from threads of oil
drain plug.
7.Apply Loctite 290 to threads of oil drain plug.
8. Fit axle drain plug and tighten to 64 Nm (47
lbf.ft).
9.Fill differential housing with recommended oil to
bottom of oil filler/level plug hole.
+ CAPACITIES, FLUIDS AND
LUBRICANTS, Lubrication.
10.Lubricate a new 'O' ring with recommended oil
and fit to oil filler/level plug.
11.Fit axle filler/level plug and tighten to 10 Nm (7
lbf.ft).
12.Remove all traces of oil from differential
housing.
Propeller shafts
Lubricate
Rear shaft
1.Clean area around front universal joint grease
nipple.
2.Apply recommended grease to the grease
nipple.
+ CAPACITIES, FLUIDS AND
LUBRICANTS, Lubrication.
Front shaft
3.Remove blanking plug adjacent to sliding joint
from propeller shaft.
4.Screw a 1/4in UNF grease nipple into blanking
plug hole.
Page 129 of 1672

MAINTENANCE
10-20 PROCEDURES
5.Apply recommended grease to the grease
nipple.
+ CAPACITIES, FLUIDS AND
LUBRICANTS, Lubrication.
6.Remove grease nipple.
7.Fit blanking plug.
Anti-roll bar links
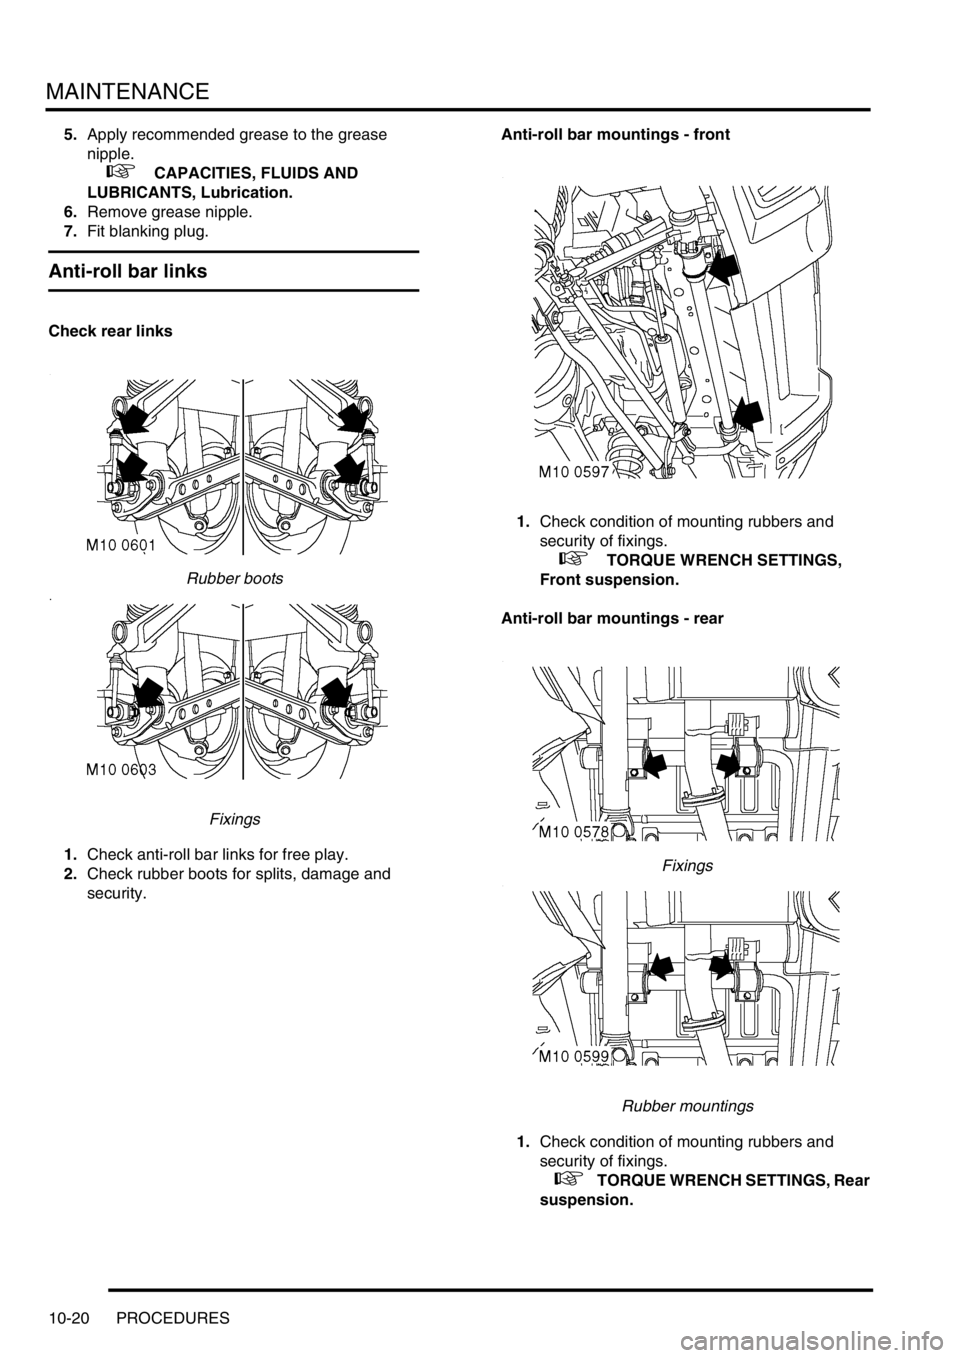
Check rear links
Rubber boots
Fixings
1.Check anti-roll bar links for free play.
2.Check rubber boots for splits, damage and
security.Anti-roll bar mountings - front
1.Check condition of mounting rubbers and
security of fixings.
+ TORQUE WRENCH SETTINGS,
Front suspension.
Anti-roll bar mountings - rear
Fixings
Rubber mountings
1.Check condition of mounting rubbers and
security of fixings.
+ TORQUE WRENCH SETTINGS, Rear
suspension.
Page 130 of 1672

MAINTENANCE
PROCEDURES 10-21
ACE actuators
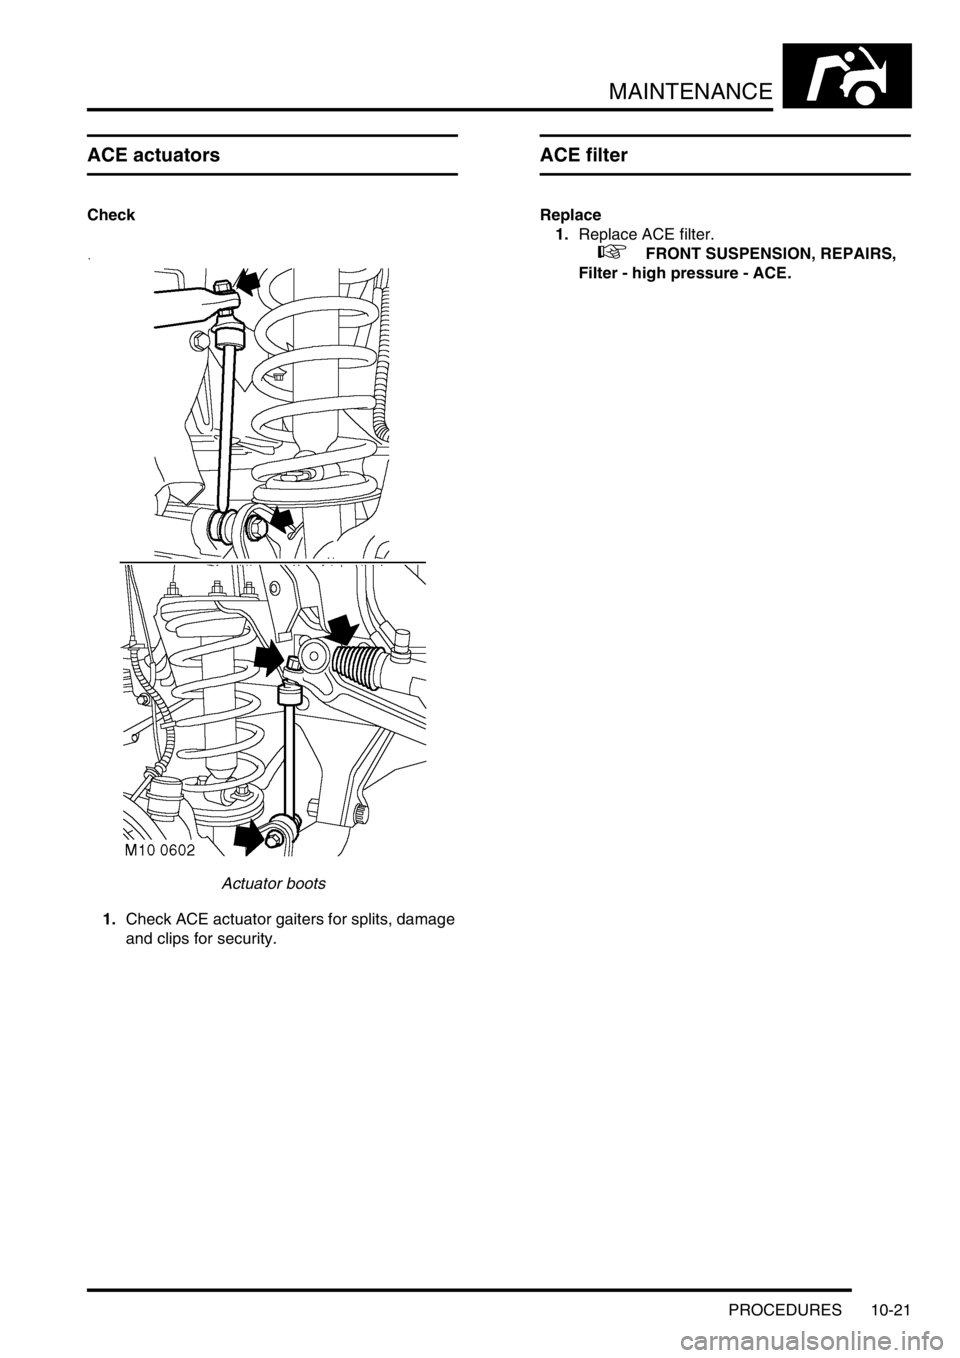
Check
Actuator boots
1.Check ACE actuator gaiters for splits, damage
and clips for security.
ACE filter
Replace
1.Replace ACE filter.
+ FRONT SUSPENSION, REPAIRS,
Filter - high pressure - ACE.