LAND ROVER DISCOVERY 2002 Workshop Manual
Manufacturer: LAND ROVER, Model Year: 2002, Model line: DISCOVERY, Model: LAND ROVER DISCOVERY 2002Pages: 1672, PDF Size: 46.1 MB
Page 291 of 1672
ENGINE - V8
12-2-48 OVERHAUL
10.Clean mating faces of rocker covers and
cylinder heads.
11.Fit new rocker cover gaskets, dry, position
rocker cover, fit bolts and working in diagonal
sequence, tighten to:
lStage 1 - 3 Nm (2.5 lbf.ft)
lStage 2 - 8 Nm (6 lbf.ft)
12.Ensure that outer rim of gasket is correctly
positioned around periphery of rocker cover.
13.Secure ht leads to rocker cover.
14.Clean coolant outlet elbow mating faces.
15.Lubricate and fit new 'O' ring to outlet pipe.
16.Position coolant outlet elbow, fit bolts and
tighten to 22 Nm (17 lbf.ft).
17.Position alternator, fit mounting bolts and
tighten to 45 Nm (34 lbf.ft).
18.Position alternator cables and tighten terminal
B+ to 18 Nm (13 lbf.ft) and terminal D+ to 5 Nm
(3.5 lbf.ft).
19.Position auxiliary housing, fit bolts and tighten
to 40 Nm (30 lbf.ft). Fit nut and tighten to 22 Nm
(17 lbf.ft).
20.Clean jockey pulley mating faces.
21.Position jockey pulley and tighten bolt to 50 Nm
(37 lbf.ft).
22.Clean PAS pump pulley mating faces.
23.Position PAS pump pulley, fit bolts and tighten
to 22 Nm (17 lbf.ft).
24.Secure injector harness and connect injector
multiplugs.
25.Connect multiplug to coolant thermistor.
Gasket - exhaust manifold
$% 30.15.12.01
Disassembly
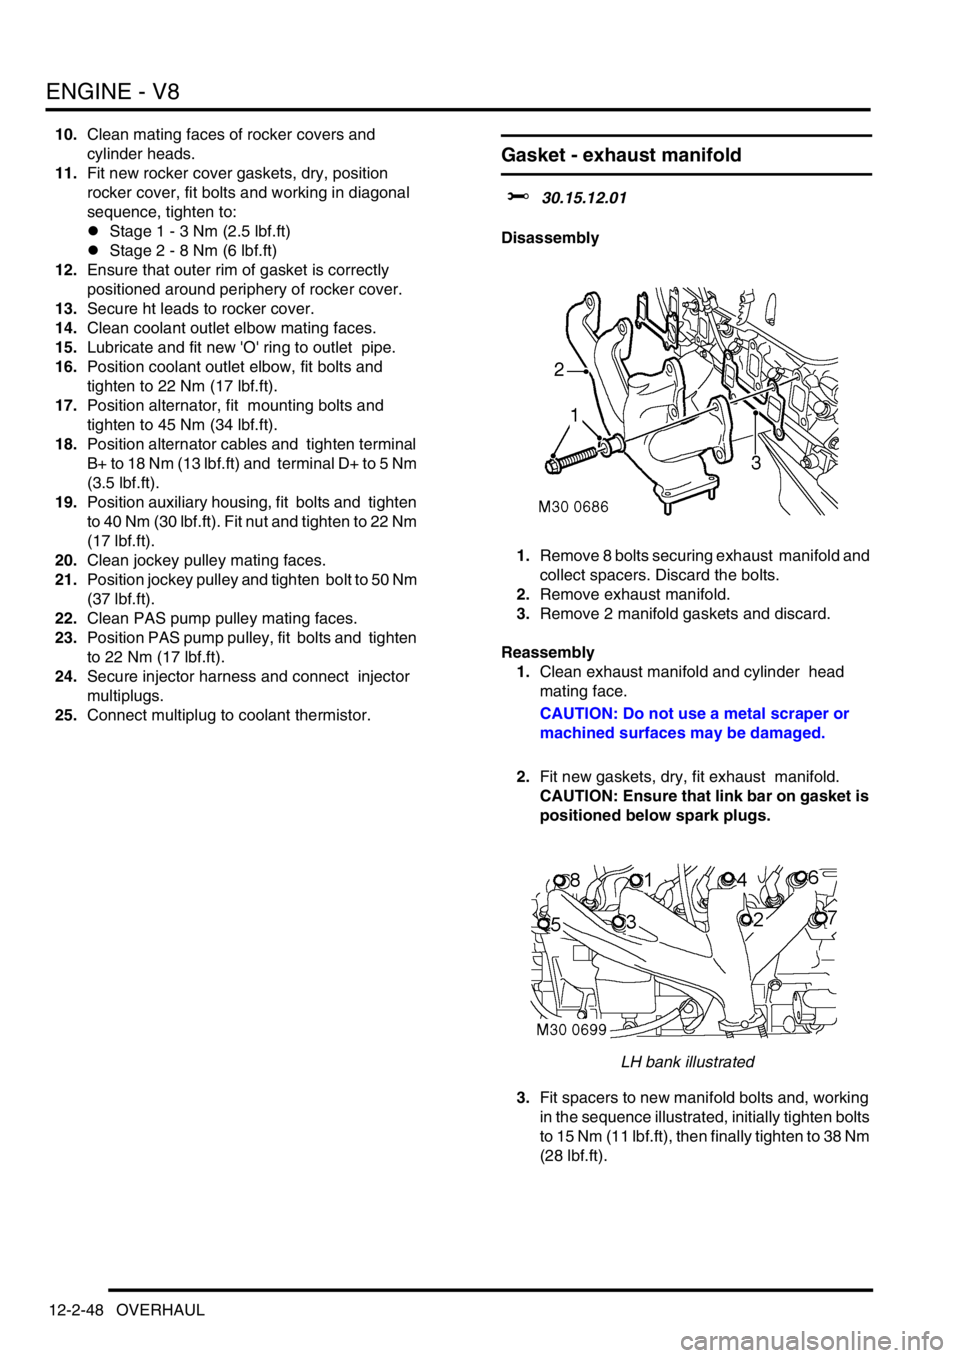
1.Remove 8 bolts securing exhaust manifold and
collect spacers. Discard the bolts.
2.Remove exhaust manifold.
3.Remove 2 manifold gaskets and discard.
Reassembly
1.Clean exhaust manifold and cylinder head
mating face.
CAUTION: Do not use a metal scraper or
machined surfaces may be damaged.
2.Fit new gaskets, dry, fit exhaust manifold.
CAUTION: Ensure that link bar on gasket is
positioned below spark plugs.
LH bank illustrated
3.Fit spacers to new manifold bolts and, working
in the sequence illustrated, initially tighten bolts
to 15 Nm (11 lbf.ft), then finally tighten to 38 Nm
(28 lbf.ft).
Page 292 of 1672
ENGINE - V8
OVERHAUL 12-2-49
Seal - crankshaft - rear - automatic
models
$% 12.21.20.01
Disassembly
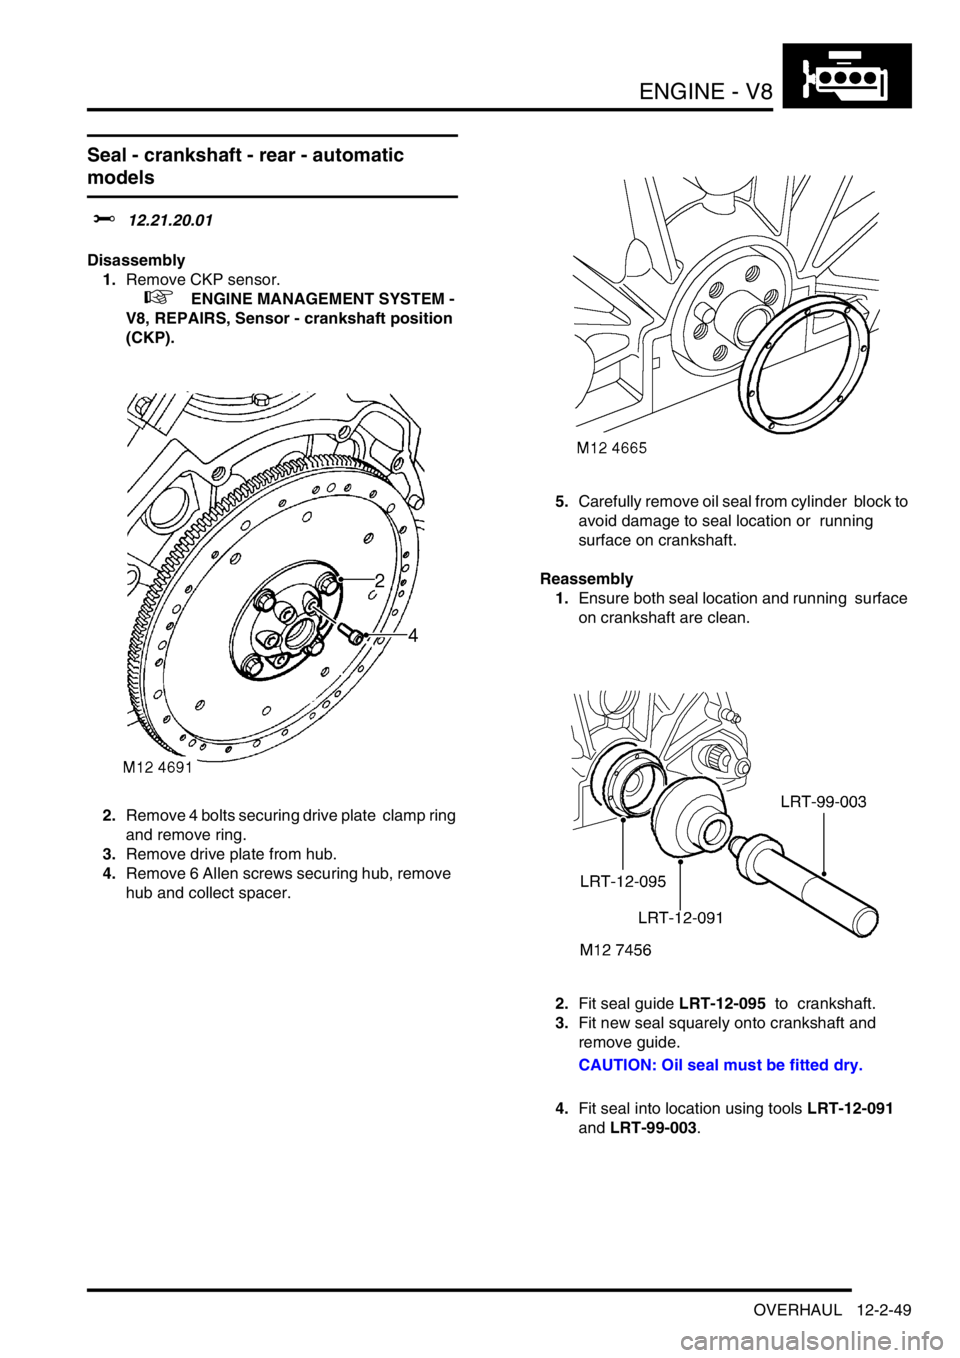
1.Remove CKP sensor.
+ ENGINE MANAGEMENT SYSTEM -
V8, REPAIRS, Sensor - crankshaft position
(CKP).
2.Remove 4 bolts securing drive plate clamp ring
and remove ring.
3.Remove drive plate from hub.
4.Remove 6 Allen screws securing hub, remove
hub and collect spacer. 5.Carefully remove oil seal from cylinder block to
avoid damage to seal location or running
surface on crankshaft.
Reassembly
1.Ensure both seal location and running surface
on crankshaft are clean.
2.Fit seal guide LRT-12-095 to crankshaft.
3.Fit new seal squarely onto crankshaft and
remove guide.
CAUTION: Oil seal must be fitted dry.
4.Fit seal into location using tools LRT-12-091
and LRT-99-003.
Page 293 of 1672
ENGINE - V8
12-2-50 OVERHAUL
5.Clean hub and mating face, spacer and clamp
ring.
6.Clean drive plate and ensure free from cracks
and distortion.
7.Fit spacer and hub to crankshaft, tighten Allen
screws to 78 Nm (58 lbf.ft).
8.Fit drive plate and clamp ring, tighten bolts to
45 Nm (35 lbf.ft).
9.Fit CKP sensor.
+ ENGINE MANAGEMENT SYSTEM -
V8, REPAIRS, Sensor - crankshaft position
(CKP).
Seal - crankshaft - rear - manual models
$% 12.21.20.01
Disassembly
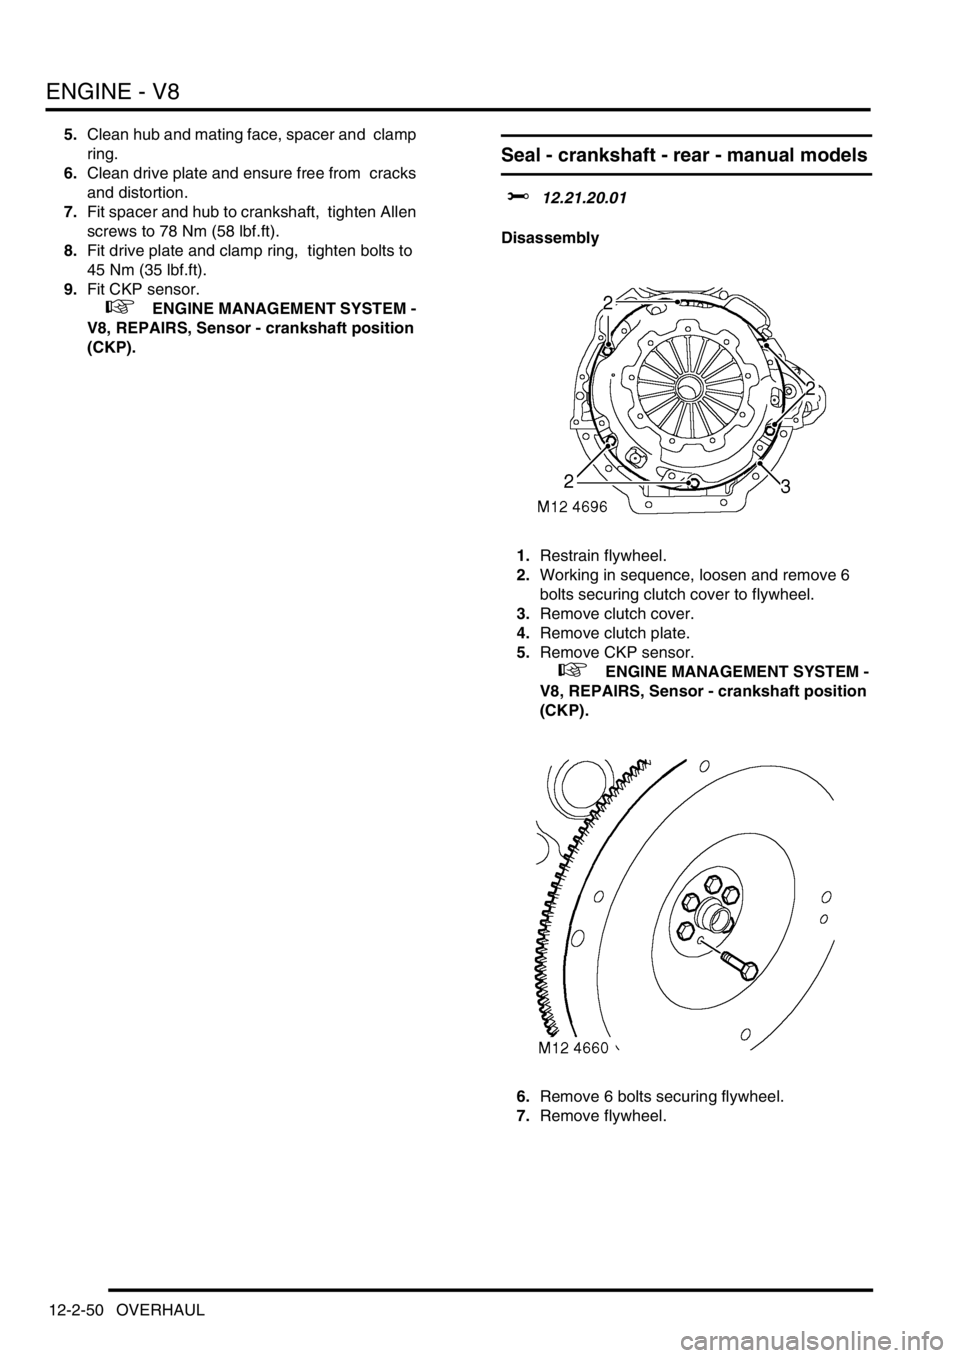
1.Restrain flywheel.
2.Working in sequence, loosen and remove 6
bolts securing clutch cover to flywheel.
3.Remove clutch cover.
4.Remove clutch plate.
5.Remove CKP sensor.
+ ENGINE MANAGEMENT SYSTEM -
V8, REPAIRS, Sensor - crankshaft position
(CKP).
6.Remove 6 bolts securing flywheel.
7.Remove flywheel.
Page 294 of 1672
ENGINE - V8
OVERHAUL 12-2-51
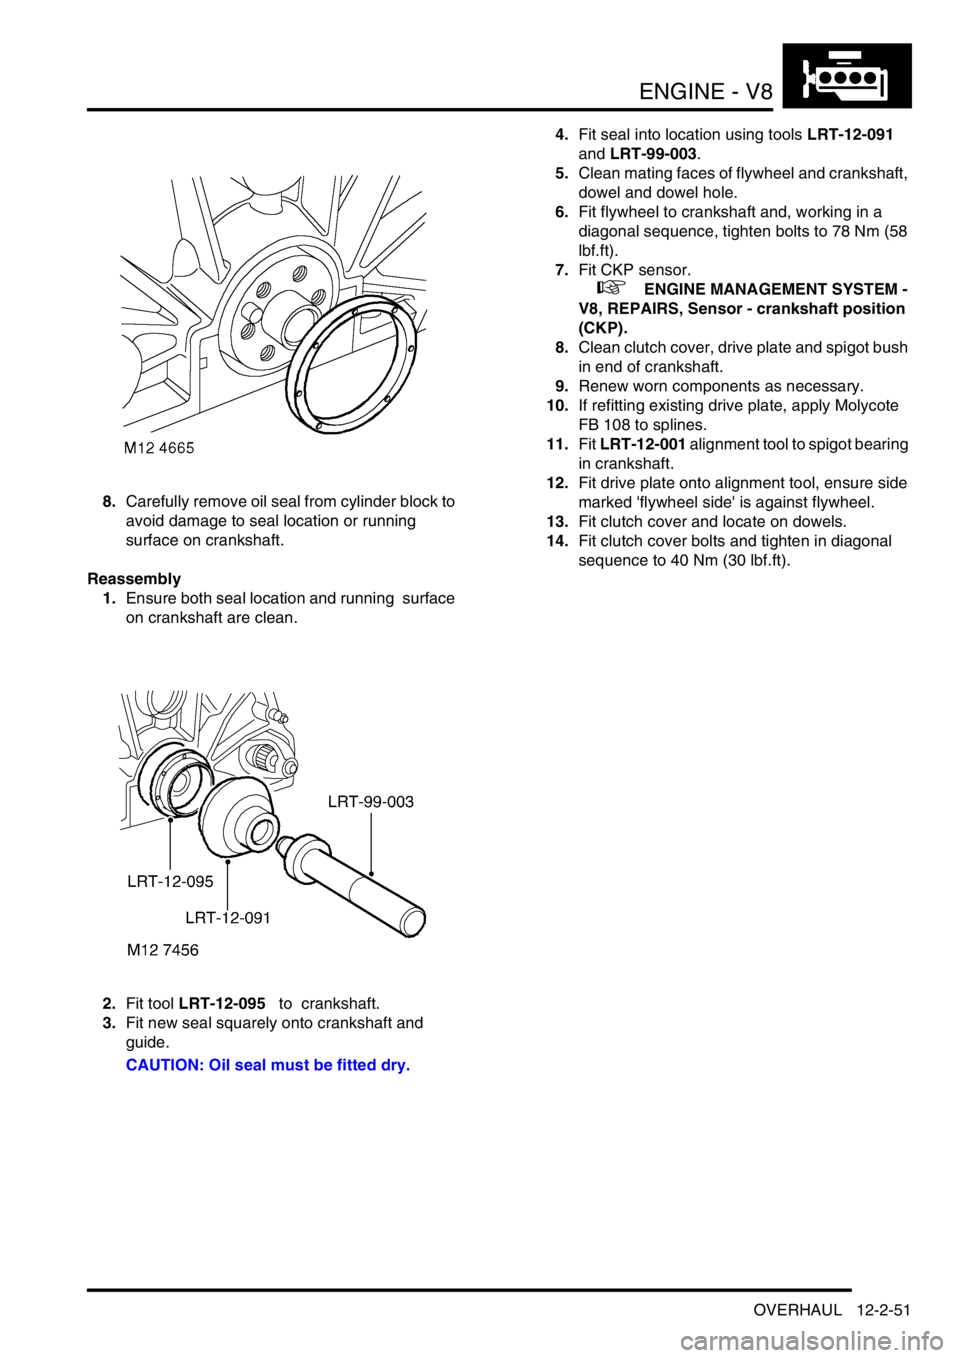
8.Carefully remove oil seal from cylinder block to
avoid damage to seal location or running
surface on crankshaft.
Reassembly
1.Ensure both seal location and running surface
on crankshaft are clean.
2.Fit tool LRT-12-095 to crankshaft.
3.Fit new seal squarely onto crankshaft and
guide.
CAUTION: Oil seal must be fitted dry.4.Fit seal into location using tools LRT-12-091
and LRT-99-003.
5.Clean mating faces of flywheel and crankshaft,
dowel and dowel hole.
6.Fit flywheel to crankshaft and, working in a
diagonal sequence, tighten bolts to 78 Nm (58
lbf.ft).
7.Fit CKP sensor.
+ ENGINE MANAGEMENT SYSTEM -
V8, REPAIRS, Sensor - crankshaft position
(CKP).
8.Clean clutch cover, drive plate and spigot bush
in end of crankshaft.
9.Renew worn components as necessary.
10.If refitting existing drive plate, apply Molycote
FB 108 to splines.
11.Fit LRT-12-001 alignment tool to spigot bearing
in crankshaft.
12.Fit drive plate onto alignment tool, ensure side
marked 'flywheel side' is against flywheel.
13.Fit clutch cover and locate on dowels.
14.Fit clutch cover bolts and tighten in diagonal
sequence to 40 Nm (30 lbf.ft).
Page 295 of 1672

ENGINE - V8
12-2-52 OVERHAUL
Bearing - spigot - crankshaft
$% 12.21.45.01
Disassembly
1.Remove 6 bolts securing clutch cover.
2.Remove clutch cover.
3.Tap a thread in spigot bush to accommodate a
suitable impulse extractor.
4.Fit extractor to bush.
5.Remove bush from crankshaft. Reassembly
1.Clean bush register in rear of crankshaft.
2.Using a suitable drift, fit new bush to crankshaft
so that it is flush with or up to a maximum of 1.6
mm (0.06 in) below the end of the crankshaft.
3.Ream spigot bush to 19.117 + 0.025
− 0.00 mm
(0.75 + 0.001
− 0.00 in) .
4.Remove all traces of swarf on completion.
5.Clean mating faces of flywheel and crankshaft,
dowel and dowel hole.
6.Fit clutch cover to flywheel and tighten bolts by
diagonal slection to 40 Nm (30 lbf.ft).
Page 296 of 1672
ENGINE - V8
OVERHAUL 12-2-53
Gasket - engine sump
$% 12.60.38.01
Disassembly
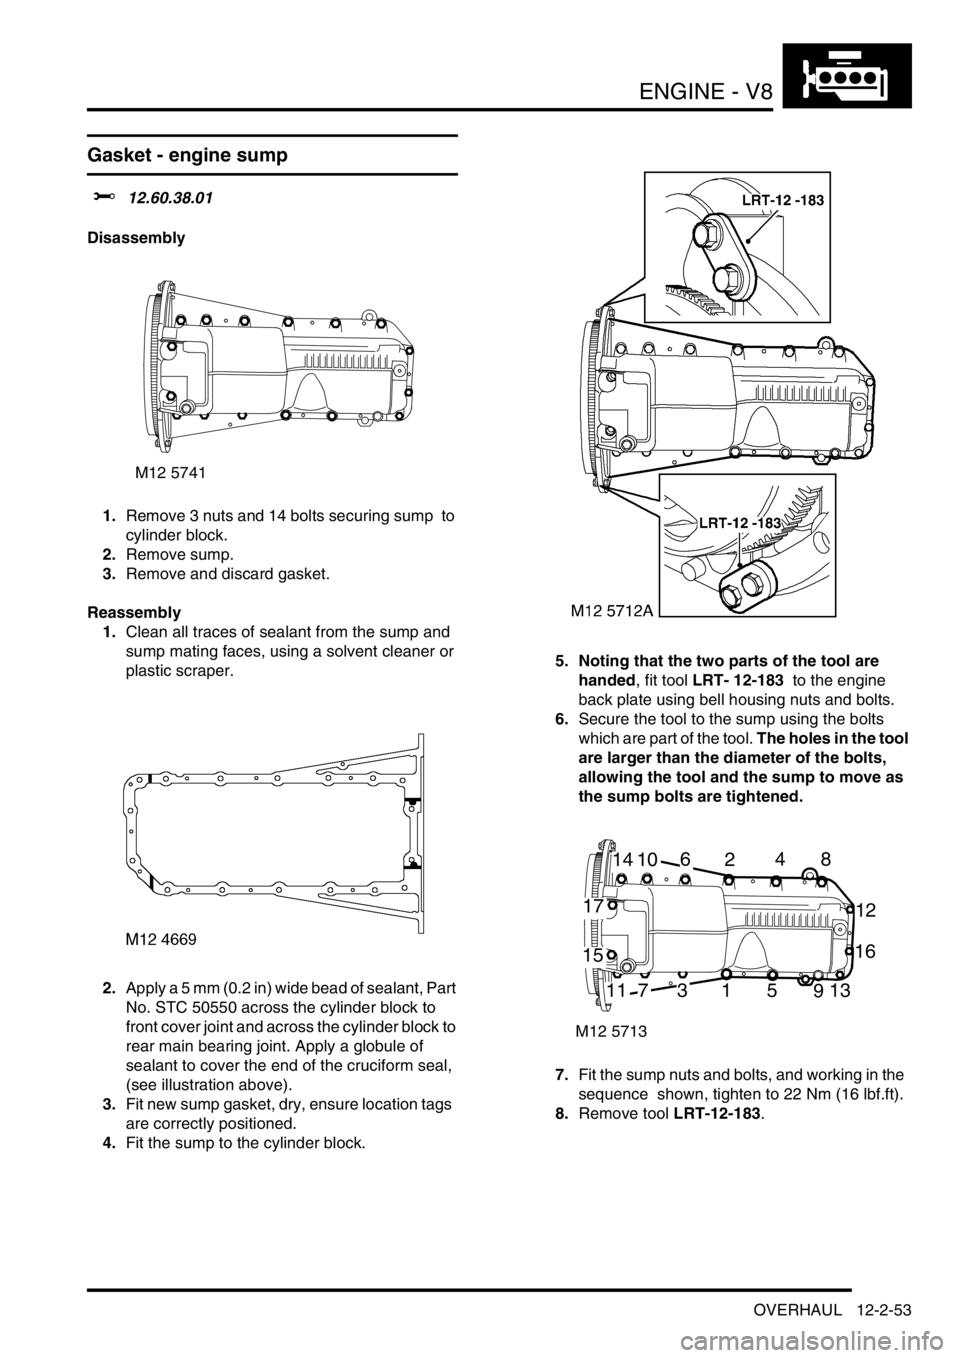
1.Remove 3 nuts and 14 bolts securing sump to
cylinder block.
2.Remove sump.
3.Remove and discard gasket.
Reassembly
1.Clean all traces of sealant from the sump and
sump mating faces, using a solvent cleaner or
plastic scraper.
2.Apply a 5 mm (0.2 in) wide bead of sealant, Part
No. STC 50550 across the cylinder block to
front cover joint and across the cylinder block to
rear main bearing joint. Apply a globule of
sealant to cover the end of the cruciform seal,
(see illustration above).
3.Fit new sump gasket, dry, ensure location tags
are correctly positioned.
4.Fit the sump to the cylinder block.5. Noting that the two parts of the tool are
handed, fit tool LRT- 12-183 to the engine
back plate using bell housing nuts and bolts.
6.Secure the tool to the sump using the bolts
which are part of the tool. The holes in the tool
are larger than the diameter of the bolts,
allowing the tool and the sump to move as
the sump bolts are tightened.
7.Fit the sump nuts and bolts, and working in the
sequence shown, tighten to 22 Nm (16 lbf.ft).
8.Remove tool LRT-12-183.
M12 5741
M12 5713
14106248
12
16
17
15
117315913
Page 297 of 1672
ENGINE - V8
12-2-54 OVERHAUL
Strainer - oil pick-up
$% 12.60.20.01
Disassembly
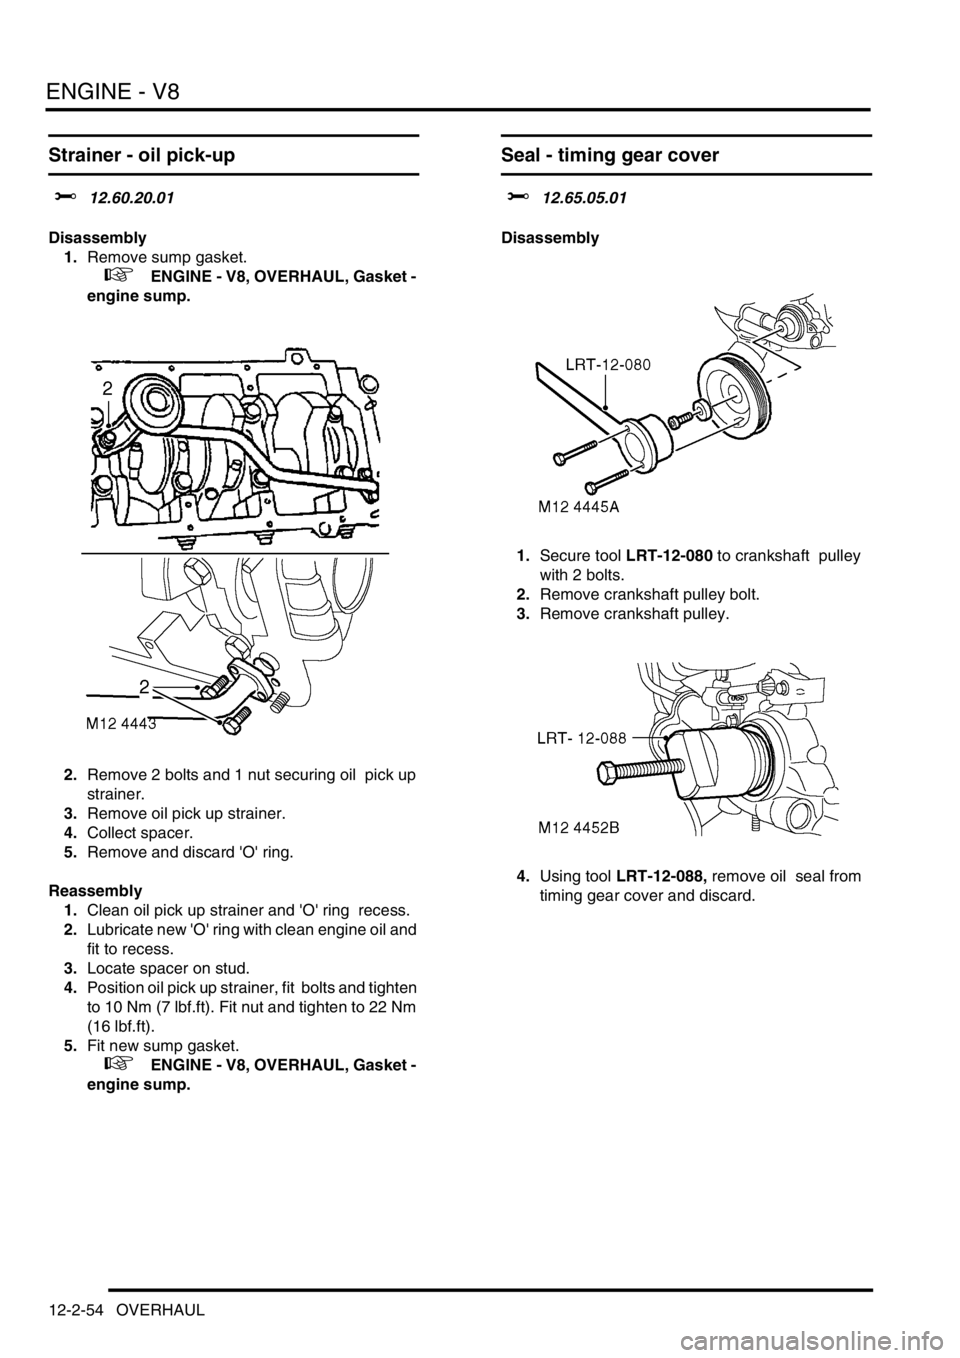
1.Remove sump gasket.
+ ENGINE - V8, OVERHAUL, Gasket -
engine sump.
2.Remove 2 bolts and 1 nut securing oil pick up
strainer.
3.Remove oil pick up strainer.
4.Collect spacer.
5.Remove and discard 'O' ring.
Reassembly
1.Clean oil pick up strainer and 'O' ring recess.
2.Lubricate new 'O' ring with clean engine oil and
fit to recess.
3.Locate spacer on stud.
4.Position oil pick up strainer, fit bolts and tighten
to 10 Nm (7 lbf.ft). Fit nut and tighten to 22 Nm
(16 lbf.ft).
5.Fit new sump gasket.
+ ENGINE - V8, OVERHAUL, Gasket -
engine sump.
Seal - timing gear cover
$% 12.65.05.01
Disassembly
1.Secure tool LRT-12-080 to crankshaft pulley
with 2 bolts.
2.Remove crankshaft pulley bolt.
3.Remove crankshaft pulley.
4.Using tool LRT-12-088, remove oil seal from
timing gear cover and discard.
Page 298 of 1672
ENGINE - V8
OVERHAUL 12-2-55
Reassembly
1.Clean seal register in timing gear cover and
crankshaft pulley.
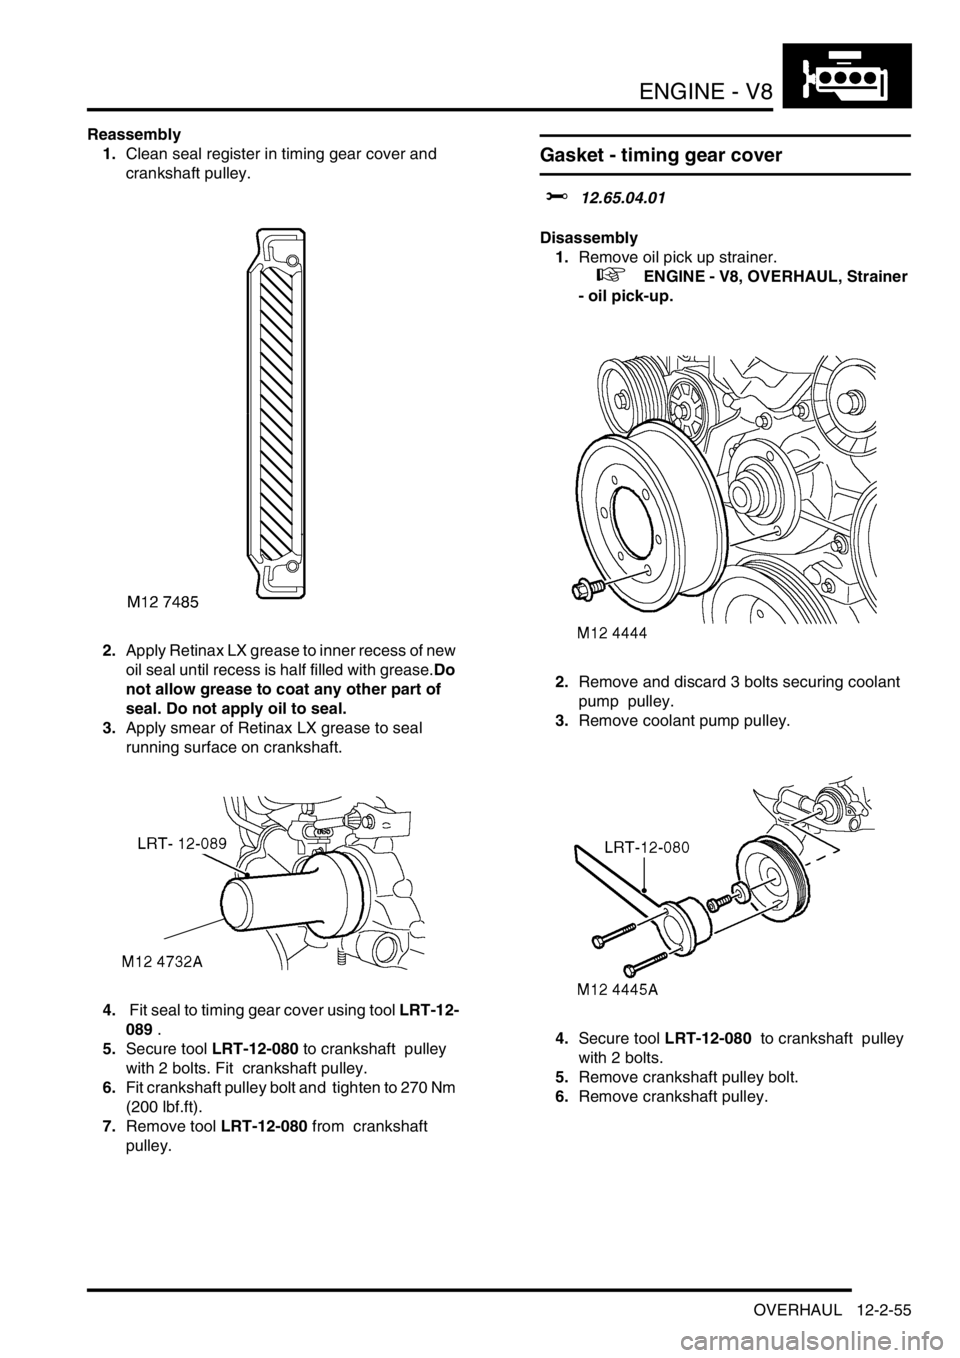
2.Apply Retinax LX grease to inner recess of new
oil seal until recess is half filled with grease.Do
not allow grease to coat any other part of
seal. Do not apply oil to seal.
3.Apply smear of Retinax LX grease to seal
running surface on crankshaft.
4. Fit seal to timing gear cover using tool LRT-12-
089 .
5.Secure tool LRT-12-080 to crankshaft pulley
with 2 bolts. Fit crankshaft pulley.
6.Fit crankshaft pulley bolt and tighten to 270 Nm
(200 lbf.ft).
7.Remove tool LRT-12-080 from crankshaft
pulley.
Gasket - timing gear cover
$% 12.65.04.01
Disassembly
1.Remove oil pick up strainer.
+ ENGINE - V8, OVERHAUL, Strainer
- oil pick-up.
2.Remove and discard 3 bolts securing coolant
pump pulley.
3.Remove coolant pump pulley.
4.Secure tool LRT-12-080 to crankshaft pulley
with 2 bolts.
5.Remove crankshaft pulley bolt.
6.Remove crankshaft pulley.
Page 299 of 1672
ENGINE - V8
12-2-56 OVERHAUL
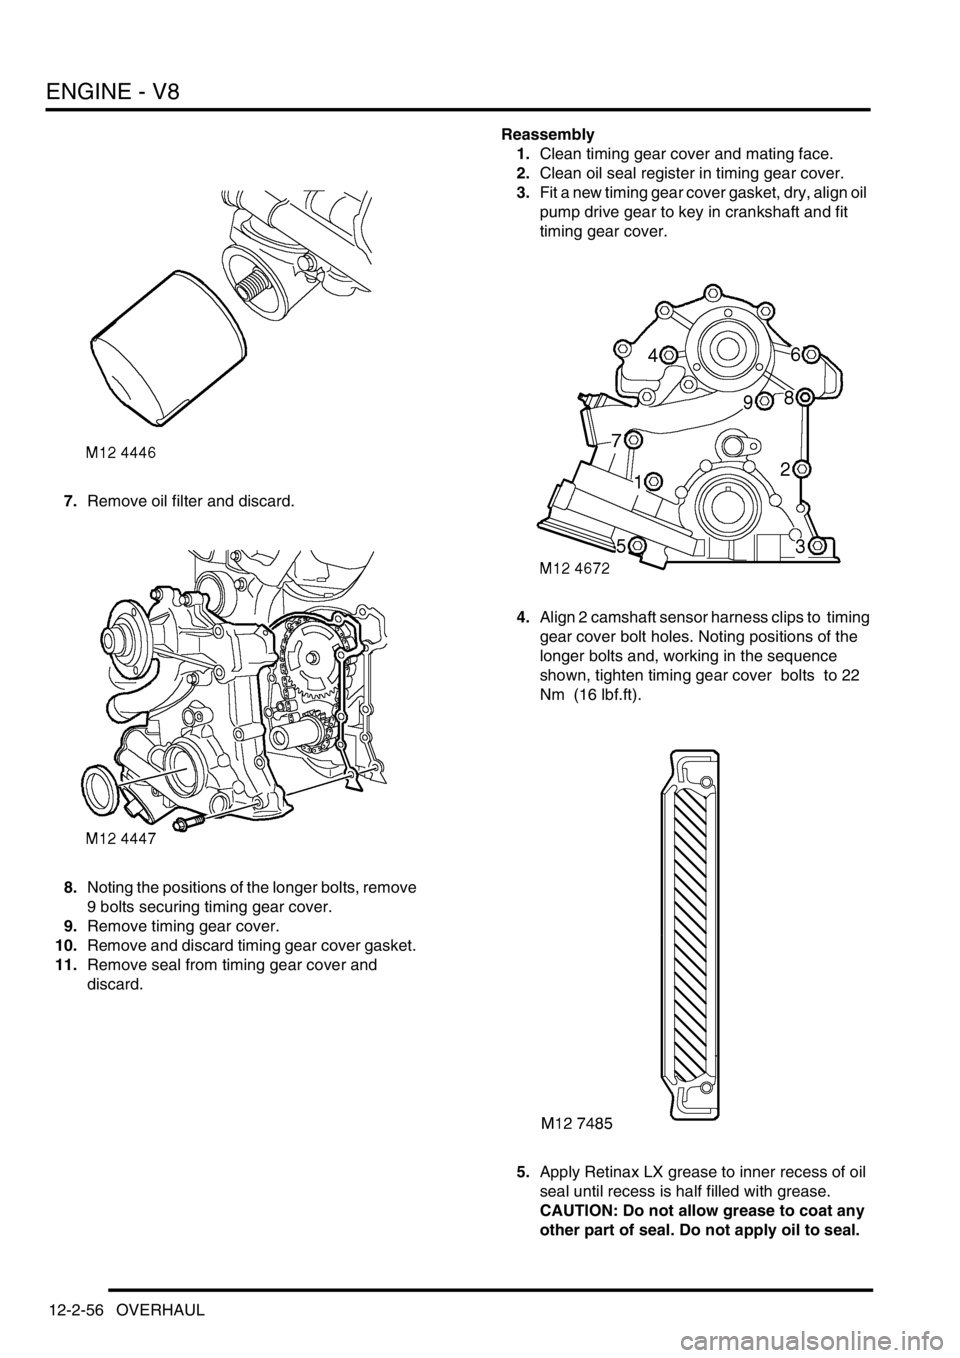
7.Remove oil filter and discard.
8.Noting the positions of the longer bolts, remove
9 bolts securing timing gear cover.
9.Remove timing gear cover.
10.Remove and discard timing gear cover gasket.
11.Remove seal from timing gear cover and
discard. Reassembly
1.Clean timing gear cover and mating face.
2.Clean oil seal register in timing gear cover.
3.Fit a new timing gear cover gasket, dry, align oil
pump drive gear to key in crankshaft and fit
timing gear cover.
4.Align 2 camshaft sensor harness clips to timing
gear cover bolt holes. Noting positions of the
longer bolts and, working in the sequence
shown, tighten timing gear cover bolts to 22
Nm (16 lbf.ft).
5.Apply Retinax LX grease to inner recess of oil
seal until recess is half filled with grease.
CAUTION: Do not allow grease to coat any
other part of seal. Do not apply oil to seal.
Page 300 of 1672
ENGINE - V8
OVERHAUL 12-2-57
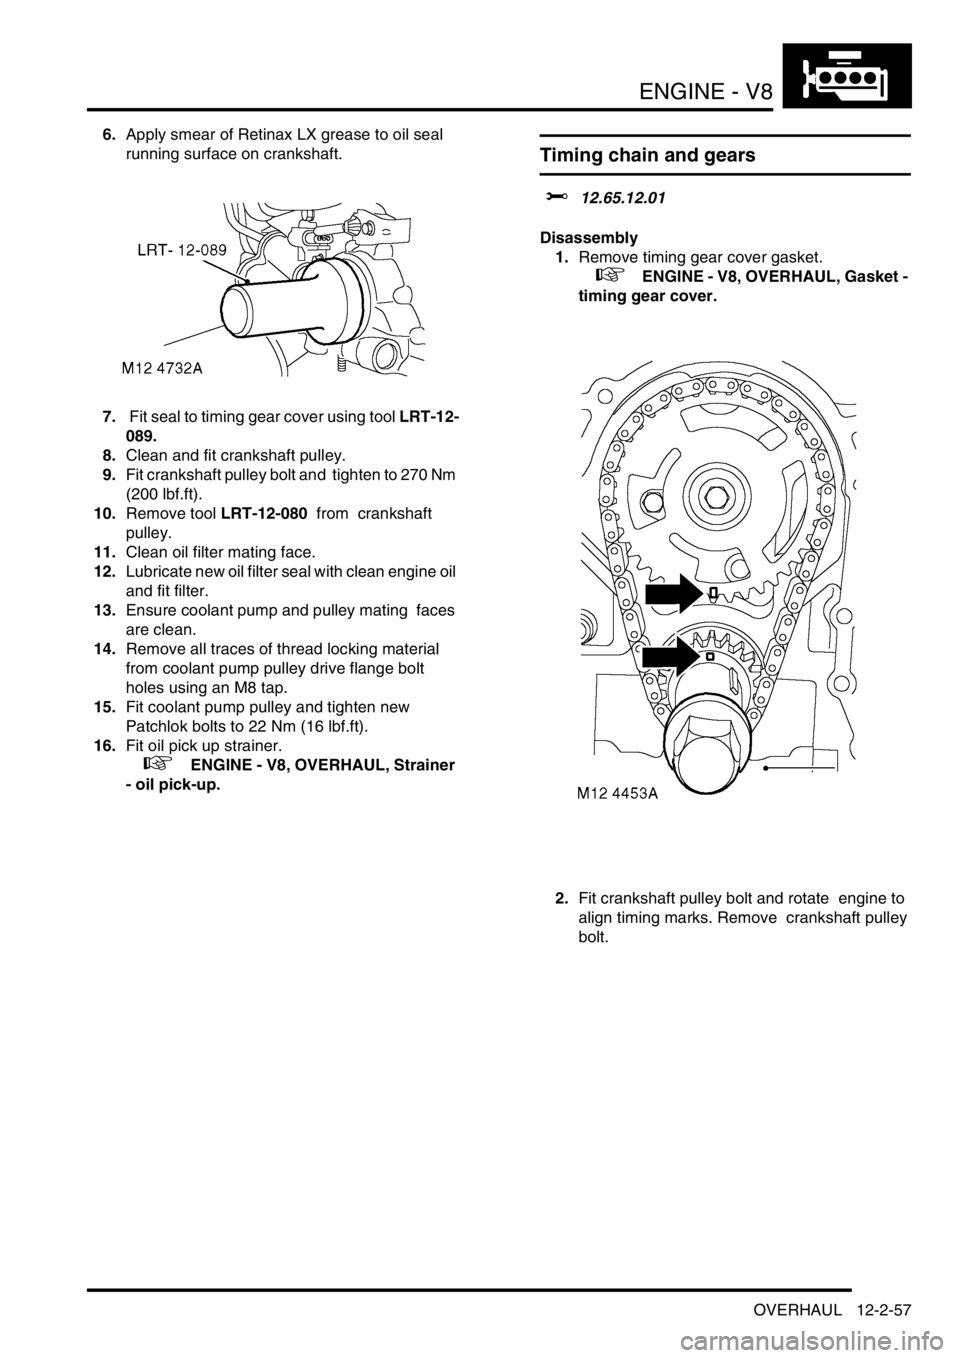
6.Apply smear of Retinax LX grease to oil seal
running surface on crankshaft.
7. Fit seal to timing gear cover using tool LRT-12-
089.
8.Clean and fit crankshaft pulley.
9.Fit crankshaft pulley bolt and tighten to 270 Nm
(200 lbf.ft).
10.Remove tool LRT-12-080 from crankshaft
pulley.
11.Clean oil filter mating face.
12.Lubricate new oil filter seal with clean engine oil
and fit filter.
13.Ensure coolant pump and pulley mating faces
are clean.
14.Remove all traces of thread locking material
from coolant pump pulley drive flange bolt
holes using an M8 tap.
15.Fit coolant pump pulley and tighten new
Patchlok bolts to 22 Nm (16 lbf.ft).
16.Fit oil pick up strainer.
+ ENGINE - V8, OVERHAUL, Strainer
- oil pick-up.
Timing chain and gears
$% 12.65.12.01
Disassembly
1.Remove timing gear cover gasket.
+ ENGINE - V8, OVERHAUL, Gasket -
timing gear cover.
2.Fit crankshaft pulley bolt and rotate engine to
align timing marks. Remove crankshaft pulley
bolt.