LAND ROVER DISCOVERY 2002 Workshop Manual
Manufacturer: LAND ROVER, Model Year: 2002, Model line: DISCOVERY, Model: LAND ROVER DISCOVERY 2002Pages: 1672, PDF Size: 46.1 MB
Page 301 of 1672
ENGINE - V8
12-2-58 OVERHAUL
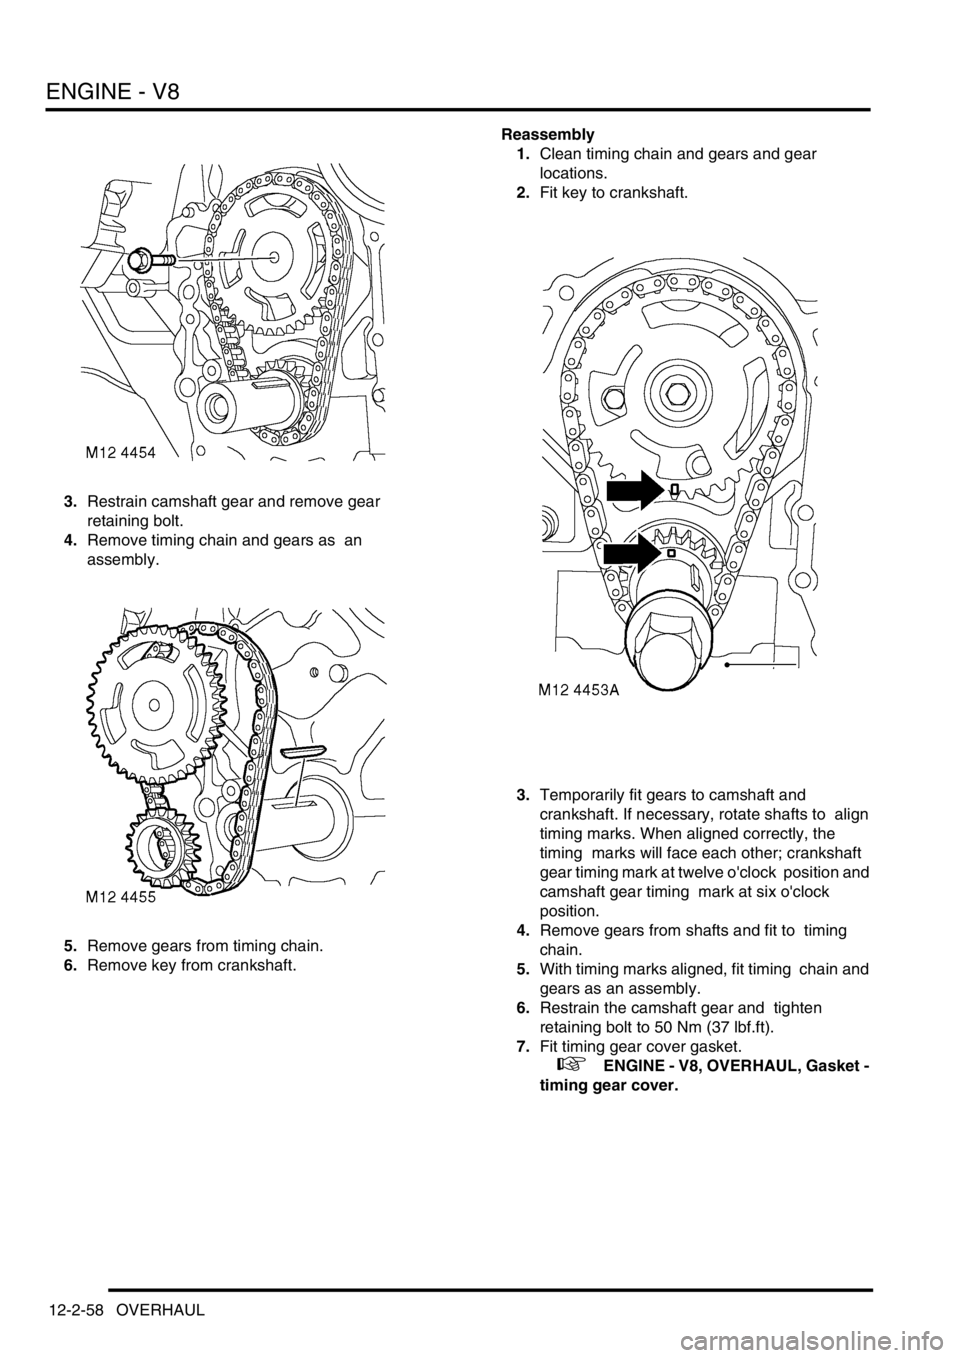
3.Restrain camshaft gear and remove gear
retaining bolt.
4.Remove timing chain and gears as an
assembly.
5.Remove gears from timing chain.
6.Remove key from crankshaft. Reassembly
1.Clean timing chain and gears and gear
locations.
2.Fit key to crankshaft.
3.Temporarily fit gears to camshaft and
crankshaft. If necessary, rotate shafts to align
timing marks. When aligned correctly, the
timing marks will face each other; crankshaft
gear timing mark at twelve o'clock position and
camshaft gear timing mark at six o'clock
position.
4.Remove gears from shafts and fit to timing
chain.
5.With timing marks aligned, fit timing chain and
gears as an assembly.
6.Restrain the camshaft gear and tighten
retaining bolt to 50 Nm (37 lbf.ft).
7.Fit timing gear cover gasket.
+ ENGINE - V8, OVERHAUL, Gasket -
timing gear cover.
Page 302 of 1672
ENGINE - V8
OVERHAUL 12-2-59
Rocker shaft - overhaul
$% 12.29.49
If both rocker shafts are to be removed, identify
each assembly to ensure refitment to original
cylinder head.
Disassembly
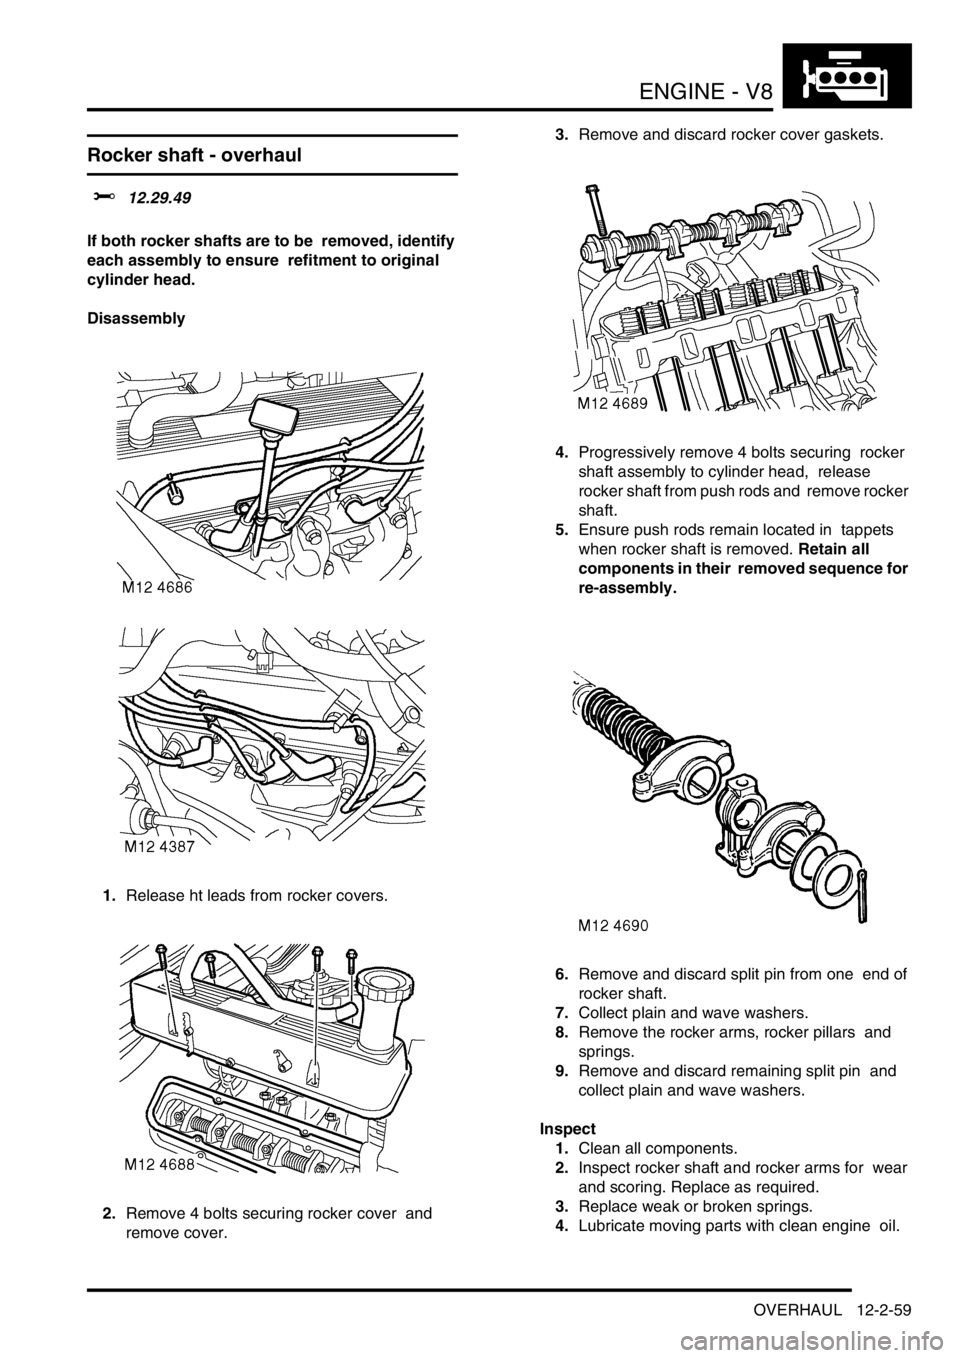
1.Release ht leads from rocker covers.
2.Remove 4 bolts securing rocker cover and
remove cover. 3.Remove and discard rocker cover gaskets.
4.Progressively remove 4 bolts securing rocker
shaft assembly to cylinder head, release
rocker shaft from push rods and remove rocker
shaft.
5.Ensure push rods remain located in tappets
when rocker shaft is removed. Retain all
components in their removed sequence for
re-assembly.
6.Remove and discard split pin from one end of
rocker shaft.
7.Collect plain and wave washers.
8.Remove the rocker arms, rocker pillars and
springs.
9.Remove and discard remaining split pin and
collect plain and wave washers.
Inspect
1.Clean all components.
2.Inspect rocker shaft and rocker arms for wear
and scoring. Replace as required.
3.Replace weak or broken springs.
4.Lubricate moving parts with clean engine oil.
Page 303 of 1672
ENGINE - V8
12-2-60 OVERHAUL
Reassembly
1.Reassemble rocker shafts, ensuring that
components are returned to their original
positions, secure plain washers with new split
pins.
2.Ensure shaft identification groove is positioned
at one o'clock, with push rod locations of rocker
arms to the right. Oil feed restriction will
result if rocker shafts are incorrectly
assembled.
3.Position rocker shaft assembly to cylinder
head ensuring push rods are engaged in
rocker arms.
4.Fit rocker shaft bolts and progressively tighten
to 40 Nm (30 lbf.ft).
5.Clean mating faces of rocker covers and
cylinder heads.
6.Fit new rocker cover gaskets, dry, position
rocker cover, fit bolts and working in diagonal
sequence, tighten to:
lStage 1 - 3 Nm (2.5 lbf.ft)
lStage 2 - 8 Nm (6 lbf.ft)
7.Ensure that gasket is correctly positioned
around periphery of rocker cover.
8.Secure ht leads to rocker cover.
Gasket - cylinder head
$% 12.29.02.01
Disassembly
1.Remove inlet manifold gasket.
+ ENGINE - V8, OVERHAUL, Gasket -
inlet manifold.
2. RH cylinder head: Remove auxiliary drive belt
tensioner.
3. RH cylinder head: Remove bolts securing
alternator mounting bracket and remove
bracket.
4.Noting their fitted order, disconnect ht leads
from spark plugs.
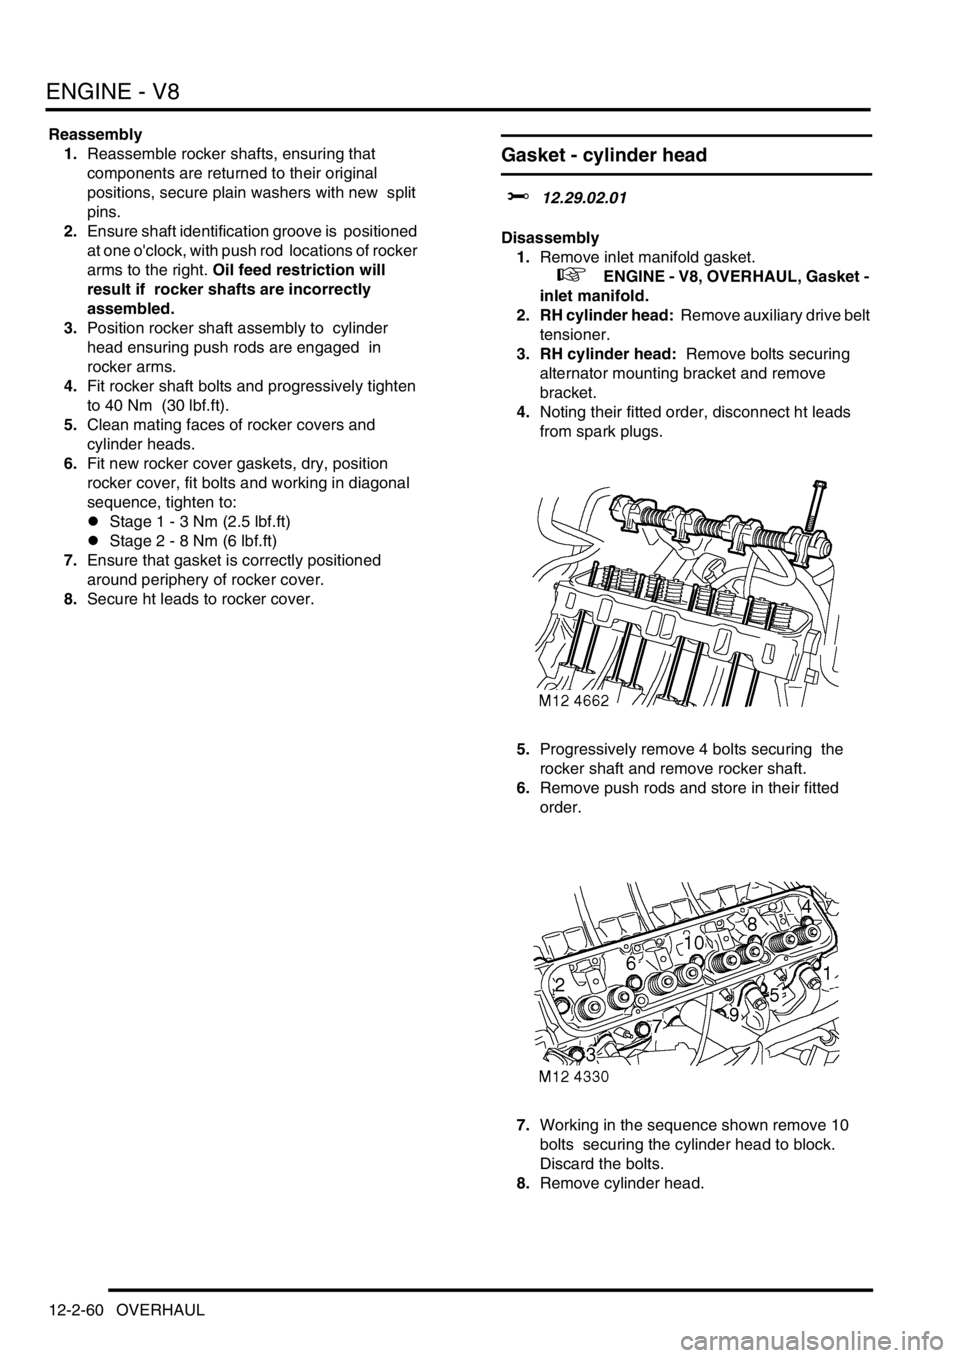
5.Progressively remove 4 bolts securing the
rocker shaft and remove rocker shaft.
6.Remove push rods and store in their fitted
order.
7.Working in the sequence shown remove 10
bolts securing the cylinder head to block.
Discard the bolts.
8.Remove cylinder head.
Page 304 of 1672
ENGINE - V8
OVERHAUL 12-2-61
9.Remove cylinder head gasket.
CAUTION: Support both ends of cylinder
head on blocks of wood.
Inspect
1.Clean mating faces of cylinder block and head
using suitable gasket removal spray and a
plastic scraper, ensure that bolt holes in block
are clean and dry.
CAUTION: Do not use a metal scraper or
machined surfaces may be damaged.
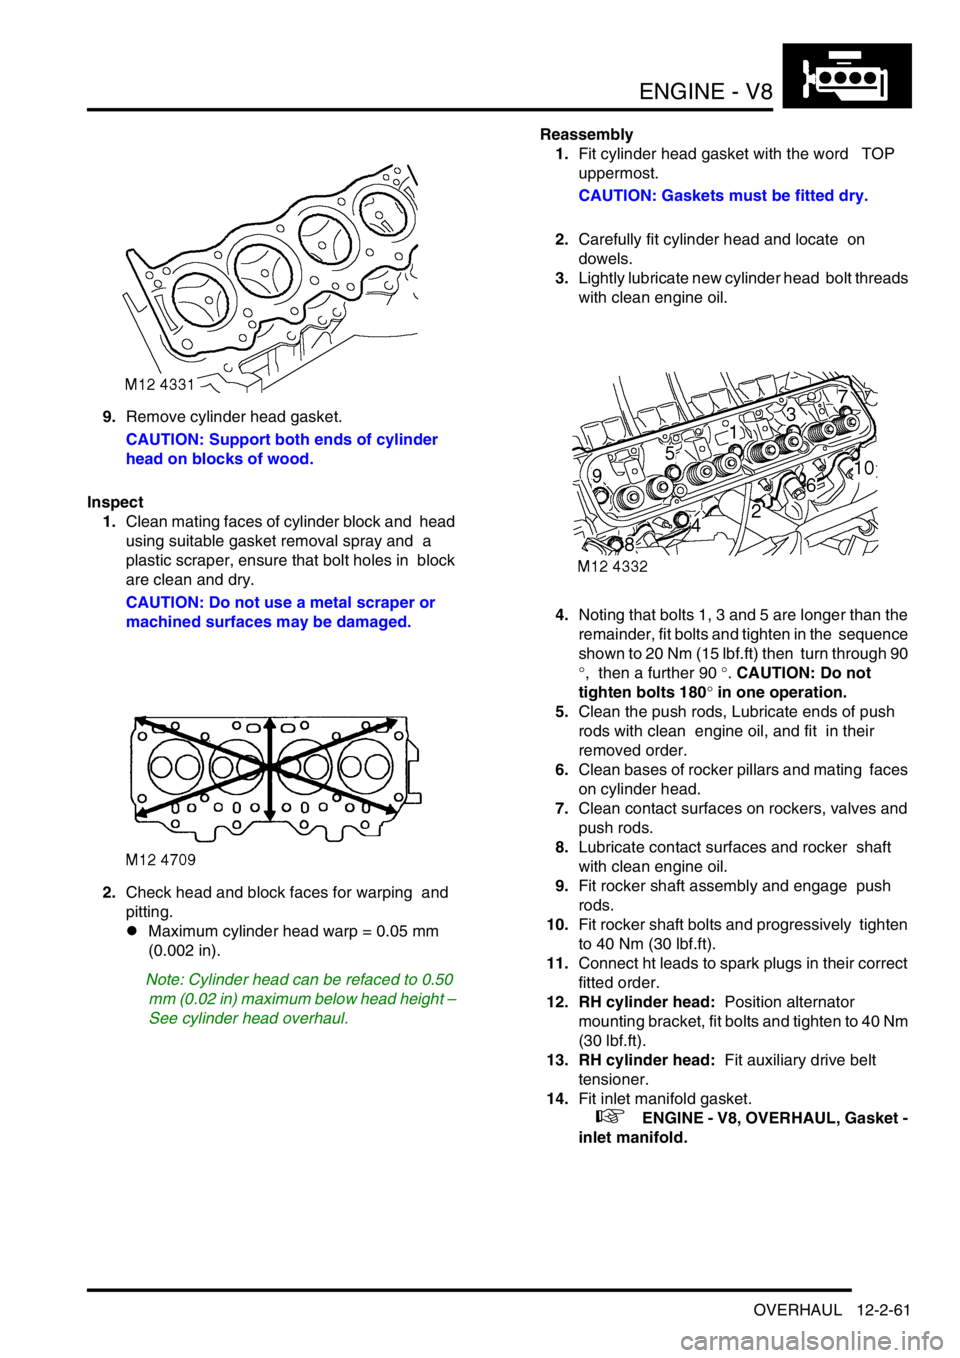
2.Check head and block faces for warping and
pitting.
lMaximum cylinder head warp = 0.05 mm
(0.002 in).
Note: Cylinder head can be refaced to 0.50
mm (0.02 in) maximum below head height –
See cylinder head overhaul.Reassembly
1.Fit cylinder head gasket with the word TOP
uppermost.
CAUTION: Gaskets must be fitted dry.
2.Carefully fit cylinder head and locate on
dowels.
3.Lightly lubricate new cylinder head bolt threads
with clean engine oil.
4.Noting that bolts 1, 3 and 5 are longer than the
remainder, fit bolts and tighten in the sequence
shown to 20 Nm (15 lbf.ft) then turn through 90
°, then a further 90 °. CAUTION: Do not
tighten bolts 180
° in one operation.
5.Clean the push rods, Lubricate ends of push
rods with clean engine oil, and fit in their
removed order.
6.Clean bases of rocker pillars and mating faces
on cylinder head.
7.Clean contact surfaces on rockers, valves and
push rods.
8.Lubricate contact surfaces and rocker shaft
with clean engine oil.
9.Fit rocker shaft assembly and engage push
rods.
10.Fit rocker shaft bolts and progressively tighten
to 40 Nm (30 lbf.ft).
11.Connect ht leads to spark plugs in their correct
fitted order.
12. RH cylinder head: Position alternator
mounting bracket, fit bolts and tighten to 40 Nm
(30 lbf.ft).
13. RH cylinder head: Fit auxiliary drive belt
tensioner.
14.Fit inlet manifold gasket.
+ ENGINE - V8, OVERHAUL, Gasket -
inlet manifold.
Page 305 of 1672

ENGINE - V8
12-2-62 OVERHAUL
Cylinder head - overhaul
$% 12.29.19.01
Disassembly
1.Remove cylinder head gasket.
+ ENGINE - V8, OVERHAUL, Gasket -
cylinder head.
2.Loosen screw on tool LRT-12-034.
3.Fit tool LRT-12-034 to valve and tighten screw
to compress valve spring sufficiently to release
collets from valve spring cap.
4.Remove 2 collets and release valve spring
compressor.
5.Remove valve spring cap and valve spring.
6.Remove valve from cylinder head.
7.Remove and discard valve stem oil seal.
8.Repeat above operations for remaining valves.
9.Keep valves, springs, caps and collets in their
fitted order. Inspect
1.Clean mating faces of cylinder block and head
using suitable gasket removal spray and a
plastic scraper, ensure that bolt holes in block
are clean and dry.
CAUTION: Do not use a metal scraper or
machined surfaces may be damaged.
2.Clean cylinder head, valve springs, valves and
inlet valve guide bores. Ensure all loose
particles of carbon are removed on completion.
3.Check head and block faces for warping and
pitting. Maximum warp = 0.05 mm (0.002 in).
4.Check cylinder head height at each end of
head. Renew a head which is outside limits.
a22.94 mm (0.903 in) - New
b62.56 mm (2.463 in) - New
5.Cylinder head can be refaced to 0.50 mm (0.02
in) max. below head height.
Page 306 of 1672

ENGINE - V8
OVERHAUL 12-2-63
6.Remove carbon deposits from exhaust valve
guide using a 8.70 mm (0.34 in) diameter
reamer inserted from combustion face side of
cylinder head.
NOTE: Modified inlet valves, exhaust valves
and valve guides were fitted to 4.0 litre engines
from the following engine numbers: 55D
05678A; 56D 50788A and 97D 05505A and are
fitted to all 4.6 litre engines.
7.Modified inlet valves may be identified by
measuring the distance 'A' from the valve head
face to the top of the undercut on the valve
stem:
lEarly valves = 29.5 to 30.5 mm (1.16 to 1.20
in)
lLater valves = 32.5 to 33.5 mm (1.28 to 1.32
in)8.Modified exhaust valves may be identified as
follows:
lEarly valves 'A' – Chrome finish
lLater valves 'B' – Black nitrided finish
9.Modified valve guides are 5 mm (0.211 in)
shorter than the early type, the overall length is
now 57 mm (2.24 in); the reduction in length
being the distance the guide protrudes into the
combustion chamber side of the cylinder head.
NOTE: The modified valves and guides may be
fitted to 4.0 litre engines prior to the above
numbers in cylinder sets. Early type valves will
continue to be supplied for early 4.0 litre
engines but if valve guides are found to be
worn, the later valves and guides must be fitted.
Page 307 of 1672
ENGINE - V8
12-2-64 OVERHAUL
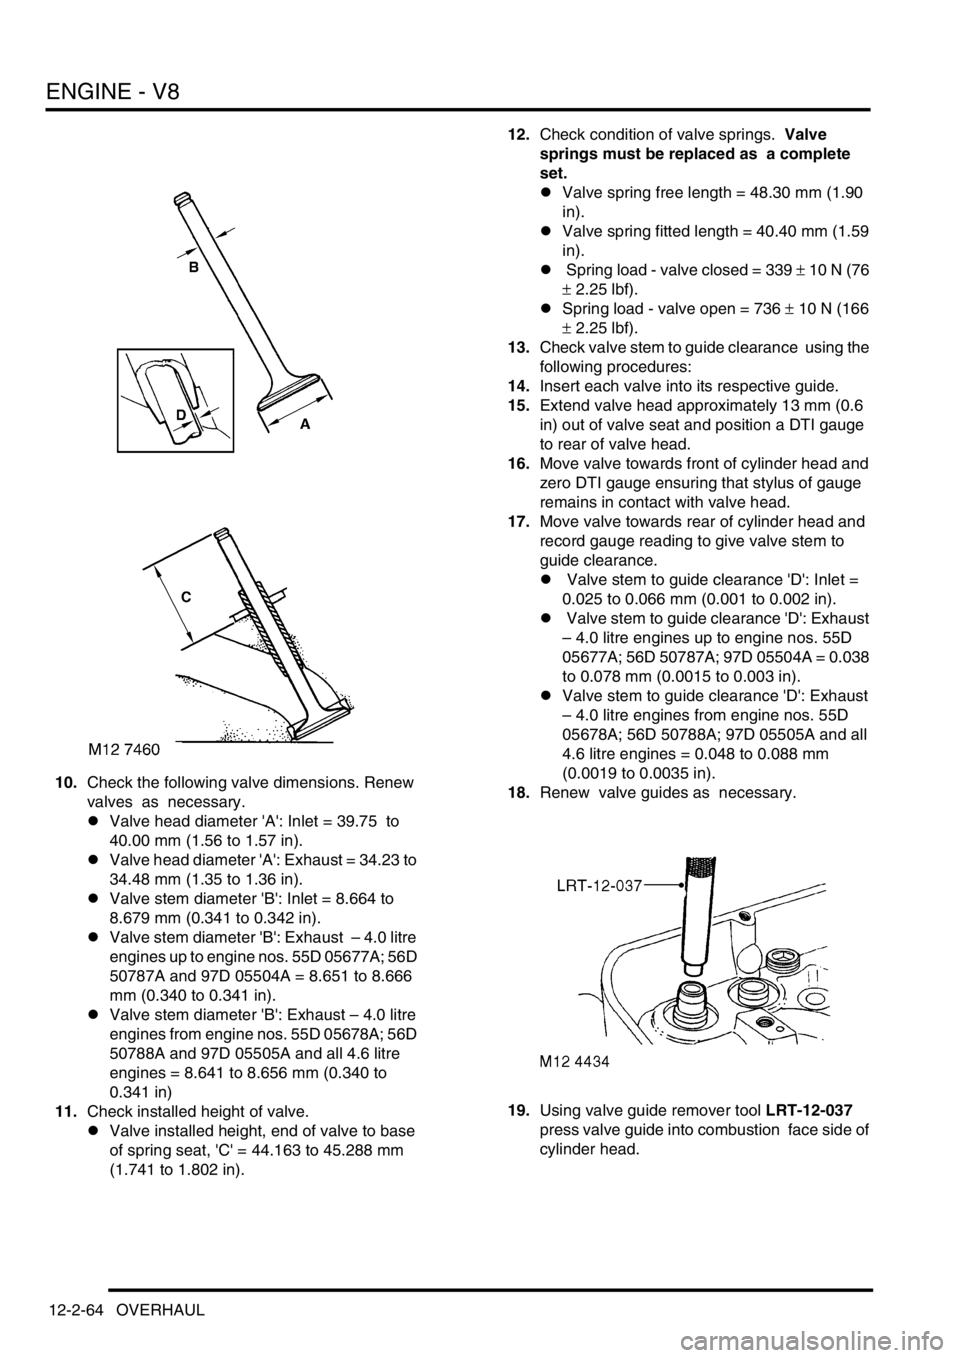
10.Check the following valve dimensions. Renew
valves as necessary.
lValve head diameter 'A': Inlet = 39.75 to
40.00 mm (1.56 to 1.57 in).
lValve head diameter 'A': Exhaust = 34.23 to
34.48 mm (1.35 to 1.36 in).
lValve stem diameter 'B': Inlet = 8.664 to
8.679 mm (0.341 to 0.342 in).
lValve stem diameter 'B': Exhaust – 4.0 litre
engines up to engine nos. 55D 05677A; 56D
50787A and 97D 05504A = 8.651 to 8.666
mm (0.340 to 0.341 in).
lValve stem diameter 'B': Exhaust – 4.0 litre
engines from engine nos. 55D 05678A; 56D
50788A and 97D 05505A and all 4.6 litre
engines = 8.641 to 8.656 mm (0.340 to
0.341 in)
11.Check installed height of valve.
lValve installed height, end of valve to base
of spring seat, 'C' = 44.163 to 45.288 mm
(1.741 to 1.802 in).12.Check condition of valve springs. Valve
springs must be replaced as a complete
set.
lValve spring free length = 48.30 mm (1.90
in).
lValve spring fitted length = 40.40 mm (1.59
in).
l Spring load - valve closed = 339
± 10 N (76
± 2.25 lbf).
lSpring load - valve open = 736
± 10 N (166
± 2.25 lbf).
13.Check valve stem to guide clearance using the
following procedures:
14.Insert each valve into its respective guide.
15.Extend valve head approximately 13 mm (0.6
in) out of valve seat and position a DTI gauge
to rear of valve head.
16.Move valve towards front of cylinder head and
zero DTI gauge ensuring that stylus of gauge
remains in contact with valve head.
17.Move valve towards rear of cylinder head and
record gauge reading to give valve stem to
guide clearance.
l Valve stem to guide clearance 'D': Inlet =
0.025 to 0.066 mm (0.001 to 0.002 in).
l Valve stem to guide clearance 'D': Exhaust
– 4.0 litre engines up to engine nos. 55D
05677A; 56D 50787A; 97D 05504A = 0.038
to 0.078 mm (0.0015 to 0.003 in).
lValve stem to guide clearance 'D': Exhaust
– 4.0 litre engines from engine nos. 55D
05678A; 56D 50788A; 97D 05505A and all
4.6 litre engines = 0.048 to 0.088 mm
(0.0019 to 0.0035 in).
18.Renew valve guides as necessary.
19.Using valve guide remover tool LRT-12-037
press valve guide into combustion face side of
cylinder head.
Page 308 of 1672
ENGINE - V8
OVERHAUL 12-2-65
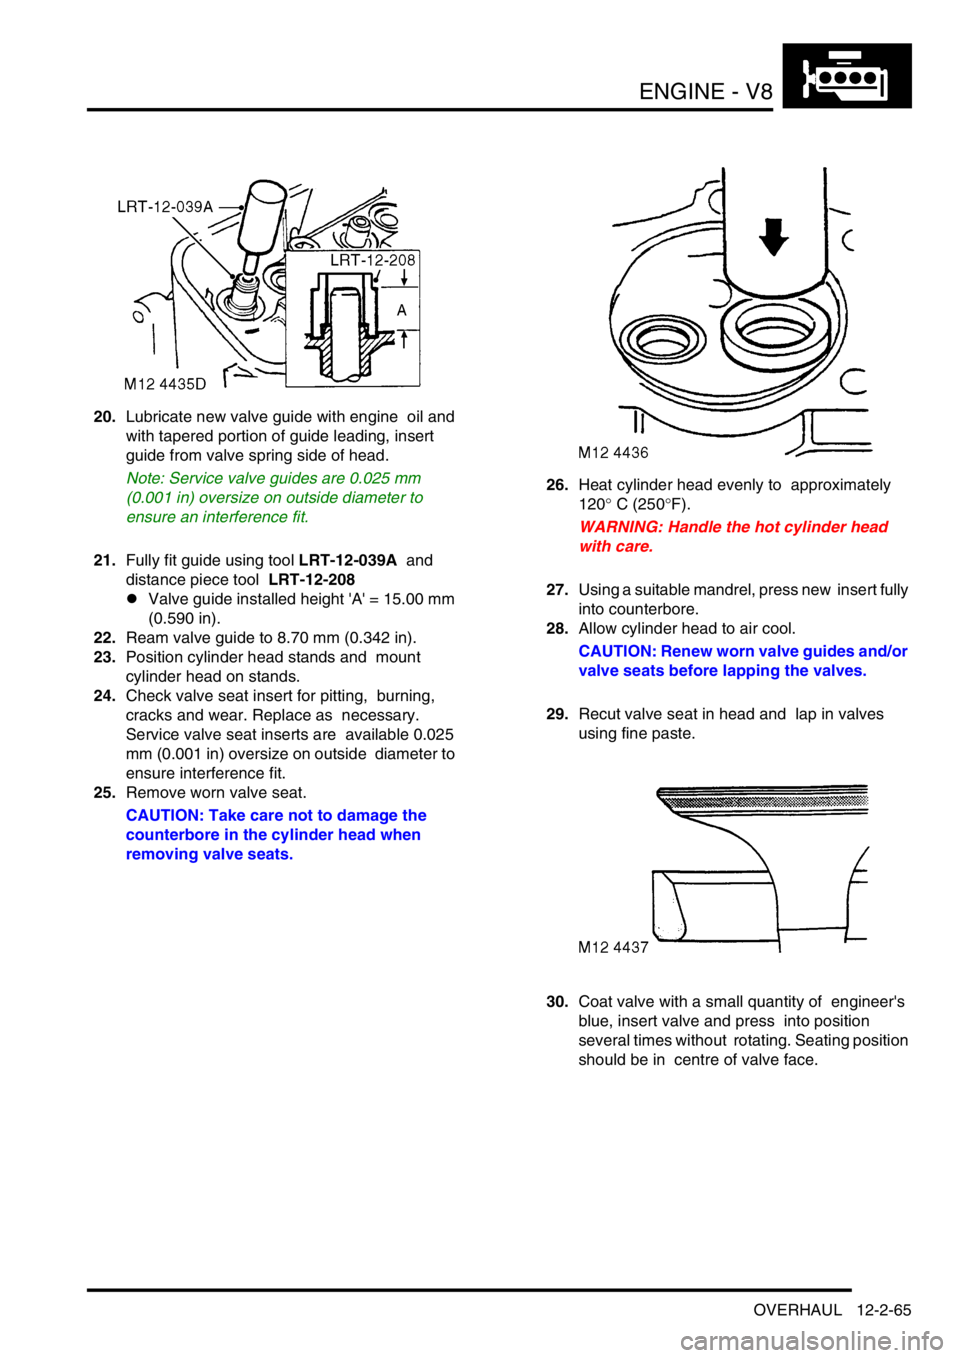
20.Lubricate new valve guide with engine oil and
with tapered portion of guide leading, insert
guide from valve spring side of head.
Note: Service valve guides are 0.025 mm
(0.001 in) oversize on outside diameter to
ensure an interference fit.
21.Fully fit guide using tool LRT-12-039A and
distance piece tool LRT-12-208
lValve guide installed height 'A' = 15.00 mm
(0.590 in).
22.Ream valve guide to 8.70 mm (0.342 in).
23.Position cylinder head stands and mount
cylinder head on stands.
24.Check valve seat insert for pitting, burning,
cracks and wear. Replace as necessary.
Service valve seat inserts are available 0.025
mm (0.001 in) oversize on outside diameter to
ensure interference fit.
25.Remove worn valve seat.
CAUTION: Take care not to damage the
counterbore in the cylinder head when
removing valve seats.26.Heat cylinder head evenly to approximately
120
° C (250°F).
WARNING: Handle the hot cylinder head
with care.
27.Using a suitable mandrel, press new insert fully
into counterbore.
28.Allow cylinder head to air cool.
CAUTION: Renew worn valve guides and/or
valve seats before lapping the valves.
29.Recut valve seat in head and lap in valves
using fine paste.
30.Coat valve with a small quantity of engineer's
blue, insert valve and press into position
several times without rotating. Seating position
should be in centre of valve face.
Page 309 of 1672
ENGINE - V8
12-2-66 OVERHAUL
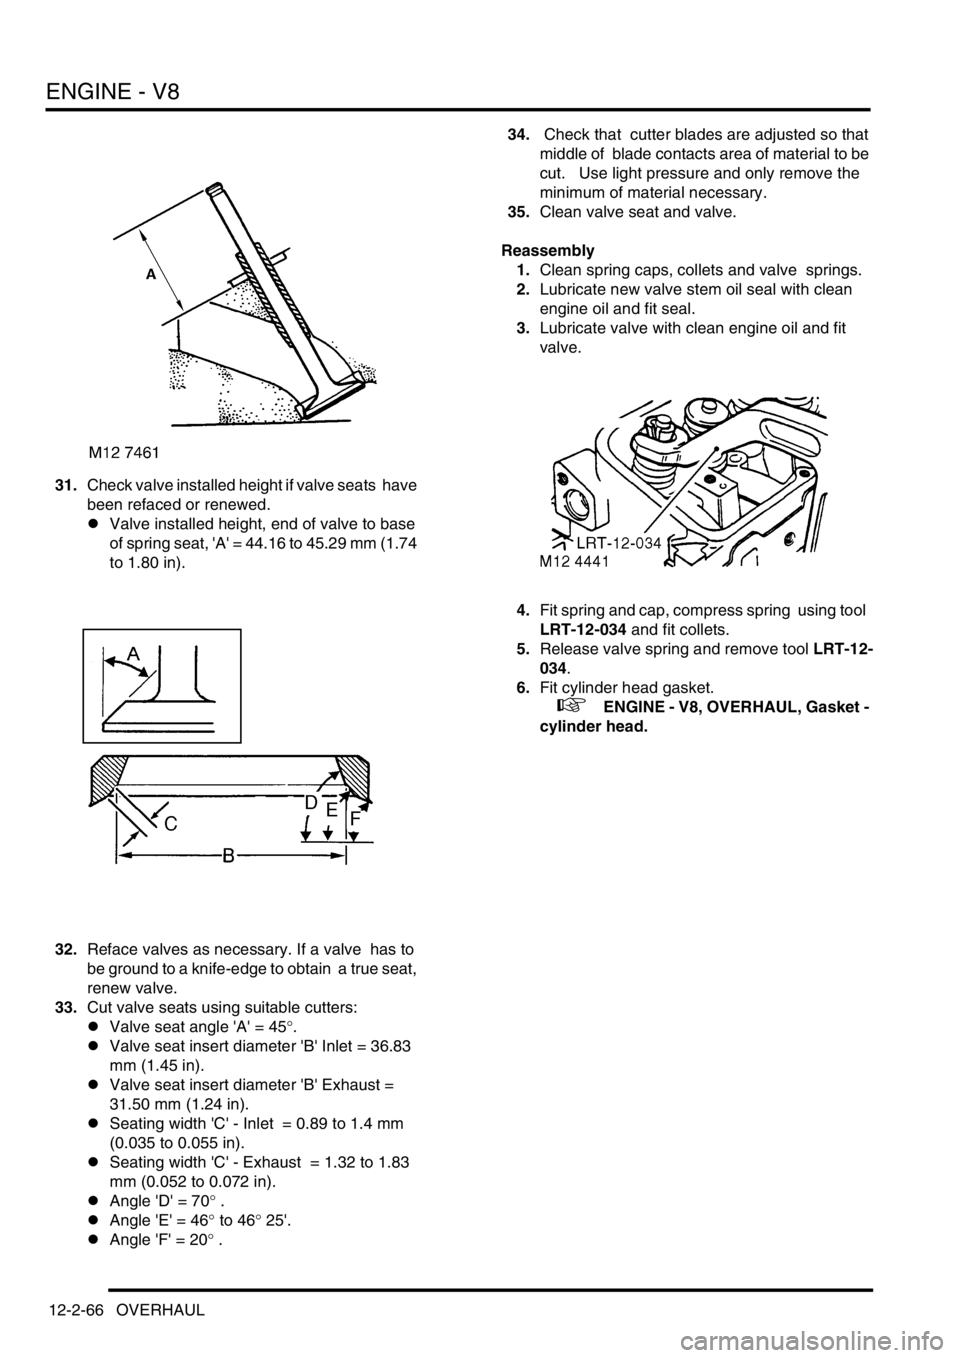
31.Check valve installed height if valve seats have
been refaced or renewed.
lValve installed height, end of valve to base
of spring seat, 'A' = 44.16 to 45.29 mm (1.74
to 1.80 in).
32.Reface valves as necessary. If a valve has to
be ground to a knife-edge to obtain a true seat,
renew valve.
33.Cut valve seats using suitable cutters:
lValve seat angle 'A' = 45
°.
lValve seat insert diameter 'B' Inlet = 36.83
mm (1.45 in).
lValve seat insert diameter 'B' Exhaust =
31.50 mm (1.24 in).
lSeating width 'C' - Inlet = 0.89 to 1.4 mm
(0.035 to 0.055 in).
lSeating width 'C' - Exhaust = 1.32 to 1.83
mm (0.052 to 0.072 in).
lAngle 'D' = 70
° .
lAngle 'E' = 46
° to 46° 25'.
lAngle 'F' = 20
° .34. Check that cutter blades are adjusted so that
middle of blade contacts area of material to be
cut. Use light pressure and only remove the
minimum of material necessary.
35.Clean valve seat and valve.
Reassembly
1.Clean spring caps, collets and valve springs.
2.Lubricate new valve stem oil seal with clean
engine oil and fit seal.
3.Lubricate valve with clean engine oil and fit
valve.
4.Fit spring and cap, compress spring using tool
LRT-12-034 and fit collets.
5.Release valve spring and remove tool LRT-12-
034.
6.Fit cylinder head gasket.
+ ENGINE - V8, OVERHAUL, Gasket -
cylinder head.
Page 310 of 1672
ENGINE - V8
OVERHAUL 12-2-67
Piston assemblies
$% 12.17.02.01
Disassembly
1.Remove cylinder head.
+ ENGINE - V8, OVERHAUL, Gasket -
cylinder head.
2.Remove oil pick-up strainer
+ ENGINE - V8, OVERHAUL, Strainer
- oil pick-up.
3.Suitably identify each connecting rod and
piston assembly to its respective cylinder bore.
4.Remove 2 bolts securing each connecting rod
bearing cap.
5.Remove connecting rod bearing cap and
collect connecting rod bearings.
6.Remove ridge of carbon from top of cylinder
bores.
7.Carefully push each piston assembly from the
top of the cylinder.
CAUTION: Ensure that connecting rods do
not contact cylinder bores.
8.Refit bearing cap onto connecting rod, lightly
tighten dowel bolts.
9.Suitably identify each piston to its respective
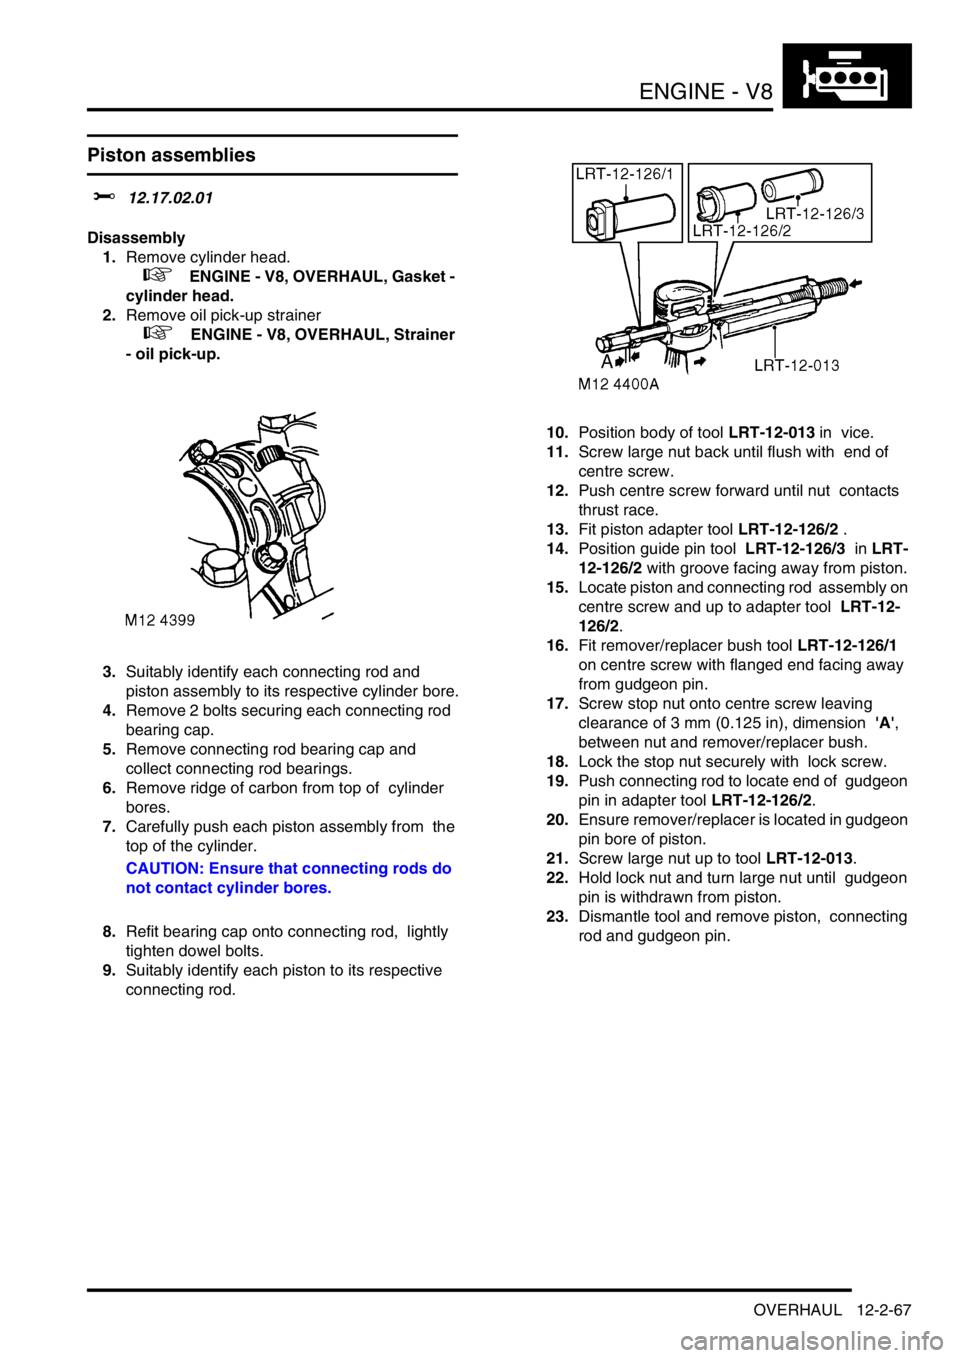
connecting rod.10.Position body of tool LRT-12-013 in vice.
11.Screw large nut back until flush with end of
centre screw.
12.Push centre screw forward until nut contacts
thrust race.
13.Fit piston adapter tool LRT-12-126/2 .
14.Position guide pin tool LRT-12-126/3 in LRT-
12-126/2 with groove facing away from piston.
15.Locate piston and connecting rod assembly on
centre screw and up to adapter tool LRT-12-
126/2.
16.Fit remover/replacer bush tool LRT-12-126/1
on centre screw with flanged end facing away
from gudgeon pin.
17.Screw stop nut onto centre screw leaving
clearance of 3 mm (0.125 in), dimension 'A',
between nut and remover/replacer bush.
18.Lock the stop nut securely with lock screw.
19.Push connecting rod to locate end of gudgeon
pin in adapter tool LRT-12-126/2.
20.Ensure remover/replacer is located in gudgeon
pin bore of piston.
21.Screw large nut up to tool LRT-12-013.
22.Hold lock nut and turn large nut until gudgeon
pin is withdrawn from piston.
23.Dismantle tool and remove piston, connecting
rod and gudgeon pin.