LAND ROVER FREELANDER 2001 Workshop Manual
Manufacturer: LAND ROVER, Model Year: 2001, Model line: FREELANDER, Model: LAND ROVER FREELANDER 2001Pages: 1007, PDF Size: 23.47 MB
Page 411 of 1007
INTERMEDIATE REDUCTION DRIVE
41-8 REPAIRS
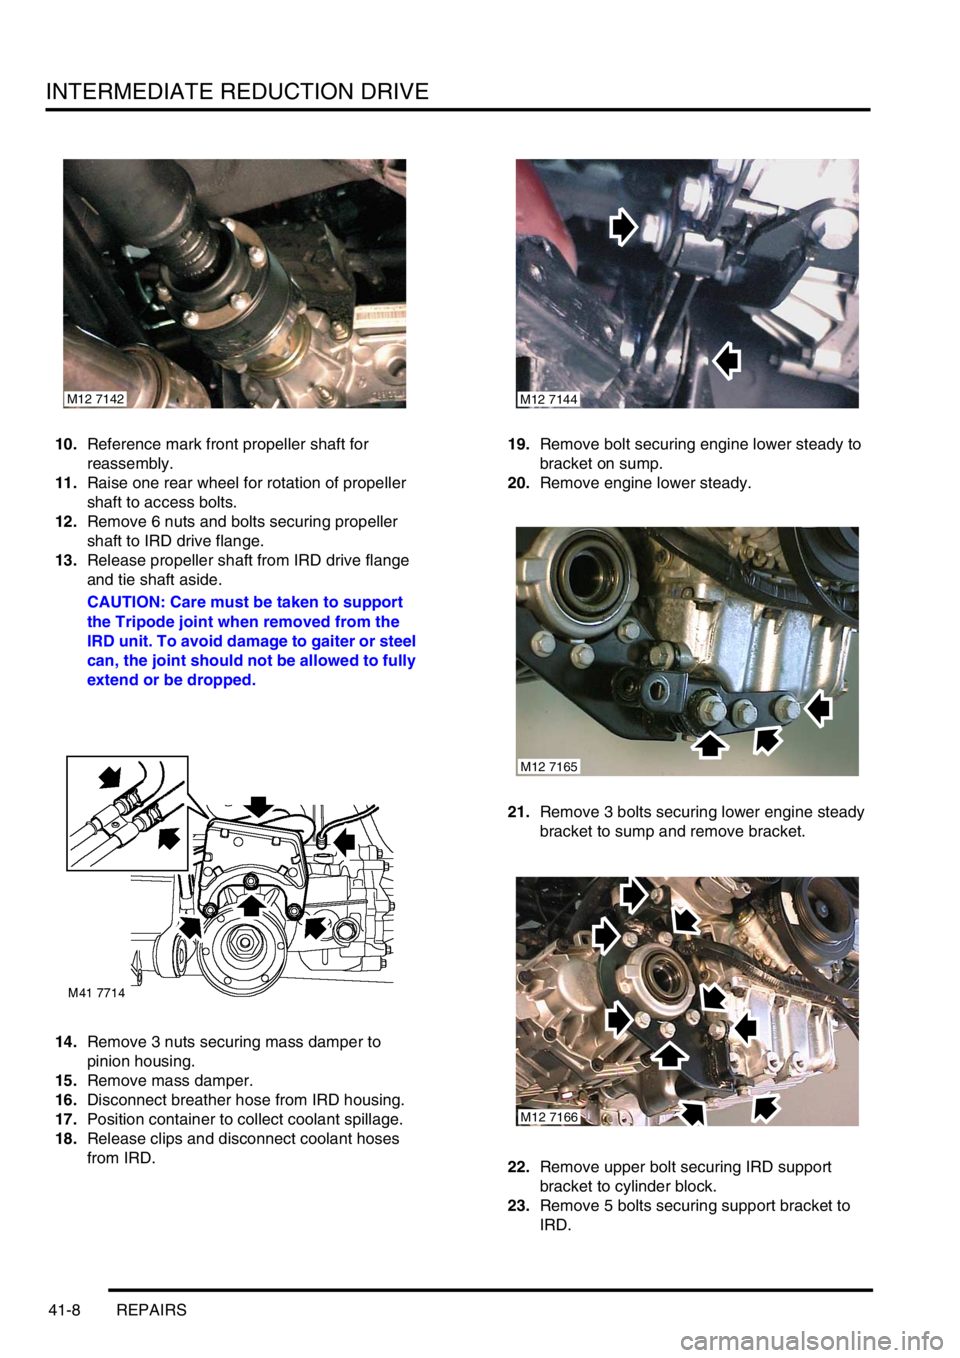
10.Reference mark front propeller shaft for
reassembly.
11.Raise one rear wheel for rotation of propeller
shaft to access bolts.
12.Remove 6 nuts and bolts securing propeller
shaft to IRD drive flange.
13.Release propeller shaft from IRD drive flange
and tie shaft aside.
CAUTION: Care must be taken to support
the Tripode joint when removed from the
IRD unit. To avoid damage to gaiter or steel
can, the joint should not be allowed to fully
extend or be dropped.
14.Remove 3 nuts securing mass damper to
pinion housing.
15.Remove mass damper.
16.Disconnect breather hose from IRD housing.
17.Position container to collect coolant spillage.
18.Release clips and disconnect coolant hoses
from IRD.19.Remove bolt securing engine lower steady to
bracket on sump.
20.Remove engine lower steady.
21.Remove 3 bolts securing lower engine steady
bracket to sump and remove bracket.
22.Remove upper bolt securing IRD support
bracket to cylinder block.
23.Remove 5 bolts securing support bracket to
IRD.
M12 7142M12 7144
M12 7165
M12 7166
Page 412 of 1007
INTERMEDIATE REDUCTION DRIVE
REPAIRS 41-9
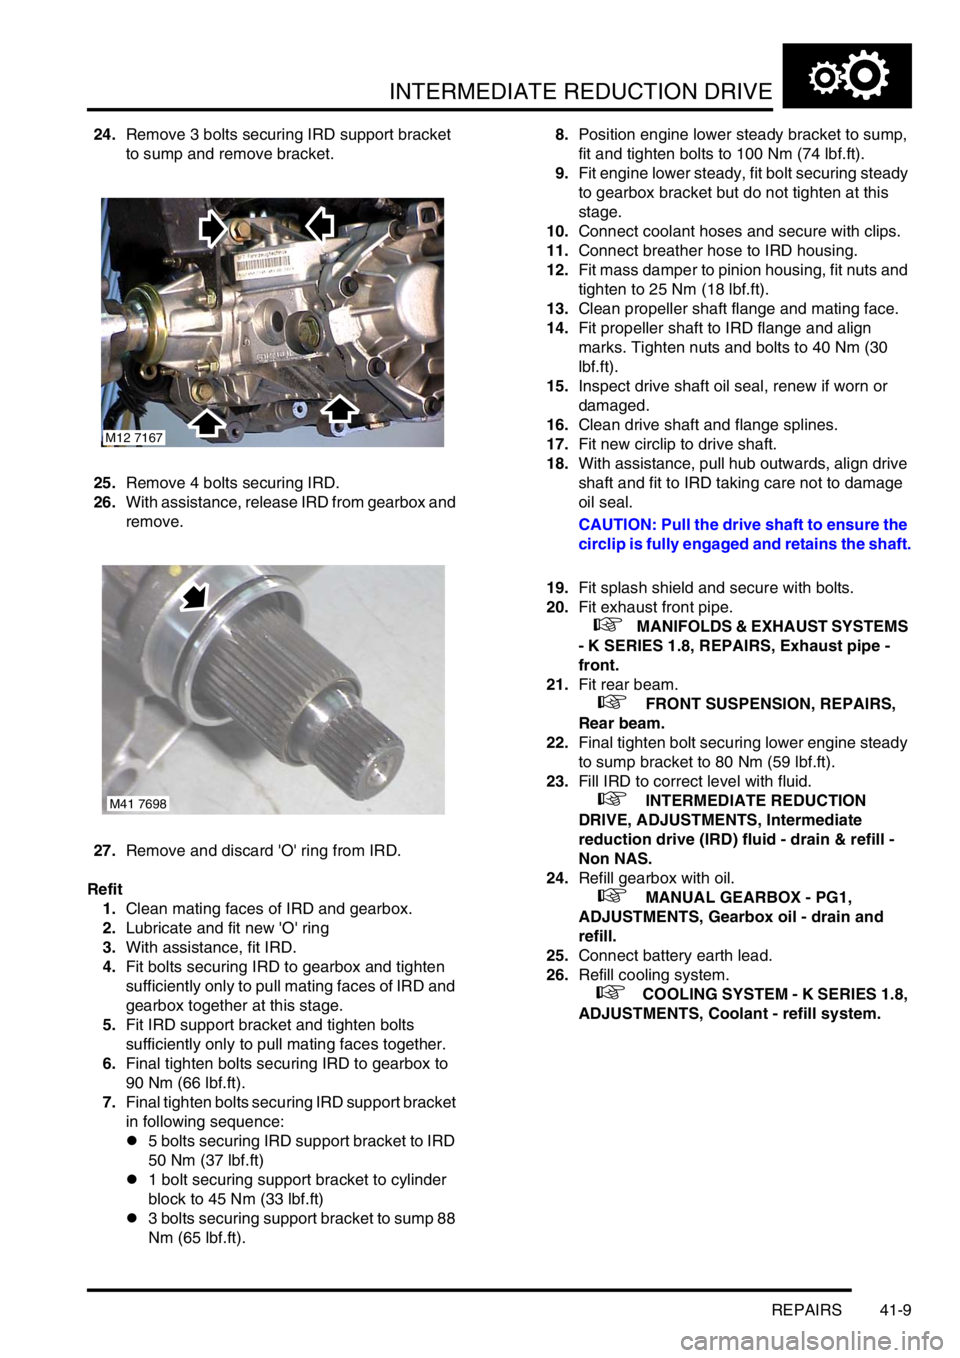
24.Remove 3 bolts securing IRD support bracket
to sump and remove bracket.
25.Remove 4 bolts securing IRD.
26.With assistance, release IRD from gearbox and
remove.
27.Remove and discard 'O' ring from IRD.
Refit
1.Clean mating faces of IRD and gearbox.
2.Lubricate and fit new 'O' ring
3.With assistance, fit IRD.
4.Fit bolts securing IRD to gearbox and tighten
sufficiently only to pull mating faces of IRD and
gearbox together at this stage.
5.Fit IRD support bracket and tighten bolts
sufficiently only to pull mating faces together.
6.Final tighten bolts securing IRD to gearbox to
90 Nm (66 lbf.ft).
7.Final tighten bolts securing IRD support bracket
in following sequence:
l5 bolts securing IRD support bracket to IRD
50 Nm (37 lbf.ft)
l1 bolt securing support bracket to cylinder
block to 45 Nm (33 lbf.ft)
l3 bolts securing support bracket to sump 88
Nm (65 lbf.ft).8.Position engine lower steady bracket to sump,
fit and tighten bolts to 100 Nm (74 lbf.ft).
9.Fit engine lower steady, fit bolt securing steady
to gearbox bracket but do not tighten at this
stage.
10.Connect coolant hoses and secure with clips.
11.Connect breather hose to IRD housing.
12.Fit mass damper to pinion housing, fit nuts and
tighten to 25 Nm (18 lbf.ft).
13.Clean propeller shaft flange and mating face.
14.Fit propeller shaft to IRD flange and align
marks. Tighten nuts and bolts to 40 Nm (30
lbf.ft).
15.Inspect drive shaft oil seal, renew if worn or
damaged.
16.Clean drive shaft and flange splines.
17.Fit new circlip to drive shaft.
18.With assistance, pull hub outwards, align drive
shaft and fit to IRD taking care not to damage
oil seal.
CAUTION: Pull the drive shaft to ensure the
circlip is fully engaged and retains the shaft.
19.Fit splash shield and secure with bolts.
20.Fit exhaust front pipe.
+ MANIFOLDS & EXHAUST SYSTEMS
- K SERIES 1.8, REPAIRS, Exhaust pipe -
front.
21.Fit rear beam.
+ FRONT SUSPENSION, REPAIRS,
Rear beam.
22.Final tighten bolt securing lower engine steady
to sump bracket to 80 Nm (59 lbf.ft).
23.Fill IRD to correct level with fluid.
+ INTERMEDIATE REDUCTION
DRIVE, ADJUSTMENTS, Intermediate
reduction drive (IRD) fluid - drain & refill -
Non NAS.
24.Refill gearbox with oil.
+ MANUAL GEARBOX - PG1,
ADJUSTMENTS, Gearbox oil - drain and
refill.
25.Connect battery earth lead.
26.Refill cooling system.
+ COOLING SYSTEM - K SERIES 1.8,
ADJUSTMENTS, Coolant - refill system.
M12 7167
M41 7698
Page 413 of 1007
INTERMEDIATE REDUCTION DRIVE
41-10 REPAIRS
Intermediate reduction drive (IRD) unit -
KV6
$% 41.25.01.99
Remove
1.Disconnect battery earth lead.
2.Remove rear beam.
+ FRONT SUSPENSION, REPAIRS,
Rear beam.
3.Remove exhaust front pipe.
+ MANIFOLDS & EXHAUST SYSTEMS
- K SERIES KV6, REPAIRS, Front pipe - Non
NAS.
4. NAS models: Remove RH catalytic converter.
+ EMISSION CONTROL, REPAIRS,
Catalytic converter - RH - KV6 - NAS.
5. NAS models:Remove LH exhaust manifold
gasket.
+ MANIFOLDS & EXHAUST SYSTEMS
- K SERIES KV6, REPAIRS, Gasket(s) -
exhaust manifold - LH - NAS.
6.Drain fluid from IRD.
+ INTERMEDIATE REDUCTION
DRIVE, ADJUSTMENTS, Intermediate
reduction drive (IRD) fluid - drain & refill -
Non NAS.
+ INTERMEDIATE REDUCTION
DRIVE, ADJUSTMENTS, Intermediate
reduction drive (IRD) lubrication system -
drain & refill - NAS.
7.Drain gearbox fluid.
+ AUTOMATIC GEARBOX - JATCO,
ADJUSTMENTS, Gearbox fluid - drain &
refill.
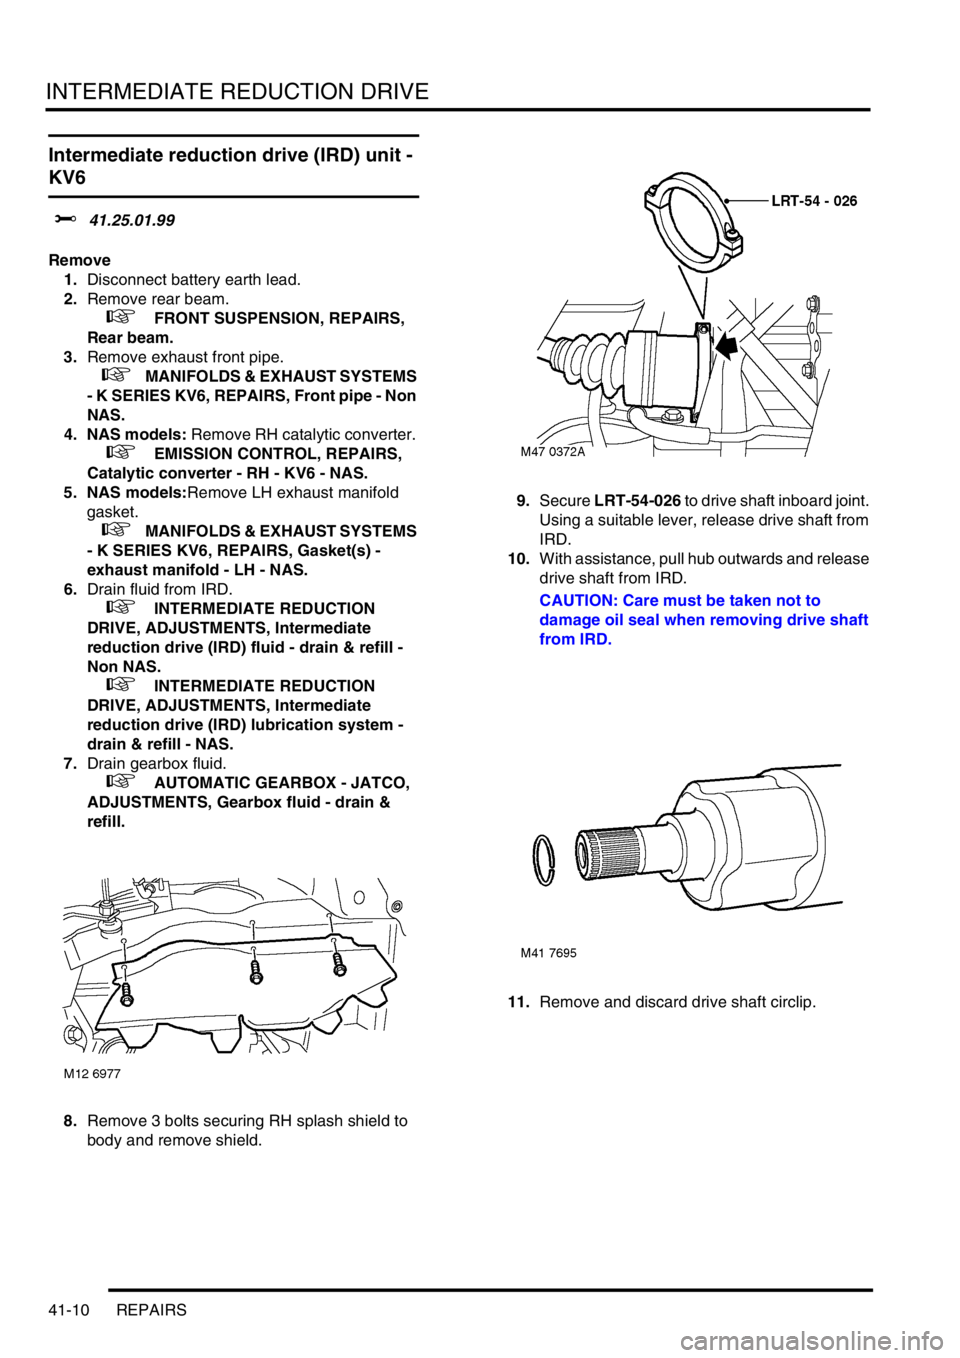
8.Remove 3 bolts securing RH splash shield to
body and remove shield.9.Secure LRT-54-026 to drive shaft inboard joint.
Using a suitable lever, release drive shaft from
IRD.
10.With assistance, pull hub outwards and release
drive shaft from IRD.
CAUTION: Care must be taken not to
damage oil seal when removing drive shaft
from IRD.
11.Remove and discard drive shaft circlip.
Page 414 of 1007
INTERMEDIATE REDUCTION DRIVE
REPAIRS 41-11
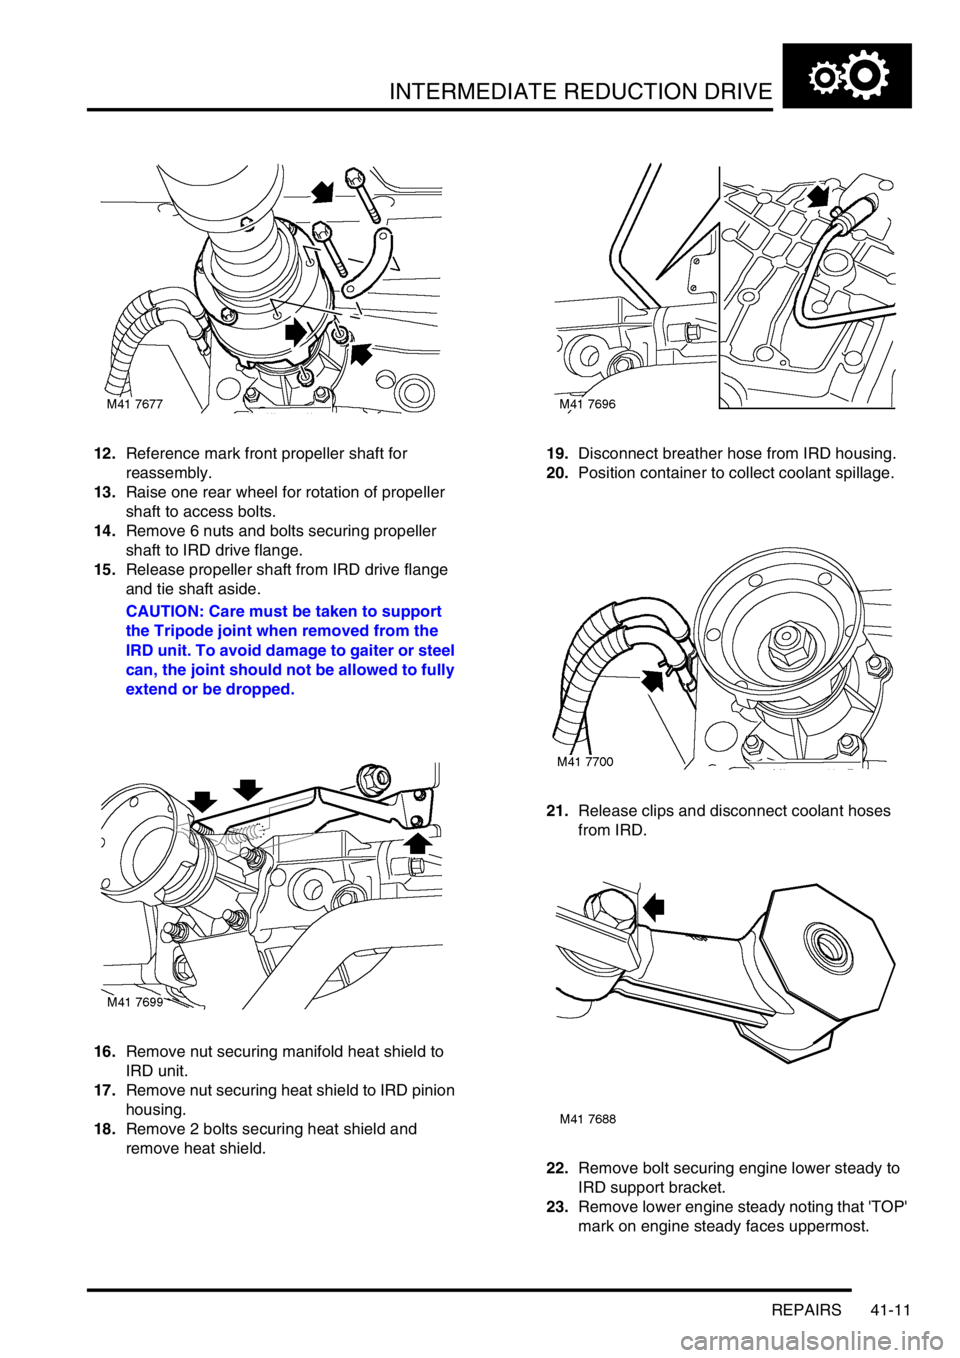
12.Reference mark front propeller shaft for
reassembly.
13.Raise one rear wheel for rotation of propeller
shaft to access bolts.
14.Remove 6 nuts and bolts securing propeller
shaft to IRD drive flange.
15.Release propeller shaft from IRD drive flange
and tie shaft aside.
CAUTION: Care must be taken to support
the Tripode joint when removed from the
IRD unit. To avoid damage to gaiter or steel
can, the joint should not be allowed to fully
extend or be dropped.
16.Remove nut securing manifold heat shield to
IRD unit.
17.Remove nut securing heat shield to IRD pinion
housing.
18.Remove 2 bolts securing heat shield and
remove heat shield.19.Disconnect breather hose from IRD housing.
20.Position container to collect coolant spillage.
21.Release clips and disconnect coolant hoses
from IRD.
22.Remove bolt securing engine lower steady to
IRD support bracket.
23.Remove lower engine steady noting that 'TOP'
mark on engine steady faces uppermost.
Page 415 of 1007
INTERMEDIATE REDUCTION DRIVE
41-12 REPAIRS
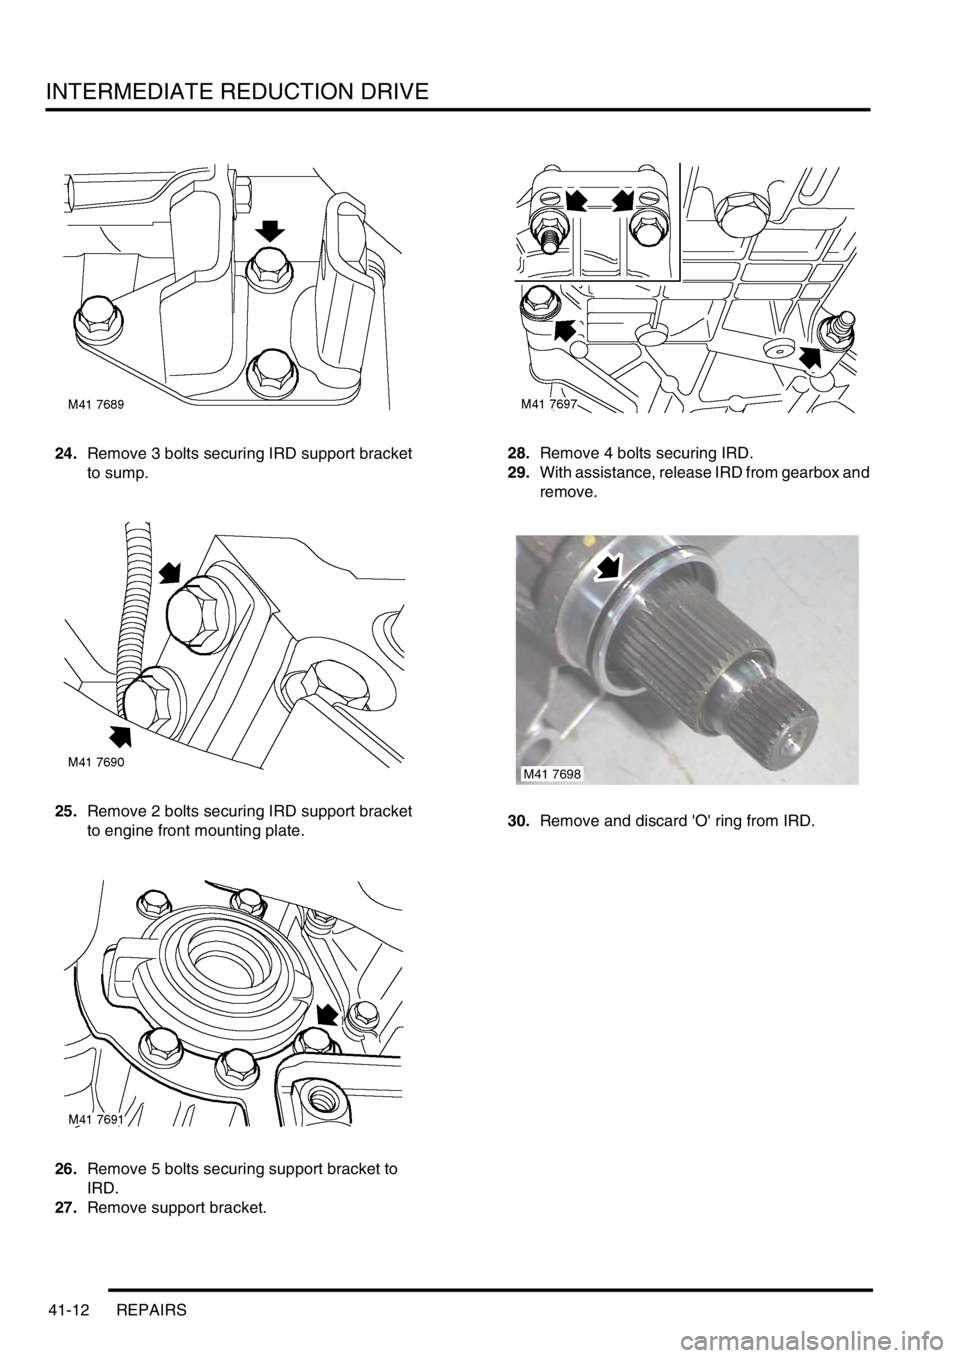
24.Remove 3 bolts securing IRD support bracket
to sump.
25.Remove 2 bolts securing IRD support bracket
to engine front mounting plate.
26.Remove 5 bolts securing support bracket to
IRD.
27.Remove support bracket.28.Remove 4 bolts securing IRD.
29.With assistance, release IRD from gearbox and
remove.
30.Remove and discard 'O' ring from IRD.
M41 7698
Page 416 of 1007
INTERMEDIATE REDUCTION DRIVE
REPAIRS 41-13
Refit
1.Clean mating faces of IRD and gearbox.
2.Lubricate and fit new 'O' ring
3.With assistance, fit IRD.
4.Fit bolts securing IRD to gearbox and tighten
sufficiently only to pull mating faces of IRD and
gearbox together at this stage.
5.Fit IRD support bracket and tighten bolts
sufficiently only to pull mating faces together.
6.Final tighten bolts securing IRD to gearbox to
90 Nm (66 lbf.ft).
7.Final tighten bolts securing IRD support
bracket in following sequence:
l5 bolts securing support bracket to IRD 50
Nm (37 lbf.ft)
l2 bolts securing support bracket to engine
front mounting bracket 50 Nm (37 lbf.ft)
l3 bolts securing support bracket to sump 88
Nm (65 lbf.ft).
8.Position lower engine steady, 'TOP' mark
uppermost. Fit bolt but do not tighten at this
stage.
9.Connect coolant hoses and secure with clips.
10.Connect breather hose to IRD housing.
11.Fit manifold heat shield and fit nut securing
heat shield to pinion housing finger tight.
12.Fit bolts securing manifold heat shield to IRD
support bracket and tighten to 9 Nm (7 lbf.ft).
13.Fit nut securing heat shield to IRD and tighten
to 45 Nm (33 lbf.ft).
14.Final tighten nut securing manifold heat shield
to IRD pinion housing to 25 Nm (18 lbf.ft).
15.Clean propeller shaft flange and mating face.
16.Fit propeller shaft to IRD flange and align
marks. Tighten nuts and bolts to 40 Nm (30
lbf.ft).
17.Inspect drive shaft oil seal, renew if worn or
damaged.
18.Clean drive shaft and flange splines.
19.Fit new circlip to drive shaft.
20.With assistance, pull hub outwards, align drive
shaft and fit to IRD taking care not to damage
oil seal.
CAUTION: Pull the drive shaft to ensure the
circlip is fully engaged and retains the shaft.21.Fit splash shield and secure with bolts.
22.Fit exhaust front pipe.
+ MANIFOLDS & EXHAUST SYSTEMS
- K SERIES KV6, REPAIRS, Front pipe - Non
NAS.
23.Fit rear beam.
+ FRONT SUSPENSION, REPAIRS,
Rear beam.
24.Final tighten bolt securing lower engine steady
to IRD support bracket to 100 Nm (74 lbf.ft).
25.Fill IRD to correct level with fluid.
+ INTERMEDIATE REDUCTION
DRIVE, ADJUSTMENTS, Intermediate
reduction drive (IRD) fluid - drain & refill -
Non NAS.
+ INTERMEDIATE REDUCTION
DRIVE, ADJUSTMENTS, Intermediate
reduction drive (IRD) lubrication system -
drain & refill - NAS.
26. NAS models: Fit RH catalytic converter.
+ EMISSION CONTROL, REPAIRS,
Catalytic converter - RH - KV6 - NAS.
27. NAS models: Fit LH exhaust manifold gasket.
+ MANIFOLDS & EXHAUST SYSTEMS
- K SERIES KV6, REPAIRS, Gasket(s) -
exhaust manifold - LH - NAS.
28.Fill gearbox with fluid.
+ AUTOMATIC GEARBOX - JATCO,
ADJUSTMENTS, Gearbox fluid - drain &
refill.
29.Connect battery earth lead.
30.Refill cooling system.
+ COOLING SYSTEM - K SERIES KV6,
ADJUSTMENTS, Coolant - drain and refill.
Page 417 of 1007
INTERMEDIATE REDUCTION DRIVE
41-14 REPAIRS
Gasket - end cover - IRD housing - Td4
$% 41.27.05
Remove
1.Drain fluid from IRD.
+ INTERMEDIATE REDUCTION
DRIVE, ADJUSTMENTS, Intermediate
reduction drive (IRD) fluid - drain & refill -
Non NAS.
2.Remove drive shaft RH seal.
+ INTERMEDIATE REDUCTION
DRIVE, REPAIRS, Seal - driveshaft - RH.
3.Remove nut securing manifold heat shield to
IRD unit.
4.Remove nut securing heat shield to IRD pinion
housing.
5.Remove 2 bolts securing heat shield and
remove heat shield.
6.Remove lower engine steady.
+ ENGINE - Td4, REPAIRS, Engine
steady - lower.
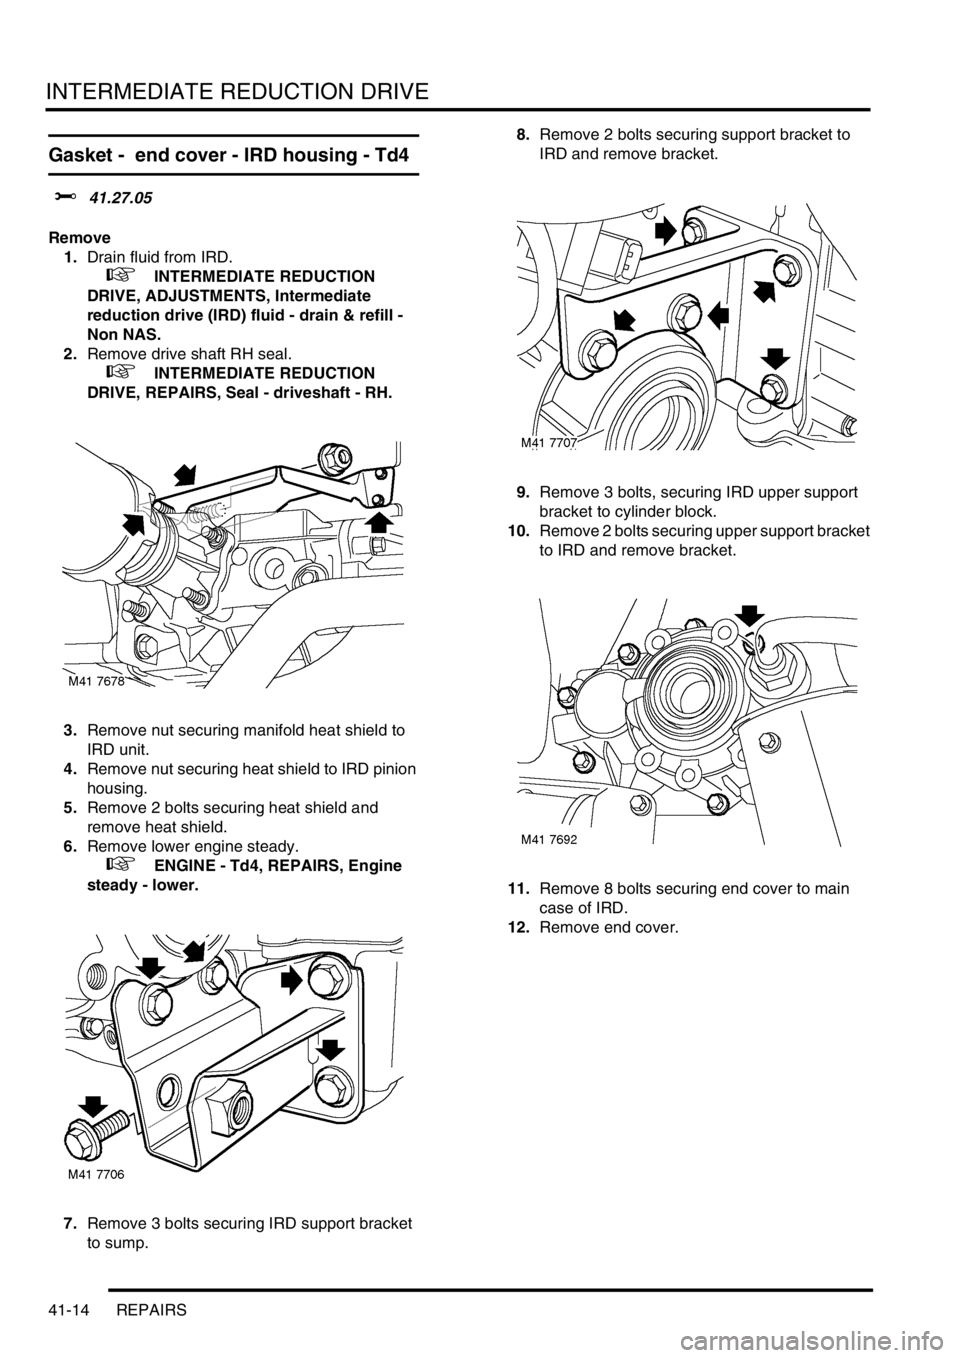
7.Remove 3 bolts securing IRD support bracket
to sump.8.Remove 2 bolts securing support bracket to
IRD and remove bracket.
9.Remove 3 bolts, securing IRD upper support
bracket to cylinder block.
10.Remove 2 bolts securing upper support bracket
to IRD and remove bracket.
11.Remove 8 bolts securing end cover to main
case of IRD.
12.Remove end cover.
Page 418 of 1007
INTERMEDIATE REDUCTION DRIVE
REPAIRS 41-15
Refit
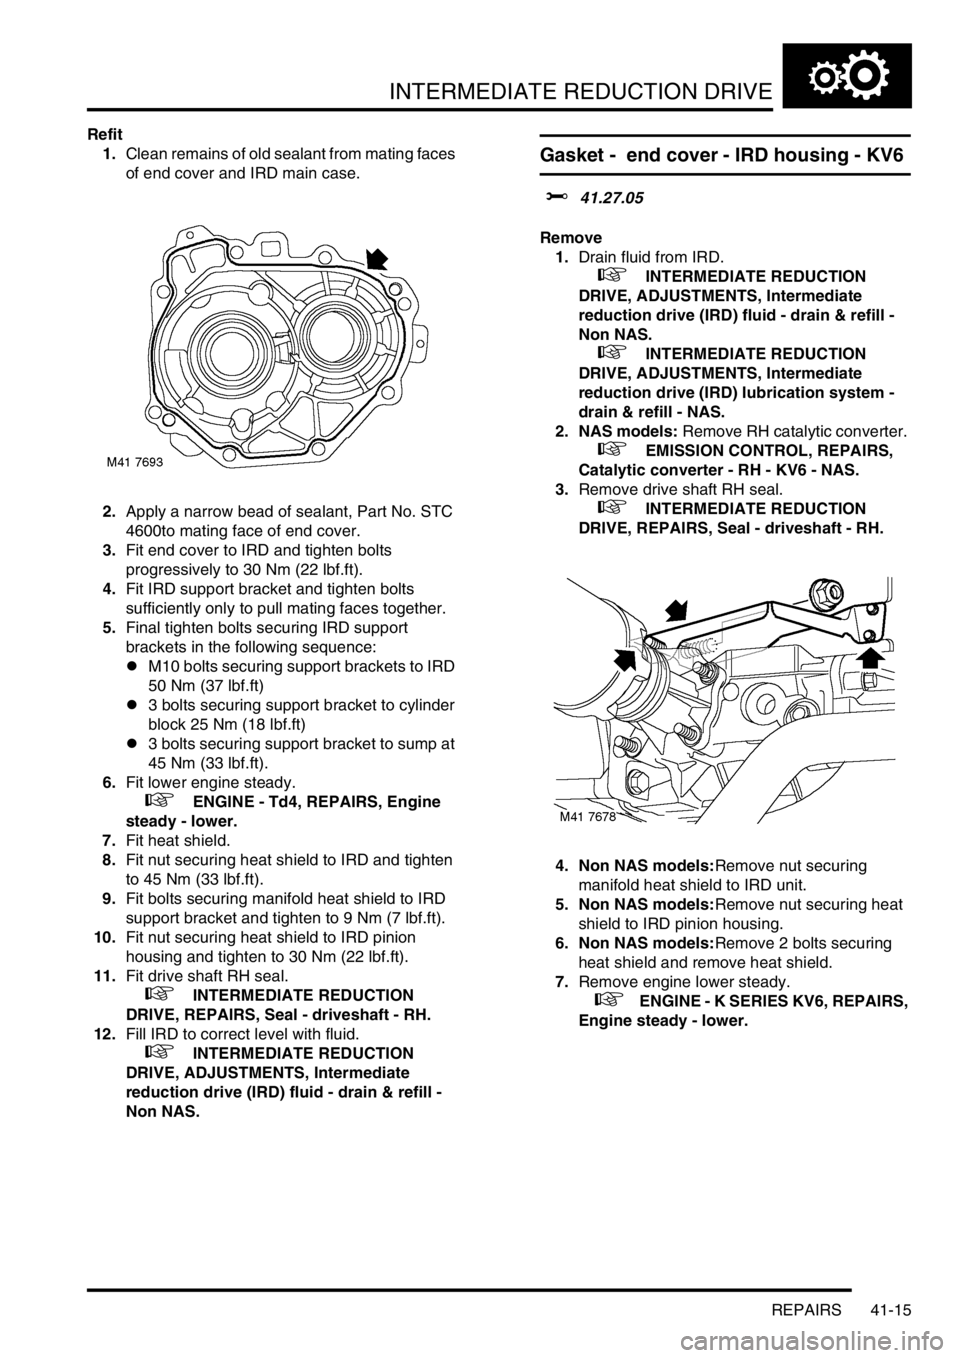
1.Clean remains of old sealant from mating faces
of end cover and IRD main case.
2.Apply a narrow bead of sealant, Part No. STC
4600to mating face of end cover.
3.Fit end cover to IRD and tighten bolts
progressively to 30 Nm (22 lbf.ft).
4.Fit IRD support bracket and tighten bolts
sufficiently only to pull mating faces together.
5.Final tighten bolts securing IRD support
brackets in the following sequence:
lM10 bolts securing support brackets to IRD
50 Nm (37 lbf.ft)
l3 bolts securing support bracket to cylinder
block 25 Nm (18 lbf.ft)
l3 bolts securing support bracket to sump at
45 Nm (33 lbf.ft).
6.Fit lower engine steady.
+ ENGINE - Td4, REPAIRS, Engine
steady - lower.
7.Fit heat shield.
8.Fit nut securing heat shield to IRD and tighten
to 45 Nm (33 lbf.ft).
9.Fit bolts securing manifold heat shield to IRD
support bracket and tighten to 9 Nm (7 lbf.ft).
10.Fit nut securing heat shield to IRD pinion
housing and tighten to 30 Nm (22 lbf.ft).
11.Fit drive shaft RH seal.
+ INTERMEDIATE REDUCTION
DRIVE, REPAIRS, Seal - driveshaft - RH.
12.Fill IRD to correct level with fluid.
+ INTERMEDIATE REDUCTION
DRIVE, ADJUSTMENTS, Intermediate
reduction drive (IRD) fluid - drain & refill -
Non NAS.
Gasket - end cover - IRD housing - KV6
$% 41.27.05
Remove
1.Drain fluid from IRD.
+ INTERMEDIATE REDUCTION
DRIVE, ADJUSTMENTS, Intermediate
reduction drive (IRD) fluid - drain & refill -
Non NAS.
+ INTERMEDIATE REDUCTION
DRIVE, ADJUSTMENTS, Intermediate
reduction drive (IRD) lubrication system -
drain & refill - NAS.
2. NAS models: Remove RH catalytic converter.
+ EMISSION CONTROL, REPAIRS,
Catalytic converter - RH - KV6 - NAS.
3.Remove drive shaft RH seal.
+ INTERMEDIATE REDUCTION
DRIVE, REPAIRS, Seal - driveshaft - RH.
4. Non NAS models:Remove nut securing
manifold heat shield to IRD unit.
5. Non NAS models:Remove nut securing heat
shield to IRD pinion housing.
6. Non NAS models:Remove 2 bolts securing
heat shield and remove heat shield.
7.Remove engine lower steady.
+ ENGINE - K SERIES KV6, REPAIRS,
Engine steady - lower.
Page 419 of 1007
INTERMEDIATE REDUCTION DRIVE
41-16 REPAIRS
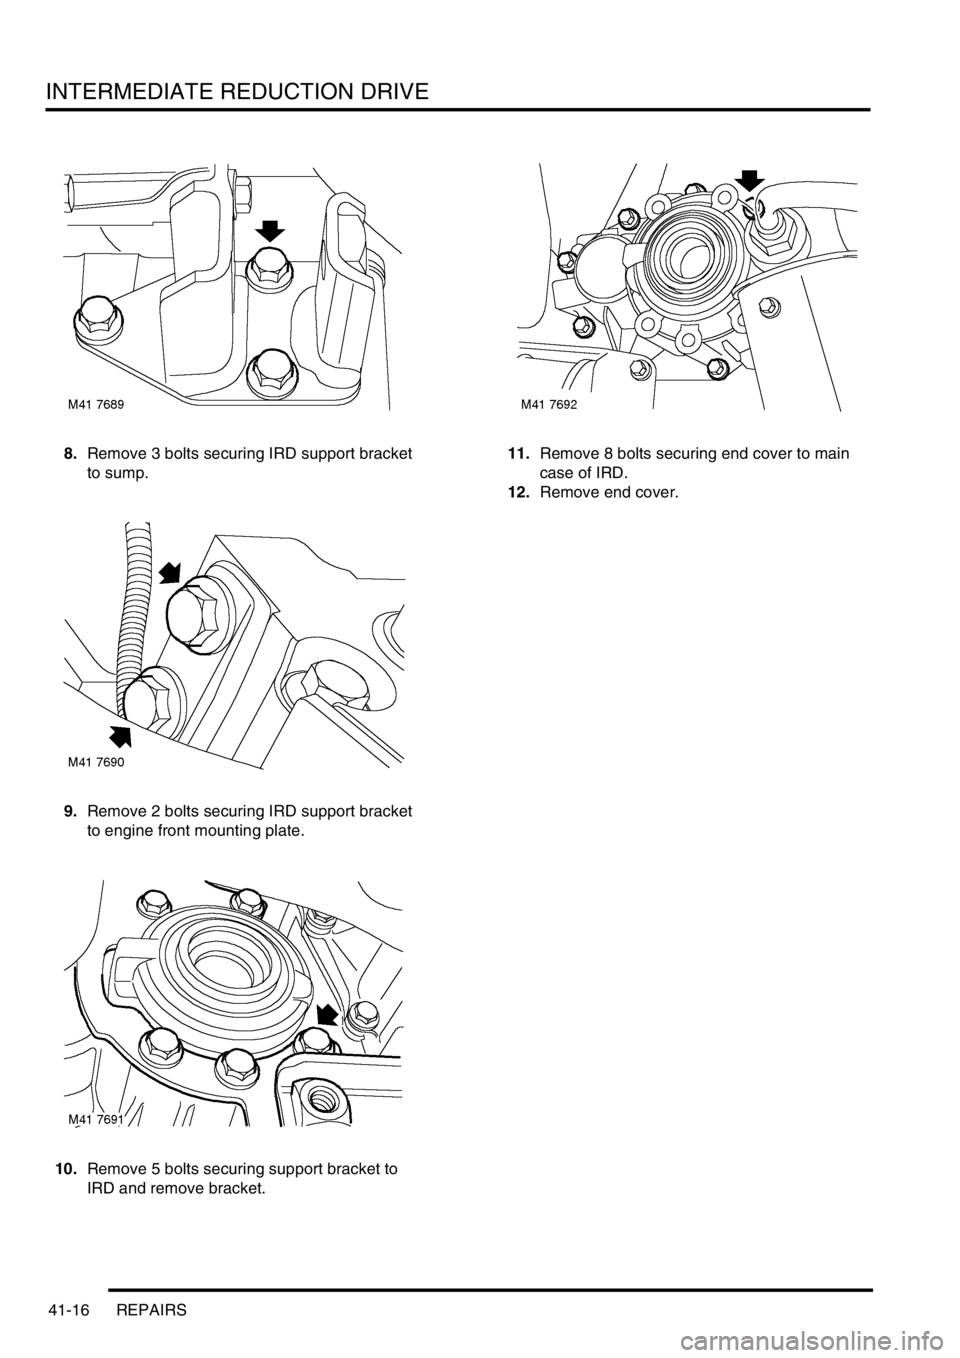
8.Remove 3 bolts securing IRD support bracket
to sump.
9.Remove 2 bolts securing IRD support bracket
to engine front mounting plate.
10.Remove 5 bolts securing support bracket to
IRD and remove bracket.11.Remove 8 bolts securing end cover to main
case of IRD.
12.Remove end cover.
Page 420 of 1007
INTERMEDIATE REDUCTION DRIVE
REPAIRS 41-17
Refit
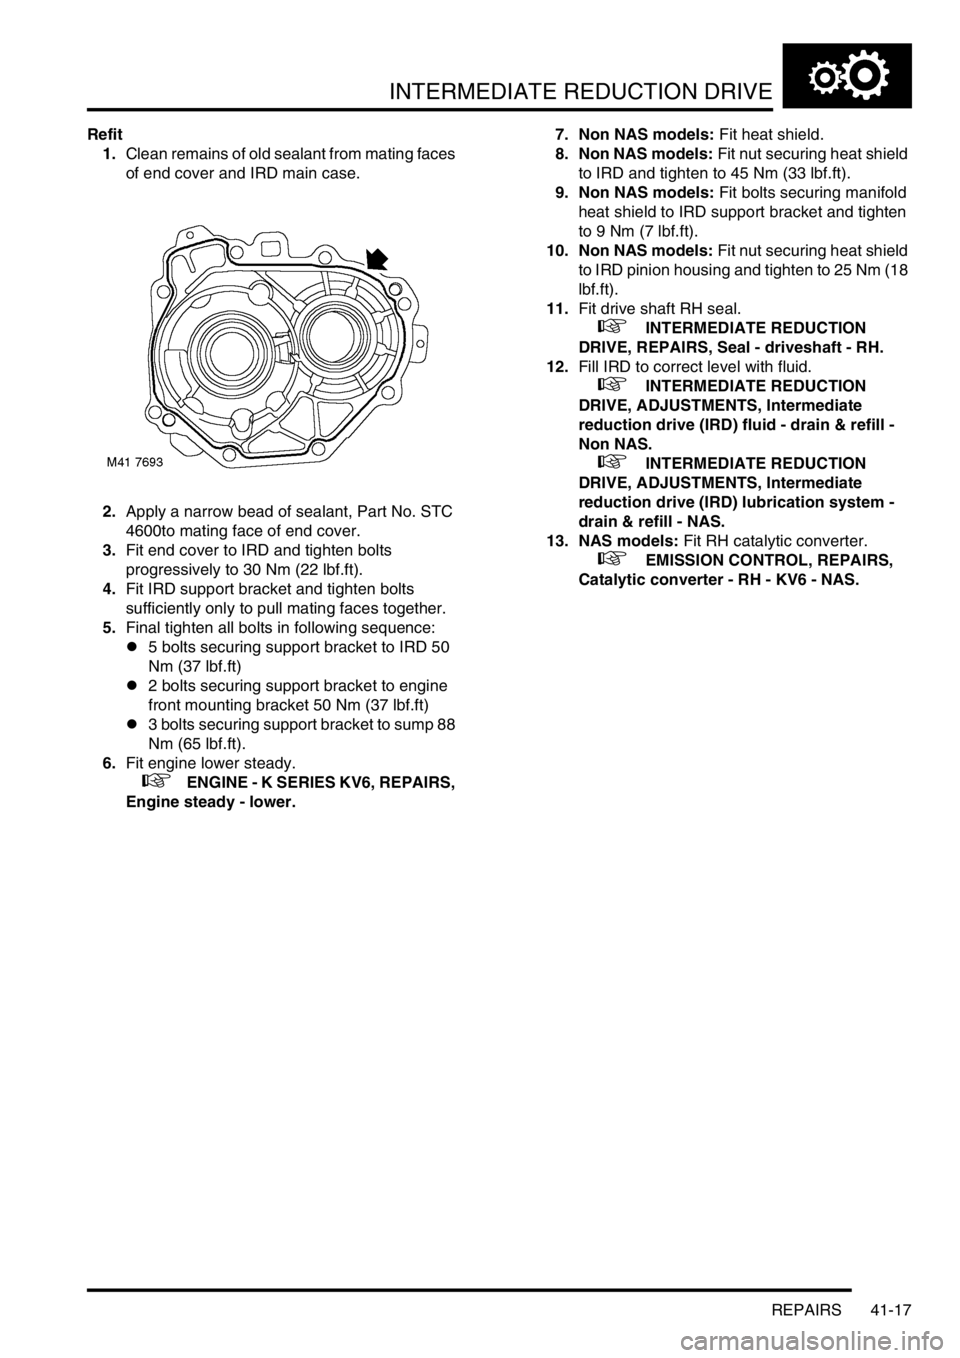
1.Clean remains of old sealant from mating faces
of end cover and IRD main case.
2.Apply a narrow bead of sealant, Part No. STC
4600to mating face of end cover.
3.Fit end cover to IRD and tighten bolts
progressively to 30 Nm (22 lbf.ft).
4.Fit IRD support bracket and tighten bolts
sufficiently only to pull mating faces together.
5.Final tighten all bolts in following sequence:
l5 bolts securing support bracket to IRD 50
Nm (37 lbf.ft)
l2 bolts securing support bracket to engine
front mounting bracket 50 Nm (37 lbf.ft)
l3 bolts securing support bracket to sump 88
Nm (65 lbf.ft).
6.Fit engine lower steady.
+ ENGINE - K SERIES KV6, REPAIRS,
Engine steady - lower.7. Non NAS models: Fit heat shield.
8. Non NAS models: Fit nut securing heat shield
to IRD and tighten to 45 Nm (33 lbf.ft).
9. Non NAS models: Fit bolts securing manifold
heat shield to IRD support bracket and tighten
to 9 Nm (7 lbf.ft).
10. Non NAS models: Fit nut securing heat shield
to IRD pinion housing and tighten to 25 Nm (18
lbf.ft).
11.Fit drive shaft RH seal.
+ INTERMEDIATE REDUCTION
DRIVE, REPAIRS, Seal - driveshaft - RH.
12.Fill IRD to correct level with fluid.
+ INTERMEDIATE REDUCTION
DRIVE, ADJUSTMENTS, Intermediate
reduction drive (IRD) fluid - drain & refill -
Non NAS.
+ INTERMEDIATE REDUCTION
DRIVE, ADJUSTMENTS, Intermediate
reduction drive (IRD) lubrication system -
drain & refill - NAS.
13. NAS models: Fit RH catalytic converter.
+ EMISSION CONTROL, REPAIRS,
Catalytic converter - RH - KV6 - NAS.