LAND ROVER FREELANDER 2001 Workshop Manual
FREELANDER 2001
LAND ROVER
LAND ROVER
https://www.carmanualsonline.info/img/64/57250/w960_57250-0.png
LAND ROVER FREELANDER 2001 Workshop Manual
Trending: tow, boot, roof, fuel cap release, relay, engine coolant, service schedule
Page 851 of 1007
CORROSION PREVENTION AND SEALING
77-4-20 SEALING
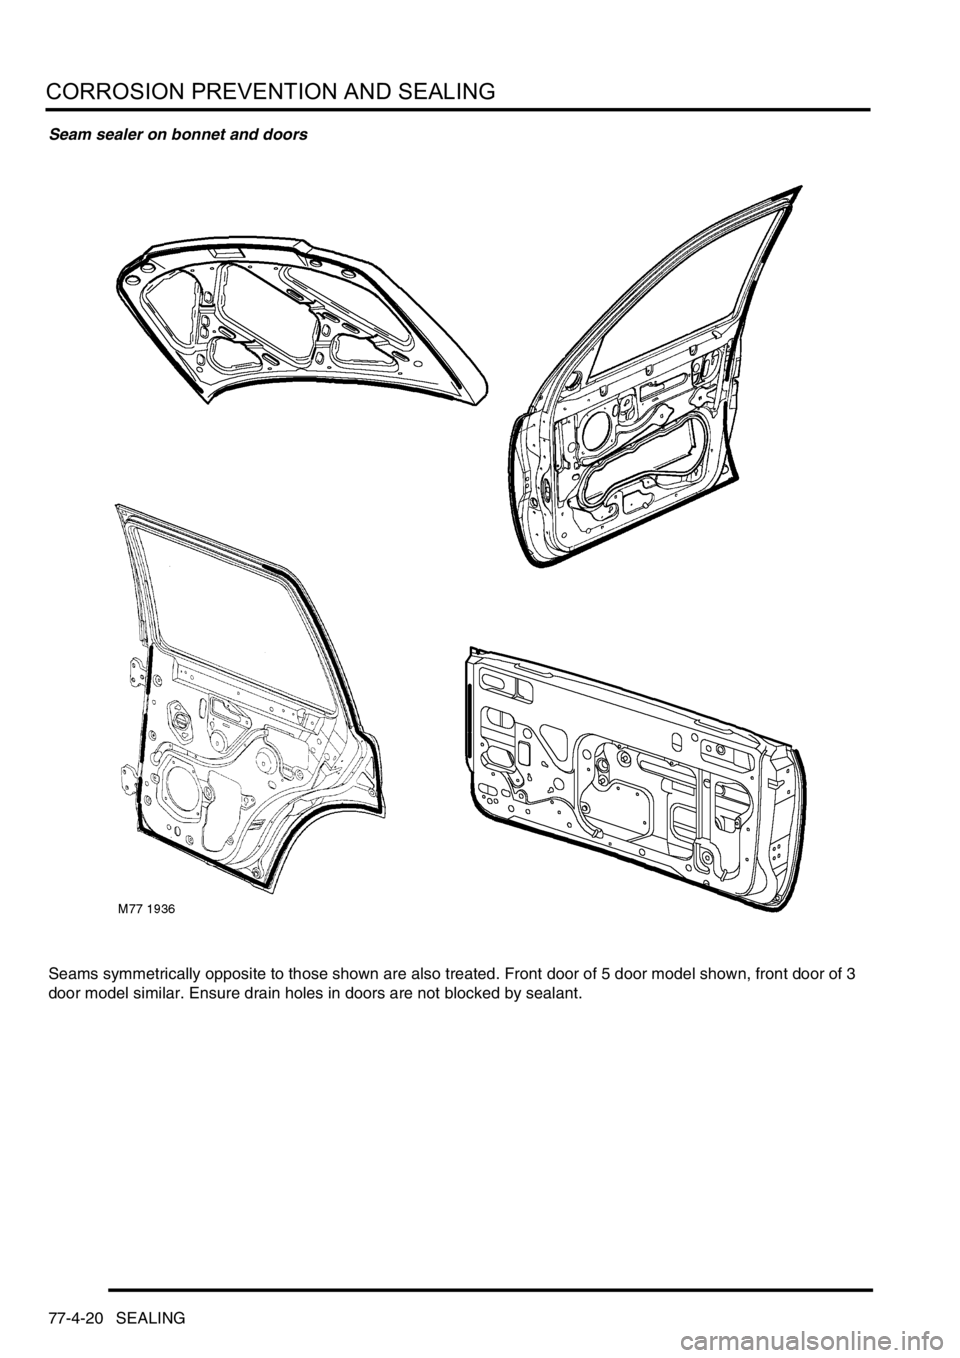
Seam sealer on bonnet and doors
Seams symmetrically opposite to those shown are also treated. Front door of 5 door model shown, front door of 3
door model similar. Ensure drain holes in doors are not blocked by sealant.
Page 852 of 1007
CORROSION PREVENTION AND SEALING
SEALING 77-4-21
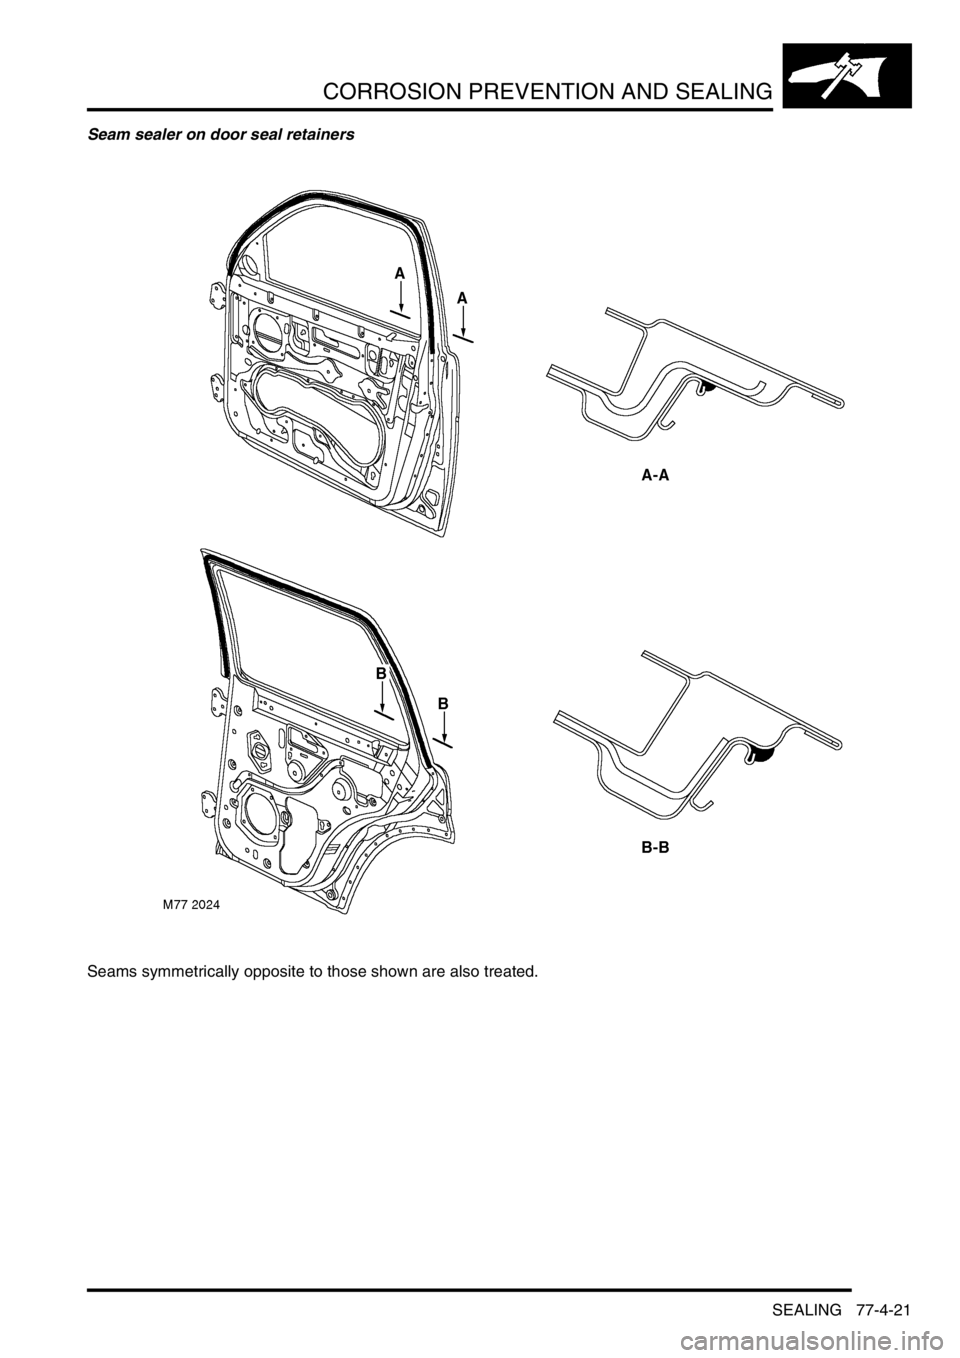
Seam sealer on door seal retainers
Seams symmetrically opposite to those shown are also treated.
Page 853 of 1007
CORROSION PREVENTION AND SEALING
77-4-22 SEALING
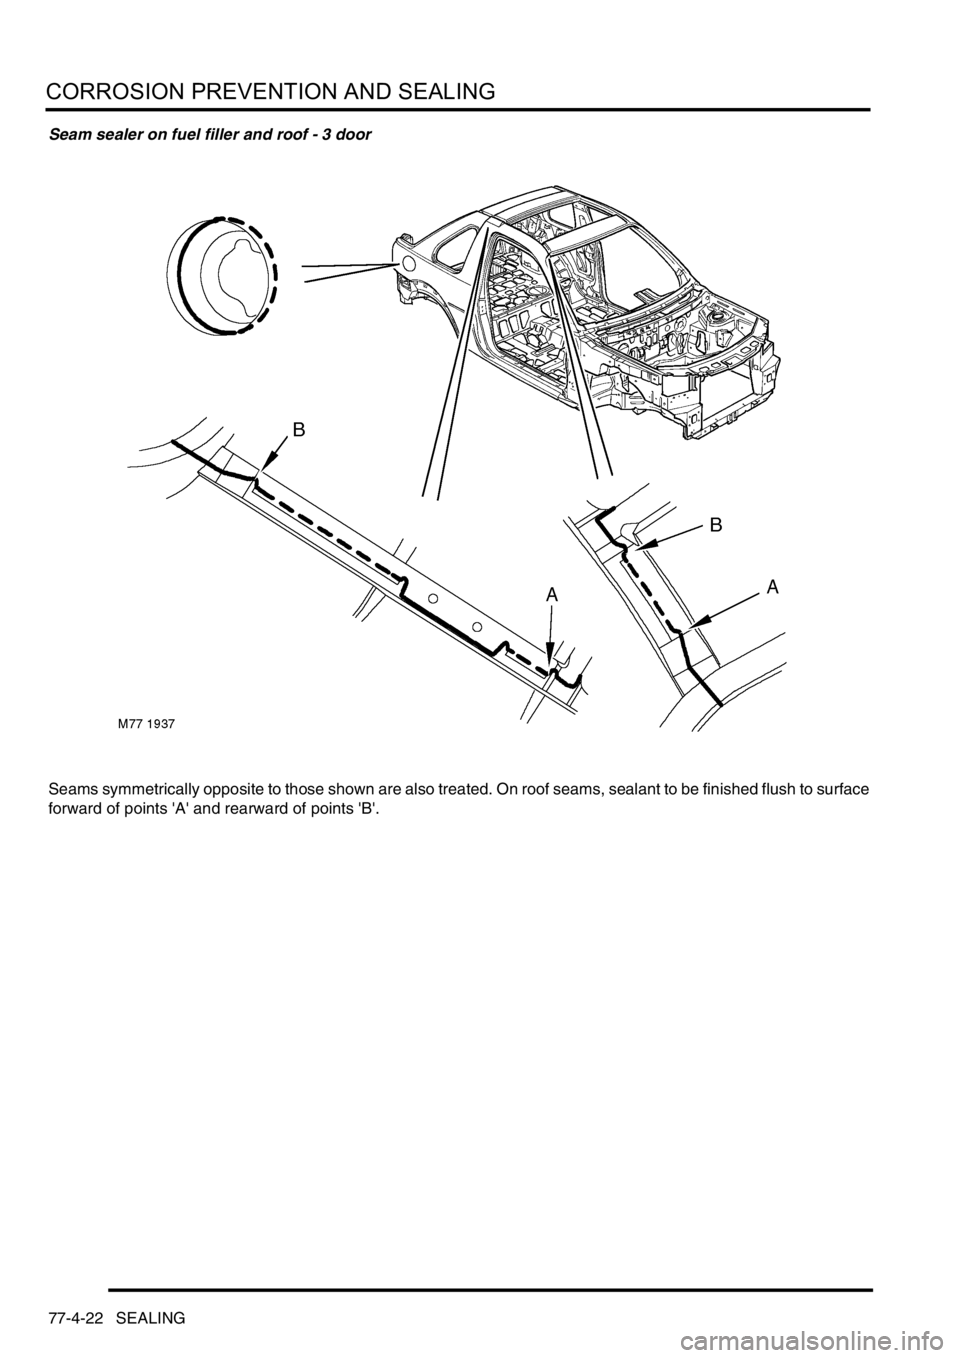
Seam sealer on fuel filler and roof - 3 door
Seams symmetrically opposite to those shown are also treated. On roof seams, sealant to be finished flush to surface
forward of points 'A' and rearward of points 'B'.
Page 854 of 1007
CORROSION PREVENTION AND SEALING
SEALING 77-4-23
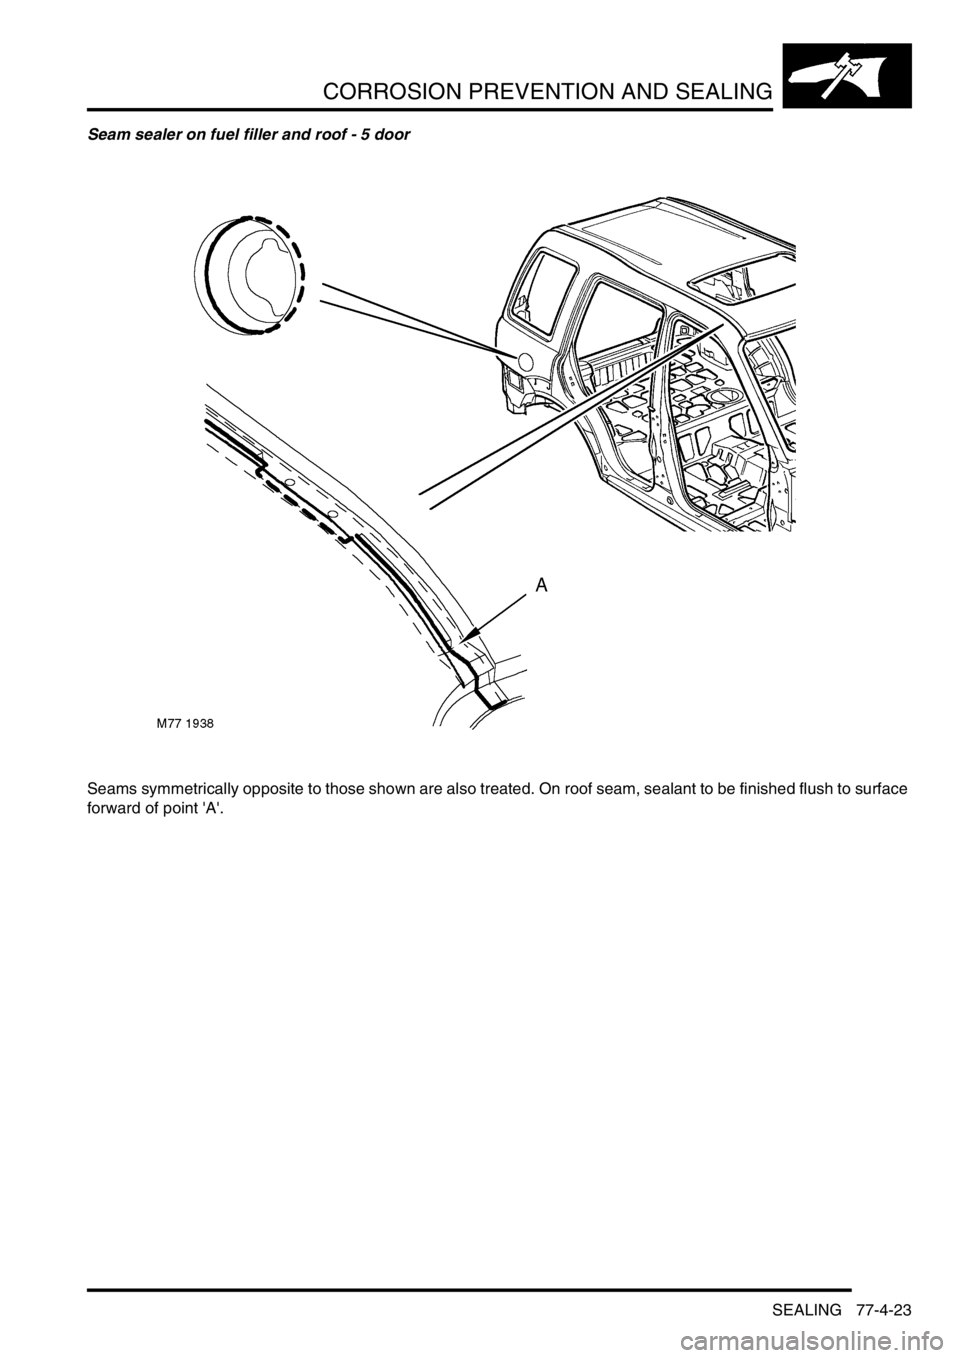
Seam sealer on fuel filler and roof - 5 door
Seams symmetrically opposite to those shown are also treated. On roof seam, sealant to be finished flush to surface
forward of point 'A'.
Page 855 of 1007
CORROSION PREVENTION AND SEALING
77-4-24 SEALING
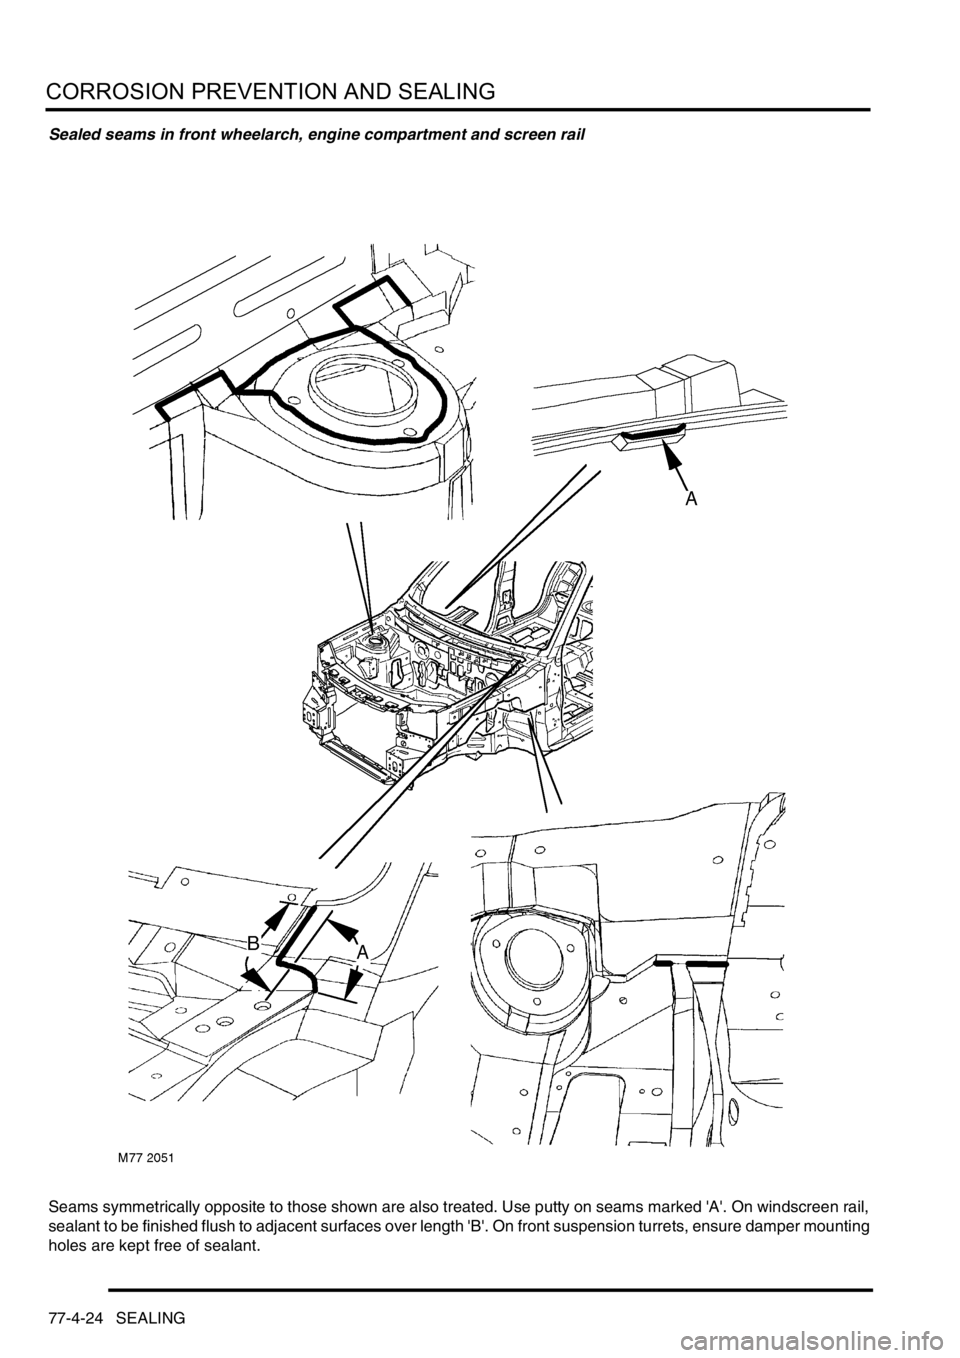
Sealed seams in front wheelarch, engine compartment and screen rail
Seams symmetrically opposite to those shown are also treated. Use putty on seams marked 'A'. On windscreen rail,
sealant to be finished flush to adjacent surfaces over length 'B'. On front suspension turrets, ensure damper mounting
holes are kept free of sealant.
Page 856 of 1007
CORROSION PREVENTION AND SEALING
SEALING 77-4-25
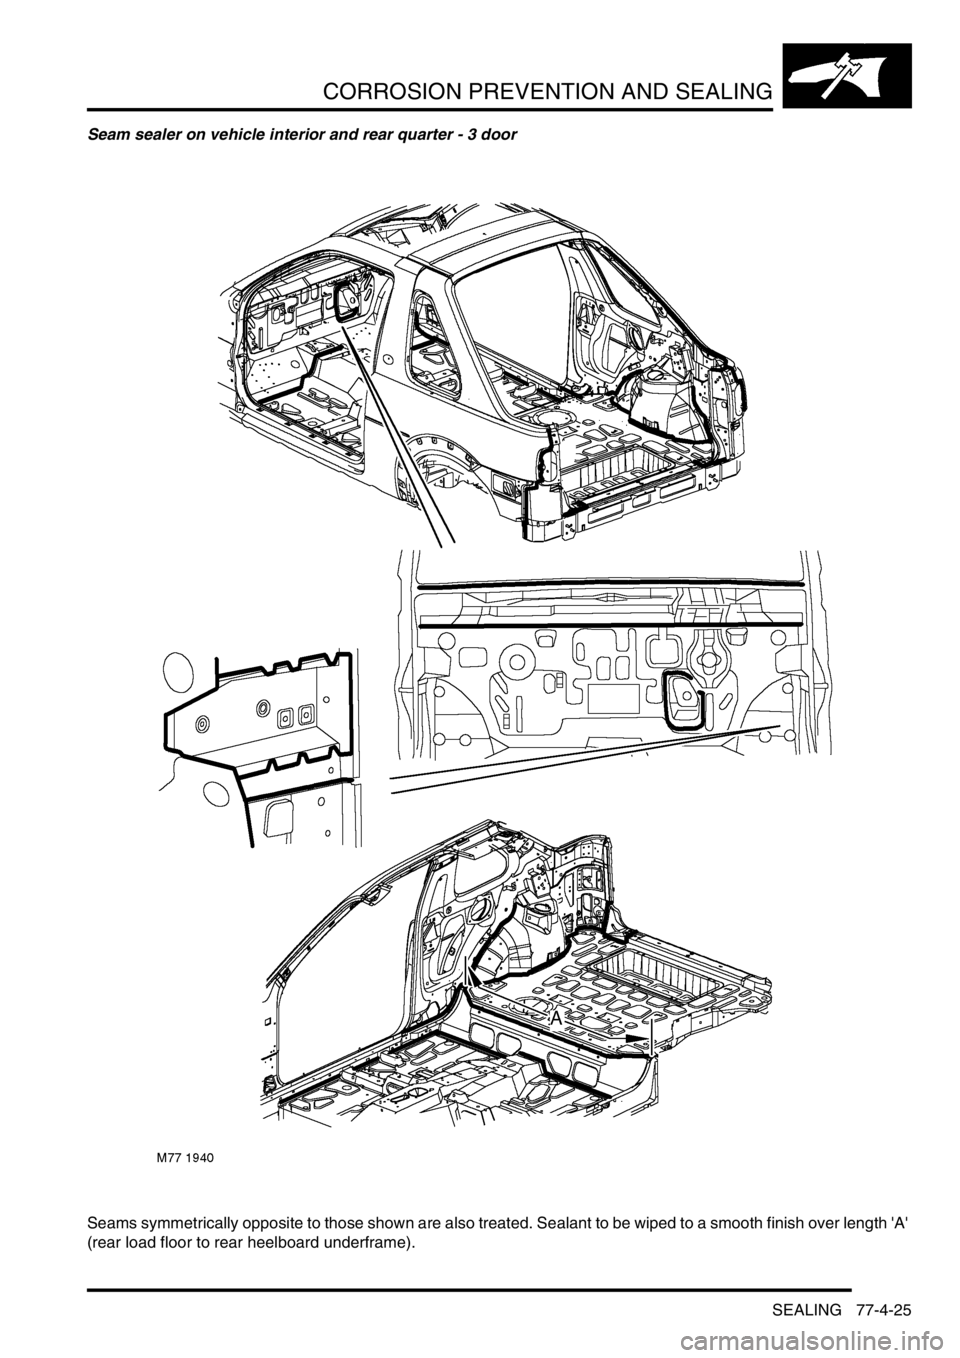
Seam sealer on vehicle interior and rear quarter - 3 door
Seams symmetrically opposite to those shown are also treated. Sealant to be wiped to a smooth finish over length 'A'
(rear load floor to rear heelboard underframe).
Page 857 of 1007
CORROSION PREVENTION AND SEALING
77-4-26 SEALING
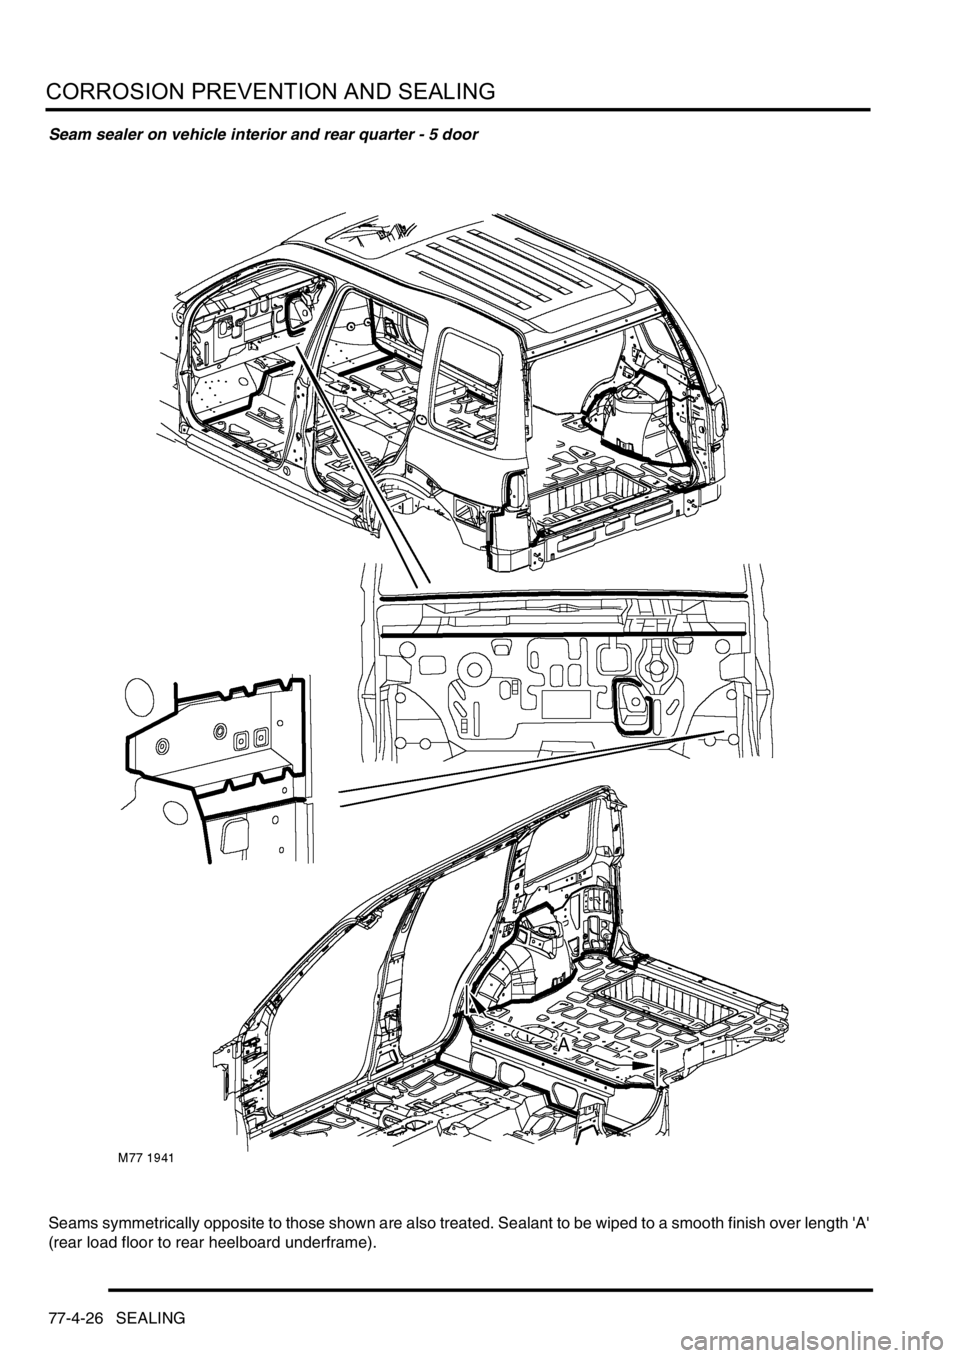
Seam sealer on vehicle interior and rear quarter - 5 door
Seams symmetrically opposite to those shown are also treated. Sealant to be wiped to a smooth finish over length 'A'
(rear load floor to rear heelboard underframe).
Page 858 of 1007
CORROSION PREVENTION AND SEALING
INTERNAL SEALING 77-4-27
INT ERNAL SEALING
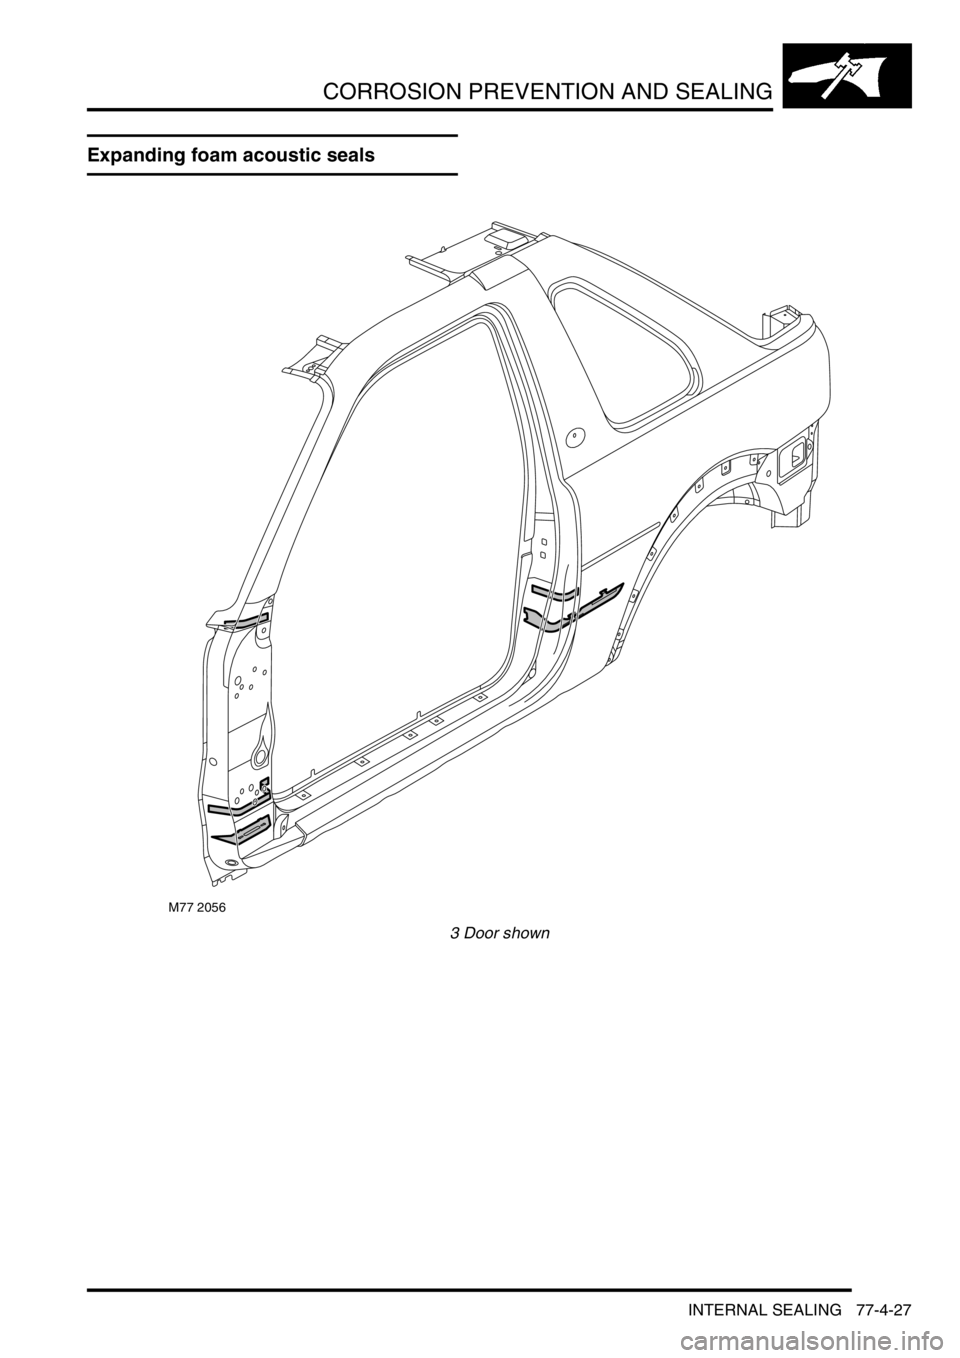
Expanding foam acoustic seals
3 Door shown
M77 2056
Page 859 of 1007
CORROSION PREVENTION AND SEALING
77-4-28 INTERNAL SEALING
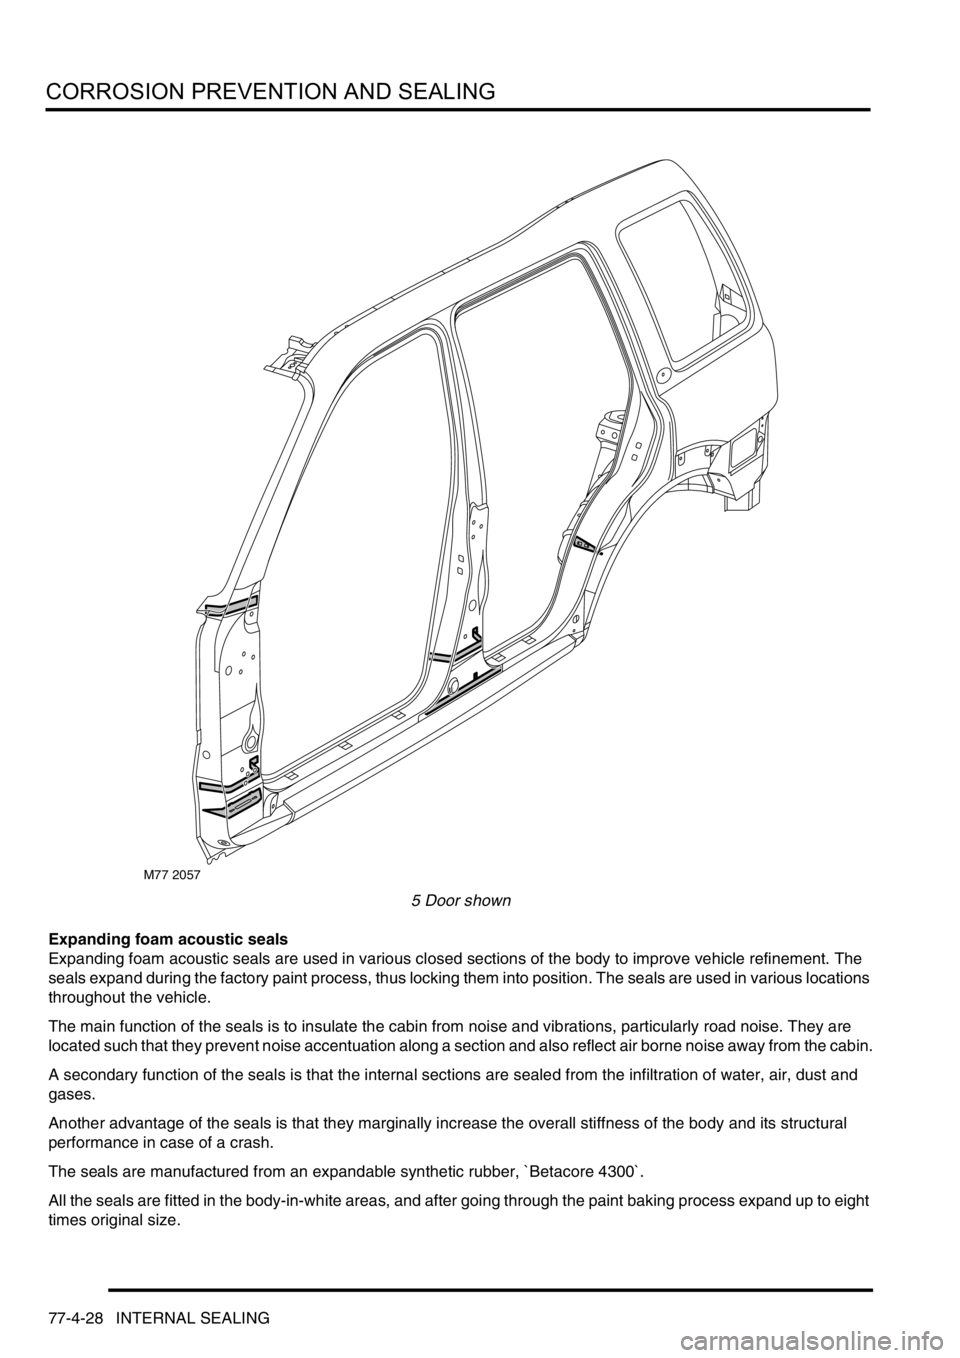
5 Door shown
Expanding foam acoustic seals
Expanding foam acoustic seals are used in various closed sections of the body to improve vehicle refinement. The
seals expand during the factory paint process, thus locking them into position. The seals are used in various locations
throughout the vehicle.
The main function of the seals is to insulate the cabin from noise and vibrations, particularly road noise. They are
located such that they prevent noise accentuation along a section and also reflect air borne noise away from the cabin.
A secondary function of the seals is that the internal sections are sealed from the infiltration of water, air, dust and
gases.
Another advantage of the seals is that they marginally increase the overall stiffness of the body and its structural
performance in case of a crash.
The seals are manufactured from an expandable synthetic rubber, `Betacore 4300`.
All the seals are fitted in the body-in-white areas, and after going through the paint baking process expand up to eight
times original size.
M77 2057
Page 860 of 1007
CORROSION PREVENTION AND SEALING
INTERNAL SEALING 77-4-29
Replacing seals
As paint oven temperatures used in a repair workshop are significantly lower than those that are used during
manufacture of the vehicle, a different process is required to replace the seals in service. When replacing a seal, the
following procedure must be followed.
After a repair that involves replacement of a section containing expanded foam, the new section must be injected
with an approved sound dampening foam. The sound dampening foam should be injected after paint refinishing and
application of cavity wax.
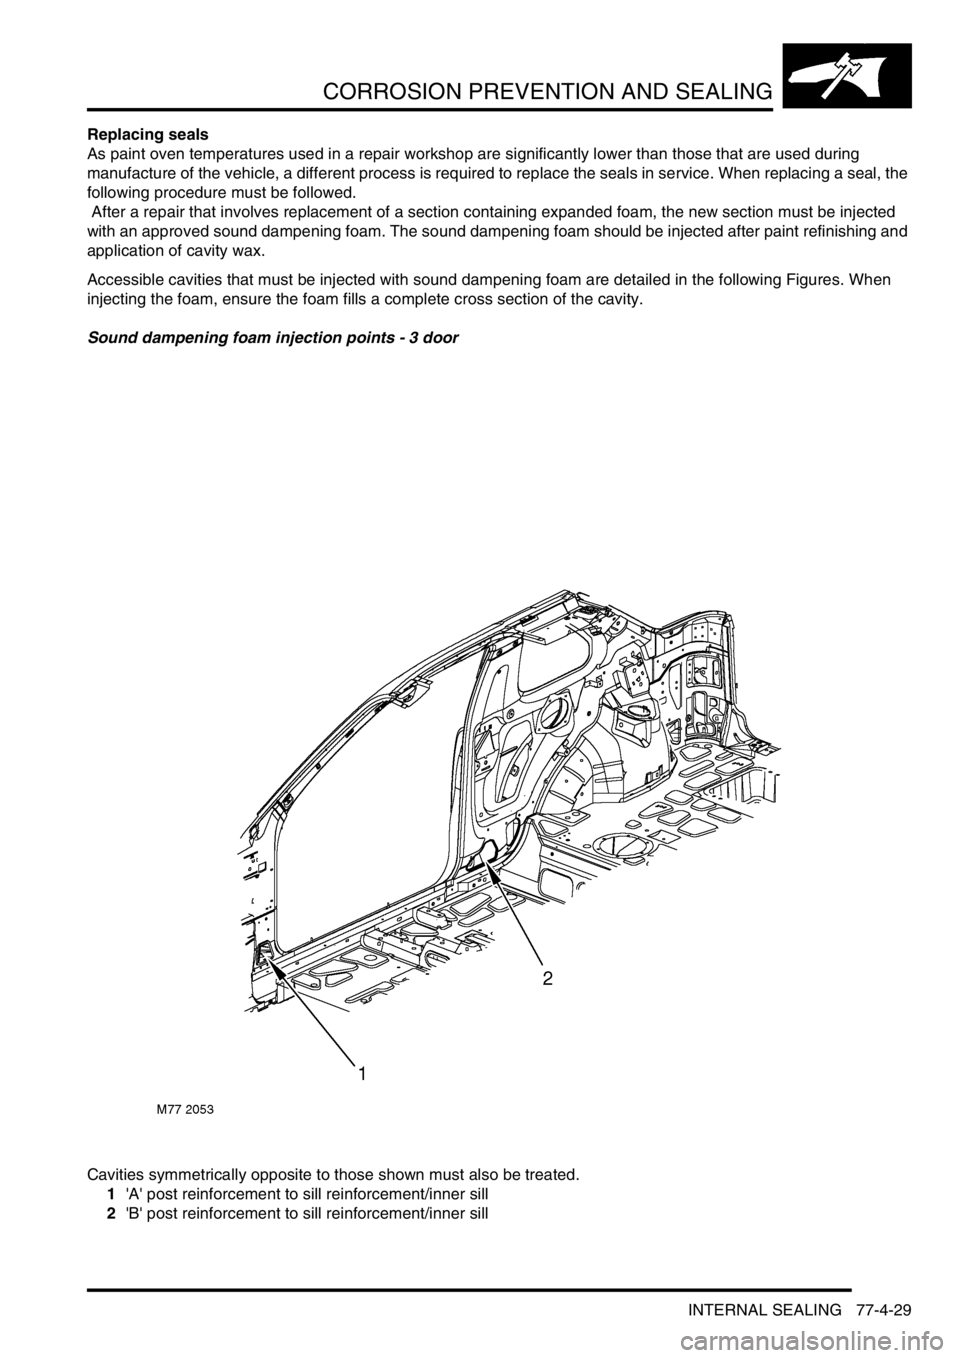
Accessible cavities that must be injected with sound dampening foam are detailed in the following Figures. When
injecting the foam, ensure the foam fills a complete cross section of the cavity.
Sound dampening foam injection points - 3 door
Cavities symmetrically opposite to those shown must also be treated.
1'A' post reinforcement to sill reinforcement/inner sill
2'B' post reinforcement to sill reinforcement/inner sill
Trending: oil level, air condition, run flat, jump start, engine oil, refrigerant type, handbrake
