LAND ROVER FREELANDER 2001 Workshop Manual
Manufacturer: LAND ROVER, Model Year: 2001, Model line: FREELANDER, Model: LAND ROVER FREELANDER 2001Pages: 1007, PDF Size: 23.47 MB
Page 891 of 1007

Page 892 of 1007
AIR CONDITIONING
REPAIRS 82-5
REPAIRS
Drive belt - compressor - Td4
$% 82.10.02
Remove
1.Disconnect battery earth lead.
2.Remove ancillary drive belt.
+ CHARGING AND STARTING,
REPAIRS, Ancillary drive belt - Td4.
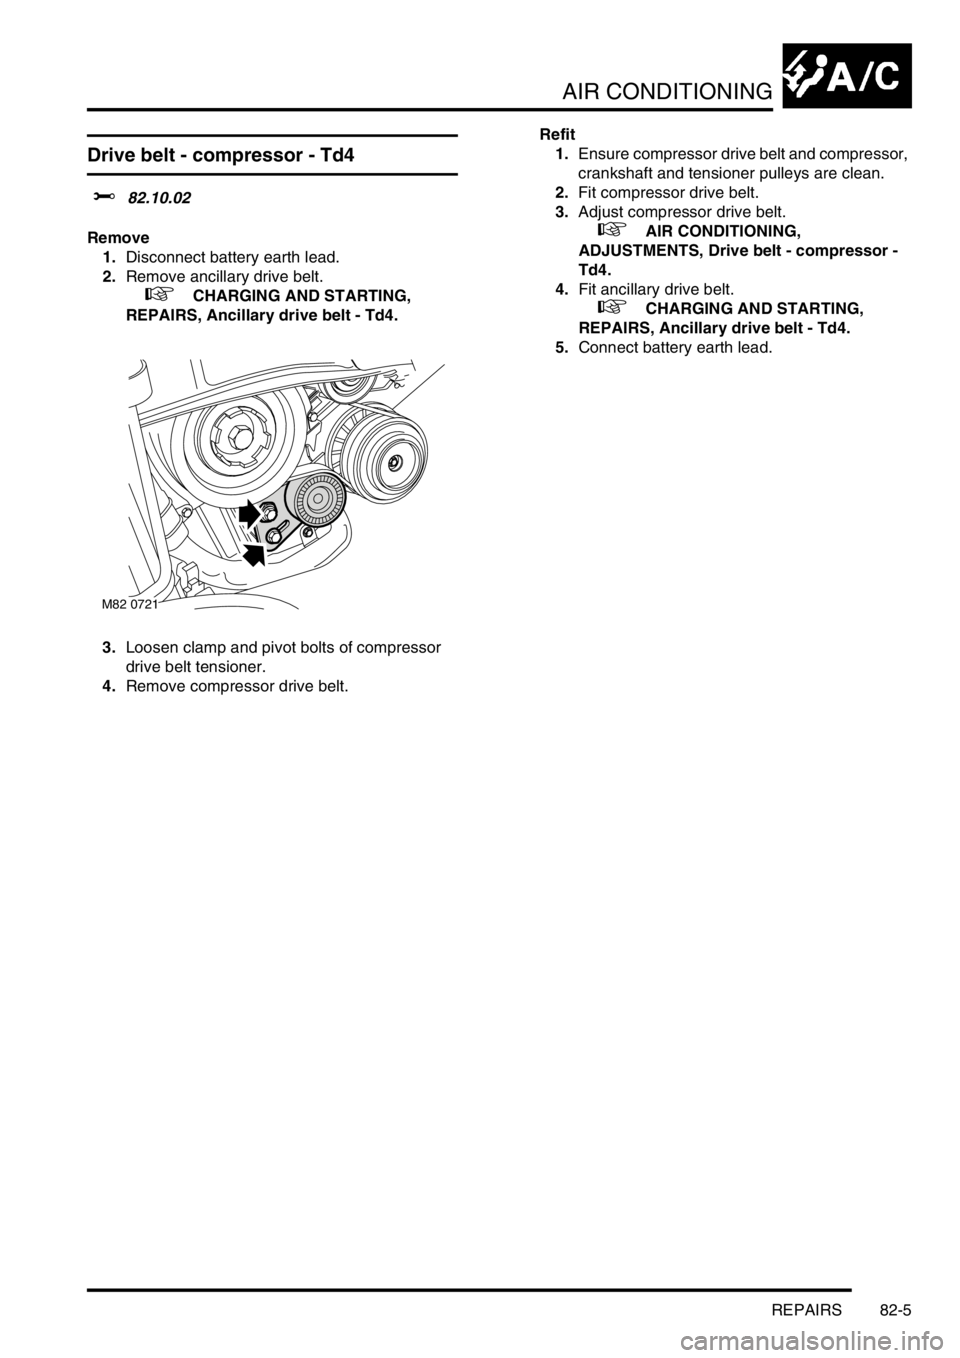
3.Loosen clamp and pivot bolts of compressor
drive belt tensioner.
4.Remove compressor drive belt.Refit
1.Ensure compressor drive belt and compressor,
crankshaft and tensioner pulleys are clean.
2.Fit compressor drive belt.
3.Adjust compressor drive belt.
+ AIR CONDITIONING,
ADJUSTMENTS, Drive belt - compressor -
Td4.
4.Fit ancillary drive belt.
+ CHARGING AND STARTING,
REPAIRS, Ancillary drive belt - Td4.
5.Connect battery earth lead.
M82 0721
Page 893 of 1007
AIR CONDITIONING
82-6REPAIRS
Compressor - Td4
$% 82.10.20
Remove
1.Raise front of vehicle.
WARNING: Do not work on or under a
vehicle supported only by a jack. Always
support the vehicle on safety stands.
2.Disconnect battery earth lead.
3.Recover refrigerant from A/C system.
+ AIR CONDITIONING, REFRIGERANT
RECOVERY, RECYCLING AND
RECHARGING, Refrigerant recovery -
recycling and recharge.
4.Remove compressor drive belt.
+ AIR CONDITIONING, REPAIRS,
Drive belt - compressor - Td4.
WARNING: Under no circumstances should
refrigerant hoses be disconnected without
first discharging the system.
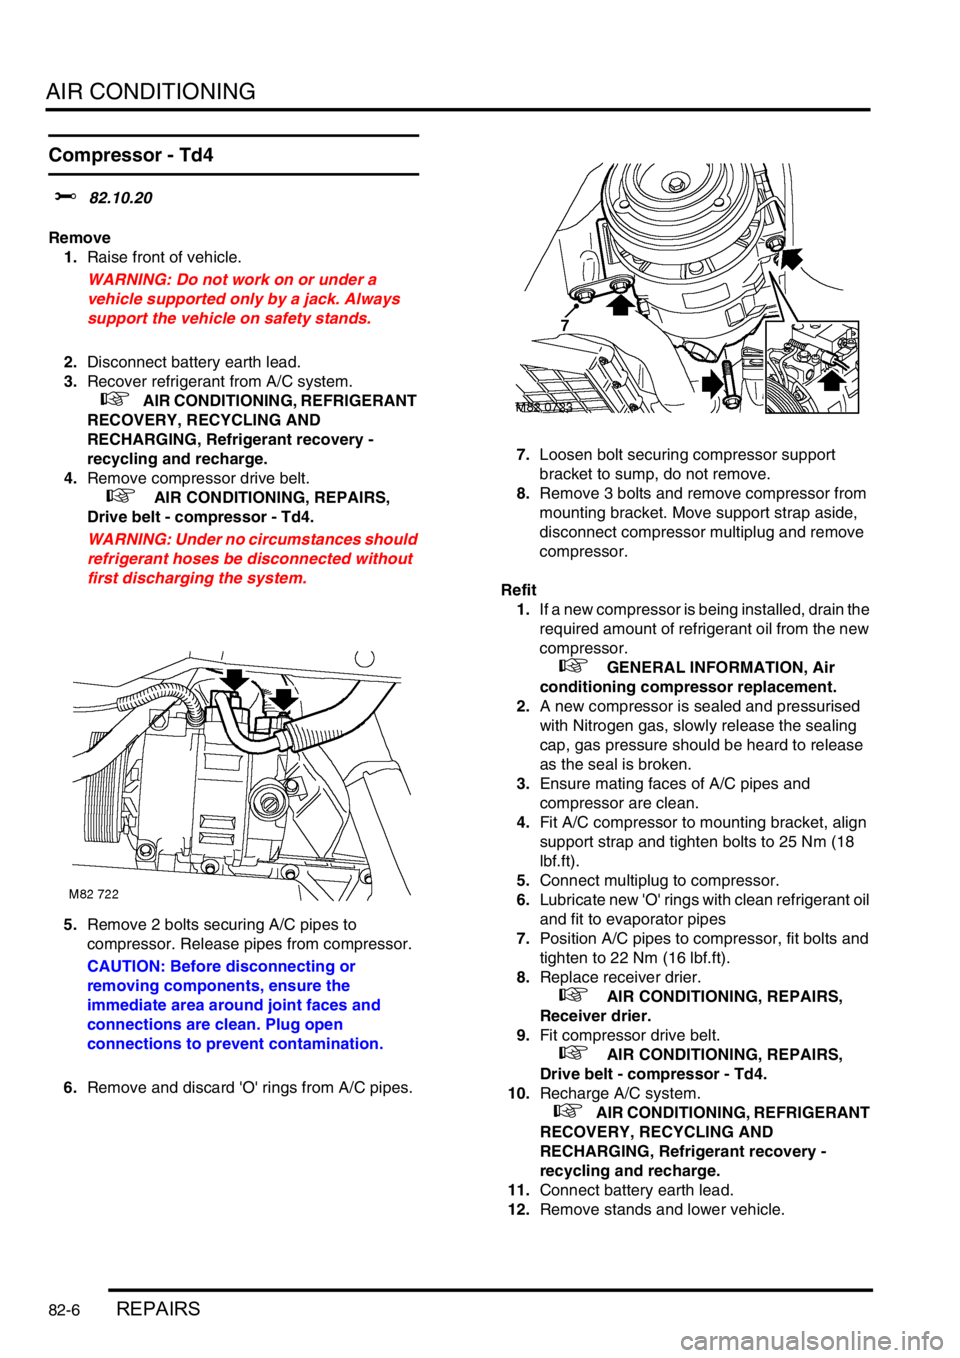
5.Remove 2 bolts securing A/C pipes to
compressor. Release pipes from compressor.
CAUTION: Before disconnecting or
removing components, ensure the
immediate area around joint faces and
connections are clean. Plug open
connections to prevent contamination.
6.Remove and discard 'O' rings from A/C pipes.7.Loosen bolt securing compressor support
bracket to sump, do not remove.
8.Remove 3 bolts and remove compressor from
mounting bracket. Move support strap aside,
disconnect compressor multiplug and remove
compressor.
Refit
1.If a new compressor is being installed, drain the
required amount of refrigerant oil from the new
compressor.
+ GENERAL INFORMATION, Air
conditioning compressor replacement.
2.A new compressor is sealed and pressurised
with Nitrogen gas, slowly release the sealing
cap, gas pressure should be heard to release
as the seal is broken.
3.Ensure mating faces of A/C pipes and
compressor are clean.
4.Fit A/C compressor to mounting bracket, align
support strap and tighten bolts to 25 Nm (18
lbf.ft).
5.Connect multiplug to compressor.
6.Lubricate new 'O' rings with clean refrigerant oil
and fit to evaporator pipes
7.Position A/C pipes to compressor, fit bolts and
tighten to 22 Nm (16 lbf.ft).
8.Replace receiver drier.
+ AIR CONDITIONING, REPAIRS,
Receiver drier.
9.Fit compressor drive belt.
+ AIR CONDITIONING, REPAIRS,
Drive belt - compressor - Td4.
10.Recharge A/C system.
+ AIR CONDITIONING, REFRIGERANT
RECOVERY, RECYCLING AND
RECHARGING, Refrigerant recovery -
recycling and recharge.
11.Connect battery earth lead.
12.Remove stands and lower vehicle.
Page 894 of 1007
AIR CONDITIONING
REPAIRS 82-7
Compressor - KV6
$% 82.10.20
Remove
1.Disconnect battery earth lead.
2.Recover refrigerant from A/C system.
+ AIR CONDITIONING, REFRIGERANT
RECOVERY, RECYCLING AND
RECHARGING, Refrigerant recovery -
recycling and recharge.
3.Remove underbelly panel.
+ EXTERIOR FITTINGS, REPAIRS,
Panel - underbelly.
4.Remove RH front road wheel.
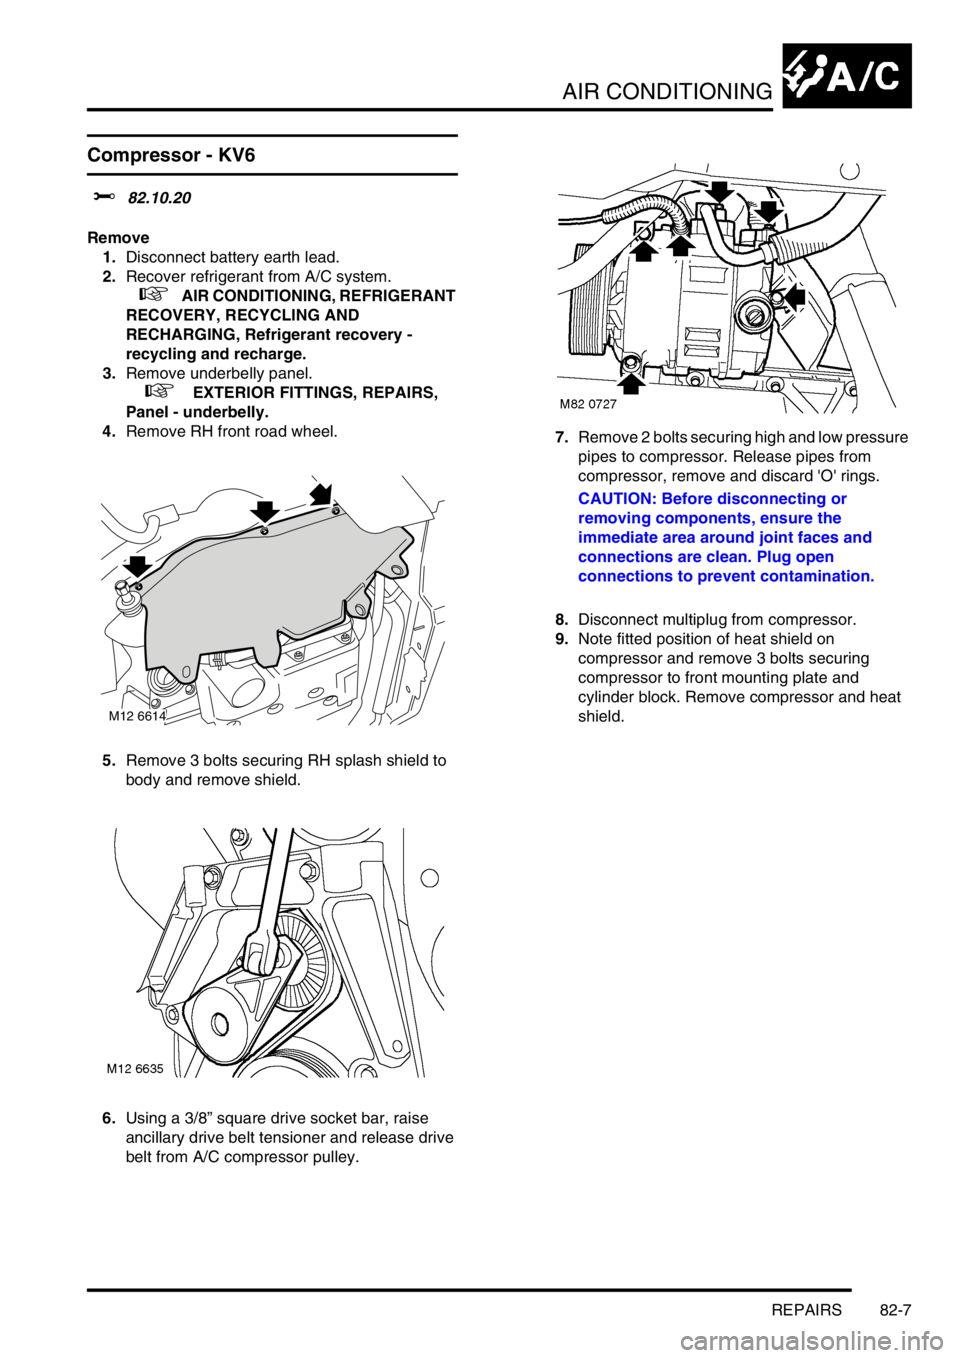
5.Remove 3 bolts securing RH splash shield to
body and remove shield.
6.Using a 3/8” square drive socket bar, raise
ancillary drive belt tensioner and release drive
belt from A/C compressor pulley.7.Remove 2 bolts securing high and low pressure
pipes to compressor. Release pipes from
compressor, remove and discard 'O' rings.
CAUTION: Before disconnecting or
removing components, ensure the
immediate area around joint faces and
connections are clean. Plug open
connections to prevent contamination.
8.Disconnect multiplug from compressor.
9.Note fitted position of heat shield on
compressor and remove 3 bolts securing
compressor to front mounting plate and
cylinder block. Remove compressor and heat
shield.
M12 6614
Page 895 of 1007
AIR CONDITIONING
82-8REPAIRS
Refit
1.If a new compressor is being installed, drain the
required amount of refrigerant oil from the new
compressor.
+ GENERAL INFORMATION, Air
conditioning compressor replacement.
2.A new compressor is sealed and pressurised
with Nitrogen gas, slowly release the sealing
cap, gas pressure should be heard to release
as the seal is broken.
3.Clean compressor and mating face on front
mounting plate and cylinder block.
4.Position compressor, fit but do not fully tighten
lower bolt.
5.Position heat shield and fit compressor upper
securing bolts. Tighten compressor upper and
lower securing bolts to 25 Nm (18 lbf.ft).
6.Remove caps from compressor and high
pressure pipe.
7.Clean compressor high pressure pipe
connection.
8.Lubricate new 'O' ring with refrigerant oil and fit
to high pressure pipe.
9.Connect high pressure pipe to compressor, fit
and tighten bolt to 25 Nm (18 lbf.ft).
10.Connect multiplug to compressor.
11.Remove caps from compressor and low
pressure pipe.
12.Clean compressor low pressure pipe
connection.
13.Lubricate new 'O' ring with refrigerant oil and fit
to low pressure pipe.
14.Connect low pressure pipe to compressor, fit
and tighten bolt to 25 Nm (18 lbf.ft).
15.Clean pulley 'V's and tensioner pulley running
surface.
16.Using a 3/8” square drive socket bar, raise
ancillary drive belt tensioner and fit drive belt to
pulleys.
17.Fit splash shield and secure with bolts.
18.Fit RH road wheel and tighten nuts to 115 Nm
85 lbf.ft).
19.Replace receiver drier.
+ AIR CONDITIONING, REPAIRS,
Receiver drier.
20.Recharge A/C system.
+ AIR CONDITIONING, REFRIGERANT
RECOVERY, RECYCLING AND
RECHARGING, Refrigerant recovery -
recycling and recharge.
21.Connect battery earth lead.
22.Fit underbelly panel.
+ EXTERIOR FITTINGS, REPAIRS,
Panel - underbelly.
Compressor - K1.8
$% 82.10.20
Remove
1.Disconnect battery earth lead.
2.Raise front of vehicle.
WARNING: Do not work on or under a
vehicle supported only by a jack. Always
support the vehicle on safety stands.
3.Remove underbelly panel.
+ EXTERIOR FITTINGS, REPAIRS,
Panel - underbelly.
4.Recover refrigerant from A/C system.
+ AIR CONDITIONING, REFRIGERANT
RECOVERY, RECYCLING AND
RECHARGING, Refrigerant recovery -
recycling and recharge.
5.Remove alternator.
+ CHARGING AND STARTING,
REPAIRS, Alternator - K1.8.
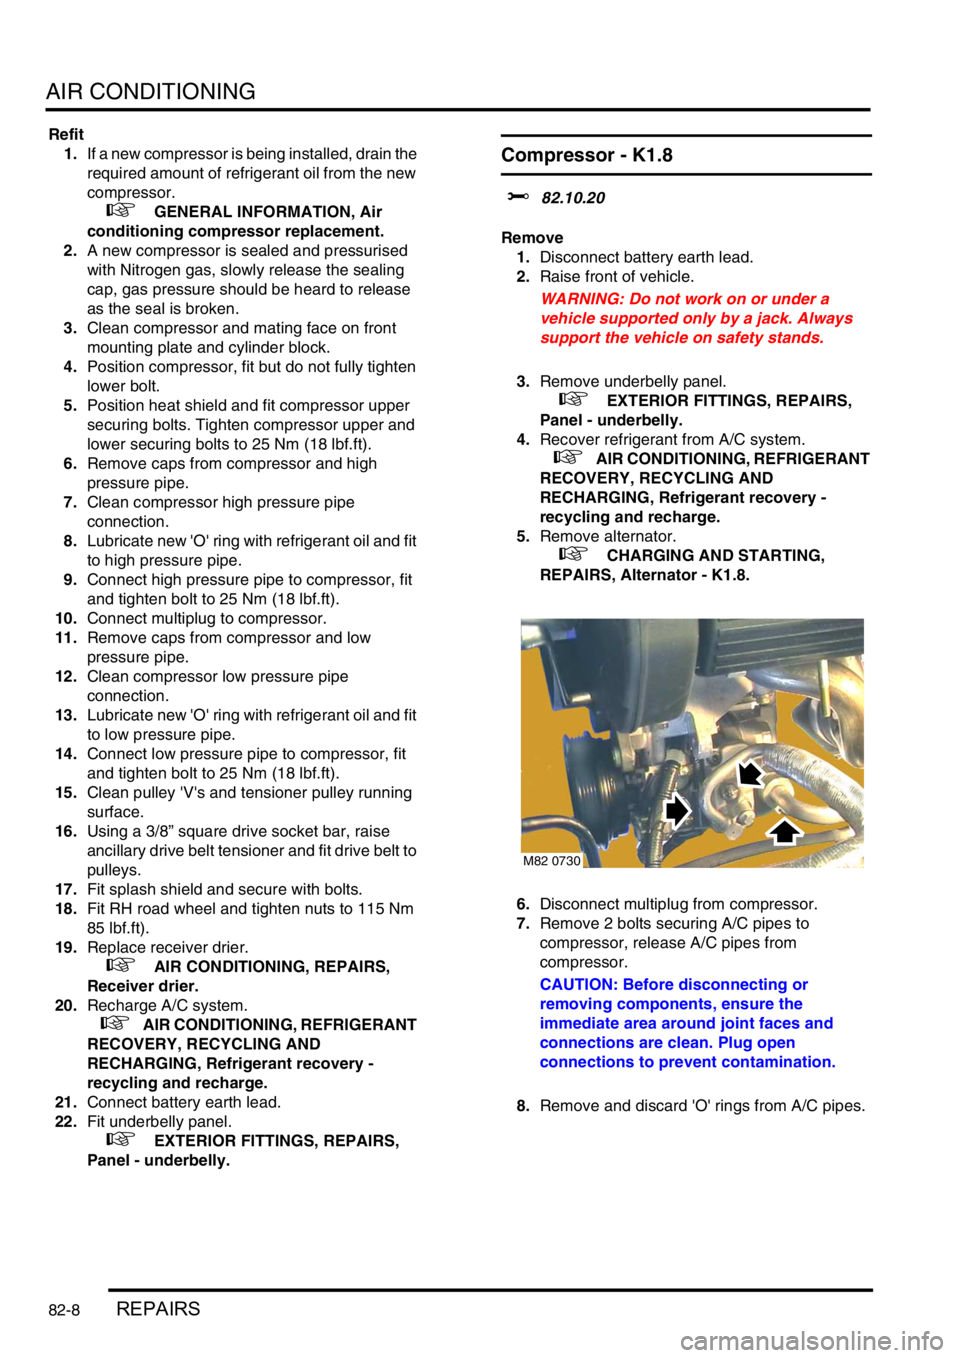
6.Disconnect multiplug from compressor.
7.Remove 2 bolts securing A/C pipes to
compressor, release A/C pipes from
compressor.
CAUTION: Before disconnecting or
removing components, ensure the
immediate area around joint faces and
connections are clean. Plug open
connections to prevent contamination.
8.Remove and discard 'O' rings from A/C pipes.
M82 0730
Page 896 of 1007
AIR CONDITIONING
REPAIRS 82-9
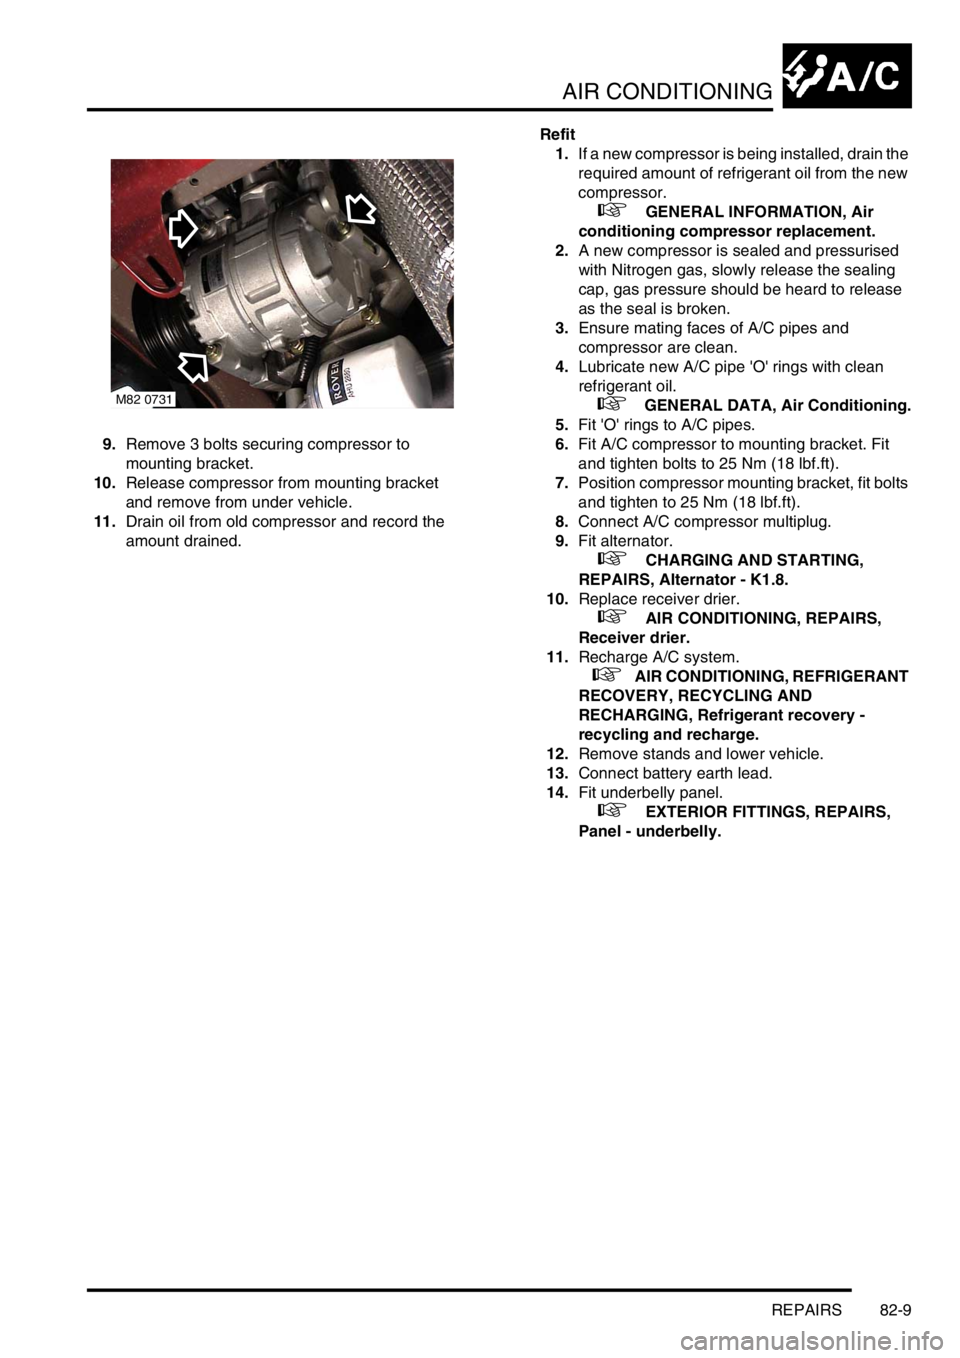
9.Remove 3 bolts securing compressor to
mounting bracket.
10.Release compressor from mounting bracket
and remove from under vehicle.
11.Drain oil from old compressor and record the
amount drained.Refit
1.If a new compressor is being installed, drain the
required amount of refrigerant oil from the new
compressor.
+ GENERAL INFORMATION, Air
conditioning compressor replacement.
2.A new compressor is sealed and pressurised
with Nitrogen gas, slowly release the sealing
cap, gas pressure should be heard to release
as the seal is broken.
3.Ensure mating faces of A/C pipes and
compressor are clean.
4.Lubricate new A/C pipe 'O' rings with clean
refrigerant oil.
+ GENERAL DATA, Air Conditioning.
5.Fit 'O' rings to A/C pipes.
6.Fit A/C compressor to mounting bracket. Fit
and tighten bolts to 25 Nm (18 lbf.ft).
7.Position compressor mounting bracket, fit bolts
and tighten to 25 Nm (18 lbf.ft).
8.Connect A/C compressor multiplug.
9.Fit alternator.
+ CHARGING AND STARTING,
REPAIRS, Alternator - K1.8.
10.Replace receiver drier.
+ AIR CONDITIONING, REPAIRS,
Receiver drier.
11.Recharge A/C system.
+ AIR CONDITIONING, REFRIGERANT
RECOVERY, RECYCLING AND
RECHARGING, Refrigerant recovery -
recycling and recharge.
12.Remove stands and lower vehicle.
13.Connect battery earth lead.
14.Fit underbelly panel.
+ EXTERIOR FITTINGS, REPAIRS,
Panel - underbelly.
M82 0731
Page 897 of 1007
AIR CONDITIONING
82-10REPAIRS
Condenser
$% 82.15.07
Remove
1.Disconnect battery earth lead.
2.Recover refrigerant from A/C system.
+ AIR CONDITIONING, REFRIGERANT
RECOVERY, RECYCLING AND
RECHARGING, Refrigerant recovery -
recycling and recharge.
3. Td4 models: Remove intercooler.
+ FUEL DELIVERY SYSTEM - DIESEL,
REPAIRS, Intercooler.
4. Remove bumper valance.
+ EXTERIOR FITTINGS, REPAIRS,
Bumper - assembly - front - up to 04MY.
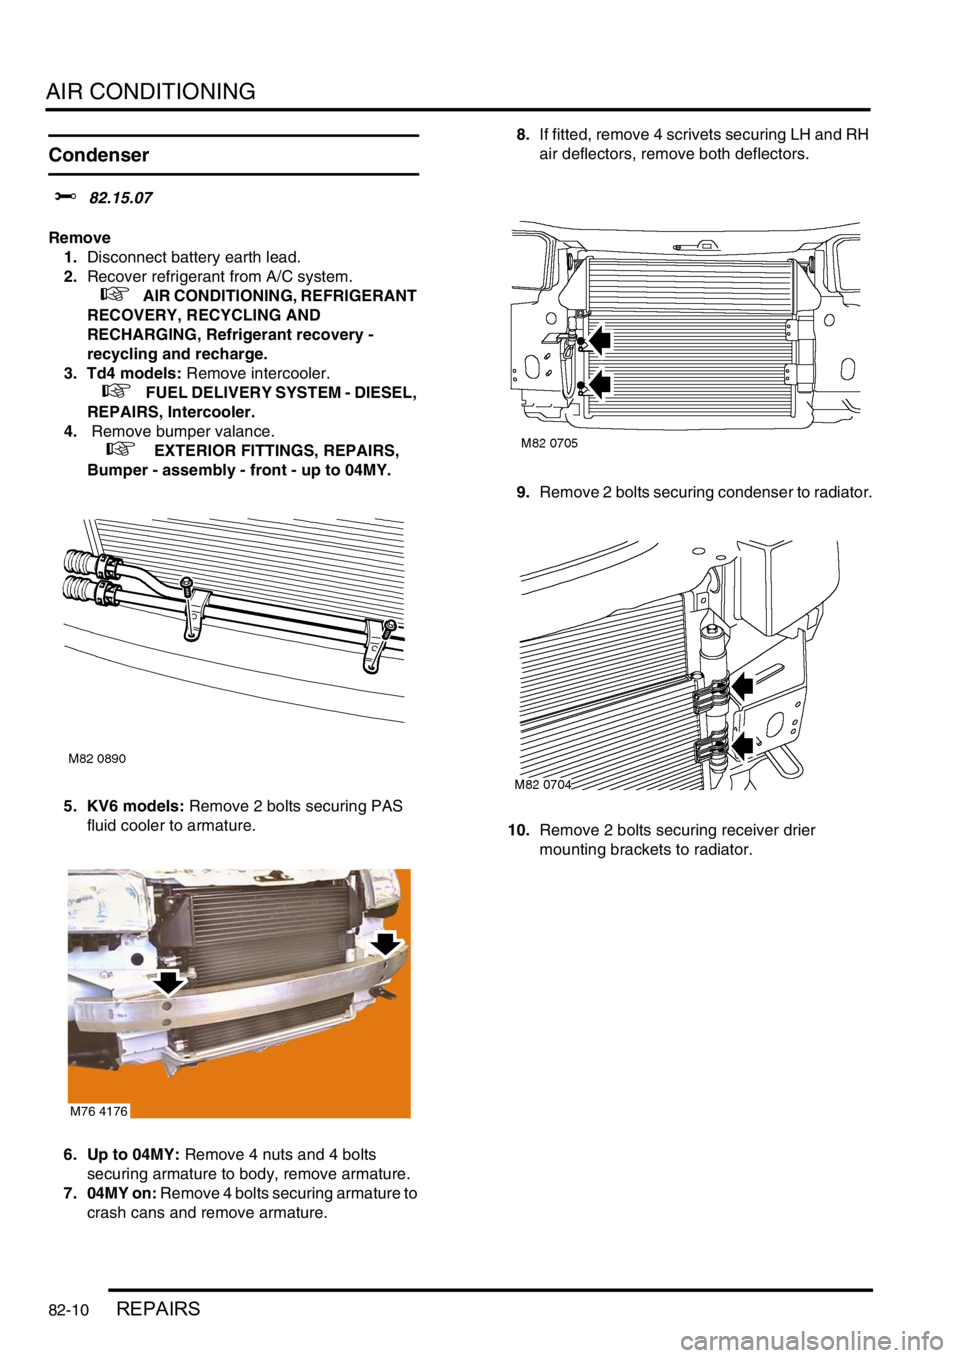
5. KV6 models: Remove 2 bolts securing PAS
fluid cooler to armature.
6. Up to 04MY: Remove 4 nuts and 4 bolts
securing armature to body, remove armature.
7. 04MY on: Remove 4 bolts securing armature to
crash cans and remove armature.8.If fitted, remove 4 scrivets securing LH and RH
air deflectors, remove both deflectors.
9.Remove 2 bolts securing condenser to radiator.
10.Remove 2 bolts securing receiver drier
mounting brackets to radiator.
M76 4176
Page 898 of 1007
AIR CONDITIONING
REPAIRS 82-11
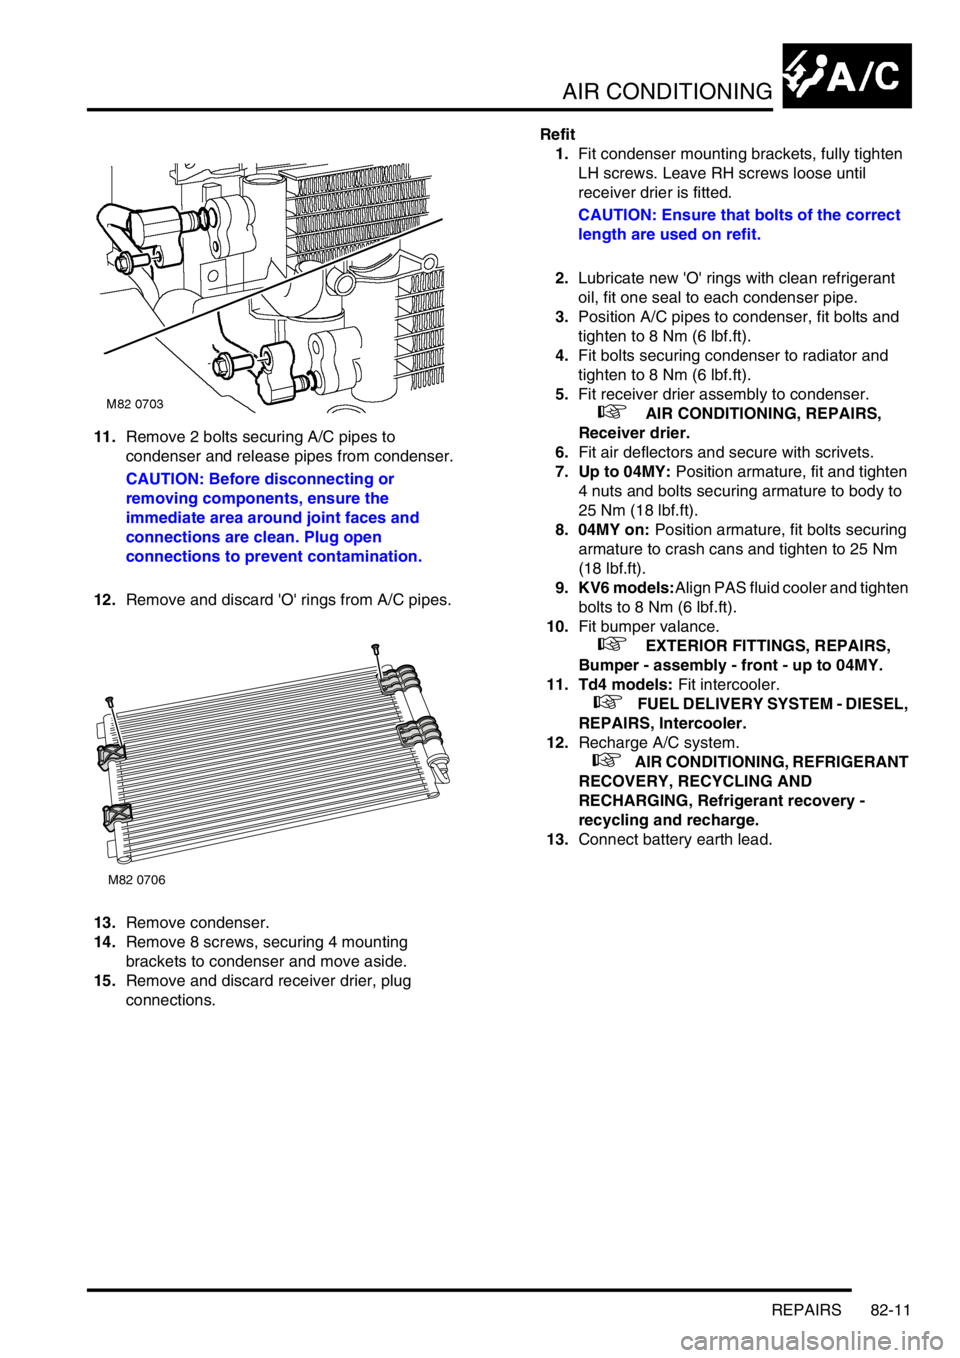
11.Remove 2 bolts securing A/C pipes to
condenser and release pipes from condenser.
CAUTION: Before disconnecting or
removing components, ensure the
immediate area around joint faces and
connections are clean. Plug open
connections to prevent contamination.
12.Remove and discard 'O' rings from A/C pipes.
13.Remove condenser.
14.Remove 8 screws, securing 4 mounting
brackets to condenser and move aside.
15.Remove and discard receiver drier, plug
connections.Refit
1.Fit condenser mounting brackets, fully tighten
LH screws. Leave RH screws loose until
receiver drier is fitted.
CAUTION: Ensure that bolts of the correct
length are used on refit.
2.Lubricate new 'O' rings with clean refrigerant
oil, fit one seal to each condenser pipe.
3.Position A/C pipes to condenser, fit bolts and
tighten to 8 Nm (6 lbf.ft).
4.Fit bolts securing condenser to radiator and
tighten to 8 Nm (6 lbf.ft).
5.Fit receiver drier assembly to condenser.
+ AIR CONDITIONING, REPAIRS,
Receiver drier.
6.Fit air deflectors and secure with scrivets.
7. Up to 04MY: Position armature, fit and tighten
4 nuts and bolts securing armature to body to
25 Nm (18 lbf.ft).
8. 04MY on: Position armature, fit bolts securing
armature to crash cans and tighten to 25 Nm
(18 lbf.ft).
9. KV6 models:Align PAS fluid cooler and tighten
bolts to 8 Nm (6 lbf.ft).
10.Fit bumper valance.
+ EXTERIOR FITTINGS, REPAIRS,
Bumper - assembly - front - up to 04MY.
11. Td4 models: Fit intercooler.
+ FUEL DELIVERY SYSTEM - DIESEL,
REPAIRS, Intercooler.
12.Recharge A/C system.
+ AIR CONDITIONING, REFRIGERANT
RECOVERY, RECYCLING AND
RECHARGING, Refrigerant recovery -
recycling and recharge.
13.Connect battery earth lead.
M82 0706
Page 899 of 1007
AIR CONDITIONING
82-12REPAIRS
Receiver drier
$% 82.17.03
Remove
1.Disconnect battery earth lead.
2.Recover refrigerant from A/C system.
+ AIR CONDITIONING, REFRIGERANT
RECOVERY, RECYCLING AND
RECHARGING, Refrigerant recovery -
recycling and recharge.
3. Remove bumper valance.
+ EXTERIOR FITTINGS, REPAIRS,
Bumper - assembly - front - up to 04MY.
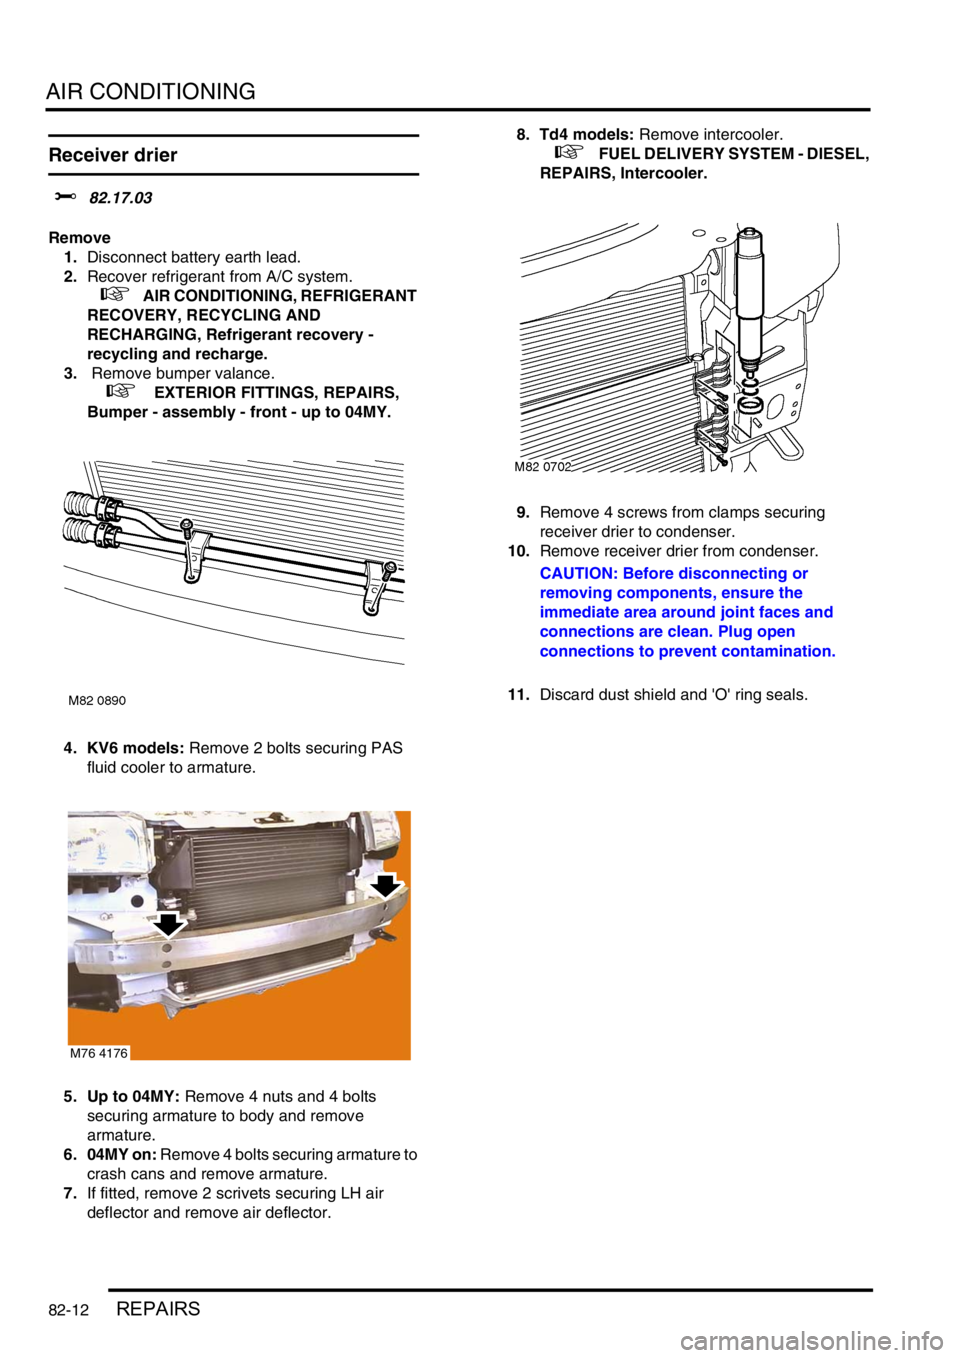
4. KV6 models: Remove 2 bolts securing PAS
fluid cooler to armature.
5. Up to 04MY: Remove 4 nuts and 4 bolts
securing armature to body and remove
armature.
6. 04MY on: Remove 4 bolts securing armature to
crash cans and remove armature.
7.If fitted, remove 2 scrivets securing LH air
deflector and remove air deflector.8. Td4 models: Remove intercooler.
+ FUEL DELIVERY SYSTEM - DIESEL,
REPAIRS, Intercooler.
9.Remove 4 screws from clamps securing
receiver drier to condenser.
10.Remove receiver drier from condenser.
CAUTION: Before disconnecting or
removing components, ensure the
immediate area around joint faces and
connections are clean. Plug open
connections to prevent contamination.
11.Discard dust shield and 'O' ring seals.
M76 4176
Page 900 of 1007
AIR CONDITIONING
REPAIRS 82-13
Refit
1.Lubricate new 'O' rings, dust shield and
condenser thread with refrigerant oil.
2.Fit 'O' rings and dust shield to receiver drier.
CAUTION: Do not remove receiver/dryer
from packaging until immediately before
installation.
3.Fit receiver drier to condenser and tighten to 12
Nm (9 lbf.ft).
4.Tighten clamps securing receiver drier to
condenser.
5.If fitted, fit air deflector and secure with scrivets.
6. Td4 models: Fit intercooler.
+ FUEL DELIVERY SYSTEM - DIESEL,
REPAIRS, Intercooler.
7. Up to 04MY: Position armature, fit and tighten
4 nuts and bolts securing armature to body to
25 Nm (18 lbf.ft).
8. 04MY on: Position armature, fit bolts securing
armature to crash cans and tighten bolts to 25
Nm (18 lbf.ft).
9. KV6 models: Align PAS fluid cooler and
tighten bolts to 8 Nm (6 lbf.ft).
10.Fit bumper valance.
+ EXTERIOR FITTINGS, REPAIRS,
Bumper - assembly - front - up to 04MY.
11.Recharge A/C system.
+ AIR CONDITIONING, REFRIGERANT
RECOVERY, RECYCLING AND
RECHARGING, Refrigerant recovery -
recycling and recharge.
12.Connect battery earth lead.
Switch - control
$% 82.20.07
Remove
1.Remove radio.
+ IN CAR ENTERTAINMENT,
REPAIRS, Radio - up to 04MY.
2.Remove 3 heater control knobs.
3.Remove 2 screws securing heater control
finisher to heater controls and remove finisher.
4.Disconnect multiplug from A/C control switch.
5.Remove switch from heater controls.
Refit
1.Fit A/C control switch and connect multiplug.
2.Fit heater control finisher and secure with
screws.
3.Fit heater control knobs.
4.Fit radio.
+ IN CAR ENTERTAINMENT,
REPAIRS, Radio - up to 04MY.