LAND ROVER FRELANDER 2 2006 Repair Manual
FRELANDER 2 2006
LAND ROVER
LAND ROVER
https://www.carmanualsonline.info/img/64/57251/w960_57251-0.png
LAND ROVER FRELANDER 2 2006 Repair Manual
Trending: tire size, engine, CD player, heating, gas mileage, wiper fluid, maintenance schedule
Page 1661 of 3229
16. CAUTION: Make s ure t hat the special tool is
correct ly l ocat ed.
Rotat e t he s pecial t ool counter-clockwi s e t o
rel ease the bl ower mot or ass embl y.
Speci al Tool (s ): 412-140 Remove t he blower motor as s embly.
Releas e t he blower motor l ocking tang.16.
Installation Us ing t he s peci al t ool, i ns t all the bl ower motor
as sembl y approximat ely 10 degrees count er-clockwi s e
from the verti cal posi ti on.
Speci al Tool (s ): 412-140 1.
Page 1662 of 3229
Rotat e t he s pecial t ool clockwis e t o s ecure t he blower
mot or as s embly.
Speci al Tool (s ): 412-140 2.
Inst all t he recircul at ion bl end door hous ing as s embl y.
3.
Connect t he recircul ati on blend door act uat or el ect ri cal
connector. Connect t he air qualit y s ensor el ect ri cal connector.
Secure t he wiring harnes s .4.
Inst all t he CJB bracket .
T orque: 10 Nm 5.
Secure t he wiring harnes s es to the CJB bracket.
6.
Inst all t he CJB.
7.
Connect t he 5 elect rical connectors to the CJB and s ecure t he front
carpet.
8.
Inst all t he CJB lower acces s cover.
9.
Inst all t he pas s enger s ide footwel l duct .
10.
Inst all t he glove compartment .
Refer t o: Glove Compart ment (501-12 Ins trument Panel and
Consol e, Removal and Ins t al lat ion).
11.
Connect t he blower mot or el ect ri cal connector.
12.
Inst all t he accelerat or pedal as sembl y.
Refer t o: Accelerat or Pedal (310-02 Accelerati on Cont rol , Removal
and Inst all at ion).
13.
Connect t he batt ery ground cable.
Refer t o: Specificati ons (414-00 Bat tery and Charging Sys tem -
General Informat ion, Specificati ons).
14.
Page 1663 of 3229
Publi s hed: 11-May-2011
Climate Control - Blower MotorRHD AWD
Removal and Inst all ati on
Special T ool(s)
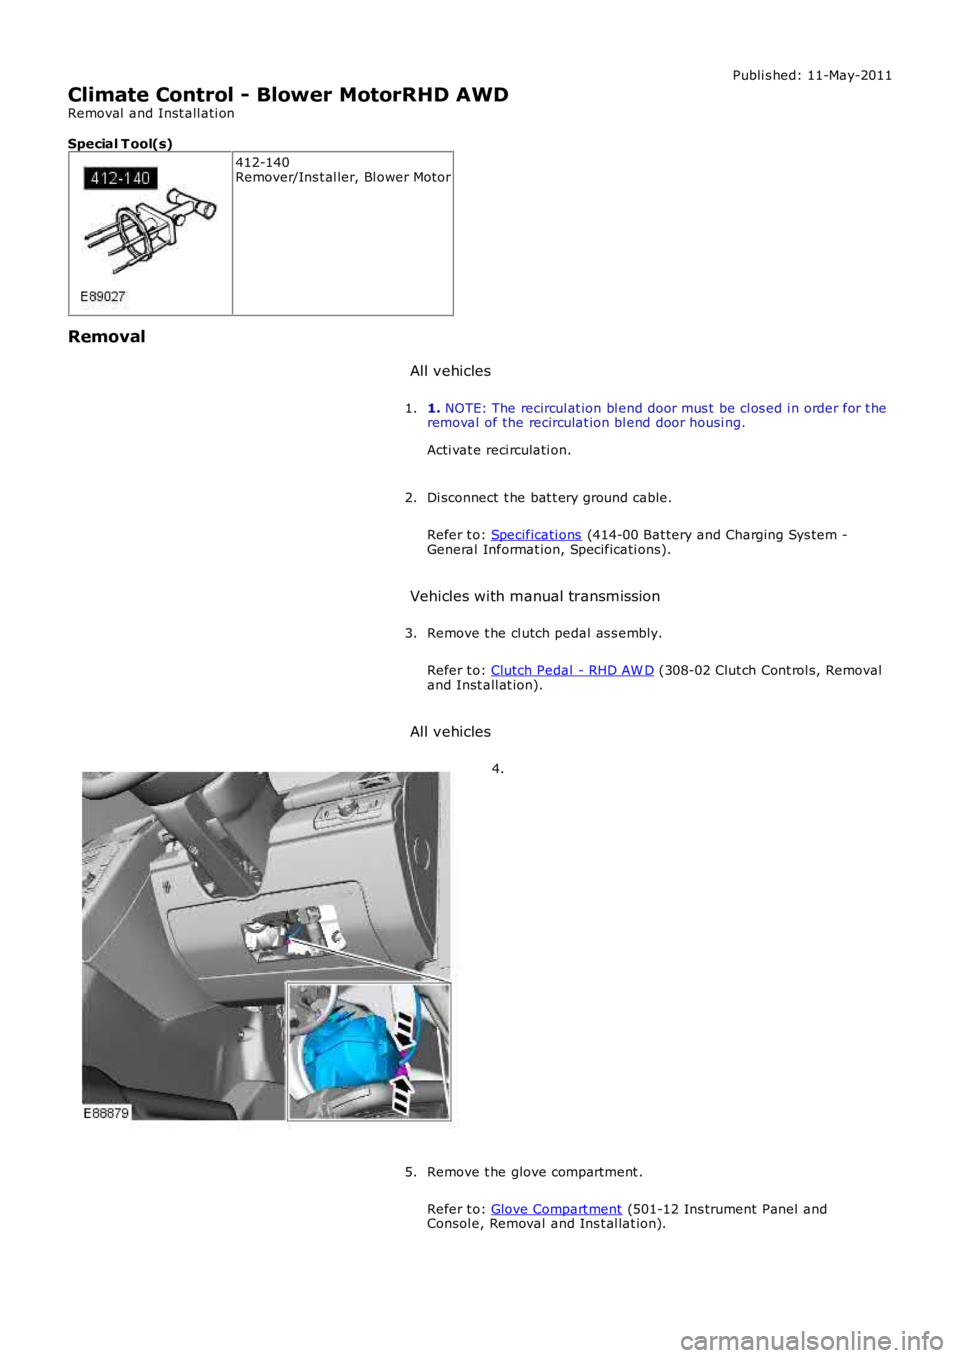
412-140Remover/Ins t al ler, Bl ower Motor
Removal
All vehicles
1. NOTE: The recircul at ion bl end door mus t be cl os ed i n order for t heremoval of the recirculat ion bl end door housi ng.
Acti vat e reci rculati on.
1.
Di sconnect t he bat t ery ground cable.
Refer t o: Specificati ons (414-00 Bat tery and Charging Sys tem -General Informat ion, Specificati ons).
2.
Vehicles with manual transmission
Remove t he cl utch pedal as s embly.
Refer t o: Clutch Pedal - RHD AW D (308-02 Clut ch Cont rol s, Removaland Inst all at ion).
3.
All vehicles
4.
Remove t he glove compartment .
Refer t o: Glove Compart ment (501-12 Ins trument Panel andConsol e, Removal and Ins t al lat ion).
5.
Page 1664 of 3229
Page 1665 of 3229
Page 1666 of 3229
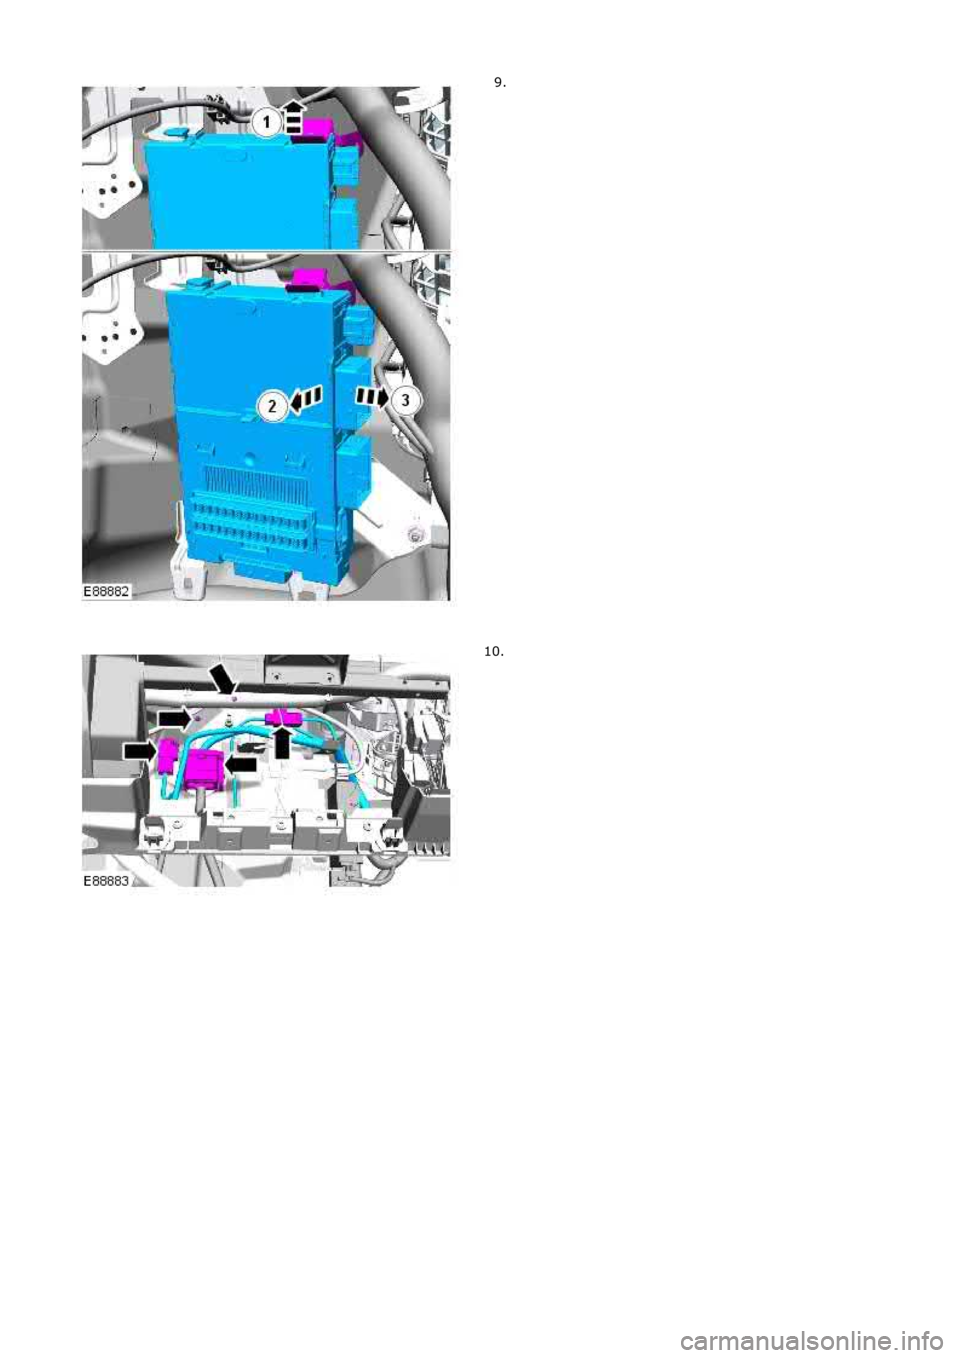
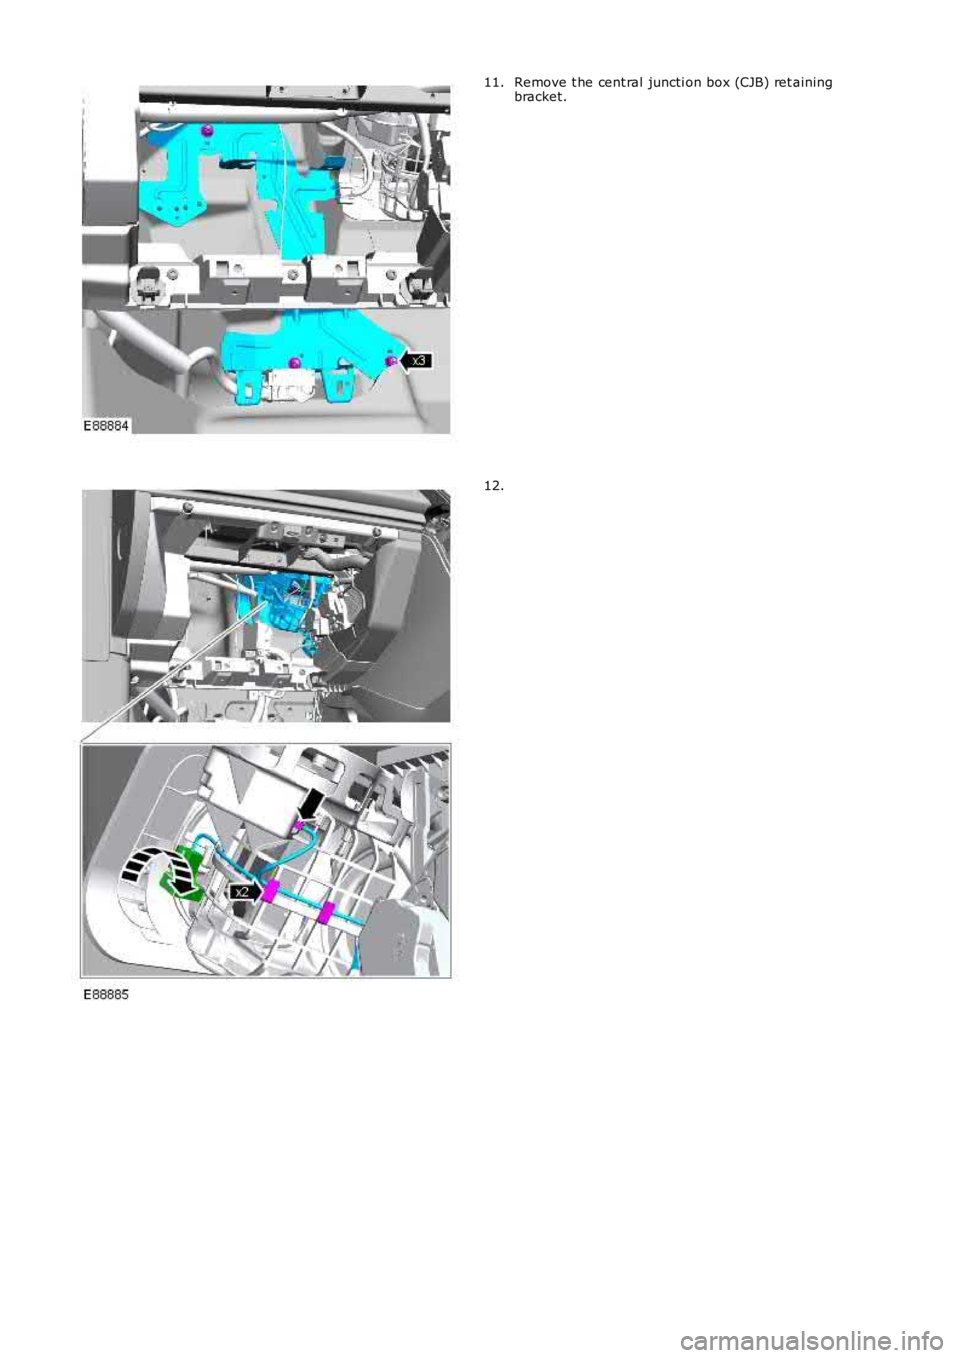
Remove t he cent ral juncti on box (CJB) ret ainingbracket.11.
12.
Page 1667 of 3229
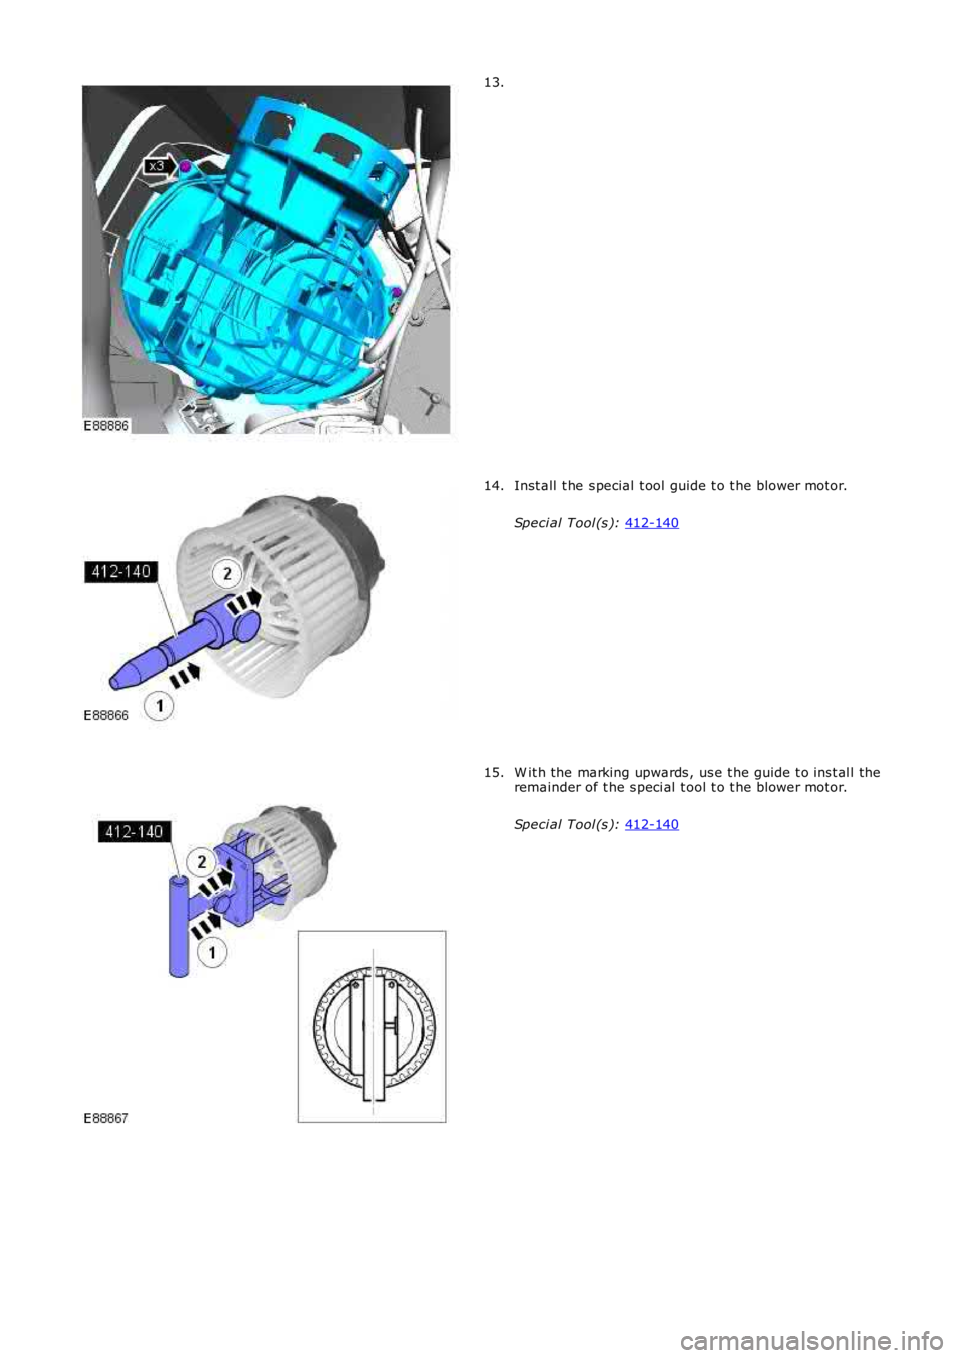
13.
Inst all t he s pecial t ool guide t o t he blower mot or.
Speci al Tool (s ): 412-140 14.
W it h the marking upwards , us e t he guide t o ins t al l the
remainder of t he s peci al t ool t o t he blower mot or.
Speci al Tool (s ): 412-140 15.
Page 1668 of 3229
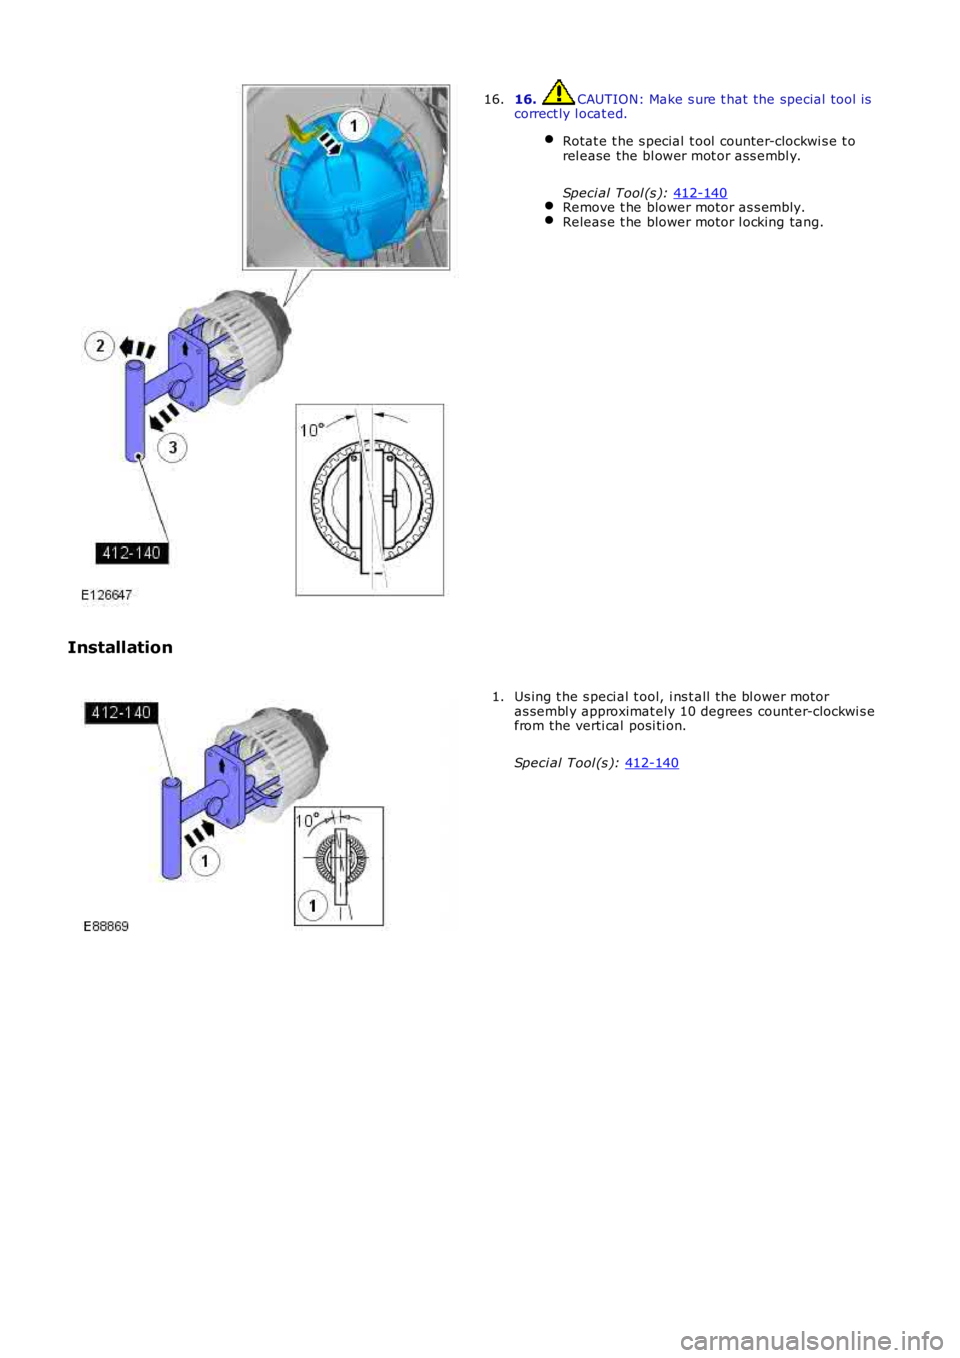
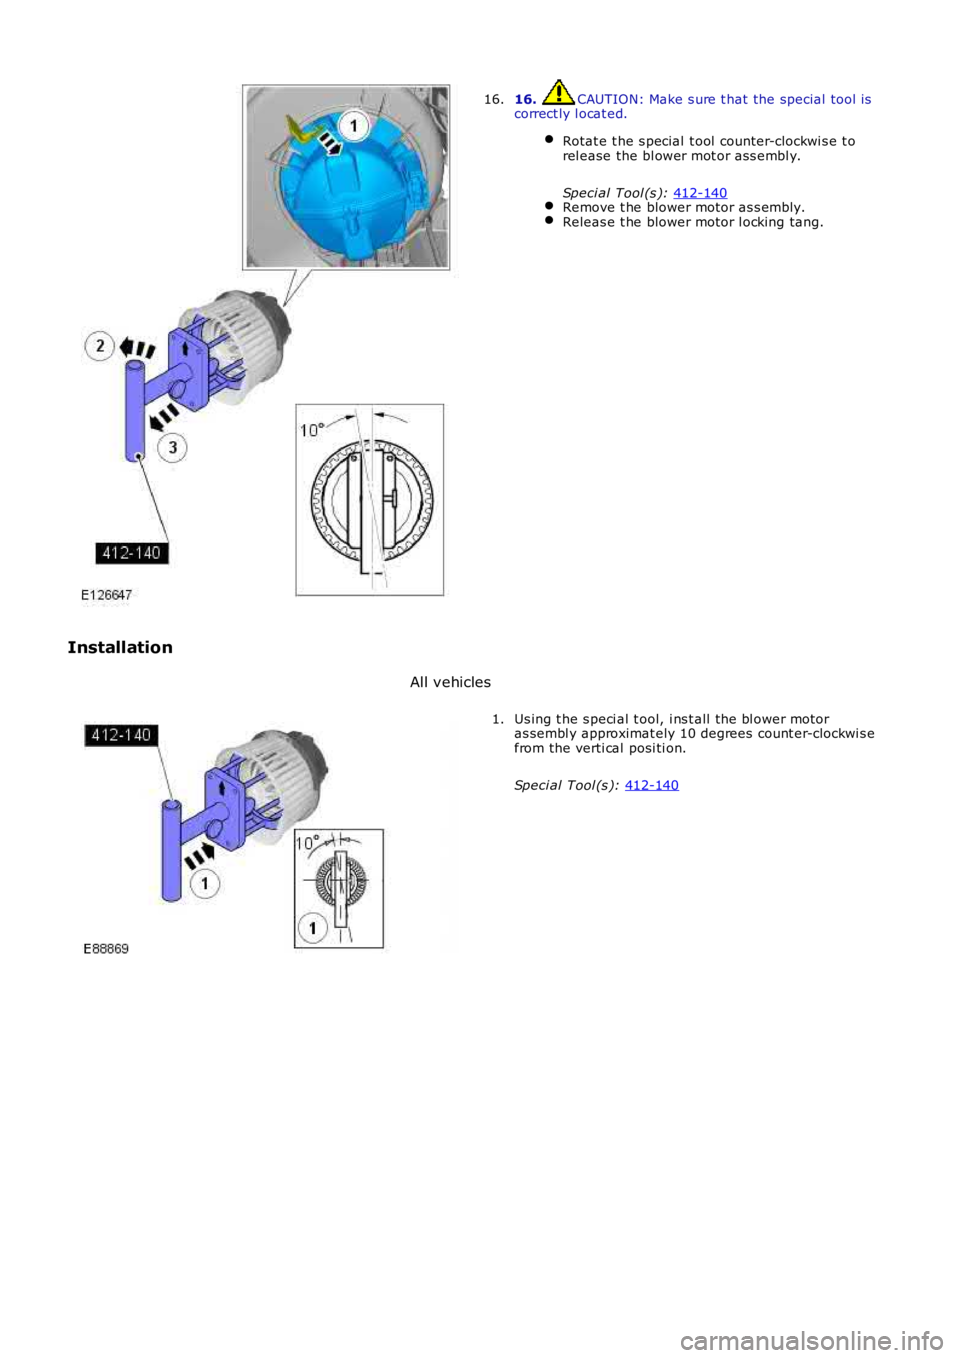
16. CAUTION: Make s ure t hat the special tool is
correct ly l ocat ed.
Rotat e t he s pecial t ool counter-clockwi s e t o
rel ease the bl ower mot or ass embl y.
Speci al Tool (s ): 412-140 Remove t he blower motor as s embly.
Releas e t he blower motor l ocking tang.16.
Installation All vehicles Us ing t he s peci al t ool, i ns t all the bl ower motor
as sembl y approximat ely 10 degrees count er-clockwi s e
from the verti cal posi ti on.
Speci al Tool (s ): 412-140 1.
Page 1669 of 3229
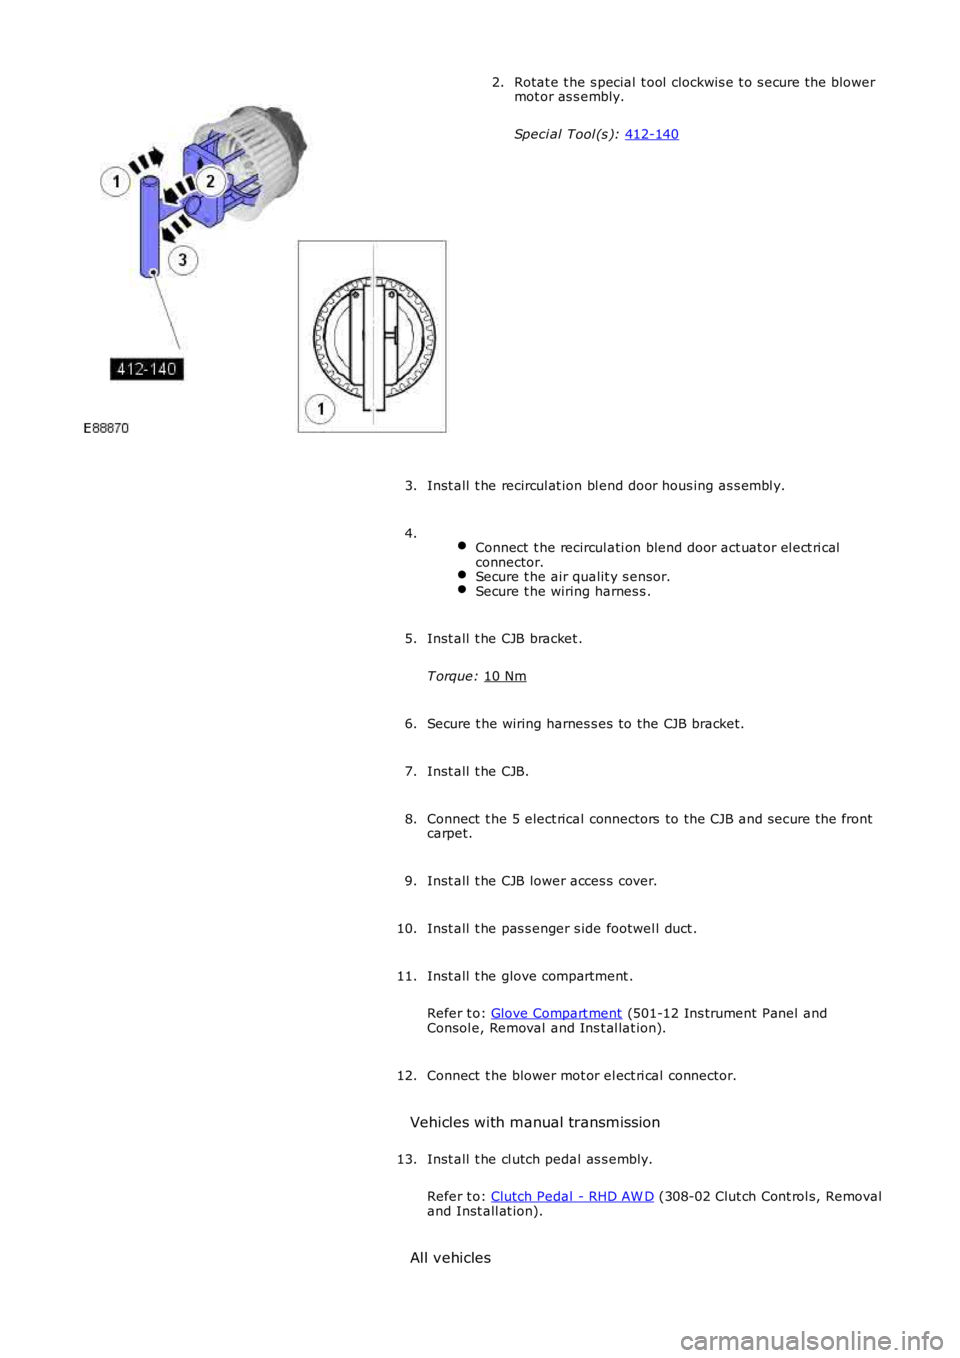
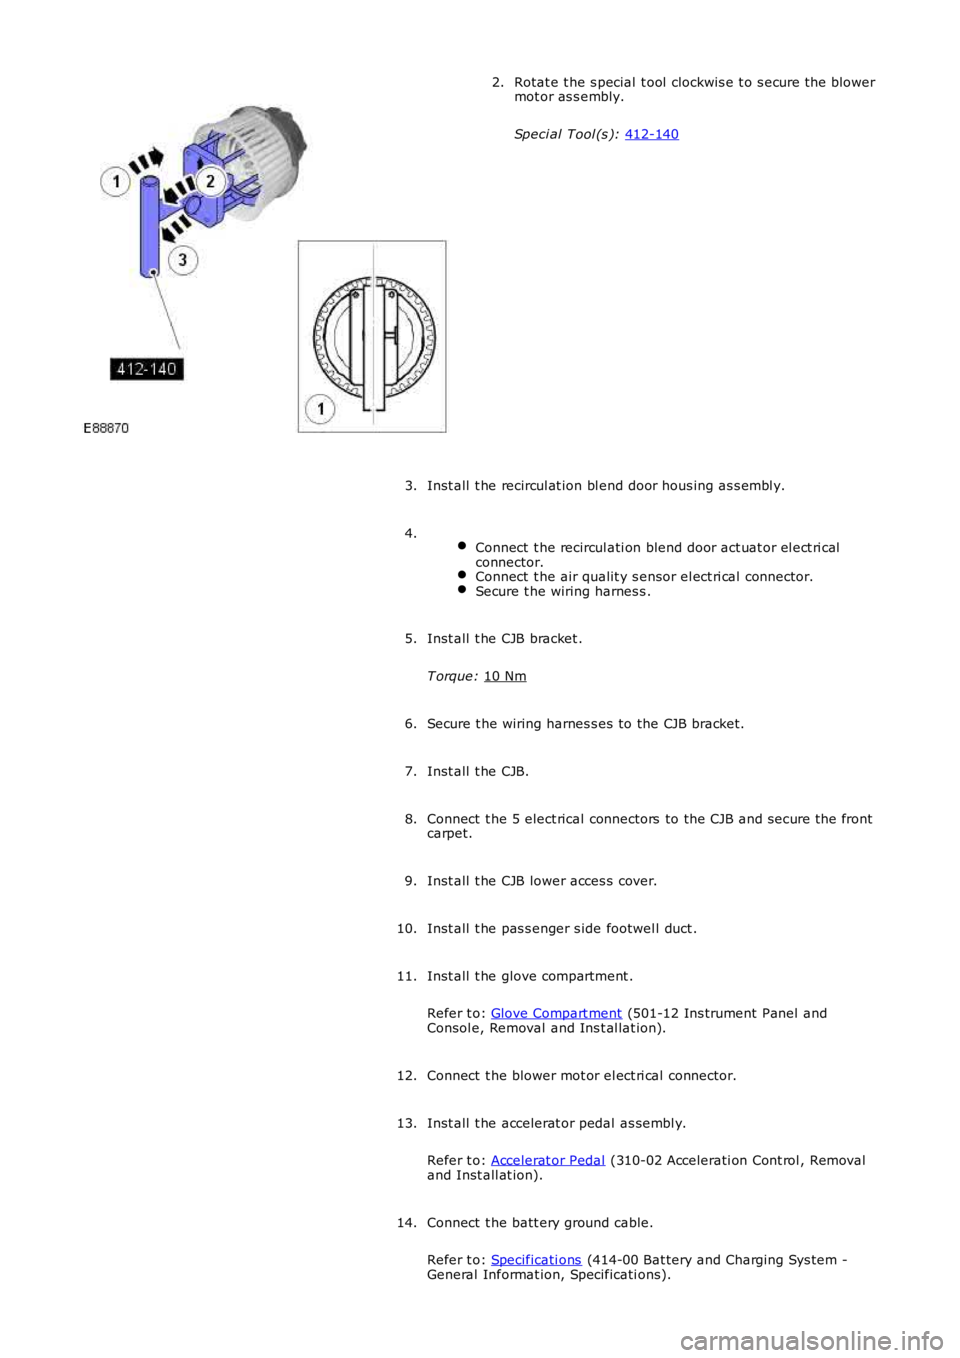
Rotat e t he s pecial t ool clockwis e t o s ecure t he blower
mot or as s embly.
Speci al Tool (s ): 412-140 2.
Inst all t he recircul at ion bl end door hous ing as s embl y.
3.
Connect t he recircul ati on blend door act uat or el ect ri cal
connector. Secure t he air qualit y s ensor.
Secure t he wiring harnes s .4.
Inst all t he CJB bracket .
T orque: 10 Nm 5.
Secure t he wiring harnes s es to the CJB bracket.
6.
Inst all t he CJB.
7.
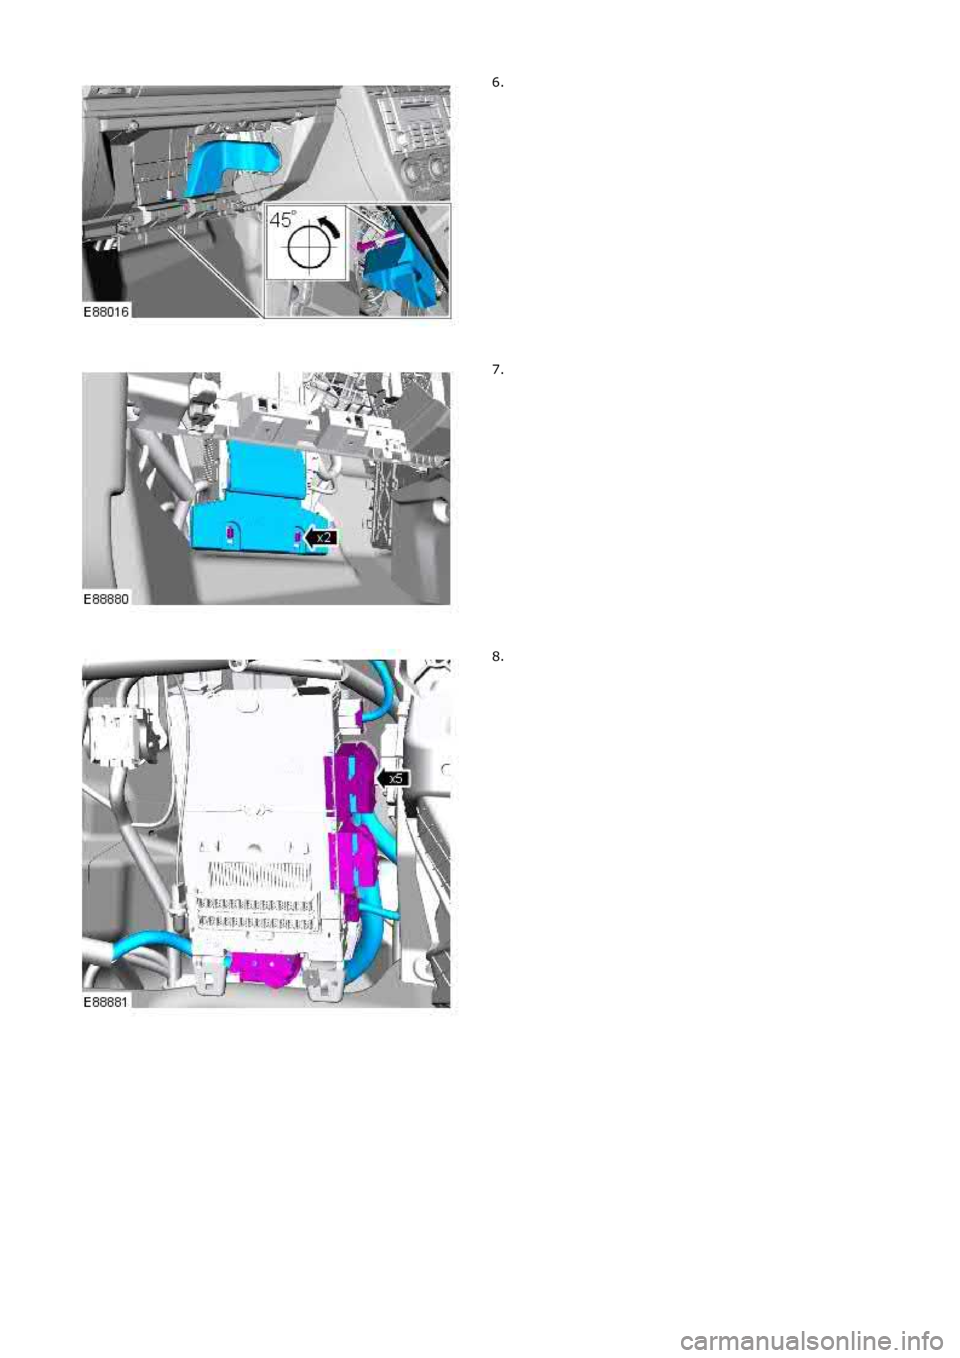
Connect t he 5 elect rical connectors to the CJB and s ecure t he front
carpet.
8.
Inst all t he CJB lower acces s cover.
9.
Inst all t he pas s enger s ide footwel l duct .
10.
Inst all t he glove compartment .
Refer t o: Glove Compart ment (501-12 Ins trument Panel and
Consol e, Removal and Ins t al lat ion).
11.
Connect t he blower mot or el ect ri cal connector.
12.
Vehicles with manual transmission Inst all t he cl utch pedal as s embly.
Refer t o: Clutch Pedal - RHD AW D (308-02 Clut ch Cont rol s, Removal
and Inst all at ion).
13.
All vehicles
Page 1670 of 3229
Connect t he batt ery ground cable.
Refer t o: Specificati ons (414-00 Bat tery and Charging Sys tem -General Informat ion, Specificati ons).
14.
Trending: cabin filter, steering wheel, manual transmission, fan, OBD port, CD player, washer fluid
