display Lexus IS220d 2012 Navigation manual
[x] Cancel search | Manufacturer: LEXUS, Model Year: 2012, Model line: IS220d, Model: Lexus IS220d 2012Pages: 407, PDF Size: 23.8 MB
Page 107 of 407
105
3. MEMORY POINTS
3
NAVIGATION SYSTEM
ISF_IS_ISC_Navi_EE
1Press the “NAV” button, and touch
“Menu” if the map screen is dis-
played.
2Touch “Memory point” on the
“Menu” screen.
3Touch “Home” on the “Memory
point” screen.
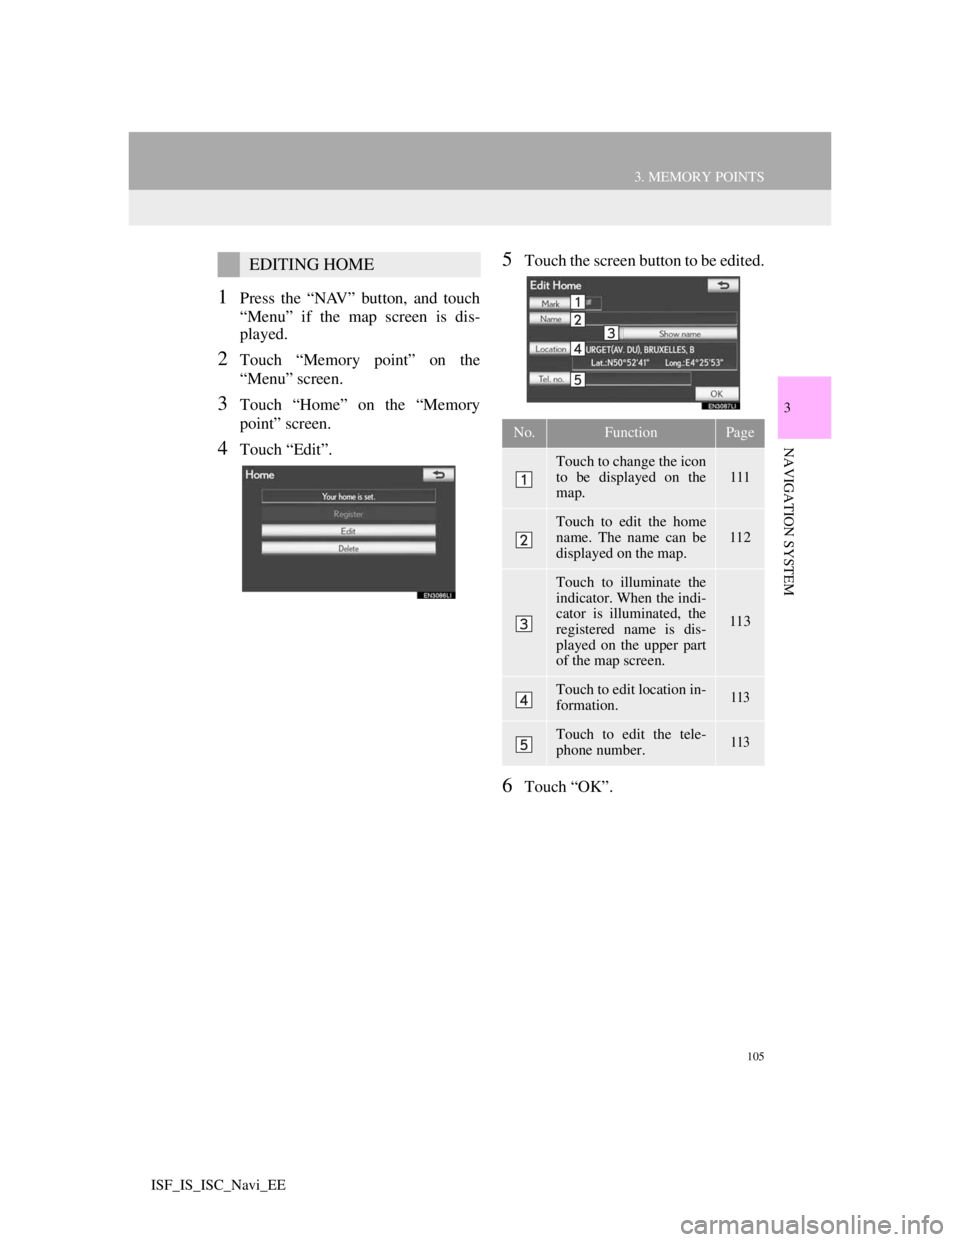
4Touch “Edit”.
5Touch the screen button to be edited.
6Touch “OK”.
EDITING HOME
No.FunctionPage
Touch to change the icon
to be displayed on the
map.111
Touch to edit the home
name. The name can be
displayed on the map.
112
Touch to illuminate the
indicator. When the indi-
cator is illuminated, the
registered name is dis-
played on the upper part
of the map screen.
113
Touch to edit location in-
formation.113
Touch to edit the tele-
phone number.113
Page 109 of 407
107
3. MEMORY POINTS
3
NAVIGATION SYSTEM
ISF_IS_ISC_Navi_EE
1Press the “NAV” button, and touch
“Menu” if the map screen is dis-
played.
2Touch “Memory point” on the
“Menu” screen.
3Touch “Quick access” on the “Mem-
ory point” screen.
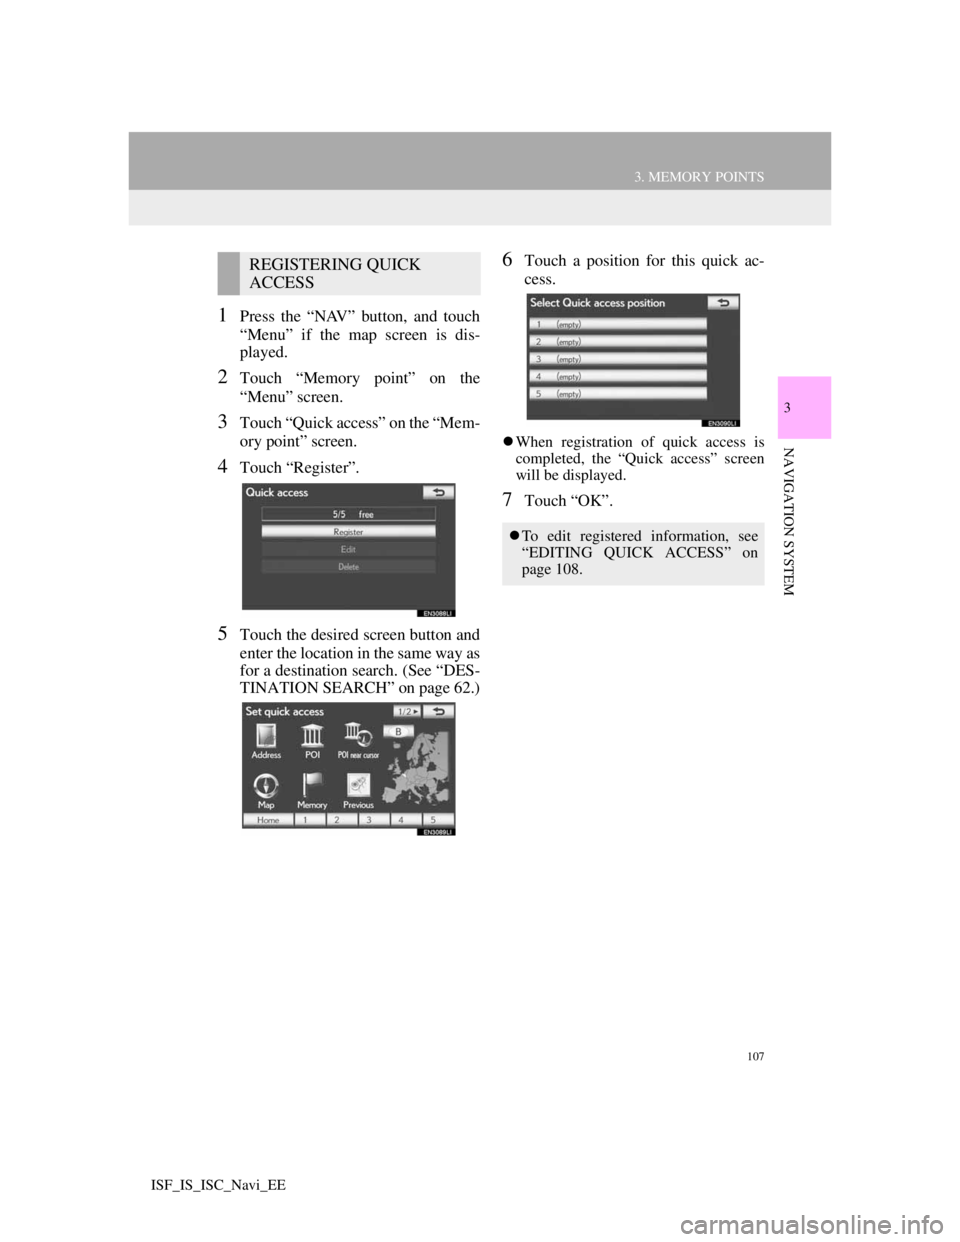
4Touch “Register”.
5Touch the desired screen button and
enter the location in the same way as
for a destination search. (See “DES-
TINATION SEARCH” on page 62.)
6Touch a position for this quick ac-
cess.
When registration of quick access is
completed, the “Quick access” screen
will be displayed.
7Touch “OK”.
REGISTERING QUICK
ACCESS
To edit registered information, see
“EDITING QUICK ACCESS” on
page 108.
Page 110 of 407
108
3. MEMORY POINTS
ISF_IS_ISC_Navi_EE
1Press the “NAV” button, and touch
“Menu” if the map screen is dis-
played.
2Touch “Memory point” on the
“Menu” screen.
3Touch “Quick access” on the “Mem-
ory point” screen.
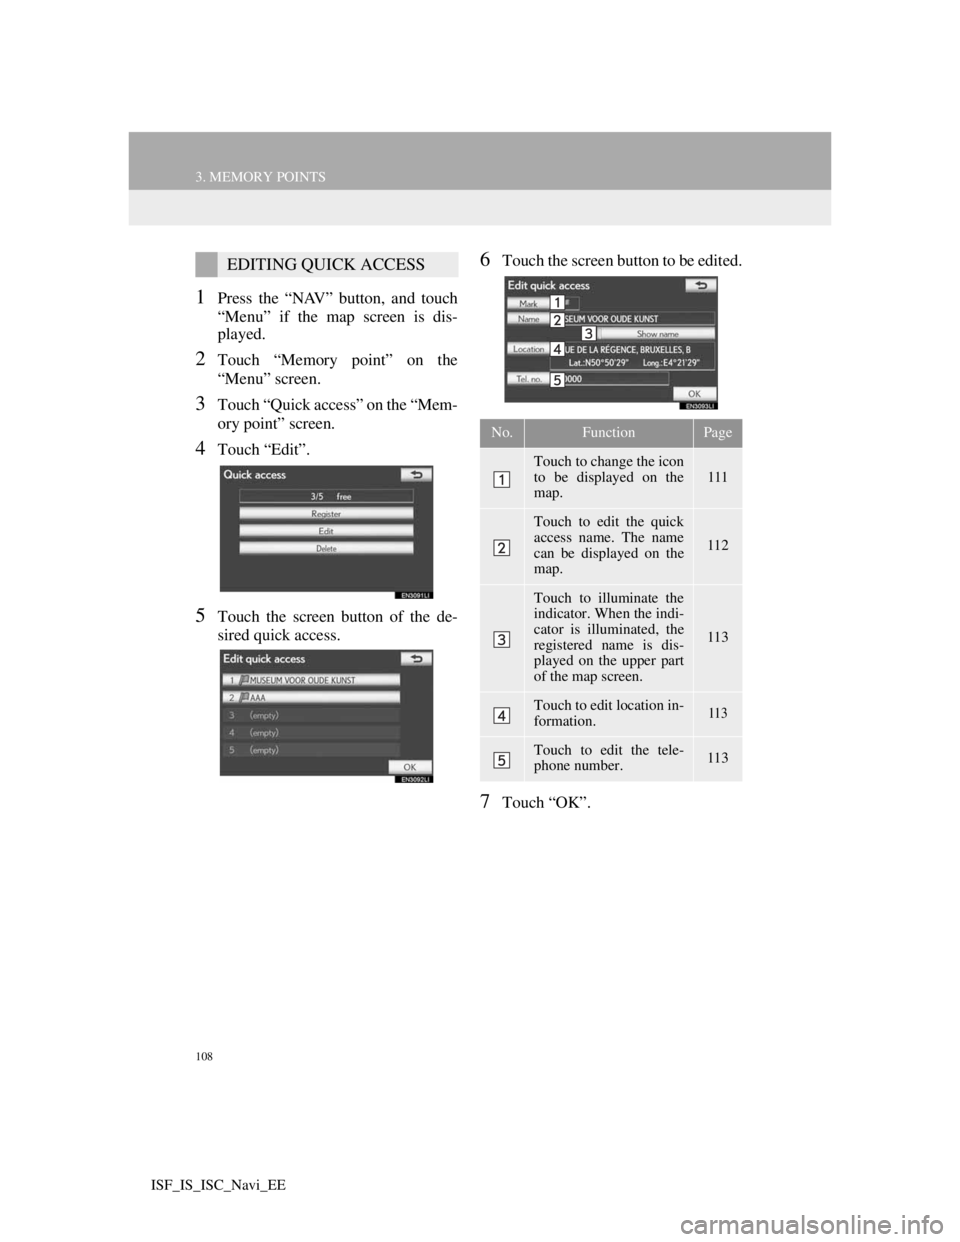
4Touch “Edit”.
5Touch the screen button of the de-
sired quick access.
6Touch the screen button to be edited.
7Touch “OK”.
EDITING QUICK ACCESS
No.FunctionPage
Touch to change the icon
to be displayed on the
map.111
Touch to edit the quick
access name. The name
can be displayed on the
map.
112
Touch to illuminate the
indicator. When the indi-
cator is illuminated, the
registered name is dis-
played on the upper part
of the map screen.
113
Touch to edit location in-
formation.113
Touch to edit the tele-
phone number.113
Page 112 of 407
110
3. MEMORY POINTS
ISF_IS_ISC_Navi_EE
1Press the “NAV” button, and touch
“Menu” if the map screen is dis-
played.
2Touch “Memory point” on the
“Menu” screen.
3Touch “Memory points” on the
“Memory point” screen.
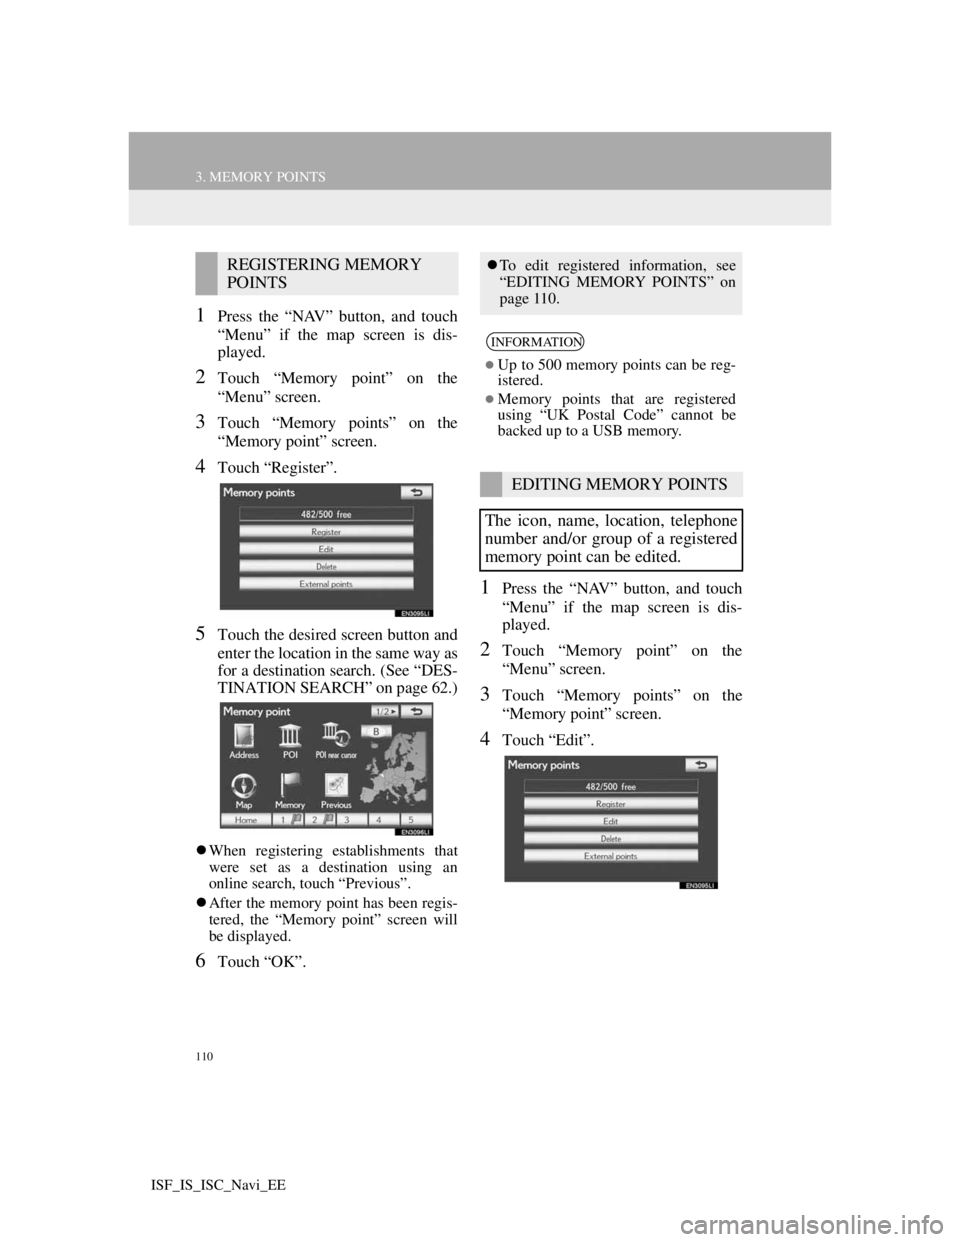
4Touch “Register”.
5Touch the desired screen button and
enter the location in the same way as
for a destination search. (See “DES-
TINATION SEARCH” on page 62.)
When registering establishments that
were set as a destination using an
online search, touch “Previous”.
After the memory point has been regis-
tered, the “Memory point” screen will
be displayed.
6Touch “OK”.
1Press the “NAV” button, and touch
“Menu” if the map screen is dis-
played.
2Touch “Memory point” on the
“Menu” screen.
3Touch “Memory points” on the
“Memory point” screen.
4Touch “Edit”.
REGISTERING MEMORY
POINTSTo edit registered information, see
“EDITING MEMORY POINTS” on
page 110.
INFORMATION
Up to 500 memory points can be reg-
istered.
Memory points that are registered
using “UK Postal Code” cannot be
backed up to a USB memory.
EDITING MEMORY POINTS
The icon, name, location, telephone
number and/or group of a registered
memory point can be edited.
Page 113 of 407
111
3. MEMORY POINTS
3
NAVIGATION SYSTEM
ISF_IS_ISC_Navi_EE
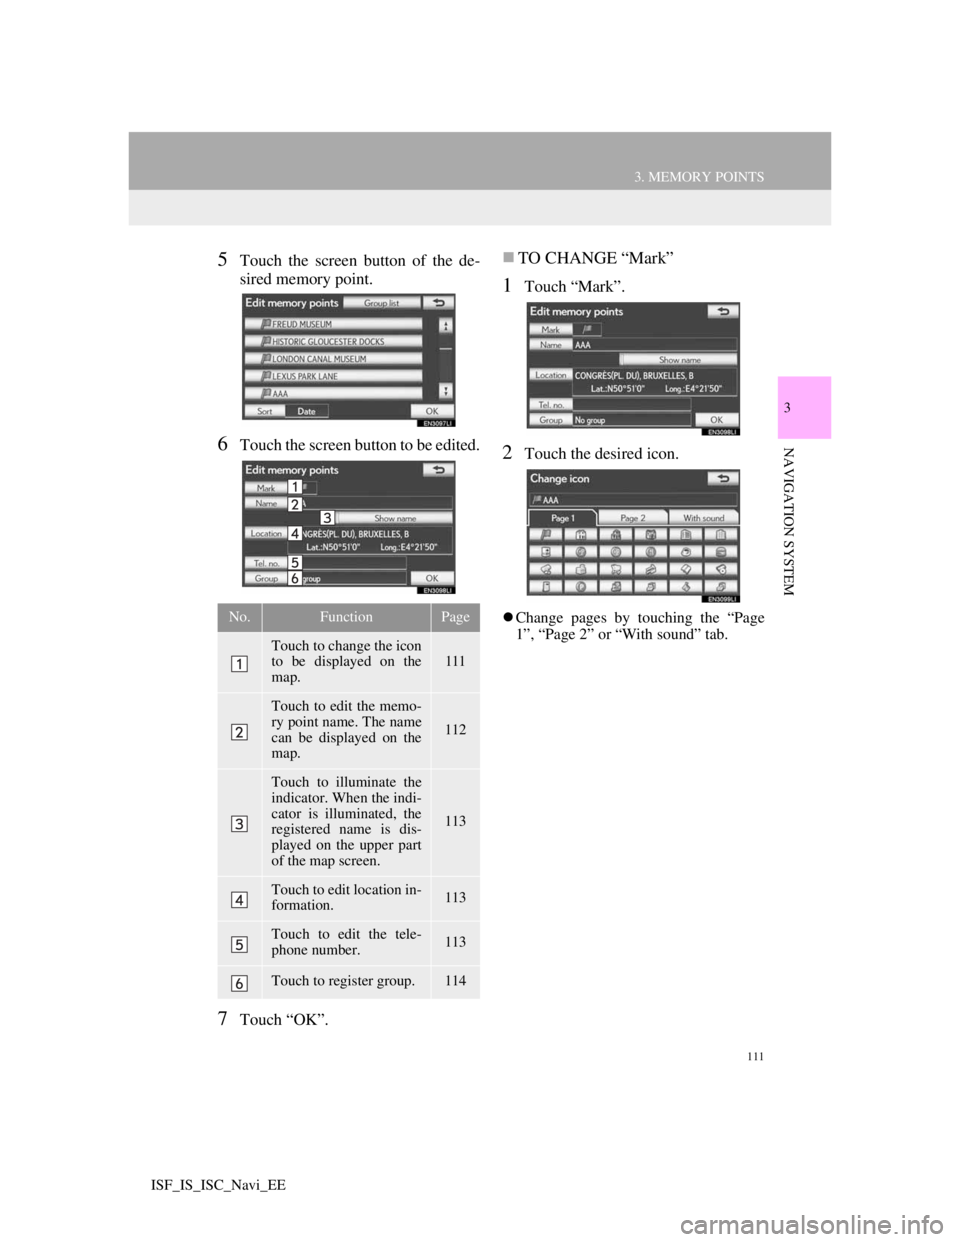
5Touch the screen button of the de-
sired memory point.
6Touch the screen button to be edited.
7Touch “OK”.
TO CHANGE “Mark”
1Touch “Mark”.
2Touch the desired icon.
Change pages by touching the “Page
1”, “Page 2” or “With sound” tab.No.FunctionPage
Touch to change the icon
to be displayed on the
map.111
Touch to edit the memo-
ry point name. The name
can be displayed on the
map.
112
Touch to illuminate the
indicator. When the indi-
cator is illuminated, the
registered name is dis-
played on the upper part
of the map screen.
113
Touch to edit location in-
formation.113
Touch to edit the tele-
phone number.113
Touch to register group.114
Page 114 of 407
112
3. MEMORY POINTS
ISF_IS_ISC_Navi_EE
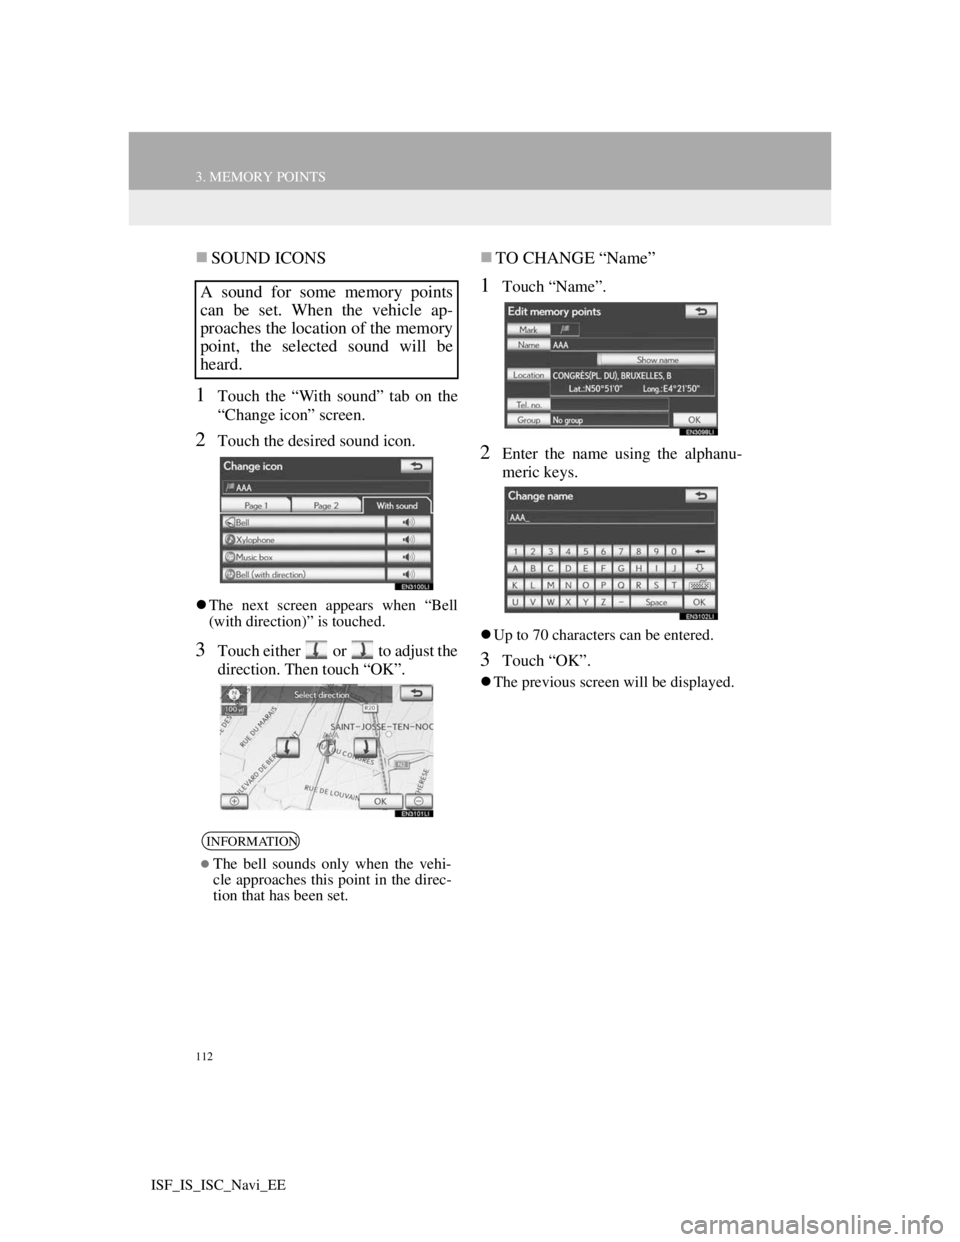
SOUND ICONS
1Touch the “With sound” tab on the
“Change icon” screen.
2Touch the desired sound icon.
The next screen appears when “Bell
(with direction)” is touched.
3Touch either or to adjust the
direction. Then touch “OK”.
TO CHANGE “Name”
1Touch “Name”.
2Enter the name using the alphanu-
meric keys.
Up to 70 characters can be entered.
3Touch “OK”.
The previous screen will be displayed.
A sound for some memory points
can be set. When the vehicle ap-
proaches the location of the memory
point, the selected sound will be
heard.
INFORMATION
The bell sounds only when the vehi-
cle approaches this point in the direc-
tion that has been set.
Page 115 of 407
113
3. MEMORY POINTS
3
NAVIGATION SYSTEM
ISF_IS_ISC_Navi_EE
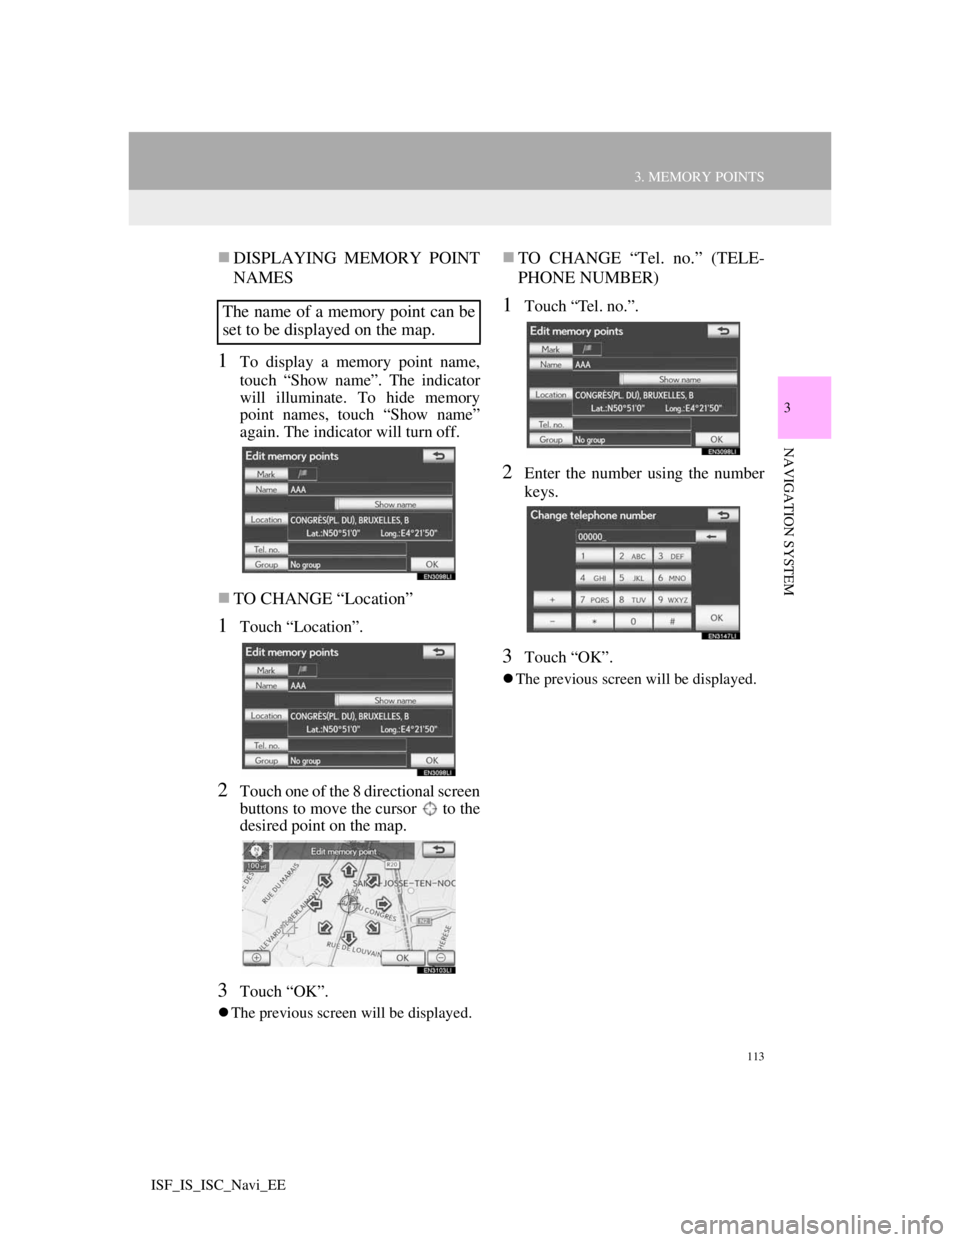
DISPLAYING MEMORY POINT
NAMES
1To display a memory point name,
touch “Show name”. The indicator
will illuminate. To hide memory
point names, touch “Show name”
again. The indicator will turn off.
TO CHANGE “Location”
1Touch “Location”.
2Touch one of the 8 directional screen
buttons to move the cursor to the
desired point on the map.
3Touch “OK”.
The previous screen will be displayed.
TO CHANGE “Tel. no.” (TELE-
PHONE NUMBER)
1Touch “Tel. no.”.
2Enter the number using the number
keys.
3Touch “OK”.
The previous screen will be displayed.
The name of a memory point can be
set to be displayed on the map.
Page 116 of 407
114
3. MEMORY POINTS
ISF_IS_ISC_Navi_EE
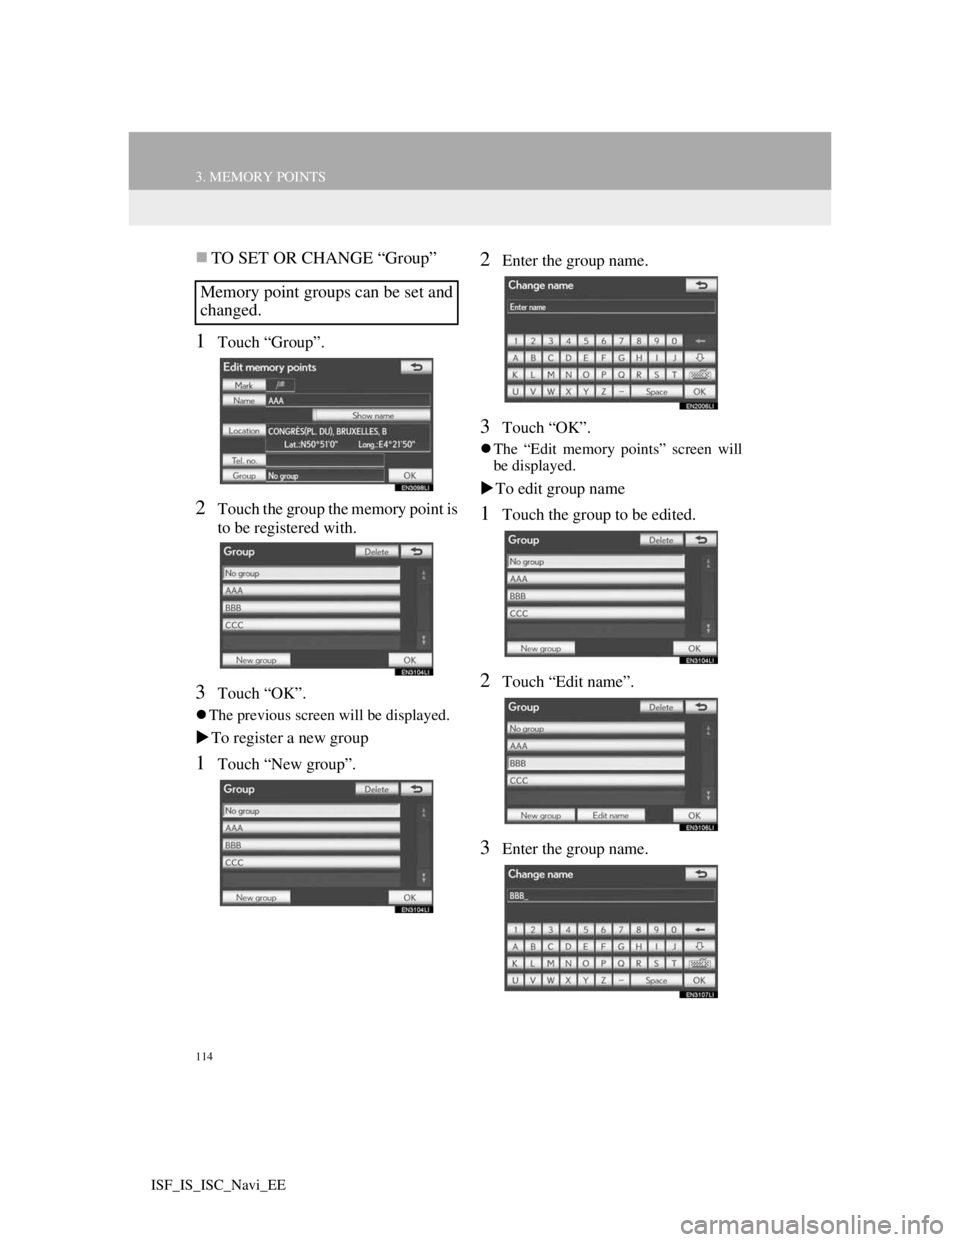
TO SET OR CHANGE “Group”
1Touch “Group”.
2Touch the group the memory point is
to be registered with.
3Touch “OK”.
The previous screen will be displayed.
To register a new group
1Touch “New group”.
2Enter the group name.
3Touch “OK”.
The “Edit memory points” screen will
be displayed.
To edit group name
1Touch the group to be edited.
2Touch “Edit name”.
3Enter the group name.
Memory point groups can be set and
changed.
Page 117 of 407
115
3. MEMORY POINTS
3
NAVIGATION SYSTEM
ISF_IS_ISC_Navi_EE
4Touch “OK”.
The “Edit memory points” screen will
be displayed.
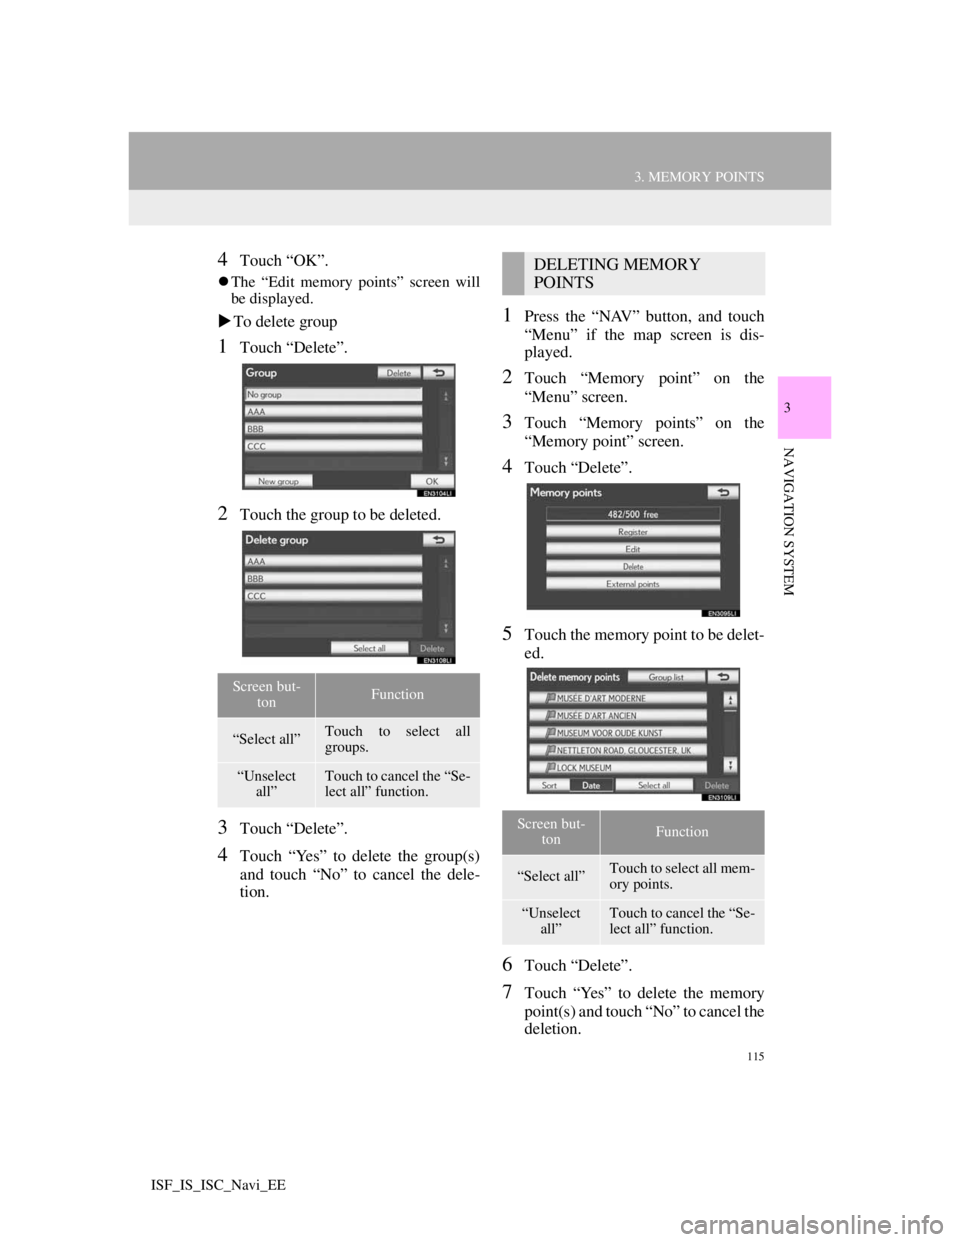
To delete group
1Touch “Delete”.
2Touch the group to be deleted.
3Touch “Delete”.
4Touch “Yes” to delete the group(s)
and touch “No” to cancel the dele-
tion.
1Press the “NAV” button, and touch
“Menu” if the map screen is dis-
played.
2Touch “Memory point” on the
“Menu” screen.
3Touch “Memory points” on the
“Memory point” screen.
4Touch “Delete”.
5Touch the memory point to be delet-
ed.
6Touch “Delete”.
7Touch “Yes” to delete the memory
point(s) and touch “No” to cancel the
deletion.
Screen but-
tonFunction
“Select all”Touch to select all
groups.
“Unselect
all”Touch to cancel the “Se-
lect all” function.
DELETING MEMORY
POINTS
Screen but-
tonFunction
“Select all”Touch to select all mem-
ory points.
“Unselect
all”Touch to cancel the “Se-
lect all” function.
Page 118 of 407
116
3. MEMORY POINTS
ISF_IS_ISC_Navi_EE
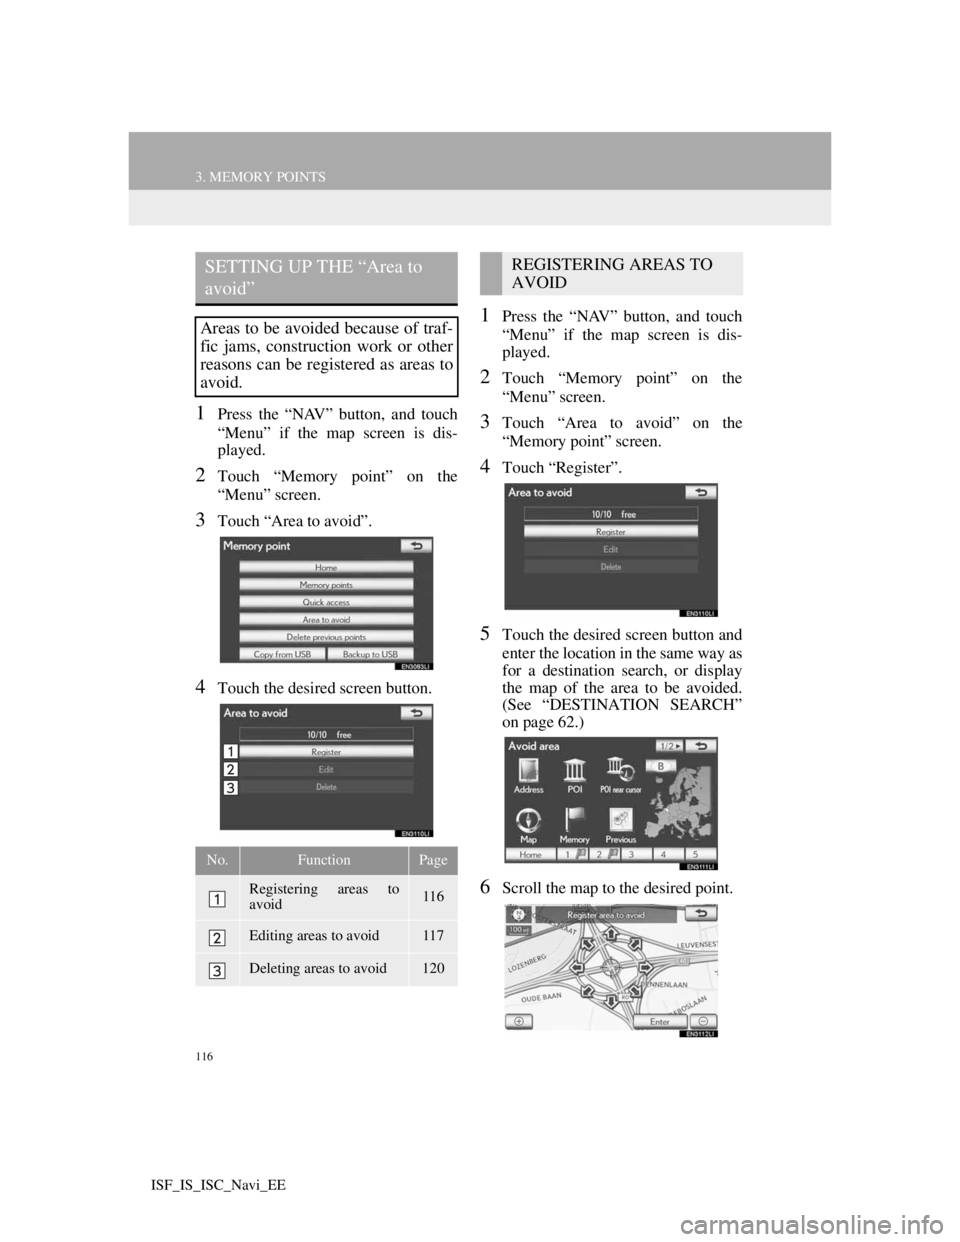
1Press the “NAV” button, and touch
“Menu” if the map screen is dis-
played.
2Touch “Memory point” on the
“Menu” screen.
3Touch “Area to avoid”.
4Touch the desired screen button.
1Press the “NAV” button, and touch
“Menu” if the map screen is dis-
played.
2Touch “Memory point” on the
“Menu” screen.
3Touch “Area to avoid” on the
“Memory point” screen.
4Touch “Register”.
5Touch the desired screen button and
enter the location in the same way as
for a destination search, or display
the map of the area to be avoided.
(See “DESTINATION SEARCH”
on page 62.)
6Scroll the map to the desired point.
SETTING UP THE “Area to
avoid”
Areas to be avoided because of traf-
fic jams, construction work or other
reasons can be registered as areas to
avoid.
No.FunctionPage
Registering areas to
avoid116
Editing areas to avoid117
Deleting areas to avoid120
REGISTERING AREAS TO
AVOID