LEXUS SC400 1991 Service Repair Manual
Manufacturer: LEXUS, Model Year: 1991, Model line: SC400, Model: LEXUS SC400 1991Pages: 4087, PDF Size: 75.75 MB
Page 401 of 4087
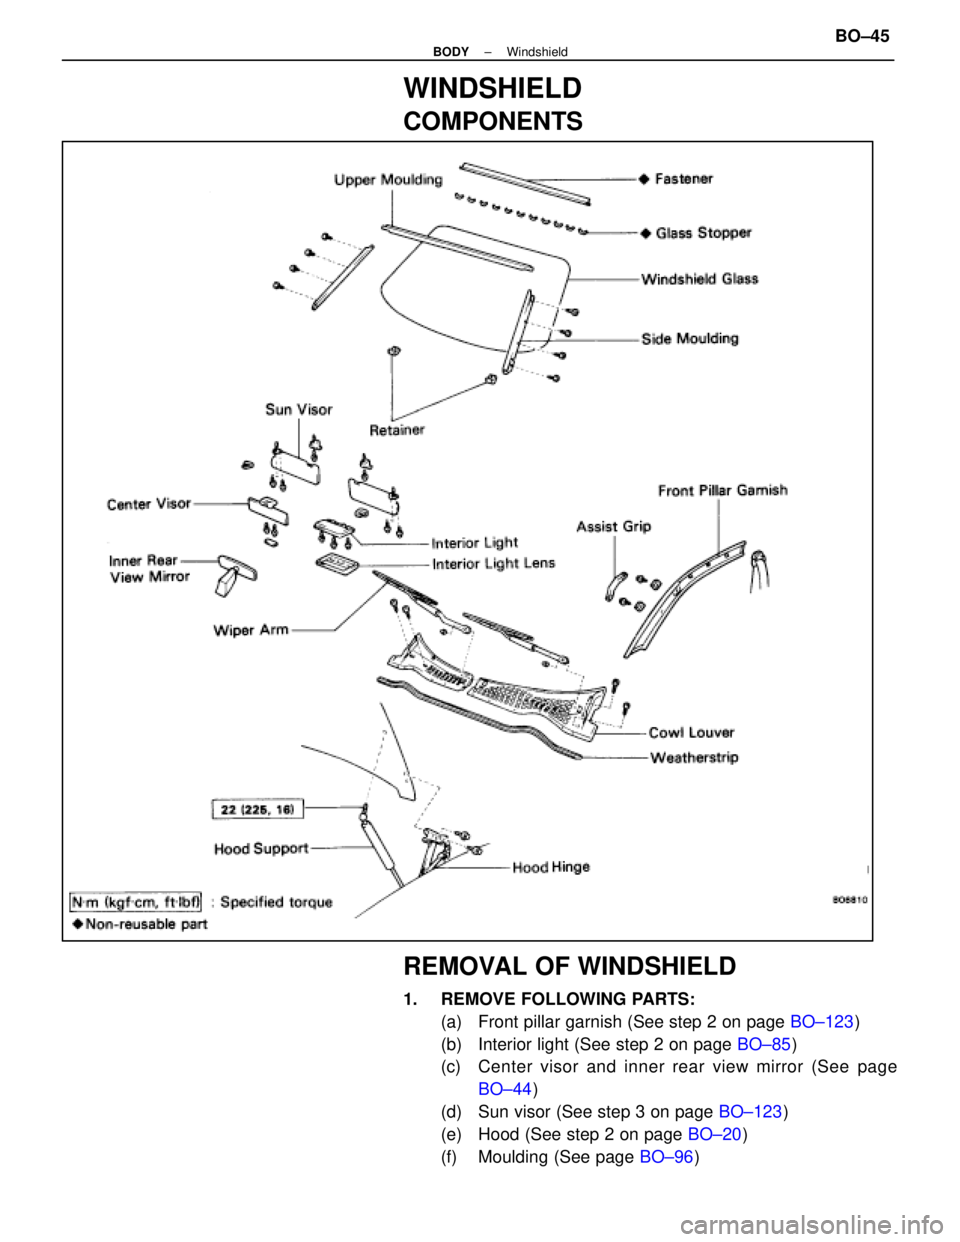
WINDSHIELD
COMPONENTS
REMOVAL OF WINDSHIELD
1. REMOVE FOLLOWING PARTS:(a) Front pillar garnish (See step 2 on page BO±123)
(b) Interior light (See step 2 on page BO±85)
(c) Center visor and i nner rear view mirror (See page
BO±44 )
(d) Sun visor (See step 3 on page BO±123)
(e) Hood (See step 2 on page BO±20)
(f) Moulding (See page BO±96)
±
BODY WindshieldBO±45
WhereEverybodyKnowsYourName
Page 402 of 4087
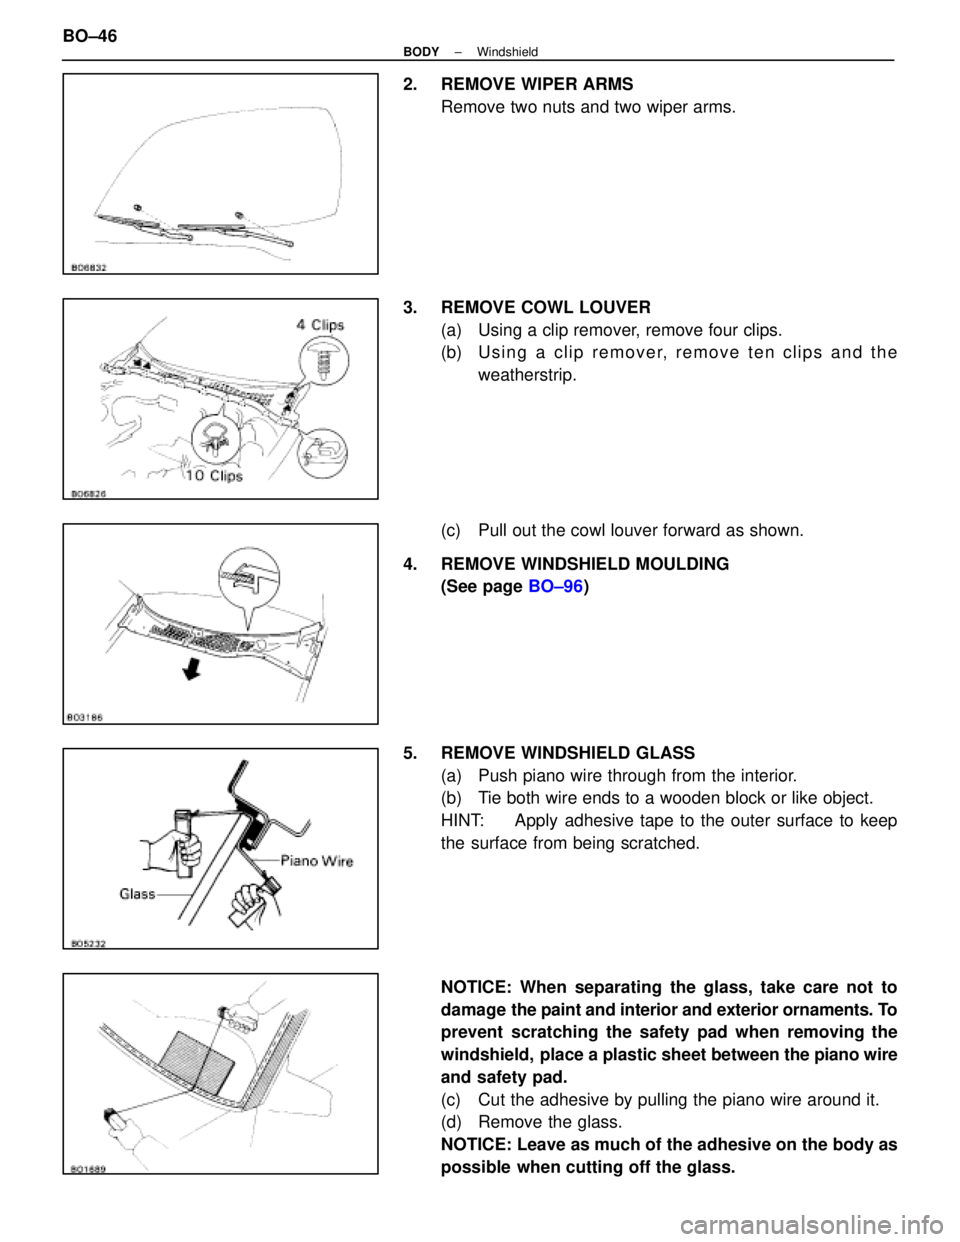
2. REMOVE WIPER ARMSRemove two nuts and two wiper arms.
3. REMOVE COWL LOUVER (a) Using a clip remover, remove four clips.
(b) U s i n g a c l i p r e m o v e r, r e m o v e t e n c l i p s a n d t h eweatherstrip.
(c) Pull out the cowl louver forward as shown.
4. REMOVE WINDSHIELD MOULDING (See page BO±96)
5. REMOVE WINDSHIELD GLASS (a) Push piano wire through from the interior.
(b) Tie both wire ends to a wooden block or like object.
HINT: Apply adhesive tape to the outer surface to keep
the surface from being scratched.
NOTICE: When separating the glass, take care not to
damage the paint and interior and exterior ornaments. To
prevent scratching the safety pad when removing the
windshield, place a plastic sheet between the piano wire
and safety pad.
(c) Cut the adhesive by pulling the piano wire around it.
(d) Remove the glass.
NOTICE: Leave as much of the adhesive on the body as
possible when cutting off the glass.
BO±46
±
BODY Windshield
WhereEverybodyKnowsYourName
Page 403 of 4087
INSTALLATION OF WINDSHIELD
(See page BO±45)
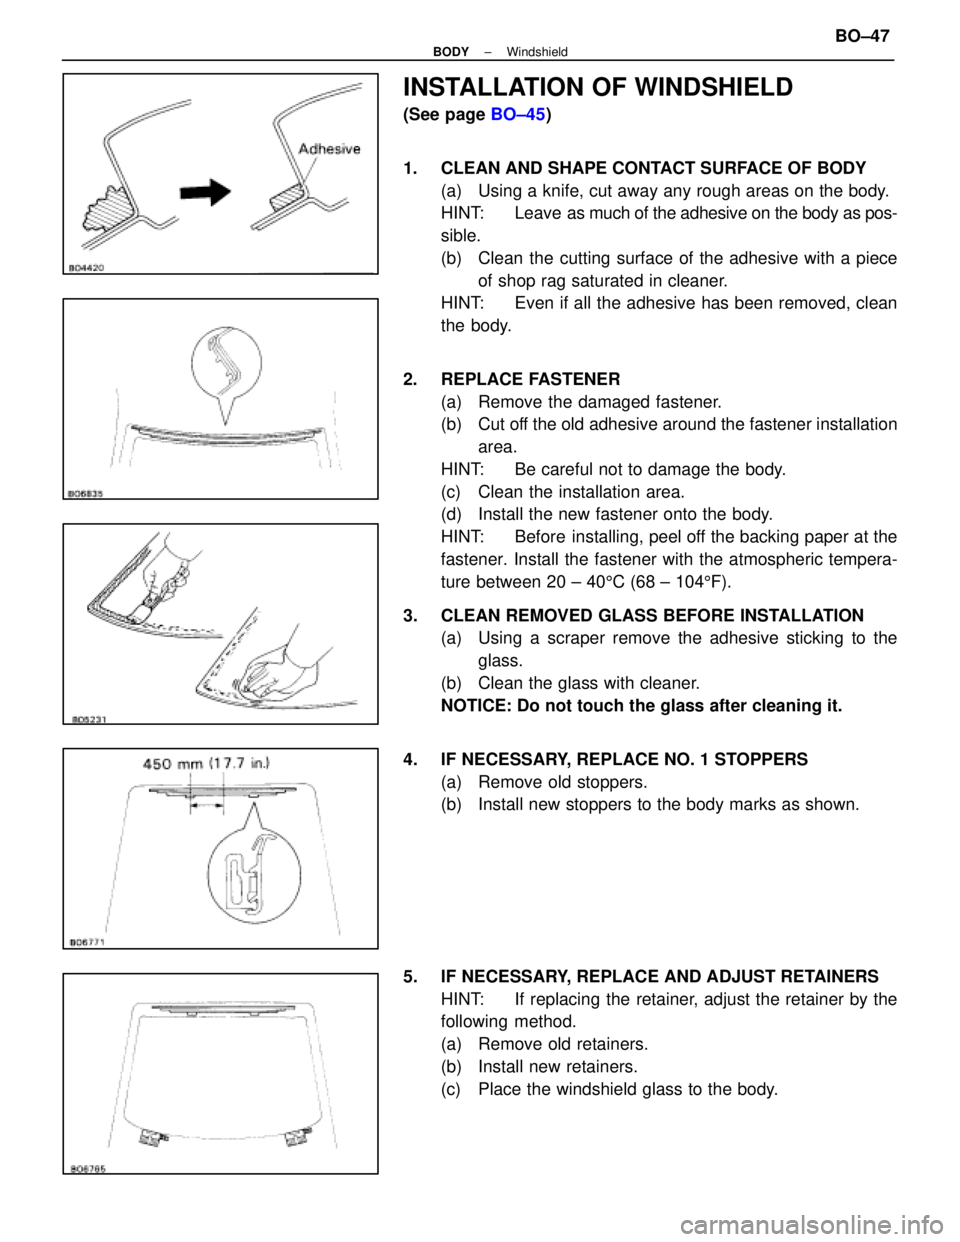
1. CLEAN AND SHAPE CONTACT SURFACE OF BODY (a) Using a knife, cut away any rough areas on the body.
HINT: Leave as m uch of the adhesive on the body as pos-
sible.
(b) Clean the cutting surface of the adhesive with a piece of shop rag saturated in cleaner.
HINT: Even if all the adhesive has been removed, clean
the body.
2. REPLACE FASTENER (a) Remove the damaged fastener.
(b) Cut off the old adhesive around the fastener installationarea.
HINT: Be careful not to damage the body.
(c) Clean the installation area.
(d) Install the new fastener onto the body.
HINT: Before installing, peel off the backing paper at the
fastener. Install the fastener with the atmospheric tempera-
ture between 20 ± 40 5C (68 ± 104 5F).
3. CLEAN REMOVED GLASS BEFORE INSTALLATION (a) Using a scraper remove the adhesive sticking to the
glass.
(b) Clean the glass with cleaner.
NOTICE: Do not touch the glass after cleaning it.
4. IF NECESSARY, REPLACE NO. 1 STOPPERS (a) Remove old stoppers.
(b) Install new stoppers to the body marks as shown.
5. IF NECESSARY, REPLACE AND ADJUST RETAINERS HINT: If replacing the retainer, adjust the retainer by the
following method.
(a) Remove old retainers.
(b) Install new retainers.
(c) Place the windshield glass to the body.
±
BODY WindshieldBO±47
WhereEverybodyKnowsYourName
Page 404 of 4087
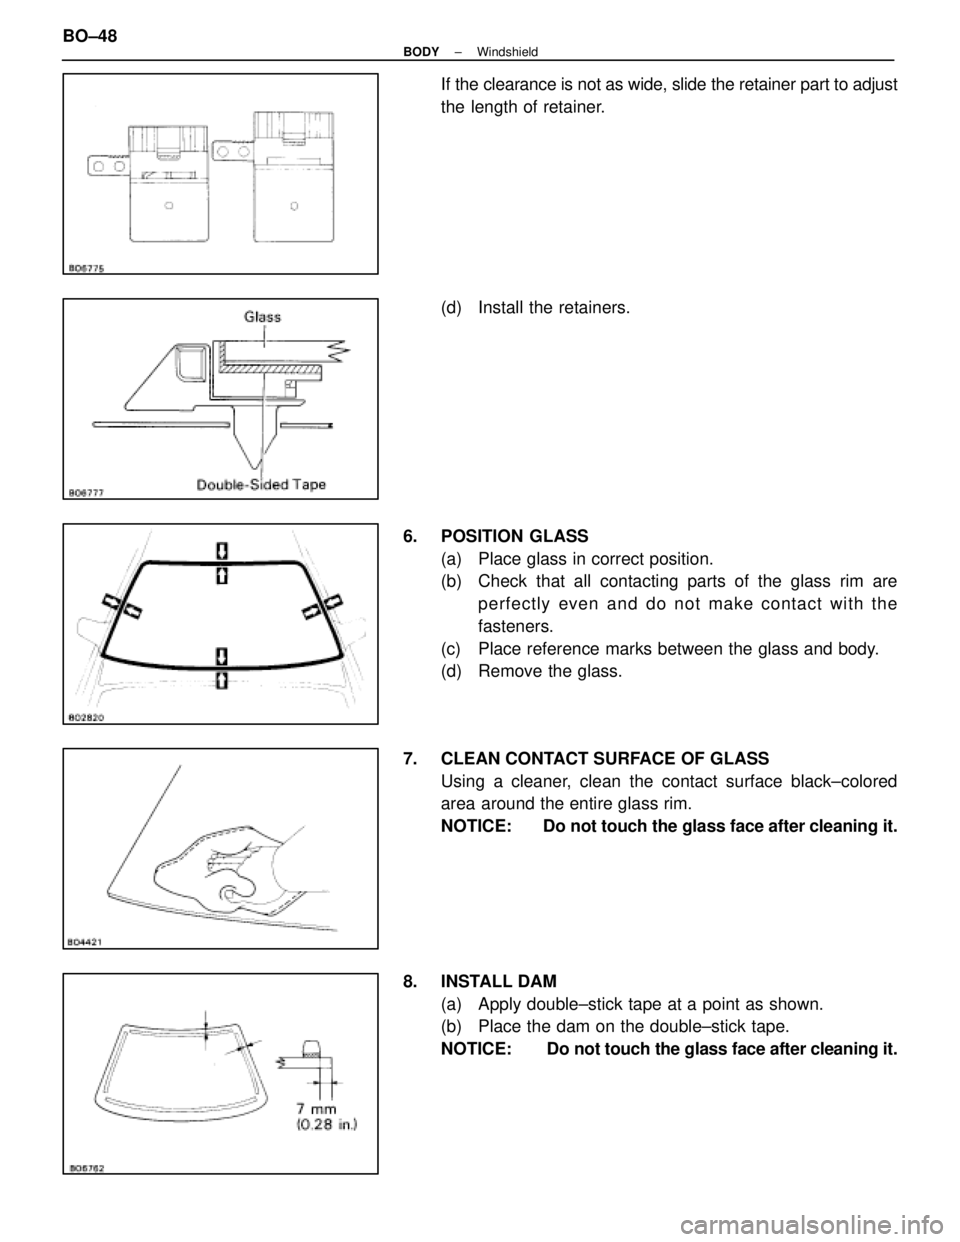
If the clearance is not as wide, slide the retainer part to adjust
the length of retainer.
(d) Install the retainers.
6. POSITION GLASS (a) Place glass in correct position.
(b) Check that all contacting parts of the glass rim areperfectly even and do not make contact with the
fasteners.
(c) Place reference marks between the glass and body.
(d) Remove the glass.
7. CLEAN CONTACT SURFACE OF GLASS Using a cleaner, clean the contact surface black±colored
area around the entire glass rim.
NOTICE: Do not touch the glass face after cleaning it.
8. INSTALL DAM (a) Apply double±stick tape at a point as shown.
(b) Place the dam on the double±stick tape.
NOTICE: Do not touch the glass face after cleaning it.
BO±48
±
BODY Windshield
WhereEverybodyKnowsYourName
Page 405 of 4087
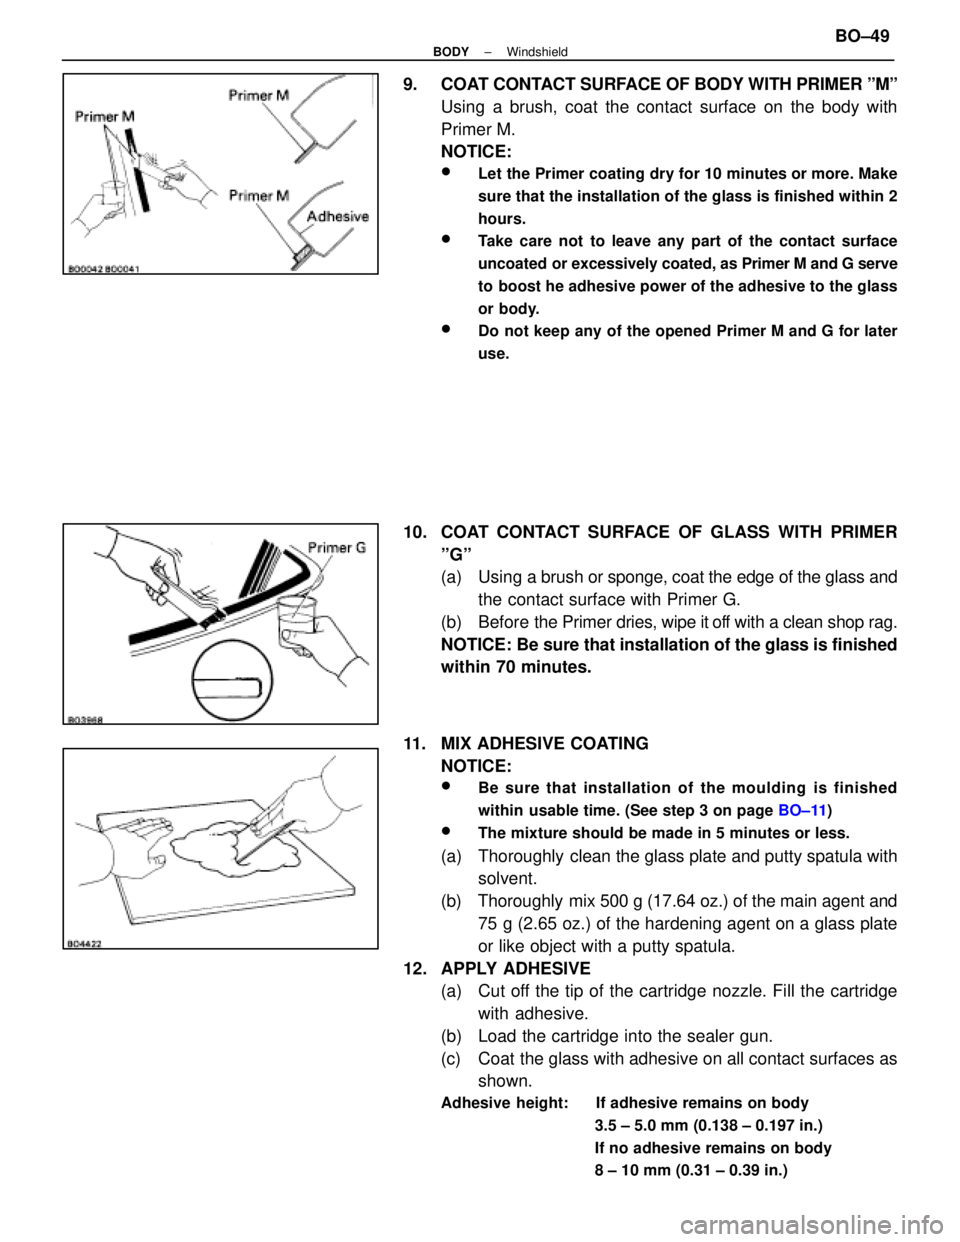
9. COAT CONTACT SURFACE OF BODY WITH PRIMER ºMºUsing a brush, coat the contact surface on the body with
Primer M.
NOTICE:
wLet the Primer coating dry for 10 minutes or more. Make
sure that the installation of the glass is finished within 2
hours.
wTake care not to leave any part of the contact surface
uncoated or excessively coated, as Primer M and G serve
to boost he adhesive power of the adhesive to the glass
or body.
wDo not keep any of the opened Primer M and G for later
use.
10. COAT CONTACT SURFACE OF GLASS WITH PRIMER ºGº
(a) Using a brush or sponge, coat the edge of the glass and
the contact surface with Primer G.
(b) Before the Primer dries, wipe it off with a clean shop rag.
NOTICE: Be sure that installation of the glass is finished
within 70 minutes.
11. MIX ADHESIVE COATING NOTICE:
wBe sure that installation of the moulding is finished
within usable time. (See step 3 on page BO±11)
wThe mixture should be made in 5 minutes or less.
(a) Thoroughly clean the glass plate and putty spatula with
solvent.
(b) Thoroughly mix 500 g (17.64 oz.) of the main agent and 75 g (2.65 oz.) of the hardening agent on a glass plate
or like object with a putty spatula.
12. APPLY ADHESIVE (a) Cut off the tip of the cartridge nozzle. Fill the cartridge
with adhesive.
(b) Load the cartridge into the sealer gun.
(c) Coat the glass with adhesive on all contact surfaces as shown.
Adhesive height: If adhesive remains on body
3.5 ± 5.0 mm (0.138 ± 0.197 in.)
If no adhesive remains on body
8 ± 10 mm (0.31 ± 0.39 in.)
±
BODY WindshieldBO±49
WhereEverybodyKnowsYourName
Page 406 of 4087
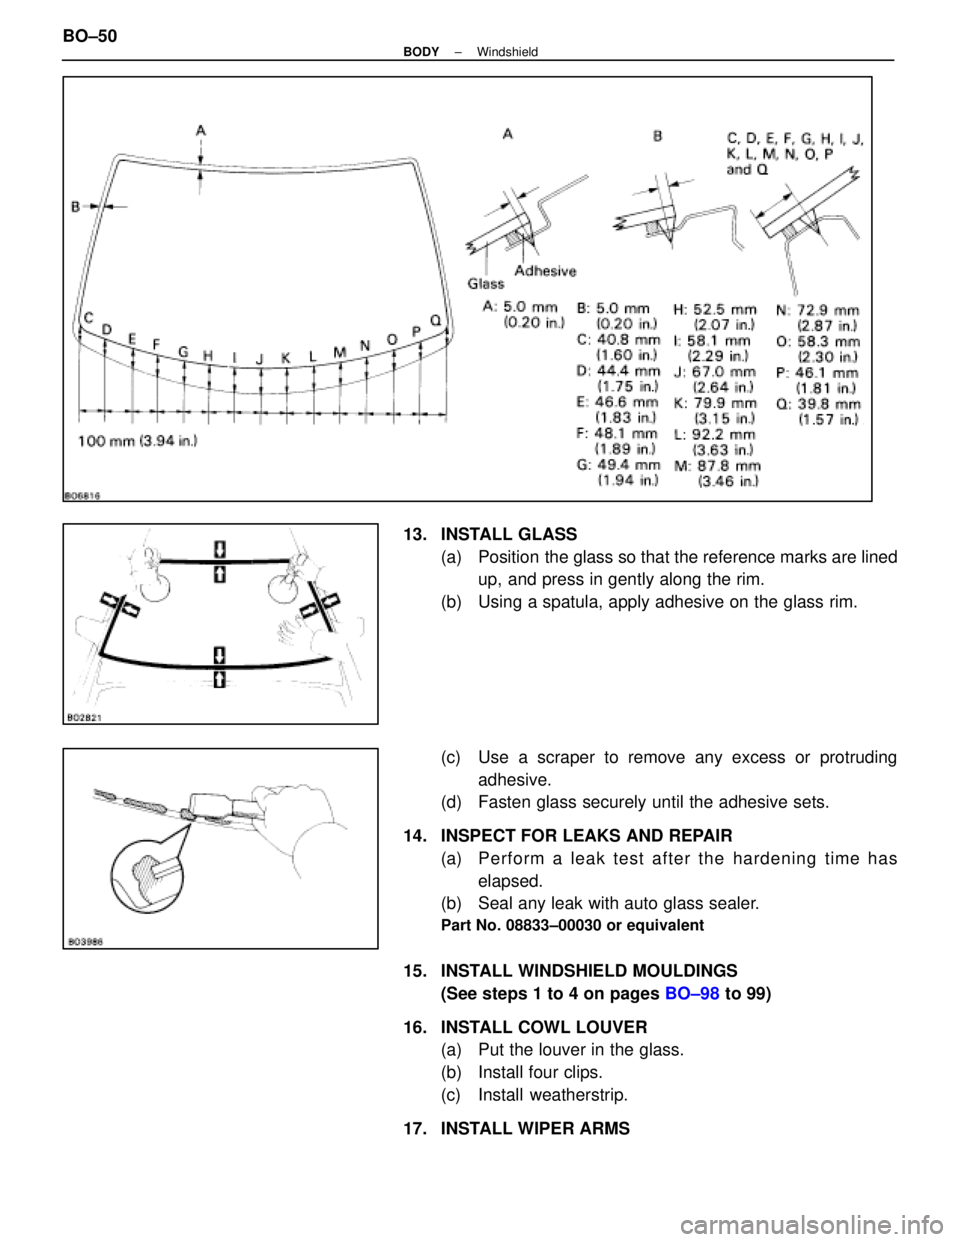
13. INSTALL GLASS(a) Position the glass so that the reference marks are linedup, and press in gently along the rim.
(b) Using a spatula, apply adhesive on the glass rim.
(c) Use a scraper to remove any excess or protruding adhesive.
(d) Fasten glass securely until the adhesive sets.
14. INSPECT FOR LEAKS AND REPAIR (a) P e rfo rm a le a k te st afte r th e ha r dening time has
elapsed.
(b) Seal any leak with auto glass sealer.
Part No. 08833±00030 or equivalent
15. INSTALL WINDSHIELD MOULDINGS
(See steps 1 to 4 on pages BO±98 to 99)
16. INSTALL COWL LOUVER (a) Put the louver in the glass.
(b) Install four clips.
(c) Install weatherstrip.
17. INSTALL WIPER ARMS
BO±50
±
BODY Windshield
WhereEverybodyKnowsYourName
Page 407 of 4087

18. INSTALL FOLLOWING PARTS:(a) Hood
HINT: Torque the hood support
Torque: 22 N Vm (225 kgf Vcm, 16 ft Vlbf)
(b) Front roof headlining
(c) Holders
(d) Center visor and inner rear view mirror
(e) Interior light
(f) Front pillar garnish
±
BODY WindshieldBO±51
WhereEverybodyKnowsYourName
Page 408 of 4087
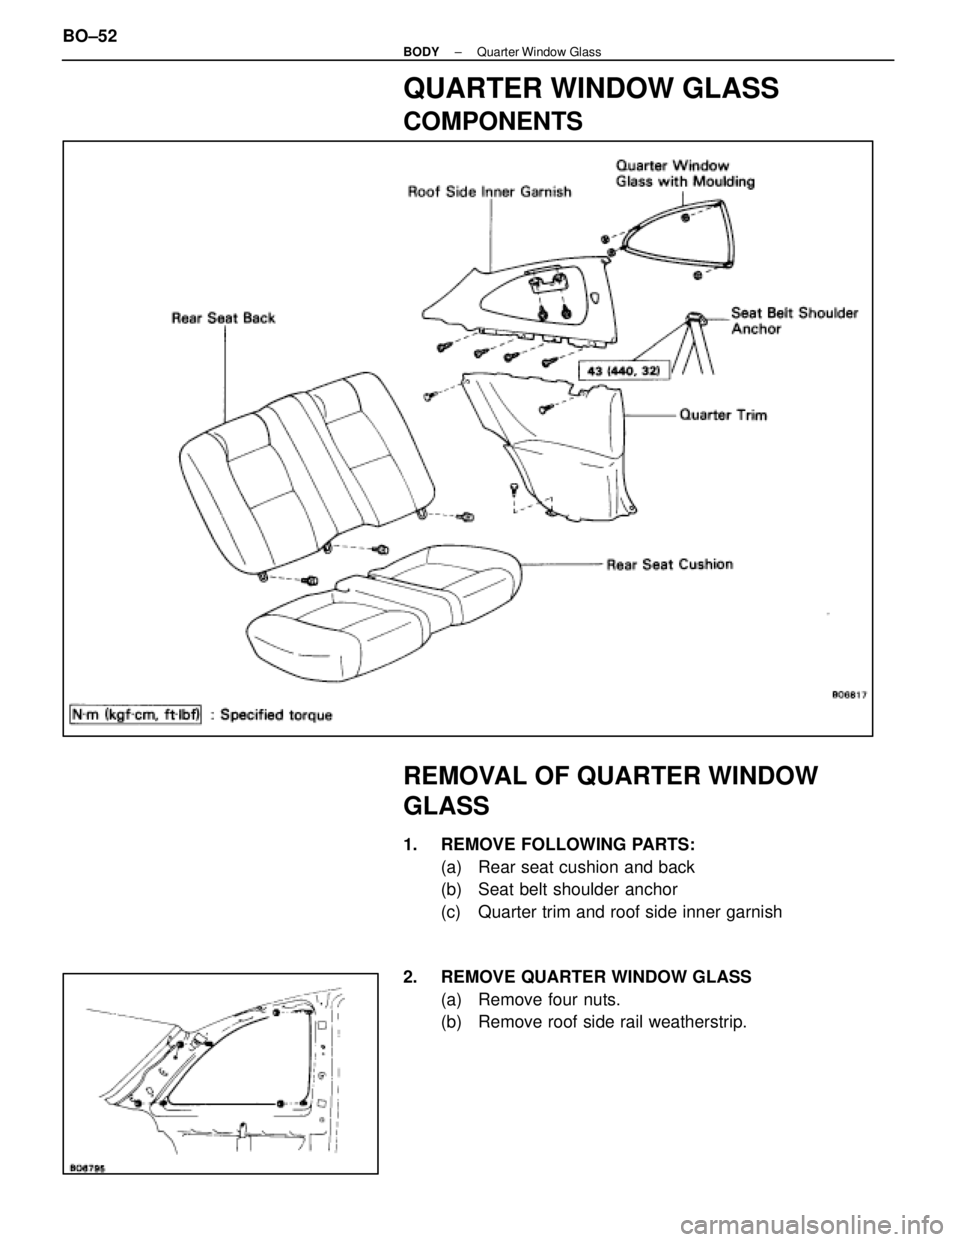
QUARTER WINDOW GLASS
COMPONENTS
REMOVAL OF QUARTER WINDOW
GLASS
1. REMOVE FOLLOWING PARTS:(a) Rear seat cushion and back
(b) Seat belt shoulder anchor
(c) Quarter trim and roof side inner garnish
2. REMOVE QUARTER WINDOW GLASS (a) Remove four nuts.
(b) Remove roof side rail weatherstrip.
BO±52
±
BODY Quarter Window Glass
WhereEverybodyKnowsYourName
Page 409 of 4087
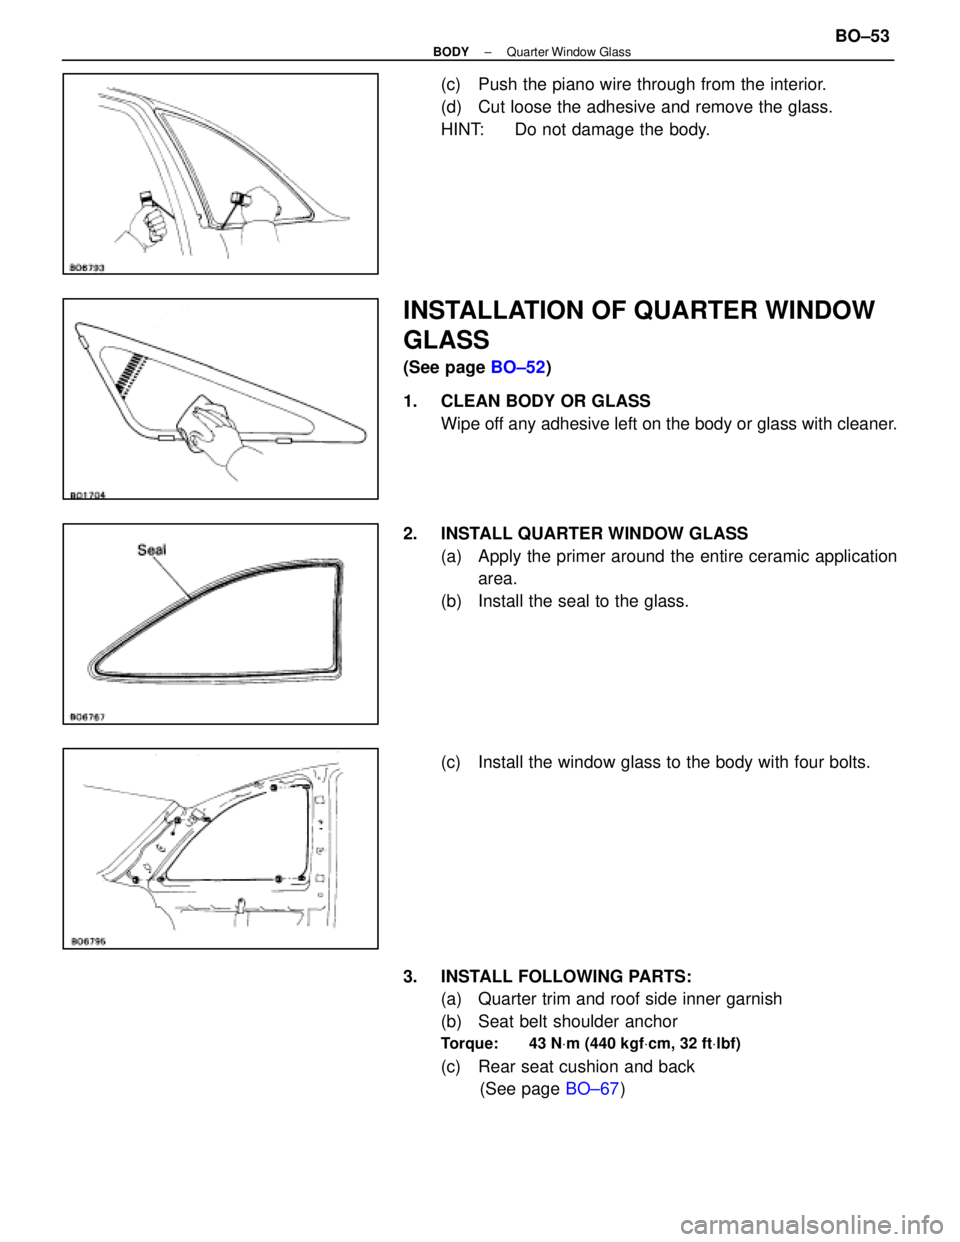
(c) Push the piano wire through from the interior.
(d) Cut loose the adhesive and remove the glass.
HINT: Do not damage the body.
INSTALLATION OF QUARTER WINDOW
GLASS
(See page BO±52)
1. CLEAN BODY OR GLASS Wipe off any adhesive left on the body or glass with cleaner.
2. INSTALL QUARTER WINDOW GLASS (a) Apply the primer around the entire ceramic applicationarea.
(b) Install the seal to the glass.
(c) Install the window glass to the body with four bolts.
3. INSTALL FOLLOWING PARTS: (a) Quarter trim and roof side inner garnish
(b) Seat belt shoulder anchor
Torque: 43 N Vm (440 kgf Vcm, 32 ft Vlbf)
(c) Rear seat cushion and back
(See page BO±67)
±
BODY Quarter Window GlassBO±53
WhereEverybodyKnowsYourName
Page 410 of 4087
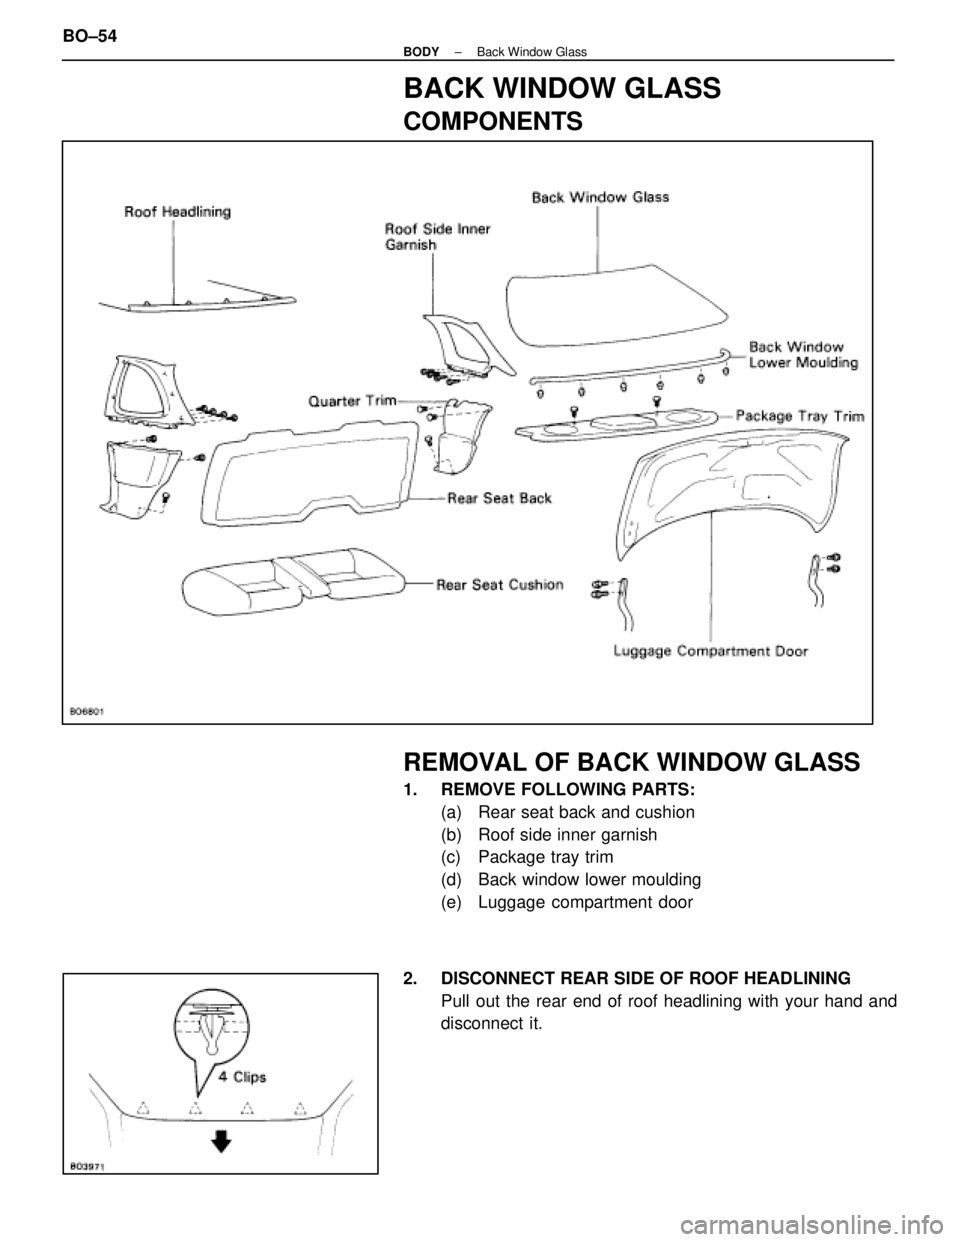
BACK WINDOW GLASS
COMPONENTS
REMOVAL OF BACK WINDOW GLASS
1. REMOVE FOLLOWING PARTS:(a) Rear seat back and cushion
(b) Roof side inner garnish
(c) Package tray trim
(d) Back window lower moulding
(e) Luggage compartment door
2. DISCONNECT REAR SIDE OF ROOF HEADLINING Pull out the rear end of roof headlining with your hand and
disconnect it.
BO±54
±
BODY Back Window Glass
WhereEverybodyKnowsYourName