LEXUS SC400 1991 Service Repair Manual
Manufacturer: LEXUS, Model Year: 1991,
Model line: SC400,
Model: LEXUS SC400 1991
Pages: 4087, PDF Size: 75.75 MB
LEXUS SC400 1991 Service Repair Manual
SC400 1991
LEXUS
LEXUS
https://www.carmanualsonline.info/img/36/57051/w960_57051-0.png
LEXUS SC400 1991 Service Repair Manual
Trending: jacking, brake light, clock reset, oil level, heater, engine overheat, coolant level
Page 421 of 4087
ASSEMBLY OF FRONT SEAT
(See page BO±63)
ASSEMBLE FRONT SEAT PARTS BY FOLLOWING DIS-
ASSEMBLY SEQUENCE IN REVERSE HINT:
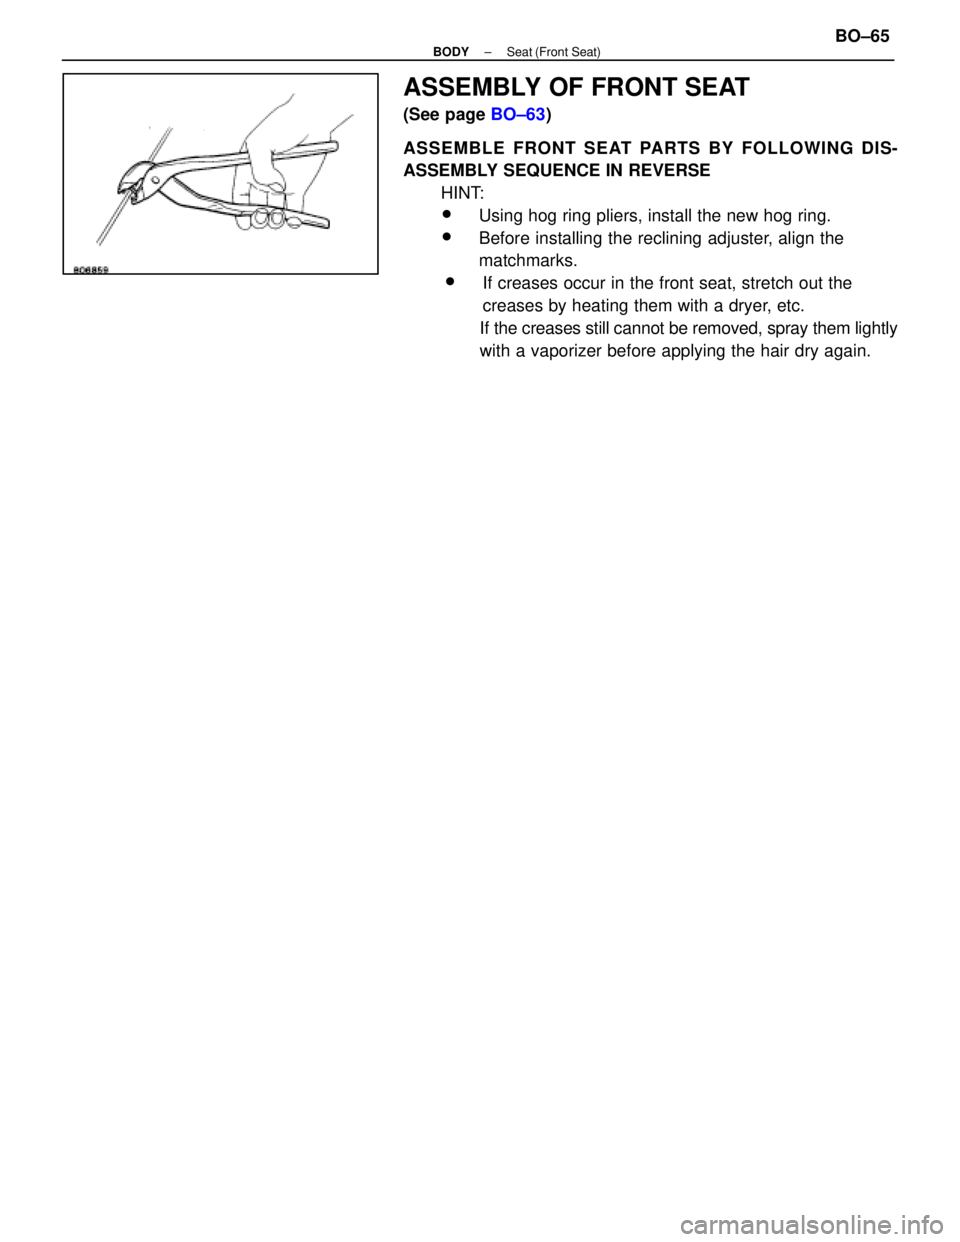
wUsing hog ring pliers, install the new hog ring.
wBefore installing the reclining adjuster, align the
matchmarks.
wIf creases occur in the front seat, stretch out the
creases by heating them with a dryer, etc.
If the creases still cannot be removed, spray them lightly
with a vaporizer before applying the hair dry again.
±
BODY Seat (Front Seat)BO±65
WhereEverybodyKnowsYourName
Page 422 of 4087
Rear Seat
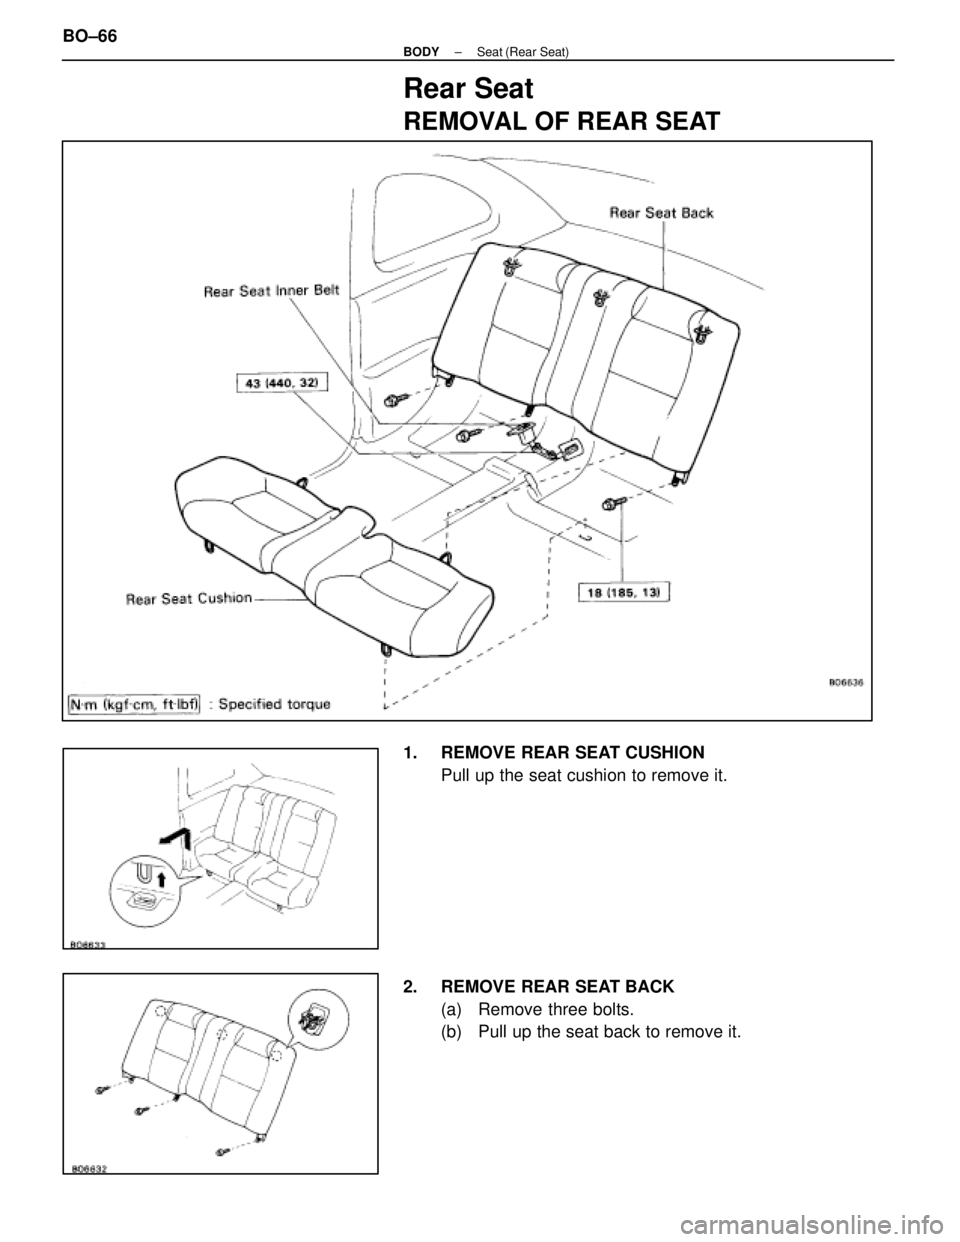
REMOVAL OF REAR SEAT
1. REMOVE REAR SEAT CUSHIONPull up the seat cushion to remove it.
2. REMOVE REAR SEAT BACK (a) Remove three bolts.
(b) Pull up the seat back to remove it.
BO±66
±
BODY Seat (Rear Seat)
WhereEverybodyKnowsYourName
Page 423 of 4087
INSTALLATION OF REAR SEAT
(See page BO±66)
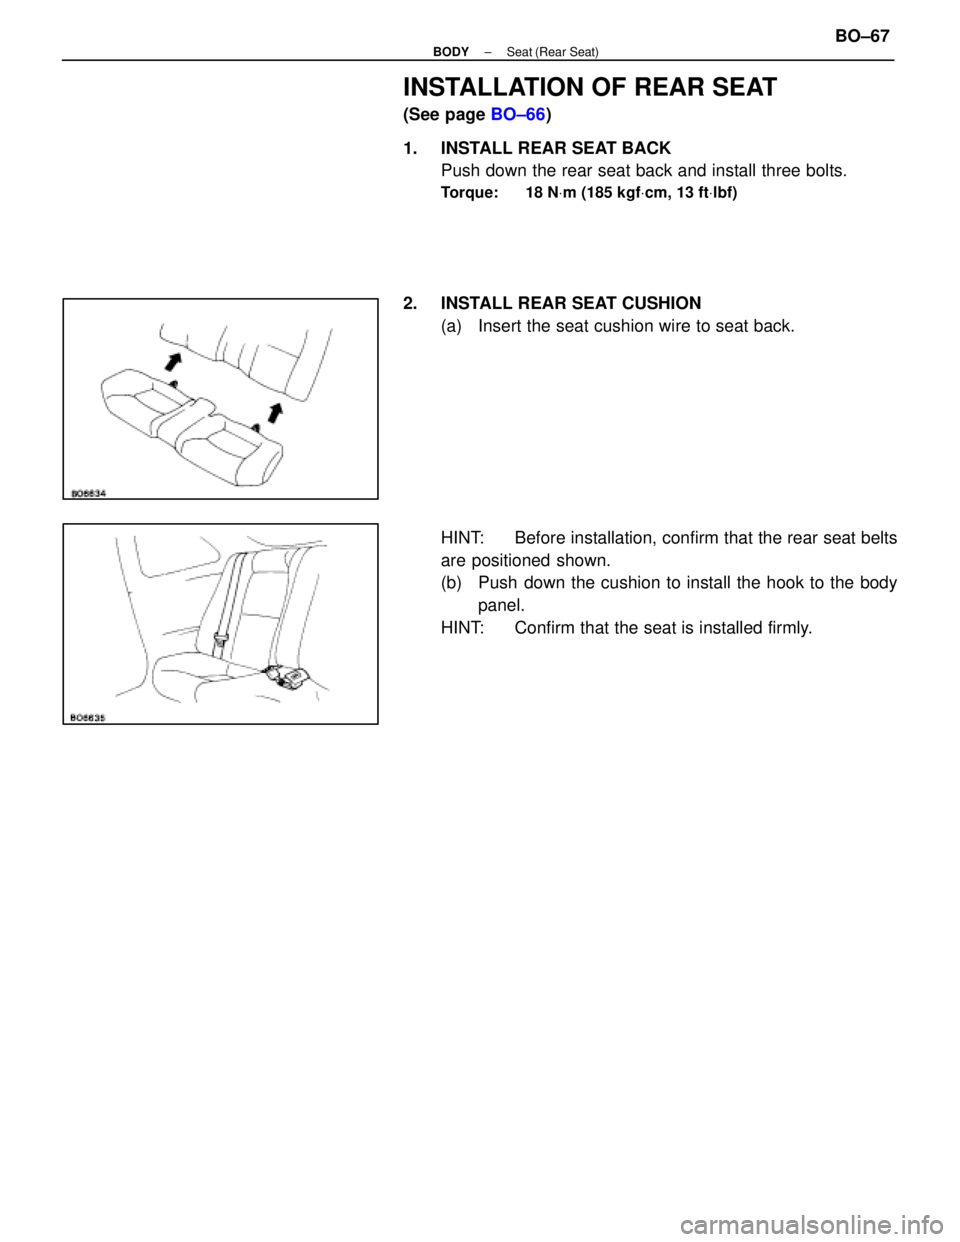
1. INSTALL REAR SEAT BACK Push down the rear seat back and install three bolts.
Torque: 18 N Vm (185 kgf Vcm, 13 ft Vlbf)
2. INSTALL REAR SEAT CUSHION
(a) Insert the seat cushion wire to seat back.
HINT: Before installation, confirm that the rear seat belts
are positioned shown.
(b) Push down the cushion to install the hook to the bodypanel.
HINT: Confirm that the seat is installed firmly.
±
BODY Seat (Rear Seat)BO±67
WhereEverybodyKnowsYourName
Page 424 of 4087
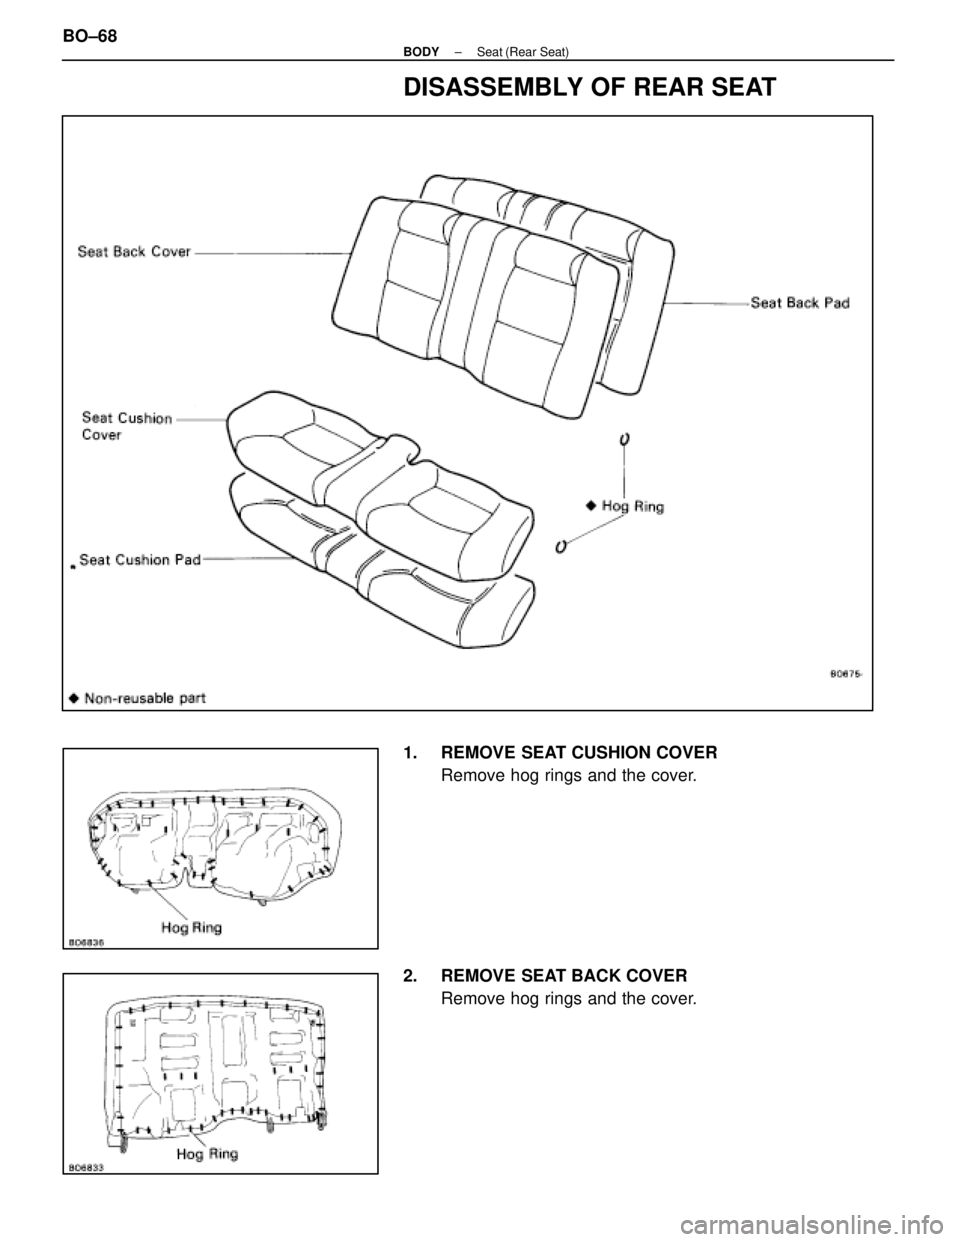
DISASSEMBLY OF REAR SEAT
1. REMOVE SEAT CUSHION COVERRemove hog rings and the cover.
2. REMOVE SEAT BACK COVER Remove hog rings and the cover.
BO±68
±
BODY Seat (Rear Seat)
WhereEverybodyKnowsYourName
Page 425 of 4087
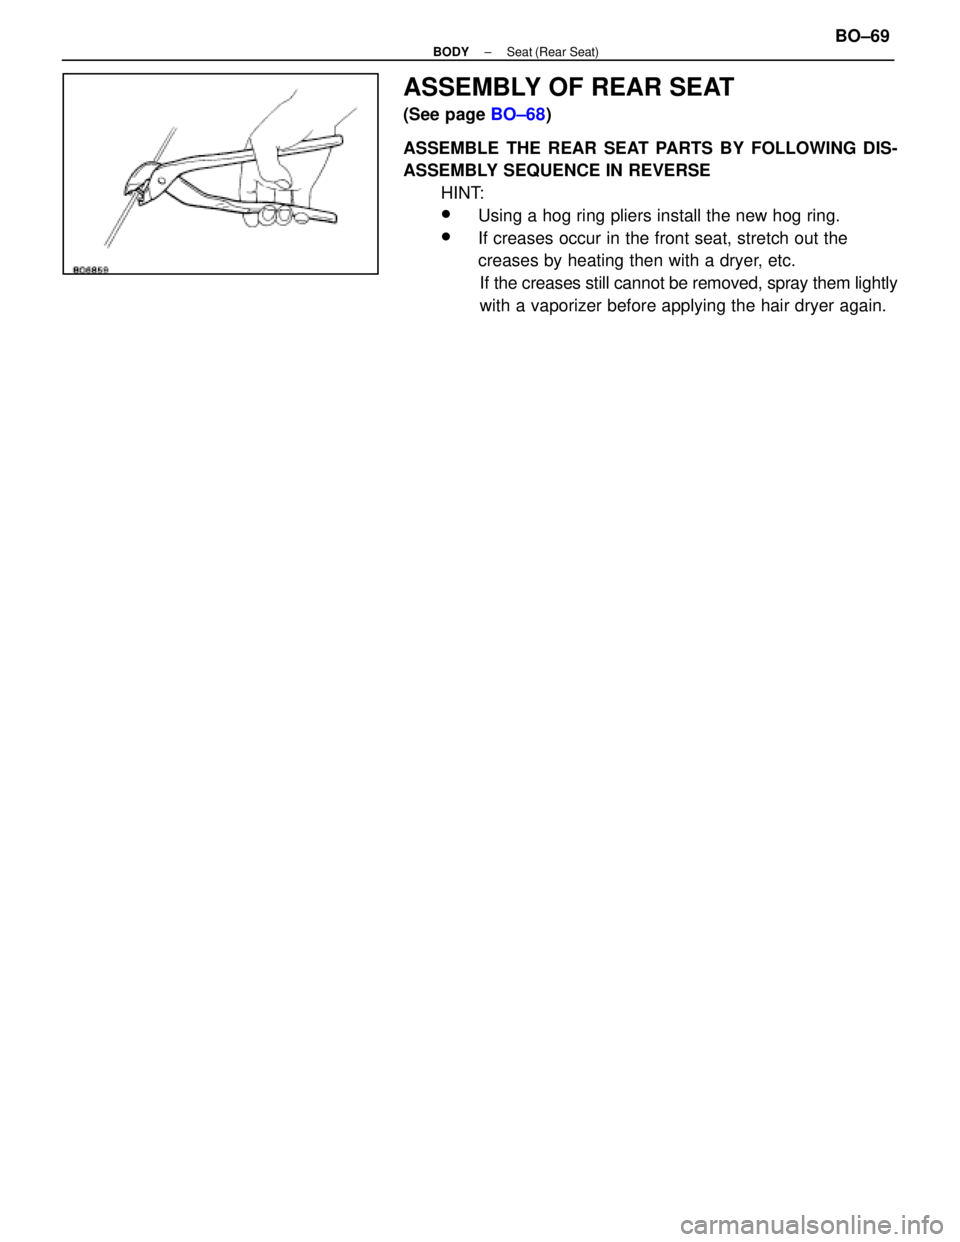
ASSEMBLY OF REAR SEAT
(See page BO±68)
ASSEMBLE THE REAR SEAT PARTS BY FOLLOWING DIS-
ASSEMBLY SEQUENCE IN REVERSE HINT:
wUsing a hog ring pliers install the new hog ring.
wIf creases occur in the front seat, stretch out the
creases by heating then with a dryer, etc.If the creases still cannot be removed, spray them lightly
with a vaporizer before applying the hair dryer again.
±
BODY Seat (Rear Seat)BO±69
WhereEverybodyKnowsYourName
Page 426 of 4087
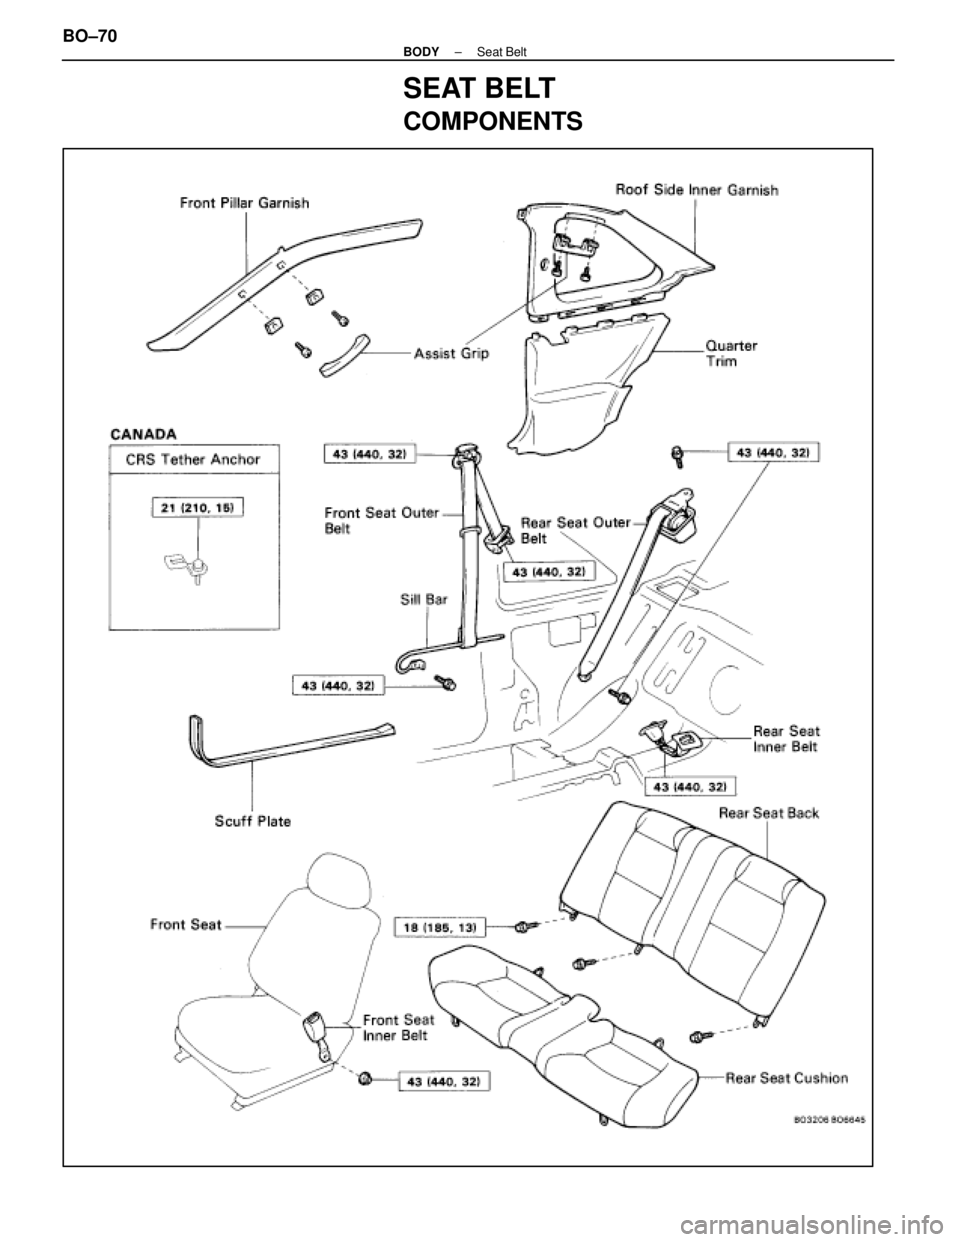
SEAT BELT
COMPONENTS
BO±70±
BODY Seat Belt
WhereEverybodyKnowsYourName
Page 427 of 4087
Front Seat Belt
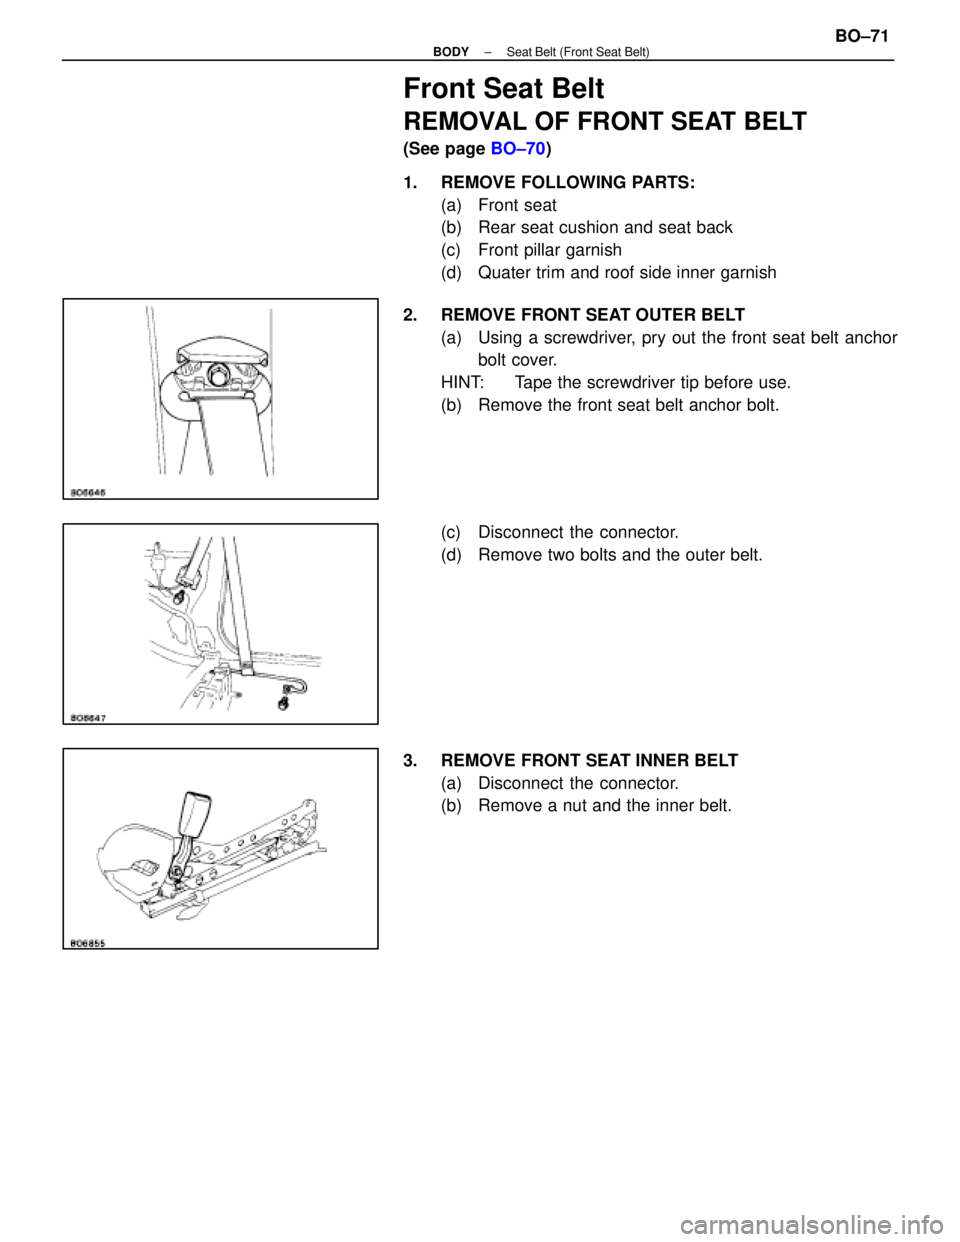
REMOVAL OF FRONT SEAT BELT
(See page BO±70)
1. REMOVE FOLLOWING PARTS: (a) Front seat
(b) Rear seat cushion and seat back
(c) Front pillar garnish
(d) Quater trim and roof side inner garnish
2. REMOVE FRONT SEAT OUTER BELT (a) Using a screwdriver, pry out the front seat belt anchorbolt cover.
HINT: Tape the screwdriver tip before use.
(b) Remove the front seat belt anchor bolt.
(c) Disconnect the connector.
(d) Remove two bolts and the outer belt.
3. REMOVE FRONT SEAT INNER BELT (a) Disconnect the connector.
(b) Remove a nut and the inner belt.
±
BODY Seat Belt (Front Seat Belt)BO±71
WhereEverybodyKnowsYourName
Page 428 of 4087
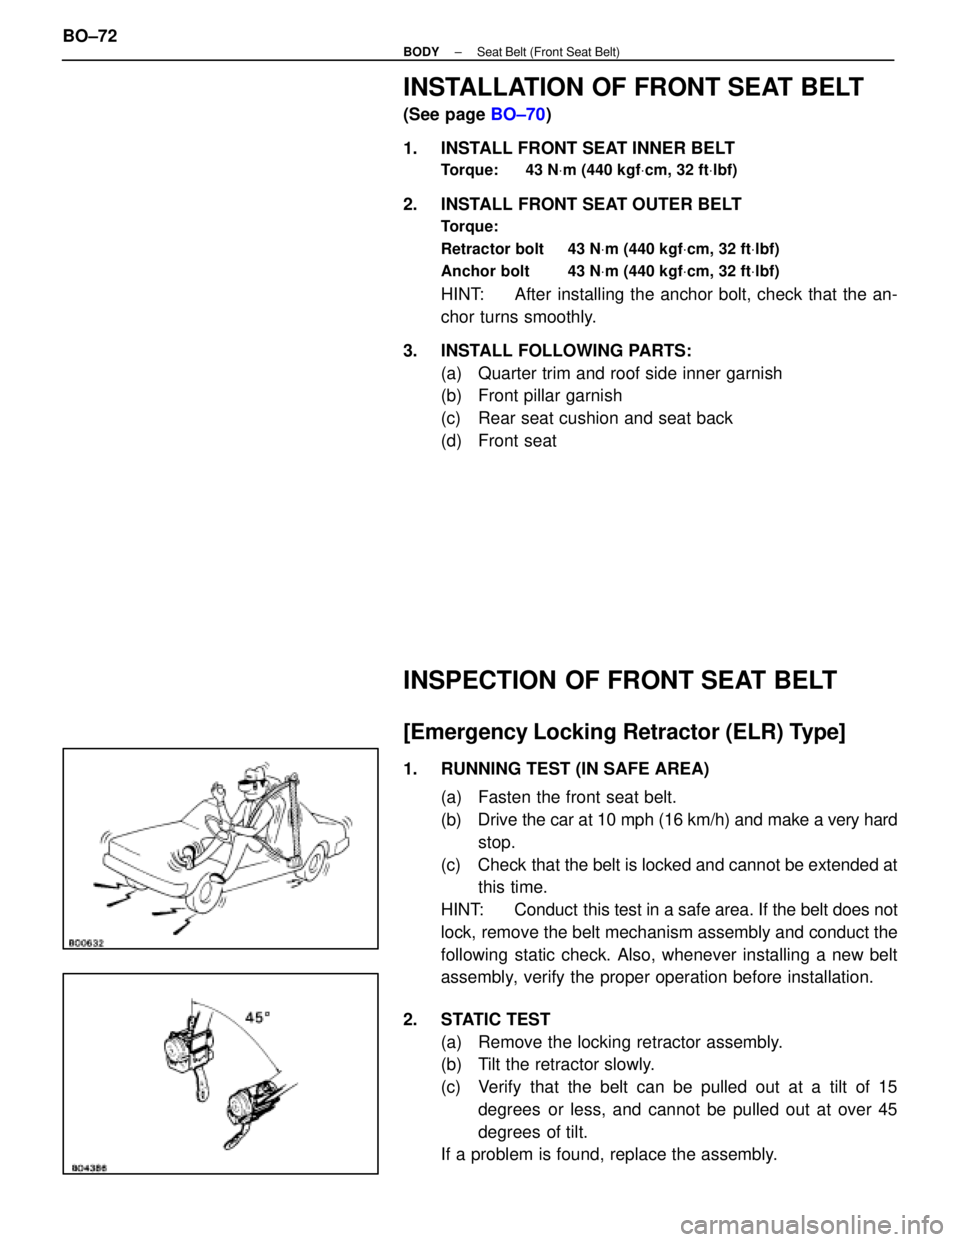
INSTALLATION OF FRONT SEAT BELT
(See page BO±70)
1. INSTALL FRONT SEAT INNER BELT
Torque: 43 N Vm (440 kgf Vcm, 32 ft Vlbf)
2. INSTALL FRONT SEAT OUTER BELT
Torque:
Retractor bolt 43 N Vm (440 kgf Vcm, 32 ft Vlbf)
Anchor bolt 43 N Vm (440 kgf Vcm, 32 ft Vlbf)
HINT: After installing the anchor bolt, check that the an-
chor turns smoothly.
3. INSTALL FOLLOWING PARTS: (a) Quarter trim and roof side inner garnish
(b) Front pillar garnish
(c) Rear seat cushion and seat back
(d) Front seat
INSPECTION OF FRONT SEAT BELT
[Emergency Locking Retractor (ELR) Type]
1. RUNNING TEST (IN SAFE AREA)
(a) Fasten the front seat belt.
(b) Drive the car at 10 mph (16 km/h) and make a very hardstop.
(c) Check that the belt is locked and cannot be extended at this time.
HINT: Conduct this test in a safe area. If the belt does not
lock, remove the belt mechanism assembly and conduct the
following static check. Also, whenever installing a new belt
assembly, verify the proper operation before installation.
2. STATIC TEST (a) Remove the locking retractor assembly.
(b) Tilt the retractor slowly.
(c) Verify that the belt can be pulled out at a tilt of 15degrees or less, and cannot be pulled out at over 45
degrees of tilt.
If a problem is found, replace the assembly.
BO±72
±
BODY Seat Belt (Front Seat Belt)
WhereEverybodyKnowsYourName
Page 429 of 4087
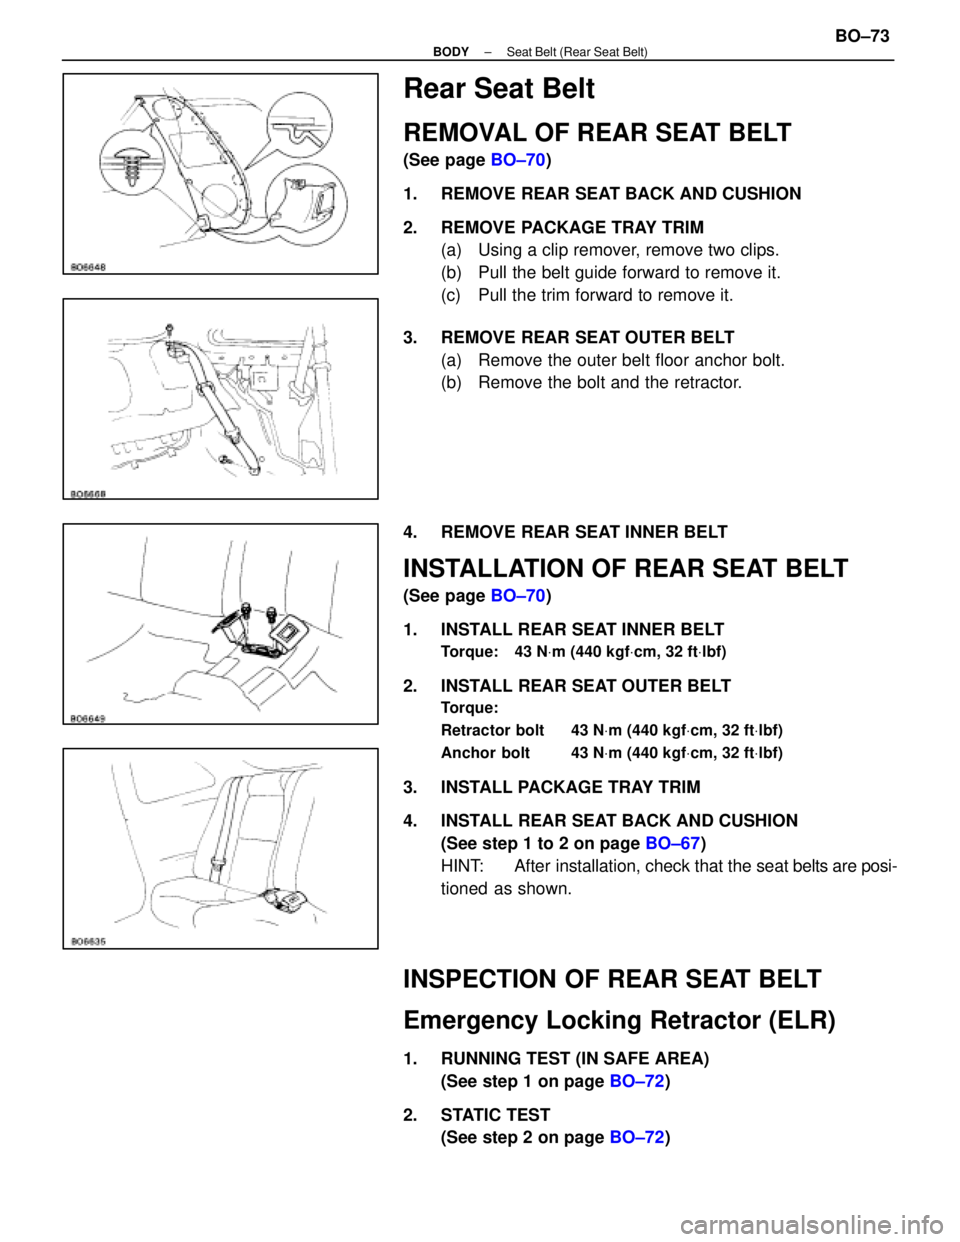
Rear Seat Belt
REMOVAL OF REAR SEAT BELT
(See page BO±70)
1. REMOVE REAR SEAT BACK AND CUSHION
2. REMOVE PACKAGE TRAY TRIM (a) Using a clip remover, remove two clips.
(b) Pull the belt guide forward to remove it.
(c) Pull the trim forward to remove it.
3. REMOVE REAR SEAT OUTER BELT (a) Remove the outer belt floor anchor bolt.
(b) Remove the bolt and the retractor.
4. REMOVE REAR SEAT INNER BELT
INSTALLATION OF REAR SEAT BELT
(See page BO±70)
1. INSTALL REAR SEAT INNER BELT
Torque: 43 N Vm (440 kgf Vcm, 32 ft Vlbf)
2. INSTALL REAR SEAT OUTER BELT
Torque:
Retractor bolt 43 N Vm (440 kgf Vcm, 32 ft Vlbf)
Anchor bolt 43 N Vm (440 kgf Vcm, 32 ft Vlbf)
3. INSTALL PACKAGE TRAY TRIM
4. INSTALL REAR SEAT BACK AND CUSHION
(See step 1 to 2 on page BO±67)
HINT: After installation, check that the seat belts are posi-
tioned as shown.
INSPECTION OF REAR SEAT BELT
Emergency Locking Retractor (ELR)
1. RUNNING TEST (IN SAFE AREA) (See step 1 on page BO±72)
2. STATIC TEST (See step 2 on page BO±72)
±
BODY Seat Belt (Rear Seat Belt)BO±73
WhereEverybodyKnowsYourName
Page 430 of 4087
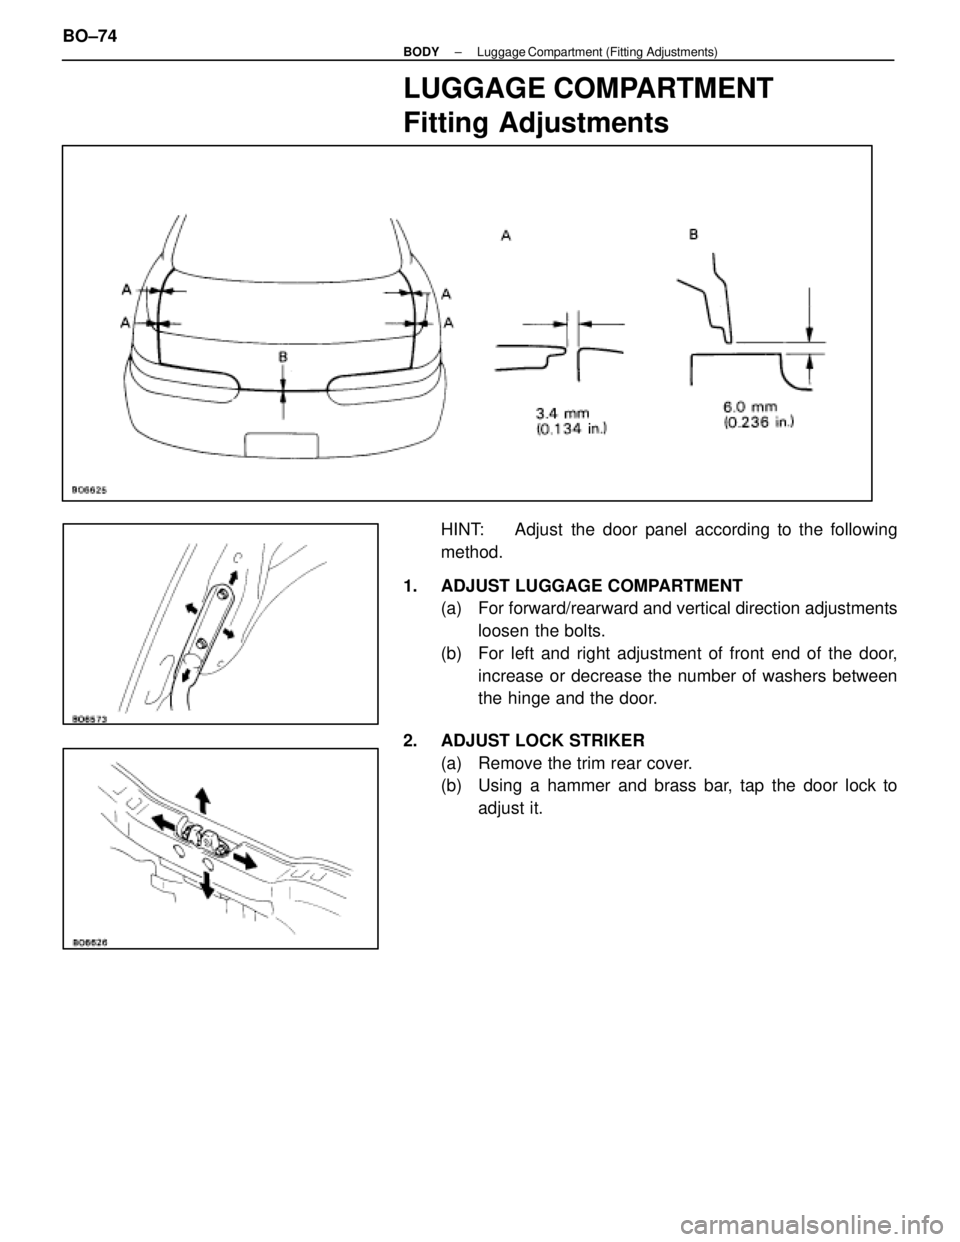
LUGGAGE COMPARTMENT
Fitting Adjustments
HINT: Adjust the door panel according to the following
method.
1. ADJUST LUGGAGE COMPARTMENT (a) For forward/rearward and vertical direction adjustments
loosen the bolts.
(b) For left and right adjustment of front end of the door, increase or decrease the number of washers between
the hinge and the door.
2. ADJUST LOCK STRIKER (a) Remove the trim rear cover.
(b) Using a hammer and brass bar, tap the door lock toadjust it.
BO±74
±
BODY Luggage Com partment (Fitting Adjustments)
WhereEverybodyKnowsYourName
Trending: fuel type, dashboard, brake, engine oil capacity, ignition, wheel bolts, transmission
