ignition MAZDA 6 2002 Workshop Manual Suplement
[x] Cancel search | Manufacturer: MAZDA, Model Year: 2002, Model line: 6, Model: MAZDA 6 2002Pages: 909, PDF Size: 17.16 MB
Page 707 of 909

ON-BOARD DIAGNOSTIC
M–77
M
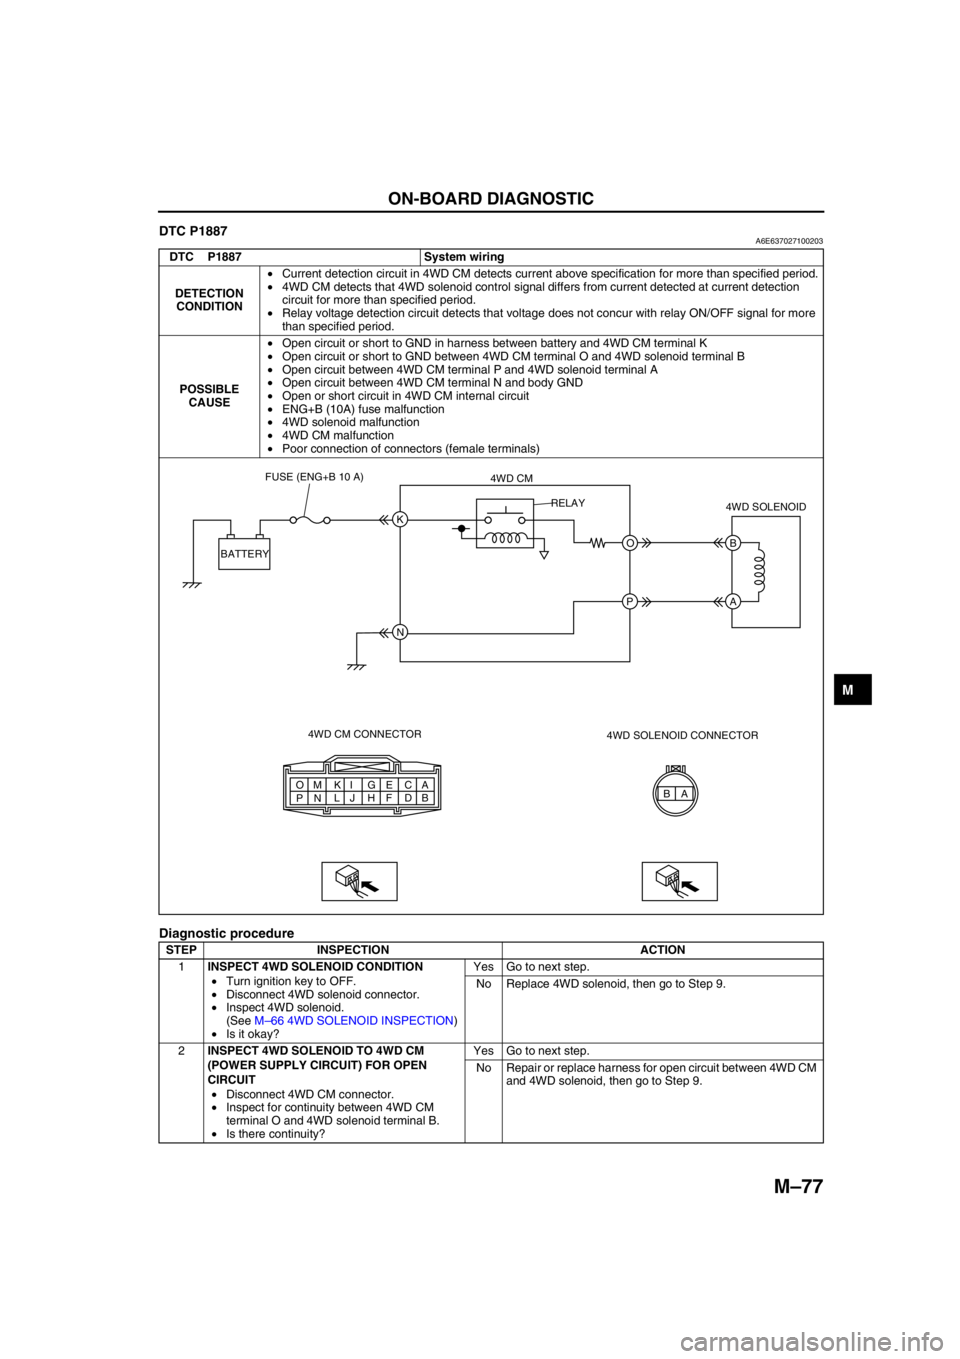
DTC P1887A6E637027100203
Diagnostic procedure
DTC P1887 System wiring
DETECTION
CONDITION•Current detection circuit in 4WD CM detects current above specification for more than specified period.
•4WD CM detects that 4WD solenoid control signal differs from current detected at current detection
circuit for more than specified period.
•Relay voltage detection circuit detects that voltage does not concur with relay ON/OFF signal for more
than specified period.
POSSIBLE
CAUSE•Open circuit or short to GND in harness between battery and 4WD CM terminal K
•Open circuit or short to GND between 4WD CM terminal O and 4WD solenoid terminal B
•Open circuit between 4WD CM terminal P and 4WD solenoid terminal A
•Open circuit between 4WD CM terminal N and body GND
•Open or short circuit in 4WD CM internal circuit
•ENG+B (10A) fuse malfunction
•4WD solenoid malfunction
•4WD CM malfunction
•Poor connection of connectors (female terminals)
STEP INSPECTION ACTION
1INSPECT 4WD SOLENOID CONDITION
•Turn ignition key to OFF.
•Disconnect 4WD solenoid connector.
•Inspect 4WD solenoid.
(See M–66 4WD SOLENOID INSPECTION)
•Is it okay?Yes Go to next step.
No Replace 4WD solenoid, then go to Step 9.
2INSPECT 4WD SOLENOID TO 4WD CM
(POWER SUPPLY CIRCUIT) FOR OPEN
CIRCUIT
•Disconnect 4WD CM connector.
•Inspect for continuity between 4WD CM
terminal O and 4WD solenoid terminal B.
•Is there continuity?Yes Go to next step.
No Repair or replace harness for open circuit between 4WD CM
and 4WD solenoid, then go to Step 9.
A A
B C
D E
F G
H I
J K
L M
N O
PB K
O B
A
N P BATTERYFUSE (ENG+B 10 A)
4WD CM
4WD CM CONNECTOR4WD SOLENOID
4WD SOLENOID CONNECTOR RELAY
Page 708 of 909

M–78
ON-BOARD DIAGNOSTIC
End Of Sie
3INSPECT 4WD SOLENOID TO 4WD CM
(POWER SUPPLY CIRCUIT) FOR SHORT TO
GROUND
•Inspect for continuity between 4WD CM
terminal O and ground.
•Is there continuity?Yes Repair or replace harness for short to ground between 4WD
CM and 4WD solenoid, then go to Step 9.
No Go to next step.
4INSPECT 4WD SOLENOID TO 4WD CM
(GROUND CIRCUIT) FOR OPEN CIRCUIT
•Inspect for continuity between 4WD CM
terminal P and 4WD solenoid terminal A.
•Is there continuity?Yes Replace 4WD CM, then go to next step.
No Repair or replace harness for open circuit between 4WD CM
and 4WD solenoid, then go to Step 9.
5INSPECT 4WD CM POWER SUPPLY CIRCUIT
FOR OPEN CIRCUIT
•Measure voltage between 4WD CM terminal
K and ground.
•Is voltage B+?Yes Replace 4WD CM, then go to Step 9.
No Go to next step.
6INSPECT 4WD CM TO BATTERY FOR OPEN
CIRCUIT
•Disconnect 4WD CM connector and battery
positive terminal.
•Inspect for continuity between 4WD CM
terminal K and battery positive terminal.
•Is there continuity?Yes Go to next step.
No Repair or replace harness for open circuit between 4WD CM
and battery positive terminal, then go to Step 9.
7INSPECT 4WD CM TO BATTERY FOR SHORT
TO GROUND
•Inspect for continuity between 4WD CM
terminal K and ground.
•Is there continuity?Yes Repair or replace harness for short to ground between 4WD
CM and battery positive terminal, then go to Step 9.
No Replace 4WD CM, then go to step 9.
8INSPECT FUSE CONDITION
•Turn ignition key to OFF.
•Is ENG+B fuse (10A) okay?Yes Go to next step.
No Replace fuse, then go to Step 9.
9VERIFY TROUBLESHOOTING COMPLETED
•Make sure to reconnect all disconnected
connectors.
•Clear DTC from memory.
(See M–76 Clearing DTCs Procedures)
•Drive vehicle.
•Is the same DTC present?Yes Replace 4WD CM, then go to next step.
No Go to next step.
10VERIFY AFTER REPAIR PROCEDURE
•Is there any other DTC present?Yes Go to applicable DTC inspection.
No Troubleshooting completed. STEP INSPECTION ACTION
Page 709 of 909

ON-BOARD DIAGNOSTIC
M–79
M
DTC P1888A6E637027100204
Diagnostic procedure
DTC P1888 Differential oil temperature sensor
DETECTION
CONDITION•Differential oil temperature sensor voltage monitor circuit detects abnormal input voltage.
POSSIBLE
CAUSE•Open circuit, or short to battery or GND between 4WD CM terminal A and differential oil temperature
sensor terminal A
•Open circuit or short to battery between 4WD CM terminal C and differential oil temperature sensor
terminal B
•Differential oil temperature sensor malfunction
•4WD CM malfunction
•Poor connection of connectors (female terminals)
STEP INSPECTION ACTION
1INSPECT DIFFERENTIAL OIL
TEMPERATURE SENSOR CONDITION
•Turn ignition key to OFF.
•Disconnect differential oil temperature
sensor connector.
•Is it okay?Yes Go to next step.
No Replace differential oil temperature sensor, then go to Step
7.
2INSPECT 4WD CM TO DIFFERENTIAL OIL
TEMPERATURE SENSOR FOR OPEN
CIRCUIT
•Disconnect 4WD CM connector.
•Inspect for continuity between 4WD CM
terminal A and differential oil temperature
sensor terminal A.
•Is there continuity?Yes Go to next step.
No Repair or replace harness for open circuit between 4WD CM
and differential oil temperature sensor, then go to Step 7.
3INSPECT 4WD CM TO DIFFERENTIAL OIL
TEMPERATURE SENSOR FOR SHORT TO
POWER
•Inspect voltage between 4WD CM terminal A
and ground.
•Is voltage B+?Yes Repair or replace harness for short to power between 4WD
CM and differential oil temperature sensor, then go to Step
7.
No Go to next step.
A B A
B C
D E
F G
H I
J K
L M
N O
PA
C A
B
4WD CM CONNECTOR4WD CM
DIFFERENTIAL OIL
TEMPERATURE SENSOR
DIFFERENTIAL OIL TEMPERATURE
SENSOR CONNECTOR
Page 711 of 909

TROUBLESHOOTING
M–81
M
SYSTEM WIRING DIAGRAMA6E638027100201
End Of Sie
TROUBLESHOOTING
IGNITION SWITCH
BATTERY
DIFFERENTIAL OIL
TEMPERATURE
SENSOR4WD CM4WD SOLENOID ELECTRONIC CONTROL
COUPLING
CAN DRIVERINSTRUMENT CLUSTER
CAN-H
CAN-LPCM DSC HU/CM KO
P I
A
C
NH G
TCM
A6E63702002
Page 713 of 909

TROUBLESHOOTING
M–83
M
Diagnostic procedure
End Of Sie
NO.2 TIGHT CORNER BRAKINGA6E638027100205
Diagnostic procedure
STEP INSPECTION ACTION
1VERIFY DSC, PCM, TCM, AND 4WD SYSTEM
DTCs
•Verify DSC, PCM, TCM, and 4WD system
DTCs using WDS or equivalent.
•Are there any DTCs present?Yes Go to applicable DTC inspection.
No Go to next step.
2VERIFY TIRE AIR PRESSURE
•Inspect tire air pressure.
•Is it within specification?Yes Go to next step.
No Adjust tire air pressure, then go to next step.
3COMPARE WITH SAME MODEL TIRES
•Install tires of the same model.
•Perform simulation driving.
•Does malfunction recur?Yes Go to next step.
No 4WD system is okay.
4COMPARE WITH SAME MODEL VEHICLE
•Install tires of malfunctioning vehicle to
another same model vehicle.
•Perform simulation driving.
•Does malfunction recur?Yes 4WD system is okay.
No Go to next step.
5INSPECT 4WD SOLENOID
•Inspect 4WD solenoid.
(See M–66 4WD SOLENOID INSPECTION)
•Is coupling component solenoid okay?Yes Inspect harness between 4WD solenoid and 4WD CM, then
go to next step.
No Replace coupling component.
6INSPECT WHEEL ALIGNMENT
•Inspect wheel alignment.
•Is it okay?Yes Replace coupling component.
No Inspect wheel alignment, and adjust it if necessary.
2 Tight corner braking
[TROUBLESHOOTING HINTS]
•Because the coupling component locks up easily (similar to direct 4WD), rotational difference between the front
and rear wheels cannot be absorbed and brake-like phenomenon occurs.
•Due to the coupling component construction, slight tight corner braking effect occurs during tight cornering on a
paved road. (4WD system is okay. Compare with another same model vehicle to determine malfunction.)
•Coupling component malfunction
•4WD solenoid malfunction
STEP INSPECTION ACTION
1VERIFY DSC, PCM, TCM, AND 4WD SYSTEM
DTCS
•Verify DSC, PCM, TCM, and 4WD system
DTCs using WDS or equivalent.
•Are there any DTCs present?Yes Go to applicable DTC inspection.
No Go to next step.
2VERIFY TIRE AIR PRESSURE
•Inspect tire air pressure.
•Is it within specification?Yes Go to next step.
No Adjust tire air pressure, then go to next step.
3INSPECT ABS WHEEL-SPEED SENSOR
•Inspect ABS wheel-speed sensor.
•Is it okay?Yes Go to next step.
No Repair or replace malfunctioning part.
4COMPARE WITH SAME MODEL VEHICLE
•Perform simulation driving with another
same model vehicle.
•Does malfunction recur on the same model
vehicle?Yes 4WD system is okay.
No Go to next step.
5PERFORM SIMULATION DRIVING WITH 4WD
SOLENOID CONNECTOR DISCONNECTED
•Turn ignition key OFF.
•Disconnect 4WD solenoid connector.
•Perform simulation driving. (Clear DTC after
simulation driving.)
•Does malfunction recur?Yes Replace coupling component.
No Go to next step.
Page 744 of 909

CONVENTIONAL BRAKE SYSTEM
P–11
P
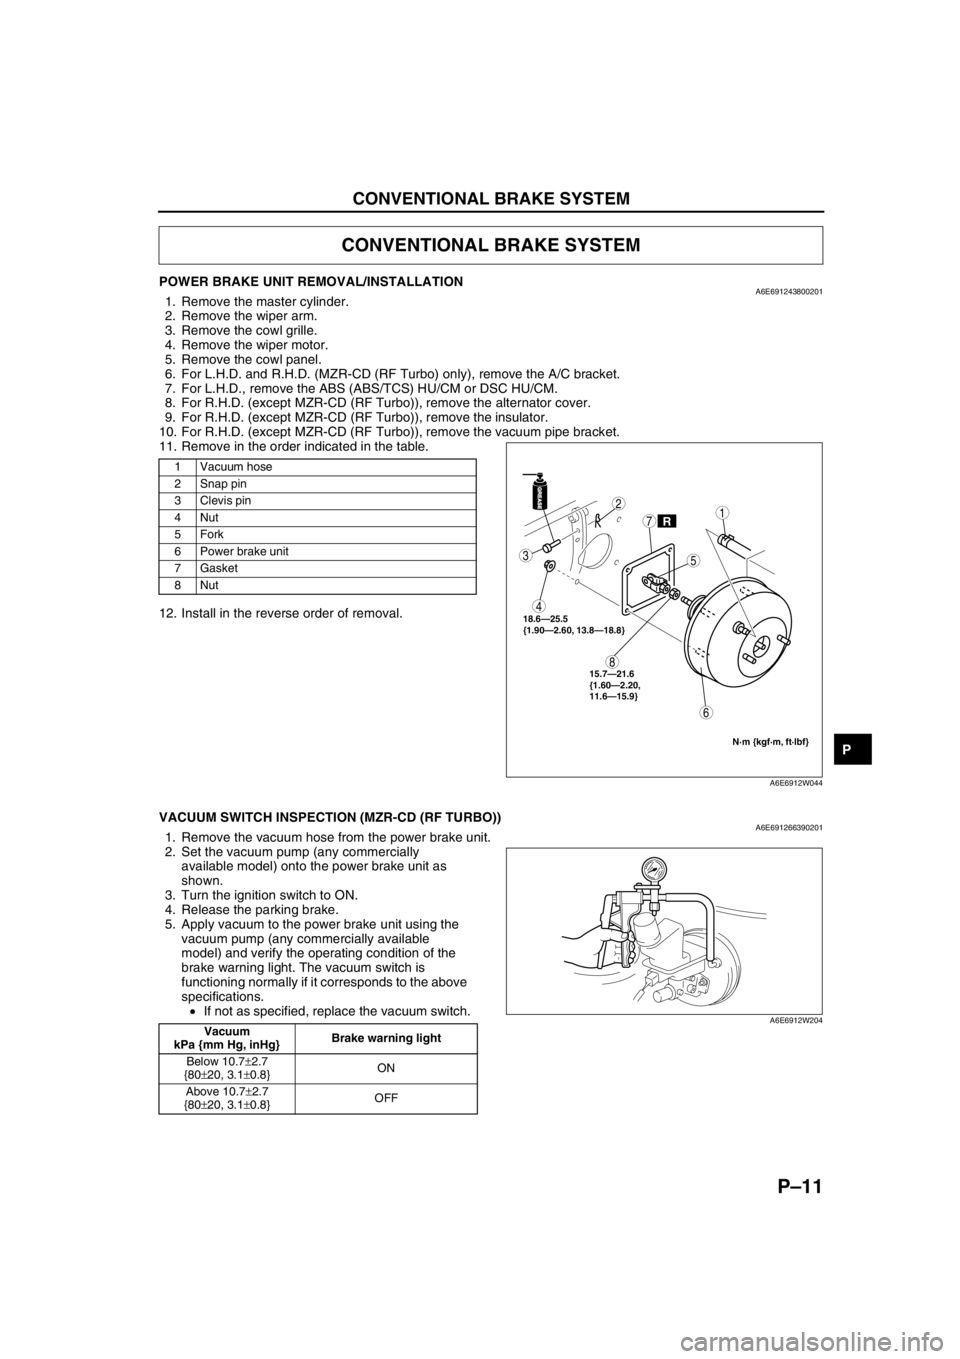
POWER BRAKE UNIT REMOVAL/INSTALLATIONA6E6912438002011. Remove the master cylinder.
2. Remove the wiper arm.
3. Remove the cowl grille.
4. Remove the wiper motor.
5. Remove the cowl panel.
6. For L.H.D. and R.H.D. (MZR-CD (RF Turbo) only), remove the A/C bracket.
7. For L.H.D., remove the ABS (ABS/TCS) HU/CM or DSC HU/CM.
8. For R.H.D. (except MZR-CD (RF Turbo)), remove the alternator cover.
9. For R.H.D. (except MZR-CD (RF Turbo)), remove the insulator.
10. For R.H.D. (except MZR-CD (RF Turbo)), remove the vacuum pipe bracket.
11. Remove in the order indicated in the table.
12. Install in the reverse order of removal.
End Of Sie
VACUUM SWITCH INSPECTION (MZR-CD (RF TURBO))A6E6912663902011. Remove the vacuum hose from the power brake unit.
2. Set the vacuum pump (any commercially
available model) onto the power brake unit as
shown.
3. Turn the ignition switch to ON.
4. Release the parking brake.
5. Apply vacuum to the power brake unit using the
vacuum pump (any commercially available
model) and verify the operating condition of the
brake warning light. The vacuum switch is
functioning normally if it corresponds to the above
specifications.
•If not as specified, replace the vacuum switch.
End Of Sie
CONVENTIONAL BRAKE SYSTEM
1 Vacuum hose
2 Snap pin
3Clevis pin
4Nut
5Fork
6 Power brake unit
7Gasket
8Nut
GREASEGREASE
R
3
4
8
6
2
7
5
1
18.6—25.5
{1.90—2.60, 13.8—18.8}
N·m {kgf·m, ft·lbf}
15.7—21.6
{1.60—2.20,
11.6—15.9}
A6E6912W044
Vacuum
kPa {mm Hg, inHg}Brake warning light
Below 10.7±2.7
{80±20, 3.1±0.8}ON
Above 10.7±2.7
{80±20, 3.1±0.8}OFFA6E6912W204
Page 750 of 909

PARKING BRAKE SYSTEM, DYNAMIC STABILITY CONTROL
P–17
P
PARKING BRAKE (LEVER TYPE) ADJUSTMENTA6E6914440002011. Start the engine and depress the brake pedal several times.
2. Stop the engine.
3. For the 2WD model, remove the rear ashtray case behind the center console
4. For the 4WD model, remove the 4 screws (back side) and pull up the rear of the center console, then remove
the rear ashtray case.
5. Turn the adjusting nut as shown in the figure.
6. After adjustment, inspect the following points:
(1) Turn the ignition switch to ON, pull the parking
brake lever one notch, and verify that the
parking brake warning light illuminates.
(2) Verify that the rear brakes do not drag.
End Of Sie
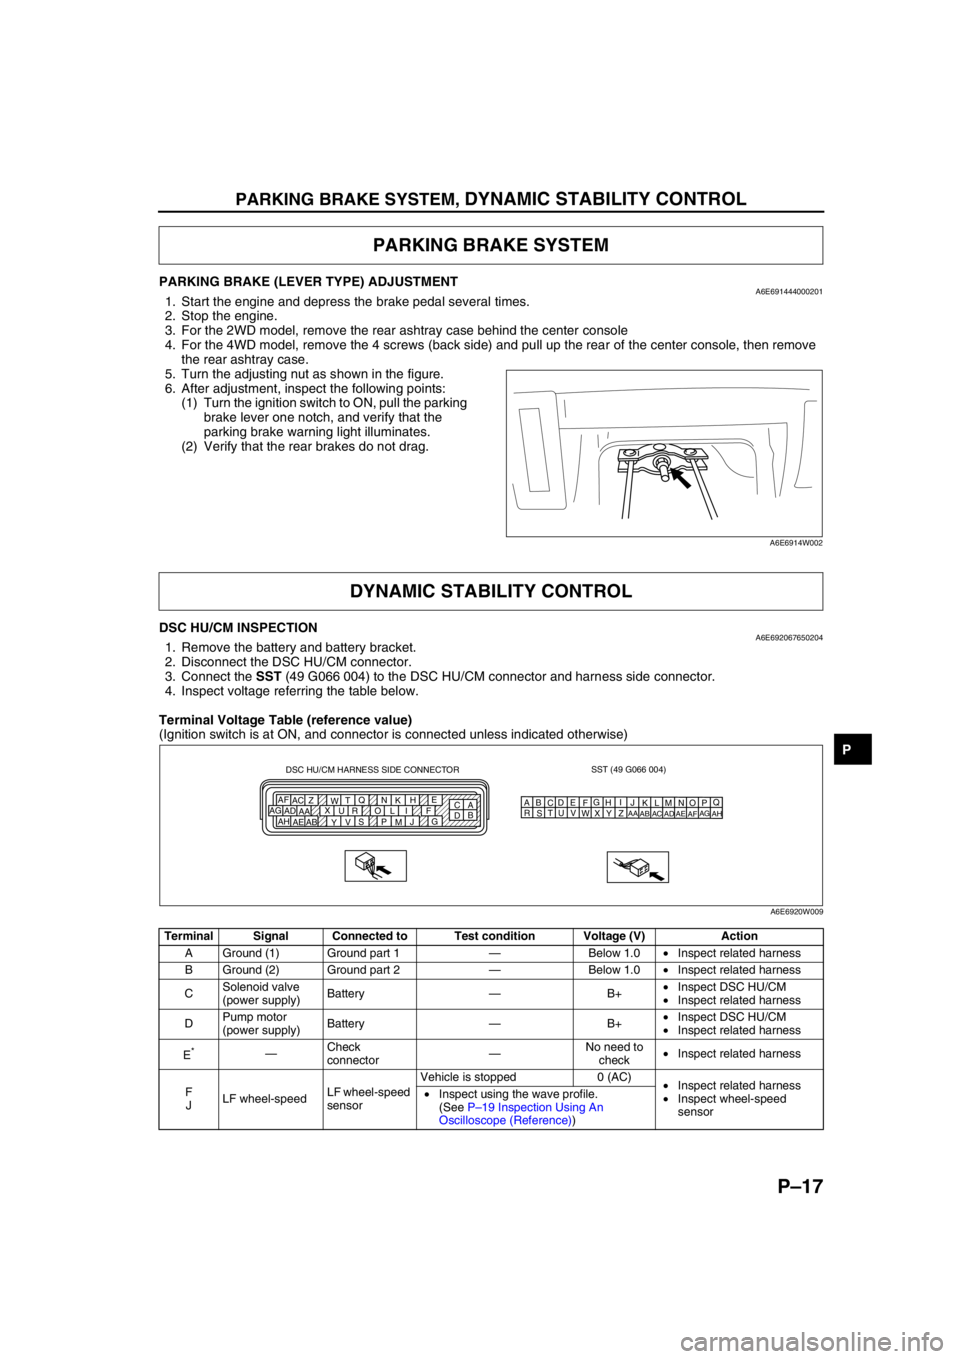
DSC HU/CM INSPECTIONA6E6920676502041. Remove the battery and battery bracket.
2. Disconnect the DSC HU/CM connector.
3. Connect the SST (49 G066 004) to the DSC HU/CM connector and harness side connector.
4. Inspect voltage referring the table below.
Terminal Voltage Table (reference value)
(Ignition switch is at ON, and connector is connected unless indicated otherwise)
PARKING BRAKE SYSTEM
A6E6914W002
DYNAMIC STABILITY CONTROL
Terminal Signal Connected to Test condition Voltage (V) Action
A Ground (1) Ground part 1—Below 1.0•Inspect related harness
B Ground (2) Ground part 2—Below 1.0•Inspect related harness
CSolenoid valve
(power supply)Battery—B+•Inspect DSC HU/CM
•Inspect related harness
DPump motor
(power supply)Battery—B+•Inspect DSC HU/CM
•Inspect related harness
E
*—Check
connector—No need to
check•Inspect related harness
F
JLF wheel-speedLF wheel-speed
sensorVehicle is stopped 0 (AC)
•Inspect related harness
•Inspect wheel-speed
sensor •Inspect using the wave profile.
(See P–19 Inspection Using An
Oscilloscope (Reference))
SST (49 G066 004)
AQ
B
CDE
FG
HI
J DSC HU/CM HARNESS SIDE CONNECTOR
A
C E
H
K N Q
T
W Z AC AF
F I L O R U X
AA AD AG
G
J
M P S
V
Y AB AE AHB
DKN
T
WZ
AC
AFLO
RU
XAA
ADAGMP
SV
YAB
AEAH
A6E6920W009
Page 751 of 909

P–18
DYNAMIC STABILITY CONTROL
K
HRR wheel-speedRR wheel-
speed sensorVehicle is stopped 0 (AC)
•Inspect related harness
•Inspect wheel-speed
sensor •Inspect using the wave profile.
(See P–19 Inspection Using An
Oscilloscope (Reference))
M
IRF wheel-speedRF wheel-
speed sensorVehicle is stopped 0 (AC)
•Inspect related harness
•Inspect wheel-speed
sensor •Inspect using the wave profile.
(See P–19 Inspection Using An
Oscilloscope (Reference))
Q
NLR wheel-speedLR wheel-speed
sensorVehicle is stopped 0 (AC)
•Inspect related harness
•Inspect wheel-speed
sensor •Inspect using the wave profile.
(See P–19 Inspection Using An
Oscilloscope (Reference))
G Battery (IG) Ignition switch Ignition switch ON B+•Inspect related harness
•Inspect ignition switch
L Brake switch Brake switchWhen brake pedal is
depressed10—14•Inspect related harness
•Inspect brake switch
OLateral-G
(lateral-G signal)Combine
sensorVehicle is stopped 2.2—2.8
•Inspect related harness
•Inspect combine sensor Left corneringFluctuation
between
2.5—4.0 V
Right corneringFluctuation
between
1.0—2.5 V
PCombine sensor
power outputCombine
sensorIgnition switch ON 4.75—5.25•Inspect related harness
•Inspect combine sensor
RSteering angle
(ground)Steering angle
sensor—Below 1.0•Inspect related harness
•Inspect steering angle
sensor
S Combine sensorCombine
sensor—3.5—5.0•Inspect related harness
•Inspect combine sensor
TYaw rate
(yaw rate signal)Combine
sensorVehicle is stopped 2.2—2.8
•Inspect related harness
•Inspect yaw rate sensor Right corneringFluctuation
between
2.5—4.62 V
Left corneringFluctuation
between
2.5—0.33 V
USteering angle
(neutral signal)Steering angle
sensorSteering position:
center position 25°—29°Below 1.0•Inspect related harness
•Inspect steering angle
sensor
Except above condition Approx. 4
VForward-G
(forward-G signal)Combine
sensorVehicle is stopped 2.2—2.8
•Inspect related harness
•Inspect combine sensor AccelerationFluctuation
between
2.5—4.0 V
Deceleration Fluctuation
between
1.0—2.5 V
WSteering angle
(steering angle
signal 2)Steering angle
sensor•Inspect using the wave profile.
(See P–19 Inspection Using An
Oscilloscope (Reference))•Inspect related harness
•Inspect steering angle
sensor
XSteering angle
(steering angle
signal 1)Steering angle
sensor•Inspect using the wave profile.
(See P–19 Inspection Using An
Oscilloscope (Reference))•Inspect related harness
•Inspect steering angle
sensor
YCombine sensor
(ground)Combine
sensor—Below 1.0•Inspect related harness
•Inspect combine sensor
AA DSC OFF switchDSC OFF
switchWhen switch is pressed Below 1.0
•Inspect related harness
•Inspect DSC OFF switch
When switch is not pressed B+
AB OBDKLN terminal of
DLC-2It cannot be determined with terminal
voltage whether the condition is good or bad
because advanced function diagnostic
output is performed with serial
communication. Inspect with service codes.•Inspect related harness
•Inspect DSC HU/CM Terminal Signal Connected to Test condition Voltage (V) Action
Page 753 of 909

P–20
DYNAMIC STABILITY CONTROL
Vehicle speed output
•DSC HU/CM terminal: AE (+) — A(-)
•Oscilloscope setting:
1 V/DIV (Y), 5 ms/DIV (X), DC range
•Vehicle condition: Driving 30 km/h (18.6 mph)
Note
•As vehicle speed increases, period of wave
shortens.
End Of Sie
COMBINE SENSOR (FORWARD-G SENSOR) INSPECTIONA6E692067650205
Caution
•Be careful and do not allow the lateral-G sensor to fall. If by chance it is subjected to strong
impact, replace it.
1. Connect the connector.
2. Turn ignition switch on, verify the voltage between terminals A and E under the following conditions.
•If not within the specification, replace the combine sensor.
(1) Horizontal
Voltage
2.2—2.8 V
(2) Acceleration (inclined 90° from horizontal)
Voltage
3.1—3.9 V
(3) Deceleration (decline 90° from horizontal)
Voltage
1.2—1.8 V
End Of Sie
0 V
A6E6921W012
FA BC D E COMBINE SENSOR
HARNESS SIDE CONNECTOR
A6E6920W008
A6J6920W104
A6J6920W103
Page 758 of 909

ON-BOARD DIAGNOSTIC
P–25
P
End Of Sie
TCSOUTD
(Torque reduction request
value)PERCENTAGE•Torque reduction is not
requested: 0 %
•Torque reduction is
requested: Changes
between 0 % and 100 %Inspect DSC HU/CM.
—
TPI (with DSC only)
(Throttle position signal input)PERCENTAGE•Closed throttle position: 0
•Wide open throttle: Changes
between 1 and 7Inspect PCM and
throttle position
sensor.—
ABS_VOLT
(System battery voltage value)VOLTAGE•Ignition key at ON: B+
•Idle: Approx. 14—16 VInspect power supply
circuit.ABS (ABS/
TCS): Z
DSC: G
ACCLMTR
*
(Accelerometer)ACCELERATION•Vehicle is stopped or driving
at a constant speed: 0 G.
•Vehicle is driving at a
acceleration: Changes
between 0— –1.28 G.
•Vehicle is driving at a
deceleration: Changes
between 0—1.27 G.Inspect combine
sensor.
V PID Name
(Definition)Unit/Condition Condition/Specification ActionABS (ABS/
TCS) HU/CM or
DSC HU/CM
terminal