service MAZDA 6 2002 Workshop Manual Suplement
[x] Cancel search | Manufacturer: MAZDA, Model Year: 2002, Model line: 6, Model: MAZDA 6 2002Pages: 909, PDF Size: 17.16 MB
Page 652 of 909
M–22
REAR AXLE
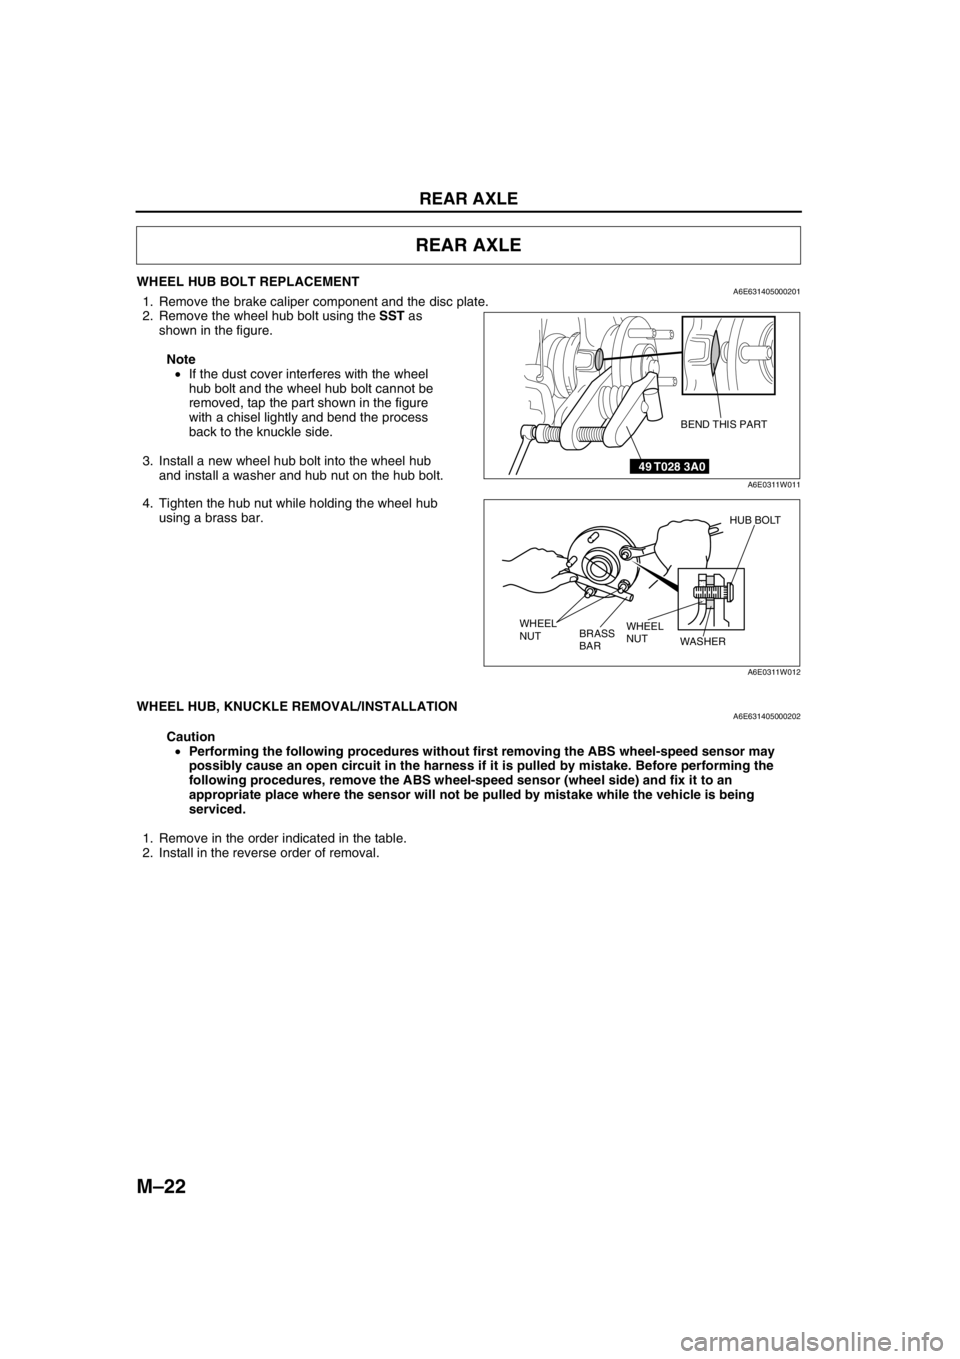
WHEEL HUB BOLT REPLACEMENTA6E6314050002011. Remove the brake caliper component and the disc plate.
2. Remove the wheel hub bolt using the SST as
shown in the figure.
Note
•If the dust cover interferes with the wheel
hub bolt and the wheel hub bolt cannot be
removed, tap the part shown in the figure
with a chisel lightly and bend the process
back to the knuckle side.
3. Install a new wheel hub bolt into the wheel hub
and install a washer and hub nut on the hub bolt.
4. Tighten the hub nut while holding the wheel hub
using a brass bar.
End Of Sie
WHEEL HUB, KNUCKLE REMOVAL/INSTALLATIONA6E631405000202
Caution
•Performing the following procedures without first removing the ABS wheel-speed sensor may
possibly cause an open circuit in the harness if it is pulled by mistake. Before performing the
following procedures, remove the ABS wheel-speed sensor (wheel side) and fix it to an
appropriate place where the sensor will not be pulled by mistake while the vehicle is being
serviced.
1. Remove in the order indicated in the table.
2. Install in the reverse order of removal.
REAR AXLE
49 T028 3A0
BEND THIS PART
A6E0311W011
HUB BOLT
WHEEL
NUT WHEEL
NUT
WASHER
BRASS
BAR
A6E0311W012
Page 673 of 909

REAR DRIVE SHAFT
M–43
M
REAR DRIVE SHAFT REMOVAL/INSTALLATIONA6E631725500202
Caution
•Performing the following procedures without first removing the ABS wheel-speed sensor may
possibly cause an open circuit in the harness if it is pulled by mistake. Before performing the
following procedures, remove the ABS wheel-speed sensor (wheel side) and fix it to an
appropriate place where the sensor will not be pulled by mistake while the vehicle is being
serviced.
1. Drain the rear differential oil into a container. (See M–48 DIFFERENTIAL OIL REPLACEMENT.)
2. Remove in the order indicated in the table.
3. Install in the reverse order of removal.
.
SST
R
R
R
OILOIL
4
3
1
2
235.2—318.5
{24.0—32.4,
173.5—234.9}
N·m {kgf·m, ft·lbf}
A6J63172001
1 Trailing link, knuckle component
(See M–22 WHEEL HUB, KNUCKLE REMOVAL/
INSTALLATION)
2 Rear drive shaft
(See M–44 Rear Drive Shaft Removal Note)3Oil seal
(See M–49 OIL SEAL (SIDE GEAR)
REPLACEMENT)
4Clip
(See M–44 Clip Installation Note)
Page 678 of 909

M–48
REAR DRIVE SHAFT, REAR DIFFERENTIAL
5. Release any trapped air from the boots by
carefully lifting up the small end of each boot with
a cloth wrapped screwdriver.
Caution
•Do not let grease leak.
•Do not damage the boot.
6. Set the drive shaft to the standard length.
Standard length
mm {in}
7. Verify that the drive shaft length is within the standard.
•If not, repeat from Step 5.
End Of Sie
DIFFERENTIAL OIL INSPECTIONA6E6319271002031. Place the vehicle on level ground.
2. Remove the filler plug and washer.
3. Verify that the oil is at the brim of the filler plug
hole.
4. If it is low, add the specified oil.
5. Install a new washer and the filler plug, and
tighten.
Tightening torque
39.2—53.9 N·m {4.0—5.4 kgf·m, 29.0—39.7
ft·lbf}
End Of SieDIFFERENTIAL OIL REPLACEMENTA6E6319271002041. Place the vehicle on level ground.
2. Remove the filler plug.
3. Remove the drain plug and drain the differential
oil into a container.
4. Install a new washer and the drain plug, and
tighten.
Tightening torque
39—53 N·m {4.0—5.4 kgf·m, 29—39 ft·lbf}
5. Add the specified differential oil from the filler plug
until the level reaches the brim of the plug hole.
Specified oil
Type (API service GL-5)
Above -18°C {0°F}: SAE 90
Below -18°C {0°F}: SAE 80
Capacity (Approximate quantity):
1.00 L {1.06 US qt, 0.88 Imp qt}
6. After filling with differential oil, perform oil level inspection.
7. Install a new washer and the drain plug, and tighten.
Tightening torque
39.2—53.9 N·m {4.0—5.4 kgf·m, 29.0—39.7 ft·lbf}
Left side Right side
805.4—815.4
{31.71—32.10}852.4—862.4
{33.56—33.95}A6E6316W007
REAR DIFFERENTIAL
FILLER PLUG
A6E63192101
FILLER PLUG
DRAIN PLUG
A6E63192102
Page 715 of 909
N–1
N
NSTEERING SYSTEM
OUTLINE................................................................ N-2
OUTLINE OF CONSTRUCTION.......................... N-2
FEATURES .......................................................... N-2
SPECIFICATIONS ............................................... N-2
STRUCTURAL VIEW ...........................................N-3
OUTLINE................................................................ N-5
SUPPLEMENTAL SERVICE
INFORMATION .................................................N-5
ENGINE SPEED SENSING POWER
STEERING........................................................... N-6
POWER STEERING FLUID INSPECTION ..........N-6
STEERING GEAR AND LINKAGE
(MZR-CD (RF TURBO))
REMOVAL/INSTALLATION ..............................N-8
STEERING GEAR AND LINKAGE (4WD)
REMOVAL/INSTALLATION ............................N-13
POWER STEERING OIL PUMP
(MZR-CD (RF TURBO))
REMOVAL/INSTALLATION ............................N-16
POWER STEERING OIL PUMP
(MZR-CD (RF TURBO))
DISASSEMBLY/ASSEMBLY .......................... N-17 FEATURES
SERVICE
Page 719 of 909

OUTLINE
N–5
N
SUPPLEMENTAL SERVICE INFORMATIONA6E660201034201•The following changes have been made since publication of the Mazda6 Workshop Manual (1730-1*-02C).
Power steering fluid
•Inspection procedure has been modified.
Steering gear and linkage (MZR-CD (RF Turbo))
•Removal/installation procedure has been added.
Steering gear and linkage (4WD)
•Removal/installation procedure has been added.
Power steering oil pump (MZR-CD (RF Turbo))
•Removal/installation procedure has been added.
•Disassembly/assembly procedure has been added.
End Of Sie
OUTLINE
Page 734 of 909

P–1
P
PBRAKING SYSTEM
OUTLINE................................................................ P-2
OUTLINE OF CONSTRUCTION.......................... P-2
FEATURES .......................................................... P-2
SPECIFICATIONS ............................................... P-2
STRUCTURAL VIEW ........................................... P-3
ABS/TCS................................................................ P-4
OUTLINE.............................................................. P-4
DYNAMIC STABILITY CONTROL......................... P-6
OUTLINE.............................................................. P-6
COMBINE SENSOR
(FORWARD-G SENSOR) ................................. P-8
CONTROLLER AREA NETWORK (CAN) ........... P-8
ON-BOARD DIAGNOSTIC..................................... P-9
OUTLINE.............................................................. P-9
OUTLINE.............................................................. P-10
SUPPLEMENTAL SERVICE INFORMATION ... P-10
GENERAL PROCEDURES.................................. P-10
PRECAUTION (BRAKES).................................. P-10
CONVENTIONAL BRAKE SYSTEM.................... P-11
POWER BRAKE UNIT
REMOVAL/INSTALLATION ............................ P-11
VACUUM SWITCH INSPECTION
(MZR-CD (RF TURBO)) .................................. P-11
VACUUM SWITCH
REMOVAL/INSTALLATION
(MZR-CD (RF TURBO)) .................................. P-12
VACUUM PUMP INSPECTION
(MZR-CD (RF TURBO)) .................................. P-12
VACUUM PUMP REMOVAL/INSTALLATION
(MZR-CD (RF TURBO)) .................................. P-13
FRONT BRAKE (DISC) INSPECTION............... P-13
FRONT BRAKE (DISC)
REMOVAL/INSTALLATION ............................ P-14
DISC PAD (FRONT) REPLACEMENT .............. P-16
PARKING BRAKE SYSTEM................................ P-17
PARKING BRAKE (LEVER TYPE)
ADJUSTMENT ................................................ P-17
DYNAMIC STABILITY CONTROL....................... P-17
DSC HU/CM INSPECTION ................................ P-17
COMBINE SENSOR
(FORWARD-G SENSOR) INSPECTION ........ P-20
ON-BOARD DIAGNOSTIC................................... P-21
DSC ON-BOARD DIAGNOSIS .......................... P-21
DTC C1119 ........................................................ P-26
DTC C1949, C1950............................................ P-27
DTC U2511 ........................................................ P-29 FEATURES
SERVICE
Page 743 of 909
P–10
OUTLINE , GENERAL PROCEDURES
SUPPLEMENTAL SERVICE INFORMATIONA6E690201020205•The following changes have been made since publication of the Mazda6 Workshop Manual (1730-1*-02C).
Power brake unit
•Removal/installation procedure has been modified.
Vacuum switch (MZR-CD (RF Turbo))
•Inspection procedure has been added.
•Removal/installation procedure has been added.
Vacuum pump (MZR-CD (RF Turbo))
•Inspection procedure has been added.
•Removal/installation procedure has been added.
Front brake (disc)
•Inspection procedure has been modified.
•Removal/installation procedure has been modified.
Disc pad (front)
•Replacement procedure has been modified.
Parking brake (lever type)
•Adjustment procedure has been modified.
DSC HU/CM
•Inspection procedure has been modified.
Combine sensor (Forward-G sensor)
•Inspection procedure has been modified.
On-board diagnostic (ABS/TCS)
•4WD and MZR-CD (RF Turbo) have been added.
End Of Sie
PRECAUTION (BRAKES)A6E691001020201Wheels and Tires Removal/Installation
1. The removal and installation procedures for the wheels and tires are not mentioned in this section. When a
wheel is removed, tighten it to 88—118 N·m {9.0—12.0 kgf·m, 65.0—87.0 ft·lbf}.
Brake Lines Disconnection/Connection
Caution
•Brake fluid will damage painted surfaces. If brake fluid does get on a painted surface, wipe it off
immediately.
1. Tighten the brake pipe flare nut using the SST (49 0259 770B). Be sure to modify the brake pipe flare nut
tightening torque to allow for use of a torque wrench-SST combination.
•If any brake line has been disconnected anytime during the procedure, add brake fluid, bleed the brakes,
and inspect for leakage after the procedure has been completed.
Connectors Disconnection
1. Disconnect the negative battery cable before doing any work that requires handling of connectors. Reconnect
the negative battery cable only after the work is completed.
ABS, ABS/TCS, or DSC Components Operations
1. Make sure that there are no DTCs in the ABS, ABS/TCS, or DSC memory after working on ABS, ABS/TCS or
DSC components.
•If there are any DTCs in the memory, clear them.
End Of Sie
OUTLINE
GENERAL PROCEDURES
Page 751 of 909

P–18
DYNAMIC STABILITY CONTROL
K
HRR wheel-speedRR wheel-
speed sensorVehicle is stopped 0 (AC)
•Inspect related harness
•Inspect wheel-speed
sensor •Inspect using the wave profile.
(See P–19 Inspection Using An
Oscilloscope (Reference))
M
IRF wheel-speedRF wheel-
speed sensorVehicle is stopped 0 (AC)
•Inspect related harness
•Inspect wheel-speed
sensor •Inspect using the wave profile.
(See P–19 Inspection Using An
Oscilloscope (Reference))
Q
NLR wheel-speedLR wheel-speed
sensorVehicle is stopped 0 (AC)
•Inspect related harness
•Inspect wheel-speed
sensor •Inspect using the wave profile.
(See P–19 Inspection Using An
Oscilloscope (Reference))
G Battery (IG) Ignition switch Ignition switch ON B+•Inspect related harness
•Inspect ignition switch
L Brake switch Brake switchWhen brake pedal is
depressed10—14•Inspect related harness
•Inspect brake switch
OLateral-G
(lateral-G signal)Combine
sensorVehicle is stopped 2.2—2.8
•Inspect related harness
•Inspect combine sensor Left corneringFluctuation
between
2.5—4.0 V
Right corneringFluctuation
between
1.0—2.5 V
PCombine sensor
power outputCombine
sensorIgnition switch ON 4.75—5.25•Inspect related harness
•Inspect combine sensor
RSteering angle
(ground)Steering angle
sensor—Below 1.0•Inspect related harness
•Inspect steering angle
sensor
S Combine sensorCombine
sensor—3.5—5.0•Inspect related harness
•Inspect combine sensor
TYaw rate
(yaw rate signal)Combine
sensorVehicle is stopped 2.2—2.8
•Inspect related harness
•Inspect yaw rate sensor Right corneringFluctuation
between
2.5—4.62 V
Left corneringFluctuation
between
2.5—0.33 V
USteering angle
(neutral signal)Steering angle
sensorSteering position:
center position 25°—29°Below 1.0•Inspect related harness
•Inspect steering angle
sensor
Except above condition Approx. 4
VForward-G
(forward-G signal)Combine
sensorVehicle is stopped 2.2—2.8
•Inspect related harness
•Inspect combine sensor AccelerationFluctuation
between
2.5—4.0 V
Deceleration Fluctuation
between
1.0—2.5 V
WSteering angle
(steering angle
signal 2)Steering angle
sensor•Inspect using the wave profile.
(See P–19 Inspection Using An
Oscilloscope (Reference))•Inspect related harness
•Inspect steering angle
sensor
XSteering angle
(steering angle
signal 1)Steering angle
sensor•Inspect using the wave profile.
(See P–19 Inspection Using An
Oscilloscope (Reference))•Inspect related harness
•Inspect steering angle
sensor
YCombine sensor
(ground)Combine
sensor—Below 1.0•Inspect related harness
•Inspect combine sensor
AA DSC OFF switchDSC OFF
switchWhen switch is pressed Below 1.0
•Inspect related harness
•Inspect DSC OFF switch
When switch is not pressed B+
AB OBDKLN terminal of
DLC-2It cannot be determined with terminal
voltage whether the condition is good or bad
because advanced function diagnostic
output is performed with serial
communication. Inspect with service codes.•Inspect related harness
•Inspect DSC HU/CM Terminal Signal Connected to Test condition Voltage (V) Action
Page 763 of 909
R–1
R
RSUSPENSION
OUTLINE................................................................ R-2
OUTLINE OF CONSTRUCTION.......................... R-2
FEATURES .......................................................... R-2
SPECIFICATIONS ............................................... R-3
STRUCTURAL VIEW ...........................................R-4
REAR SUSPENSION............................................. R-5
SUSPENSION CONTROL SYSTEM ................... R-5
OUTLINE................................................................ R-7
SUPPLEMENTAL SERVICE INFORMATION .....R-7
WHEEL ALIGNMENT............................................. R-8
FRONT WHEEL ALIGNMENT (WGN).................R-8
REAR WHEEL ALIGNMENT (WGN) ................... R-9
REAR SUSPENSION........................................... R-11
SUSPENSION CONTROL SYSTEM
ON-VEHICLE INSPECTION (WGN) ...............R-11
REAR SHOCK ABSORBER
REMOVAL/INSTALLATION (WGN) ................ R-11
REAR SHOCK ABSORBER DISPOSAL
(WGN) .............................................................R-12
REAR STABILIZER
REMOVAL/INSTALLATION (4WD)................. R-13
TRAILING LINK REMOVAL/INSTALLATION
(4WD) .............................................................. R-14
REAR CROSSMEMBER
REMOVAL/INSTALLATION (4WD)................. R-16 FEATURES
SERVICE
Page 769 of 909
REAR SUSPENSION, OUTLINE
R–7
R
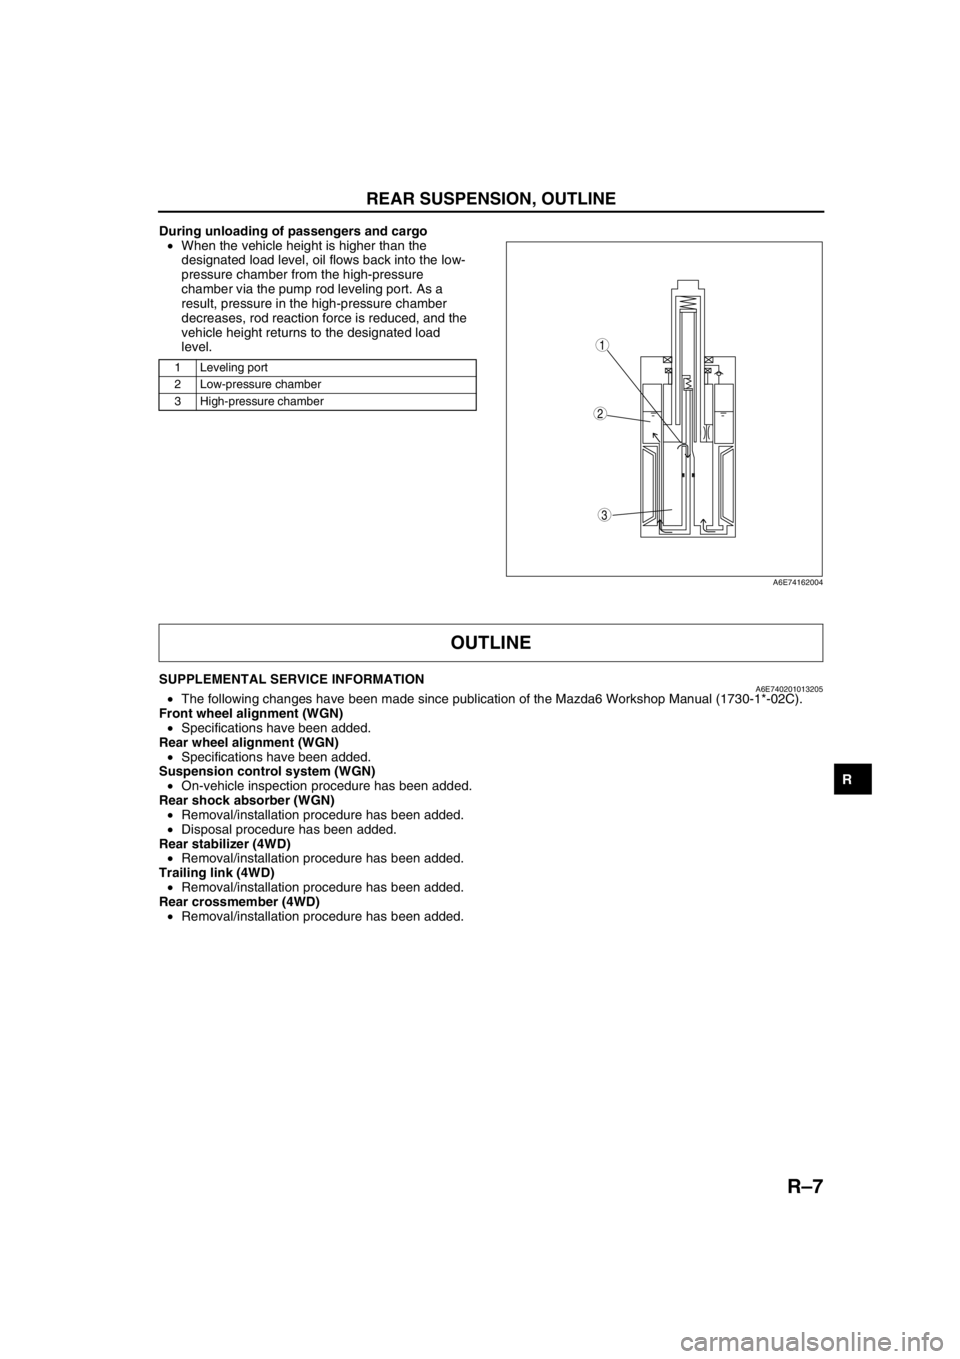
During unloading of passengers and cargo
•When the vehicle height is higher than the
designated load level, oil flows back into the low-
pressure chamber from the high-pressure
chamber via the pump rod leveling port. As a
result, pressure in the high-pressure chamber
decreases, rod reaction force is reduced, and the
vehicle height returns to the designated load
level.
.
End Of Sie
SUPPLEMENTAL SERVICE INFORMATIONA6E740201013205•The following changes have been made since publication of the Mazda6 Workshop Manual (1730-1*-02C).
Front wheel alignment (WGN)
•Specifications have been added.
Rear wheel alignment (WGN)
•Specifications have been added.
Suspension control system (WGN)
•On-vehicle inspection procedure has been added.
Rear shock absorber (WGN)
•Removal/installation procedure has been added.
•Disposal procedure has been added.
Rear stabilizer (4WD)
•Removal/installation procedure has been added.
Trailing link (4WD)
•Removal/installation procedure has been added.
Rear crossmember (4WD)
•Removal/installation procedure has been added.
End Of Sie
1 Leveling port
2 Low-pressure chamber
3 High-pressure chamber
3
1
2
A6E74162004
OUTLINE