change MAZDA MODEL 6 2015 (in English) Owner's Manual
[x] Cancel search | Manufacturer: MAZDA, Model Year: 2015, Model line: MODEL 6, Model: MAZDA MODEL 6 2015Pages: 576
Page 136 of 576

Black plate (136,1)
For instance, trip meter A can record the
distance from the point of origin, and trip
meter B can record the distance from
where the fuel tank is filled.
When trip meter A is selected, pressing
the selector again within one second will
change to trip meter B mode.
When trip meter A is selected, TRIP A
will be displayed. When trip meter B is
selected, TRIP B will be displayed.
The trip meter records the total distance
the vehicle is driven until the meter is
again reset. Return it to“0.0”by holding
the selector depressed for 1 second or
more. Use this meter to measure trip
distances and to compute fuel
consumption.
NOTE
lOnly the trip meters record tenths of
kilometers (miles).
lThe trip record will be erased when:lThe power supply is interrupted (blown
fuse or the battery is disconnected).
lThe vehicle is driven over 9999.9 km
(mile).
qTachometer
The tachometer shows engine speed in
thousands of revolutions per minute
(rpm).
Red zone Striped zone
CAUTION
Do not run the engine with the
tachometer needle in the RED ZONE.
This may cause severe engine
damage.
NOTE
When the tachometer needle enters the
STRIPED ZONE, this indicates to the driver
that the gears should be shifted before entering
the RED ZONE.
4-12
When Driving
Instrument Cluster and Display
Mazda6_8DQ8-EA-13L_Edition3 Page136
Friday, June 13 2014 6:21 PM
Form No.8DQ8-EA-13L
Page 138 of 576

Black plate (138,1)
When driving on snowy or foggy roads,
or in other situations when the instrument
cluster's visibility is reduced due to glare
from surrounding brightness, cancel the
illumination dimmer and increase the
illumination intensity.
To cancel the illumination dimmer, rotate
the knob clockwise fully. You will hear a
beep sound and the illumination dimmer
will be canceled.
NOTE
lThis symbol () indicates the knob to
adjust the brightness of the dashboard
illumination.
lIf the dashboard illumination knob is kept
at the illumination dimmer cancel position,
the instrument cluster will not dim when the
headlight switch is turned to the
or
position again. Rotate the dashboard
illumination knob counterclockwise to
activate the illumination dimmer.
qOutside Temperature Display
When the ignition is switched ON, the
outside temperature is displayed.
Type A
Type B
NOTE
Under the following conditions, the outside
temperature display may differ from the actual
outside temperature depending on the
surroundings and vehicle conditions:
lSignificantly cold or hot temperatures.lSudden changes in outside temperature.lThe vehicle is parked.lThe vehicle is driven at low speeds.
(Type B instrument cluster)
The outside temperature unit can be
switched between Celsius and Fahrenheit
using the following procedure.
1. Press the INFO button with the ignition
switched off and continue pressing the
INFO button for 5 seconds or longer
while switching the ignition ON. The
outside temperature display flashes.
2. Press the up
or downpart of the
INFO switch to change the outside
temperature unit.
3. Press and hold the INFO button for 3
seconds or longer while the outside
temperature display is flashing. The
outside temperature display
illuminates.
4-14
When Driving
Instrument Cluster and Display
Mazda6_8DQ8-EA-13L_Edition3 Page138
Friday, June 13 2014 6:21 PM
Form No.8DQ8-EA-13L
Page 140 of 576
Black plate (140,1)
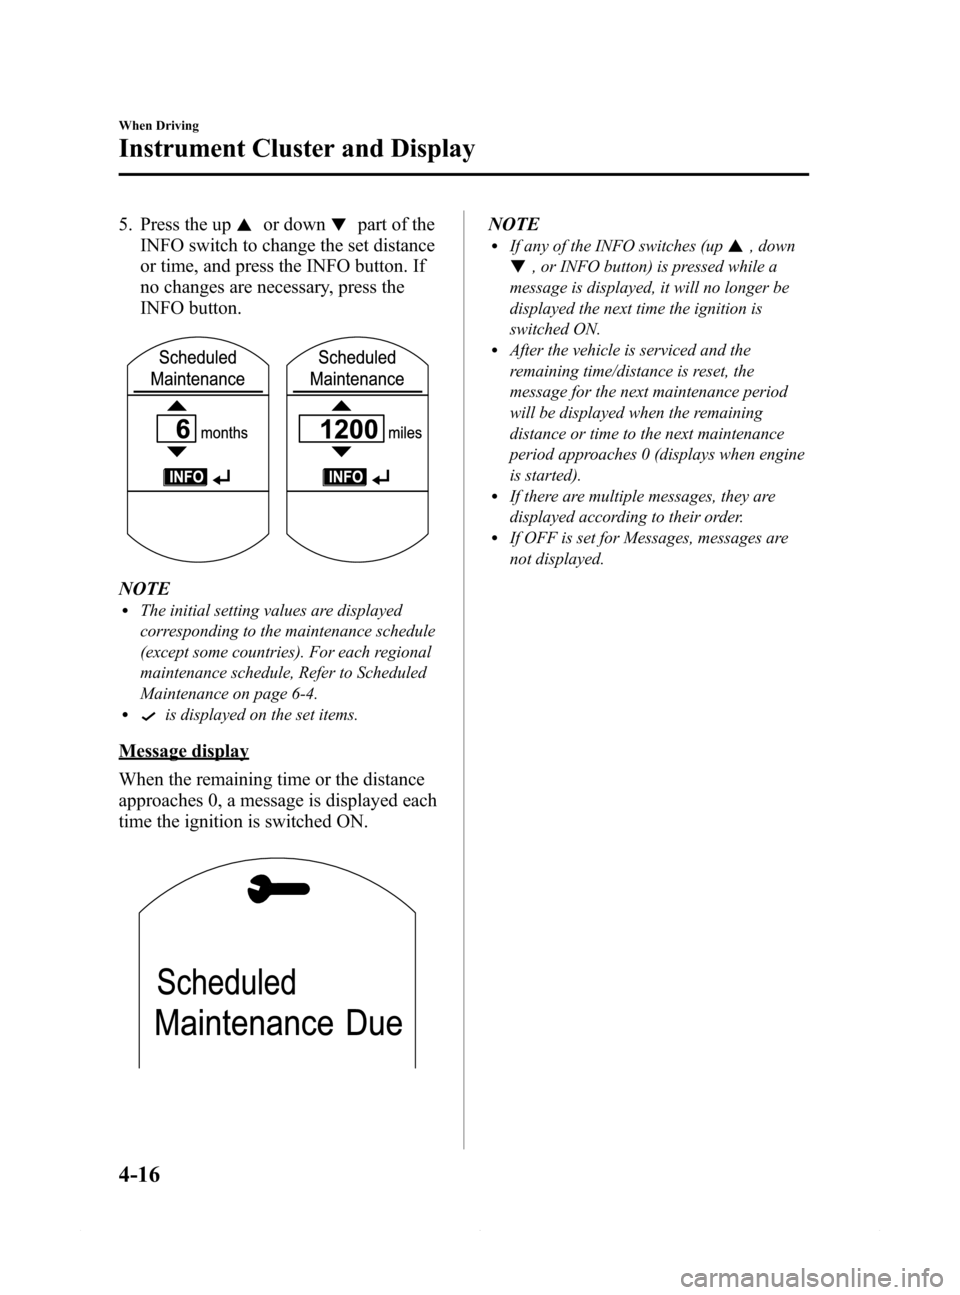
5. Press the upor downpart of the
INFO switch to change the set distance
or time, and press the INFO button. If
no changes are necessary, press the
INFO button.
NOTElThe initial setting values are displayed
corresponding to the maintenance schedule
(except some countries). For each regional
maintenance schedule, Refer to Scheduled
Maintenance on page 6-4.
lis displayed on the set items.
Message display
When the remaining time or the distance
approaches 0, a message is displayed each
time the ignition is switched ON.
NOTElIf any of the INFO switches (up, down
, or INFO button) is pressed while a
message is displayed, it will no longer be
displayed the next time the ignition is
switched ON.
lAfter the vehicle is serviced and the
remaining time/distance is reset, the
message for the next maintenance period
will be displayed when the remaining
distance or time to the next maintenance
period approaches 0 (displays when engine
is started).
lIf there are multiple messages, they are
displayed according to their order.
lIf OFF is set for Messages, messages are
not displayed.
4-16
When Driving
Instrument Cluster and Display
Mazda6_8DQ8-EA-13L_Edition3 Page140
Friday, June 13 2014 6:21 PM
Form No.8DQ8-EA-13L
Page 141 of 576
Black plate (141,1)
Message display
Item Start of message display Displayed message
Scheduled
MaintenanceWhen remaining distance is less than
500 km (250 mile), or remaining days are
less than 15 (whichever comes first)Scheduled Maintenance Due
Tire Rotation When remaining distance is less than
500 km (250 mile)Tire Rotation Due
Tire Pressure Check When remaining days are less than 15 Tire Pressure Increase Pressure
Reset method
If resetting is performed after a
maintenance has been completed, a
notification of the next maintenance
period will be displayed when the period
approaches.
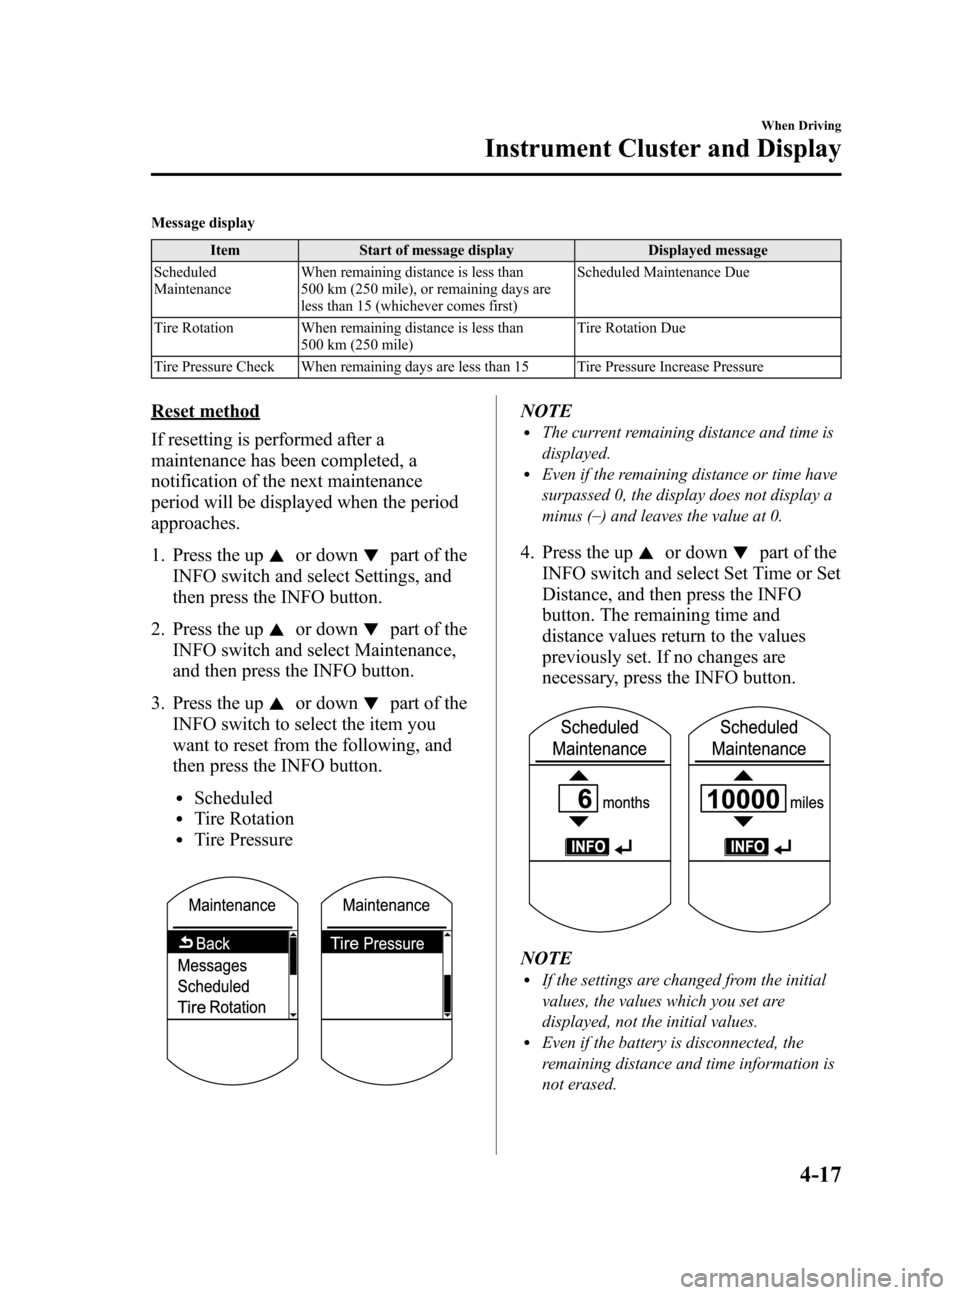
1. Press the up
or downpart of the
INFO switch and select Settings, and
then press the INFO button.
2. Press the up
or downpart of the
INFO switch and select Maintenance,
and then press the INFO button.
3. Press the up
or downpart of the
INFO switch to select the item you
want to reset from the following, and
then press the INFO button.
lScheduledlTire RotationlTire Pressure
NOTElThe current remaining distance and time is
displayed.
lEven if the remaining distance or time have
surpassed 0, the display does not display a
minus (_
) and leaves the value at 0.
4. Press the upor downpart of the
INFO switch and select Set Time or Set
Distance, and then press the INFO
button. The remaining time and
distance values return to the values
previously set. If no changes are
necessary, press the INFO button.
NOTElIf the settings are changed from the initial
values, the values which you set are
displayed, not the initial values.
lEven if the battery is disconnected, the
remaining distance and time information is
not erased.
When Driving
Instrument Cluster and Display
4-17
Mazda6_8DQ8-EA-13L_Edition3 Page141
Friday, June 13 2014 6:21 PM
Form No.8DQ8-EA-13L
Page 143 of 576

Black plate (143,1)
The distance-to-empty will be calculated
and displayed every second.
Type A
Type B
NOTElEven though the distance-to-empty display
may indicate a sufficient amount of
remaining driving distance before refueling
is required, refuel as soon as possible if the
fuel level is very low or the low fuel
warning light illuminates.
lThe display will not change unless you add
more than approximately 10 L (2.6 US gal,
2.2 Imp gal) of fuel.
lThe distance-to-empty is the approximate
remaining distance the vehicle can be
driven until all the graduation marks in the
fuel gauge indicating the remaining fuel
supply disappear.
Average fuel economy mode
This mode displays the average fuel
economy by calculating the total fuel
consumption and the total traveled
distance since purchasing the vehicle, re-
connecting the battery after disconnection,
or resetting the data. The average fuel
economy is calculated and displayed
every minute.
Type A
Type B
To clear the data being displayed, press
the INFO button for more than 1.5
seconds.
After pressing the INFO button, - - - L/
100 km (- - - mpg) will be displayed for
about 1 minute before the fuel economy is
recalculated and displayed.
Current fuel economy mode
This mode displays the current fuel
economy by calculating the amount of
fuel consumption and the distance
traveled.
When Driving
Instrument Cluster and Display
4-19
Mazda6_8DQ8-EA-13L_Edition3 Page143
Friday, June 13 2014 6:21 PM
Form No.8DQ8-EA-13L
Page 145 of 576

Black plate (145,1)
Refer to i-ELOOP on page 4-96.
Lane Departure Warning System
(LDWS) display (Type A instrument
cluster)í
Information regarding the Lane Departure
Warning System (LDWS) is displayed.
Refer to Lane Departure Warning System
(LDWS) on page 4-130.
Mazda Radar Cruise Control (MRCC)
display (Type A instrument cluster)í
Information regarding the Mazda Radar
Cruise Control (MRCC) is displayed.Refer to Mazda Radar Cruise Control
(MRCC) on page 4-102.
Settings (Type A instrument cluster)
The following settings can be changed
(Setting changes cannot be made while
driving because the settings are not
displayed.):
lReset AverageslSmart City Brake Support (SCBS)lLane Departure Warning System
(LDWS)
lBlind Spot Monitoring (BSM) SystemlMaintenancelOptional ScreenlVolumeslUnitslLanguagelRestore Default
To change settings
1. Press the up
or downpart of the
INFO switch and select Settings, and
then press the INFO button.
2. Press the up
or downpart of the
INFO switch to select the item you
want to change, and then press the
INFO button.
When Driving
Instrument Cluster and Display
4-21íSome models. Mazda6_8DQ8-EA-13L_Edition3 Page145
Friday, June 13 2014 6:21 PM
Form No.8DQ8-EA-13L
Page 171 of 576

Black plate (171,1)
Manual Transaxle Operation
qManual Transaxle Shift Pattern
Neutral position
The shift pattern of the transaxle is
conventional, as shown.
Depress the clutch pedal all the way down
while shifting; then release it slowly.
Your vehicle is equipped with a device to
prevent shifting to R (reverse) by mistake.
Push the shift lever downward and shift to
R.
WARNING
Do not use sudden engine braking on
slippery road surfaces or at high
speeds:
Shifting down while driving on wet,
snowy, or frozen roads, or while
driving at high speeds causes sudden
engine braking, which is dangerous.
The sudden change in tire speed
could cause the tires to skid. This
could lead to loss of vehicle control
and an accident.
Be sure to leave the shift lever in 1 or R
position and set the parking brake
when leaving the vehicle unattended:
Otherwise the vehicle could move
and cause an accident.
CAUTION
ØKeep your foot off the clutch pedal
except when shifting gears. Also,
do not use the clutch to hold the
vehicle on an upgrade. Riding the
clutch will cause needless clutch
wear and damage.
ØDo not apply any excessive lateral
force to the gear lever when
changing from 5th to 4th gear.
This could lead to the accidental
selection of 2nd gear, which can
result in damage to the transaxle.
ØMake sure the vehicle comes to a
complete stop before shifting to R.
Shifting to R while the vehicle is
still moving may damage the
transaxle.
NOTE
If shifting to R is difficult, shift back into
neutral, release the clutch pedal, and try
again.
When Driving
Transaxle
4-47
Mazda6_8DQ8-EA-13L_Edition3 Page171
Friday, June 13 2014 6:21 PM
Form No.8DQ8-EA-13L
Page 176 of 576

Black plate (176,1)
4. Move the selector lever.
5. Take the vehicle to an Authorized
Mazda Dealer to have the system
checked.
qManual Shift Mode
This mode gives you the feel of driving a
manual transaxle vehicle by operating the
selector lever and allows you to control
engine rpm and torque to the drive wheels
much like a manual transaxle when more
control is desired.
To change to manual shift mode, shift the
lever from D to M.
NOTE
Changing to manual shift mode while driving
will not damage the transaxle.
To return to automatic shift mode, shift
the lever from M to D.
NOTE
lIf you change to manual shift mode when
the vehicle is stopped, the gear will shift to
M1.
lIf you change to manual shift mode without
depressing the accelerator pedal when
driving in D range, 5th gear/6th gear, the
gear will shift to M4/M5.
Indicators
Manual shift mode indicator
In manual shift mode, the“M”of the shift
position indicator in the instrument panel
illuminates.
Gear position indicator
The numeral for the selected gear
illuminates.
Manual shift mode indicator
Gear position indicator
NOTElIf the gears cannot be shifted down when
driving at higher speeds, the gear position
indicator will flash twice to signal that the
gears cannot be shifted down (to protect the
transaxle).
lIf the automatic transaxle fluid (ATF)
temperature becomes too high, there is the
possibility that the transaxle will switch to
automatic shift mode, canceling manual
shift mode and turning off the gear position
indicator illumination. This is a normal
function to protect the automatic transaxle.
After the ATF temperature has decreased,
the gear position indicator illumination
turns back on and driving in manual shift
mode is restored.
4-52
When Driving
Transaxle
Mazda6_8DQ8-EA-13L_Edition3 Page176
Friday, June 13 2014 6:21 PM
Form No.8DQ8-EA-13L
Page 178 of 576

Black plate (178,1)
Manually Shifting down
(M6→M5→M4→M3→M2→M1)
To shift down to a lower gear, move the
selector lever forward (
) once.
To shift down to a lower gear with the
steering shift switches, pull the DOWN
switch (
) toward you once with your
fingers.
DOWN switch (-)
WARNING
Do not use engine braking on slippery
road surfaces or at high speeds:
Shifting down while driving on wet,
snowy, or frozen roads, or while
driving at high speeds causes sudden
engine braking, which is dangerous.
The sudden change in tire speed
could cause the tires to skid. This
could lead to loss of vehicle control
and an accident.
Keep your hands on the steering wheel
rim when using fingers on the steering
shift switches:
Putting your hands inside the rim of
the steering wheel when using the
steering shift switches is dangerous.
If the driver's air bag were to deploy
in a collision, your hands could be
impacted causing injury.
NOTE
lWhen driving at high speeds, the gear may
not shift down.
lDuring deceleration, the gear may
automatically shift down depending on
vehicle speed.
lWhen depressing the accelerator fully, the
transaxle will shift to a lower gear,
depending on vehicle speed.
Second gear fixed mode
When the selector lever is moved back
(
) while the vehicle speed is about 10
km/h (6 mph) or less, the transaxle is set
in the second gear fixed mode. The gear is
fixed in second while in this mode for
easier acceleration from a stop and driving
on slippery roads such as snow-covered
roads.
If the selector lever is moved back (
)or
forward (
) while in the second gear
fixed mode, the mode will be canceled.
4-54
When Driving
Transaxle
Mazda6_8DQ8-EA-13L_Edition3 Page178
Friday, June 13 2014 6:21 PM
Form No.8DQ8-EA-13L
Page 181 of 576

Black plate (181,1)
Passing
For extra power when passing another
vehicle or climbing steep grades, depress
the accelerator fully. The transaxle will
shift to a lower gear, depending on vehicle
speed.
NOTE
The accelerator pedal feels heavy as it is being
depressed, but then lightens as it is fully
depressed. This change in pedal force aids the
engine control system in determining how
much the accelerator pedal has been
depressed for performing kickdown, and
functions to control whether or not kickdown
should be performed.
Climbing steep grades from a stop
To climb a steep grade from a stopped
position:
1. Depress the brake pedal.
2. Shift to D or M1, depending on the
load weight and grade steepness.
3. Release the brake pedal while
gradually accelerating.
Descending steep grades
When descending a steep grade, shift to
lower gears, depending on load weight
and grade steepness. Descend slowly,
using the brakes only occasionally to
prevent them from overheating.
When Driving
Transaxle
4-57
Mazda6_8DQ8-EA-13L_Edition3 Page181
Friday, June 13 2014 6:21 PM
Form No.8DQ8-EA-13L