engine oil MAZDA MX-5 1994 User Guide
[x] Cancel search | Manufacturer: MAZDA, Model Year: 1994, Model line: MX-5, Model: MAZDA MX-5 1994Pages: 1708, PDF Size: 82.34 MB
Page 44 of 1708

ENGINE TUNE-UP B 2 ADJUSTING BOLT LOCKNUT Tension N {kgf, lbfl I Drive belt New* Used I Limit I A belt that has been on a running engine for less than five minutes. 45UOBX-011 Alternator PIS, PIS + A/C AIC Adjustment (1) Alternator belt Loosen the alternator bolts @J and @ and adjust the belt deflection by turning the adjusting bolt 0. Tightening torque @: 19-25 N-m {I .9-2.6 kgf.m, 14-18 ft4bf) @: 38-51 N-m (3.8-5.3 kgf.m, 28-38 ft4bf) 491 -745 (50-76, 11 0-1 67) 491-588 (50-60, 11C-132) 49 1-588 (50-60, 11 0-1 32) (2) PIS belt, PIS + A/C belt Loosen the PIS oil pump bolt @ and nuts @ and @ and adjust the belt deflection by turning the adjusting bolt @. Tightening torque @: 3246 N.m (3.24.7 kgf.m, 24-33 ftlbf) @: 37-53 N-m I3.7-5.5 kgf.m, 27-39 ft4bf) 0: 19-25 N-m {I .9-2.6 kgf.m, 14-18 ft4bf) 491 -706 (50-72, 11 0-1 58) 422-490 (43-50, 95-1 10) 422490 {43-50, 95-1 lo} (3) AIC belt If necessary, loosen the lock nut and adjust the belt deflection by turning the adjusting bolt. 343 (35,771 245 {25, 55) 245 {25,55) Tightening torque: 38-51 N.m (3.8-5.3 kgf.m, 28-38 ft.lbf) Gartner Banana
Page 45 of 1708

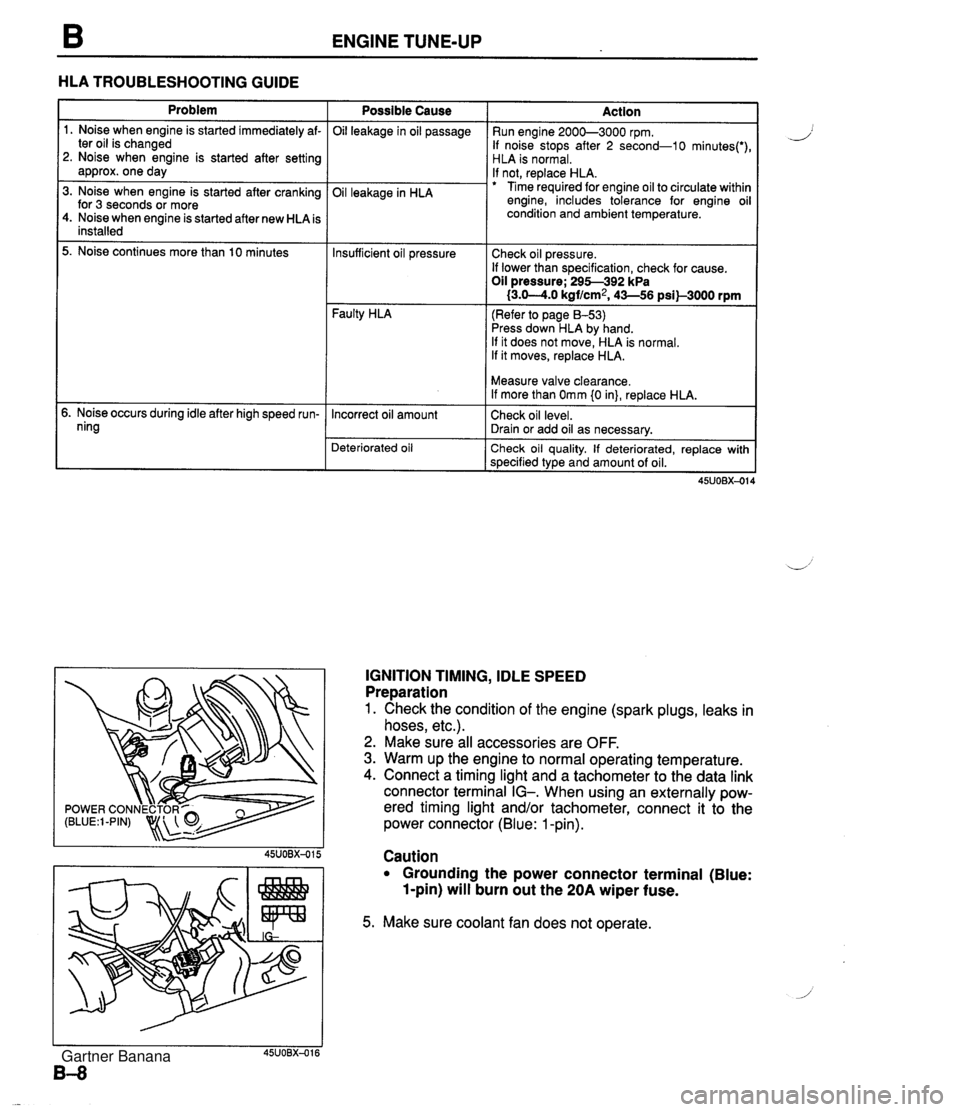
ENGINE TUNE-UP HLA TROUBLESHOOTING GUIDE Problem 1. Noise when engine is started immediately af- ter oil is changed 2. Noise when engine is started after setting approx. one day 3. Noise when engine is started after cranking for 3 seconds or more 4. Noise when engine is started after new HLA is installed 5. Noise continues more than 10 minutes 5. Noise occurs during idle after high speed run- ning Possible Cause Oil leakage in oil passage Oil leakage in HLA Faulty HLA Action Run engine 2000-3000 rpm. If noise stops after 2 second-10 minutes(') HLA is normal. If not, replace HLA. Time required for engine oil to circulate withir engine, includes tolerance for engine oi condition and ambient temperature. Insufficient oil pressure (Refer to page 8-53) Press down HLA by hand. If it does not move, HLA is normal. If it moves, replace HLA. Check oil pressure. If lower than specification, check for cause. Oil pressure; 295-392 kPa I3.0-4.0 kgf/cm2, 43-56 psil-3000 rpm Deteriorated oil Check oil quality. If deteriorated, replace with specified type and amount of oil. Incorrect oil amount IGNITION TIMING, IDLE SPEED Preparation 1. Check the condition of the engine (spark plugs, leaks in hoses, etc.). 2. Make sure all accessories are OFF. 3. Warm up the engine to normal operating temperature. 4. Connect a timing light and a tachometer to the data link connector terminal IG-. When using an externally pow- ered timing light and/or tachometer, connect it to the power connector (Blue: 1 -pin). Measure valve clearance. If more than Omm {0 in}, replace HLA. Check oil level. Drain or add oil as necessary. Caution Grounding the power connector terminal (Blue: 1-pin) will burn out the 20A wiper fuse. 5. Make sure coolant fan does not operate. Gartner Banana
Page 47 of 1708

COMPRESSION COMPRESSION If the engine exhibits low power, poor fuel economy, or poor idle, check the following: 1. Ignition system (Refer to section G.) 2. Compression (Refer to page B-10.) 3. Fuel system (Refer to section F.) INSPECTION 1. Check that the battery is fully charged. Recharge it if necessary. (Refer to section G.) 2. Warm up the engine to the normal operating tempera- ture. 3. Turn the engine OFF. 4. Remove all spark plugs. 5. Disconnect the ignition coil connector. 6. Connect a compression gauge to the No.1 spark plug hole. 7. Fully depress the accelerator pedal and crank the en- gine. 8. Record the maximum gauge reading. 9. Check each cylinder, as above. Compression: 1,255 kPa (1 2.8 kgf/cm2, 182 psi)-300 rpm Minimum: 883 kPa (9.0 kgf/cm2, 128 psiF300 rpm Differential limit between cylinders: 196 kPa (2.0 kgf/cm2, 28 psi} 10. If the compression in one or more cylinders is low, pour a small amount of engine oil into the cylinder and re- check the compression. (1) If the compression increases, the piston, piston rings, or cylinder wall may be worn. (2) If the compression stays low, the valve may be stuck or seated improperly. (3) If the compression in adjacent cylinders stays low, the cylinder head gasket may be defective or the cyl- inder head distorted. 11 . Connect the ignition coil connector. 12. Install the spark plugs. Tightening torque: 15--22 N.m (1.5-2.3 kgf.m, 11-16 ftlbf) Gartner Banana
Page 48 of 1708

ON-VEHICLE MAINTENANCE B ON-VEHICLE MAINTENANCE PREPARATION L SST 49 DO11 102 Lock tool, crankshaft Shaft (Part of 49 E011 1AO) Collar (Part of 49 E011 1 AO) Warninq For removal / installat ion of timing belt pulley For prevention of engine rotation For prevention of engine rotation 49 EOl 1 105 Stopper (Part of 49 EOll 1AO) 49 EOll 1 A0 Ring gear brake set For prevention of engine rotation For prevention of engine rotation ~onhuous exposure with USED engine oil has caused skin cancer in laboratory mice. Protect your skin by washing with soap and water immediately after this work. 49 SEO1 310 A Centering tool, clutch disc For installation of clutch disc Gartner Banana
Page 49 of 1708

B ON-VEHICLE MAINTENANCE TIMING BELT Removal / lnstallation 1. Disconnect the negative battery cable. 2. Drain the engine coolant. 3. Remove the under cover. 4. Remove in the order shown in the figure, referring to Removal Note. 5. Install in the reverse order of removal, referring to lnstallation Note. (80-110 kgfmn, 7.9-10.7 Nm 13-17 Nm (125-175 kgfcm, 109-151 In4bf) Nm (kgfm, ft4bf) 45UOBX425 1. Air intake pipe 12. Spark plug 2. Upper radiator hose Removal / Installation ......... section G 3. Water hoses (Connected to thermostat 13. PCV valve housing) 14. Cylinder head cover 4. PIS andlor A/C drive belt 15. Upper timing belt cover Removal 1 Installation ....... page B- 6 16. Middle timing belt cover 5. Alternator drive belt 17. Lower timing belt cover Removal / Installation ....... page 5 6 18. Timing belt 6. Water pump pulley Removal Note ............. page B-13 7. Plate Installation Note ........... page B-14 8. Crankshaft pulley Inspection ................. page 8-58 9. Pulley lock bolt 19. Tensioner, tensioner spring Removal Note ............. page B-13 Installation Note ........... page B-14 /' Installation Note ........... page 51 5 Inspection ................. page 558 10. Pulley boss 20. Idler 11. Ignition coil and high-tension lead Inspection ................. page 8-58 Gartner Banana
Page 56 of 1708

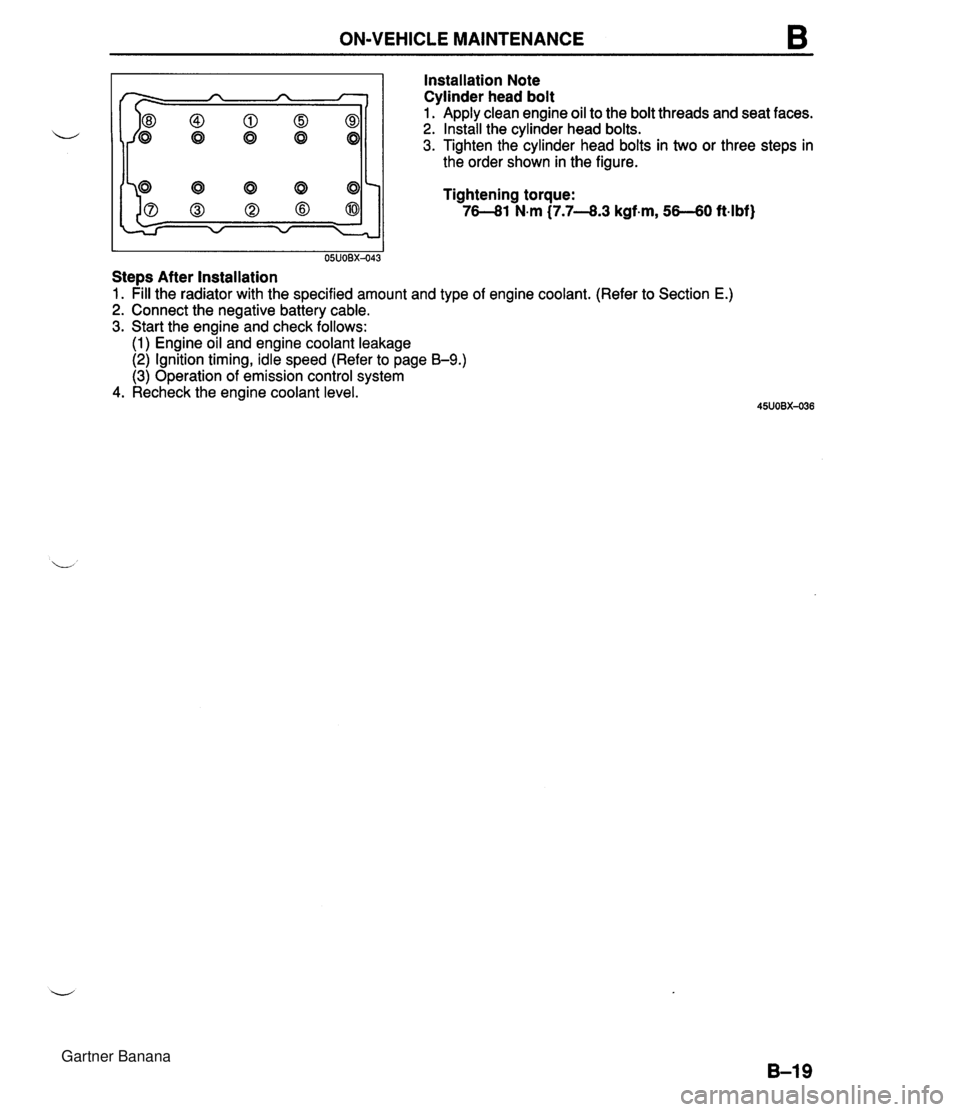
ON-VEHICLE MAINTENANCE B Installation Note Cylinder head bolt I I 05UOBX-043 Stem After Installation Apply clean engine oil to the bolt threads and seat faces. Install the cylinder head bolts. Tighten the cylinder head bolts in two or three steps in the order shown in the figure. Tightening torque: 76-81 N.m (7.7-8.3 kgf-m, 56-60 ft4bf) 1. pill the radiator with the specified amount and type of engine coolant. (Refer to Section E.) 2. Connect the negative battery cable. 3. Start the engine and check follows: (1) Engine oil and engine coolant leakage (2) Ignition timing, idle speed (Refer to page B-9.) (3) Operation of emission control system 4. Recheck the engine coolant level. Gartner Banana
Page 58 of 1708

ON-VEHICLE MAINTENANCE B CRANKSHAFT POSITION SENSOR DRIVE GROOVE 45UOBX-04 Removal Note Camshaft pulley 1. Hold the camshaft with a wrench at the cast hexagon. 2. Remove the camshaft pulley lock bolts. 3. Remove the camshaft pulleys. Camshaft 1. Loosen the camshaft cap bolts in two or three steps in the order shown in the figure. 2. Remove the camshaft caps. 3. Remove the camshafts. 4. Remove the camshaft oil seals from the camshafts. HLA Caution The HLA must be reinstalled in the same posi- tions from which they were removed. If they are not, it can cause premature and uneven wear. Note Mark the HLA to show their original positions. Remove the HLA from the cylinder head. Installation Note HLA 1. Apply clean engine oil to the friction surfaces. 2. If the HLA are being reused, install them in the position from which they were removed. 3. Verify that the HLA move smoothly in their bores. Camshaft Note The exhaust camshaft has a groove for the crank- shaft position sensor drive. 1. Apply clean engine oil to the camshaft journals and bear- ings. 2. Install the camshaft in position. Gartner Banana
Page 59 of 1708

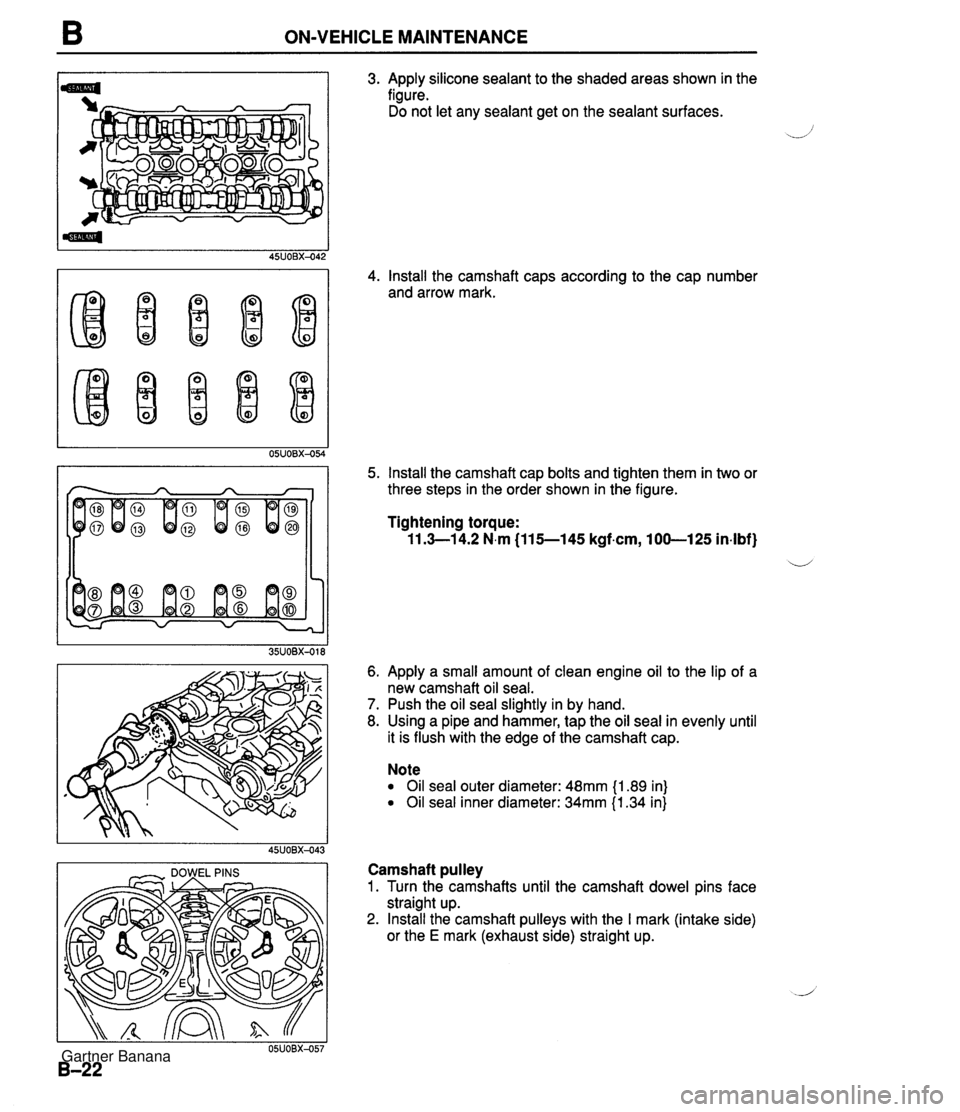
B ON-VEHICLE MAINTENANCE I - DOWEL PINS I 3. Apply silicone sealant to the shaded areas shown in the figure. Do not let any sealant get on the sealant surfaces. 4. Install the camshaft caps according to the cap number and arrow mark. 5. Install the camshaft cap bolts and tighten them in two or three steps in the order shown in the figure. Tightening torque: 11.3-1 4.2 N.m (115--145 kgf.cm, 100-125 in-lbf} ii 6. Apply a small amount of clean engine oil to the lip of a new camshaft oil seal. 7. Push the oil seal slightly in by hand. 8. Using a pipe and hammer, tap the oil seal in evenly until it is flush with the edge of the camshaft cap. Note Oil seal outer diameter: 48mm {I .89 in) Oil seal inner diameter: 34mm {I .34 in} Camshaft pulley 1. Turn the camshafts until the camshaft dowel pins face straight up. 2. Install the camshaft pulleys with the I mark (intake side) or the E mark (exhaust side) straight up. Gartner Banana
Page 62 of 1708

ON-VEHICLE MAINTENANCE B Steps After Installation 1. Connect the neaative batterv cable. Oil seal 1. Cut the oil seal lip with a razor knife. 2. Remove the oil seal with a screwdriver protected with a rag. Installation Note Oil seal 1. Apply a small amount of clean engine oil to the lip of a new oil seal. 2. Push the oil seal slightly in by hand. 3. Tap the oil seal in evenly with a pipe and a hammer until it is flush with the edge of the oil pump body. Note Oil seal outer diameter: 50.5mm (1.99 in} Oil seal inner diameter: 36.5mm (1.44 in} Timing belt pulley 1. Install the timing belt pulley. 2. Install the pulley woodruff key with the tapered side to- ward the oil pump body. 2. Start the enginsand check, and if necessary, adjust the ignition timing. 3. Connect the negative battery cable. 4. Start the engine and check follows: (1) Engine coolant leakage (2) Ignition timing (Refer to page B-9.) 5. Recheck the engine coolant levels. Gartner Banana
Page 64 of 1708

ON-VEHICLE MAINTENANCE Installation Note Oil seal 1. Apply a small amount of clean engine oil to w new oil seal. 2. Push the oil seal slightly in by hand. 3. Using a pipe and hammer, tap the oil seal in it is flush with the edge of the rear cover. Note Oil seal outer diameter: 100mm (3.94 in} Oil seal inner diameter: 83mm (3.27 in} 45UOBX-049 Steps After Installation 1. Connect the negative battery cable. 2. Start the engine and perform engine adjustments as necessary. the lip of a evenly until Gartner Banana