wiring MAZDA MX-5 1994 Repair Manual
[x] Cancel search | Manufacturer: MAZDA, Model Year: 1994, Model line: MX-5, Model: MAZDA MX-5 1994Pages: 1708, PDF Size: 82.34 MB
Page 241 of 1708

F ON-BOARD DIAGNOSIS SYSTEM CODE NO. I 28 (EGR SOLENOID VALVE(VACUUM)) I I iTEP I INSPECTION ACTION (vacuum) circuit? valve (vacuum) connector disconnected OK? - Yes Repair or replace connector I Go to next step Yes Go to next step No - Yes - No 3 Check for open or short circuit in wiring from EGR solenoid valve (vacuum) terminal A to main relay terminal I Condition 1 Voltage IG switch ON I Battery positive voltage Is continuity between EGR solenoid valve (vacu- um) terminal B and PCME terminal IT OK? Check for short circuit in wiring from EGR solenoid valve (vacuum) terminal B to PCME terminal IT 0 If OK, go to next step 0 If not OK, repair or replace wiring harness Repair or replace wire harness Yes - No 4 Replace PCME Replace EGR solenoid valve (vacuum) Is EGR solenoid valve (vacuum) OK? CODE No. I - 29 (EGR SOLENOID VALVE(VENT)) I iTEP I INSPECTION ACTION I I If there a poor connection in EGR solenoid valve (vent) circuit? Repair or replace connector Go to next step Go to next step 1 Is connector terminal A voltages with EGR solenoid valve (vent) connector disconnected OK? Check for open or short circuit in wiring from EGR solenoid valve (vent) terminal A to main relay terminal I Condition I Voltage G switch ON I Battery positive voltage 1 Yes 3 Check for short circuit in wiring from EGR solenoid valve (vent) terminal B to PCME terminal 1 R Is continuity between EGR solenoid valve (vent) terminal B and PCME terminal 1 R OK? 0 If OK, go to next step s If not OK, repair or replace wiring harness Re~air or reolace wire harness I 4 Replace PCME I Replace EGR solenoid valve (vent) 39UOFX-110 Is EGR solenoid valve (vent) OK? No Yes No Gartner Banana
Page 242 of 1708
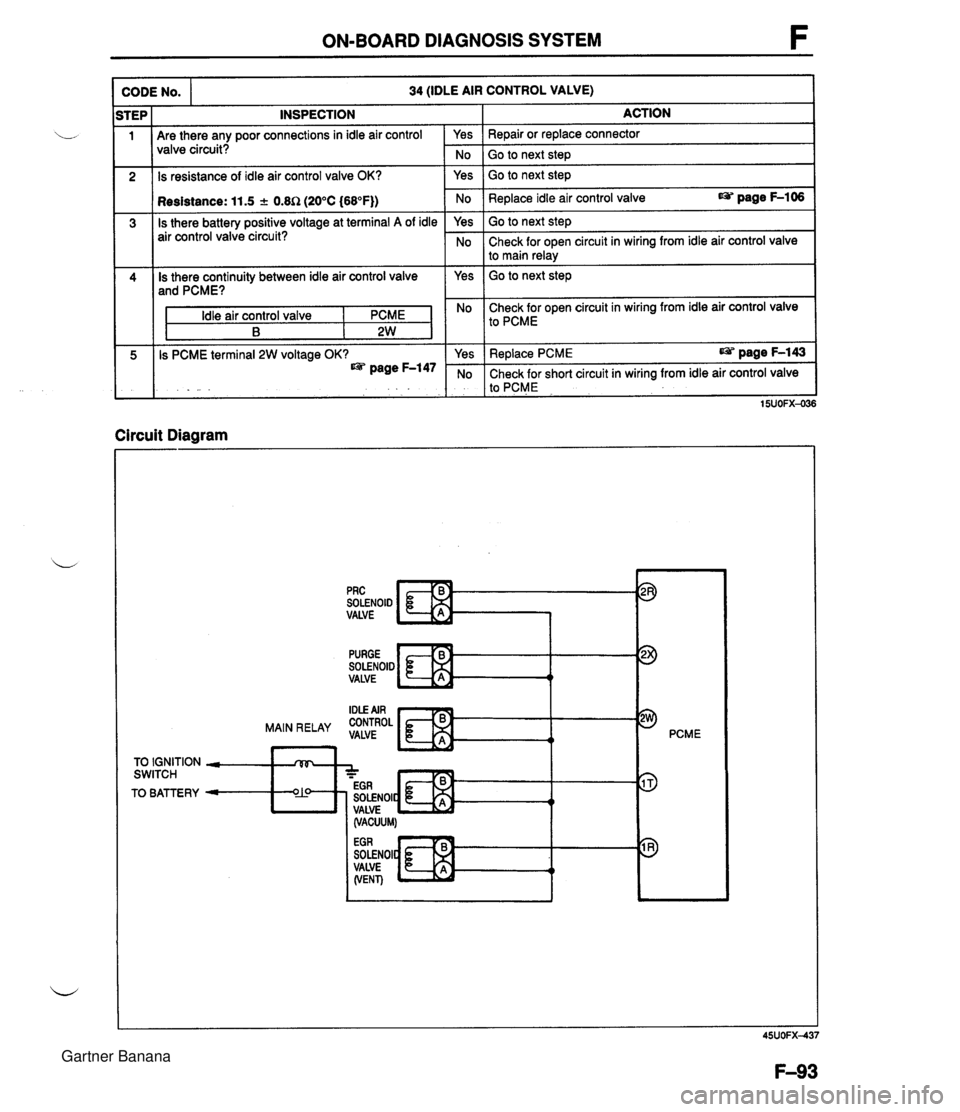
ON-BOARD DIAGNOSIS SYSTEM INSPECTION Are there any poor connections in idle air control valve circuit? CODE NO. Is resistance of idle air control valve OK? 34 (IDLE AIR CONTROL VALVE) 1 Resistance: 11.5 + 0.8R (20°C (68°F)) Is there battery positive voltage at terminal A of idle air control valve circuit? Is there continuity between idle air control valve and PCME? Idle air control valve I PCME B 2W Is PCME terminal 2W voltage OK? page F-147 Circuit Diagram No 1 Go to next ste~ I Yes ACTION Repair or replace connector Yes No Yes Go to next step I I Go to next step Replace idle air control valve page F-106 Yes No No Check for open circuit in wiring from idle air control valve I to PCME Go to next step Check for open circuit in wiring from idle air control valve to main relay SOLENOID VALVE pRc c Yes No PURGE SOLENOID VALVE Replace PCME page F-143 Check for short circuit in wiring from idle air control valve to PCME t PCME 15UOFX-036 TO IGNITION - rVF, SWITCH A - - EGR TO BATTERY - O?! SOLENOIC t 4 I, VALVE (VACUUM) SOLENOI VALVE (VENT) Gartner Banana
Page 268 of 1708
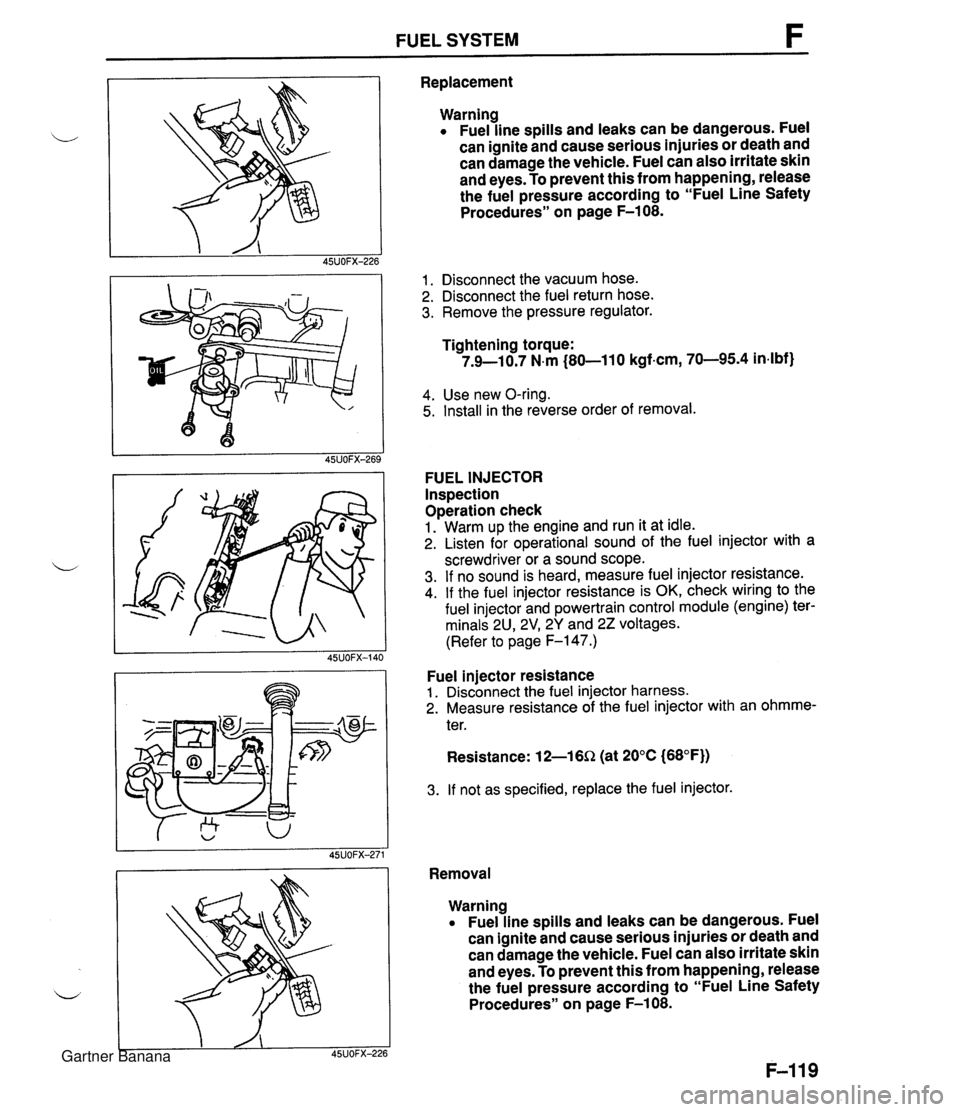
FUEL SYSTEM F Replacement Warning Fuel line spills and leaks can be dangerous. Fuel can ignite and cause serious injuries or death and can damage the vehicle. Fuel can also irritate skin and eyes. To prevent this from happening, release the fuel pressure according to "Fuel Line Safety Procedures" on page F-108. 1. Disconnect the vacuum hose. 2. Disconnect the fuel return hose. 3. Remove the pressure regulator. Tightening torque: 7.9-10.7 N.m (80-11 0 kgf-cm, 70-95.4 in4bf) 4. Use new O-ring. 5. Install in the reverse order of removal. FUEL INJECTOR Inspection Operation check 1. Warm up the engine and run it at idle. 2. Listen for operational sound of the fuel injector with a screwdriver or a sound scope. 3. If no sound is heard, measure fuel injector resistance. 4. If the fuel injector resistance is OK, check wiring to the fuel injector and powertrain control module (engine) ter- minals 2U, 2V1 2Y and 22 voltages. (Refer to page F-147.) Fuel injector resistance 1. Disconnect the fuel injector harness. 2. Measure resistance of the fuel injector with an ohmme- ter. Resistance: 12-16Q (at 20°C (68°F)) 3. If not as specified, replace the fuel injector. Removal Warning Fuel line spills and leaks can be dangerous. Fuel can ignite and cause serious injuries or death and can damage the vehicle. Fuel can also irritate skin and eyes. To prevent this from happening, release the fuel pressure according to "Fuel Line Safety Procedures" on page F-108. Gartner Banana
Page 275 of 1708
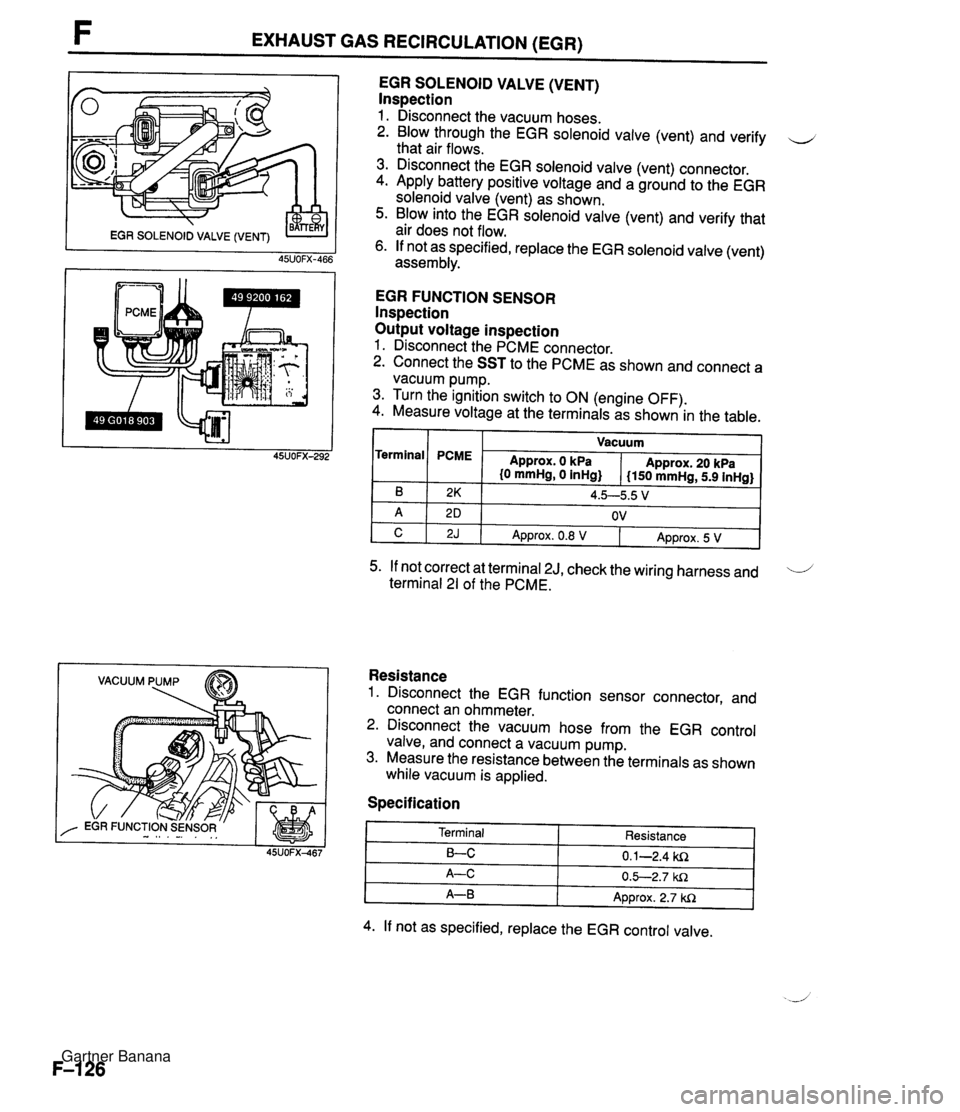
F EXHAUST GAS RECIRCULATION (EGR) VACUUM PUMP EGR SOLENOID VALVE (VENT) lnspection 1. Disconnect the vacuum hoses. 2. Blow through the EGR solenoid valve (vent) and verify u that air flows. 3. Disconnect the EGR solenoid valve (vent) connector. 4. Apply battery positive voltage and a ground to the EGR solenoid valve (vent) as shown. 5. Blow into the EGR solenoid valve (vent) and verify that air does not flow. 6. If not as specified, replace the EGR solenoid valve (vent) assembly. EGR FUNCTION SENSOR lnspection Output voltage inspection 1. Disconnect the PCME connector. 2. Connect the SST to the PCME as shown and connect a vacuum pump. 3. Turn the ignition switch to ON (engine OFF). 4. Measure voltage at the terminals as shown in the table. I I Vacuum I Terminal 5. If not correct at terminal 2J, check the wiring harness and 'i terminal 21 of the PCME. B A C Resistance 1. Disconnect the EGR function sensor connector, and connect an ohmmeter. 2. Disconnect the vacuum hose from the EGR control valve, and connect a vacuum pump. 3. Measure the resistance between the terminals as shown while vacuum is applied. PCME Specification 2K 2 D 2J Approx. 0 kPa {O mmHg, 0 inHg} 4. If not as specified, replace the EGR control valve. Approx. 20 kPa I150 mmHg, 5.9 inHg} 4.5--5.5 V OV Terminal LC A-C A-B Approx. 0.8 V Resistance 0.1-2.4 ki2 0.5-2.7 W1 Approx. 2.7 W1 Approx. 5 V Gartner Banana
Page 293 of 1708
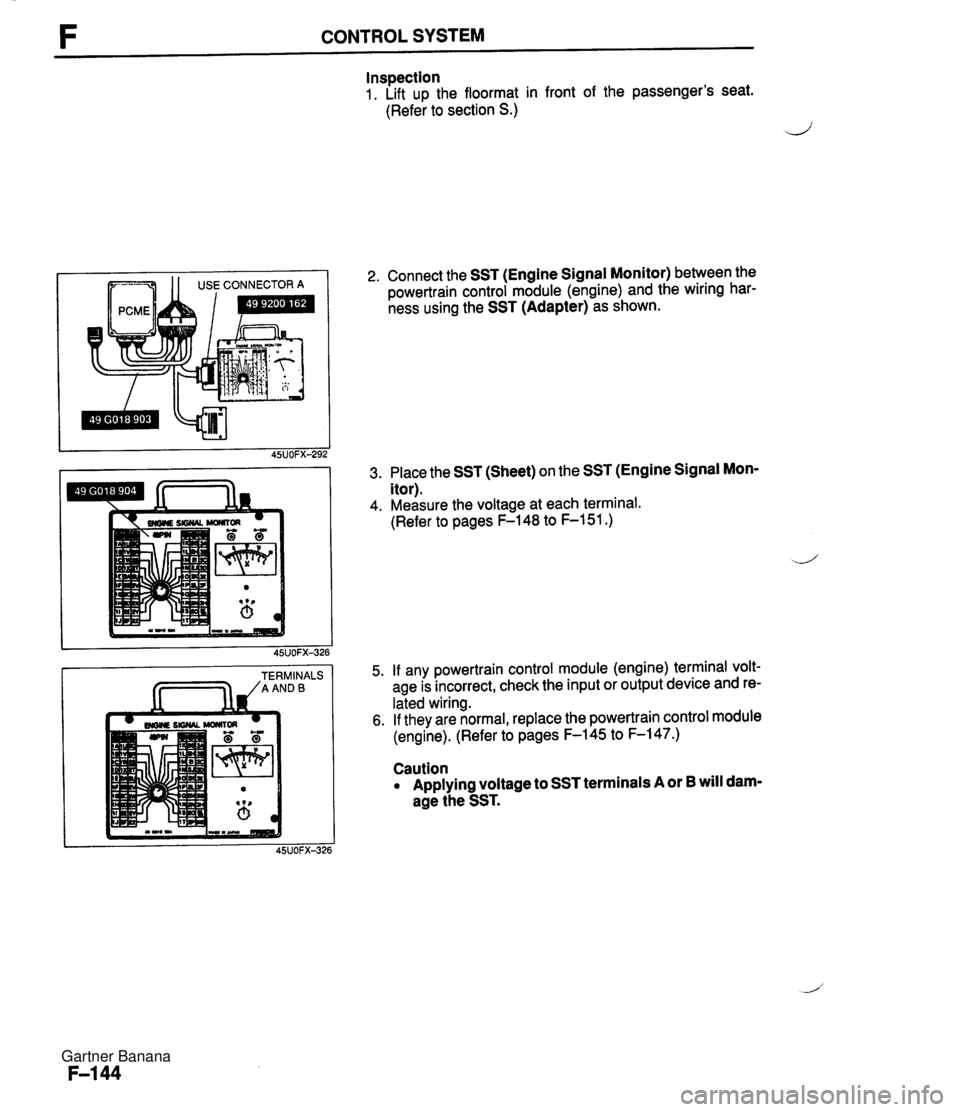
F CONTROL SYSTEM Inspection 1. Lift up the floormat in front of the passenger's seat. (Refer to section S.) ,i 1 USECONNECTORA TERMINALS /AANDB 2. Connect the SST (Engine Signal Monitor) between the powertrain control module (engine) and the wiring har- ness using the SST (Adapter) as shown. 3. Place the SST (Sheet) on the SST (Engine Signal Mon- itor). 4. Measure the voltage at each terminal. (Refer to pages F-148 to F-151.) 5. If any powertrain control module (engine) terminal volt- age is incorrect, check the input or output device and re- lated wiring. 6. If they are normal, replace the powertrain control module (engine). (Refer to pages F-145 to F-147.) Caution Applying voltage to SST terminals A or B will dam- age the SST. Gartner Banana
Page 297 of 1708

CONTROL SYSTEM Check Point for Each Terminal B+: Battery positive voltage Terminal -. - Connection to Abnormal voltage Possible cause Battery Always OV (Battery OK) Always OV Main relay a ROOM 10A fuse burned Open circuit in wiring from ROOM 1 OA fuse to PCME terminal 1A Main relay malfunction (Refer to page F-156) Open circuit in wiring from main relay to PCME termi- nal 1 B Ignition switch (Start position) a Main relay malfunction (Refer to page F-156) Open circuit in wiring from main relay to data link connector terminal +B Open or short circuit in wiring from data link connec- tor terminal MEN to PCME terminal 1 D Always OV (Starter turns) Always OV Open circuit in wiring from starter interlock switch to PCME terminal 1 C Self-Diagnosis Checker (Monitor lamp) Always B+ a Poor connection at PCME connector PCME malfunction I Always approx. 5V I a PCME malfunction Malfunction indicator light (MIL) Always below 2.5V (MIL always ON) Always below 2.5V Open circuit in wiring from combination meter to (MIL never ON) I PCME terminal I E a Short circuit in wiring from combination meter to PCME terminal 1 E PCME malfunction Always B+ Poor connection at PCME connector a PCME malfunction Self-Diagnosis Checker (Code No.) Always below 2.5V (No display on Self-Diagnosis Checker) Main relay malfunction (Refer to page F-156) a Open circuit in wiring from main relay to data link connector terminal +B Always B+ Always below 2.5V ("88" is displayed and buzzer sounds continuously) a Poor connection at PCME connector a PCME malfunction - Open or short circuit in wiring from data link connec- tor terminal FEN to PCME terminal I E Igniter Always OV a Refer to Code No.01 troubleshooting I (Refer to section GI Powertrain control module (transmission) Always B+ I PCME malfunction A/C relay malfunction (Refer to section U) a Open circuit in wiring from main relay to NC relay a Open circuit in wiring from NC relay to PCME termi- nal 1 J a Short circuit in wiring from NC relay to PCME termi- nal 1 J a PCME malfunction Always below 2.5V (NC does not operate) Always below 2.5V (Air conditioning sensor OFF but A/C operates) AIC relay Air conditioning sensor malfunction (Refer to section U) Poor connection at PCME connector PCME malfunction Always B+ Open circuit in wiring from PCME terminal 1 K to ground PCME malfunction Ground (MT) Always B+ Open (AT) Always OV Short circuit in wiring from PCME terminal 1 K to grounc PCME malfunction Coolant fan relay Always below 1 .OV (Coolant fan OK) Open or short circuit in wiring from fan relay to PCME terminal I L PCME malfunction Gartner Banana
Page 298 of 1708

CONTROL SYSTEM B+: Battery positive voltage Terminal 1 M 7 1 N 10 1 P 1 Q 1 R 1 S 1 T 1 U Connection to Abnormal voltage Always approx. 1 V Always approx. 7V Possible cause r Vehicle speed sensor malfunction r Short circuit in wiring from vehicle speed sensor to PCME terminal 1 M Vehicle speed sensor - r Vehicle speed senso~malfunction r Open circuit in wiring from vehicle speed sensor to PCME terminal 1 M r Throttle position sensor misadjustment (Refer to page F-154) r Short circuit in wiring from PCME terminal 1 N to throttle position sensor 6 PCME malfunction Always OV Throttle position sensor (idle terminal) Always B+ r Throttle position sensor misadjustment (Refer to page F-154) r Open circuit in wiring from PCME terminal 1 N to throttle position sensor r Open circuit in wiring from throttle position sensor to ground Stoplight switch Always OV (Stoplights OK) r Open circuit in wiring from stoplight switch to PCME terminal 10 r Steering pressure sensor malfunction (Refer to page F-158) Short circuit in wiring from PCME terminal 1 P to steering pressure sensor r PCME malfunction r Steering pressure sensor malfunction (Refer to F-158) r Open circuit in wiring from PCME terminal 1 P to steering pressure sensor Open circuit in wiring from steering pressure sensor to ground r Air conditioning sensor malfunction (Refer to section U) r Short circuit in wiring from PCME terminal 1 Q to air conditioning sensor r Poor connection at PCME connector r PCME malfunction Always OV Steering pressure sensor Always B+ -- Air conditioning sensor Always OV (with blower switch ON) Air conditioning sensor malfunction (Refer to section U) Open circuit in wiring from PCME terminal 1Q to air conditioning sensor Open circuit in wiring from air conditioning sensor to blower switch Always B+ (with blower switch ON) (Blower fan OK) EGR solenoid valve (vent) Always OV r Refer to Code No.29 Troubleshooting (Refer to page F-92) Short circuit in wiring from blower switch to PCME terminal 1 S r Poor connection at PCME connector PCME malfunction Always OV (Blower fan OK) Blower switch Always B+ (Blower fan OK) Open circuit in wiring from blower switch to PCME terminal IS EGR solenoid (vacu- um) Always OV r Refer to Code No.28 Troubleshooting (Refer to paae F-92) Headlight switch Always OV (Headlights OK) r Open or short circuit in wiring from headlight relay to PCME terminal 1 U Gartner Banana
Page 299 of 1708

F CONTROL SYSTEM B+: Battery positive voltage Abnormal voltage Possible cause Terminal 1 v Connection to Neutral switch malfunction (Refer to page F-157) Clutch switch malfunction (Refer to page F-156) Short circuit in wiring from PCME terminal 1 V to neutral or clutch switch Neutral switch malfunction (Refer to page F-157) 0 Clutch switch malfunction (Refer to page F-156) 0 Open circuit in wiring from PCME terminal 1 V to neutral or clutch switch Poor connection at PCME connector 0 ParWneutral switch malfunction (Refer to section K) 0 Short circuit in wiring from parWneutral switch to PCME terminal 1V 0 ParWneutral switch malfunction (Refer to section K) 0 Open circuit in wiring from parWneutral switch to PCME terminal 1 V Always OV Neutral switchlClutch switch (MT) Always B+ Always OV ParWneutral switch (AT) Always B+ Poor contact at ground terminal 0 Open circuit in wiring from PCME to ground Sround More than OV Crankshaft position sensor (SGT-signal) Always OV or approx. 5V Always below 2V or 4V Refer to Code No.03 troubleshooting (Refer to page F-84) Refer to code No.08 Troubleshooting (Refer to page F-86) 0 Short circuit in wiring from PCME terminal 2H to data link connector terminal TEN Mass airflow sensor Always OV Data link connector (Terminal TEN) 0 Open circuit in wiring from PCME terminal 2H data link connector terminal TEN 0 Open circuit in wiring from data link connector terminal GND to around Always B+ Igniter EGR function sensor Always OV Always approx. OV or approx. 5v Refer to Code No.01 troubleshooting (Refer to paae F-83) 0 Refer to Code No.16 Troubleshooting (Refer to page F-89) 0 Short circuit in wiring from PCME terminal 2K tothrottle position sensor, PCME, or mass airflow sensor Poor connection at PCME connector PCME malfunction Vre f Always OV lllumination light ON when rear window defroster switch ON Open or short circuit in wiring from rear window de- froster switch to PCME terminal 2L Always below 1 .ov Rear window defroster switch Open circuit in wiring from ignition switch to rear win- dow defroster switch Rear window defroster switch malfunction (Refer to section T) lllumination light never ON Open circuit in wiring from PCME terminal 2M to throttle position sensor 0 Open circuit in wiring from PCME terminal 2K to throttle position sensor 0 Open circuit in wiring from PCME terminal 20 to throttle position sensor Always constant Throttle position sensor Alwavs above 1V 0 Throttle position sensor misadjustment Refer to Code No.15 troubleshooting (Refer to page F-88) OV after warm-up Heated oxygen sensor Always approx, 1V after warm-up 0 Refer to Code No.17 troubleshooting (Refer to page F-90) Refer to Code No.08 troubleshooting (Refer to page F-86) Mass airflow sensor Always OV or approx. 5V Gartner Banana
Page 300 of 1708

CONTROL SYSTEM B+: Battery positive voltage Terminal Connection to Abnormal voltaae Possible cause Mass airflow sensor (Intake air temperature sensor) Refer to Code No.10 troubleshooting (Refer to page F-87) Always OV or approx. 5V Intake air temperature sensor malfunction (Refer to page F-152) Refer to Code No.09 troubleshooting (Refer to page F-87) Engine coolant temper- ature sensor Always OV or approx. 5V r Engine coolant temperature sensor malfunction (Refer to page F-154) Refer to Code No.25 Troubleshooting (Refer to page F-91) Always OV or B+ PRC solenoid valve r Open or short circuit in wiring from condenser fan relay to PCME terminal 25 PCME malfunction Open or short circuit in wiring from fuel pump relay to PCME terminal 2T Condenser fan relay Always below 2.OV Fuel pump relay Always below 1 .OV Main relay malfunction (Refer to page F-156) r Open or short circuit in wiring from fuel injector to PCME terminal 2U or 2V Always OV Fuel injector ldle air control valve Purge solenoid valve Always B+ Always OV or B+ Always OV or B+ PCME malfunction r Refer to Code No.34 troubleshooting (Refer to page F-93) ldle air control solenoid valve malfunction (Refer to page F-I 06) r Refer to Code No.26 troubleshooting (Refer to page F-91) r Purge solenoid valve malfunction (Refer to pane F-132) -- Fuel injector Always OV Main relay malfunction (Refer to page F-156) Open or short circuit in wiring from fuel injector to PCME terminal 2Y or 22 Always B+ PCME malfunction Gartner Banana
Page 319 of 1708
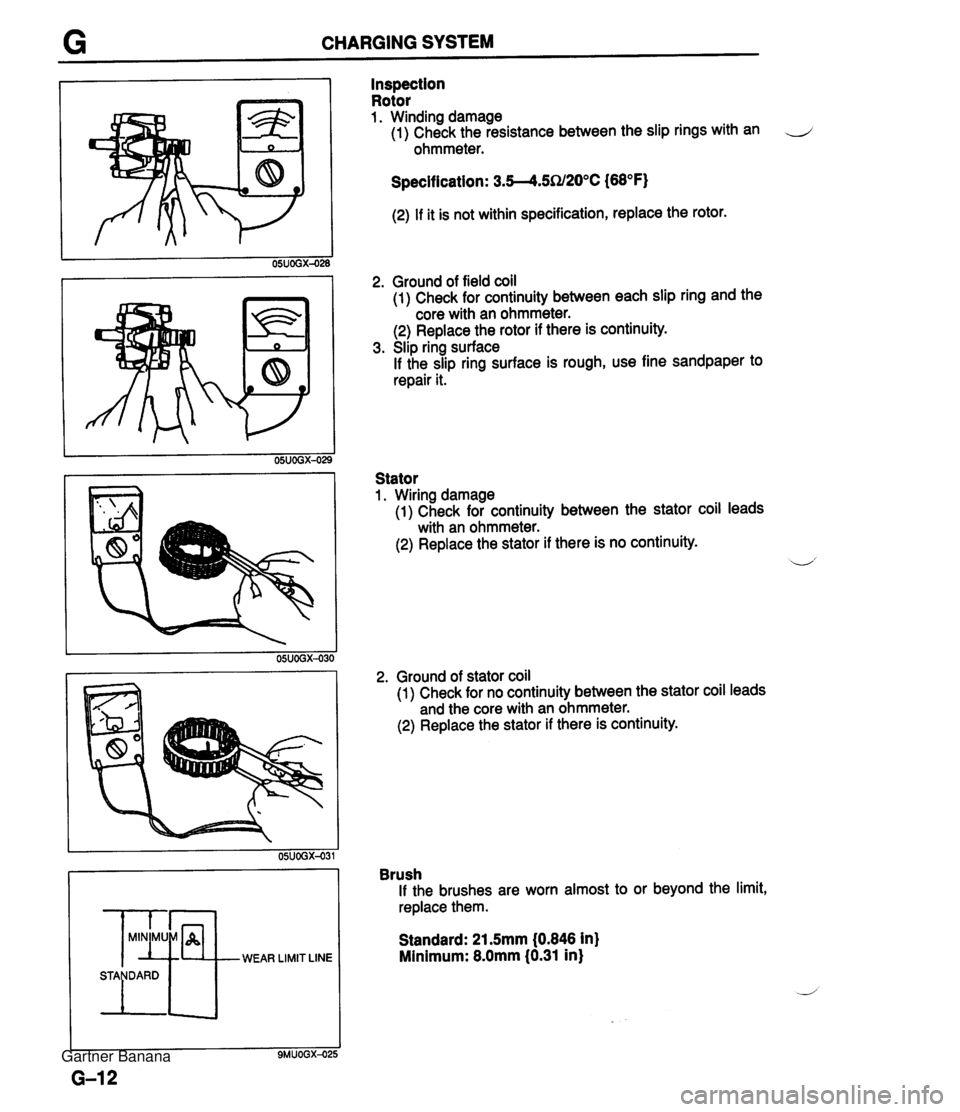
G CHARGING SYSTEM WEAR LIMIT LINE Inspection Rotor 1. Winding damage (1) Check the resistance between the slip rings with an J ohmmeter. Specification: 3.5--4.5SU20°C (68°F) (2) If it is not within specification, replace the rotor. 2. Ground of field coil (1) Check for continuity between each slip ring and the core with an ohmmeter. (2) Replace the rotor if there is continuity. 3. Slip ring surface If the slip ring surface is rough, use fine sandpaper to repair it. Stator 1. Wiring damage (1) Check for continuity between the stator coil leads with an ohmmeter. (2) Replace the stator if there is no continuity. 2. Ground of stator coil (1)~heck for no continuity between the stator coil leads and the core with an ohmmeter. (2) Replace the stator if there is continuity. Brush If the brushes are worn almost to or beyond the limit, replace them. Standard: 21.5mm (0.846 in) Minimum: 8.0mm (0.31 in) Gartner Banana