check oil MAZDA MX-5 1994 Repair Manual
[x] Cancel search | Manufacturer: MAZDA, Model Year: 1994, Model line: MX-5, Model: MAZDA MX-5 1994Pages: 1708, PDF Size: 82.34 MB
Page 507 of 1708
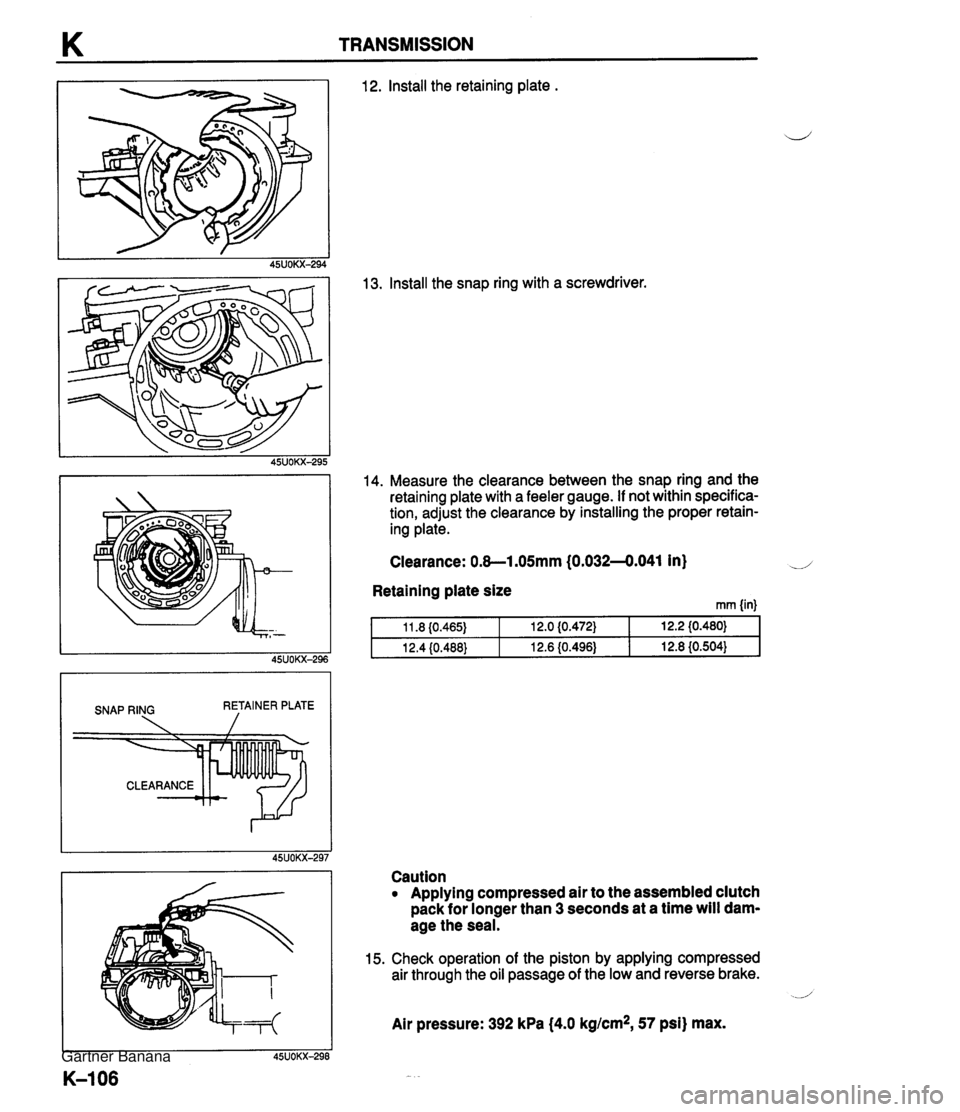
K TRANSMISSION SNAP RING RETAINER PLATE 12. lnstall the retaining plate . 13. Install the snap ring with a screwdriver. 14. Measure the clearance between the snap ring and the retaining plate with a feeler gauge. If not within specifica- tion, adjust the clearance by installing the proper retain- ing plate. Clearance: 0.8-1.05mm (0.032-4.041 in) d Retaining plate size rnrn {in) Caution Applying compressed air to the assembled clutch pack for longer than 3 seconds at a time will dam- age the seal. 15. Check operation of the piston by applying compressed air through the oil passage of the low and reverse brake. _i Air pressure: 392 kPa (4.0 kglcm*, 57 psi) max. Gartner Banana
Page 510 of 1708

TRANSMISSION K 8. Apply ATF to the new O-rings, and install them onto the manual shaft. 9. Apply ATF to the manual shaft, and install it into the transmission case. 10. Install the parking rod and retaining ring. 11. Apply ATF to the manual plate, and install it onto the manual shaft. 12. Drive the spring pin. 13. Check the parking mechanism operation. 14. Apply ATF to the new seal rings, and install them onto the oil distributor. 15. Install the snap ring, key, and speedometer drive gear onto the output shaft. 16. Secure the speedometer drive gear with the snap ring. Gartner Banana
Page 512 of 1708
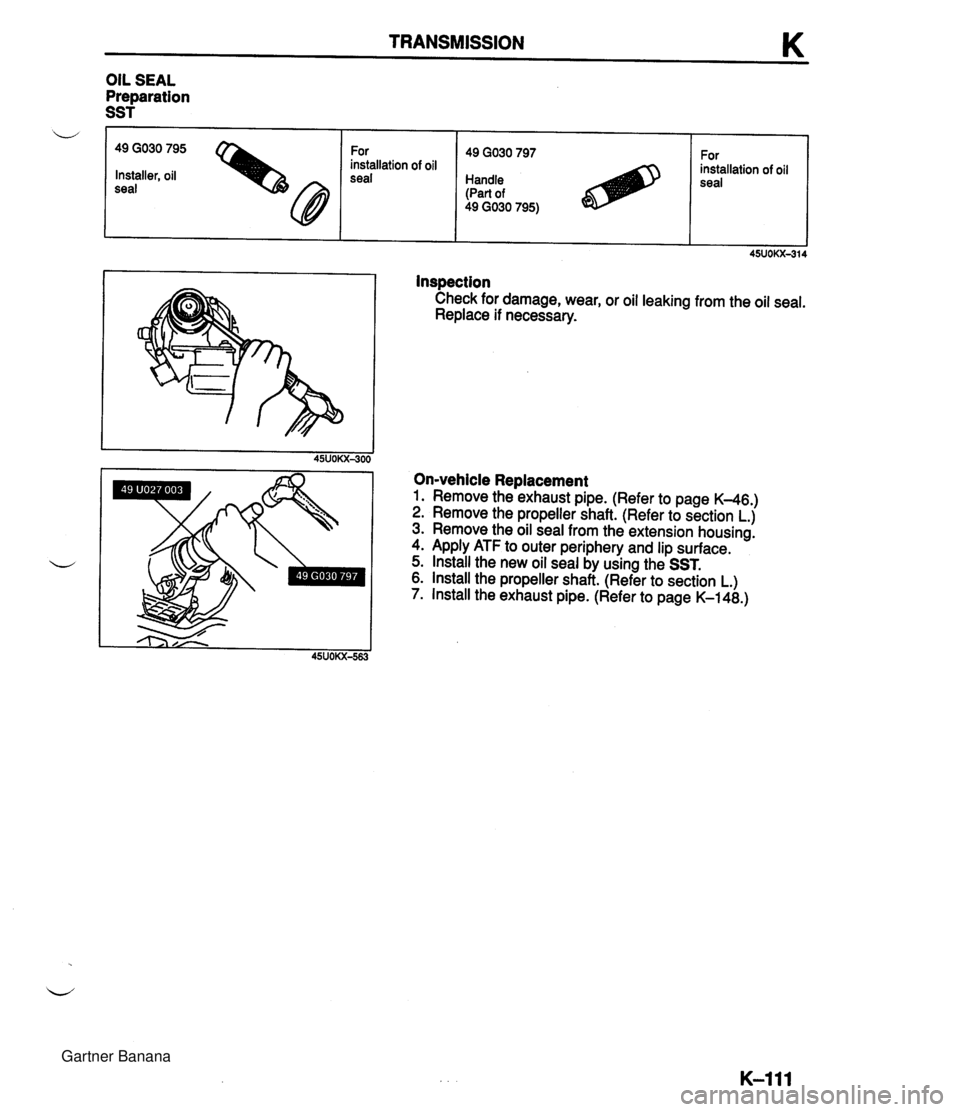
TRANSMISSION K Inspection Check for damage, wear, or oil leaking from the oil seal. Replace if necessary. OIL SEAL Preparation SST On-vehicle Replacement 1. Remove the exhaust pipe. (Refer to page K-46.) 2. Remove the propeller shaft. (Refer to section L.) 3. Remove the oil seal from the extension housing. 4. Apply ATF to outer periphery and lip surface. 5. Install the new oil seal by using the SST. 6. lnstall the propeller shaft. (Refer to section L.) 7. Install the exhaust pipe. (Refer to page K-148.) w 49 GO30 795 For installation of oil Installer, oil seal 49 GO30 797 Handle (Part of 49 GO30 795) For installation of oil seal Gartner Banana
Page 514 of 1708
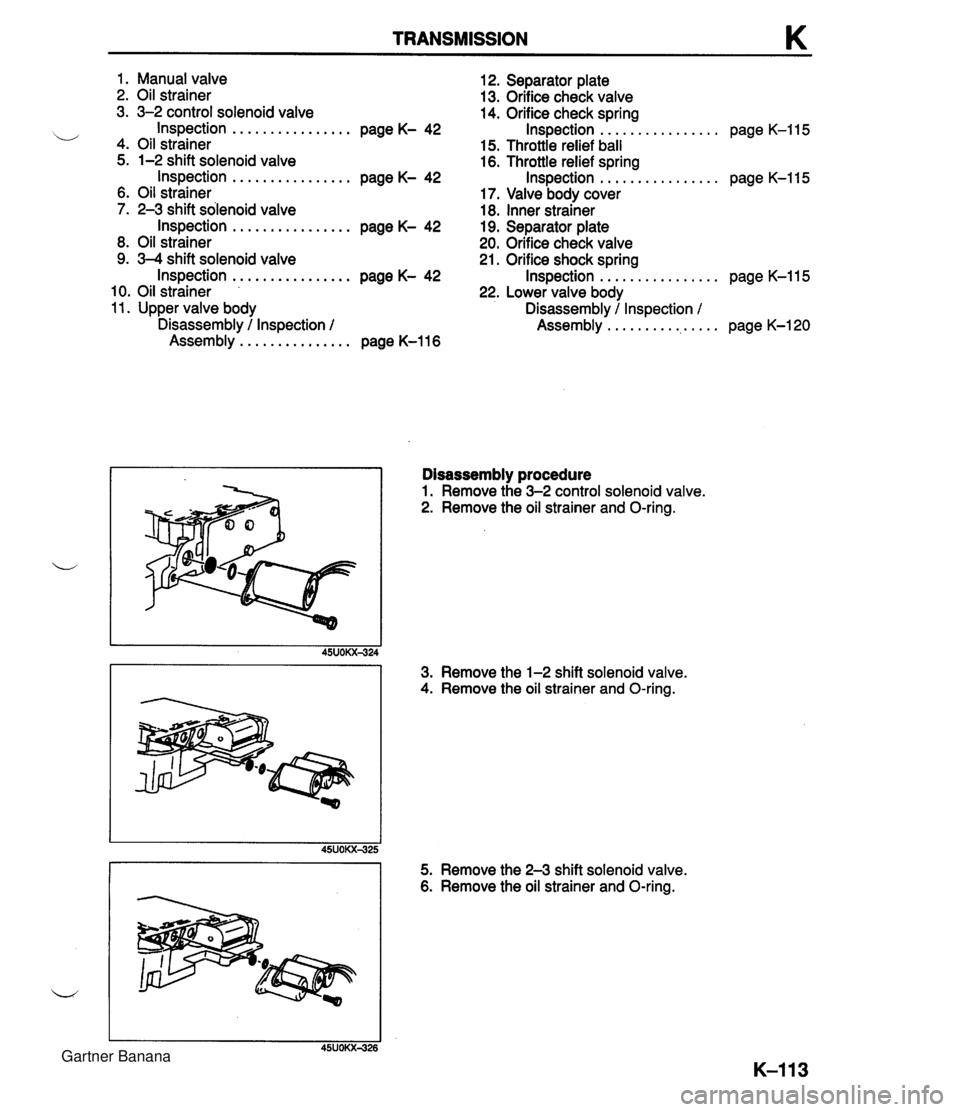
TRANSMISSION 1. Manual valve 12. Separator plate 2. Oil strainer 13. Orifice check valve 3. 3-2 control solenoid valve 14. Orifice check spring ................ ................ i/ Inspection page K- 42 Inspection page K-115 4. Oil strainer 15. Throttle relief ball 5. 1-2 shift solenoid valve 16. Throttle relief spring Inspection ................ page K- 42 Inspection ................ page K-115 6. Oil strainer 17. Valve body cover 7. 2-3 shift solenoid valve 18. Inner strainer Inspection ................ page K- 42 19. Separator plate 8. Oil strainer 20. Orifice check valve 9. 3-4 shift solenoid valve 21. Orifice shock spring ................ Inspection ................ page K- 42 Inspection page K-115 10. Oil strainer 22. Lower valve body 11. Upper valve body Disassembly / Inspection / ................ Disassembly / Inspection / Assembly page K-120 Assembly ............... page K-116 Disassembly procedure 1. Remove the 3-2 control solenoid valve. 2. Remove the oil strainer and O-ring. 3. Remove the 1-2 shift solenoid valve. 4. Remove the oil strainer and O-ring. I I 45UOKX425 5. Remove the 2-3 shift solenoid valve. 6. Remove the oil strainer and O-ring. i/ Gartner Banana
Page 515 of 1708
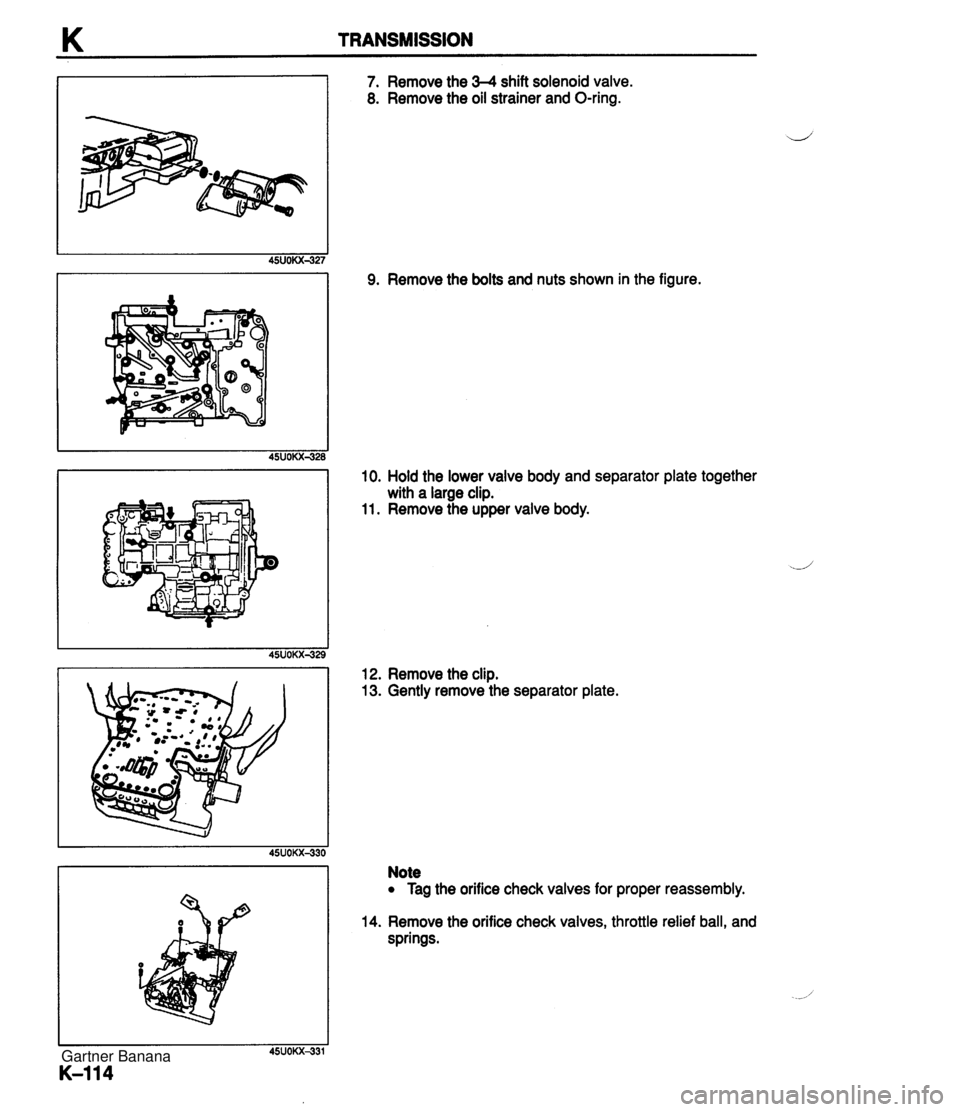
K TRANSMISSION 7. Remove the 34 shift solenoid valve. 8. Remove the oil strainer and O-ring. 9. Remove the bolts and nuts shown in the figure. 10. Hold the lower valve body and separator plate together with a large clip. 11. Remove the upper valve body. 12. Remove the clip. 13. Gently remove the separator plate. Note Tag the orifice check valves for proper reassembly. 14. Remove the orifice check valves, throttle relief ball, and springs. Gartner Banana
Page 516 of 1708

TRANSMISSION K r FREE LENGTH 1 -/i- WIRE DIAMETER 15. Gently remove the separator plate. Note Tag the orifice check valves for proper reassembly, 16. Remove the orifice check valves and springs. Inspection 1. Measure the spring specifications. 2. If not within specification, replace the spring(s). item Outer dia. Spring mm {in} Free length mm {in) 15.5 (0.61 0) 26.8 (1.055) Orifice check Throttle relief 5.0 (0.1 97) 6.5 I0.256) No. of coils 12.0 14.0 Wire dla. mm {in) 0.23 (0.009) 0.9 {0.035) Gartner Banana
Page 530 of 1708
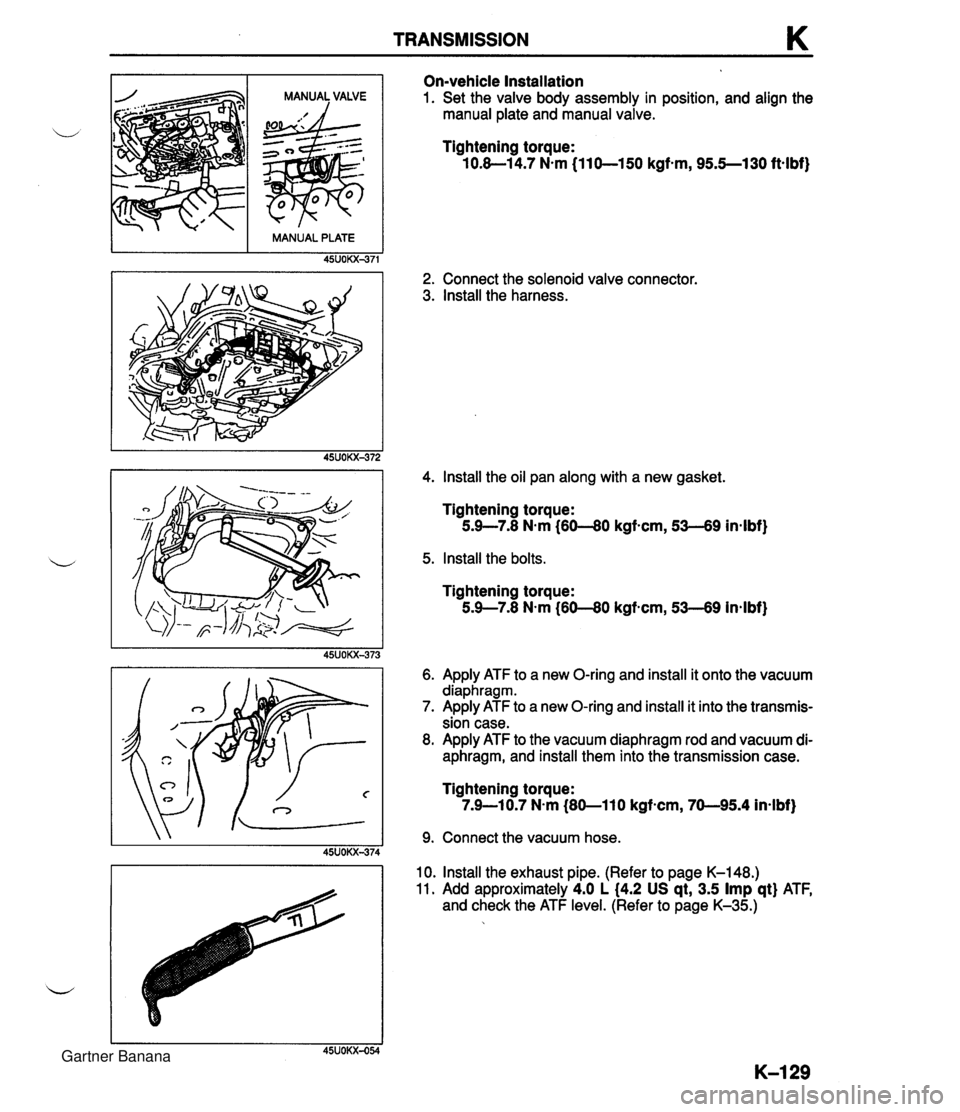
TRANSMISSION K On-vehicle Installation 1. Set the valve body assembly in position, and align the manual plate and manual valve. Tightening torque: 10.8-1 4.7 N.m (11 0-150 kgf-m, 95.5--130 ftalbf) 2. Connect the solenoid valve connector. 3. Install the harness. , . 4. Install the oil pan along with a new gasket. MANUAL PLATE Tightening torque: 5.9-7.8 N.m (60-80 kgf-cm, 53-69 in4bf) 45UOKX-371 5. Install the bolts. Tightening torque: 5.9-7.8 Nsm (60--80 kgf-cm, 53--69 inalbf) 6. Apply ATF to a new O-ring and install it onto the vacuum diaphragm. 7. Apply ATF to a new O-ring and install it into the transmis- sion case. 8. Apply ATF to the vacuum diaphragm rod and vacuum di- aphragm, and install them into the transmission case. Tightening torque: 7.9-1 0.7 N-m (80-1 10 kgf-cm, 70-95.4 in-lbf) 9. Connect the vacuum hose. 10. Install the exhaust pipe. (Refer to page K-148.) 11. Add approximately 4.0 L (4.2 US qt, 3.5 Imp qt) ATF, and check the ATF level. (Refer to page K-35.) Gartner Banana
Page 531 of 1708

K TRANSMISSION VACUUM DIAPHRAGM Preparation SST Note Excessive shift shock and improper shifting often indicate a vacuum diaphragm malfunction. 49 GO32 355 Adjustment gauge Warning When the transmission and the ATF are hot, they can cause burns to the skin. Allow the trans- mission and the ATF to cool before doing this procedure. For adjustment of vacuum diaphragm rod On-vehicle Removal 1. On level ground, jack up the vehicle and support it evenly on safety stands. 2. Remove the exhaust pipe. (Refer to page K-45.) 3. Loosen the oil pan mounting bolts, and drain approx. 1.0 L (1.1 US qt, 0.9 Imp qt) of ATF. L' 4. Disconnect the vacuum hose. 5. Remove the vacuum diaphragm, O-rings, and vacuum diaphragm rod. Inspection 1. Check that the vacuum diaphragm rod moves when vac- uum is applied to the vacuum diaphragm. 2. If not correct, replace the vacuum diaphragm. Gartner Banana
Page 541 of 1708
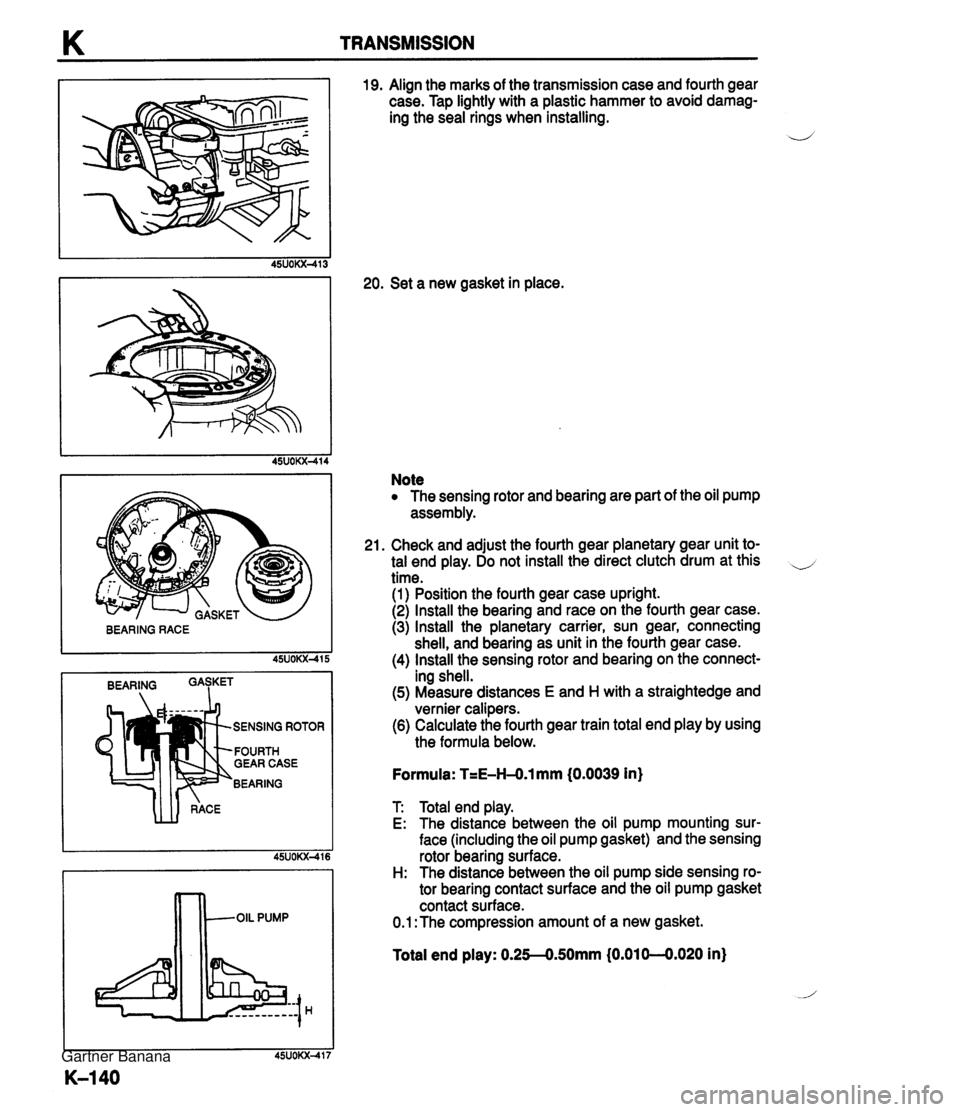
K TRANSMISSION I BEARING I SENSING ROTOR FOURTH GEAR CASE BEARING 19. Align the marks of the transmission case and fourth gear case. Tap lightly with a plastic hammer to avoid damag- ing the seal rings when installing. 20. Set a new gasket in place. Note The sensing rotor and bearing are part of the oil pump assembly. 21. Check and adjust the fourth gear planetary gear unit to- tal end play. Do not install the direct clutch drum at this .-, time. (1) Position the fourth gear case upright. (2) Install the bearing and race on the fourth gear case. (3) Install the planetary carrier, sun gear, connecting shell, and bearing as unit in the fourth gear case. (4) Install the sensing rotor and bearing on the connect- ing shell. (5) Measure distances E and H with a straightedge and vernier calipers. (6) Calculate the fourth gear train total end play by using the formula below. Formula: T=E-H-O.1 mm (0.0039 in) T Total end play. E: The distance between the oil pump mounting sur- face (including the oil pump gasket) and the sensing rotor bearing surface. H: The distance between the oil pump side sensing ro- tor bearing contact surface and the oil pump gasket contact surface. 0.1 :The compression amount of a new gasket. Total end play: 0.25-0.50mm (0.01 0-0.020 in} Gartner Banana
Page 542 of 1708
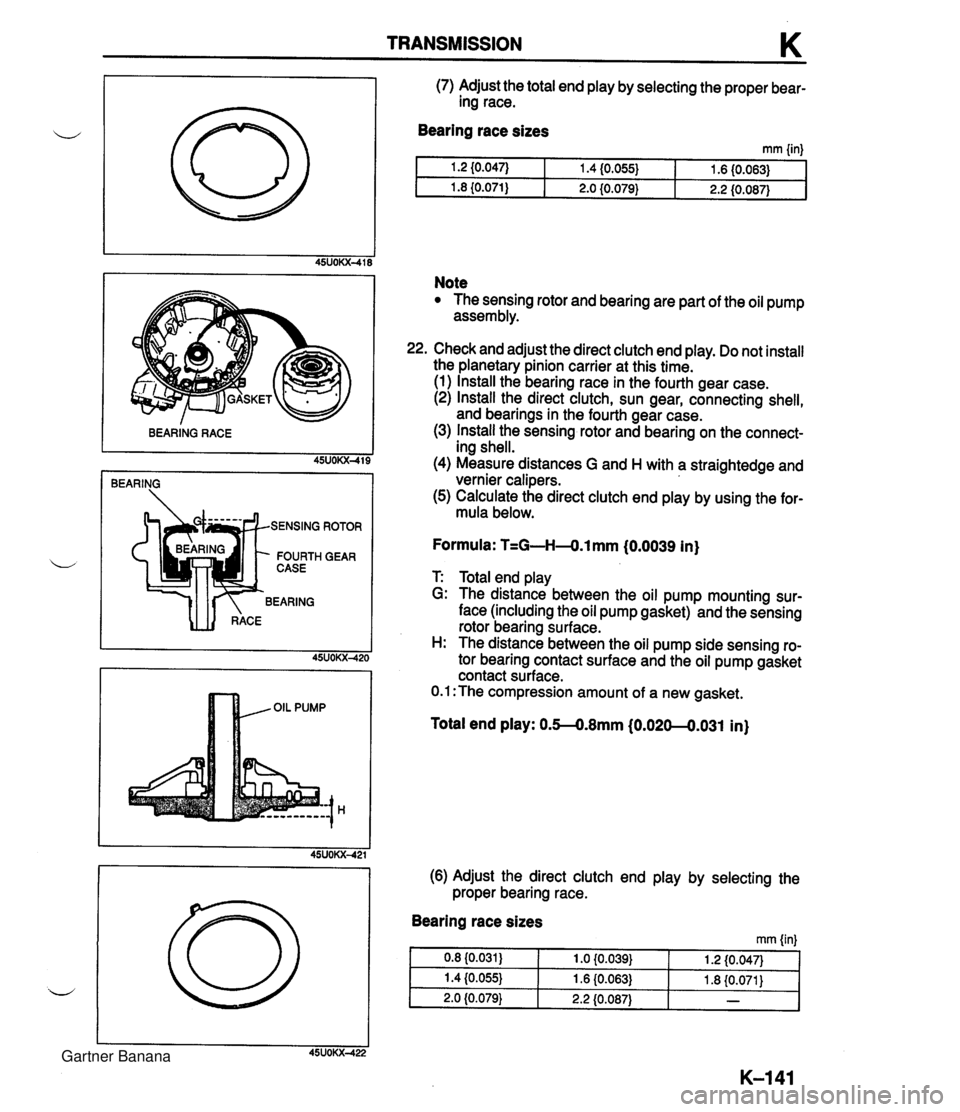
TRANSMISSION K BEARING RACE 45UOKX-419 ROTOR I GEAR (7) Adjust the total end play by selecting the proper bear- ing race. Bearing race sizes mm linl Note The sensing rotor and bearing are part of the oil pump assembly. Check and adjust the direct clutch end play. Do not install the planetary pinion carrier at this time. (1) Install the bearing race in the fourth gear case. (2) Install the direct clutch, sun gear, connecting shell, and bearings in the fourth gear case. (3) Install the sensing rotor and bearing on the connect- ing shell. (4) Measure distances G and H with a straightedge and vernier calipers. (5) Calculate the direct clutch end play by using the for- mula below. Formula: T=G-H4.l mm (0.0039 in) T: Total end play G: The distance between the oil pump mounting sur- face (including the oil pump gasket) and the sensing rotor bearing surface. H: The distance between the oil pump side sensing ro- tor bearing contact surface and the oil pump gasket contact surface. 0.1 :The compression amount of a new gasket. Total end play: 0.M.8mm (0.020--0.031 in) (6) Adjust the direct clutch end play by selecting the proper bearing race. Bearing race sizes rnm {in} Gartner Banana