cooling MAZDA MX-5 1994 Workshop Manual
[x] Cancel search | Manufacturer: MAZDA, Model Year: 1994, Model line: MX-5, Model: MAZDA MX-5 1994Pages: 1708, PDF Size: 82.34 MB
Page 10 of 1708

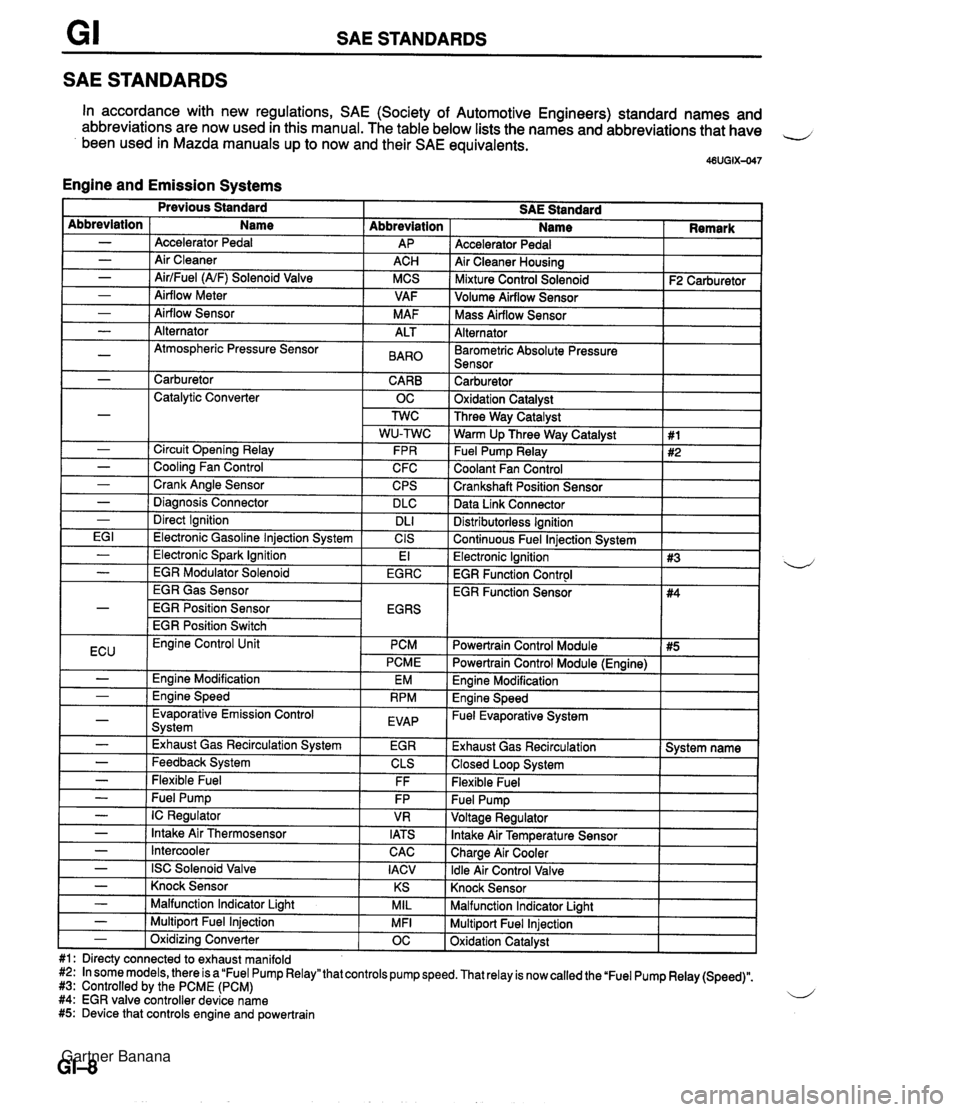
SAE STANDARDS SAE STANDARDS In accordance with new regulations, SAE (Society of Automotive Engineers) standard names and abbreviations are now used in this manual. The table below lists the names and abbreviations that have 4 been used in Mazda manuals up to now and their SAE equivalents. 46UGIX-047 Engine and Emission Systems Accelerator Pedal Air Cleaner Housing I Mixture Control Solenoid I F2 Carburetor ] Abbreviation AP ACH MCS VAF M AF Abbreviation - - - - - Volume Airflow Sensor I I Name Accelerator Pedal Air Cleaner AirlFuel (NF) Solenoid Valve Airflow Meter Airflow Sensor I Mass Airflow Sensor I I Alternator I I - - - -~ I Barometric Absolute Pressure I I Sensor I I Alternator Atmospheric Pressure Sensor I - 1 Carburetor CARB 1 Catalytic Converter OC ALT BAR0 Carburetor 1 Oxidation Catalvst I - - - - - I Direct Ignition I DL1 EG I 1 Electronic Gasoline lniection Svstem I CIS Three Way Catalyst Warm Up Three Way Catalyst Fuel Pump Relay Coolant Fan Control Crankshaft Position Sensor Data Link Connector Circuit Opening Relay Cooling Fan Control Crank Angle Sensor Diaanosis Connector Distributorless Ignition I Continuous Fuel lniection Svstem I 1 #1 #2 FPR C FC CPS DLC I Previous Standard SAE Standard Name I Remark - ( Electronic Spark Ignition EGR Gas Sensor EGR Position Sensor EGR Position Switch El Electronic Ignition 1 #3 EGR Function Control I - I EGR Modulator Solenoid I EGRC 4 ECU I Evaporative Emission Control Svstem I EVAP - - I -,--- I - I Exhaust Gas Recirculation System I EGR Engine Control Unit PCM PCME Engine Modification Ennine Speed EM RPM - - - - - Feedback System Flexible Fuel - I Intercooler Powertrain Control Module I #5 I EGR Function Sensor CLS FF Fuel Pump IC Regulator Intake Air Thermosensor CAC I Powertrain Control Module (Engine) I #4 FP VR IATS - I ISC Solenoid Valve I IACV Engine Modification I Engine Speed - Fuel Evaporative System I Exhaust Gas Recirculation 1 System name 1 Closed Loop System I Flexible Fuel Knock Sensor I I - ( Knock Sensor I KS I Malfunction Indicator Light I I - I Malfunction Indicator Liaht MIL Multiport Fuel Injection Oxidation Catalyst - 1 Multiport Fuel Injection #1: Directy connected to exhaust manifold #2: In some models, there is a "Fuel Pump Relay" that controls pump speed. That relay is now called the 'Fuel Pump Relay (Speed)". #3: Controlled by the PCME (PCM) 4 #4: EGR valve controller device name #5: Device that controls engine and powertrain MFI - 1 Oxidizina Converter OC Gartner Banana
Page 32 of 1708

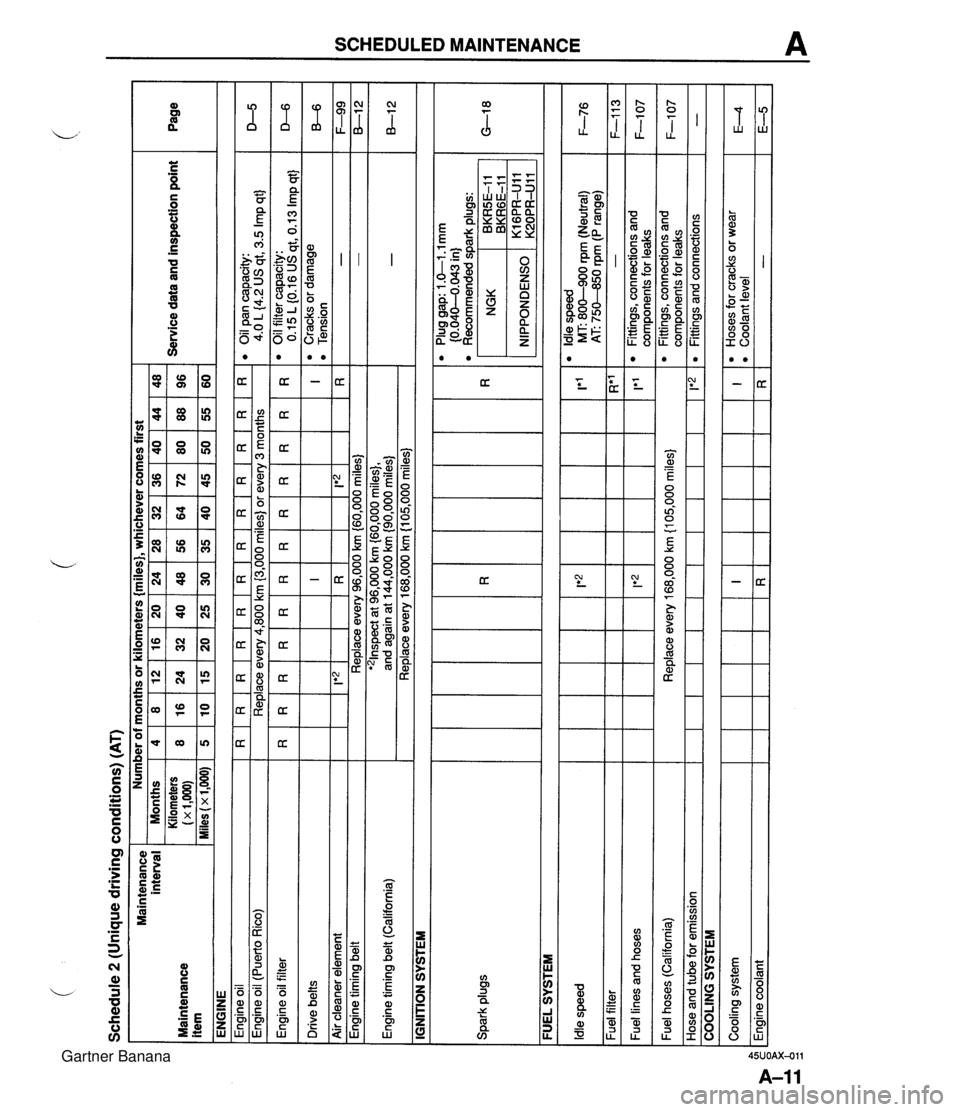
Schedule 2 (Unique driving conditions) (AT) Maintenance interval Maintenance item ENGINE Engine oil I R I R I R I R I R I R I R I R I R I R I R I R Engine oil filter Drive belts Number of months or kilometers {miles}, whichever comes first eoilpancapacity: 4.0 L {4.2 US qt, 3.5 Imp qt} Engine oil (Puerto Rico) I I IGNITION SYSTEM Service data and inspection point Months Kilometers (x 1,m) Miles (x 1,000) D-5 Replace every 4,800 km (3,000 miles) or every 3 months I I I I I I I I - - Engine timing belt (California) Spark plugs Page - - Air cleaner element I I FUEL SYSTEM 4 8 5 I F-99 8-1 2 -. . . '21nspect at 96,000 km {60,000 miles}, and again at 144,000 km {90,000 miles) Replace every 168,000 km (1 05,000 miles) - - R*' - 1'1 l Oilfiltercapacity: 0.15 L (0.16 US qt, 0.13 Imp qt} l Cracks or damage l Tension I R 1 Ie2 1 Engine timing belt ~ --- - - l Plug gap: 1 .&I -1 mm (0.040-4.043 in) l Recommended dark ~luas: 8 16 10 D-6 B-6 Replace every 96,000 km (60,000 miles) Idle speed Fuel filter Fuel lines and hoses NGK , BKRGE-11 BKR5E-I 1 12 24 15 IRI I*2 lt2 l Idle speed MT: 800-900 rpm (Neutral) 1 F-76 AT: 75M0 rpm (P range) 16 32 20 I!*'2 1 20 40 25 24 48 30 - Fittings, connections and com~onents for leaks 36 72 45 F-113 F-1 07 Fuel hoses (California) Hose and tube for emission 28 56 35 Cooling system Engine coolant 32 64 40 COOLING SYSTEM Replace every 168,000 km {I 05,000 miles} 1 1*2 48 96 60 40 80 50 I R 44 88 55 l Fittings, connections and components for leaks Fittings and connections F-1 07 - I R l Hoses for cracks or wear l Coolant level - E4 E-5 Gartner Banana
Page 35 of 1708

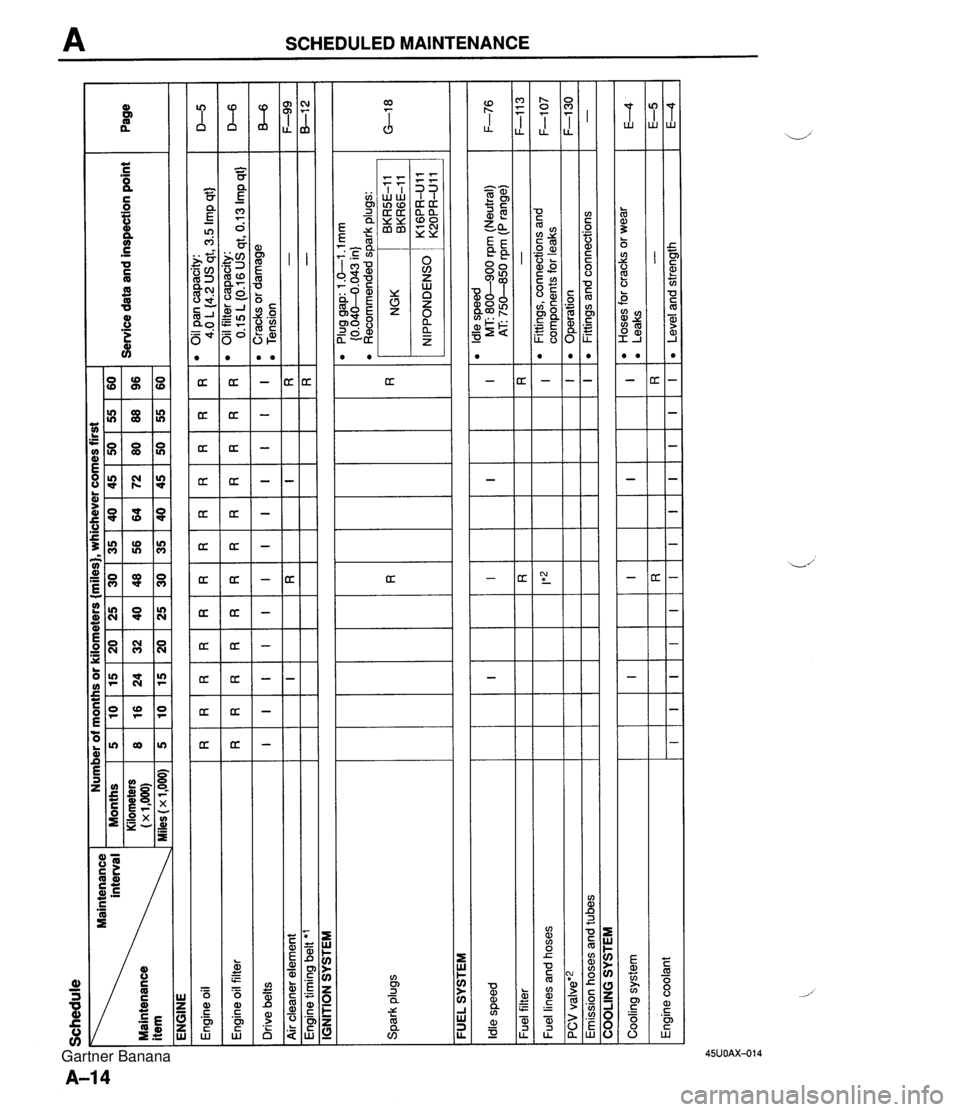
Schedule interval Maintenance ENGINE Number of months or kilometers {miles), whichever comes first I -. Months 5 10 15 20 25 30 35 40 45 50 55 60 Kilometers 8 16 24 32 40 48 56 64 72 80 88 96 - Service data and inspection point 1~1.000~ Page Spark plugs FUEL SYSTEM -- Plug gap: 1 .GI .l mm {0.04M.043 in) l Recommended spark plugs: D-5 D-6 B-6 F-99 8-1 2 IGNITION SYSTEM R I I Engine oil Engine oil filter Drive belts Air cleaner element Engine timing belt 'l R I R I F-76 F-1 1 3 F-107 F-I30 - Idle speed Fuel filter Fuel lines and hoses PCV valve'2 Emission hoses and tubes R I COOLING SYSTEM I Cooling system Engine coolant R I R I I E4 E-5 E4 I R I R I R I R I*z I l Hoses for cracks or wear l Leaks - Level and strength I R RR I R R R I I R I OilPancapacity: 4.0 L (4.2 US qt, 3.5 Imp qt) 0 Oil filter capacity: 0.15L(0.16USqt,0.13Impqt) 'Cracksordamage 0 Tension - - R I I I I I R I l ldle speed MT: 800-900 rpm (Neutral) AT 750-850 rpm (P range) - l Fittings, connections and components for leaks Operation Fittings and connections I I R I I I I I I I I I R I Gartner Banana
Page 41 of 1708

B TROUBLESHOOTING GUIDE Problem nsufficlent power 4bnormal combustion Engine noise Possible Cause Insufficient compression Malfunction of HLA' Compression leakage from valve seat Seized valve stem Weak or broken valve spring Failed cylinder head gasket Cracked or distorted cylinder head Stuck, damaged, or worn piston ring Cracked or worn piston Malfunction of fuel system Malfunction of ignition system Others Slipping clutch Dragging brakes Wrong size tires Malfunction of engine-related components Malfunction of HLA* Stuck or burned valve Weak or broken valve spring Carbon accumulation in combustion chamber Malfunction of fuel system Malfunction of ignition system Crankshaft- or bearing-related parts Excessive main bearing oil clearance Main bearing seized or heat-damaged Excessive crankshaft end play Excessive connecting rod bearing oil clearance Connecting rod bearing seized or heat-damaged Piston-related parts Worn cylinder Worn piston or piston pin Seized piston Damaged piston ring Bent connecting rod Valves or timing-related parts Malfunction of HLA' Broken valve spring Excessive valve auide clearance Malfunction of cooling system Malfunction of fuel system Others Malfunction of water pump bearing Improper drive belt tension Malfunction of alternator bearing Exhaust gas leakage Malfunction of timina belt tensioner Remedy Replace Repair Replace Replace Replace Replace Replace Replace Refer to section F Refer to section G Refer to section H Refer to section P Refer to section Q Replace Replace Replace Eliminate carbon Refer to section F Refer to section G Replace or repair Replace Replace or repair Replace or repair Replace Replace or repair Replace Replace Replace Replace Replace Replace Replace Refer to section E Refer to section F Refer to section E Adjust Refer to section G Refer to section F Replace Page Tappet noise may occur if the engine has set idle for an extended period. The noise should dissipate after the engine has reached normal operating temperature. (HLA troubleshooting: Refer to page 6-8) Gartner Banana
Page 42 of 1708

ENGINE TUNE-UP ENGINE TUNE-UP PREPARATION SST I 49 9200 020 Tension gauge, V-ribbed belt For inspection of ignition timing and idle speed For inspection of drive belt tension ENGINE OIL 49 801 9 9AO System selector Warning Continuous exposure with USED engine oil has caused skin cancer in laboratory mice. Protect your skin by washing with soap and water im- mediately after this work. Inspection 1. Be sure the vehicle is on level ground. 2. Warm up the engine to normal operating temperature and stop it. 3. Wait for five minutes. 4. Remove the dipstick and check the oil level and condi- tion. 5. Add or replace oil if necessary. Note The distance between the L and F marks on the dip- stick represents 0.8 L (0.85 US qt, 0.70 Imp qt}. ENGINE COOLANT Inspection Coolant level (engine cold) Warning Removing the radiator cap or the coolant filler cap while the engine is running, or when the engine and radiator are hot is dangerous. Scalding cool- ant and steam can shoot out and cause serious in- jury. It can also damage the engine and cooling system. Turn off the engine and wait until it is cool. Even then, be very careful when removing the cap. Wrap a thick cloth around it and slowly turn it counterclockwise to the first stop. Step back while the pressure escapes. When you're sure all the pressure is gone, press down on the cap-still using a cloth - turn it, and remove it. 1. Verify that the coolant level is near the radiator filler neck. 2. Verify that the coolant level in the coolant reservoir is be- tween the FULL and LOW marks. 3. Add coolant if necessary. Gartner Banana
Page 137 of 1708

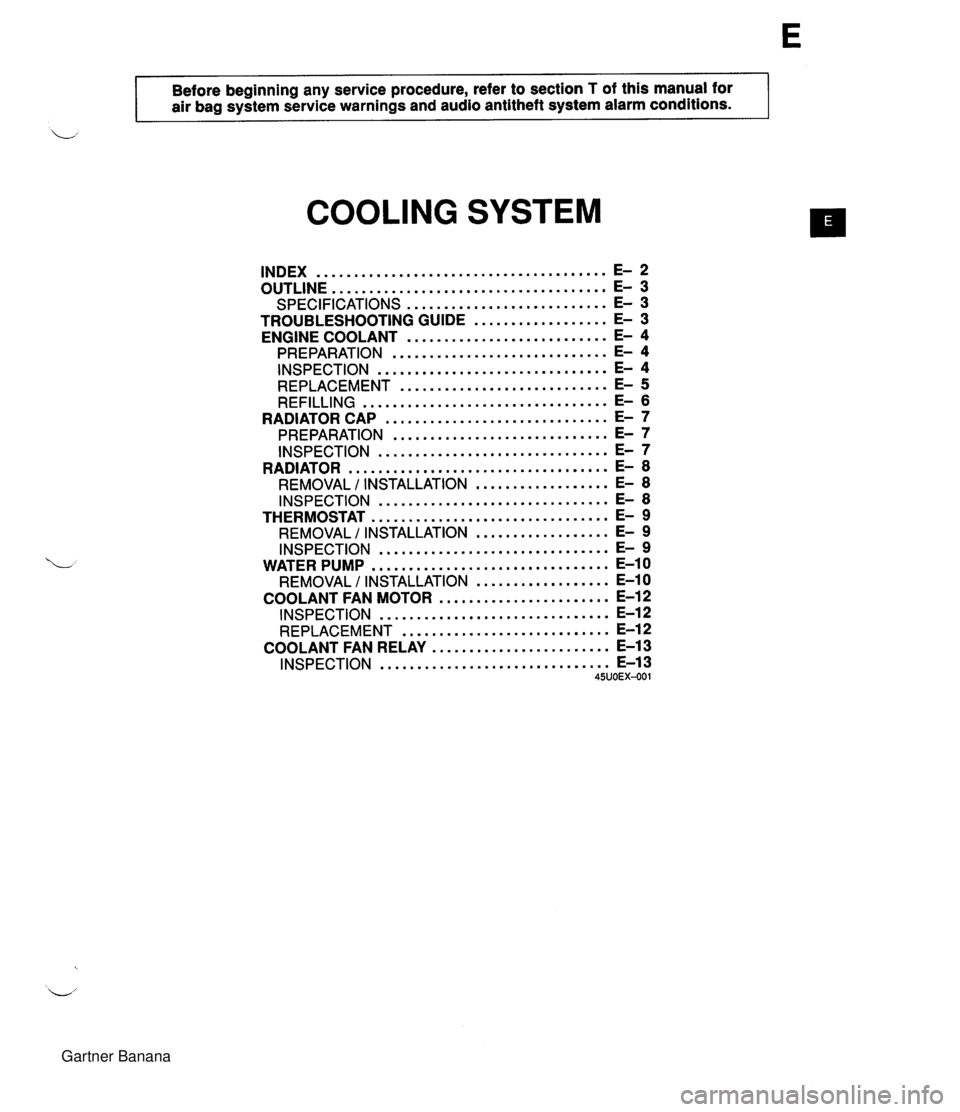
- . - . Before beginning any service procedure, refer to section T of this manual for air bag system service warnings and audio antitheft system alarm conditions . COOLING SYSTEM INDEX ....................................... E- 2 OUTLINE ..................................... E- 3 SPECIFICATIONS ........................... E- 3 TROUBLESHOOTING GUIDE .................. E- 3 ENGINE COOLANT ........................... E- 4 PREPARATION ............................. E- 4 INSPECTION ............................... E- 4 REPLACEMENT ............................ E- 5 REFILLING ................................. E- 6 .............................. RADIATOR CAP E- 7 ............................. PREPARATION E- 7 INSPECTION ............................... E- 7 RADIATOR ................................... E- 8 REMOVAL I INSTALLATION .................. E- 8 INSPECTION ............................... E- 8 THERMOSTAT ................................ E- 9 REMOVAL I INSTALLATION .................. E- 9 INSPECTION ............................... E- 9 WATER PUMP ................................ E-10 REMOVAL / INSTALLATION .................. E-10 COOLANT FAN MOTOR ....................... E-12 INSPECTION ............................... E-12 REPLACEMENT ............................ E-12 ........................ COOLANT FAN RELAY E-13 ............................... INSPECTION E-13 45UOEX-001 Gartner Banana
Page 139 of 1708

OUTLINE, TROUBLESHOOTING GUIDE OUTLINE SPECIFICATIONS Cooling system I Water-cooled, forced circulation I - - Engine Item - Water pump BP DOHC Coolant capacity L {US qt, Imp qt) TY ~e Thermostat 6.0 {6.3,5.3} Centrifugal, V-ribbed belt driven Radiator - Coolant fan Opening temperature Water seal TY pe Main: 86.5-89.5 {l 88-1 93) Sub : 83.5-86.5 (1 83-1 87) Unified mechanical seal Wax, two-stage I Full-open temperature "C ("F) 100 {212} 1 Full-open lift mm {in} Main: 8.0 (0.31) min. Sub : 1.5 (0.06) min. TY pe Corrugated fin Cap valve opening pressure kPa {kgf/cm2, psi} 1 TROUBLESHOOTING GUIDE Problem Electric 320 {l 2.6) 5 120-1 2 below 7.7 Type 45UOEX-003 Blade Motor Coolant level insufficient 1 Add Outer diameter mm {in) Number Capacity W-V Current A Possible Cause Coolant leakage 1 Repair Remedy Radiator fins clogged ( Clean Radiator cap malfunction 1 Replace Coolant fan malfunction 1 Replace Thermostat malfunction 1 Replace Water passage clogged 1 Clean Water pump malfunction Impurities in coolant Replace Replace Gartner Banana
Page 140 of 1708

ENGINE COOLANT ENGINE COOLANT PREPARATION SST INSPECTION 49 9200 145 Adapter set, radiator cap tester Warning Removing the radiator cap or the coolant drain plug while the engine is running, or when the engine and radiator are hot is dangerous. Scalding coolant and steam may shoot out and cause serious injury. It may also damage the engine and cooling system. Turn off the engine and wait until it is cool. Even then, be very careful when removing the cap. Wrap a thick cloth around it and slowly turn it counterclockwise to the first stop. Step back while the pressure escapes. When you're sure all the pressure is gone, press down on the cap - still using a cloth -turn it, andremove it. For inspection of cooling system pressure Coolant Level (Engine Cold) 1. Verify that the coolant level is near the radiator filler neck. 2. Verify that the coolant level in the coolant reservoir is be- tween the FULL and LOW marks. Add coolant if neces- sary. u Note The distance between the LOW and FULL marks on the coolant reservoir represents 4.5 L (4.8 US qt, 4.0 Imp qt). Coolant Quality 1. Verify that there is no buildup of rust or scale around the radiator cap or radiator filler neck. 2. Verify that coolant is free of oil. Replace the coolant if necessary. 49 9200 146 Adapter A (Part of 49 9200 145) Coolant Leakage 1. Connect a radiator tester (commercially available) and the SST to the radiator filler neck. 2. Apply 103 kPa (1.05 kgf/cm2, 14.9 psi} pressure to the system. 3. Verify that the pressure is held. If not, check for coolant leakage. For inspection of cooling system pressure / V Caution Apply more than 103 kPa (1.05 kgf/cm2, 14.9 psi) can damage the hoses, fittings, and other compo- nents, and cause leaks. Gartner Banana
Page 141 of 1708

ENGINE COOLANT COOLANT PROTECTION SPECIFIC GRAVITY COOLANT TEMPERATURE "C (OF) 45UOEX-00 Coolant Protection Caution The engine has aluminum parts that can be dam- aged by alcohol or methanol antifreeze. Do not use alcohol or methanol in the cooling system. Use only ethylene-glycol-based coolant. Use only soft (demineralized) water in the coolant mixture. Water that contains minerals will cut down on the coolant's effectiveness. 1. Measure the coolant temperature and specific gravity with a thermometer and a hydrometer. 2. Determine the coolant protection by referring to the graph shown. If the coolant protection is not proper, add water or cool- ant. Antifreeze solution mixture percentage I Coolant protection I I Above -1 6°C (3°F) 1 65 1 35 1 1.054 1 REPLACEMENT Draining Above -26°C {-15°F) Above -40°C I-40°F} Warning Removing the radiator cap or the coolant drain plug while the engine is running, or when the en- gine and radiator are hot is dangerous. Scalding coolant and steam may shoot out and cause seri- ous injury. If may also damage the engine and cooling system. Turn off the engine and wait until it is cool. Even then, be very careful when removing the cap. Wrap a thick cloth around it and slowly turn it counterclockwise to the first stop. Step back while the pressure escapes. When you're sure all the pressure is gone, press down on the cap-still using a cloth - turn it, and remove it. 1. Remove the radiator cap and loosen the drain plug. 2. Drain the coolant into a container. 3. Flush the cooling system with water until all traces of col- or are gone, then let the system drain completely. 4. Install the drain plug. 55 45 45 55 1.066 1.078 Gartner Banana
Page 142 of 1708

E ENGINE COOLANT REFILLING Use the proper amount and mixture of ethylene-glycol based coolant. (Refer to Coolant Protection, page E-5.) 1. Slowly pour the coolant into the radiator up to the coolant filler port. Filling pace: 1.0 L (1.1 US qt, 0.9 Imp qt}/min. max 2. Fill the coolant reservoir up to the FULL level. 3. Fully install the radiator cap. 4. Start the engine and let it idle until it warms up. 5. If the temperature increases beyond normal, there is ex- cessive air in the system. Stop the engine and allow it to cool; then repeat step 1-3. 6. Run the engine at 2,200-2,800 rpm for five seconds; re- peat several times. 7. Stop the engine and allow it to cool. Warning Remove the radiator cap or the coolant filler cap while the engine is running, or when the engine and radiator are hot is dangerous. Scalding cool- ant and steam may shoot out and cause serious injury. It may also damage the engine and cooling system. Turn off the engine and wait until it is cool. Even then, be very careful when removing the cap. Wrap a thick cloth around it and slowly turn it counterclockwise to the first stop. Step back while the pressure escapes. When you're sure all the pressure is gone, press ii down on the cap -still using a cloth - turn it, and remove it. 8. Remove the radiator cap and check the coolant level. If the coolant level has dropped, repeat the procedure from step 1. Gartner Banana