engine MAZDA PROTEGE 1992 Workshop Manual
[x] Cancel search | Manufacturer: MAZDA, Model Year: 1992, Model line: PROTEGE, Model: MAZDA PROTEGE 1992Pages: 1164, PDF Size: 81.9 MB
Page 679 of 1164
CONVENTIONALBRAKESYSTEM P
1 SUOPX-001
03UOPX-03
0
o3uoPx-os
0
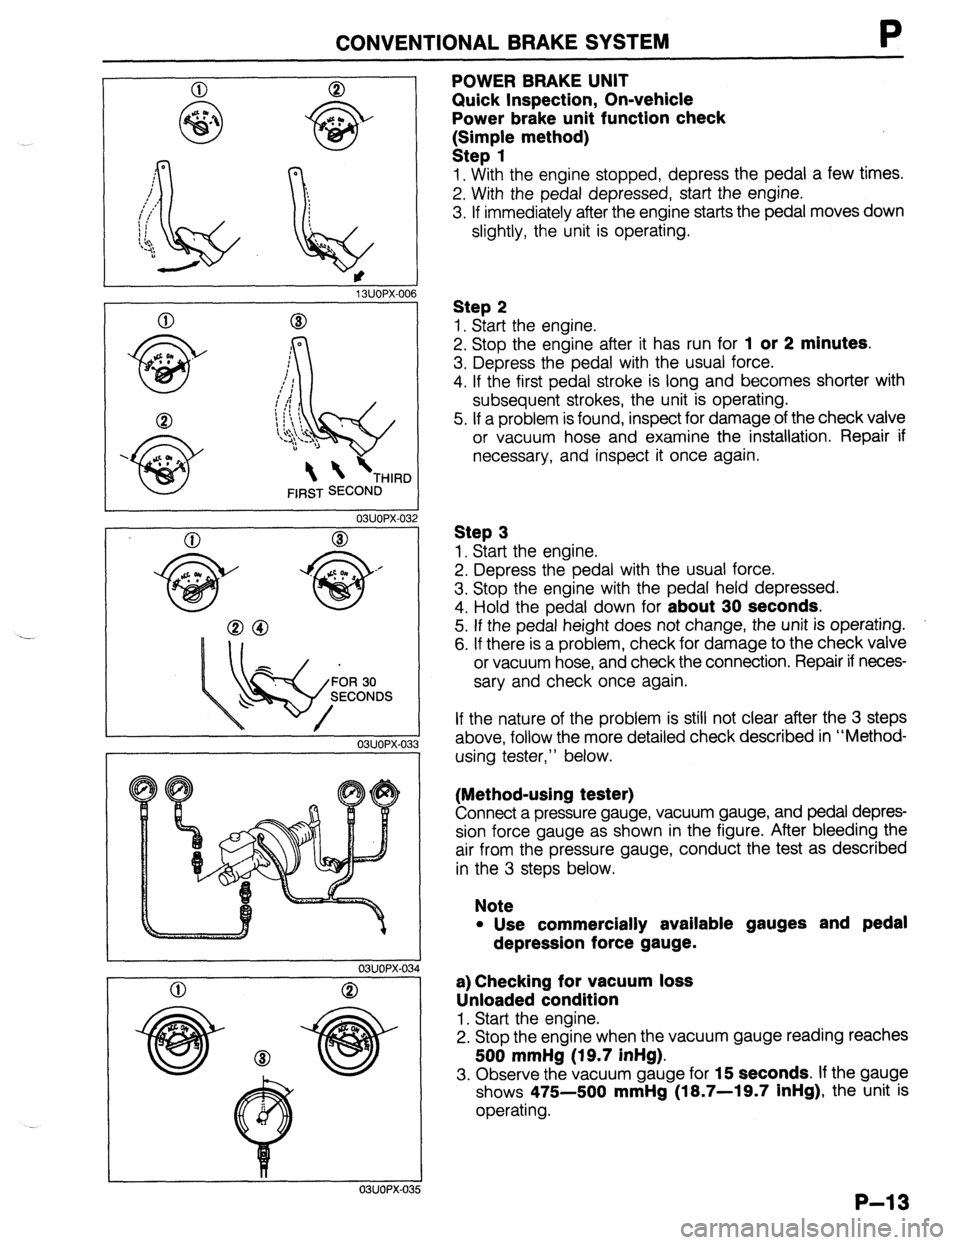
POWER BRAKE UNIT
Quick Inspection, On-vehicle
Power brake unit function check
k:;;p{e method)
1. With the engine stopped, depress the pedal a few times.
2. With the pedal depressed, start the engine.
3. If immediately after the engine starts the pedal moves down
slightly, the unit is operating.
Step 2
1. Start the engine.
2. Stop the engine after it has run for
1 or 2 minutes.
3. Depress the pedal with the usual force.
4. If the first pedal stroke is long and becomes shorter with
subsequent strokes, the unit is operating.
5. If a problem is found, inspect for damage of the check valve
or vacuum hose and examine the installation. Repair if
necessary, and inspect it once again.
Step 3
1. Start the engine.
2. Depress the pedal with the usual force.
3. Stop the engine with the pedal held depressed.
4. Hold the pedal down for
about 30 seconds.
5. If the pedal height does not change, the unit is operating.
6. If there is a problem, check for damage to the check valve
or vacuum hose, and check the connection. Repair if neces-
sary and check once again.
If the nature of the problem is still not clear after the 3 steps
above, follow the more detailed check described in “Method-
using tester,” below.
(Method-using tester)
Connect a pressure gauge, vacuum gauge, and pedal depres-
sion force gauge as shown in the figure. After bleeding the
air from the pressure gauge, conduct the test as described
in the 3 steps below.
Note
l Use commercially available gauges and pedal
depression force gauge.
a) Checking for vacuum loss
Unloaded condition
1. Start the engine.
2. Stop the engine when the vacuum gauge reading reaches
500 mmHg (19.7 inHg).
3. Observe the vacuum gauge for 15 seconds. If the gauge
shows 475-500
mmHg (18.7-19.7 inHg), the unit is
operating.
P-13
Page 680 of 1164

P CONVENTIONAL BRAKE SYSTEM
0 8
500 mmHg
(19.7 inHg)
96 N (20 kg, 44 lb)
03UOPX-03
03UOPX-03
03UOPX-031
Loaded condition
1. Start the engine.
2. Depress the brake pedal with a force of 196 N (20 kg, 44
lb).
3. With the brake pedal depressed, stop the engine when the
vacuum gauge reading reaches 500 mmHg (19.7 inHg).
4. Observe the vacuum gauge for 15 seconds. If the gauge
shows 475-500 mmHg (18.7-19.7 inHg), the unit is
operating.
b) Checking for hydraulic pressure
1. If with the engine stopped (vacuum 0 mmHg) the fluid pres-
sure is within specification, the unit is operating.
Pedal force Fluid pressure
196 N (20 kg, 44 lb) 1 1,177 kPa (12 kg/cm2, 171 psi) min
2. Start the engine. Depress the brake pedal when the vacu-
um reaches 500 mmHg (19.7 inHg). If the fluid pressure
is within specification, the unit is operating.
Pedal force Fluid pressure
196 N (20 kg, 44 lb) 7,063 kPa (72 kg/cm’, 1,024 psi)
P-14
Page 681 of 1164
CONVENTIONAL BRAKE SYSTEM P
03UOPX-039
ARROW MARK
23UOPX-Old
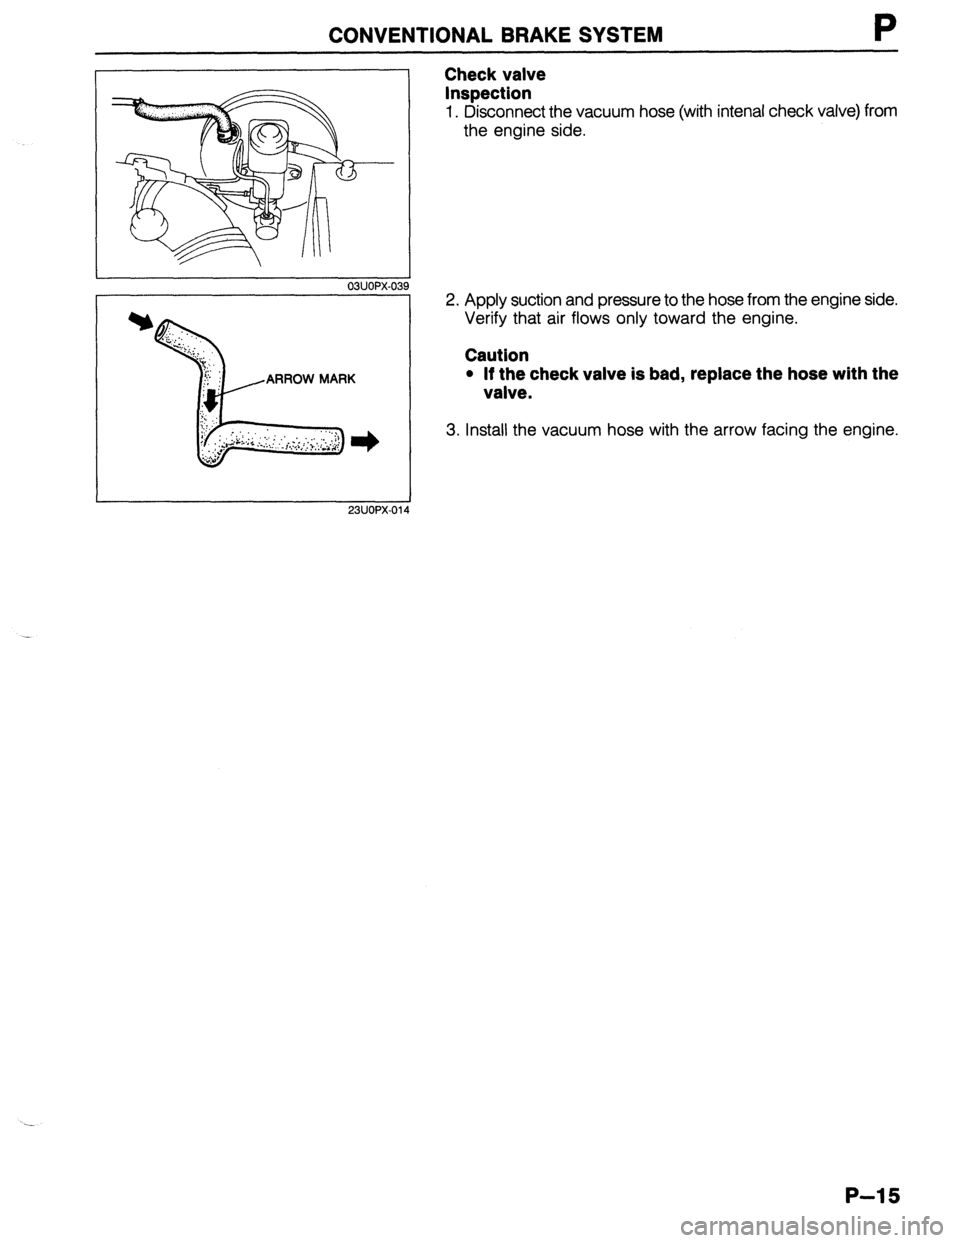
Check valve
Inspection
1. Disconnect the vacuum hose (with intenal check valve) from
the engine side.
2. Apply suction and pressure to the hose from the engine side.
Verify that air flows only toward the engine.
Caution
l If the check valve is bad, replace the hose with the
valve.
3. Install the vacuum hose with the arrow facing the engine.
P-15
Page 697 of 1164
PARKING BRAKE SYSTEM
PARKING BRAKE SYSTEM
TROUBLESHOOTING GUIDE
Problem
Brakes do not
release
Parking brake does
not hold well Possible cause
Improper return of parking brake cable or improper ad-
justment
Excessive lever stroke
Brake cable stuck or damaged
Brake fluid or oil on pad or lining
Hardening of pad / lining surface or poor contact Remedy Repair or adjust
Adjust
Repair or replace
Clean or replace
Grind or replace Page P-32
P-31
P-32
P-i,28
ONOPX-080
PARKING BRAKE SHOE
Removal / Inspection / Installation
Disc brake
Removal and Installation (Refer to page P-23)
Inspection (Refer to page P-25)
Drum brake
Removal and Installation (Refer to page P-28)
Inspection (Refer to page P-29)
03u0Px-081
13UOPX-021
03UOPX-08
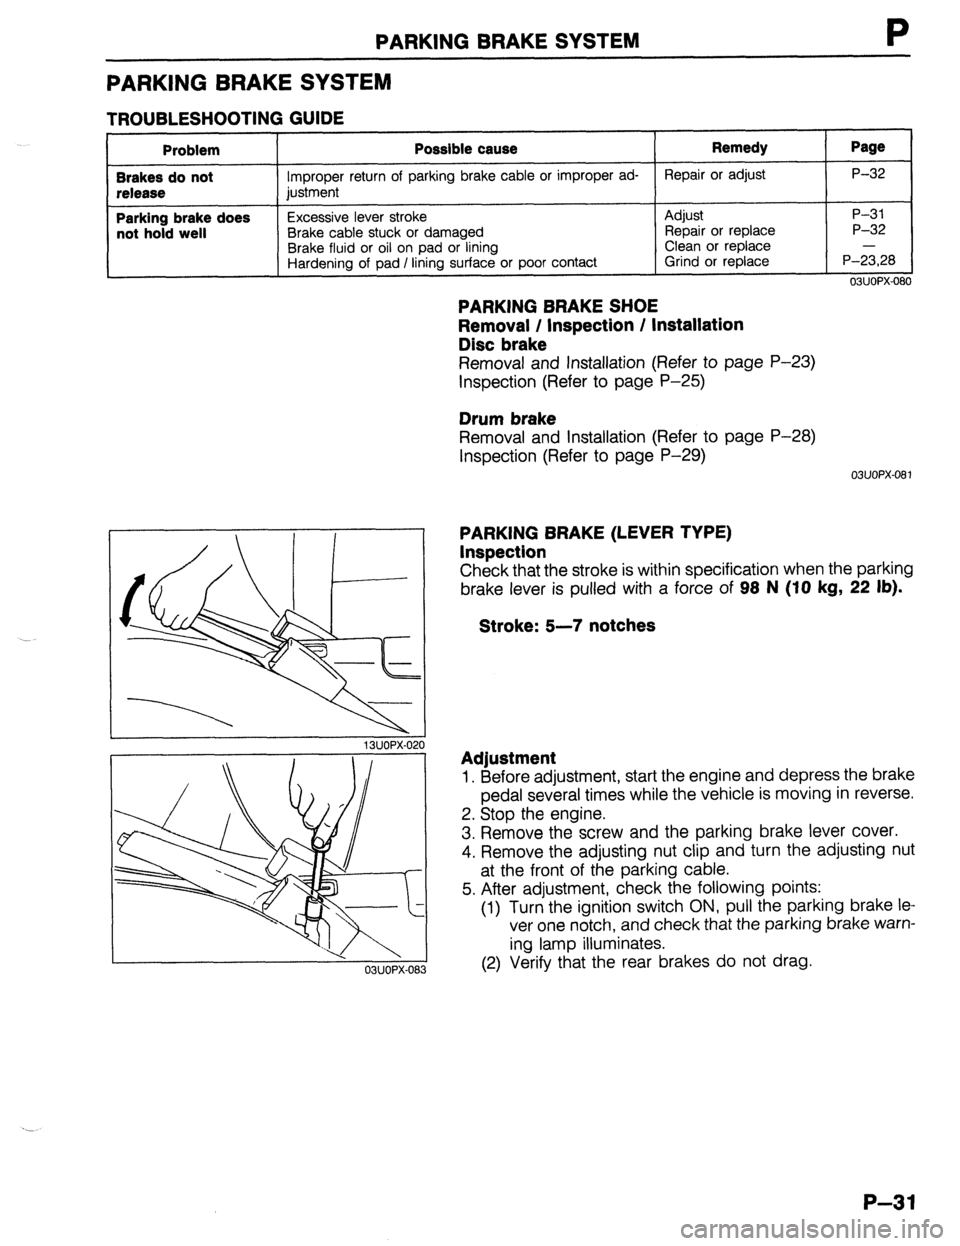
PARKING BRAKE (LEVER TYPE)
Inspection
Check that the stroke is within specification when the parking
brake lever is pulled with a force of 98 N (IO
kg, 22 lb).
Stroke: 5-7 notches
Adjustment
1. Before adjustment, start the engine and depress the brake
pedal several times while the vehicle is moving in reverse.
2. Stop the engine.
3. Remove the screw and the parking brake lever cover.
4. Remove the adjusting nut clip and turn the adjusting nut
at the front of the parking cable.
5. After adjustment, check the following points:
(1) Turn the ignition switch ON, pull the parking brake le
ver one notch, and check that the parking brake warn-
ing lamp illuminates.
(2) Verify that the rear brakes do not drag.
P-31
Page 702 of 1164
Q OUTLINE, TROUBLESHOOTING GUIDE
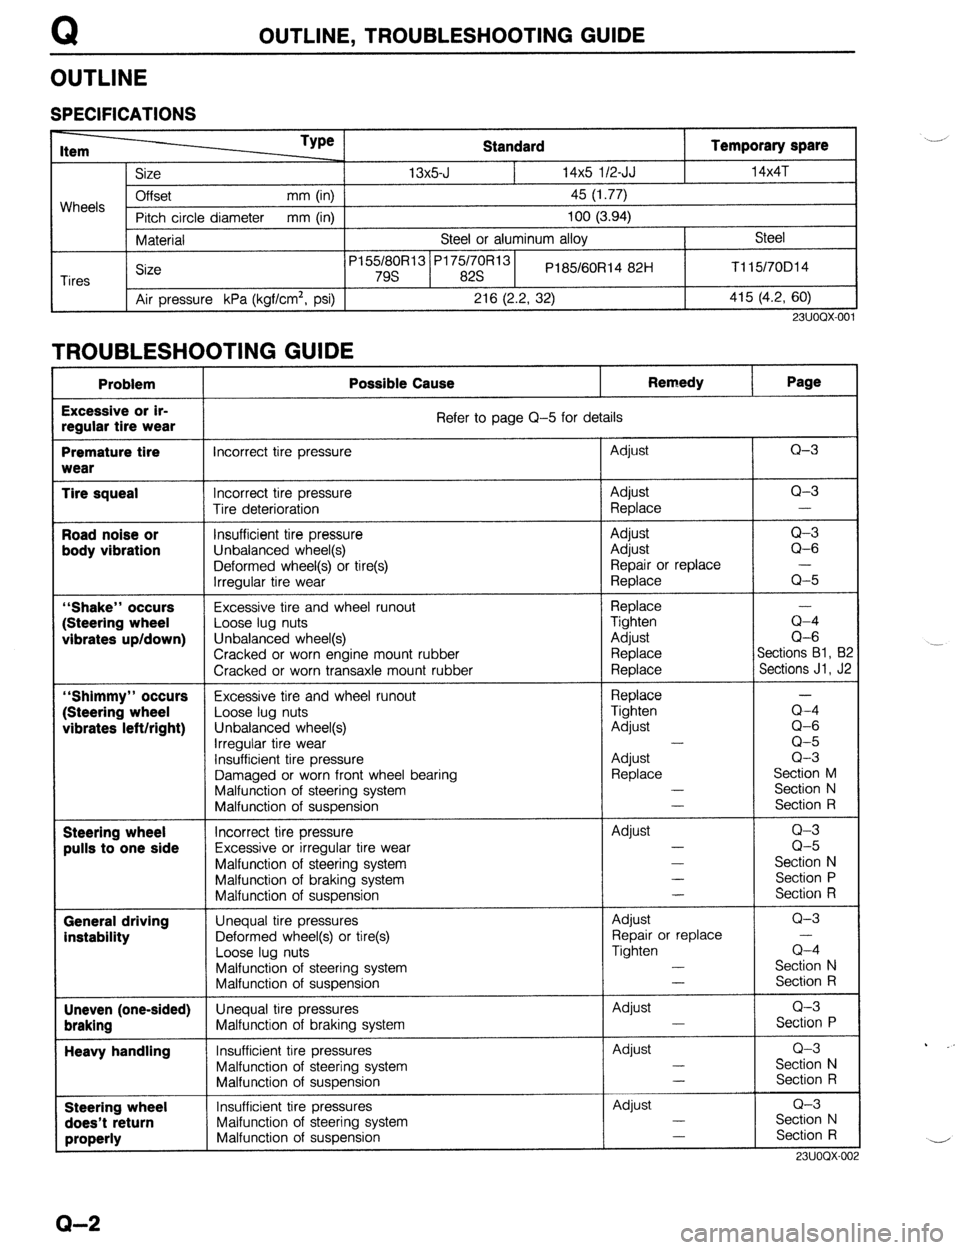
OUTLINE
SPECIFICATIONS
Wheels
Tires Standard Temporary spare __/
Size 13x5-J 14x5 l/2-JJ l4x4T
Offset mm (in)
45 (1.77)
Pitch circle diameter mm (in)
100 (3.94)
Material Steel or aluminum alloy Steel
Size P155/80R13’P175/70R131
PI 85/60Rl4 82H Tll5/70D14
79s 82s
Air pressure kPa (kgflcm’, psi)
216 (2.2, 32) 415 (4.2, 60)
23UOQX-001
TROUBLESHOOTING GUIDE _____ -_- ____ _ __.- -. -.-.--
Problem Possible Cause Remedy Page
Excessive or ir-
regular tire wear Refer to page Q-5 for details
Premature tire incorrect tire pressure Adjust Q-3
wear
Tire squeal Incorrect tire pressure Adjust Q-3
Tire deterioration Replace -
Road noise or Insufficient tire pressure Adjust Q-3
body vibration
Unbalanced wheel(s) Adjust Q-6
Deformed wheel(s) or tire(s) Repair or replace
Irregular tire wear Replace Q-5
“Shake” occurs Excessive tire and wheel runout
Replace
(Steering wheel Loose lug nuts
Tighten a-4
vibrates up/down) Unbalanced wheel(s)
Adjust Q-6
Cracked or worn engine mount rubber
Replace Sections Bl, B:
Cracked or worn transaxle mount rubber
Replace Sections Jl, J2
“Shimmy” occurs Excessive tire and wheel runout
Replace
(Steering wheel
Loose lug nuts Tighten a-4
vibrates left/right) Unbalanced wheel(s)
Adjust Q-6
irregular tire wear -
Q-5
insufficient tire pressure
Adjust Q-3
Damaged or worn front wheel bearing
Replace Section M
Malfunction of steering system -
Section N
Malfunction of suspension -
Section R
Steering wheel Incorrect tire pressure Adjust Q-3
pulls to one side Excessive or irregular tire wear -
Q-5
Malfunction of steering system -
Section N
Malfunction of braking system -
Section P
Malfunction of suspension -
Section R
General driving Unequal tire pressures Adjust Q-3
instability Deformed wheel(s) or tire(s) Repair or replace
Loose lug nuts Tighten Q-4
Malfunction of steering system -
Section N
Malfunction of suspension -
Section R
Uneven (one-sided) Unequal tire pressures
Adjust Q-3
braking Malfunction of braking system -
Section P
Heavy handling Insufficient tire pressures Adjust Q-3
Malfunction of steering system -
Section N
Malfunction of suspension -
Section R
Steering wheel Insufficient tire pressures Adjust Q-3
does’t return Malfunction of steering system -
Section N
properly Malfunction of suspension -
Section R
731100x-or . _. -,
Q-2
Page 710 of 1164
R OUTLINE
OUTLINE
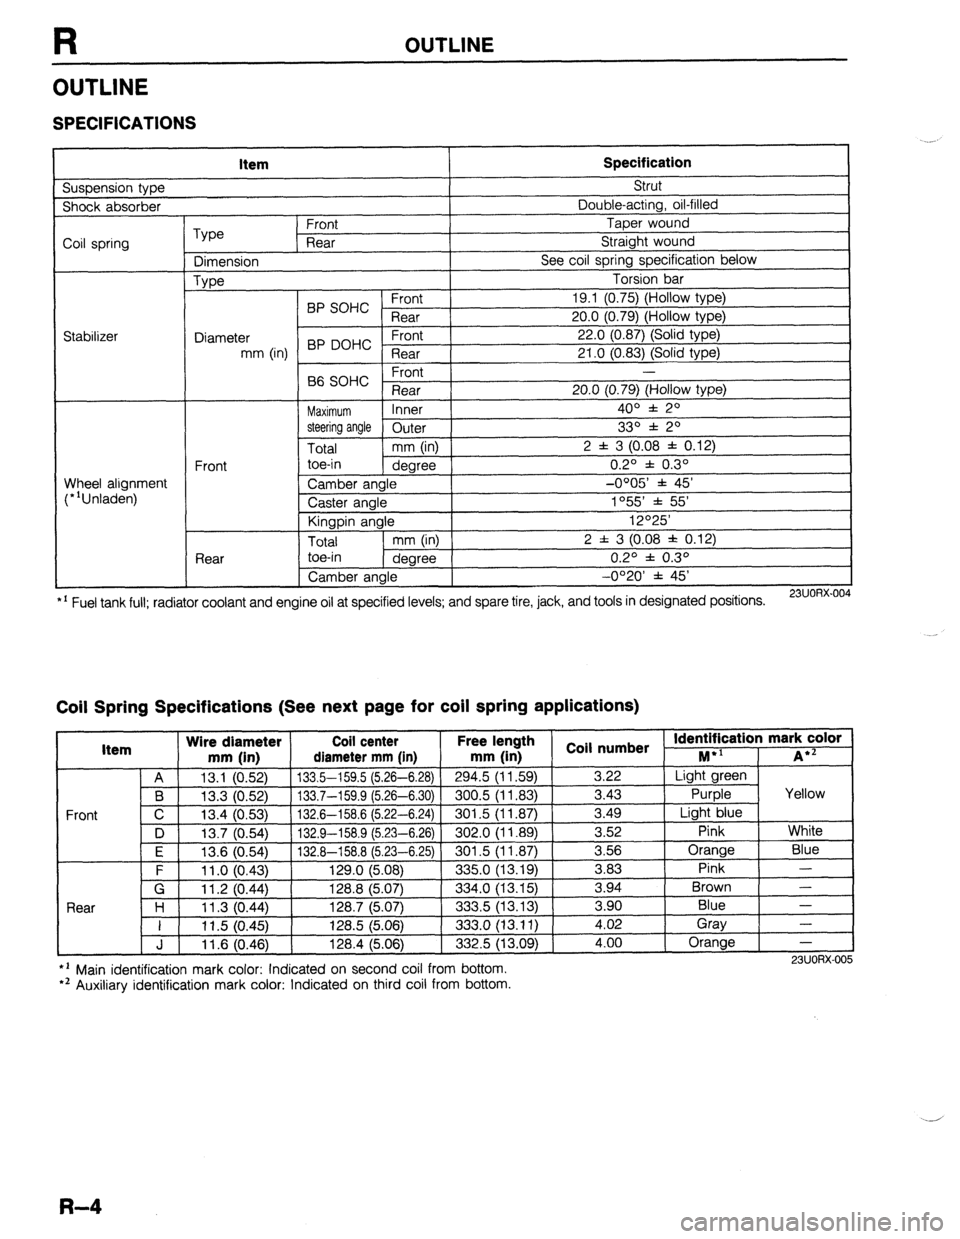
SPECIFICATIONS
Suspension type Item Specification Strut
Shock absorber Double-acting, oil-filled
Coil spring
Stabilizer Type Front Taper wound
Rear Straight wound
Dimension See coil spring specification below
Type Torsion bar
BP SOHC Front 19.1 (0.75) (Hollow type)
Rear 20.0 (0.79) (Hollow type)
Diameter 22.0 (0.87) (Solid type)
mm (in) BP DOHC ;eTrt
21 .O (0.83) (Solid type)
P ,
-
66 SOHC rronr
Rear 20.0 (0.79) (Hollow type)
Maximum Inner 400 f 20
steering angle
Outer 330 f 20
Total mm (in) 2 f 3 (0.08 f 0.12)
Front toe-in
degree 0.2O f 0.3O
Wheel alignment
(*‘Unladen) Camber angle -0005’ f 45’
Caster angle 1055 * 55’
Kingpin angle 12O25’
Total mm (in) 2 f 3 (0.08 * 0.12)
Rear toe-in
degree 0.2O f 0.3O
Camber angle -0°20’ f 45’
*’ Fuel tank full; radiator coolant and engine oil at specified levels; and spare tire, jack, and tools in designated positions.
23UORX.004
Coil Spring Specifications (See next page for coil spring applications)
I Item Wire diameter Coil center Free lel.=-. .
mm iin1 rliamotor mm [in mm (in 1 coil numbs
Front
nath
1 _ . . *St Identification mark color +l
., . . . . I...,
-*.....-.“, * . . . . . ,..-, -....- I--‘, M iA*=
A 13.1 (0.52) 133.5-159.5 (5.26-6.28)
294.5 (11.59) 3.22 Light green
B 13.3 (0.52) 133.7-159.9 (5.26-6.30) 300.5 (11.83)
3.43 Purple Yellow
C 13.4 (0.53)
132.6-158.6 (5.22-6.24) 301.5 (11.87) 3.49
Light blue
D 13.7 (0.54)
132.9-158.9 (5.23-6.26) 302.0 (11.89) 3.52
Pink White
I F I 12f3 Kl5Al I 1.17 A-l!% 8 f!i PR-Fi 751
I RrIl .5 II 1 6x71 I 3.56 Orange
Blue
3 83 Pink -
Brown - .“._ \“.- .,
. “W.., ~ - -. - \-. -- -. - -, -- .-
\’ .‘-‘I t
F 11 .o (0.43) 129.0 (5.08)
335.0 (13.19) -.--
G 11.2 (0.44) 128.8 (5.07)
334.0 (13.15) 3.94
Rnnr l-4
1 I ? 07 AA 1387 /5n7
.?m !i 113 1% 3 an Blue - I I I I .” \v.-7, I&V., \V.“., ---.., \.-. .-, I 11.5 (0.45) 128.5 (5.06)
333.0 (13.11) i:oi Gray
-
J 11.6 (0.46) 128.4 (5.06)
332.5 (13.09) 4.00 Orange
-
l ’ Main identification mark color: Indicated on second coil from bottom.
*’ Auxiliary identification mark color: Indicated on third coil from bottom. 23UORX-005
R-4
Page 711 of 1164

OUTLINE R
Coil Spring Applications
Model
PROTEGi
HATCHBACK Engine
Transaxle Sun roof ’ Front
I Rear
I
I
5MTX -
B 1 USA Canada USA Canada BP SOHC I I A I H
4EATX 1 -
C B H H
BP -
B6 DOHC
SOHC
BP SOHC 5MTX
4EATX
5MTX Manual transaxle @speed)
23UORX-006 .............
4EATX ............ Electronically controlled automatic transaxle (4-speed)
I- I c I- II I- I 0
E -
J I -
E -
I -
0 D -
J
I - -
A A G G
-
B B
G F
- -
B -
G
- -
B -
G
R-5
Page 713 of 1164
WHEEL ALIGNMENT
WHEEL ALIGNMENT
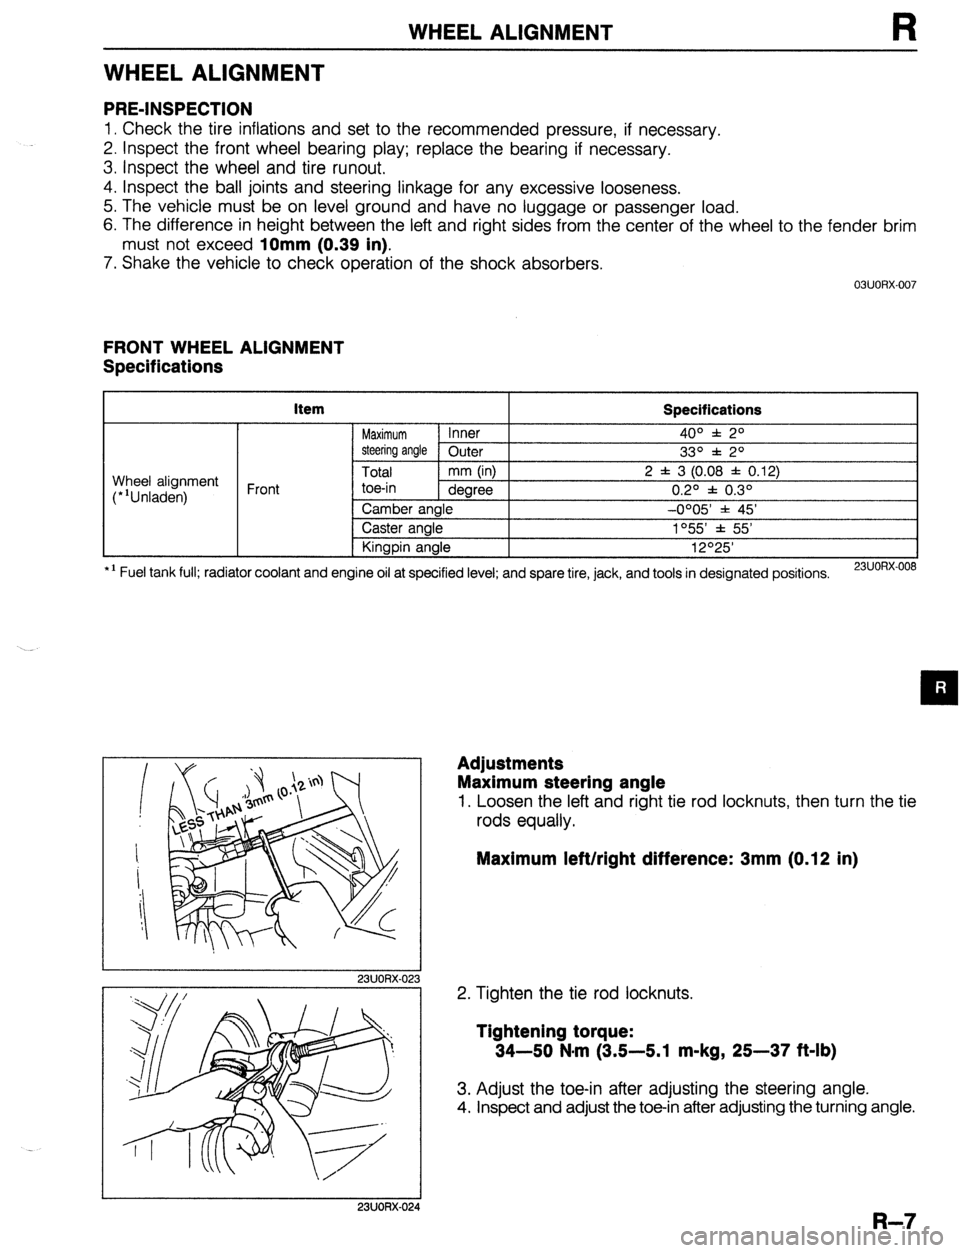
PRE-INSPECTION
1. Check the tire inflations and set to the recommended pressure, if necessary.
2. Inspect the front wheel bearing play; replace the bearing if necessary.
3. inspect the wheel and tire runout.
4. Inspect the ball joints and steering linkage for any excessive looseness.
5. The vehicle must be on level ground and have no luggage or passenger load.
6. The difference in height between the left and right sides from the center of the wheel to the fender brim
must not exceed
10mm (0.39 in).
7. Shake the vehicle to check operation of the shock absorbers.
03UORX.007
FRONT WHEEL ALIGNMENT
Specifications
item
Specifications
Maximum Inner 4o” f: 2O
steering angle Outer
33O f 2O
Total mm (in) 2 f 3 (0.08 f 0.12)
toe-in dearee 0.20 f 0.30 Wheel alignment
(*‘Unladen) Front
*I Fuel tank full; radiator coolant and Camber angle -0005 * 45’
Caster angle 1°55’ f 55’
Kingpin angle 12O25’
engine oil at specified level; and spare tire, jack, and tools in designated positions.
23UORX-008
I
I 23UORX-023
Adjustments
Maximum steering angle
1. Loosen the left and right tie rod locknuts, then turn the tie
rods equally.
Maximum left/right difference: 3mm (0.12 in)
2. Tighten the tie rod locknuts.
Tightening torque:
34-50 N-m (3.5-5.1 m-kg, 25-37 ft-lb)
3. Adjust the toe-in after adjusting the steering angle.
4. Inspect and adjust the toe-in after adjusting the turning angle.
I 23UORX-024
R-7
Page 715 of 1164

WHEEL ALIGNMENT
REAR WHEEL ALIGNMENT
Specifications
kern Specifications
Total mm (in) 2 f 3 (0.08 f 0.12)
Wheel alignment
(*‘Unladen) Rear toe-in
degree 0.2O f 0.3O
Camber angle -0020’ f 45’
*I Fuel tank full; radiator coolant and engine oil at specified level; and spare tire, jack, and tools in designated positions.
13UORX-012
Adjustment
Total toe-in
1. Loosen the lateral link locknuts.
2. Turn the lateral link adjustment link to adjust.
Note
l One turn of the link changes 11.3mm (0.44 in).
3. Tighten the lateral link locknuts to the specified torque.
Tightening torque:
55-64 N,m (5.6-6.5 m-kg, 41-47 ft-lb)
R-9
Page 716 of 1164

FRONT SUSPENSION (STRUT)
FRONT SUSPENSION (STRUT)
PREPARATION
SST
19 GO17 5A0
support of engine
19 GO17
502
Part of
19 GO17 5AO)
19 GO34 1AO
Zompressor coil support of engine support of engine
49 GO34 102
49 GO34 1AO)
49 1243 785
Installer boot 49
0180 51oB installation of ball measurement of
R-l 0