drain bolt MAZDA PROTEGE 1992 Workshop Manual
[x] Cancel search | Manufacturer: MAZDA, Model Year: 1992, Model line: PROTEGE, Model: MAZDA PROTEGE 1992Pages: 1164, PDF Size: 81.9 MB
Page 37 of 1164

ENGINE TUNE-UP PROCEDURE Bl
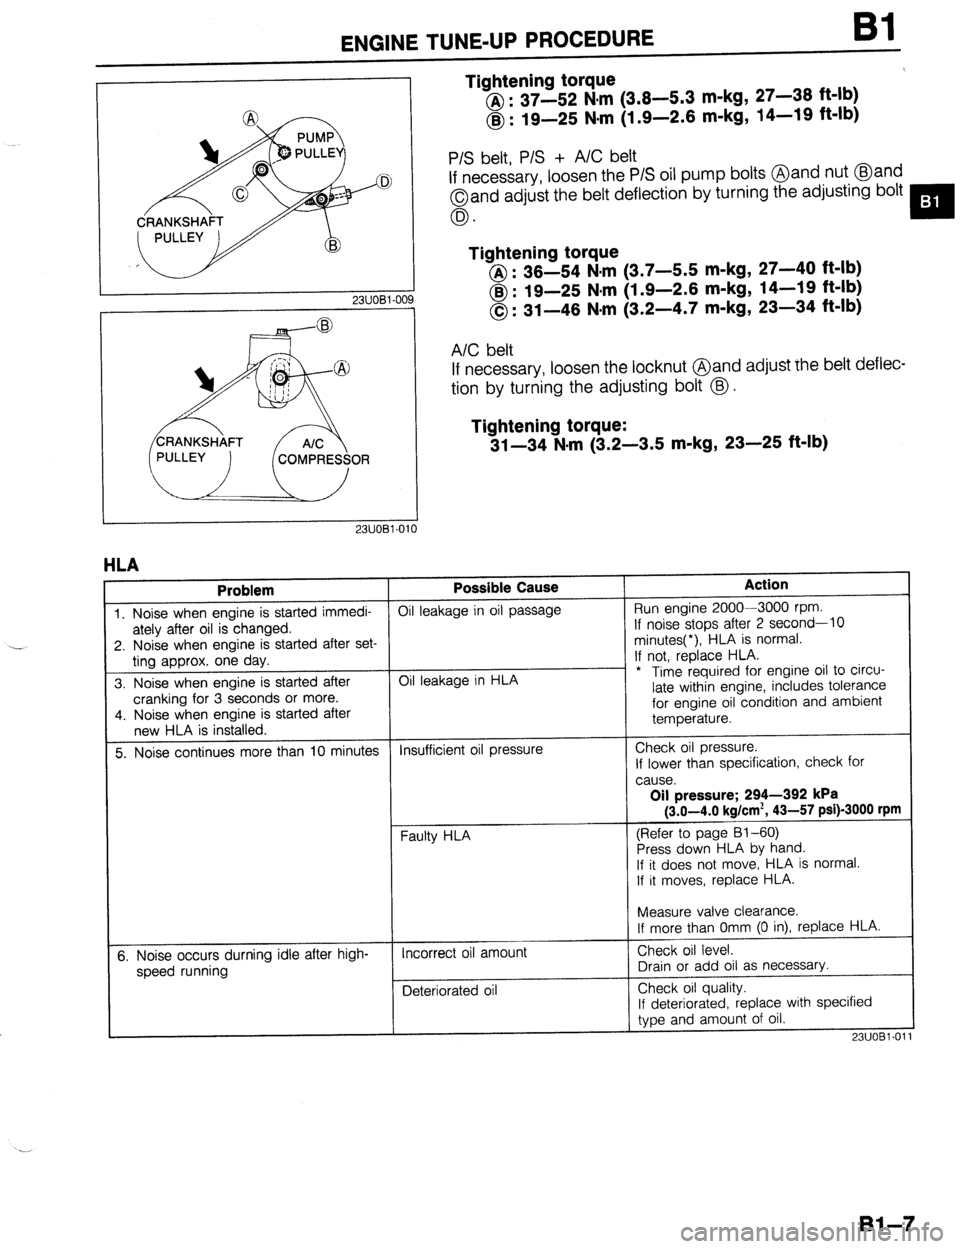
Tightening torque
@ : 37-52 N,m (3.8-5.3 m-kg, 27-38 ft-lb)
@ : 19-25 Nsm (1.9-2.6 m-kg, 14-19 ft-lb)
23UOBl-OC
P/S belt, P/S + A/C belt
If necessary, loosen the P/S oil pump bolts @and nut @and
Oand adjust the belt deflection by turning the adjusting bolt
0.
Tightening torque
@I : 36-54 N.m (3.7-5.5 m-kg, 27-40 ft-lb)
@ : 19-25 N#m (1.9-2.6 m-kg, 14-19 ft-lb)
0: 31-46 N-m (3.2-4.7 m-kg, 23-34 ft-lb)
A/C belt
If necessary, loosen the locknut @and adjust rhe belt deflec-
tion by turning the adjusting bolt @.
Tightening torque:
31-34 N-m (3.2-3.5 m-kg, 23-25 ft-lb)
1
HLA
Problem Possible Cause Action
1. Noise when engine is started immedi- Oil leakage in oil passage Run engine 2000-3000 rpm.
ately after oil is changed. If noise stops after 2 second-10
2. Noise when engine is started after set- minutes(*), HLA is normal.
ting approx. one day. If not, replace HLA.
3. Noise when engine is started after Oil leakage in HLA - * Time required for engine oil to circu-
cranking for 3 seconds or more. late within engine, includes tolerance
4. Noise when engine is started after for engine oil condition and ambient
new HLA is installed. temperature.
5. Noise continues more than 10 minutes Insufficient oil pressure Check oil pressure.
If lower than specification, check for
cause.
Oil pressure; 294-392 kPa
(3.0-4.0 kg/cm*, 43-57 psi)-3000 rpm
(Refer to page 81-60)
Press down HLA by hand.
If it does not move,. HLA is normal.
If it moves, replace HLA.
t
I
Measure valve clearance.
If more than Omm (0 in), replace HLA.
5. Noise occurs durning idle after high-
speed running Incorrect oil amount
Deteriorated oil Check oil level.
Drain or add oil as necessary.
Check oil quality.
If deteriorated, replace with specified
type and amount of oil.
23UOBl-01
Bl-7
Page 139 of 1164

ENGINE TUNE-UP PROCEDURE 92
23UOB2-OC
DRIVE PULLEY
I I
2311082.010
HLA
I Problem
1. Noise when engine is started immedi-
ately after oil is changed.
2. Noise when engine is started after set-
tina aporox. one dav.
3. Noise when engine is started after
cranking for 3 seconds or more.
4. Noise when engine is started after
new HLA is installed.
5. Noise continues more than 10 minutes
6. Noise occurs durning idle after high-
“”
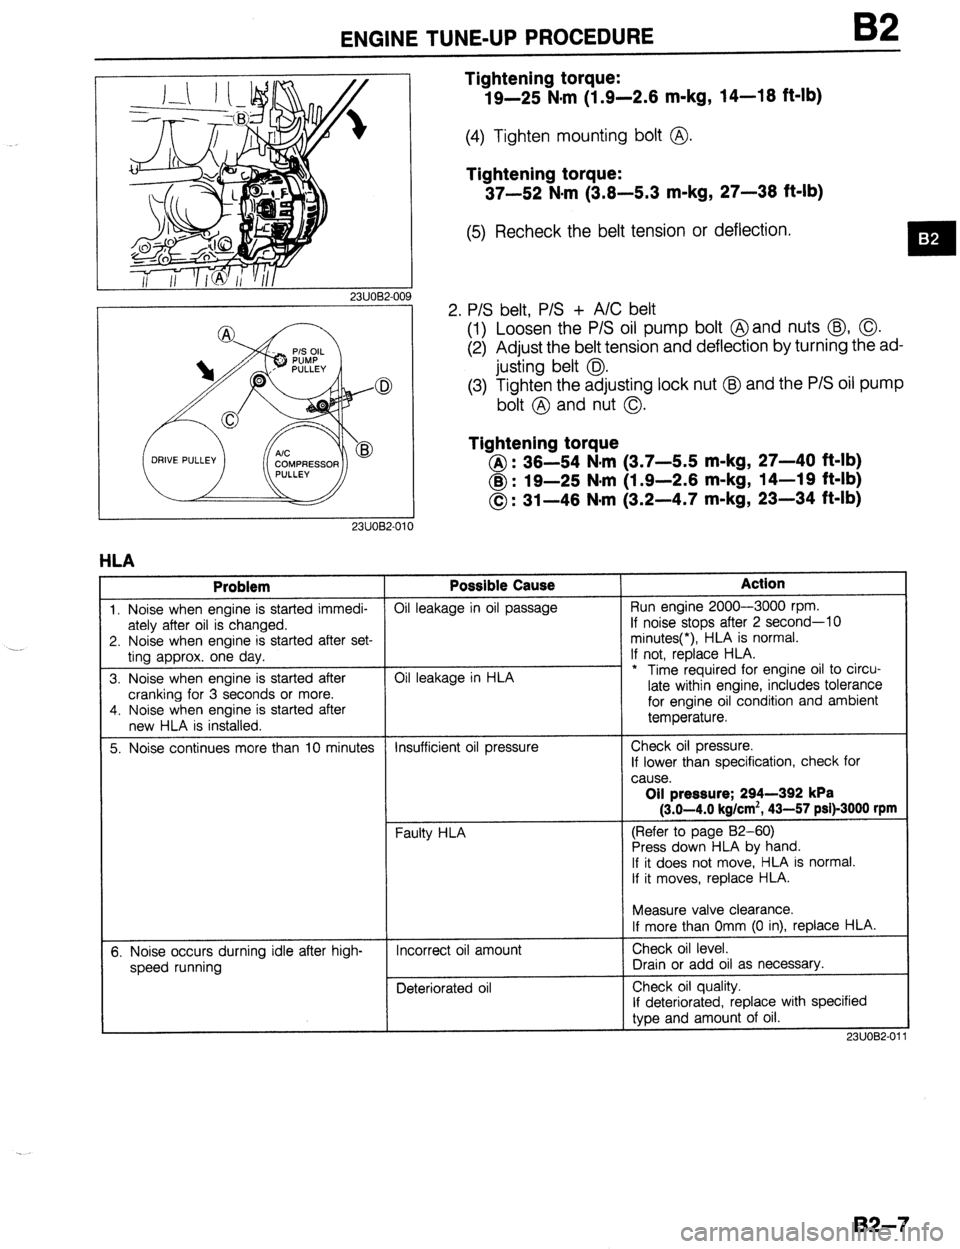
Tightening torque:
19-25 N.m (1.9-2.6 m-kg, 14-16 ft-lb)
(4) Tighten mounting bolt @.
Tightening torque:
37-52 N#rn (3.6-5.3 m-kg, 27-36 ft-lb)
(5) Recheck the belt tension or deflection.
2. P/S belt, P/S + A/C belt
(1) Loosen the P/S oil pump bolt @and nuts @, 0.
(2) Adjust the belt tension and deflection by turning the ad-
justing belt 0.
(3) Tighten the adjusting lock nut @J and the P/S oil pump
bolt @ and nut 0.
Tightening torque
@: 36-54 N-m (3.7-5.5 m-kg, 27-40 ft-lb)
@ : 19-25 N*m (1.9-2.6 m-kg, 14-19 ft-lb)
0: 31-46 N-m (3.2-4.7 m-kg, 23-34 ft-lb) Possible Cause
Oil leakage in oil passage
Oil leakage in HLA
Insufficient oil pressure
Faulty HLA
Incorrect oil amount
Deteriorated oil Action Run engine 2000-3000 rpm.
If noise stops after 2 second-10
minutes(*), HLA is normal.
If not, replace HLA.
* Time required for engine oil to circu-
late within engine, includes tolerance
for engine oil condition and ambient
temperature.
Check oil pressure.
If lower than specification, check for
cause. Oil pressure; 294-392 kPa
(3.0-4.0 kg/cm’, 43-57 psi)-3000 rpm
(Refer to page 82-60)
Press down HLA by hand.
If it does not move, HLA is normal.
If it moves, replace HLA.
Measure valve clearance.
If more than Omm (0 in), replace HLA.
Check oil level.
Drain or add oil as necessary.
Check oil quality.
If deteriorated, replace with specified
type and amount of oil.
2311082-01
B2-7
Page 148 of 1164

82 ON-VEHICLE MAINTENANCE
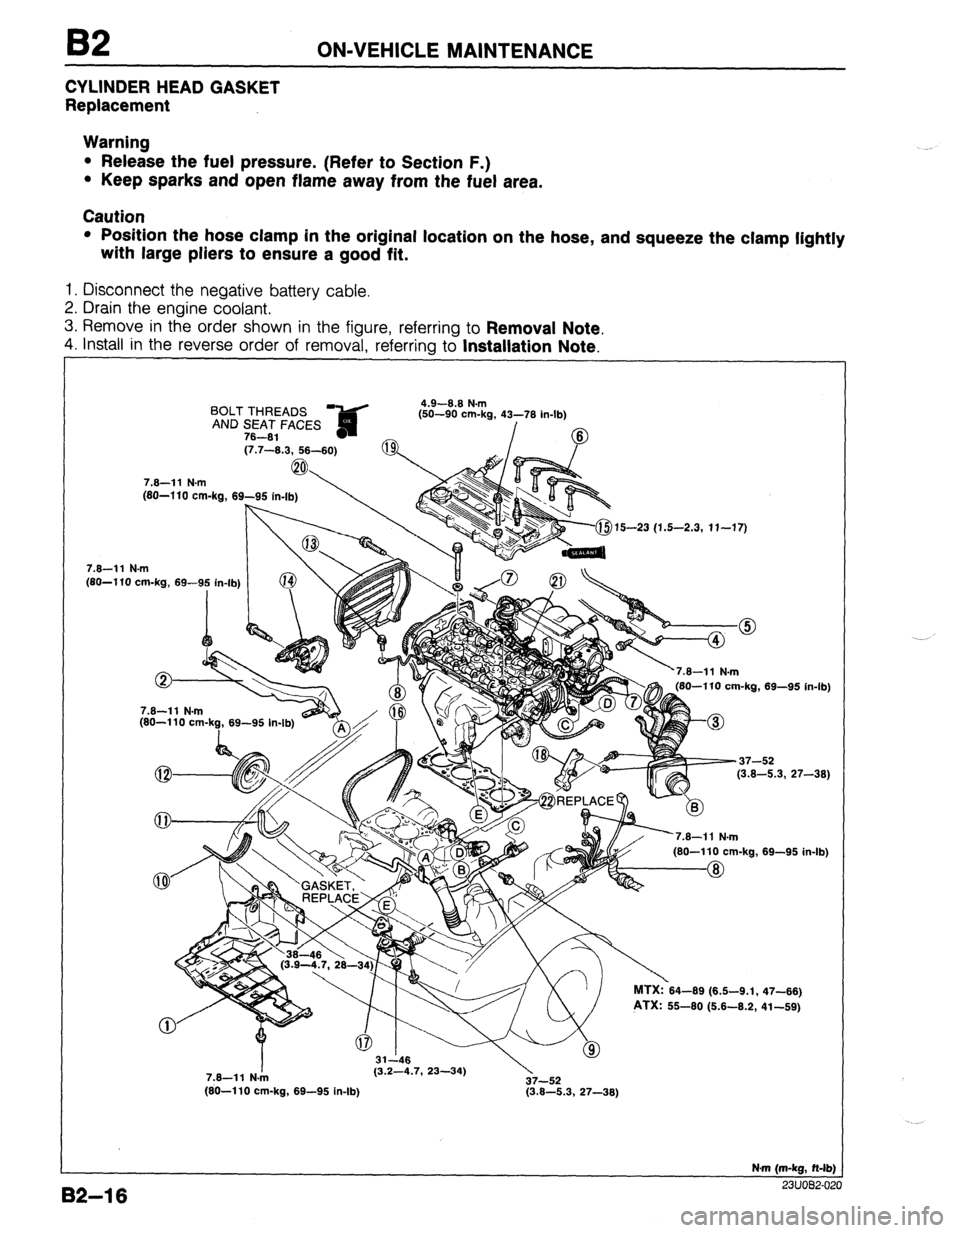
CYLINDER HEAD GASKET
Replacement
Warning
l Release the fuel pressure. (Refer to Section F.)
l Keep sparks and open flame away from the fuel area.
Caution
l Position the hose clamp in the original location on the hose, and squeeze the clamp lightly
with large pliers to ensure a good fit.
1. Disconnect the negative battery cable.
2. Drain the engine coolant.
3. Remove in the order shown in the figure, referring to
Removal Note.
4. install in the reverse order of removal, referrina to Installation Note.
BOLT THREADS ?&d 4.9-8.8 N.m
fsn-an om.h 41-‘71( ir
AND SEAT FACES ,-- -- -... ..=, _” . _ ..I-lb)
78-81 - /
(7.7-8.3, 58-60)
7.8-11 N.m
(80-l 10 cm-ka, 69-95
, . . . . . . (80-l 10 cm-kg, 69-9: in-lb) (j-$15-23 (1.5-2.3, 11-17)
82-l 6
7.8-11 N.m
(80-110 cm-k?, 69-95 In-lb) 180-110 cm-ka. 69-95 in-lb
-37-52
(3.8-5.3, 27-38)
’
nl MTX:?64-69 (6.6-9.1,
PTX: 55-60 (6.6-8.2, 69-95 in. .Ib)
47-86)
41-69)
7.8-11 N./n (3.2-4.7, 23-34)
37-52
(80-110 cm-kg, 69-95 in-lb) (3.8-5.3, 27-38)
N-m (m-kg, N-lb)
^^. .^_^ __
Page 510 of 1164

Jl TRANSAXLE
r
03UOJ2-026
03UOJl-03:
Oil seal
Replacement (On-vehicle)
Jack up the vehicle and support it with safety stands. Drain
the transaxle oil. Next, use the following procedure to replace
the driveshaft oil seal:
1. Remove the front wheel.
2. Remove the splash shield.
3. Separate the front stabilizer from the lower arm.
Caution
l Do not damage the dust boots.
4. Remove the clinch bolt and pull the lower arm downward.
Separate the knuckle from the lower arm ball joint.
5. Loosen the nut and disconnect the tie-rod end with the SST.
Caution
l Do not subject the tripod joint to shock when remov-
ing the driveshaft.
6. Disconnect the driveshaft from the transaxle by prying with
a bar inserted between the outer ring and the transaxle.
7. Suspend the driveshaft with a rope.
03UOJl-036
8. Remove the oil seal with a screwdriver.
03UOJ2-03’
03UOJi-03;
51-20
Note
l Tap in until the oil seal installer contacts the case.
l Coat the oil seal lip with transaxle oil.
9. Tap the new oil seal into the transaxle case with the SST.