MERCEDES-BENZ C-CLASS COUPE 2015 Owners Manual
Manufacturer: MERCEDES-BENZ, Model Year: 2015, Model line: C-CLASS COUPE, Model: MERCEDES-BENZ C-CLASS COUPE 2015Pages: 385, PDF Size: 13.12 MB
Page 241 of 385
X
Confir mbyp ressing aon thesteering
wheel.
X Press :or9 to select th edigital
speedometer.
Resetting values X
Press òon thesteering wheel to open the
men ulist.
X Press :or9 on thesteering wheel to
select the Trip
Tripmenu.
X Confir mbyp ressing aon thesteering
wheel.
X Press :or9 to select th efunction that
you wish to reset.
X Press a.
X Press :to select Yes Yesand press ato
confirm.
You can reset th evalues of th efollowin gfunc-
tions:
R Trip meter
R "From start "tripc om puter
R "From reset "tripc om puter
R ECO display
If you reset th evalues in th e"ECO display", the
values in th e"From start "tripc om puter are also
reset .Ifyou reset th evalues in th e"From start"
trip computer, th evalues in th e"ECO display"
are also reset. Navigation menu
Displaying navigation instructions In the
Navi Navimenu, th emultifunction display
shows navigation instructions. You can fin dfur-
ther informatio nonnavigation instruction sin
th es eparate operatin ginstructions.
X Switch on th emultimedia system (see sepa-
rat eo peratin ginstructions).
X Press òon thesteering wheel to open the
men ulist.
X Press :or9 on thesteering wheel to
select the Navi
Navimenu.
X Confir mbyp ressing aon thesteering
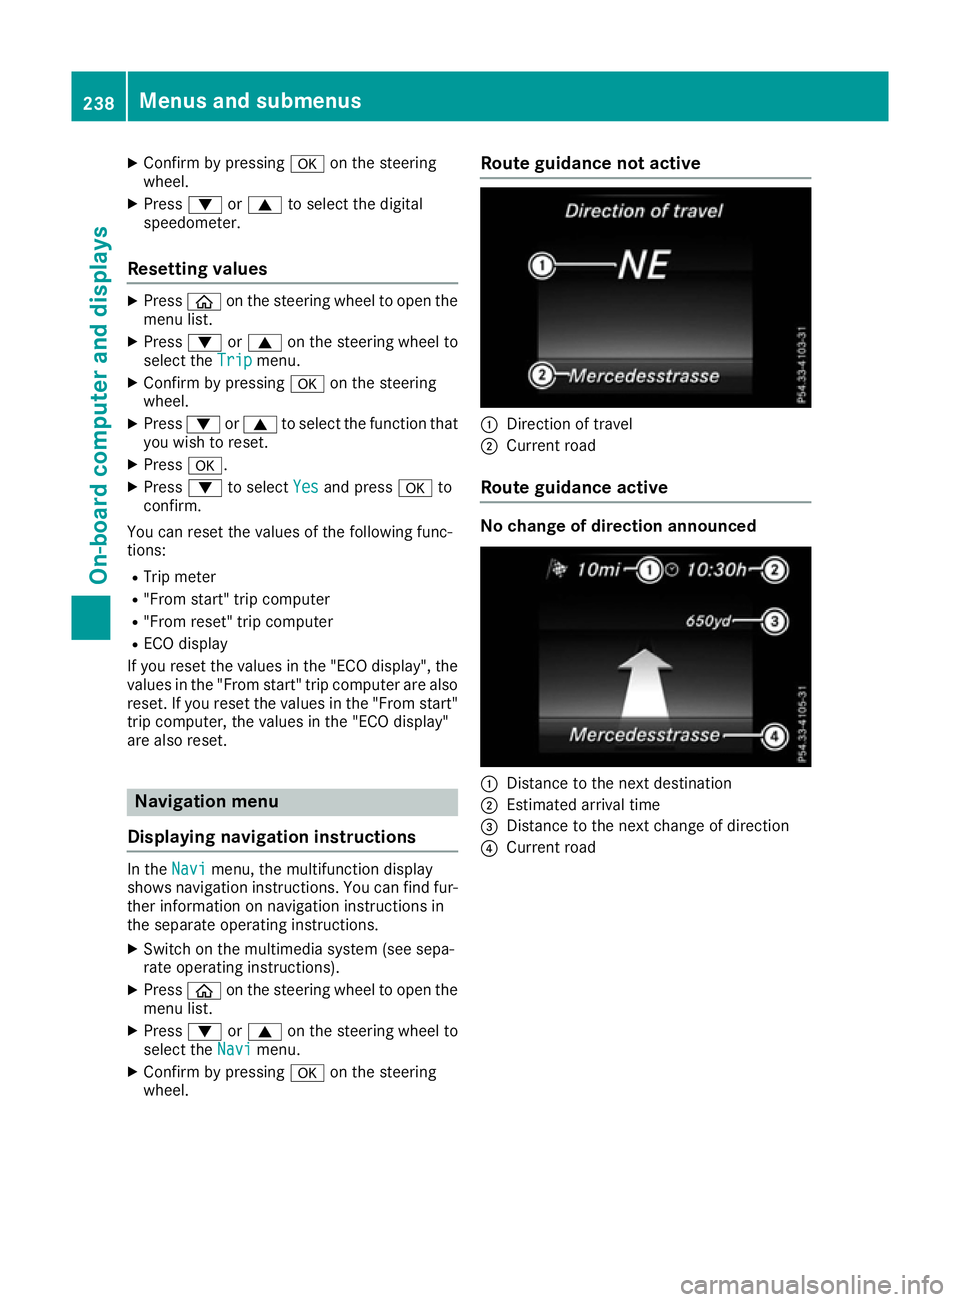
wheel. Route guidance not active
:
Direction of travel
; Curren troad
Route guidance active No change of direction announced
:
Distance to th enextd estination
; Estimate darrival time
= Distance to th enextc hang eofd irection
? Curren troad 238
Menu
sand submenusOn-boar dcomputer and displays
Page 242 of 385
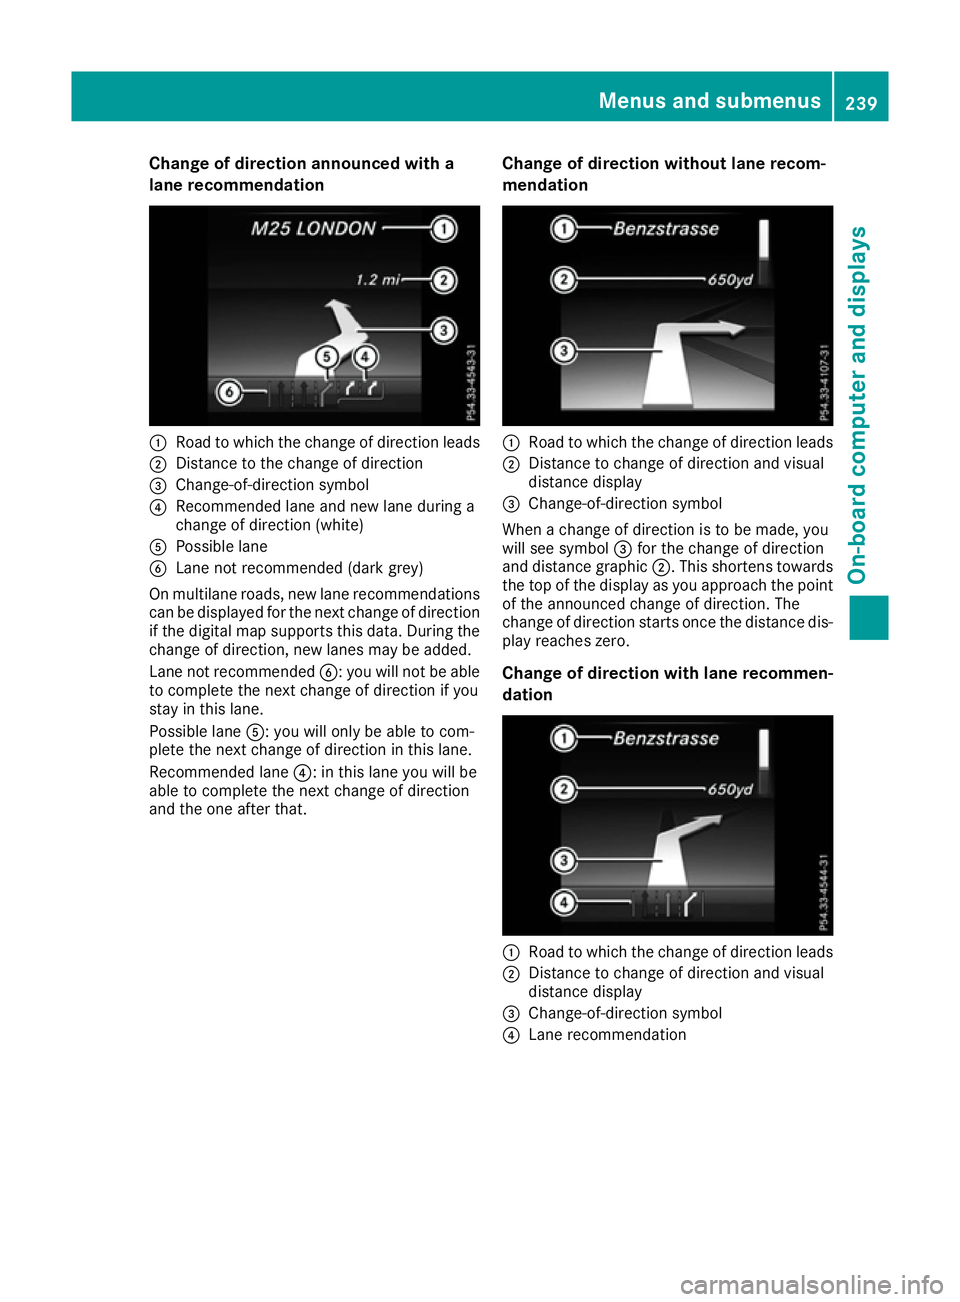
Change of direction announced with a
lane recommendation :
Road to whic hthe change of direction leads
; Distance to th echange of direction
= Change-of-direction symbol
? Recommende dlane and new lane durin ga
change of direction (white)
A Possible lane
B Lanenotrecommended (dark grey)
On multilane roads ,new lane recommendations
can be displaye dfor th enextc hange of direction
if th edigital map support sthisd ata. During the
change of direction ,new lane smay be added.
Lan enotrecommended B:you will no tbeable
to complet ethe nex tchange of direction if you
stay in this lane.
Possible lane A:you will only be able to com-
plet ethe nex tchange of direction in this lane.
Recommende dlane ?:int hisl ane you will be
able to complet ethe nex tchange of direction
and th eoneafter that. Change of direction without lane recom-
mendation :
Road to whic hthe chang eofdirection leads
; Distance to chang eofdirection and visual
distanc edisplay
= Change-of-direction symbol
When achange o fdirection is to be made, you
will see symbol =for th echange o fdirection
and distanc egraphic ;.This shortens towards
th et op of th edisplay as you approach th epoint
of th eannounced chang eofdirection .The
chang eofdirection start soncet he distanc edis-
play reaches zero.
Change of direction with lane recommen-
dation :
Road to whic hthe chang eofdirection leads
; Distance to chang eofdirection and visual
distanc edisplay
= Change-of-direction symbol
? Lanerecommendation Menu
sand submenus
239On-boardcomputer and displays Z
Page 243 of 385
Other status indicator
softhe naviga-
tion system :
Additional information
Other possible additional information: R New route...
New route... orCalculating route...
Calculating route...
An ew route is calculated.
R Road not mapped
Road not mapped
The vehicle position is inside the area of the
digital map but the road is not recognised, e.g. new roads, car parks or private land.
R No route No route
No route could be calculated to the selected
destination.
R O
You have reached the destination or an inter-
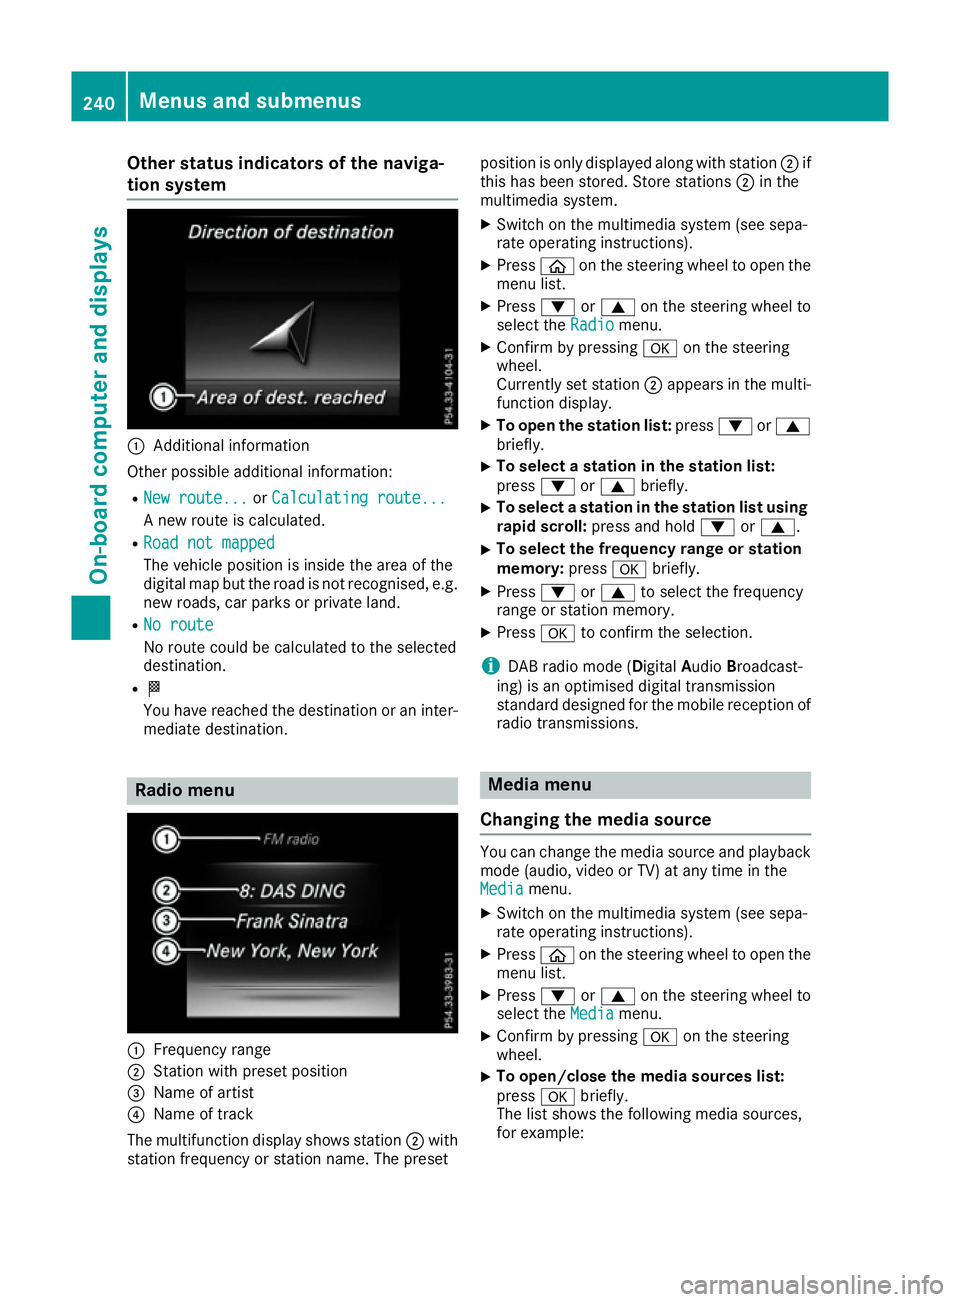
mediate destination. Radio menu
:
Frequenc yrange
; Station with preset position
= Name of artist
? Name of track
The multifunction display shows station ;with
station frequenc yorstation name. The preset position is only displayed along with station
;if
this has been stored. Store stations ;in the
multimedia system.
X Switc hont he multimedia system (see sepa-
rate operatin ginstructions).
X Press òon the steering wheel to open the
menu list.
X Press :or9 on the steering wheel to
select the Radio
Radio menu.
X Confirm by pressing aon the steering
wheel.
Currently set station ;appears in the multi-
function display.
X To open the station list: press:or9
briefly.
X To select
astation in the station list:
press :or9 briefly.
X To select
astation in the station list using
rapid scroll: press and hold :or9.
X To select the frequency range or station
memory:
pressabriefly.
X Press :or9 to select the frequency
range or station memory.
X Press ato confirm the selection.
i DABr
adio mode (Digital AudioBroadcast-
ing) is an optimised digital transmission
standard designed for the mobile reception of
radio transmissions. Media menu
Changing the media source You can change the media source and playback
mode (audio, video or TV) at any time in the
Media Media menu.
X Switc hont he multimedia system (see sepa-
rate operatin ginstructions).
X Press òon the steering wheel to open the
menu list.
X Press :or9 on the steering wheel to
select the Media
Mediamenu.
X Confirm by pressing aon the steering
wheel.
X To open/close the media sources list:
press
abriefly.
The list shows the following media sources,
for example: 240
Menus and submenusOn-boar
dcomputer and displays
Page 244 of 385
R
Dis c(CD /DVD) (DV DonlyinC OMAND
Online multimedia system)
R SD card
R Medi aRegis ter (only in COMAND Online
multimedia system)
R USB storag edevice
R Bluetooth ®
capable audi odevice
Please observe furthe rinformatio nonmedia
support and media operatio ninthe multimedia
system (see separate operating instructions).
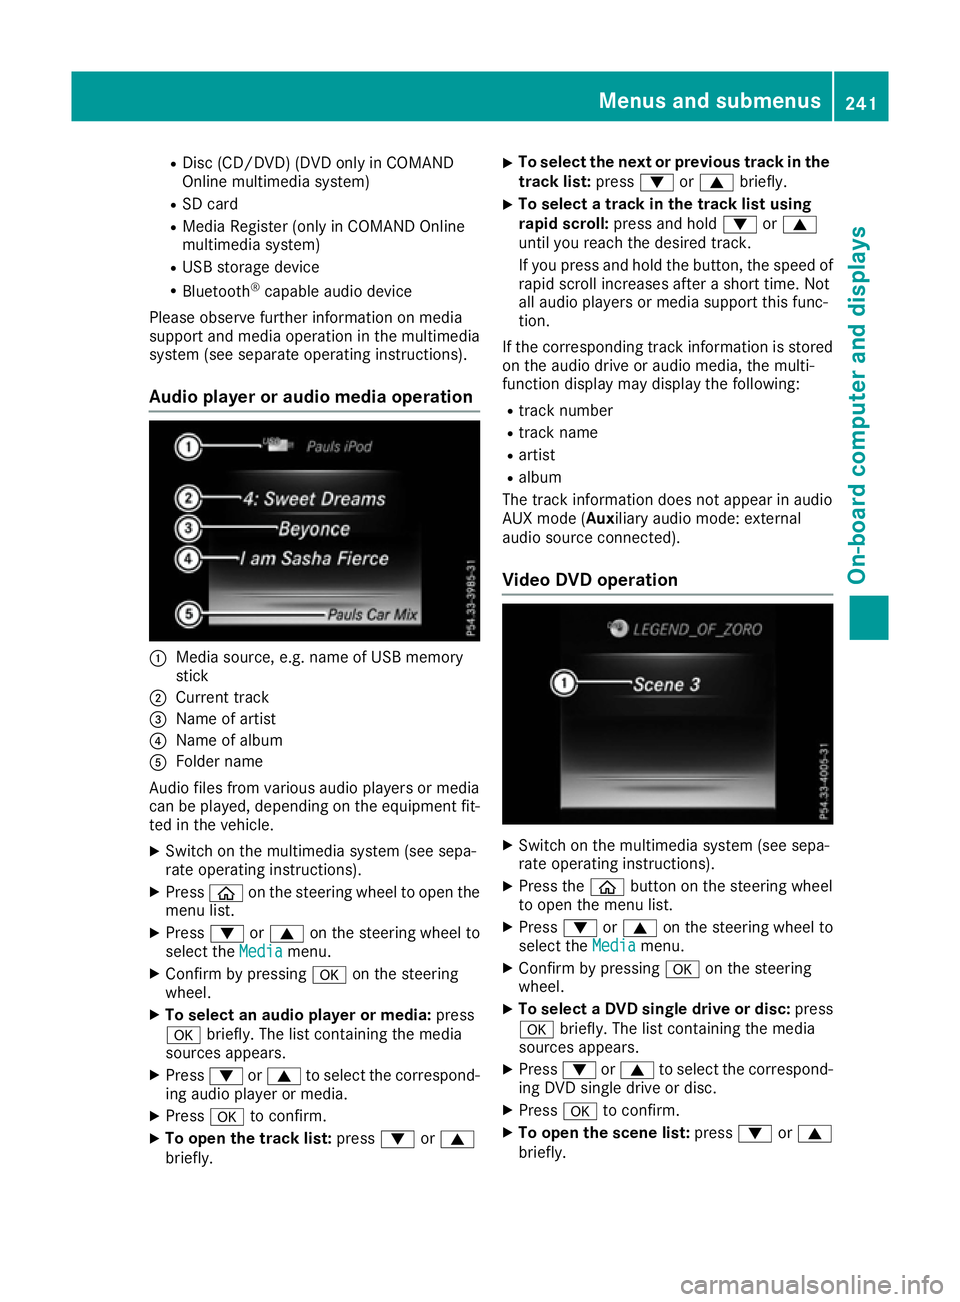
Audio player or audi omediaoperation :
Medi asource, e.g .nam eofU SB memory
stick
; Current track
= Name of artist
? Name of album
A Folde rname
Audio files fro mvarious audi oplayer sorm edia
can be played ,depen ding on the equipment fit-
ted in the vehicle.
X Switch on the multimedia system (see sepa-
rate operating instructions).
X Press òon the steerin gwheel to open the
menu list.
X Press :or9 on the steerin gwheel to
select the Media
Media menu.
X Confir mbypressing aon the steering
wheel.
X To select an audi oplayer or media: press
a briefly. The list containing the media
sources appears.
X Press :or9 to select the correspond-
ing audi oplayer or media.
X Press ato confirm.
X To ope nthe trac klist: press :or9
briefly. X
To select the next or previous trac
kinthe
trac klist: press :or9 briefly.
X To select
atrac kint he trac klistu sing
rapid scroll: press and hold :or9
unti lyou reach the desired track.
If yo upress and hol dthe button, the spee dof
rapi dscroll increases after ashort time .Not
al la udio players or media support thi sfun c-
tion.
If the corresponding track informatio niss tored
on the audi odrive or audi omedia ,the multi-
functio ndisplay maydisplay the following:
R track number
R track name
R artist
R album
The track informatio ndoesn ot appear in audio
AUX mod e(Aux iliary audiomode: external
audi osource connected).
Vide oDVD operation X
Switch on the multimedia system (see sepa-
rate operating instructions).
X Press the òbutton on the steerin gwheel
to open the menu list.
X Press :or9 on the steerin gwheel to
select the Media Mediamenu.
X Confir mbypressing aon the steering
wheel.
X To select aDVD single driv eordisc:press
a briefly. The list containing the media
sources appears.
X Press :or9 to select the correspond-
ing DVD singl edrive or disc.
X Press ato confirm.
X To ope nthe scen elist: press :or9
briefly. Menus and submenus
241On-board computer and displays Z
Page 245 of 385
X
To select the next or previous scen
einthe
scen elist: press :or9 briefly.
X To select
ascene in the scen elistu sing
rapid scroll: press and hold :or9
unti ldesir ed scene :hasb eenr eached.
X Press ato confirm your selection.
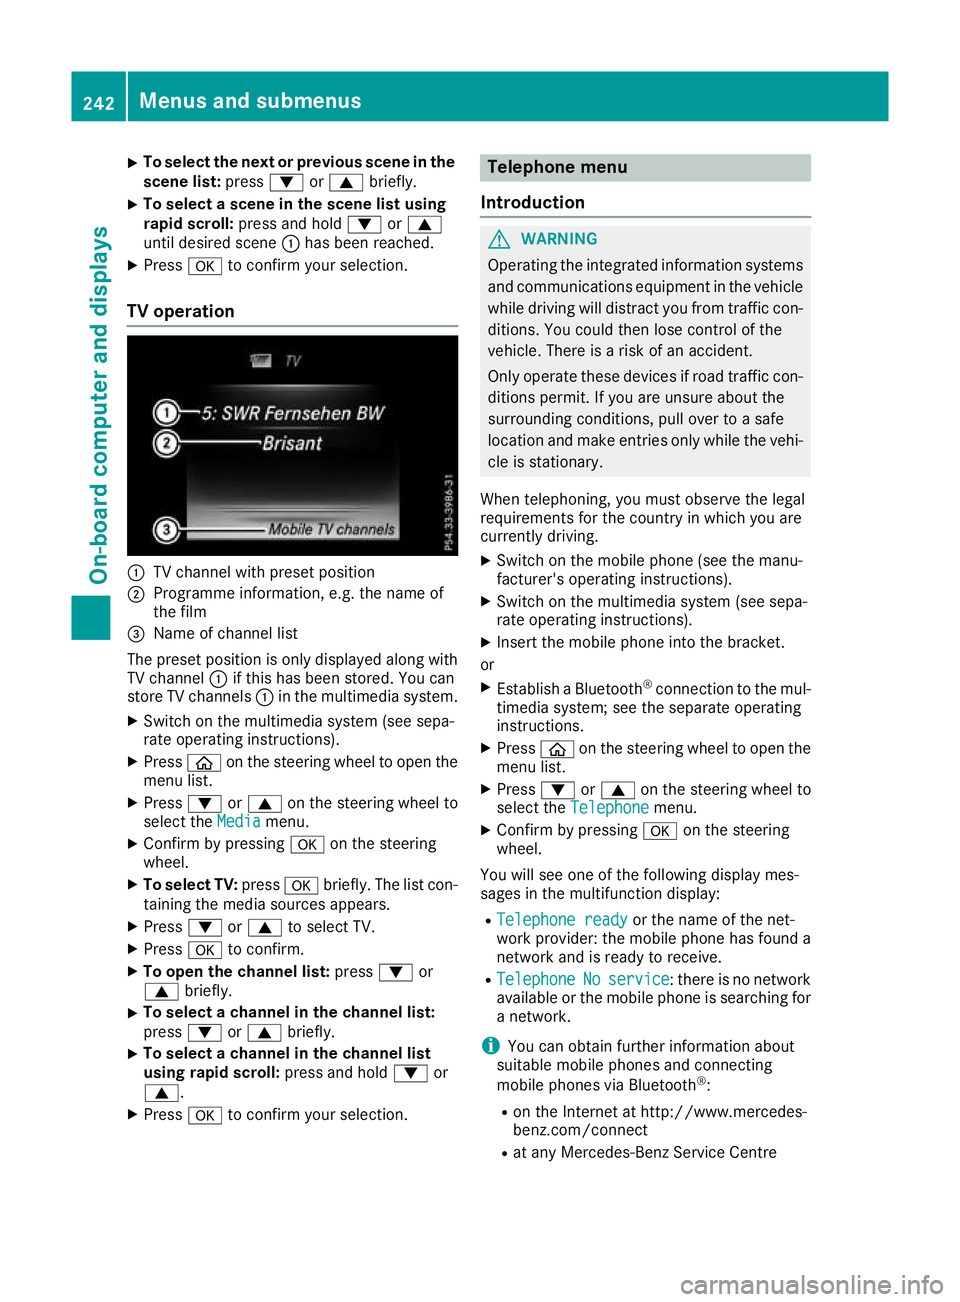
TV operation :
TV channel with preset position
; Programme information, e.g .the name of
the film
= Name of channel list
The preset positio niso nlyd isplayed along with
TV channel :if thi shasbeen stored .You can
stor eTVc hannels :in the multimedia system.
X Switch on the multimedia system (se esepa-
rate operating instructions).
X Press òon the steering whee ltoopent he
menu list.
X Press :or9 on the steering whee lto
select the Media
Media menu.
X Confir mbypressing aon the steering
wheel.
X To select TV: pressabriefly. The list con-
taining the media sources appears.
X Press :or9 to select TV.
X Press ato confirm.
X To ope nthe channel list: press:or
9 briefly.
X To select
achannel in the channel list:
press :or9 briefly.
X To select
achannel in the channel list
using rapid scroll: press and hold:or
9.
X Press ato confirm your selection. Telephone menu
Introduction G
WARNING
Operating the integrated informatio nsystems
and communications equipment in the vehicle
whil edriving will distract yo ufrom traffic con-
ditions. Yo ucould then lose contro lofthe
vehicle. There is ariskofana ccident.
Onl yoperate thes edevice sifr oadt raffic con-
ditions permit. If yo uare unsur eabout the
surrounding conditions, pull ove rtoasafe
location and make entries onl ywhile the vehi-
cle is stationary.
Whe ntelephoning, yo umusto bserve the legal
requirements for the country in which yo uare
currentl ydriving.
X Switch on the mobil ephone (se ethe manu-
facturer's operating instructions).
X Switch on the multimedia system (se esepa-
rate operating instructions).
X Insert the mobil ephone into the bracket.
or X Establis haBluetooth ®
connectio ntothe mul-
timedi asystem ;see the separate operating
instructions.
X Press òon the steering whee ltoopent he
menu list.
X Press :or9 on the steering whee lto
select the Telephone
Telephone menu.
X Confir mbypressing aon the steering
wheel.
Yo uw ills ee one of the following display mes-
sages in the multifunctio ndisplay:
R Telephone ready
Telephone ready or the nameofthe net-
work provider: the mobil ephone ha sfound a
network and is ready to receive.
R Telephone
Telephone No
Noservice
service:t hereisnon etwork
available or the mobil ephone is searching for
an etwork.
i Youc an obtai nfurther informatio nabout
suitabl emobilephones and connecting
mobil ephones via Bluetooth ®
:
R on the Interne tath ttp://www.mercedes-
benz.com/connect
R at any Mercedes-Benz Service Centre 242
Menus and submenusOn-board computer and displays
Page 246 of 385
Accepting
acall If someon
ecallsy ou when you are in the Tele‐
Tele‐
phone
phone menu,adisplay message appear sinthe
multifunction display.
You can accept acall at any time, eve nifyou are
no tint heTelephone
Telephone menu.
X Press the 6buttonont hesteering wheel
to accept an incoming call.
Rejecting or ending acall You can en
dorrejectac all at any time eve nif
you are no tintheTelephone Telephone menu.
X Press the ~buttonont hesteering wheel
to rejec torendan incoming call.
Selecting an entry in th ephone book X
Press òon thesteering whee ltoo pen the
men ulist.
X Press :or9 on thesteering whee lto
select the Telephone
Telephone menu.
X Confir mbyp ressing aon thesteering
wheel.
X Press :, 9ora to switch to the
phone book.
X Press :or9 to select th enames one
after th eother.
or X To star trap id scrolling: press and hold :
or 9 for longer than on esecond.
The names in th ephone book are displayed
quickl yone after th eother.
If you press and hold the :or9 button
for longer than fiv eseconds, th ename
appear switht he next or previous lette rinitial
lette rint healphabet.
Rapid scrollin gstops when you release the
butto norr eachthe endoft helist.
X If only one telephone number is store
dfor
an ame: press the 6ora buttonto
start dialling.
or
X If there is mor
ethano ne number for a
particular name: press the6ora
butto ntod isplay th enumbers.
X Press :or9 to select th enumber you
want to dial.
X Press the 6ora buttontos tart dial-
ling. or
X To exit th etelephone book: press the~
or % button.
Redialling The on-board computer saves th
elast names or
number sdialle dint heredial memory.
X Press òon thesteering whee ltoo pen the
men ulist.
X Press :or9 on thesteering whee lto
select the Telephone
Telephone menu.
X Confir mbyp ressing aon thesteering
wheel.
X Press the 6buttontos witch to th eredial
memory.
X Press :or9 to select th edesired
nam eorn umber.
X Press the 6ora buttontos tart dial-
ling.
or X To exit th eredial memory: press the~
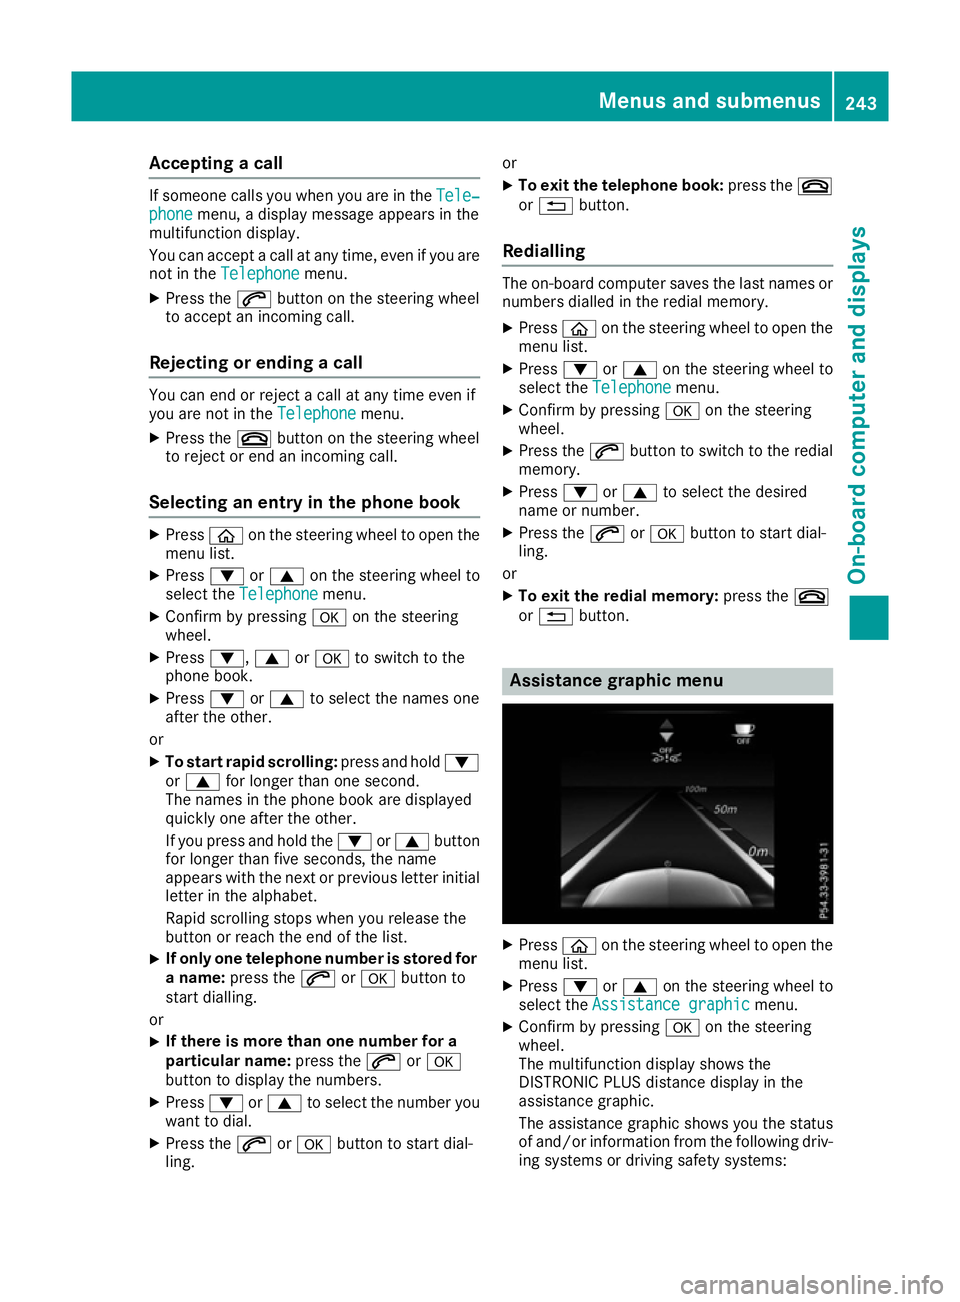
or % button. Assistance graphic menu
X
Press òon thesteering whee ltoo pen the
men ulist.
X Press :or9 on thesteering whee lto
select the Assistanc egraphic
Assistanc egraphic menu.
X Confir mbyp ressing aon thesteering
wheel.
The multifunction display shows the
DISTRONI CPLUSd istanc edisplay in the
assistanc egraphic.
The assistanc egraphic shows you th estatus
of and/o rinformation from th efollowin gdriv-
ing systems or drivin gsafet ysystems: Menu
sand sub menus
243On-boardcomputer an ddisplays Z
Page 247 of 385
R
DISTRONI CPLUS(Ypage 184)
R Traffi cSignA ssist (Y page 216)
R Distance warning functio nand autono-
mou sbraking system of COLLISION PRE-
VENTION ASSIST PLU S(Ypage 69)
R PRE-SAFE ®
Brake (Y page 75)
R Blind Spo tAssist (Y page 218 )orActive
Blind Spo tAssist (Y page 221)
R ATTENTION ASSIST (Y page 215)
R Lane Keeping Assist (Y page 219)orActive
Lane Keeping Assist (Y page223)
X Press :to display the ATTENTION ASSIST
assessment. Servic
emenu
Introduction Depending on the equipment fitted in the vehi-
cle, you have the following options in the Ser‐
Ser‐
vice
vice menu:
R Calling up display messages in the message
memory (Y page253)
R Restarting the tyre pressure loss warning sys-
tem (Y page358) or checking the tyre pres-
sure electronically (Y page360)
R Calling up the service due date
(Y page3 25)
R Displaying the AdBlue ®
level and range
(Y page2 44) (BlueTEC vehicles only)
Displayin gthe AdBlue ®
level and range The
AdBlue
AdBlue menu is only available in BlueTEC
vehicles.
X Press òon the steering whee ltoopen the
menu list.
X Press :or9 on the steering whee lto
select the Service
Service menu.
X Confirm by pressing aon the steering
wheel.
X Press :or9 to select the AdBlue AdBlue
submenu.
X Press ato confirm yours election.
The range and AdBlue ®
level appear in abar
grap hint he multifunction display.
Observe the informatio nand notes on "Refuel-
ling" (Y page169). Setting
smenu
Introduction Depending on the equipment fitted in the vehi-
cle, you have the following options in the
Set‐ Set‐
tings
tings menu:
R Changing assistance settings (Y page244)
R Changing head-up display settings
(Y page2 46)
R Changing the light settings (Y page247)
R Changing the instrument cluster settings
(Y page2 48)
R Changing the vehicl esettings (Y page248)
R Restoring the factory settings (Y page249)
Assistanc esubmenu Deactivating/activating ESP
®
Observe the "Important safety notes" section in the description of ESP ®
(Y page7 2). G
WARNING
If you deactivate ESP ®
,E SP ®
no longer sta-
bilises the vehicle. There is an increase drisk
of skidding and an accident.
Only deactivate ESP ®
in the situations descri-
bed in the following.
It may be best to deactivate ESP ®
in the follow-
ing situations:
R when using snow chains
R in deep snow
R on sand or gravel
Deactivating/activating ESP ®
on Mercedes-
AMG vehicles (Y page73).
For further informatio nabout ESP ®
,s ee
(Y page7 1).
X Start the engine.
X Press òon the steering whee ltoopen the
menu list.
X Press :or9 on the steering whee lto
select the Settings
Settings menu.
X Confirm by pressing aon the steering
wheel.
X Press :or9 to select the Assistance Assistance
submenu.
X Press ato confirm.
X Select ESP
ESPwith : or9. 244
Menus and submenusOn-board computer and displays
Page 248 of 385
X
Press ato confirm.
The curren tselection appears.
X To activate/deactivate: press theabut-
ton again.
If the å warning lamp in the instrument
cluster lights up when the vehicle is ready to
drive, ESP ®
is deactivated.
If the ÷ andå warning lamps light up
continuously, ESP ®
is not availabl edue to amal-
function.
Observe the information on warning lamps
(Y page 287).
Observe the information on display messages
(Y page 254).
Traffic Sign Assist
You can activat eordeactivate the warning func-
tion of Traffic Sign Assist in the Traffic TrafficSign
Sign
Assist
Assist menu. When the message function is
activated, detected traffic signs and information appear in the multifunction display for five sec-
onds.
X Press òon the steerin gwheel to open the
menu list.
X Press the :or9 button on the steering
wheel to select the Settings
Settings menu.
X Confirm by pressing aon the steering
wheel.
X Press :or9 to select the Assistance Assistance
submenu.
X Press ato confirm.
X Select Traffic Sign Assist Traffic Sign Assist with: or
9.
X Press ato confirm.
The curren tselection appears.
X Activate or deactivat
ethe warning func-
tion: press aagain.
For further information about Traffic Sign Assist, see (Y page 216).
Activating/deactivating COLLISION PRE-
VENTION ASSIST PLUS
X Press òon the steerin gwheel to open the
menu list.
X Press :or9 on the steerin gwheel to
select the Settings
Settings menu.
X Confirm by pressing aon the steering
wheel.
X Press :or9 to select the Assistance Assistance
submenu. X
Press ato confirm.
X Select Collision Prevention Collision Prevention with9
or :.
X Press ato confirm.
The curren tselection appears.
X To activate/deactivate: press theabut-
ton again.
When COLLISION PREVENTION ASSIST PLUS
is deactivated, the æsymbol appears in
the multifunction display in the Assistance Assistance
graphic
graphic menu.
For further information about COLLISION PRE-
VENTION ASSIST PLUS, see (Y page 69).
Activating/deactivating PRE-SAFE ®
Brake PRE ‑SAFE ®
Brake is only availabl efor vehicles
with the Drivin gAssistance package.
X Press òon the steerin gwheel to open the
menu list.
X Press :or9 on the steerin gwheel to
select the Settings
Settings menu.
X Confirm by pressing aon the steering
wheel.
X Press :or9 to select the Assistance Assistance
submenu.
X Press ato confirm.
X Select PRE-SAFE Brake
PRE-SAFE Brake with: or9.
X Press ato confirm.
The curren tselection appears.
X To activate/deactivate: press theabut-
ton again.
When PRE-SAFE ®
Brake is deactivated, the
æ symbol appears in the multifunction dis-
play in the Assistance graphic Assistance graphic menu.
Further information on PRE‑ SAFE®
Brake
(Y page 75).
Activating/deactivating Blind Spot Assist
X Press òon the steerin gwheel to open the
menu list.
X Press :or9 on the steerin gwheel to
select the Settings Settings menu.
X Confirm by pressing aon the steering
wheel.
X Press :or9 to select the Assistance Assistance
submenu.
X Press ato confirm.
X Select Blind Spot Assist Blind Spot Assist with: or
9. Menus and submenus
245On-board computer and displays Z
Page 249 of 385
X
Press ato confirm.
The curren tselection appears.
X To activate/deactivate: press theabut-
ton again.
Further information about Blind Spot Assist
(Y page 218).
For further information about Active Blind Spot
Assist ,see (Y page 221).
Setting ATTENTION ASSIST X Press òon the steerin gwheel to open the
menu list.
X Press :or9 on the steerin gwheel to
select the Settings Settings menu.
X Confirm by pressing aon the steering
wheel.
X Press :or9 to select the Assistance
Assistance
submenu.
X Press ato confirm.
X Select ATTENTION ASSIST
ATTENTION ASSIST with: or
9.
X Press ato confirm.
X Press :or9 to select Deactivated
Deactivated,
Standard
Standard orSensitive
Sensitive.
X Press the abutton to confirm the selec-
tion.
When ATTENTION ASSIST is deactivated, the
é symbol appears in the Assistance
Assistance
graphic graphic menu in the multifunction display.
For further information about ATTENTION
ASSIST, see (Y page 215).
Setting Lane Keeping Assist X Press òon the steerin gwheel to open the
menu list.
X Press :or9 on the steerin gwheel to
select the Settings
Settings menu.
X Confirm by pressing aon the steering
wheel.
X Press :or9 to select the Assistance
Assistance
submenu.
X Press ato confirm.
X Select Lane Keeping Assist
Lane Keeping Assist with: or
9.
X Press ato confirm.
The curren tselection, Standard
Standard orAdap‐
Adap‐
tive
tive,a ppears.
X To change the setting: pressaagain.
For further information about Lane Keeping
Assist ;see (Y page 219). Further information about Active Lane Keeping
Assist (Y page 223).
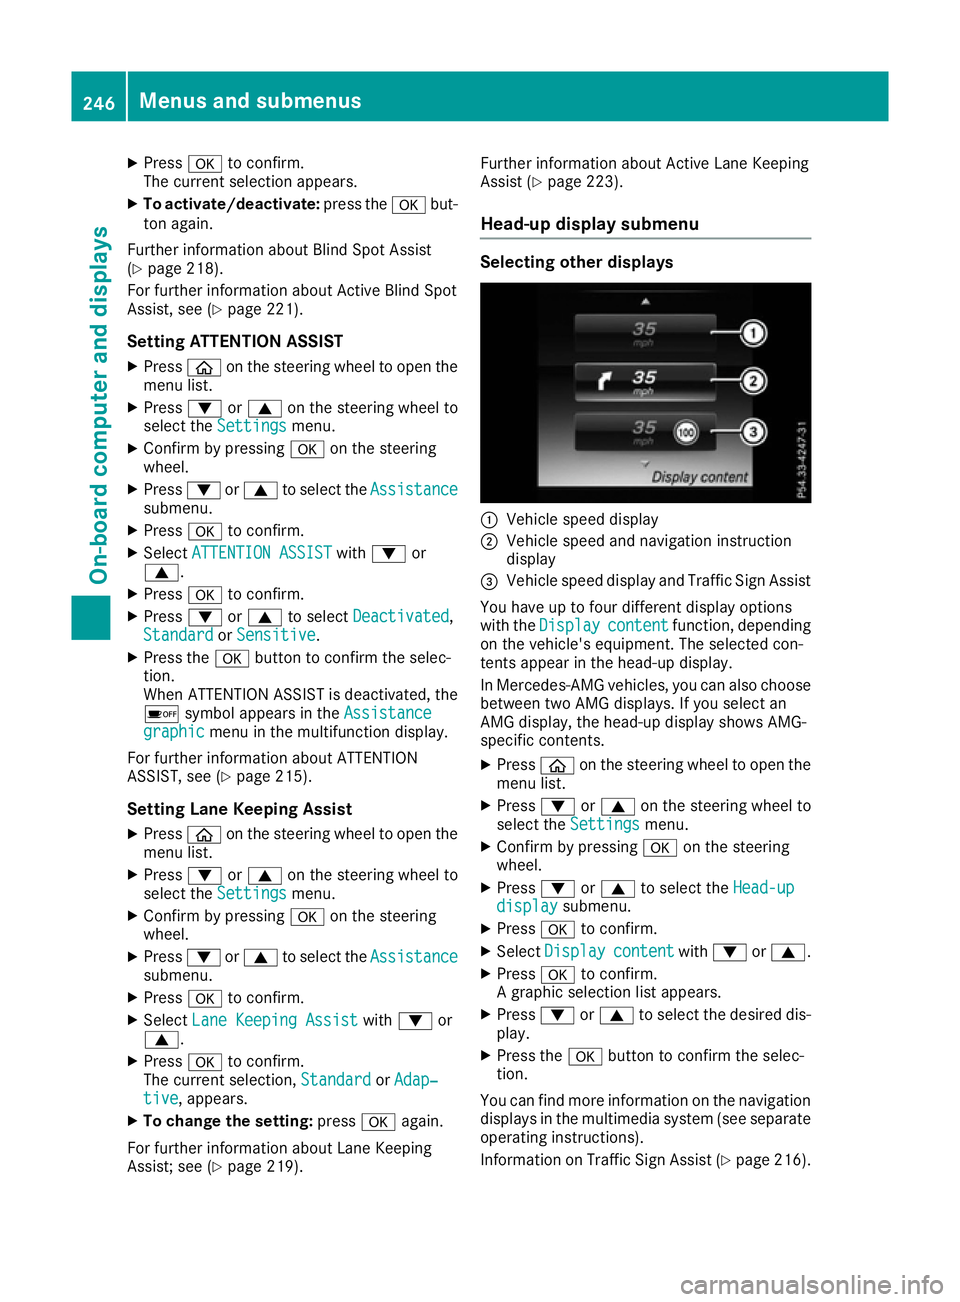
Head-up display submenu Selecting other displays
:
Vehicle speed display
; Vehicle speed and navigation instruction
display
= Vehicle speed display and Traffic Sign Assist
You have up to four different display options
with the Display Display content
contentfunction, depending
on the vehicle's equipment. The selected con-
tentsa ppear in the head-up display.
In Mercedes-AMG vehicles, you can also choose
between two AMG displays. If you select an
AMG display, the head-up display shows AMG-
specific contents.
X Press òon the steerin gwheel to open the
menu list.
X Press :or9 on the steerin gwheel to
select the Settings
Settings menu.
X Confirm by pressing aon the steering
wheel.
X Press :or9 to select the Head-up Head-up
display display submenu.
X Press ato confirm.
X Select Display
Display content
contentwith: or9.
X Press ato confirm.
Ag raphic selection list appears.
X Press :or9 to select the desired dis-
play.
X Press the abutton to confirm the selec-
tion.
You can find more information on the navigation displays in the multimedia system (see separate
operating instructions).
Information on Traffic Sign Assist (Y page 216).246
Menus and submenusOn-board computer and displays
Page 250 of 385
Setting the position
You can adjust the position of the head-up dis-
play on the windscreen. You can compensate for
height differences if the seat positions are
changed, for example.
X Switch on the head-up display (Y page 235).
X Press òon the steering wheel to open the
menu list.
X Press :or9 on the steering wheel to
select the Settings
Settings menu.
X Confirm by pressing aon the steering
wheel.
X Press :or9 to select the Head-up Head-up
display
display submenu.
X Press ato confirm.
X Press :or9 to select the Position
Position
function.
X Press ato save the setting.
X Press :or9 to adjust the position to a
level from Level
Level +5
+5(up) to Level
Level -5
-5(down).
X Press aor% to save the setting.
Using the Memory function, you can save and
call up the set position of the head-up display as as ingle memory preset (Y page 116).
Adjusting the brightness
The brightness of the head-up display is auto-
matically adjusted to the surrounding light con-
ditions. You can also individually adjust the
brightness of the head-up display.
X Switch on the head-up display (Y page 235).
X Press òon the steering wheel to open the
menu list.
X Press :or9 on the steering wheel to
select the Settings
Settings menu.
X Confirm by pressing aon the steering
wheel.
X Use : or9 to select the Head-up
Head-up
display
display submenu.
X Press ato confirm.
X Press :or9 to select the Brightness
Brightness
function.
X Press the abutton to save the setting.
X Press :or9 to adjust the brightness
to alevel from Level
Level +5
+5(bright) to Level
Level-5
-5
(dark).
X Press the aor% button to save the
setting. Light submenu Switching the Intelligent Light System
on/off
X Press òon the steering wheel to open the
menu list.
X Press :or9 on the steering wheel to
select the Settings Settings menu.
X Confirm by pressing aon the steering
wheel.
X Press :or9 to select the Lights
Lights
submenu.
X Press ato confirm.
X Press :or9 to select the Intelli‐
Intelli‐
gent Light System
gent Light System function.
If the Intelligent Light System
Intelligent Light System function
has been switched on, the cone of light and
the L symbol in the multifunction display
are shown in white.
X Press the abutton to save the setting.
If you switch on the Intelligent
Intelligent Light
LightSys‐
Sys‐
tem
tem function, the following functions are activa-
ted:
R Motorway mode
R Active light function
R Cornering light function
R Extended range foglamps
If you set the dipped-beam headlamps for driv-
ing on the right/left ,the multifunction display
shows the Inactive Inactive for
forleft-side
left-side traffic
traffic
or Inactive for right-side traffic
Inactive for right-side traffic dis-
play message in the Lights
Lightssubmenu instead of
the Intelligent Light System
Intelligent Light System function
(Y page 247). This display message will only
appear if the settingf or driving on the left/right
is set opposite to your vehicle's countryv ersion.
Further information on the Intelligent Light Sys-
tem (Y page 121).
Setting the dipped-beam headlamps for
driving on the left/right
This function is only available in vehicles with
the Intelligent Light System.
You can use this function to switch between
symmetrical and asymmetrical dipped beam
(Y page 118).
X Press òon the steering wheel to open the
menu list.
X Press :or9 on the steering wheel to
select the Settings
Settings menu. Menus and submenus
247On-board computer and displays Z