MERCEDES-BENZ C-Class COUPE 2017 CL205 Owner's Manual
Manufacturer: MERCEDES-BENZ, Model Year: 2017, Model line: C-Class COUPE, Model: MERCEDES-BENZ C-Class COUPE 2017 CL205Pages: 354, PDF Size: 8.66 MB
Page 311 of 354
Do not start the vehicleusing arapid charging device. If your vehicle's battery is discharged, the
engine can be jump-started froma nothervehicleorf romas econd battery using jumpe rcables.
Observe the following points:
RThe battery is not accessible in al lvehicles. If the othe rvehicle's battery is not accessible ,jump-
start the vehicl eusing asecond battery or ajump-starting device.
RYo um ayonl yjump-star tthe vehicl ewhent he engine and exhaust system ar ecold.
RAllv eh icle sexcept vehicle swithal ithium-io nbattery: do not start the engine if the battery
is frozen. Let the battery thawf irst.
ROnlyjump-star tfromb atteries with a12Vvoltagerating.
ROnlyu sejumpe rcable swhich have asufficient cross-sectio nand insulate dtermina lclamps.
RIf the battery is full ydischarged, leav ethe battery thati sbeing used to jump-star tconnected for
af ew minute sbefor ea ttempting to start. Thi scharge sthe battery slightly.
RMake sure thatt he two vehicles do not touch.
Make sure that:
Rthe jumpe rcable sarenot damaged.
Rwhen the jumpe rcable sareconnected to the battery ,uninsulated sections of the termina lclamp
do not come into contact with othe rmetalsections.
Rthe jumpe rcable scanno tcome into contact with parts which can mov ewhent he engine is
running ,suc hast he V-bel tpulle yort he fan.
XSecure the vehicl ebyapplyingthe electri cparkin gb rake.
XShift the transmission to position P.
XMake sure thatt he ignition is switched off .All indicator lamps in the instrument cluster must be
off .W henu sing the SmartKey, tur nthe SmartKeytop osition0in the ignition lock and remove it
(
Ypage 131).
XSwitch off al lelectrical consumers ,e.g.r ea rw indo wd efroster ,lighting, etc.
XOpen the hood.
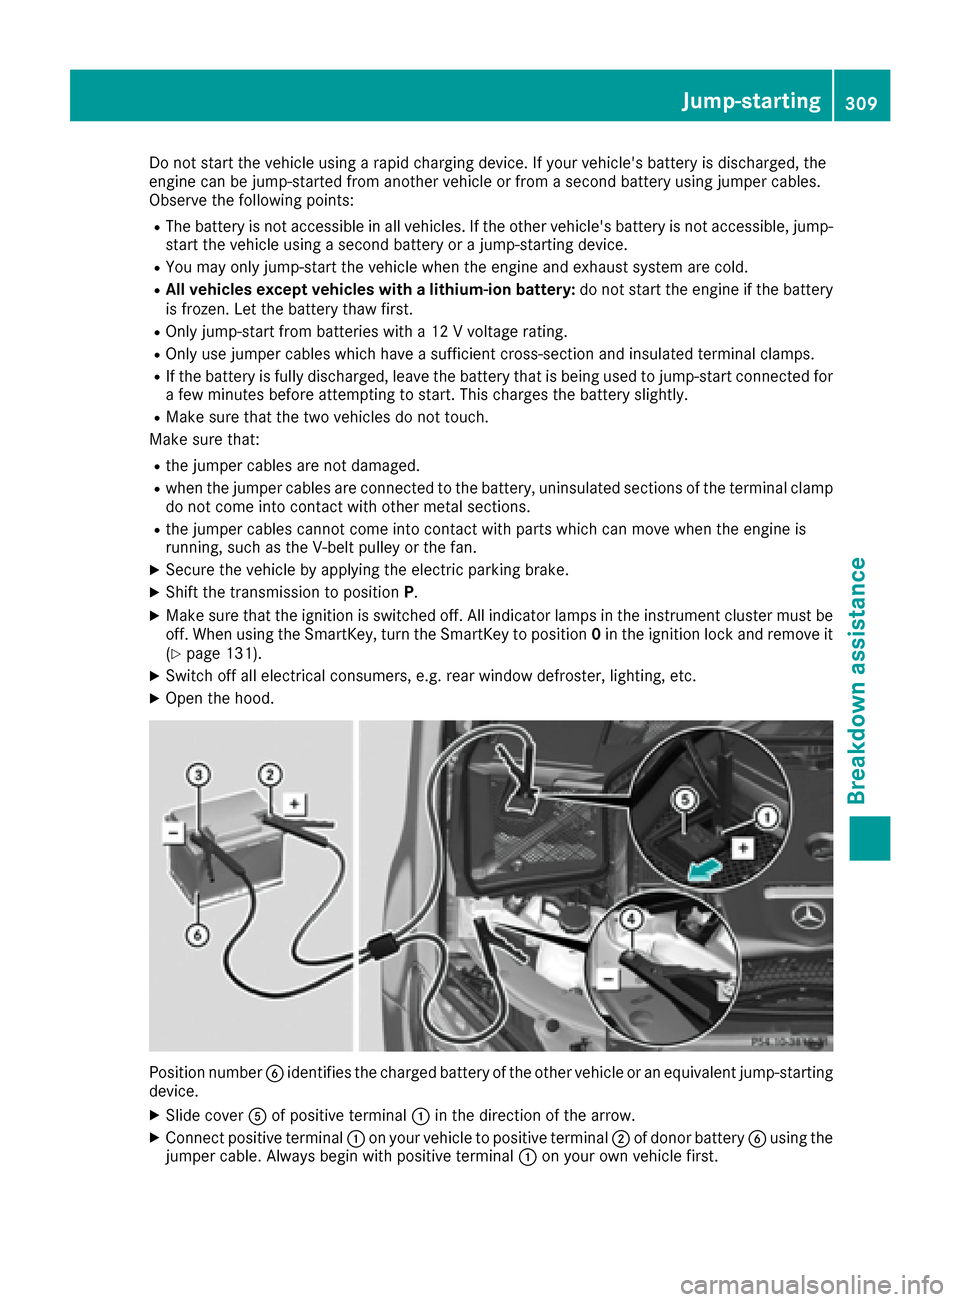
Positio nnumber Bidentifie sthe charge dbattery of the othe rvehicl eorane quivalen tjump-starting
device.
XSlide cover Aof positive terminal :in the direction of the arrow.
XConnect positive terminal :on your vehicl etopositive terminal ;of donor battery Busing the
jumpe rcable .Alway sbegin with positive terminal :on your ow nvehicl efirst.
Jump-starting309
Breakdow nassistance
Z
Page 312 of 354
XStart the engine of the donorvehicl eand run it at idling speed.
XConnect negative terminal =of dono rbattery Bto ground point ?of your vehicl eusing the
jumper cable ,connecting the jumper cable to dono rbattery Bfirst.
XStart the engine.
XBefore disconnecting the jumper cables, le tthe engine run for several minutes.
XFirst, remove the jumper cable sfrom ground point ?and negative terminal =,then from pos-
itive clamp :and positive terminal ;.Begineacht ime at the contacts on your ownv ehiclefirst.
XClose cover Aof positive terminal :afte rremoving jumper cables.
XHave the battery checke dataqualified specialist workshop.
Jump-starting is not considered to be anorma loperating condition.
iJumpe rcable sand further information regarding jump-starting can be obtaine datany qualified
specialist workshop.
Towin gand tow-starting
Important safety notes
GWARNING
Functions relevant to safety are restricted or
no longer available if:
Rthe engine is not running.
Rthe brake system or the power steering is
malfunctioning.
Rthere is amalfunction in the voltag esupply
or the vehicle's electrical system.
If your vehicl eisbeing towed, much more
force may be necessary to stee rorbrake.
There is ariskofana ccident.
In such cases, us eatow bar. Before towing,
make sure that the steering move sfreely.
GWARNING
You can no longer stee rthe vehicl eifthe
steering wheel lock hasb eene ngaged .There
is ar iskofana ccident.
Alway sswitch off the ignition when towing the
vehicl ewithat ow cable or atow bar.
GWARNING
Whe ntowing or tow-starting another vehicle
and its weight is greate rthan the permissible
gross weigh tofyourv ehicle, the:
Rthe towing eyec ould detach itself
Rthe vehicle/trailer combination could roll-
over.
There is ariskofana ccident.
Whe ntowing or tow-starting another vehicle,
its weight shoul dnot be greate rthan the per-
missible gross weight of your vehicle.
Details on the permissible gross vehicl eweight
of your vehicl ecan be found on the vehicl eide n-
tification plate (
Ypage 343).
!Whe nCOLLISIONP REVENTION ASSIST
PLUS, DISTRONIC PLU Sorthe HOLD function
is activated, the vehicl ebrakes automatically
in certain situations.
To avoid damag etothe vehicle, deactivate
thes esystems in the following or similar sit-
uations:
Rwhen towing the vehicle
Rin the car wash
!Make sure that the electri cparking brake is
released .Ifthe electri cparking brake is faulty,
visit aquali fied specialist workshop.
!Secure the tow rop eortow ba rtothe towing
eyeo nly.Otherwise, the vehicl ecould
become damaged.
310Towinga nd tow-starting
Breakdown assistance
Page 313 of 354
!Do not use the towing eye for recovery. This
could damage the vehicle. If in doubt, have
the vehicle recovered using acrane.
!When towing, pull aways lowly and
smoothly. If the tractive power is too high, the
vehicles could be damaged.
!Shift the automatic transmission to Nand
do not open the driver's or front passenger's
door during towing. The automatic transmis-
sion may otherwise shift to position P,which
could damage the transmission.
!Do not tow with sling-type equipment. This
could damage the vehicle.
!The vehicle can be towed amaximum of
30 miles (50km). The towing speed of 30 mph (50 km/h) must not be exceeded.
If the vehicle has to be towed more than
30 miles (50km), the entire vehicle must be
raised and transported.
It is better to have the vehicle transported than
to have it towed away.
If the vehicle has suffered transmission damage,
have it transported on atransporter or trailer.
The automatic transmission must be in position N when the vehicle is being towed. If the auto-
matic transmission cannot be shifted to position
N,h ave the vehicle transported on atransporter
or trailer.
The battery must be connected and charged.
Otherwise, you:
Rcannot turn the SmartKey to position 2in the
ignition lock
Rcannot release the electric parking brake
Rcannot shift the automatic transmission to
position N
Disarm the automatic locking feature before the vehicle is towed (
Ypage 81). You could other-
wise be locked out when pushing or towing the
vehicle.
Installing/removing the towing eye
Installingt he towing eye
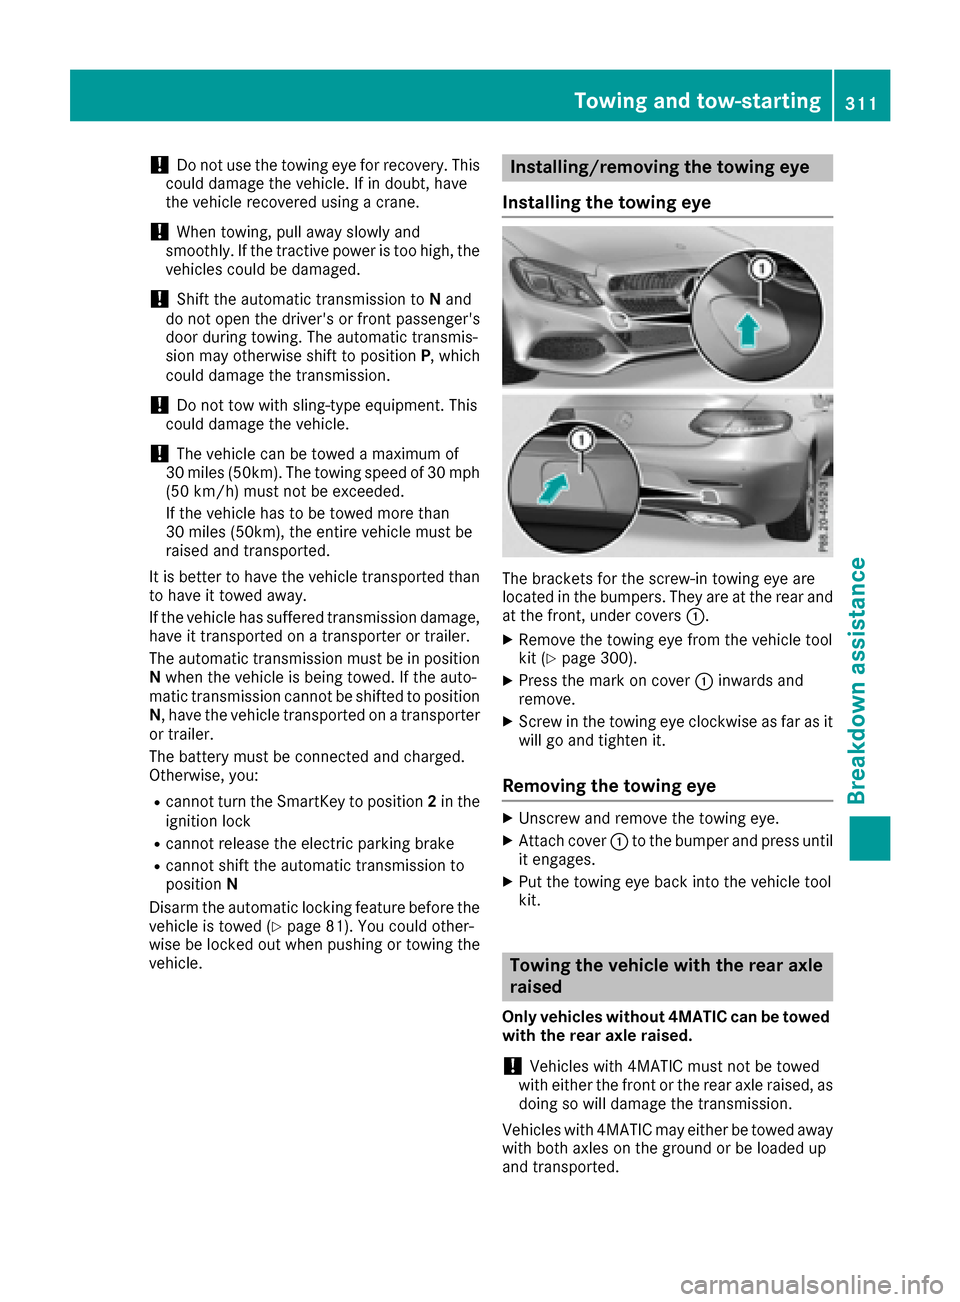
The brackets for the screw-in towing eye are
located in the bumpers. They are at the rear and
at the front,u nder covers:.
XRemove the towing eye from the vehicle tool
kit (Ypage 300).
XPress the mark on cover :inwards and
remove.
XScrew in the towing eye clockwise as far as it will go and tighten it.
Removing the towing eye
XUnscrew and remove the towing eye.
XAttach cover :to the bumper and press until
it engages.
XPut the towing eye back into the vehicle tool
kit.
Towing the vehiclew ith the rear axle
raised
Only vehicles without 4MATIC can be towed
with the rear axle raised.
!Vehicles with 4MATIC must not be towed
with either the front or the rear axle raised, as doing so will damage the transmission.
Vehicles with 4MATIC may either be towed away
with both axles on the ground or be loadedu p
and transported.
Towing and tow-starting311
Breakdown assistance
Z
Page 314 of 354

!Vehicles with automatic transmission must
not be towed with the rear axle raised. The
vehicle/trailer combination may otherwise
swerve or even roll over.
Towing avehiclew ith both axles on
the ground
The automatic transmission automaticallys hifts
to position Pwhen you open the driver's or front-
passenger door or when you remove the Smart-
Key from the ignition lock. In order to ensure
that the automatic transmission stays in posi-
tion Nwhen towing the vehicle, you must
observe the following points:
XMake sure that the vehicle is stationary.
XTurn the SmartKey to position 2in the ignition
lock.
XDepress and hold the brake pedal.
XShift the automatic transmission to position
N.
XLeave the SmartKey in position 2in the igni-
tion lock.
XRelease the brake pedal.
XRelease the electric parking brake.
XSwitch on the hazard warning lamps
(Ypage 112).
In order to signal achange of direction when
towing the vehicle with the hazard warning
lamps switched on, use the combination switch
as usual. In this case, only the indicator lamps
for the direction of travel flash. After resetting
the combination switch, the hazard warning
lamp starts flashing again.
Transporting the vehicle
4MATIC vehicles/vehiclesw ith auto-
matic transmission
!When the vehicle is loadedf or transport, the
front and rear axles must be stationary and on the same transportation vehicle. Positioning
over the connection point of the transport
vehicle is not permitted. The drive train may
otherwise be damaged.
All vehicles
!You may only secure the vehicle by the
wheels, not by parts of the vehicle such as
axle or steering components. Otherwise, the
vehicle could be damaged.
The towing eye can be used to pull the vehicle
onto atrailer or transporter for transporting pur-
poses.
XTurn the SmartKey to position 2in the ignition
lock.
XShift the automatic transmission to position
N.
As soon as the vehicleh as been loaded:
XPrevent the vehicle from rolling awayb y
applying the electric parking brake.
XShift the automatic transmission to posi-
tion P.
XTurn the SmartKey to position 0in the ignition
lock and remove it.
XSecure the vehicle.
312Towing and tow-starting
Breakdown assistance
Page 315 of 354
Noteson4 MATIC vehicles
!
Vehicle swith4 MATIC must not be towed
with eithe rthe front or the rea raxler aised, as
doing so will damage the transmission.
Vehicle swith4 MATIC maye ithe rbet owed away
with both axles on the ground or be loaded up
and transported.
If the vehicle' stransmission, front, or rea raxlei s
damaged, have the vehicl etransporte dona
truck or trailer.
In the even tofdamagetot he electrical sys-
tem: if the battery is defective, the automatic
transmission will be locked in position P.Tos hift
the automatic transmission to position N,you
must provide powe rtothe vehicle' selectrical
syste mint he same wa yaswhenj ump-starting
(
Ypage 308).
Have the vehicl etransporte donatransporte ror
trailer.
Tow-startin g(em ergency engine
starting)
!
Vehicle switha utomatic transmission must
not be tow-started .You could otherwis edam -
ag et he automatic transmission.
iYouc an find information on "Jump-starting"
under (Ypage 308).
Fuses
Important safety notes
GWARNING
If yo umanipulate or bridg eafaulty fuse or if
yo ur eplace it with afusew ithah igheramper -
age, the electric cable scould be overloaded.
This could resul tinafire. There is ariskofa n
accident and injury.
Alway sreplace faulty fusesw itht he specified
new fusesh avingthe correc tamperage.
Blown fusesm ustber eplaced with fusesoft he
same rating ,which yo ucan recognize by the
color and value. Th efuser ating sarelistedint he
fuse allocatio nchart.
Th efus ea lloc atio nchart is on the fuse bo xinthe
trunk (
Ypage 315). If
an ewly inserte dfusea lsob lows ,havet he
cause traced and rectifie dataqualified special-
is tw orkshop ,e.g.ana uthorized Mercedes-Benz
Center.
!Onl yusefusest hath aveb eena pproved for
Mercedes-Benz vehicles and which have the
correc tfus er ating for the systemc oncerned.
Otherwise, components or systems could be
damaged.
!Make sure tha tnomoisture can ente rthe
fuse bo xwhent he cover is open.
!When closing the cover, make sure tha titis
lying correctly on the fuse box. Moistur eseep-
ing in or dirt could otherwis eimpair theope
r-
ation of the fuses.
Th ef uses in your vehicl eserve to close down
faulty circuits .Ifafuse blows, al lthe compo-
nents on the circuit and their functions stop
operating.
Before changin gafuse
Observe the important safety notes
(Ypage 313)
XSwitch off the engine.
XSwitch off al lelectrica lconsumers.
XSecure the vehicl eagain st rolling away
(Ypage 152).
XRemov ethe SmartKeyf romthe ignition lock.
or, in vehicles with KEYLESS-GOs tart-function
or KEYLESS ‑GO
XOpen the driver's door.
Theo n-board electronics now have status 0.
This is the same as the SmartKeyh avingbeen
removed.
Th ed river’s door can be closeda gain.
All indicator lamps in the instrumen tcluster
must be off.
Th ef uses arel oc ated in variou sfuseb oxes:
RFuse bo xonthe driver's side of the dashboard
RFuse bo xinthe front-passenge rfootwell
RFuse bo xinthe engine compartment on the
driver's side
RFuse bo xunder the trunk floo ronthe right-
hand side of the vehicle, when viewed in the
directio noftravel
Fuses313
Breakdow nassistance
Z
Page 316 of 354
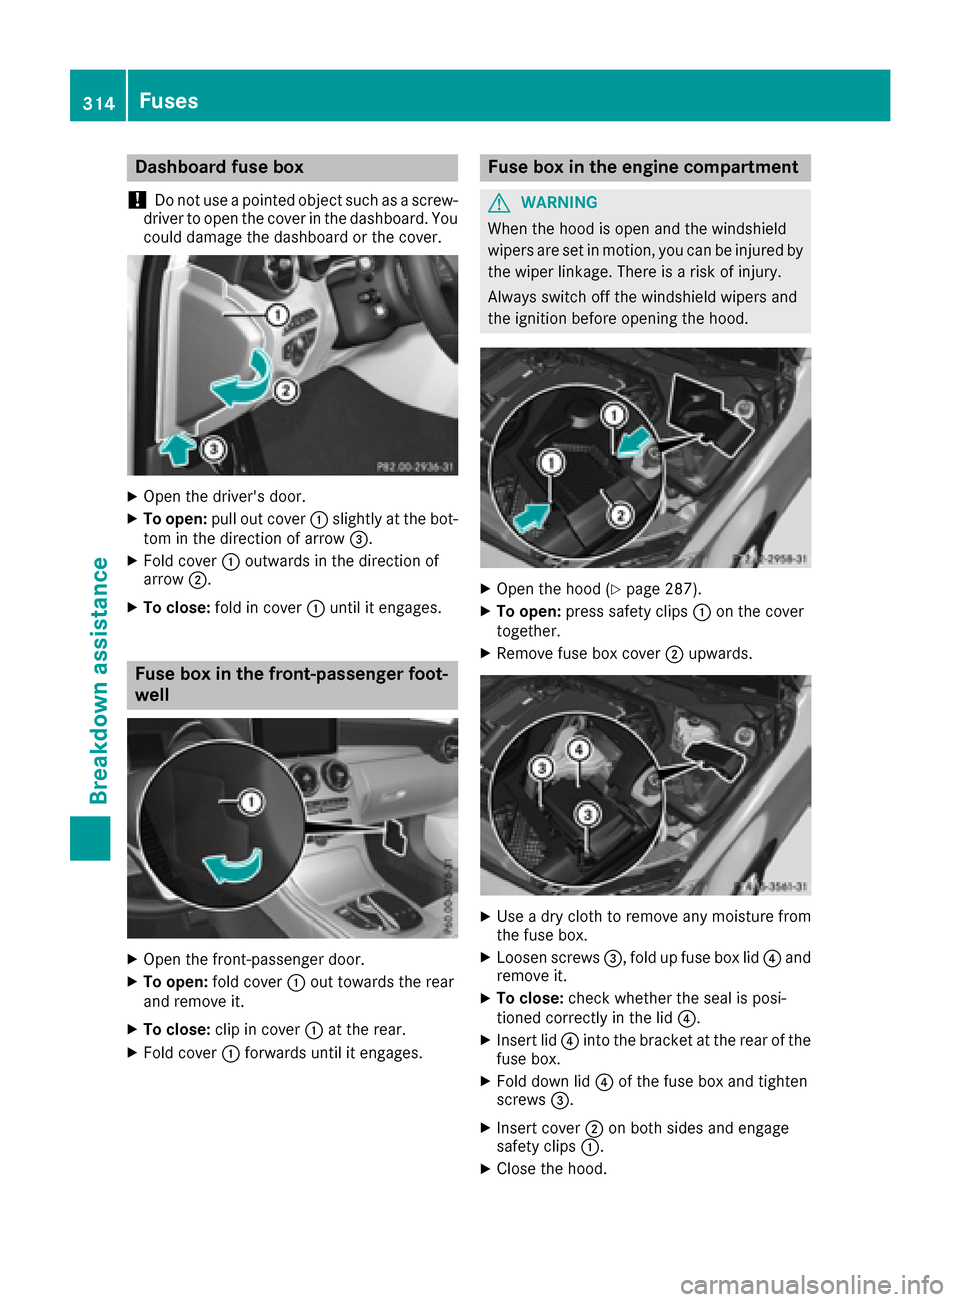
Dashboardfuseb ox
!
Do no tuse ap ointe dobjec tsuc hasas crew -
driver to ope nthe cover in th edashboard. You
could damage th edashboar dorthecover .
XOpenthe driver's door.
XTo open: pull out cover :slightly at th ebot-
to mint hedirection of arrow =.
XFold cover:outward sinthedirection of
arrow ;.
XTo close :fold in cover :until it engages.
Fus ebox in th efront-passenger foot -
well
XOpe nthe front-passenger door.
XTo open: fold cover :out toward sthe rea r
and remov eit.
XTo close :clip in cover :at th erear.
XFold cover :forwards until it engages.
Fus ebox in th eengin ecompartment
GWARNING
Whe nthe hoo diso pena nd th ewindshield
wipers are set in motion ,you can be injured by
th ew iperlinkage. There is ariskofi njury.
Always switch of fthe windshield wipers and
th ei gnition befor eopening th ehood.
XOpe nthe hoo d(Ypage 287).
XTo open: press safet yclips : on th ecover
together .
XRemovefuseb ox cover ;upwards.
XUse adry clot htoremov eany moisture from
th ef useb ox.
XLoosen screw s=,f oldupf useb ox lid ?and
remov eit.
XTo close :chec kwhether th eseal is posi-
tioned correctl yint he lid?.
XInser tlid ? into th ebracket at th erearoft he
fus eb ox.
XFold down lid ?of th efuseb ox and tighten
screw s=.
XInser tcover ; on bot hsides and engage
safet yclips :.
XClos ethe hood.
314Fuses
Breakdown assistance
Page 317 of 354
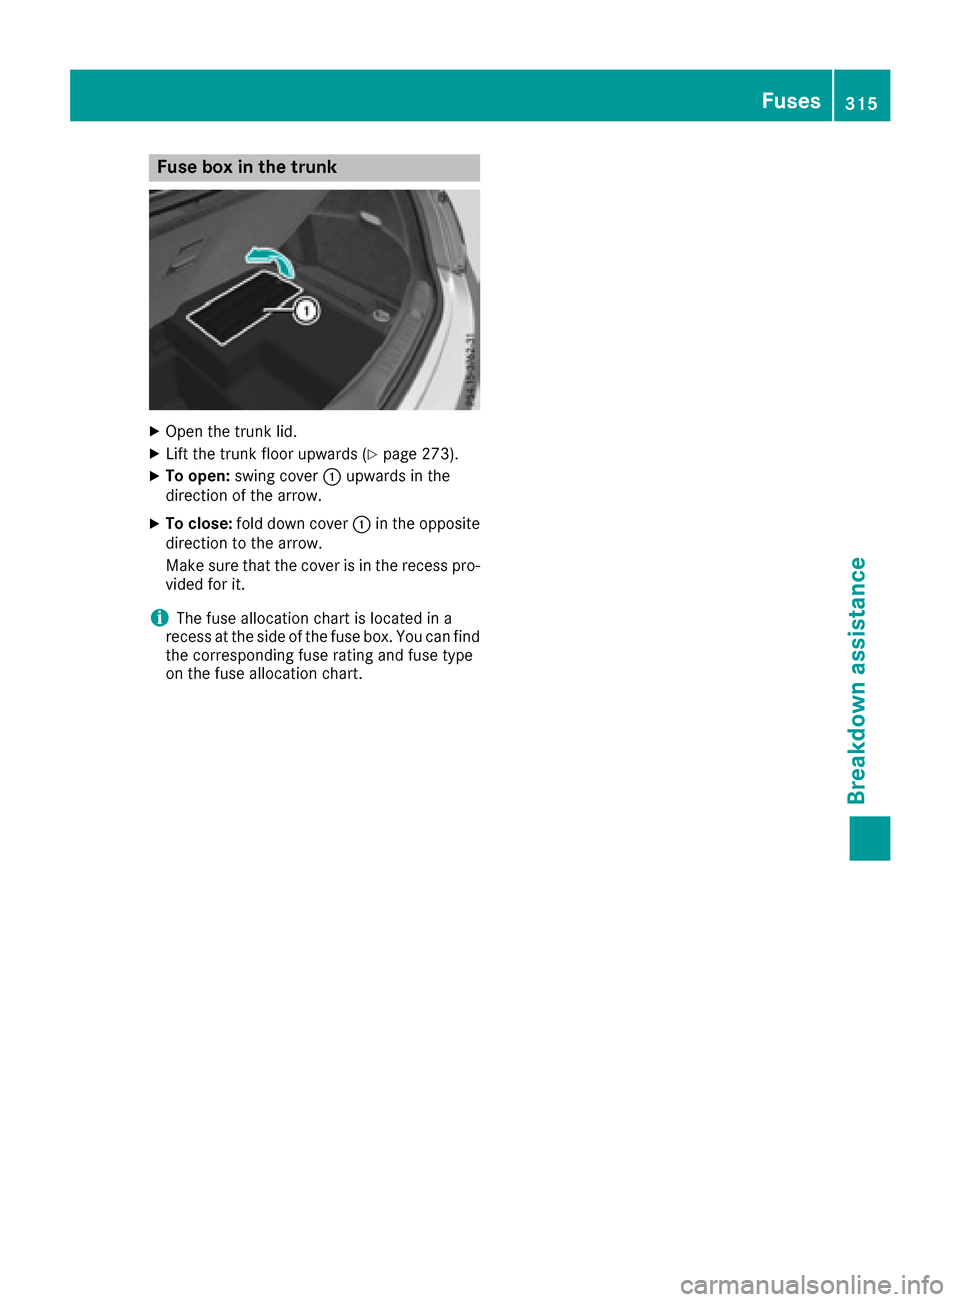
Fuse box in thetrunk
XOpen th etrunk lid.
XLif tthe trunk floor upward s(Ypage 273).
XTo open:swin gcover : upward sinthe
direction of th earrow.
XTo close: foldd own cover :in th eopposit e
direction to th earrow.
Mak esure that th ecover is in th erecess pro -
vide dfor it .
iThe fus eallocation chart is locate dina
recess at th eside of th efus eb ox.You can fin d
th ec orre sponding fus erating and fus etype
on th efusea llocation chart .
Fuses315
Breakdown assistance
Z
Page 318 of 354
Important safety notes
GWARNING
If wheels and tires of th ewrong siz eare used,
th ew hee lbrakes or suspension component s
may be damaged. Ther eisariskofana cci-
dent.
Always replace wheels and tires wit hthose
that fulfill th especification softheoriginal
part .
When replacing wheels, mak esuretou se the
correct:
Rdesignation
Rmodel
When replacing tires ,makes uretou se the
correct:
Rdesignation
Rmanufacturer
Rmodel
GWARNIN G
Af lat tire severely impairs th edriving ,steer -
ing and braking characteristics of th evehicle.
Ther eisar iskofa ccident.
Tires without run-flat characteristics :
Rdo notdrivew ithaf lat tire.
Rimmediately replace th eflat tire wit hyour
emergenc yspar ew hee lors parew heel, or
consult aqualified specialist workshop.
Tires wit hrun-flat characteristics :
Rpay attention to theinformation and warn -
ing notice sonMOExtended tires (tire swith
run-flat characteristics).
Accessories that are no tapprove dfor your vehi-
cle by Mercedes-Ben zorare notbein gused cor-
rectl ycan impair th eoperating safety.
Before purchasing and usin gnon-ap proved
accessories, visit aqualified specialist work-
sho pand inquire about :
Rsuitability
Rlegal stipulation s
Rfactory recommendation sFurther information regarding wheels and tires
can be foun
dunder "Wheel/tire combinations"
(
Ypage 340).
You can ask for information regarding permitte d
wheel-tire combination satanauthorized
Mercedes-Ben zCenter.
Information on tire pressur ecan be found:
Ron th eTirea nd Loading Information placard
on th eB-pillar on th edriver' sside
(
Ypage 326)
Rin th etirep ressur etable in th efuel filler flap
(Ypage 150)
Runder "Tir epressure" (Ypage 319)
Operation
Information on driving
Checkthe tire pressur ewhen th evehicl eis
heavily laden and adjust prio rtoatrip.
While driving ,pay attention to vibrations, noises
and unusual handlin gcharacteristics ,e.g.p ull-
ing to on eside .This may indicat ethatthe
wheels or tires are damaged. If you suspec ttha t
at ireisd efective, reduce your spee dimmedi-
ately. Stop th evehicl eass oonasp ossible to
chec kthe wheels and tires for damage. Hidden
tire damag ecould also be causing th eunusual
handlin gcharacteristics .Ifyou fin dnos ignsof
damage, hav ethe tires and wheels checke data
qualified specialist workshop.
When parking your vehicle, mak esuret hatthe
tires do no tget deformed by th ecurboro ther
obstacles. If they canno tbeavoided, driv eover
obstacles suc hascurbs slowly and at an obtuse
angle. Otherwise, you may damag ethe wheels
or tires .
Notes on high performance tires
GWARNIN G
Due to th especial tire tread in combination
wit hthe optimized rubber compound ,the re is
an increased ris kofhydroplaning and skid-
din gonad amp or wet road surface. tire gri pis
also noticeably reduce datlow outside tem-
peratures and low tire operating tempera-
tures. Ther eisariskofana ccident.
316Operation
Wheels and tires
Page 319 of 354
Turn on ESP®and adapt your driving style
accordingly. When the outside temperature
falls below 10 †, use M+S tires.
iDifferent driving styles may lead to high tire
wear and the tires may reach the minimum
tire tread depth after only ashort time.
Regular checking of wheels and tires
GWARNING
Damaged tires can cause tire inflation pres-
sure loss. As aresult, you could lose control of
your vehicle. There is arisk of accident.
Check the tires regularly for signs of damage
and replace any damaged tires immediately.
Check wheels and tires for damage at least once
am onth. Check wheels and tires after driving
off-road or on rough roads. Damaged wheels
can cause aloss of tire pressure. Pay particular
attention to damage such as:
Rcuts in the tires
Rpunctures
Rtears in the tires
Rbulges on tires
Rdeformation or severe corrosion on wheels
Regularly check the tire tread depth and the
condition of the tread across the whole width of
the tire (
Ypage 317). If necessary, turn the
front wheels to full lock in order to inspect the
inner side of the tire surface.
All wheels must have avalve cap to protec tthe
valve against dirt and moisture. Do not mount
anything ontot he valve other than the standard
valve cap or other valve caps approved by
Mercedes-Benz for your vehicle. Do not use any
other valve caps or systems, e.g. tire pressure
monitoring systems.
Regularly check the pressure of all the tires par-
ticularly prior to long trips. Adjust the tire pres-
sure as necessary (
Ypage 319).
The service life of tires depends, among other
things, on the following factors:
Rdriving style
Rtire pressure
Rdistance covered
Notes on tire tread
GWARNING
Insufficient tire tread will reduce tire traction.
The tire is no longer able to dissipate water.
This means that on wet road surfaces, the risk
of hydroplaning increases, in particular where speed is not adapted to suit the driving con-
ditions. There is arisk of accident.
If the tire pressure is too high or too low, tires
may exhibit different levels of wear at differ-
ent locations on the tire tread. Thus, you
should regularly check the tread depth and
the condition of the tread across the entire
width of all tires.
Minimum tire tread depth for:
RSummer tires: âin (3 mm)
RM+S tires: ãin (4 mm)
For safety reasons, replace the tires before
the legally prescribed limit for the minimum
tire tread depth is reached.
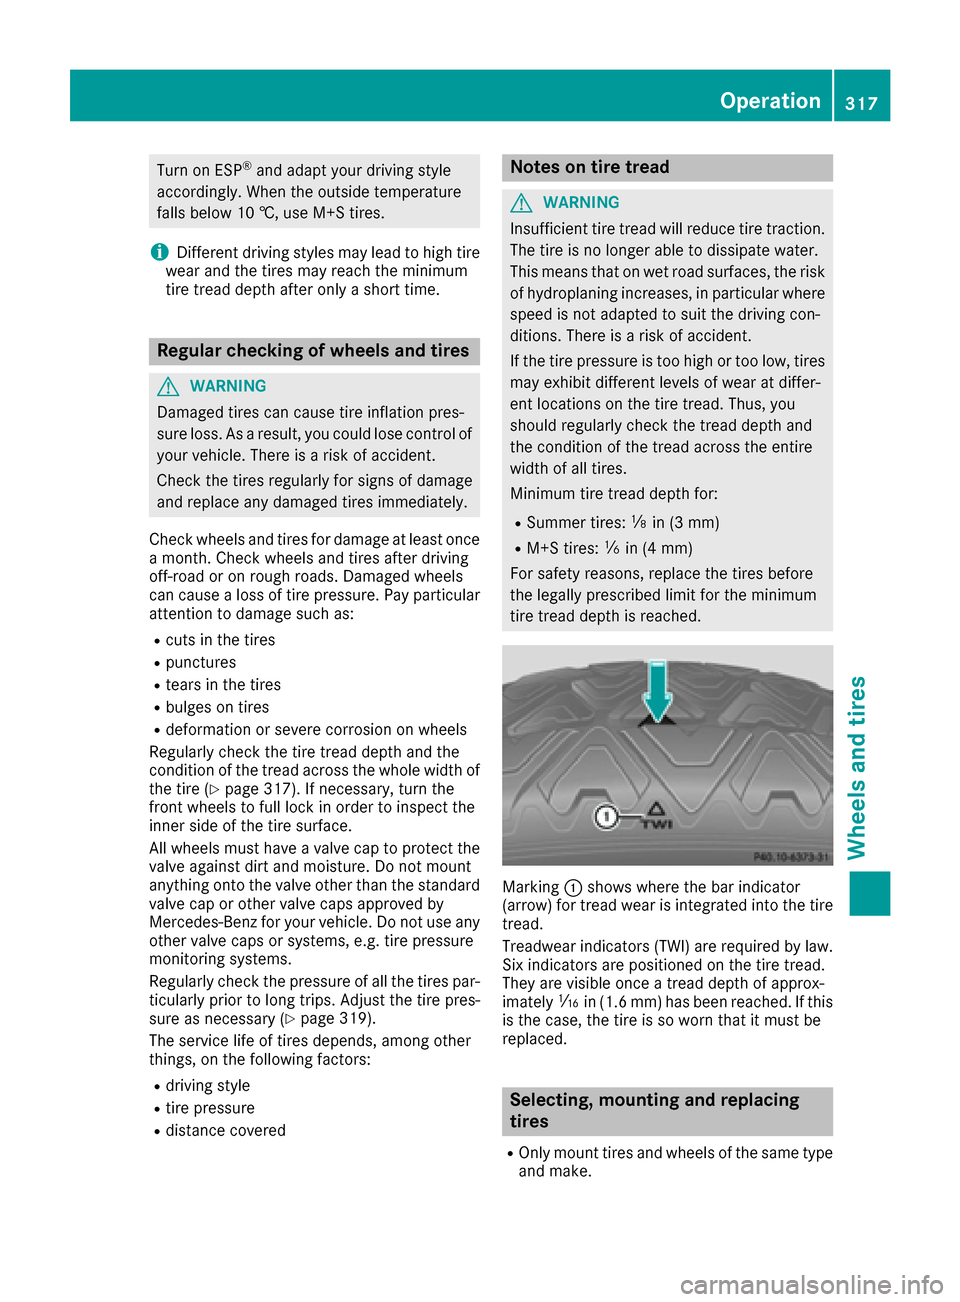
Marking :shows where the bar indicator
(arrow) for tread wear is integrated into the tire
tread.
Treadwear indicators (TWI) are required by law. Six indicators are positioned on the tire tread.
They are visible once atread depth of approx-
imately áin (1.6 mm) has been reached. If this
is the case, the tire is so worn that it must be
replaced.
Selecting, mounting and replacing
tires
ROnly mount tires and wheels of the same type
and make.
Operation317
Wheels and tires
Z
Page 320 of 354
Exception: it is permissibletoinstalladiffer-
ent typ eormakeint he event of aflatt ire.
Observe the "MOExtende dtires(tires with
run-flat characteristics" sectio n(
Ypage 301).
ROnlymount tire softhe correct size onto the
wheels.
RBrea kinn ew tire satmoderate speeds for the
first 60 miles (100 km). The yonlyr each their
full performance after thisd istance.
RDo not drive with tire swhich have too little
trea ddepth,ast hissignificantl yreduce sthe
tractio nonw etroads (hydroplaning).
RReplace the tire safter sixy earsat the latest,
regardless of wear.
MOExtende dtires(tires with run-flat
properties)
With MOExtende dtires(tires with runf latc har-
acteristics), yo ucan continue to drive your vehi-
cle eve nifthere is atotall ossofp ressure in one
or mor etires.
MOExtende dtiresm ayonl ybeu sedinc onjunc-
tio nw ithana ctive tire pressure loss warning
system or with an active tire pressure monitor
and on wheels specifically teste dbyMercedes-
Benz.
Note sond rivingwithM OExtende dtiresw itha
fla ttire (
Ypage 301).
Vehicles equipped with MOExtende dtiresa re
not equipped with aTIREFIT kit at the factory .It
is therefore recommende dthaty ouadditionally
equi pyourvehicl ewithaT IREFIT kit if yo umount
tire sthatd onot featur erun-flat properties, e.g.
winter tires. ATIREFIT kit can be obtained from
aq uali fied specialis tworkshop.
Winter operation
General notes
Hav eyourv ehicl ewinter-proofed at aquali fied
specialis tworkshop at the onse tofwinter.
Observe the note sinthe "Changing awheel "
sectio n(
Ypage 335).
Driving with summe rtires
At temperatures belo w45‡(+7 †),summer
tire slos ee last icity and therefore tractio nand
braking power. Chang ethe tire sonyourvehicle to M+S tire
s. Usingsumme rtires at very cold
temperatures could cause cracks to form,
thereby damaging the tires permanently.
Mercedes-Benz cannot accept responsibility for
this type of damage.
GWARNING
Damage dtires can cause tire inflation pres-
sure loss. As aresult, you could lose control of
you rvehicle. There is arisk of accident.
Check the tires regularly for signs of damage
and replace any damaged tires immediately.
M+S tires
GWARNING
M+S tires with atire tread depth of less than
ã in (4 mm) are not suitable for use in winter
and do not provid esufficient traction. There is
ar isk of an accident.
M+S tires with atread depth of less than ãin
(4 mm) must be replaced immediately.
At temperatures belo w45‡ (+7 †), use winter
tires or all-season tires. Bot htype soft ire are
identified by the M+S marking.
Only winter tires bearing the isnowflake
symbol in addition to the M+S marking provide
the best possibl egrip in wintry road conditions.
Only these tires wil lallow driving safety systems
such as ABS and ESP
®to function optimally in
winter. Theset ires have beend eveloped specif-
ically for driving in snow.
Use M+S tires of the same make and tread on all
wheels to maintain safe handling characteris-
tics.
Always observe the maximu mpermissible
speeds pecified for the M+S tires you have
mounted.
When you have mounted the M+S tires:
XCheck the tire pressures (Ypag e322).
XRestart the tire pressure monitor
(Ypag e325).
318Wintero peration
Wheels and tires