display MERCEDES-BENZ CL CLASS 2010 Owners Manual
[x] Cancel search | Manufacturer: MERCEDES-BENZ, Model Year: 2010, Model line: CL CLASS, Model: MERCEDES-BENZ CL CLASS 2010Pages: 500, PDF Size: 9.32 MB
Page 188 of 500
From another main function
X
Press shortcut button R.
COMAND activates the last selected disc
mode.
i When media interface operation was
selected before, it is now activated.
X Select MediaQ Media Interface.
The media list appears. The dot #
indicates the currently played medium.
i When no device is connected, Media
Interface instead of the device name
appears.
If COMAND does not support the
connected device, the message Device
incompatible. appears. The device will
be listed in the media list as Not
Available. When two devices are
connected, the message Please ensure
that only one device is connected.
appears.
X Confirm with W.
COMAND activates a connected device. A
corresponding message appears.
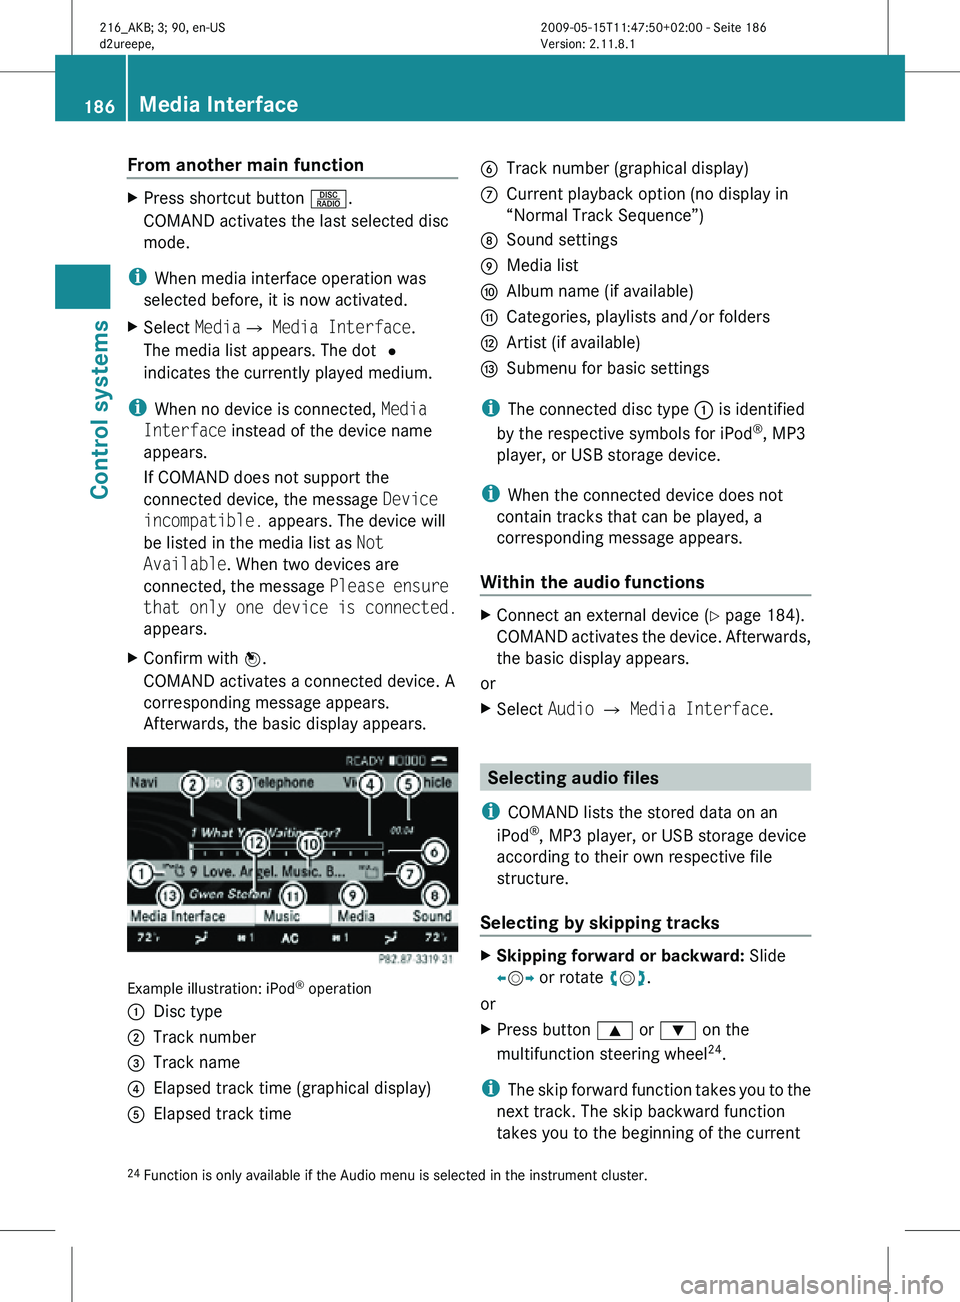
Afterwards, the basic display appears. Example illustration: iPod
®
operation
: Disc type
; Track number
= Track name
? Elapsed track time (graphical display)
A Elapsed track time B
Track number (graphical display)
C Current playback option (no display in
“Normal Track Sequence”)
D Sound settings
E Media list
F Album name (if available)
G Categories, playlists and/or folders
H Artist (if available)
I Submenu for basic settings
i The connected disc type : is identified
by the respective symbols for iPod ®
, MP3
player, or USB storage device.
i When the connected device does not
contain tracks that can be played, a
corresponding message appears.
Within the audio functions X
Connect an external device (Y page 184).
COMAND activates the device. Afterwards,
the basic display appears.
or
X Select Audio Q Media Interface. Selecting audio files
i COMAND lists the stored data on an
iPod ®
, MP3 player, or USB storage device
according to their own respective file
structure.
Selecting by skipping tracks X
Skipping forward or backward: Slide
XVY or rotate cVd.
or
X Press button 9 or : on the
multifunction steering wheel 24
.
i The skip forward function takes you to the
next track. The skip backward function
takes you to the beginning of the current
24 Function is only available if the Audio menu is selected in the instrument cluster. 186
Media InterfaceControl systems
216_AKB; 3; 90, en-US
d2ureepe,
Version: 2.11.8.1 2009-05-15T11:47:50+02:00 - Seite 186
Page 189 of 500
track, provided it has been played for
longer
that
8 seconds. When the track has
been played for less than 8 seconds, you
will skip to the track before the current one.
When you select an option other than
Normal Track Sequence, the track is
chosen at random.
Selecting via telephone keypad X
Initiating entry: Press button Ä.
The input menu appears. The number of
digits you can enter depends on the
number of stored tracks.
X Entering track number: Press a button,
for example Á.
The number on the button you have
pressed is the first digit in the input line.
i COMAND ignores invalid digits and does
not display them.
X Enter more digits as desired.
X Confirming entry: Press W.
or
X Hold down the last digit button of the
desired track
number (e.g. track 108, press
´, Å, then hold Â).
The selected track is played back.
Fast forward/rewind X
With the main area active: Slide X
VY and
hold until the desired track part is reached.
i With iPods ®
, the fast-rewind function
works within the current track only. Selecting category/playlist/folder
iPod ®
and selected MP3 player You can select tracks via categories and
folders.
Categories, for example, can be: R
Current Track List
R Playlists
R Artists
R Albums
R Track
R Podcasts
R Genres
R Composers
R Audiobooks
i Some categories contain the entry All.
When selecting this entry, the entire
content of the respective category is
played back.
USB devices You can select folders and playlists (if
available). COMAND can display the
respective album name and artist, the so-
called metadata, during playback when the
metadata have been read into the system.
Playlists are indicated in the display by a
special
symbol.
When you open a playlist, the
related tracks are opened and playback starts
by selecting a track.
For USB storage devices, you can determine
whether the metadata from the tags of coded
audio data or the file name and folder is to be
displayed during playback.
X Displaying album name and artist:
Select Media Interface Q Display
Metadata.
Selecting category and opening folder X
Opening category/folder list: Press W
when the window is selected.
or
X Select Music.
The available categories or the folder
content, e.g. subfolders, are displayed. Media Interface
187
Control systems
216_AKB; 3; 90, en-US
d2ureepe, Version: 2.11.8.1 2009-05-15T11:47:50+02:00 - Seite 187 Z
Page 190 of 500
i
The menu option Music is not available
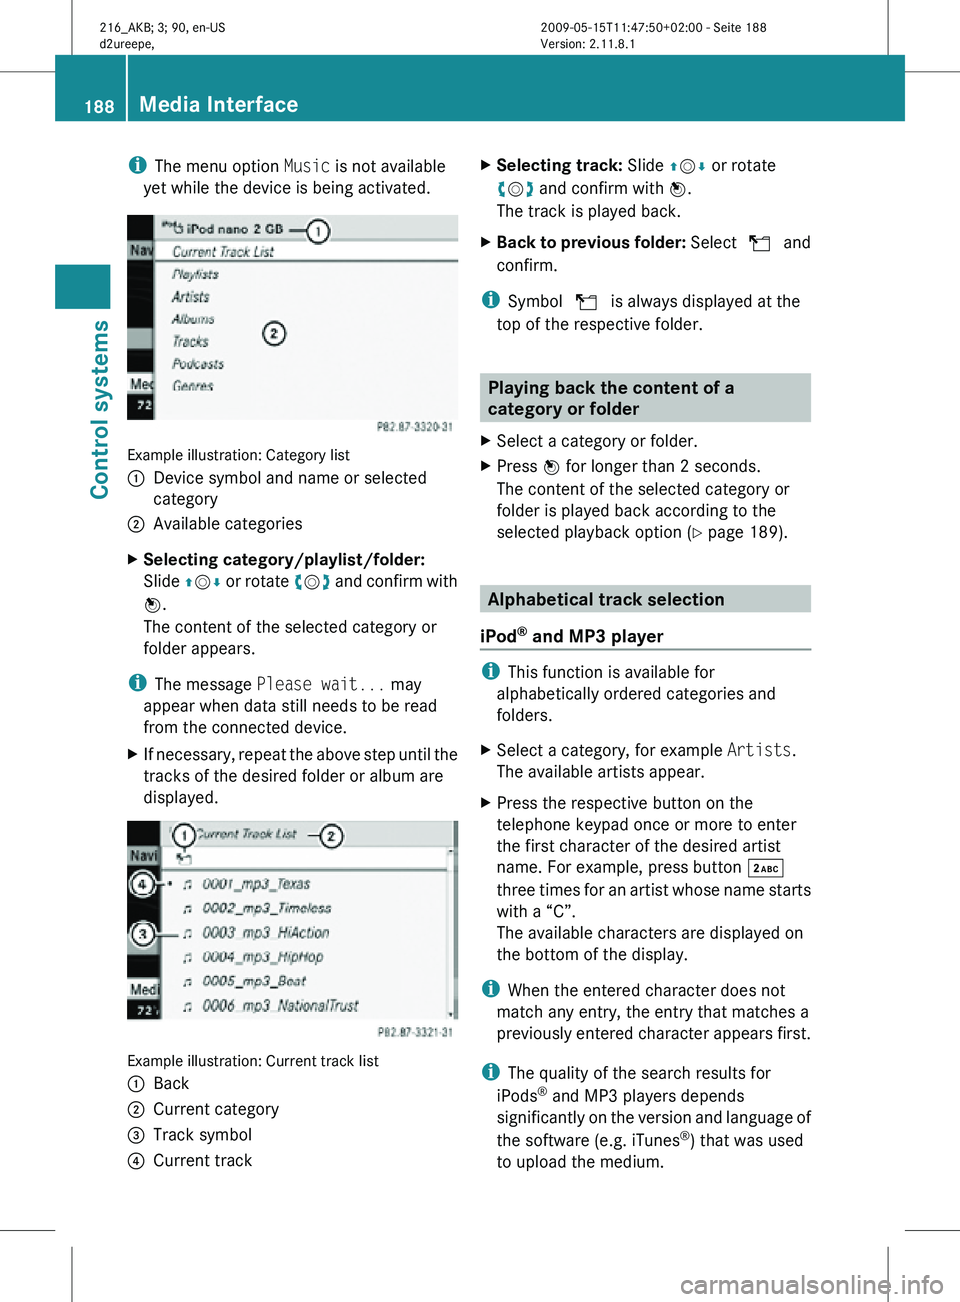
yet while the device is being activated. Example illustration: Category list
:
Device symbol and name or selected
category
; Available categories
X Selecting category/playlist/folder:
Slide ZVÆ or rotate cVd and confirm with
W.
The content of the selected category or
folder appears.
i The message Please wait... may
appear when data still needs to be read
from the connected device.
X If necessary, repeat the above step until the
tracks of the desired folder or album are
displayed. Example illustration: Current track list
:
Back
; Current category
= Track symbol
? Current track X
Selecting track: Slide ZVÆ or rotate
cVd and confirm with W.
The track is played back.
X Back to previous folder: Select U and
confirm.
i Symbol U is always displayed at the
top of the respective folder. Playing back the content of a
category or folder
X Select a category or folder.
X Press W for longer than 2 seconds.
The content of the selected category or
folder is played back according to the
selected playback option ( Y page 189). Alphabetical track selection
iPod ®
and MP3 player i
This function is available for
alphabetically ordered categories and
folders.
X Select a category, for example Artists.
The available artists appear.
X Press the respective button on the
telephone keypad once or more to enter
the first character of the desired artist
name. For example, press button ·
three times for an artist whose name starts
with a “C”.
The available characters are displayed on
the bottom of the display.
i When the entered character does not
match any entry, the entry that matches a
previously entered character appears first.
i The quality of the search results for
iPods ®
and MP3 players depends
significantly on the version and language of
the software (e.g. iTunes ®
) that was used
to upload the medium. 188
Media InterfaceControl systems
216_AKB; 3; 90, en-US
d2ureepe,
Version: 2.11.8.1 2009-05-15T11:47:50+02:00 - Seite 188
Page 191 of 500
USB storage device
i
This function is available for
alphabetically ordered directories. The
function is
not available within playlists for
example.
X Within a folder, press the respective button
on the telephone keypad once or more to
enter the first character of the desired
artist name. For example, press button
l three
times for an artist whose name
starts with a “C”.
The available characters are displayed on
the bottom of the display.
When the directory contains folders only,
COMAND will search for folders. Selecting active partition (USB
storage devices only)
You can
select this function with USB storage
devices when the storage space is
partitioned. The system supports up to 4
partitions (primary or logical, FAT formatted).
i The Windows formatting program
supports FAT partitions of up to 32 gigabyte
by default.
X Select Media Interface Q Select
Active Partition. Playback options
The following options are available:
R Normal Track Sequence
Tracks are
played back in regular order (e.g.
in numerical or in alphabetical order).
R Random Tracks
All available tracks on the current medium
are played back in random order.
R Category Mix or Random Folder (with
USB devices when Folder was selected) Tracks of the currently active category or
folder
and
its subfolders are played back in
random order.
X Selecting playback options: Select
Media Interface in the basic display.
The list of options appears. The dot
#
indicates the currently selected option.
X Select an option. COMAND vehicle menu
Introduction
In this menu, you can program the following
vehicle functions: Function
Multi-function Contour Seat
Settings (Y page 198)
Rear Window Sunshade (Y page 190)
Easy Entry/Exit Feature
(Y page 190)
Exterior Lighting Delayed Shut-off
(Y page 191)
Interior Lighting Delayed Shut-off
(Y page 191)
Ambient Lighting (Y page 192)
Automatic Mirror Folding
(Y page 192)
Locator Lighting (Y page 192)
Automatic Locking (Y page 193)
Trunk Opening-height Restriction
(Y page 193)
You can select the individual vehicle
functions in two ways. COMAND vehicle menu
189
Control systems
216_AKB; 3; 90, en-US
d2ureepe, Version: 2.11.8.1 2009-05-15T11:47:50+02:00 - Seite 189 Z
Page 192 of 500
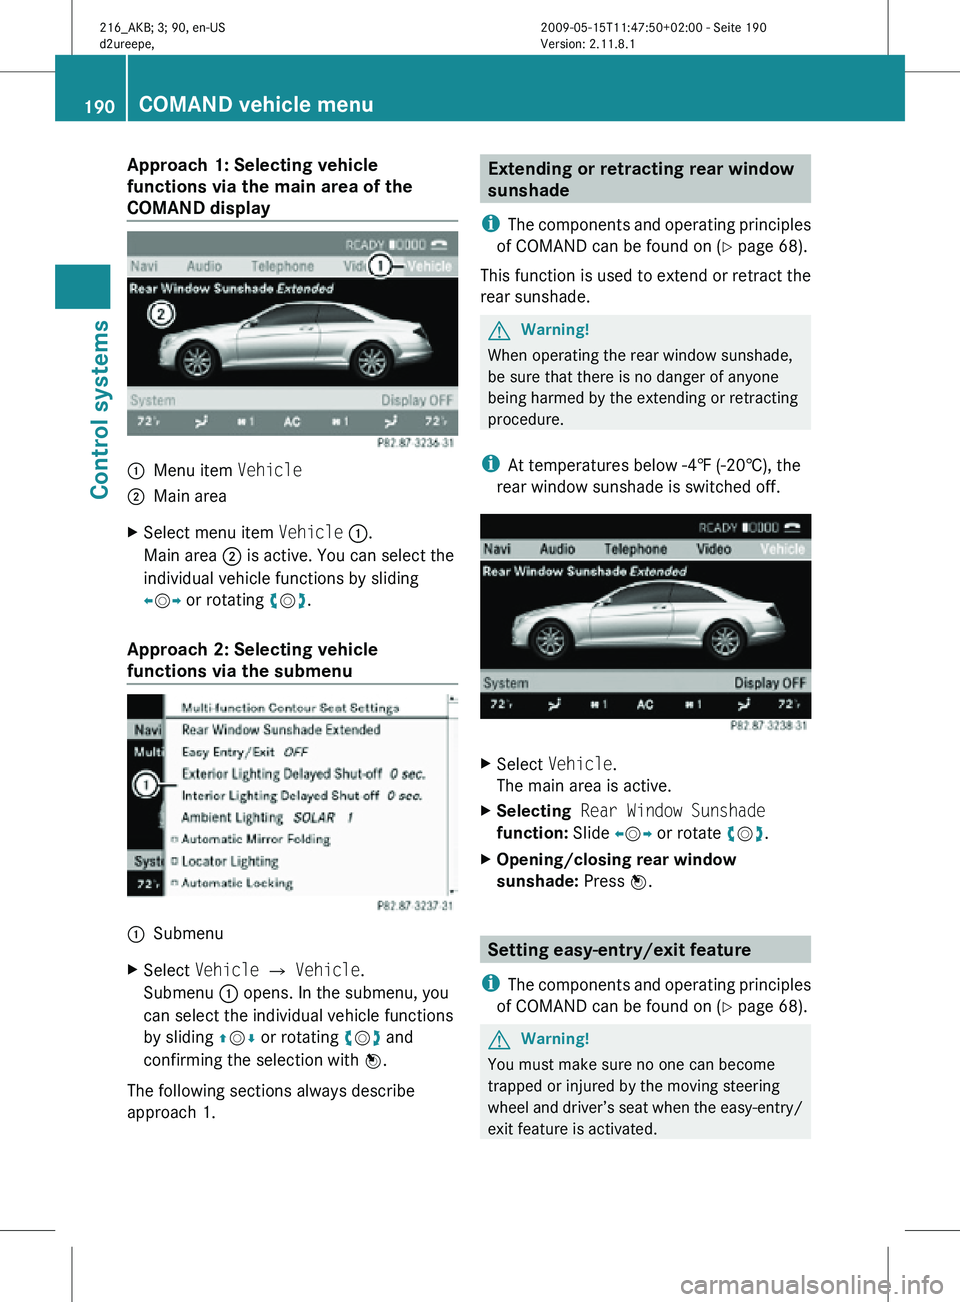
Approach 1: Selecting vehicle
functions via the main area of the
COMAND display
:
Menu item Vehicle
; Main area
X Select menu item Vehicle :.
Main area ; is active. You can select the
individual vehicle functions by sliding
XVY or rotating cVd.
Approach 2: Selecting vehicle
functions via the submenu :
Submenu
X Select Vehicle Q Vehicle.
Submenu : opens. In the submenu, you
can select the individual vehicle functions
by sliding ZVÆ or rotating cVd and
confirming the selection with W.
The following sections always describe
approach 1. Extending or retracting rear window
sunshade
i The components and operating principles
of COMAND can be found on ( Y page 68).
This function is used to extend or retract the
rear sunshade. G
Warning!
When operating the rear window sunshade,
be sure that there is no danger of anyone
being harmed by the extending or retracting
procedure.
i At temperatures below -4‡ (-20†), the
rear window sunshade is switched off. X
Select Vehicle.
The main area is active.
X Selecting Rear Window Sunshade
function: Slide XVY or rotate cVd.
X Opening/closing rear window
sunshade: Press W. Setting easy-entry/exit feature
i The components and operating principles
of COMAND can be found on ( Y page 68). G
Warning!
You must make sure no one can become
trapped or injured by the moving steering
wheel and driver’s seat when the easy-entry/
exit feature is activated. 190
COMAND vehicle menuControl systems
216_AKB; 3; 90, en-US
d2ureepe,
Version: 2.11.8.1 2009-05-15T11:47:50+02:00 - Seite 190
Page 201 of 500
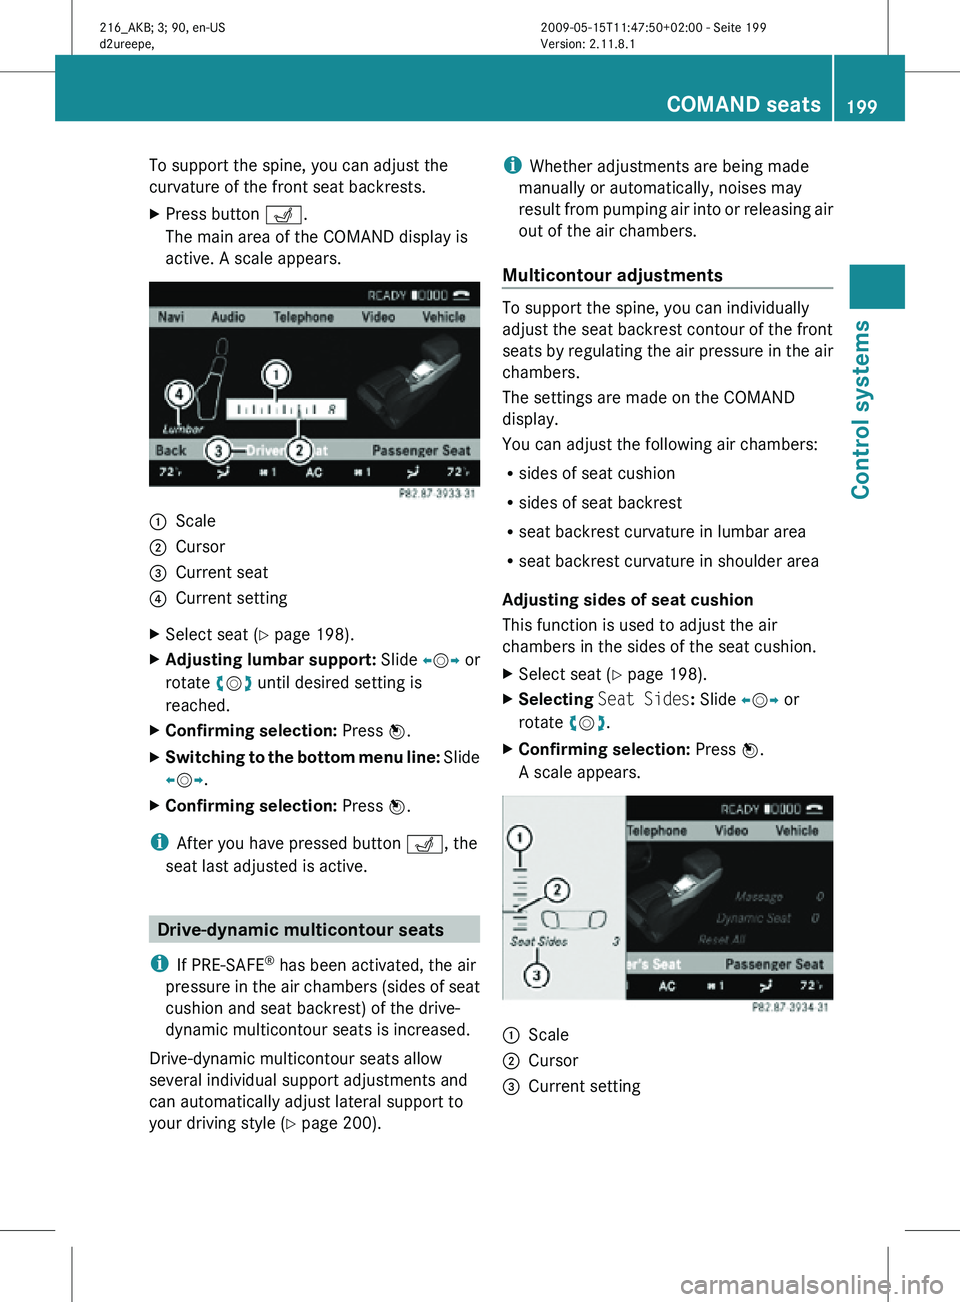
To support the spine, you can adjust the
curvature of the front seat backrests.
X
Press button T.
The main area of the COMAND display is
active. A scale appears. :
Scale
; Cursor
= Current seat
? Current setting
X Select seat (Y page 198).
X Adjusting lumbar support: Slide XVY or
rotate cVd until desired setting is
reached.
X Confirming selection: Press W.
X Switching to the bottom menu line: Slide
XVY.
X Confirming selection: Press W.
i After you have pressed button T, the
seat last adjusted is active. Drive-dynamic multicontour seats
i If PRE-SAFE ®
has been activated, the air
pressure in the air chambers (sides of seat
cushion and seat backrest) of the drive-
dynamic multicontour seats is increased.
Drive-dynamic multicontour seats allow
several individual support adjustments and
can automatically adjust lateral support to
your driving style ( Y page 200). i
Whether adjustments are being made
manually or automatically, noises may
result from pumping air into or releasing air
out of the air chambers.
Multicontour adjustments To support the spine, you can individually
adjust the seat backrest contour of the front
seats by regulating the air pressure in the air
chambers.
The settings are made on the COMAND
display.
You can adjust the following air chambers:
R
sides of seat cushion
R sides of seat backrest
R seat backrest curvature in lumbar area
R seat backrest curvature in shoulder area
Adjusting sides of seat cushion
This function is used to adjust the air
chambers in the sides of the seat cushion.
X Select seat (Y page 198).
X Selecting Seat Sides: Slide XVY or
rotate cVd.
X Confirming selection: Press W.
A scale appears. :
Scale
; Cursor
= Current setting COMAND seats
199Control systems
216_AKB; 3; 90, en-US
d2ureepe, Version: 2.11.8.1 2009-05-15T11:47:50+02:00 - Seite 199 Z
Page 204 of 500
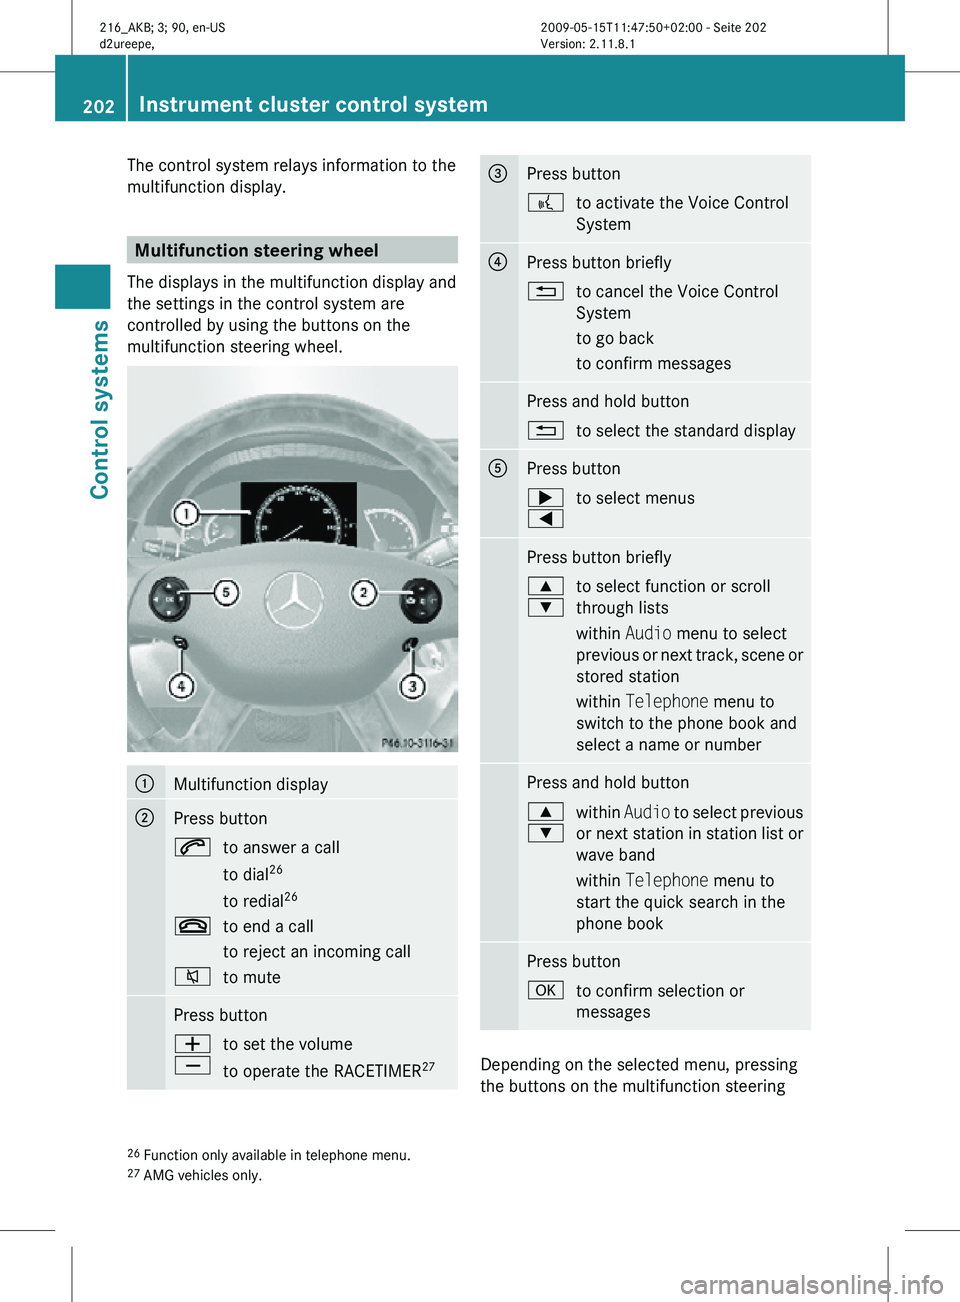
The control system relays information to the
multifunction display.
Multifunction steering wheel
The displays in the multifunction display and
the settings in the control system are
controlled by using the buttons on the
multifunction steering wheel. :
Multifunction display
;
Press button
6
to answer a call
to dial26
to redial 26
~ to end a call
to reject an incoming call
8 to mute Press button
W
X
to set the volume
to operate the RACETIMER
27 =
Press button
?
to activate the Voice Control
System ?
Press button briefly
%
to cancel the Voice Control
System
to go back
to confirm messages Press and hold button
%
to select the standard display A
Press button
;
=
to select menus Press button briefly
9
:
to select function or scroll
through lists
within Audio menu to select
previous or next track, scene or
stored station
within Telephone menu to
switch to the phone book and
select a name or number Press and hold button
9
:
within
Audio to select previous
or next station in station list or
wave band
within Telephone menu to
start the quick search in the
phone book Press button
a
to confirm selection or
messages Depending on the selected menu, pressing
the buttons on the multifunction steering
26 Function only available in telephone menu.
27 AMG vehicles only. 202
Instrument cluster control systemControl systems
216_AKB; 3; 90, en-US
d2ureepe,
Version: 2.11.8.1 2009-05-15T11:47:50+02:00 - Seite 202
Page 205 of 500
wheel will alter what appears in the
multifunction display.
The information available in the multifunction
display is arranged in menus and
accompanying functions. For example, in the
Settings menu, you will find functions for
making settings to your vehicle. There are
functions for calling up information and for
making settings to your vehicle.
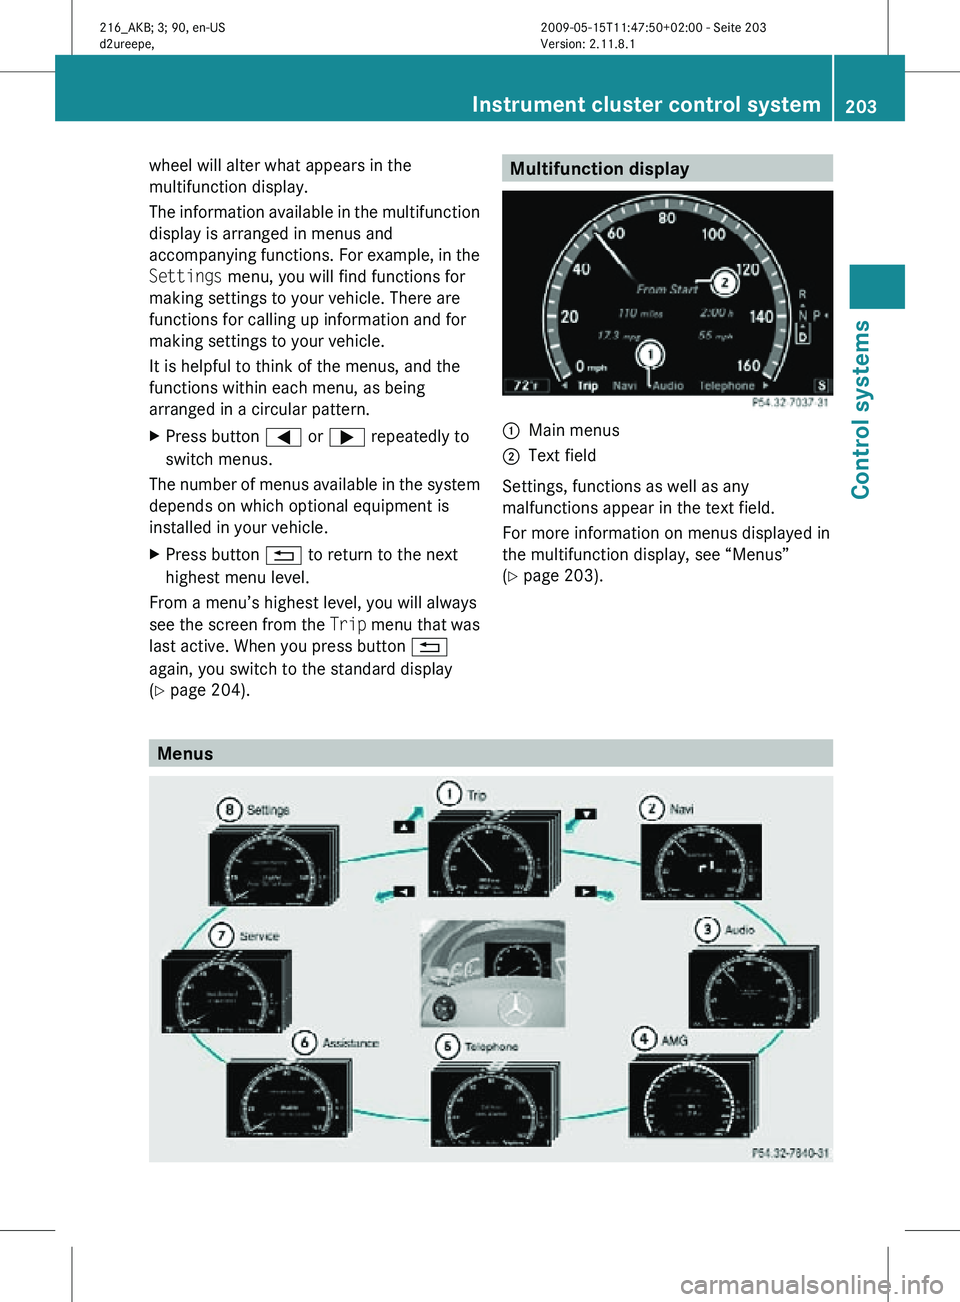
It is helpful to think of the menus, and the
functions within each menu, as being
arranged in a circular pattern.
X
Press button = or ; repeatedly to
switch menus.
The number of menus available in the system
depends on which optional equipment is
installed in your vehicle.
X Press button % to return to the next
highest menu level.
From a menu’s highest level, you will always
see the screen from the Trip menu that was
last active. When you press button %
again, you switch to the standard display
(Y page 204). Multifunction display
:
Main menus
; Text field
Settings, functions as well as any
malfunctions appear in the text field.
For more information on menus displayed in
the multifunction display, see “Menus”
(Y page 203). Menus Instrument cluster control system
203Control systems
216_AKB; 3; 90, en-US
d2ureepe, Version: 2.11.8.1 2009-05-15T11:47:50+02:00 - Seite 203 Z
Page 206 of 500
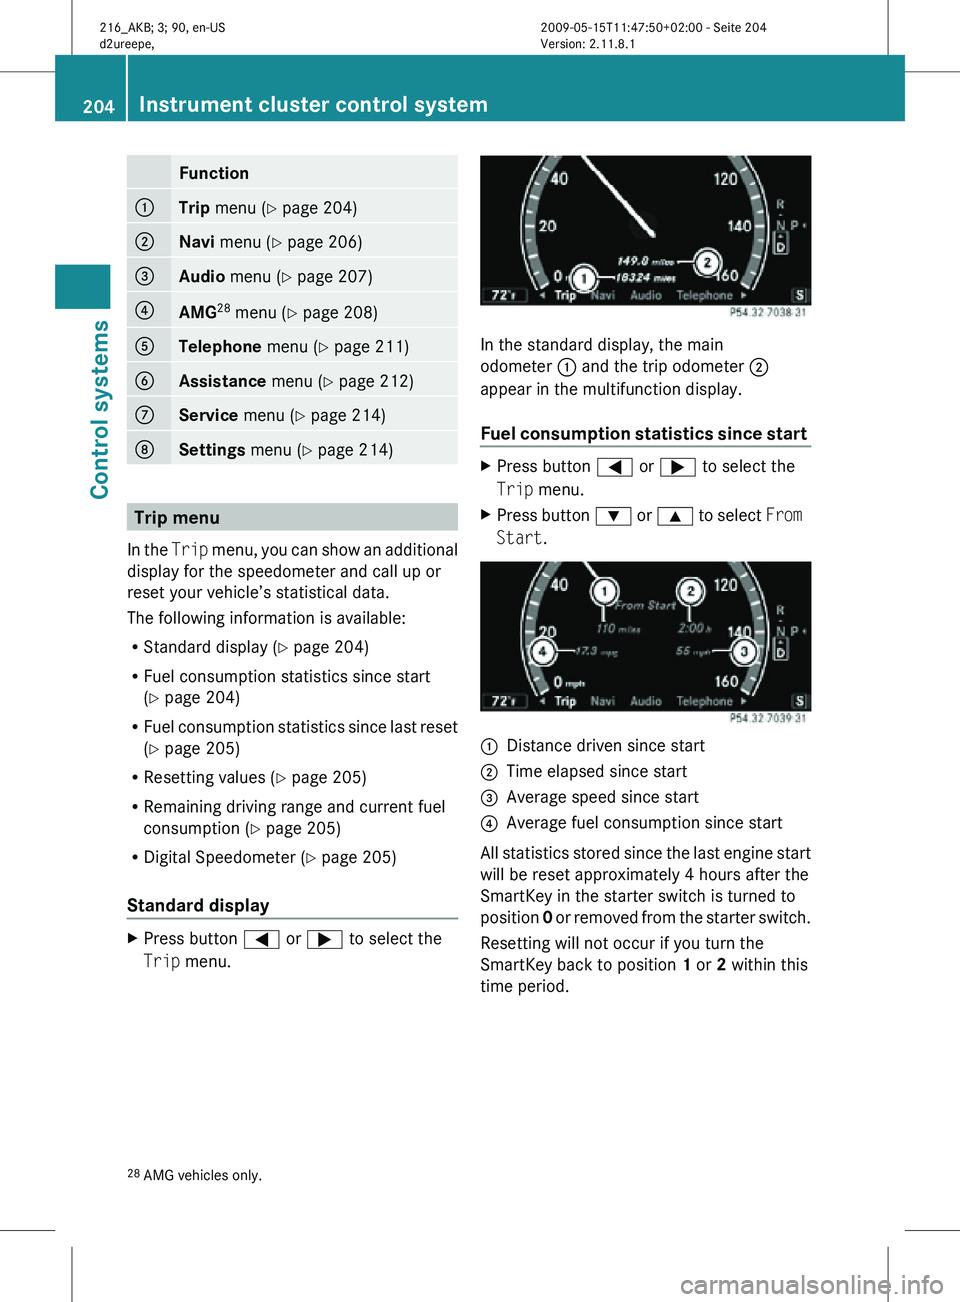
Function
:
Trip
menu (Y page 204) ;
Navi menu (Y page 206)
=
Audio
menu (Y page 207) ?
AMG
28
menu (Y page 208) A
Telephone
menu (Y page 211) B
Assistance
menu (Y page 212) C
Service
menu (Y page 214) D
Settings menu (Y page 214)
Trip menu
In the Trip menu, you can show an additional
display for the speedometer and call up or
reset your vehicle’s statistical data.
The following information is available:
R Standard display ( Y page 204)
R Fuel consumption statistics since start
(Y page 204)
R Fuel consumption statistics since last reset
(Y page 205)
R Resetting values ( Y page 205)
R Remaining driving range and current fuel
consumption (Y page 205)
R Digital Speedometer ( Y page 205)
Standard display X
Press button = or ; to select the
Trip menu. In the standard display, the main
odometer : and the trip odometer ;
appear in the multifunction display.
Fuel consumption statistics since start
X
Press button = or ; to select the
Trip menu.
X Press button : or 9 to select From
Start. :
Distance driven since start
; Time elapsed since start
= Average speed since start
? Average fuel consumption since start
All statistics stored since the last engine start
will be reset approximately 4 hours after the
SmartKey in the starter switch is turned to
position 0 or removed from the starter switch.
Resetting will not occur if you turn the
SmartKey back to position 1 or 2 within this
time period.
28 AMG vehicles only. 204
Instrument cluster control systemControl systems
216_AKB; 3; 90, en-US
d2ureepe,
Version: 2.11.8.1 2009-05-15T11:47:50+02:00 - Seite 204
Page 207 of 500
Fuel consumption statistics since last
reset
X
Press button = or ; to select the
Trip menu.
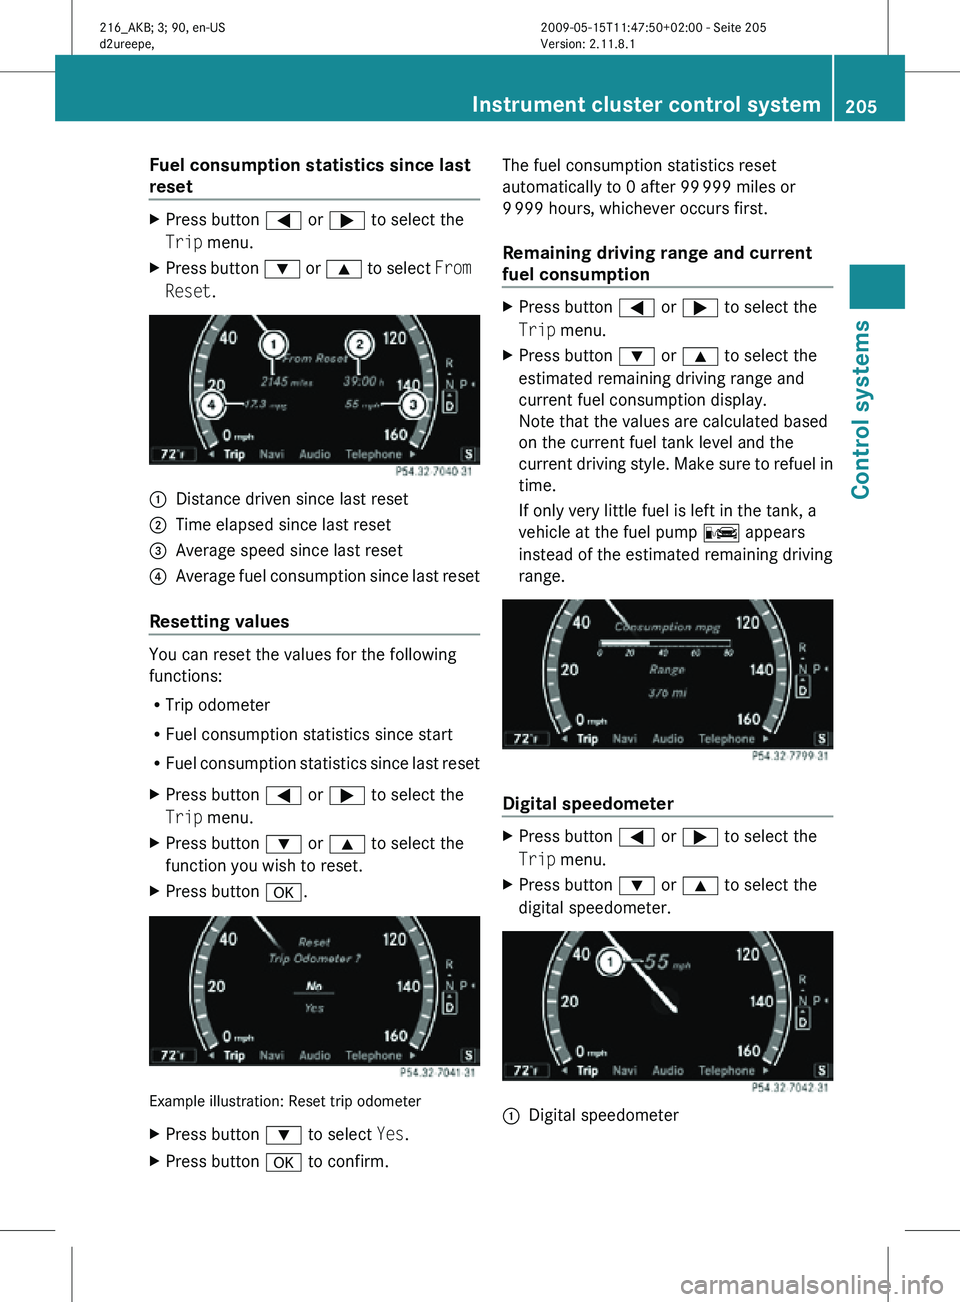
X Press button : or 9 to select From
Reset. :
Distance driven since last reset
; Time elapsed since last reset
= Average speed since last reset
? Average fuel consumption since last reset
Resetting values You can reset the values for the following
functions:
R
Trip odometer
R Fuel consumption statistics since start
R Fuel consumption statistics since last reset
X Press button = or ; to select the
Trip menu.
X Press button : or 9 to select the
function you wish to reset.
X Press button a. Example illustration: Reset trip odometer
X
Press button : to select Yes.
X Press button a to confirm. The fuel consumption statistics reset
automatically to 0 after 99
999 miles or
9 999 hours, whichever occurs first.
Remaining driving range and current
fuel consumption X
Press button = or ; to select the
Trip menu.
X Press button : or 9 to select the
estimated remaining driving range and
current fuel consumption display.
Note that the values are calculated based
on the current fuel tank level and the
current driving style. Make sure to refuel in
time.
If only very little fuel is left in the tank, a
vehicle at the fuel pump C appears
instead of the estimated remaining driving
range. Digital speedometer
X
Press button = or ; to select the
Trip menu.
X Press button : or 9 to select the
digital speedometer. :
Digital speedometer Instrument cluster control system
205Control systems
216_AKB; 3; 90, en-US
d2ureepe, Version: 2.11.8.1 2009-05-15T11:47:50+02:00 - Seite 205 Z