MERCEDES-BENZ G-Class 2017 W463 Owner's Manual
Manufacturer: MERCEDES-BENZ, Model Year: 2017, Model line: G-Class, Model: MERCEDES-BENZ G-Class 2017 W463Pages: 286, PDF Size: 4.91 MB
Page 221 of 286
Specifying and sending the destination
address
XGo to the website http://maps.google.com
and enteradestination address into the entry
field.
XTo send the destination address to the e-
mail address of your mbrace account:
click on the correspondingb utton on the web-
site.
Example:
If you select 'Send to vehicle' and then
'Mercedes-Benz', the destination address will
be sent to your vehicle.
XWhen the "Send" dialog window appears:
Enter the e-mail address you specified when
settingupy our mbrace account into the cor-
responding field.
XClick "Send".
Information on specific commands such as
"Address entry" or "Send" can be found on the
website.
Calling up atransmitted destination
address
XTurn the SmartKey to position 2in the ignition
lock (Ypage 104).
The transmitted destination address is loaded
into the vehicle's navigation system.
Ad isplay message appears, asking whether
navigation should be started.
XSelectYesby turning 3or sliding 1
the controller and confirm with 7.
The system calculates the route and subse-
quently starts the route guidance with the
address entered.
If you select No
the address can be stored in
the address book.
If you have sent more than one destination
address, each individual destination must be
confirmed separately.
Destination addresses are loaded in the same
order as the order in which they were sent.
If you own multiple Mercedes-Benzv ehicles with
mbrace and activated mbrace accounts:
If multiple vehicles are registered under the
same e-mail address, the destination will be
sent to all the vehicles.
Vehicle remote opening
You can use the vehicle remote opening if you
have unintentionally locked your vehicle and a
replacement SmartKey is not available.
The vehicle can be opened by the Mercedes-
Benz Customer AssistanceC enter.
The vehicle can be immediately opened
remotely within four days of the ignition being
turned off. After this time, the remote unlocking
may be delayed by 15 to 60 minutes. After
30 days, the vehicle can no longer be opened
remotely.
The vehicle remote unlocking feature is availa-
ble if the relevant mobile phone network is avail-
able and adata connection is possible.
XContact the following service hotlines:
Mercedes-BenzC ustomer AssistanceC enter
at 1-800-FOR-MERCedes (1-800-367-6372)
or 1-866-990-9007
You will be asked for your password.
XReturn to your vehicle at the time agreed upon
with the Mercedes-BenzC ustomer Assis-
tance Center.
Alternatively, the vehicle can be opened via:
Rthe Internet, under the "Owners Online" sec-
tion
Rtelephone applications (e.g. for iPhone®,
Android™)
To do this, you will need your identification num-
ber and password.
Vehicle remote closing
The vehicle remote-closing feature can be used
when you have forgotten to lock the vehicle and
you are no longer nearby.
The vehicle can then be locked by the Mercedes-
Benz Customer AssistanceC enter.
The vehicle can be immediately remotely locked
within four days of the ignition being turned off.
After this time, remote closing may be delayed
by 15 to 60 minutes. After 30 days the vehicle
can no longer be valet locked remotely.
The vehicle remote closing feature is available if
the relevant mobile phone network is available
and adata connection is possible.
XContact the following service hotlines:
Features219
Stowage and features
Z
Page 222 of 286
Mercedes-BenzCustomer Assistanc eCenter
at 1-800-FOR-MERCedes (1-800-367-6372)
or 1-866-990-9007
You will be asked for your password.
The next time you are inside the vehicle and you
switch on the ignition, the Doors Locked
Remotelymessage appears in the multifunction
display.
Alternatively, the vehicle can be locked via:
Rthe Internet, under the "Owners Online" sec-
tion
Rtelephone applications (e.g. for iPhone®,
Android™)
To do this, you will need your identification num-
ber and password.
Stolen vehicle recovery service
If your vehicle has been stolen:
XNotify the police.
The police will issue anumbered incident
report.
XThis number will be forwarded to the
Mercedes-BenzC ustomer Assistanc eCenter
together with your PIN.
The Mercedes-BenzC ustomer Assistance
Center then tries to locate the system. The
Mercedes-BenzC ustomer Assistanc eCenter
contacts you and the local law enforcement
agency if the vehicle is located.
However, only the law enforcement agency is
informed of the location of the vehicle.
If the anti-theft alarm system is activated for
longer than 30 seconds, the Mercedes-Benz
Customer Assistanc eCenter is automatically
notified.
Vehicle Health Check
With the Vehicle Health Check, the Customer
Assistanc eCenter can provide improved sup-
port for problems with your vehicle. During an
existing call, vehicle data is transferred to the
Customer Assistanc eCenter.
The customer service representative can use
the received data to decide what kind of assis-
tance is required. You are then, for example,
guided to the nearest Mercedes-BenzS ervice
Center or arecovery vehicle is called.
If vehicle data need to be transferred during an
Info call or aRoadside Assistanc ecall, this is
initiated by the Customer Assistanc eCenter. You will see the
Roadside Assistance Con‐
nectedmessage in the display.Ift he Vehicle
Health Check can be started, the RequestforVehicle Diagnostics Received Startvehicle diagnostics?message appears in
the display.
XPress the Yesbutton to confirm the message.
XWhen the Vehicle Diagnostics PleaseStart Ignitionmessage appears: turn the
SmartKey to position 2in the ignition lock
(
Ypage 104).
XIf the Please follow the instructionsreceivedbyphoneandmoveyourvehi‐cle to asafe position.message
appears: please follow the instructions
received by phone and move your vehicle to a
safe position.
The message in the display disappears.
The vehicle operating state check begins. You
will see the Vehicle Diagnostics Active
message.
If you select Cancel
,the Vehicle Health
Check is canceled completely.
When the check is complete, the Sending
vehicle diagnostics data. (Voice con‐nection may be interrupted duringdatatransfer)message appears. The vehicle
data can now be sent.
XPress the OKbutton to confirm the message.
The voice connection with the Customer
Assistanc eCenter is terminated.
You will see the Vehicle diagnosis:
Transferring data...message.
The vehicle data is sent to the Customer
Assistanc eCenter.
Depending on what the customer service rep-
resentative agreed with you, the voice connec-
tion is re-established after the transfer is com-
plete. If necessary, you will be contacted at a
later time by another means, e.g. by e-mail or
phone.
Another function of the Vehicle Health Check is
the transfer of service data to the Customer
Assistanc eCenter. If aservice is due, the display
shows amessage to this effect together with
information about any special offers at your
workshop.
This information can also be called up under
"Owners Online" at http://www.mbusa.com.
Information on the data stored in the vehicle
(
Ypage 28).
220Features
Stowage and features
Page 223 of 286
Information on Roadside Assistance
(Ypage 25).
Downloading routes
Downloading routes allows you to transfer and
save predefined routes in the navigation sys-
tem.
Aroute can be prepared and sent by either a
customer service representative or under "Own-
ers Online" at http://www.mbusa.com.
Each route can include up to four way points.
Once aroute has been received by the naviga-
tion system, you wills ee theDo
youwanttostart route guidance? DestinationReceived destination has been savedin "Previous destinations".message on
the multimedia system display.
The route is saved.
XTo start route guidance: selectYes.
An overview of the route is shown in the dis-
play.
If you select No
,the saved route can be called
up later in the navigation menu.
XSelect Start.
Route guidance starts.
Downloaded and saved routes can be calledu p
again.
Speed alert
You can define the uppers peed limit, which
must not be exceeded by the vehicle.
If this selected speed is exceeded by the vehicle,
am essagew illbesent to the Customer Assis-
tance Center. The Customer Assistance Center
then forward sthis information to you.
You can select the way in which you receive this
information beforehand. Possible options
include text message,e -mail or an automated
call.
The data you receive contains the following
information:
Rthe location where the speed limitw as excee-
ded
Rthe time at which the speed limitw as excee-
ded
Rthe selected speed limitw hich was exceeded
Geo fencing
Geo fencing allows you to select areasw hich the
vehicle shoul dnot enter or leave. You willb e
informed if the vehicle crosses the boundaries
of the selected areas. You can select the way in
which you receive this information beforehand.
Possible options include text message, e-mail or an automated call.
The area can be determined as either acircle or
ap olygon with amaximum of ten corners. You
can specify up to ten areass imultaneously. Dif-
ferent settings are possible for each area.
These settings can be calledupu nder "Owners
Online" at http://www.mbusa.com.
Alternatively,y ou can trigger an Info call and
notify the customer service representative that
you wish to activate geo-fencing.
Currently inactive areasc an be activated by text
message.
Triggering the vehicle alarm
With this function, you can trigger the vehicle's
panic alarm via text message. An alarm sounds
and the exterior lighting flashes. Depending on
the setting, the panic alarm lasts five or ten sec- onds. Afterwards, the alarm switches off.
Brush guard (USA only)
If the brush guard has to be removed, contact a
qualifieds pecialist workshop.
Garage door opener
General notes
You can use the HomeLink®garage door opener
integrated into the rear-view mirror to operate
up to three different gate/garage door opener
systems.
Certai ngarage door drives are incompatible
with the integrated garage door opener. If you
have difficulty programing the integrated garage
door opener, contact aMercedes-Benz Service
Center.
Features221
Stowagea nd features
Z
Page 224 of 286
Alternatively,you can cal lthe following tele-
phone assistance services:
RUSA: Mercedes-Benz Customer Assistance
Center at 1-800-FOR-MERCedes
RCanada: Customer Service at
1-800-387-0100
RHomeLink®hotline 1-800-355-3515( free of
charge)
Mor einformatio nonHomeLink
®and/or com-
patible products is also availabl eonline at
http://www.homelink.com.
Notesont he declaratio nofconformity
(
Ypage 127).
USA: FCC ID: CB2HMIHL4
Canada: IC:2 79B-HMIHL4
USA only:
Thi sd evice complies with Part 15 of the FCC
Rules. Operatio niss ubject to the following two
conditions:
1. Thi sdevice mayn ot cause harmfuli nterfer-
ence ,and
2. thisd evice must accept any interference
received, including interference thatm aycause
undesired operation.
Any unauthorized modification to thisd evice
could voidt he user'sauthority to operate the
equipment.
Canad aonly:
Thi sd evice complies with RSS-210 of Industry
Canada. Operatio niss ubject to the following
two conditions:
1. Thi sdevice mayn ot cause harmfuli nterfer-
ence ,and
2. thisd evice must accept any interference
received, including interference thatm aycause
undesired operation.
Any unauthorized modification to thisd evice
could voidt he user'sauthority to operate the
equipment.
Important safety notes
GWARNING
Whe nyou operate or programt he garage door
with the integrated garage door opener, per-
sons in the range of movement of the garage
door can become trappe dorstruck by the
garage door. There is ariskofi njury.
Whenusing the integrated garage door
opener, always make sure thatn obodyis
withint he range of movement of the garage
door.
GWARNING
Combustion engine semitp oiso nousexhaust
gases such as carbo nmonoxide. Inhaling
thes eexhaus tgases lead stopoisoning. There
is ar iskoff atalinjury.T herefore neve rleave
the engine running in enclose dspaces with-
outs ufficient ventilation.
Programming
Programming
Pa ya ttentio ntothe "Important safety notes"
(Ypage 222).
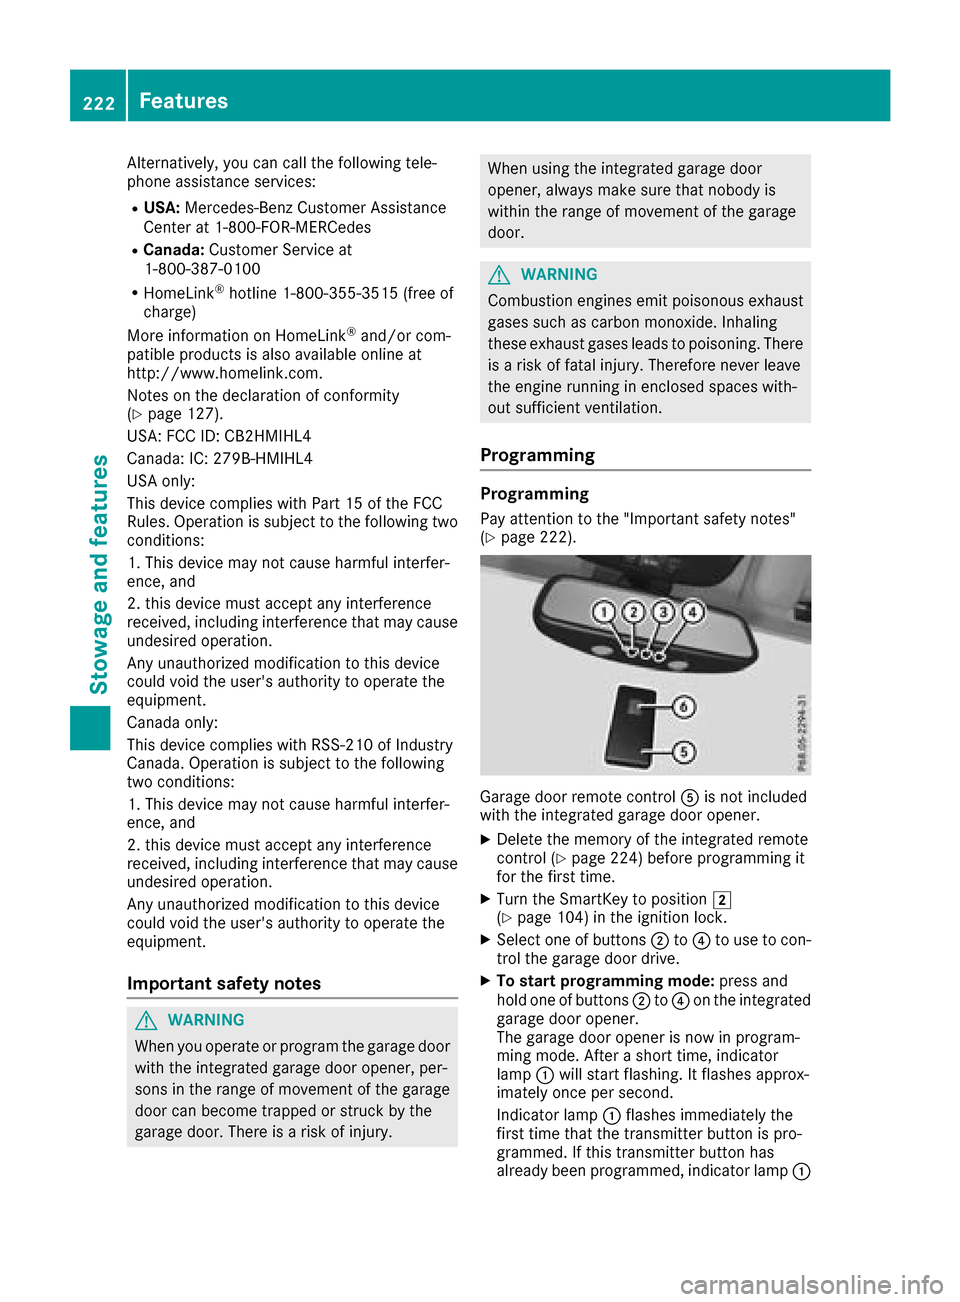
Garage door remote control Ais not included
with the integrated garage door opener.
XDelete the memory of the integrated remote
control(Ypage 224) before programming it
for the first time.
XTurn the SmartKeytop osition 2
(Ypage 104 )inthe ignition lock.
XSelect one of buttons ;to? to us etoc on-
trol the garage door drive.
XTo start programmin gmode: press and
hol done of buttons ;to? on the integrated
garage door opener.
The garage door opene risnow in program-
ming mode. After ashort time ,indicator
lamp :will start flashing. It flashesa pprox-
imatelyo nce persecond.
Indicato rlam p: flashesi mmediatelyt he
first time thatt he transmitterbutton is pro-
grammed. If thist ransmitterbutton has
already been programmed, indicator lamp :
222Features
Stowageand featur es
Page 225 of 286
will only start flashing atarateofo nceas ec-
ond after 20 second shave elapsed.
XContinue to hold th etransmitter button.
XTo progra mtheremote control: point
transmitter button Bof remote control A
towards th etransmitter buttons on th erear-
view mirror at adistanc eof2to12in(5t o
30 cm).
XKeep transmitte rbutto nB on remote control
A presse duntilindicator lamp :start sto
flas hrapid ly.
When indicator lamp :flashes rapidly: pro-
grammin gisfinished.
XReleaset ransmitte rbuttons ;,=or? on
th ei ntegrate dremotec ontroland transmitter
button Bon remotec ontrolA.
If indicator lamp :does no tflas hrapidly and
goes out after approximately 20 seconds:
repeat th eprogrammin gproces sfor th ecor-
respondin gbutto nont herear-view mirror.
When doingso, var ythe dist ancebetween
remotec ontrolA and th erear-view mirror.
The required distancebetween remotec on-
trol Aand th eintegrate dgarag edoor opener
depends on thegarag edoor drivesystem.
Several attempt smightben ecessary. You
should test every positio nfor at least
20 seconds before trying another position.
If th eg arag edoor system work swithar olling
code, you must synchronize th eremotec ontrol
integrate dintherear-
view mirror
withthe
garag edoor system receive rafter program-
ming.
You can fin dfurther informatio nonthisint he
operatin ginstructionsoft hegarag edoor sys-
tem.
Synchronizing th erolling code
Pay attentio ntothe"Im portan tsafety notes"
(Ypage 222).
If th eg arag edoor system uses arolling code,
you willalso have to synchronize th egarage
door system withthe integrate dgarag edoor
opener inther ear-view mirror .Todothisy ou will
need to use th eprogrammin gbutto nont hedoor
driv econtro lpanel. The programmin gbutton
may belocate dindifferent places dependin gon
th em anufacturer. It isusually locate donthe
door driveunit on th egarag eceilin g.
Fam iliarize yourself withthe garag edoor drive
operatin ginstructions, e.g .unde r"Program-
min gaddit ional remotec ontrols",before carry-
ing out th efollowings teps. Your vehicle must
be within reac hofthegarage
door or gateo pener drive. Makes ure that nei-
ther your vehicle no rany persons/object sare
presentw ithin th esweep of th edoor or gate.
Observ ethe safety note swhen performin gthe
rolling code synchronization (
Ypage 222).
XTurn th eSmartKey to position 2
(Ypage 104) in th eignition lock.
XGet out of th evehicle.
XPress th eprogrammin gbutto nont hedoor
driveu n
it.
You no whave 30 seconds to initiat ethe next
step.
XGet int othe vehicle.
XPress previously programmed button ;,=
or ? on th eintegrate dgarag edoor opener
repeatedly until thedoor closes.
The rolling code synchronization is then com- plete.
Notes on programmin gthe remote con-
trol
Canadian radio frequency lawsrequire a"break"
(or interruption)oft hetransmission signals
after broadcastin gfor afew seconds. Therefore,
these signals may no tlast longe nough for the
integrate dremotec ontroltorecognize th esig-
nal durin gprogramming. Comparable with
Canadian law,American garag edoor openers
also have abuilt -in "interruption".
Procee dasfollows:
Rif you livein Canada.
Rifyou have difficulties programmin gthe
garag edoor opener (regardless of wherey ou
live )when usingt heprogrammin gsteps.
XPress and hold oneofb uttons;to? on the
integrate dgarag edoor opener until th einte-
grated remotec ontrolissuccessfully set up.
XSimultaneouslyp ress transmitterbutton B
on remotec ontrolA and hold for two sec-
onds. Then let go for 2seconds, press again
and hold for 2seconds.
XRepeat th issequenc eontransmitte rbutton
B on remotec ontrolA until th efrequency
signal isestablished.
XIf th esetup procedure is successful ,indicator
lamp :flashes once slowlya nd goes out
after afew seconds.
If indicator lamp :does no tflas hs lowlya nd
then go out:r epeat theprogrammin gprocess
for th ecorres ponding butto nontherear-view
Features223
Stowage and features
Z
Page 226 of 286
mirror. When doing so, vary the distance
betweenremote control Aand the rear-view
mirror.
The required distance betweenr emote con-
trol Aand the integrated garage door opener
depends on the garage door drive system.
Several attempts might be necessary .You
should test every position for at least
20 seconds before trying another position.
The required distance betweenr emote control
A and the integrated garage door opener
depends on the garage door drive system. Sev-
eral attempts might be necessary .You should
test every position for at least 25 seconds
before trying another position.
Problems when programming
If you have problems when programming the
integrated remote control, please note the fol-
lowing:
RCheck the transmitter frequency used by
garage door drive remote control Aand
whetheritiss upported. The transmitter fre-
quency can usuall ybefound on the back of
remote control Afor the garage door drive.
The integrated remote control is compatible
with devicest hat have units which operate in
the frequency range of 280 to 390 MHz.
RReplace the batterie sinremote control A.
This increase sthe probability of remote con-
trol Asending astrong and precise signal to
the integrated remote control on the rear-
view mirror.
RWhen programming, hold remote control A
at varying distances and angle sfrom the
transmitter button that you are programming.
Try various anglesatad istance between2and
12 inches (5to 30 cm) or at the same angle
but at varying distances.
RIf another remote control Ais available for
the same garage door drive, repeatt he same
programming steps with this remote control
A.B efore performing these steps, make sure
that new batterie shave been installed in
garage door drive remote control A.
RNote that some remote controls only transmit
foralimited amount of time (the indicator
lamp on the remote control goes out). Press
button Bon remote control Aagain before
transmission ends.
RAlign the antenna cabl eofthe garage door
opener unit. This can improve signal trans-
mission.
Opening/closing the garage door
Once programmed, the integrated remote con-
trol willa ssume the function of the garage door
system's remote control. Please als oread the
operating instructions for the garage door sys-
tem.
XTurn the SmartKey to position in the ignition
lock 2(Ypage 104).
XPress one of buttons ;to? on the integra-
ted remote control in the rear-vie wmirror that
is programmed to operate the garage door.
Garage door system with fixed code: indicator
lamp :lights up continuously.
Garage door system with rolling code: indica-
tor lamp :flashes brieflya nd then lights up
for approximatelyt wo seconds. This is repea-
ted for up to 20 seconds.
The transmitter willt ransmitasignal for as
long as the transmitter button is being
pressed. The transmission willbeh alted after
am aximumof20s econds and indicator
lamp :willf lash.Press the transmitter but-
ton again if necessary.
XPress button ;,=or? again if necessary.
Clearing the memory
Make sure that you clear the memory of the
integrated garage door opener before selling the
vehicle.
XTurn the SmartKey to position 2
(Ypage 104) in the ignitionl ock.
XPress and hold transmitter buttons ;and ?
for approximately20s econds until indicator
lamp :flashes rapidly.
The memory of the integrated garage door
opener in the rear-vie wmirror is cleared.
224Features
Stowage and features
Page 227 of 286
Engine compartment
Hood
Important safety notes
GWARNING
If th ehood is unlatched, it may open up when
th ev ehicle is in motion and blocky our view.
Thereisar isk of an accident.
Never unlatch th ehood while driving .Before
ever ytrip, ensure that th ehood is locked.
GWARNING
When opening and closingt hehood,itm ay
suddenly fall int othe closed position.T hereis
ar isk of injury to personsw ithin range of
movementoft hehood.
Open and close th ehood only when no onei s
within its range of movement.
GWARNING
Opening th ehood when th eengine is over-
heated or when there is afireint heengine
compartmen tcoul de xpose you to hot gases
or other servic eproducts. Thereisar isk of
injury.
Let an overheate dengine coo ldown before
opening th ehood.Ift here is afireint he
engine compartment, keep th ehood closed
and contac tthe fired epartment.
GWARNING
The ignition system and th efuel injection sys-
te mw ork unde rhigh voltage. If you touch
component swhicha re unde rvoltage, you
coul dget an electric shock. Thereisar isk of
injury.
Never touch component softheignition sys-
te morf uel injection system when th eignition
is switched on.
GWARNING
The engine compartmen tcontain smoving
components. Certain components, sucha s
th er adiator fan ,may continue to run or start
again suddenly when th eignition is off .There
is ar isk of injury.
If you nee dtodoany work inside th eengine
compartment:
Rswitch off th eignition
Rnever reac hintot he area wheret here is a
risk of danger from moving components,
suchast hefan rotatio narea
Rremove jewelry and watches
Rkeep items of clothing and hair, for exam-
ple, away from moving parts
Do no ttou ch th efollowingw hen theignition is
switched on:
RIgnition coils
RSpar kplug connectors
RTest socket
Opening th ehood
GWARNING
Certain component sintheengine compart-
ment, suchast heengine ,radiator and parts
of th eexhaust system, can become ver yhot.
Workin gintheengine compartmen tposesa
risk of injury.
Wherep ossible, let th eengine coo ldown and
touch only th ecomponent sdescribe dinthe
following.
GWARNING
When th ehood is open and th ewindshield
wipersa re set in motion,y ou can be injured by
th ew iper linkage. Thereisar isk of injury.
Always switch off th ewindshield wipersa nd
th ei gnition before opening th ehood.
!Makes ure that th ewindshield wipersa re
no tfolded away from th ewindshield. You
coul dotherwise damag ethe windshield wip-
ers or th ehood.
Engine compartment225
Maintenance and care
Z
Page 228 of 286
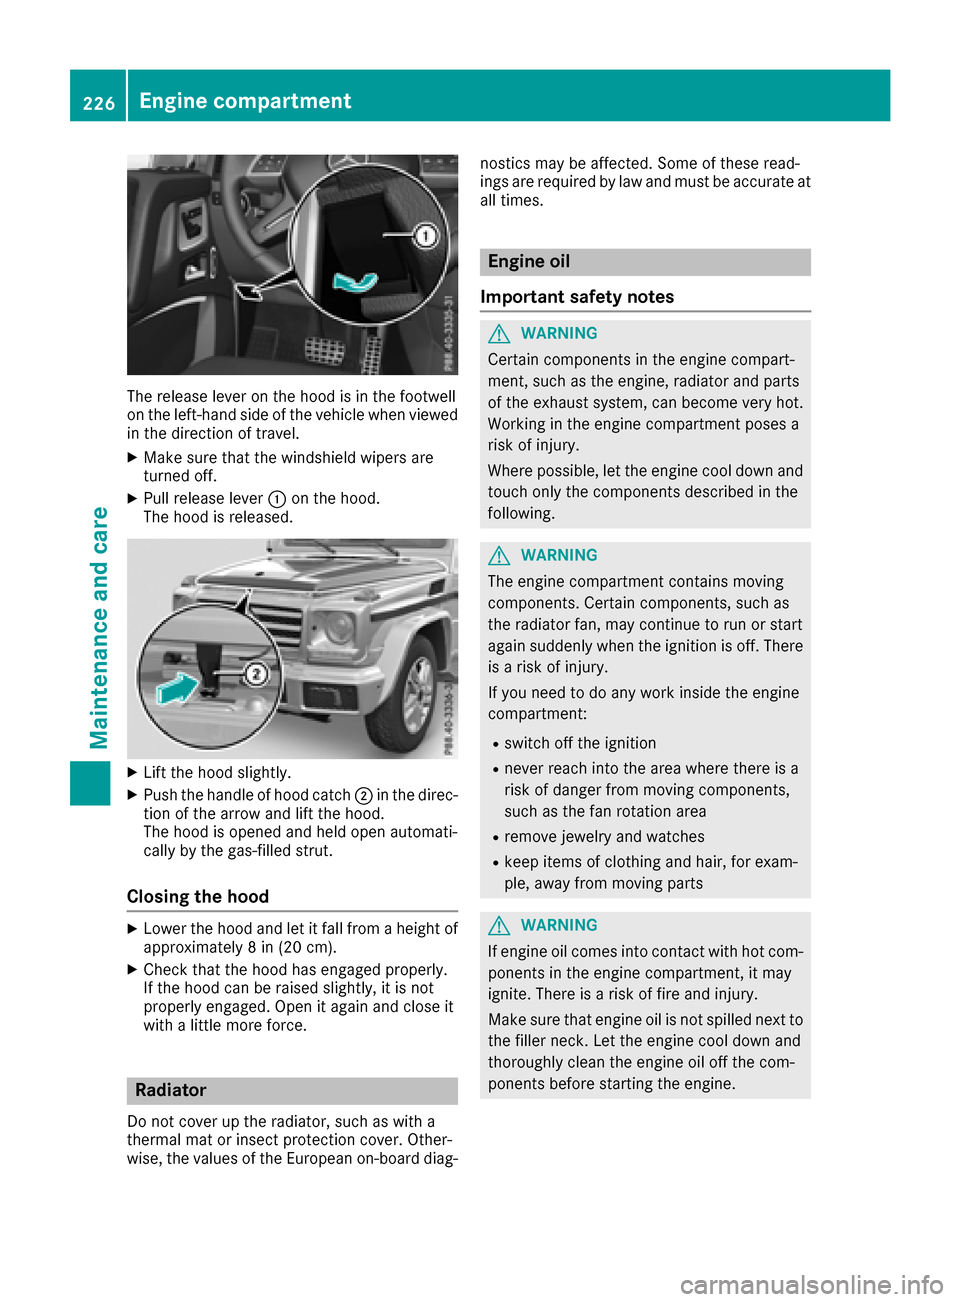
The release lever on the hood is in the footwell
on the left-hand side of the vehicle when viewed
in the direction of travel.
XMake sure that the windshield wipers are
turned off.
XPull release lever:on the hood.
The hood is released.
XLift the hood slightly.
XPush the handle of hood catch ;in the direc-
tion of the arrow and lift the hood.
The hood is opened and held open automati-
cally by the gas-filled strut.
Closing the hood
XLower the hood and let it fall from aheight of
approximately 8in(20 cm).
XCheck that the hood has engaged properly.
If the hood can be raised slightly, it is not
properly engaged. Open it again and close it
withalittle more force.
Radiator
Do not cover up the radiator, such as with a
thermal mat or insect protection cover. Other-
wise, the values of the European on-board diag- nostics may be affected. Some of these read-
ings are required by law and must be accurate at
all times.
Engine oil
Important safety notes
GWARNING
Certain components in the engine compart-
ment,s uch as the engine, radiator and parts
of the exhaust system, can become very hot.
Workin ginthe engine compartment poses a
risk of injury.
Where possible, let the engine cool down and touch only the components described in the
following.
GWARNING
The engine compartment contains moving
components .Certain components ,such as
the radiator fan, may continue to run or start
again suddenly when the ignition is off. There is ar isk of injury.
If you need to do any work inside the engine
compartment:
Rswitch off the ignition
Rnever reach into the area where there is a
risk of danger from moving components,
such as the fan rotation area
Rremove jewelry and watches
Rkeep items of clothinga nd hair, for exam-
ple, away from moving parts
GWARNING
If engine oil comes into contact with hot com- ponent sinthe engine compartment,itm ay
ignite. There is arisk of fire and injury.
Make sure that engine oil is not spilled next to
the filler neck.L et the engine cool down and
thoroughly clean the engine oil off the com-
ponent sbefore starting the engine.
226Engine compartment
Maintenance and care
Page 229 of 286
GWARNING
Opening the hood when the engine is over-
heated or when there is afire in the engine
compartment coul dexpose you to hot gases
or other service products. There is arisk of
injury.
Let an overheated engine cool downb efore
opening the hood. If there is afire in the
engine compartment, keep the hood closed
and contact the fire department.
Notes on the oil level
Depending on you rdriving style ,the vehicle
consumes up to 0.9 US qt (0.8 liters )ofoil per
600 mile s(1000 km). The oil consumption may
be higher than this whe nthe vehicle is new or if
you frequently drive at high engine speeds.
Depending on the engine, the oil dipstick may be
in ad ifferent location.
When checking the oil level:
Rpark the vehicle on alevels urface
Rthe engine should be switched off for approx-
imately five minutes if the engine is at normal
operating temperature
Rif the engine is not at normal operating tem-
perature, e.g. if the engine wa sonly started
briefly,w aita pproximately 30 minutes before
carrying out the measurement
Checking the oil level usingt he oil dip-
stick
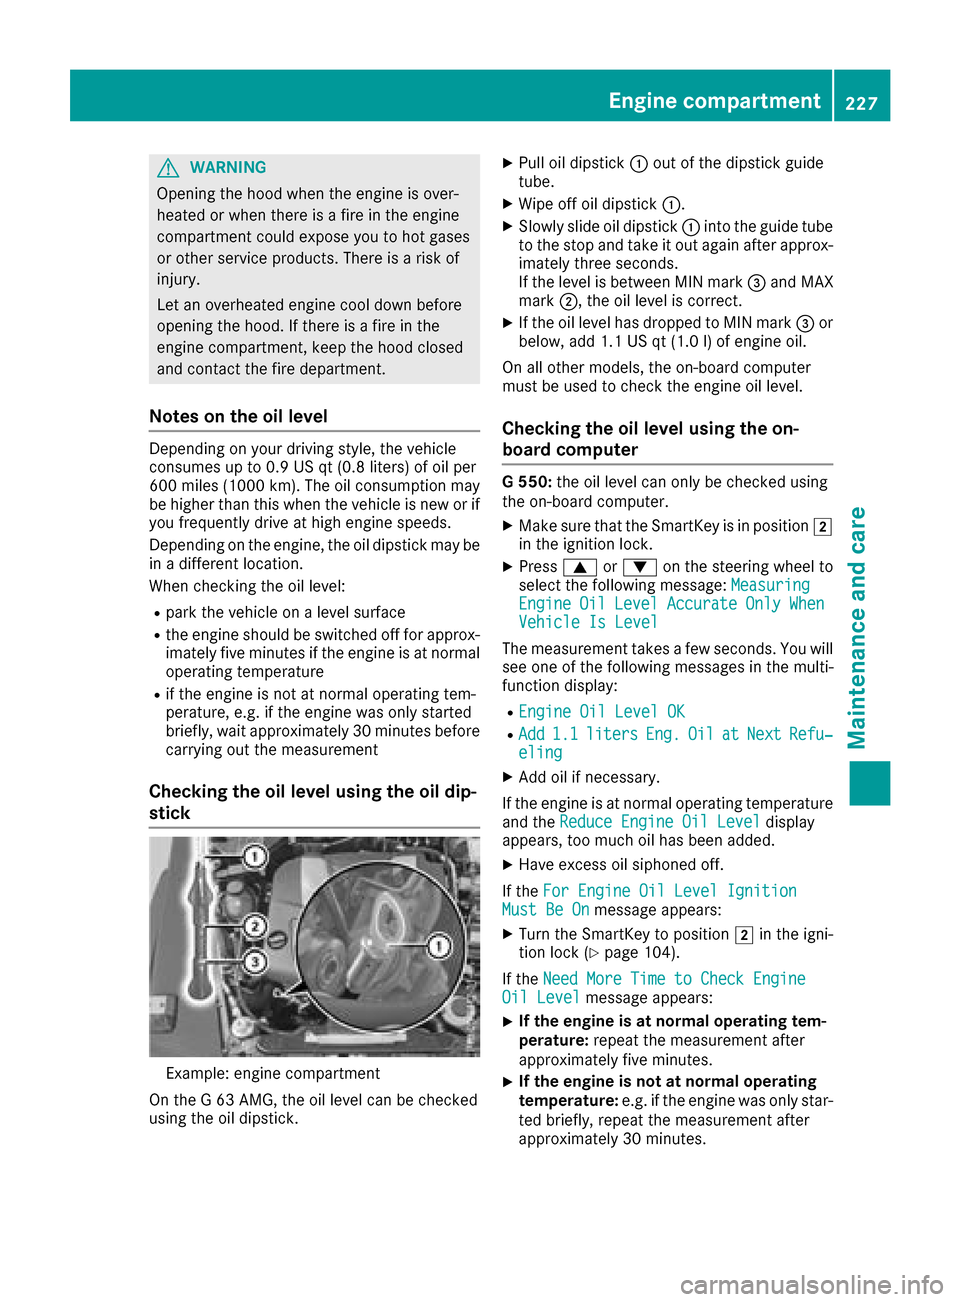
Example: engine compartment
On the G63AMG, the oil levelc an be checked
using the oil dipstick.
XPul loil dipstick :out of the dipstick guide
tube.
XWipeo ff oil dipstick :.
XSlowly slide oil dipstick :into the guide tube
to the stop and take it out again after approx-
imately three seconds.
If the levelisb etween MIN mark =and MAX
mark ;,the oil levelisc orrect.
XIf the oil levelh as dropped to MIN mark =or
below, add 1.1 US qt (1.0 l)of engine oil.
On all other models, the on-board computer
must be used to check the engine oil level.
Checking the oil level using the on-
board computer
G5 50: the oil level can only be checked using
the on-board computer.
XMake sure that the SmartKey is in position 2
in the ignition lock.
XPress 9or: on the steering wheel to
select the following message: Measuring
EngineOilLevelAccurateOnlyWhenVehicle Is Level
The measurement takesafew seconds. You will
see one of the following messages in the multi-
function display:
REngine Oil Level OK
RAdd1.1litersEng.OilatNextRefu‐eling
XAdd oil if necessary.
If the engine is at normal operating temperature and the Reduce Engine Oil Level
display
appears, too much oil has been added.
XHave excess oil siphoned off.
If the For Engine Oil Level Ignition
Must Be Onmessage appears:
XTurn the SmartKey to position 2in the igni-
tion lock (Ypage 104).
If the Need More Time to Check Engine
Oil Levelmessage appears:
XIf the engine is at norma loperating tem-
perature: repeat the measurement after
approximately five minutes.
XIf the engine is not at norma loperating
temperature: e.g. if the engine was only star-
ted briefly, repeat the measurement after
approximately 30 minutes.
Engine compartment227
Maintenance and care
Z
Page 230 of 286
If theEngine Oil Level Not Measurablewith Running Enginemessage appears:
XSwitch off the engine.
XIf the engine is at normal operating tem-
perature: waitabou tfive minutes before car-
rying out the measurement.
XIf the engine is not at normal operating
temperature: e.g. if the engine was only star-
ted briefly, wai tapproximately 30 minutes
before carrying out the measurement.
If you wish to cancel the measurement, press
the 9 or: button on the multifunction
steering wheel.
Adding engine oil
!Use only engine oils and oil filters that are
approved for vehiclesw ithaservice system. A
list of the engine oils and oil filters that have
been tested and approved in accordance with
Mercedes-Benz Specifications for Service
Products is available at any authorized
Mercedes-Benz Center.
The following cause engine failure or damage
to the exhaust system:
RUse of engine oils and oil filters that have
not been expressly approved for the service
system
RReplacement of engine oil and oil filter after
the replacement interval specifiedbyt he
service system has expired
RUse of engine oil additives
!Do not add too much oil. If the oil level is
above the "max" mark on the dipstick, too
much oil has been added. This can leadt o
damage to the engine or the catalytic con-
verter. Have excess oil siphoned off.
HEnvironmental note
When adding oil, take care not to spilla ny. If
oil enters the soil or waterways ,itisharmful to
the environment.
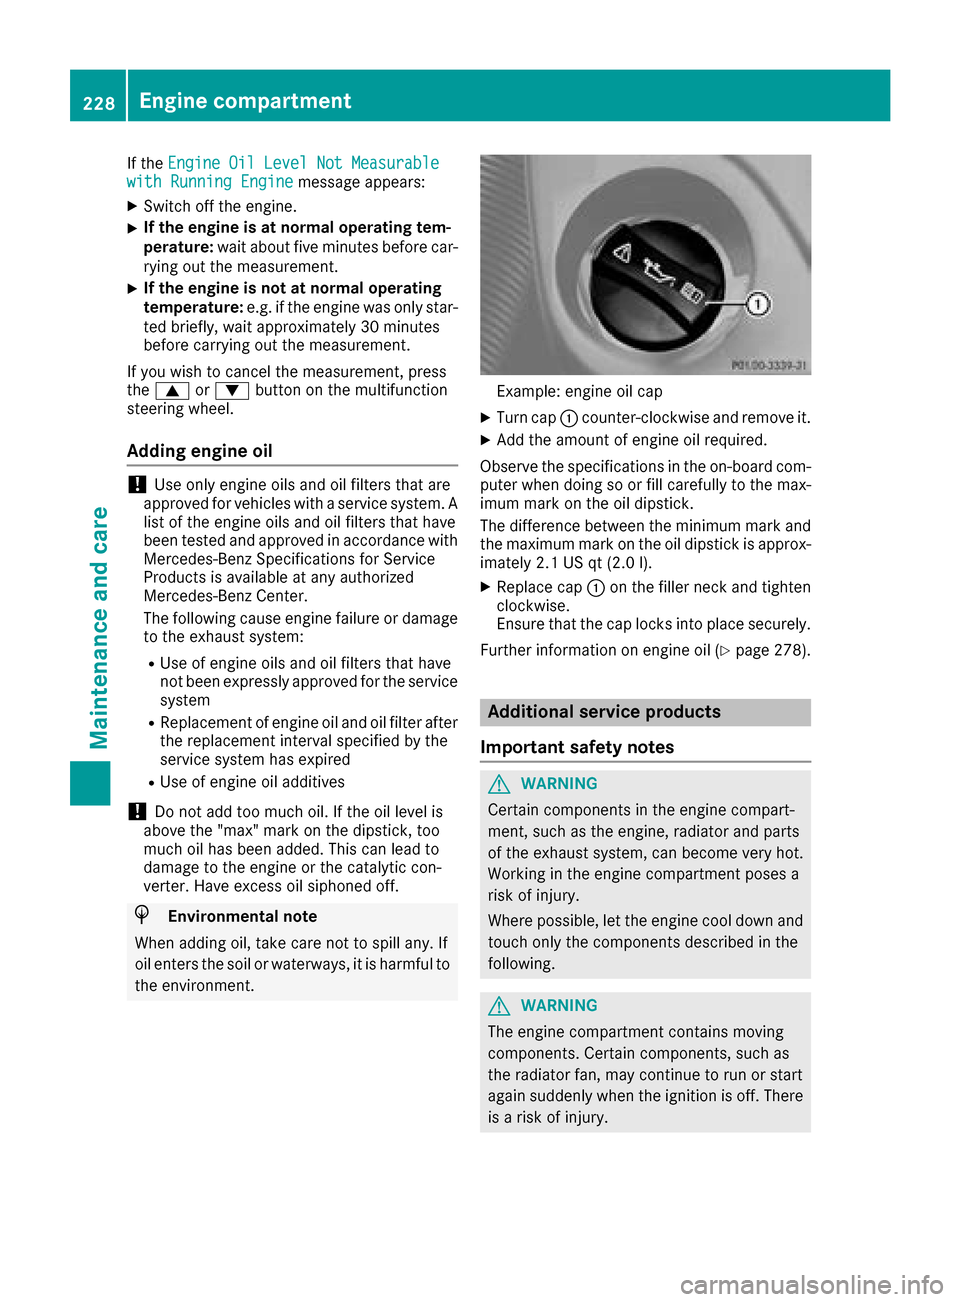
Example: engine oil cap
XTurn cap :counter-clockwise and remove it.
XAdd the amount of engine oil required.
Observe the specifications in the on-board com-
puter when doing so or fill carefully to the max-
imum mark on the oil dipstick.
The difference betweent he minimum mark and
the maximum mark on the oil dipstick is approx-
imatel y2.1 US qt (2.0 l).
XReplace cap :on the fille rneck and tighten
clockwise.
Ensur ethat the cap locks into place securely.
Further information on engine oil(
Ypage 278).
Additional servic eproducts
Important safety notes
GWARNING
Certai ncomponents in the engine compart-
ment, such as the engine, radiator and parts
of the exhaus tsystem, can become very hot.
Working in the engine compartment poses a
ris kofi njury.
Where possible ,let the engine cool dow nand
touch only the components described in the
following.
GWARNING
The engine compartment contains moving
components .Certai nc omponents ,suc ha s
the radiator fan, may continu etorun or start
agai nsudde nlyw hent he ignition is off. There
is ar iskofi njury.
228Engine compartment
Maintenancea nd care