MERCEDES-BENZ G-Class 2017 W463 Owner's Manual
Manufacturer: MERCEDES-BENZ, Model Year: 2017, Model line: G-Class, Model: MERCEDES-BENZ G-Class 2017 W463Pages: 286, PDF Size: 4.91 MB
Page 231 of 286
If you need to do any work inside the engine
compartment:
Rswitch off the ignition
Rnever reach into the area where there is a
risk of danger from moving components,
such as the fan rotation area
Rremove jewelry and watches
Rkeep items of clothing and hair, for exam-
ple, awayfrom moving parts
GWARNING
The cooling system is pressurized, particularly
when the motor is warm. If you open the cap,
you could be scaldedifh ot coolant spraysout.
There is arisk of injury.
Let the engine cool down before you open the
cap. Wear gloves and eye protection. Slowly
open the cap to relieve pressure.
GWARNING
Opening the hood when the engine is over-
heated or when there is afire in the engine
compartment could expose you to hot gases
or other service products. There is arisk of
injury.
Let an overheated engine cool down before
opening the hood. If there is afire in the
engine compartment, keep the hood closed
and contact the fire department.
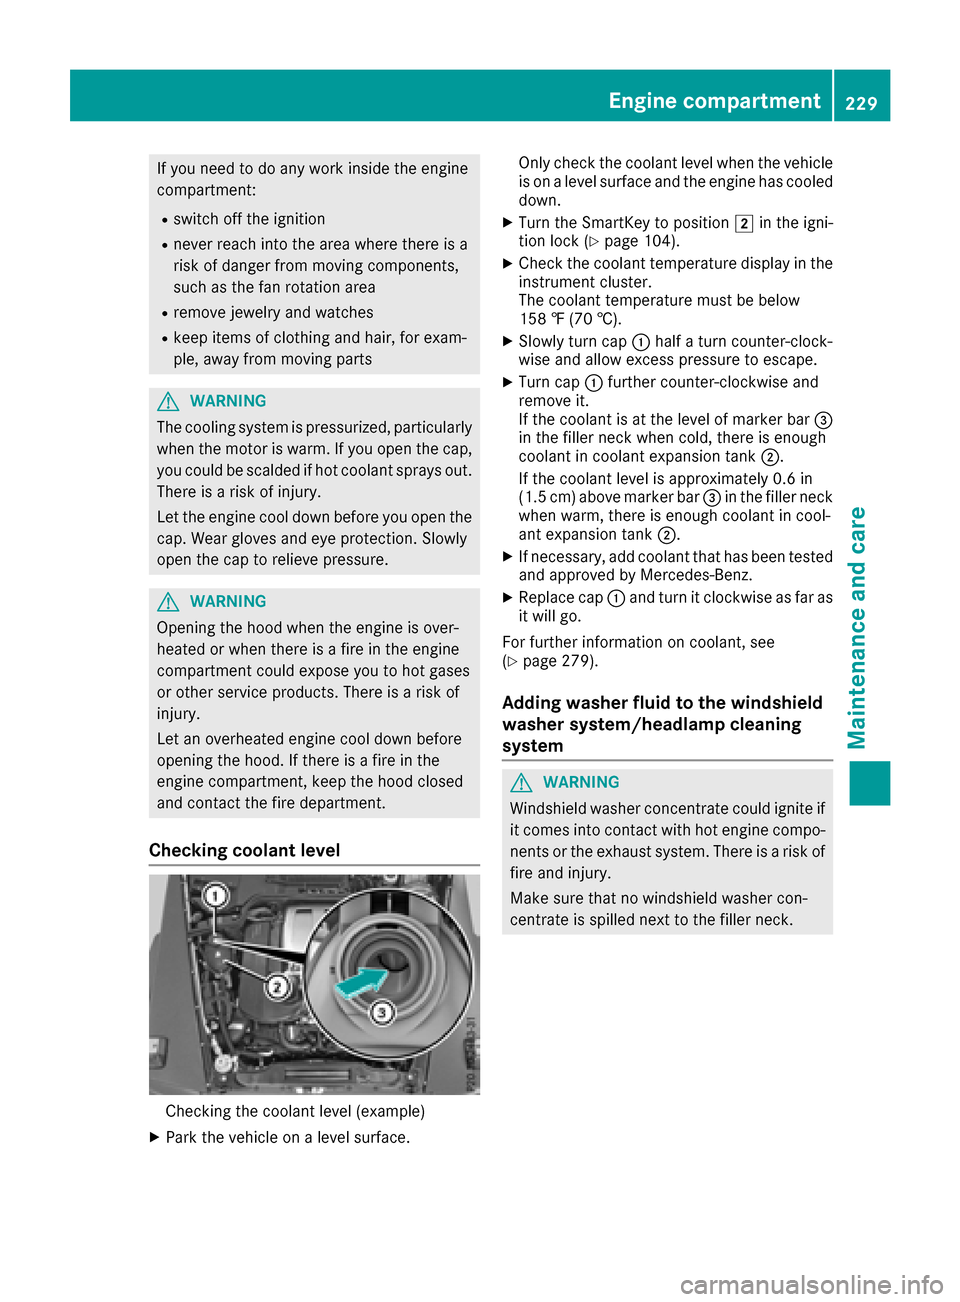
Checking coolant level
Checking the coolant level (example)
XPark the vehicle on alevel surface. Only check the coolant level when the vehicle
is on alevel surface and the engine has cooled
down.
XTurn the SmartKey to position 2in the igni-
tion lock (Ypage 104).
XCheck the coolant temperature display in the
instrument cluster.
The coolant temperature must be below
158 ‡(70 †).
XSlowlyt urn cap :half aturn counter-clock-
wise and allow excess pressure to escape.
XTurn cap :further counter-clockwise and
remove it.
If the coolant is at the level of marker bar =
in the fillern eck when cold, there is enough
coolant in coolant expansion tank ;.
If the coolant level is approximately 0.6 in
(1.5 cm) above marker bar =in the fillern eck
when warm, there is enough coolant in cool-
ant expansion tank ;.
XIf necessary,add coolant that has been tested
and approved by Mercedes-Benz.
XReplace cap :and turn it clockwise as far as
it willg o.
For further information on coolant, see
(
Ypage 279).
Adding washe rfluid to the windshield
washe rsystem/headlamp cleaning
system
GWARNING
Windshield washer concentrate could ignite if it comes into contact with hot engine compo-
nents or the exhaust system. There is arisk of
fire and injury.
Make sure that no windshield washer con-
centrate is spilled next to the fillern eck.
Engine compartment229
Maintenanceand care
Z
Page 232 of 286
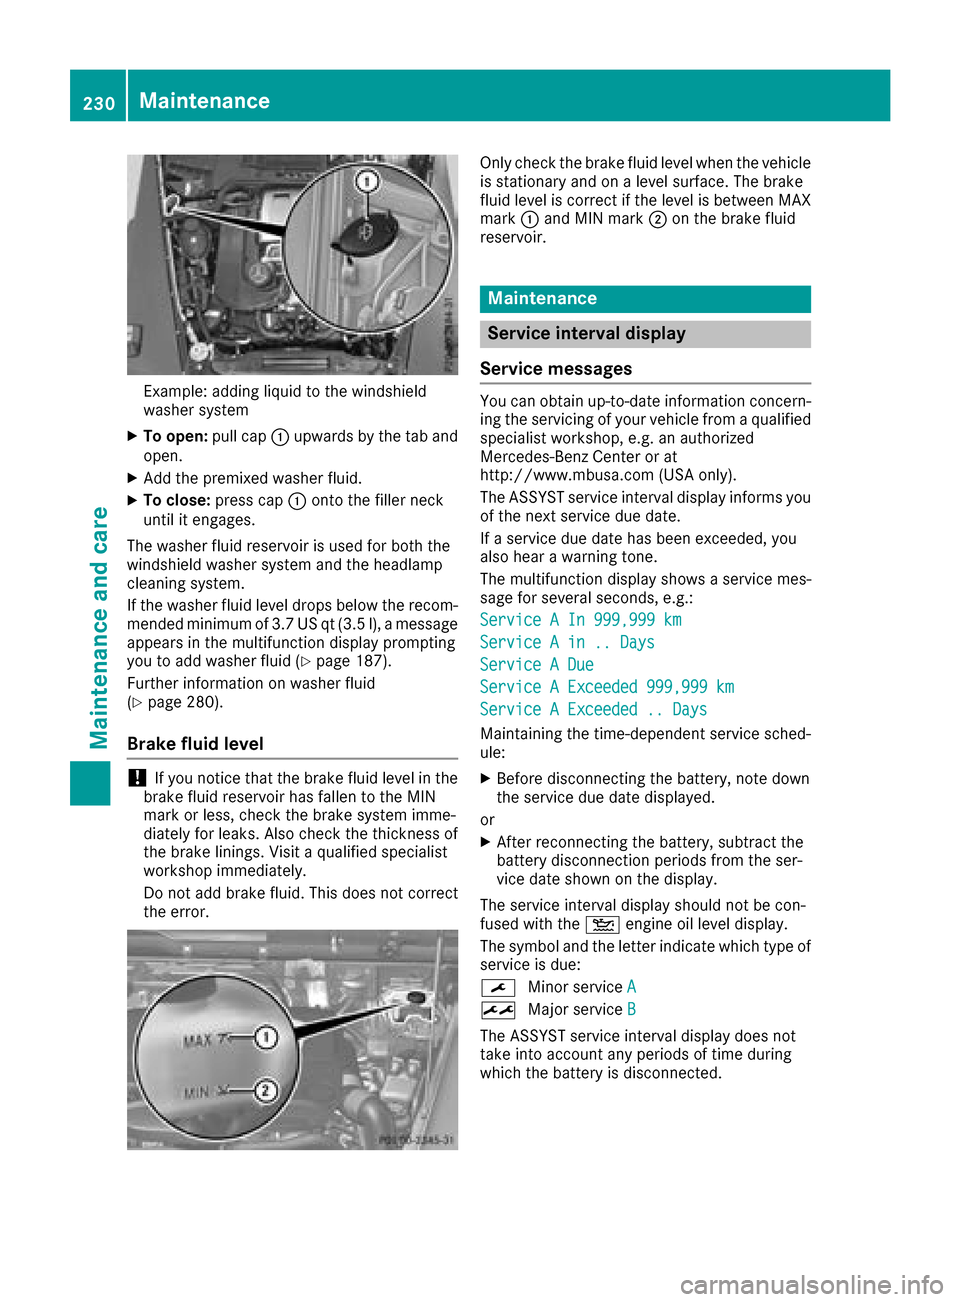
Example: adding liquid to the windshield
washersystem
XTo open: pull cap:upwards by the tab and
open.
XAdd the premixed washe rfluid.
XTo close: press cap :onto the fille rneck
unti lite ngages.
The washe rfluid reservoi risusedf or both the
windshiel dwashers ystem and the headlamp
cleaning system.
If the washe rfluid level drops belo wthe recom-
mended minimu mof3.7 US qt (3.5 l) ,amessage
appear sinthe multifunctio ndisplay prompting
yo utoa ddwashe rfluid (
Ypage 187).
Furtheri nformatio nonwasherf luid
(
Ypage 280).
Brake fluid level
!If yo unotice thatt he brake fluid level in the
brake fluid reservoi rhas fallen to the MIN
mark or less, check the brake system imme-
diately for leaks .Alsoc heck the thicknes sof
the brake linings. Visitaq ualified specialist
workshop immediately.
Do not ad dbrake fluid .Thisd oesn ot correct
the error.
Onlyc heck the brake fluid level when the vehicle
is stationar yand on alevel surface. The brake
fluid level is correct if the level is between MAX
mark :and MIN mark ;on the brake fluid
reservoir.
Maintenance
Service interval display
Service messages
Yo uc an obtai nup-to-date informatio nconcern-
ing the servicing of your vehicl efromaq ualified
specialis tworkshop ,e.g.ana uthorized
Mercedes-Benz Center or at
http://www.mbusa.com (USA only).
The ASSYST servic eintervald isplayinforms you
of the next servic eduedate.
If as ervic eduedate hasb eene xceeded ,you
also hear awarning tone.
The multifunctio ndisplay shows aservic emes-
sage for severa lseconds, e.g.:
ServiceAIn9 99,999km
ServiceAin..D ays
ServiceADue
ServiceAExceeded 999,999k m
ServiceAExceeded .. Days
Maintaining the time-dependent servic esched-
ule:
XBefore disconnecting the battery ,note down
the servic eduedate displayed.
or
XAfter reconnecting the battery ,sub tract the
battery disconnection periods fromt he ser-
vic ed ates hown on the display.
The servic eintervald isplayshouldnot be con-
fused with the 4engine oi llev el display.
The symbo land the letter indicate which typ eof
servic eisdue:
¯ Minor service A
±
Major service B
The ASSYST servic eintervald isplaydoes not
take into account any periods of time during
which the battery is disconnected.
230Maintenance
Maintenance and care
Page 233 of 286
Hidingaservice message
XTo hide the service message, press the %
back button on the multifunction steering
wheel(
Ypage1 58).
Displayings ervice messages
Use the buttons on the multifunction steering
wheel.
XSwitch on the ignition.
XPress=or; to select the standard
display menu on the steering wheel
(
Ypage1 60).
XPress9or: to select the service
interval display.
The ¯ or± service symbol and the ser-
vice due date are displayed.
Points to remember
The specified maintenance interval takes only
the normal operation of the vehiclei nto
account. Under arduous operating conditions or
increased loadont he vehicle, maintenance
work must be carrie dout more frequently, for
example:
Rregular city driving with frequent intermediate
stops
Rif the vehicleisp rimarily usedtotravel short
distances
Ruse in mountainous terrainoronp oor road
surfaces
Rif the engine is often left idling for long periods
Under these or similar conditions, have ,for
example, the air filter, engine oil and oil filter
replaced or changed more frequently. Under
arduous operating conditions, the tires must be
checked more often. Further information can be obtained at aqualified specialist workshop, e.g.
an authorized Mercedes-Benz Center.
Care
General notes
!
For cleaning you rvehicle, do not use any of
the following:
Rdry, roug horhard cloths
Rabrasive cleaning agents
Rsolvents
Rcleaning agents containing solvents
Do not scrub.
Do not touch the surfaces or protective films
with hard objects, e.g. aring or ice scraper.
You coul dotherwise scratch or damage the
surfaces and protective film.
!Do not park you rvehiclef oralong period of
time directly after cleaning, particularly after
cleaning the wheelr im with wheelcleaner.
Wheelc leaner can leadtot he increased cor-
rosionoft he brake discs and pads. Therefore,
drive for afew minutes after cleaning. By
heating up the brakes ,the brake discs and
padsd ry. The vehiclec an then be parked for a
long period of time.
HEnvironmental note
Disposeofe mpty packaging and cleaning
cloths in an environmentally responsiblem an-
ner.
Regula rcare of you rvehicleisac ondition for
retaining the quality in the long term.
Use care products and cleaning agents recom-
mended and approved by Mercedes-Benz.
Washing the vehicle and cleaning the
paintwork
Automatic car wash
GWARNING
Braking efficiency is reduced after washing
the vehicle. There is arisk of an accident.
After the vehicleh as been washed, brake
carefully while paying attention to the traffic
conditions until full braking power is restored.
!When DISTRONIC PLUS or the HOLD func-
tion is activated, the vehicleb rakes automat-
ically in certain situations.
To avoi ddamage to the vehicle, deactivate
DISTRONIC PLUS and the HOLD function in
the following or similar situations:
Rwhen towing the vehicle
Rin the car wash
!Never cleany ourv ehicleinaT ouchless
Automatic Ca rWash as these use special
Care231
Maintenance and care
Z
Page 234 of 286
cleaning agents. These cleaning agents can
damagethe paintwork or plasti cparts.
!Make sure that the automatic car wash is
suitablef or the size of the vehicle .Fold in the
exterior mirrors before the vehicle is washed.
The exterior mirrors could otherwise be dam-
aged.
!Make sure that the automatic transmission
is in position Nwhe nwashing your vehicle in
at ow-through car wash. The vehicle could be
damaged if the transmission is in another
position.
!Make sure that:
Rthe sid ewindow sand the sliding sunroof
are fully closed.
Rthe blower is switched off.
Rthe windshield wiper switch is at position 0.
The vehicle may otherwise be damaged.
You can wash the vehicle in an automatic car
wash from the very start.
If the vehicle is very dirty, pre-wash it before
cleaning it in an automatic car wash.
After using an automatic car wash, wipe off wax
from the windshield and the wiper blades. This
will prevent smears and reduce wiping noises
caused by residueont he windshield.
Washing by hand
In some countries,washing by hand is only
allowed at speciall yequipped washing bays.
Observe the legalr equirements in each country.
Whenu sing the vehicle in winter, remove all
trace sofroads altd eposits carefully and as
soona spossible.
Whenw ashing the underside of the vehicle ,also
clean the insides of the wheels.
XDo not us ehot water and do not wash the
vehicle in direct sunlight.
XUse asoft sponge to clean.
XUse amildc leaning agent, such as acar
shampooa pproved by Mercedes-Benz.
XThoroughlyh osedownthe vehicle with agen-
tle jet of water.
XDo not point the water jet directlyt owards the
ai ri nlet.
XUse plenty of water and rinse outt he sponge
frequently.
XRinse the vehicle with clean water and dry
thoroughly with achamois.
XDo not le tthe cleaning agent dry on the paint-
work.
Powe rwashers
GWARNING
The water jet from acircula rjet nozzle (dirt
blasters) can cause invisible exterior damage
to the tire sorchassisc omponents. Compo-
nents damaged in this wa ymay fai lunexpect-
edly. There is ariskofana ccident.
Do not us epower washers with circula rjet
nozzle stoclean the vehicle .Have damaged
tire sorc hassisc omponents replaced imme-
diately.
!Alway smaintainad istance of at least
11.8 in (30 cm )between the vehicle and the
power washern ozzle.Information aboutt he
correct distance is available from the equip-
ment manufacturer.
Move the power washern ozzle around when
cleaning your vehicle.
Do not ai mdirectlyata ny of the following:
RTires
RDoor gaps, roof gaps, joints, etc.
RElectrical components
RBattery
RConnectors
RLamps
RSeals
RTrim
RVentilation slots
Damaged seals or electrical components can
lead to leaks or failures.
!Vehicles with decorative film: parts of your
vehicle are covered with adecorative film.
Maintain adistance of at least 27.5 in (70 cm)
between the parts of the vehicle covered with
the fil mand the nozzle of the hig hpressure
cleaner.
Information aboutt he correct distance is
available from the equipment manufacturer.
Move the power washern ozzle around when
cleaning your vehicle.
232Care
Maintenancea nd care
Page 235 of 286
Cleaning thepaintwork
!Do no taffix:
Rstickers
Rfilms
Rmagnetic plates or similar items
to painte dsurfaces .You coul dotherwise
damag ethe paintwork.
Scratches, corrosive deposits ,areas affected by
corrosion and damag ecaused by inadequate
car ecanno talways be completely repaired .In
suchc ases, visit aqualified specialist workshop.
XRemove dirt immediately, wherep ossible,
while avoiding rubbing to ohard.
XSoak insect remains withi nsect removerand
rinse off th etreated areas afterwards.
XSoak bird droppings withw aterand rinse off
th et reated areas afterwards.
XRemove coolant ,brak efluid ,tre er esin, oils,
fuels and greases by rubbing gently witha
cloth soaked in petroleum ether or lighter
fluid.
XUse tar remove rtoremove tar stains.
XUse siliconer emovertoremove wax.
If wate rnolonger forms "beads"o nthe paint
surface, use th epaintc arep roduct srecommen-
ded and approved by Mercedes-Benz. This is the
cas eapproximately every three to fiv emonths,
dependingont heclimate conditionsa nd the
car eproduct used.
The cleanin gproduct PaintC leaner, whichh as
been recommended and approved by
Mercedes-Benz, should be used when dirt has
penetrated th epaints urface.
Als ouse PaintC leaner on paintt hath as become
dull.
Do no tuse these car eproduct sinthesun or on
th eh ood while th ehood is hot .
XUse
asuitable touch-up stick ,e.g.MBT ouch-
Up Stick ,torepair slightd amagetothepaint-
work quickly and provisionally.
Matt efinish care
!Never polisht hevehicle or th elight alloy
wheels. Polishingc auses thefinish to shine.
!The followingm ay causethe paintt o
become shinya nd thus reducethe matte
effect:
Rstron grubbing of th epaintwork with
unsuitable materials
Rfrequentu se of automatic car washes
Rwashingthevehicle in direct sunlight
!Never use paintc leaner, buffing or polishing
products, or glossp reserver, e.g.wax. These
product sare only suitable for high-gloss sur-
faces. Theiru se on vehicleswithm atte finish
leads to considerable surface damage( shiny,
spotte dareas).
Always have paintwork repairs carried out at a
qualified specialist workshop.
!Do no tuse wash program swithah ot wax
treatmen tunde rany circumstances.
Observ ethese note sifyour vehicle has aclear
matte finish. This will help you to avoid damage
to th epaintwork due to incorrect treatment.
Thesen otesalso apply to light alloy wheelsw ith
ac lear matte finish.
The vehicle should ideally be washedbyh and
usingas oftsponge, car shampoo and plenty of
water.
Use only insect remove rand car shampoo from
th er ange of approved Mercedes-Ben zcare
products.
Cleaning th evehicle parts
Cleaning th ewheels
GWARNING
The wate rjet from acircular je tnozzle (dirt
blasters)c an causeinvisible exterior damage
to th etires or chassis components .Compo-
nent sdamaged in this way may fail unexpect-
edly. Thereisar iskofana ccident.
Do no tuse power washers withc ircular jet
nozzles to clean th evehicle .Haved amaged
tires or chassis components replaced imme-
diately.
!Do no tuse acidic wheel cleanin gproducts
to remove brak edust.T his coul ddamage
wheel boltsa nd brakecomponents.
Care233
Maintenance and care
Z
Page 236 of 286
!Do not park your vehicle foralong period of
time directly after cleaning, particularlya fter
cleaning the wheel rim with wheel cleaner.
Wheel cleaner can lead to the increased cor-
rosion of the brake discs and pads. Therefore,
drive for afew minutes after cleaning. By
heating up the brakes, the brake discs and
pads dry. The vehicle can then be parked for a
long period of time.
Cleaning the windows
GWARNING
You could become trapped by the windshield wipers if they start moving while cleaning the
windshieldorw iper blades. There is arisk of
injury.
Alwayss witch off the windshieldw ipers and
the ignition before cleaning the windshieldo r
wiper blades.
!Do not use dry cloths, abrasive products,
solvents or cleaning agents containing sol-
vents to clean the inside of the windows. Do
not touch the insides of the windows with
hard objects, e.g. an ice scraper or ring. There
is otherwise arisk of damaging the windows.
!Cleant he water drainage channels of the
windshielda nd the rear window at regular
intervals. Deposits such as leaves, petals and pollen may under certain circumstances pre-
vent water from draining away. This can lead
to corrosion damage and damage to elec-
tronic components.
XCleant he inside and outside of the windows
with adamp cloth and acleaning product that
is recommended and approved by Mercedes-
Benz.
Cleaning wiper blades
GWARNING
You could become trapped by the windshield wipers if they start moving while cleaning the
windshieldorw iper blades. There is arisk of
injury.
Alwayss witch off the windshieldw ipers and
the ignition before cleaning the windshieldo r
wiper blades.
!Do not pull the wiper blade.O therwise, the
wiper blade could be damaged.
!Do not clean wiper bladest oo often and do
not rub them too hard. Otherwise, the graph-
ite coating could be damaged. This could
cause wiper noise.
!Hold the wiper arm securely when folding
back. The windshieldc ould be damagedifthe
wiper arm smacks against it suddenly.
XFold the windshieldw iper arms awayfrom the
windshield.
XCarefully clean the wiper bladesw ithadamp
cloth.
XFold the windshieldw iper arms back again
before switching on the ignition.
Cleaning the exterior lighting
!Only use cleaning agents or cleaning cloths
which are suitablef or plastic light lenses.
Unsuitable cleaning agents or cleaning cloths
could scratch or damage the plastic light len- ses.
XCleant he plastic lenses of the exterior light-
ing using awet sponge and amild cleaning
agent, e.g. Mercedes-Benz car shampoo or
cleaning cloths.
Cleaning the mirror turns ignals
!Only use cleaning agents or cleaning cloths
that are suitablef or plastic lenses. Unsuitable
cleaning agents or cleaning cloths could
scratch or damage the plastic lenses of the
mirror turn signals.
XCleant he plastic lenses of the mirror turn sig-
nals in the exterior mirror housing using awet
sponge and mild cleaning agent, e.g.
Mercedes-Benz car shampoo or cleaning
cloths.
Cleaning the sensors
!If you clean the sensors with apower
washer, make sure that you keep adistance
of at least 11.8 in (30 cm) between the vehicle
and the power washer nozzle. Information
aboutt he correct distance is available from
the equipment manufacturer.
234Care
Maintenance and care
Page 237 of 286
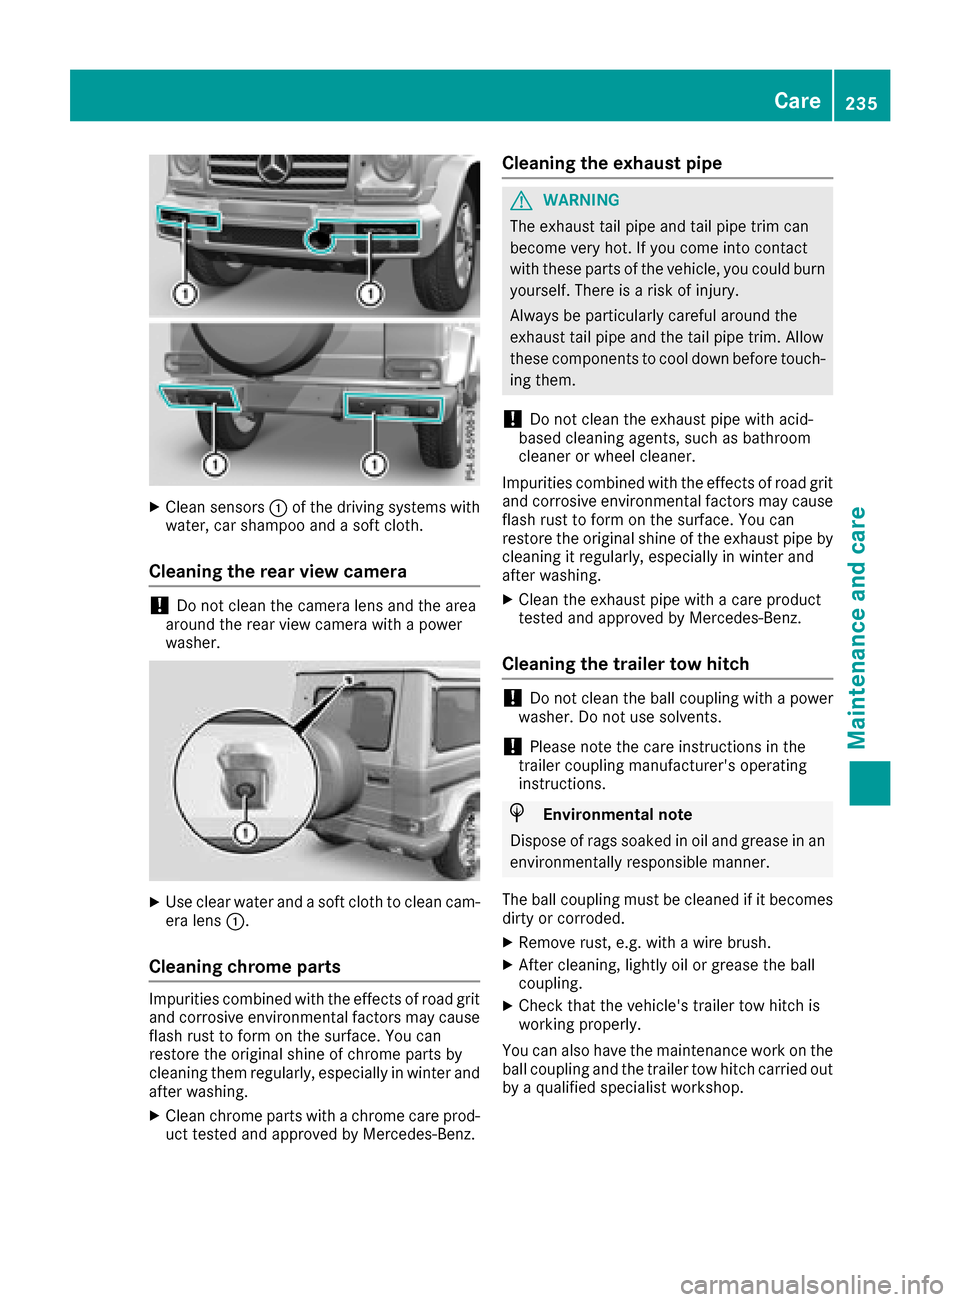
XClean sensors:of th edriving systems with
water, car shampoo and asoftc loth.
Cleaning th erearv iew camera
!Do no tclean th ecamera lensa nd thearea
aroun dthe rear view camera withap ower
washer.
XUse clear wate rand asoftc loth to clean cam-
era lens :.
Cleaning chrome parts
Impurities co mbinedwit hthe effect sofroad grit
and corrosivee nvironmental factors may cause
flas hrust to for monthesurface. You can
restore th eoriginal shineofc hrom epartsb y
cleanin gthe mr egularly, especiall yinwinter and
after washing.
XClean chrom epartsw ithac hrom ecarep rod-
uct tested and approvedbyM ercedes-Benz.
Cleaning th eexhaust pipe
GWARNING
The exhaust tail pipeand tail pipetrim can
become ver yhot.Ify ou come int ocontac t
witht hese part softhevehicle ,you could burn
yourself. Thereisar iskofi njury.
Always beparticularly careful aroun dthe
exhaust tail pipeand th etail pipe trim. Allow
these component stocooldown before touch-
ing them.
!Do no tclean th eexhaust pipe wit hacid-
based cleanin gagents ,suchasb athroom
cleane rorwheel cleaner.
Impurities combined withthe effect sofroad grit
and corrosivee nvironmental factors may cause
flas hrust to for monthesurface. You can
restore th eoriginal shineoft heexhaust pipeby
cleanin gitregularly, especiall yinwinter and
after washing.
XClean th eexhaust pipe wit hacarep roduct
tested and approve dbyMercedes-Benz.
Cleaning th etrailer tow hitch
!Do no tclean th eball couplingw ithapower
washer. Do no tuse solvents.
!Pleasen otet he car einstructionsint he
trailer couplingm anufacturer'soperating
instructions.
HEnvironmental note
Dispose of rags soaked in oil and grease in an
environmentall yresponsible manner.
The ball couplingm ust be cleanedifitbecomes
dirt yorc orroded.
XRemo verust ,e.g.w ithaw ire brush.
XAftercleaning, lightly oil or grease th eball
coupling.
XCheckt hatthe vehicle's trailer to whitch is
working properly.
You can also have th emaintenance work on the
ball couplinga nd thetrailer to whitch carried out
by aq ualified specialist workshop.
Care235
Maintenance and care
Z
Page 238 of 286
Interior care
Cleaning th edisplay
!Forcleaning ,donotuse any of th efollowing:
Ralcohol-base dthinner or gasolin e
Rabrasive cleaning agents
Rcommercially-available household cleaning
agents
Thes emay damag ethe display surface. Do
no tp ut pressur eonthedisplay surfac ewhen
cleaning .This could lead to irreparable dam-
age to th edisplay.
XBefore cleaning th edisplay, mak esuret hatit
is switched off and has cooled down .
XClean thedisplay surfac eusingac omme r-
cially available microfiber cloth and TFT/LCD
display cleaner.
XDr yt he display surfac eusingad ry microfiber
cloth .
Cleaning th eplastic trim
GWARNIN G
Care products and cleaning agents containing solvents caus esurfaces in th ecockpi tto
become porous. As aresult ,plastic part smay
come loos eintheevent of air bag deploy-
ment. Ther eisariskofi njury.
Do no tuse any car eproducts and cleaning
agents to clean th ecockpit.
!Never attach th efollowin gtoplastic surfa-
ces:
Rstickers
Rfilm s
Rperfum eoil container or similar
You could otherwise damag ethe plastic.
!Do no tallow cosmetics ,insec trepellen tor
sunscree ntocomeintoc ontac twitht he plas-
ti ct rim. This maintains th ehigh-qualit ylook of
th es urfaces.
XWipe th eplastic trim wit hadamp,lint-free
cloth ,e.g.a microfiber cloth .
XHeavy soiling:use careand cleaning prod-
uct srecommended and approve dby
Mercedes-Benz.
The surfac emay chang ecolor temporarily.
Wait until th esurfac eisd ry again .
Cleaning th esteering wheel and selec-
tor lever
XThoroughly wipe wit hadamp cloth or use
leather car eagents that have been recom-
mended and approve dbyMercedes-Benz.
Cleaning genuine wood and trim ele-
ments
!Do notuse solvent-base dcleaning agents
suc hast ar remover, whee lcleaners, polishes
or waxes. Ther eisotherwise ariskofd amag-
ing th esurface.
!Do no tuse chrom epolis hfor trim strips .The
trim strips have achrom elook but are mostl y
made of anodized aluminum and can lose
their shin eifchrom epolis hisu sed. Use a
damp ,lint-free cloth instead when cleaning
th et rims trips .
If th echrome-plated trim strips are ver ydirty,
you can use achrom epolish. If you are unsure
as to whether th etrims trips are chrome-
plated or not, consult an authorize d
Mercedes-Ben zCenter.
XWipe th ewooden trim and trim pieces wit ha
damp ,lint-free cloth ,e.g.a microfiber cloth .
XTrim elementswith piano black finish :
wipe wit hasoft, damp cotton cloth .Use clean
water.
XHeavy soiling: use careand cleaning prod-
uct srecommended and approve dby
Mercedes-Benz.
Cleaning th eseat covers
Gene raln otes
!Do no tuse am icrofiber cloth to clean cover s
made out of real leather ,artificial leather or
DINAMICA .Ifused often ,the se can damag e
th ec over.
!Observ ethe followin gwhen cleaning :
Rclean artificial leather cover swithac loth
moistened wit hasolution containing 1%
detergen t(e.g. dish washing liquid).
Rclean cloth cover switham icrofiber cloth
moistened wit hasolution containing 1%
detergen t(e.g. dish washing liquid). Rub
carefully and always wipe entire seat sec -
tion stoa voidleaving visible lines. Leav e
th es eat to dry afterwards .Cleaning result s
236Care
Maintenance and care
Page 239 of 286
depend on the type of dirt and how long it
has been there.
Rclean DINAMICA coverswithadamp cloth.
Make sure that you wipe entire seat sec-
tion stoa void leaving visible lines.
Note that regular care is essential to ensure that
the appearance and comfort of the coversi s
retained over time.
Genuine leather seat covers
!To retain the natural appearance of the
leather, observe the following cleaning
instructions:
RClean genuine leather coversc arefully with
ad amp clotha nd then wipe the covers
down with adry cloth.
RMake sure that the leather does not
become soaked. It may otherwise become
rough and cracked.
ROnly use leather care agent sthat have
been tested and approved by Mercedes-
Benz. You can obtain these from aqualified
specialist workshop.
Leather is anatural product.
It exhibit snatural surface characteristics, for
example:
Rdifferences in the texture
Rmarks caused by growth and injury
Rslight nuances of color
These are characteristic sofleather and not
material defects.
Seat covers of other materials
!Observe the following when cleaning:
Rclean artificial leather coversw ithacloth
moistened with asolution containin g1%
detergent (e.g. dish washing liquid).
Rclean clothc overswitham icrofiber cloth
moistened with asolution containin g1%
detergent (e.g. dish washing liquid). Rub
carefully and always wipe entire seat sec-
tion stoa void leaving visible lines. Leave
the seat to dry afterwards. Cleaning results
depend on the type of dirt and how long it
has been there.
Rclean DINAMICA coversw ithadamp cloth.
Make sure that you wipe entire seat sec-
tion stoa void leaving visible lines.
Cleaning the seat belts
GWARNING
Seat belts can become severely weakened if
bleached or dyed. This could cause the seat
belts to tear or fail, for instance, in the event of an accident. This poses an increased risk of
injury or fatal injury.
Never bleach or dye the seat belts.
!Do not clean the seat belts using chemical
cleanin gagents. Do not dry the seat belts by
heating at temperatures above 176 ‡(80 †)
or in direct sunlight.
XUse clean, lukewarm water and soaps olution.
Cleaning the headliner and carpets
XHeadliner:if it is very dirty,u seasoft brus hor
dry shampoo.
XCarpets: use the carpe tand textile cleaning
agents recommended and approved by
Mercedes-Benz.
Care237
Maintenancea nd care
Z
Page 240 of 286
Where willIfind...?
Warning triangle
Removing the warning triangle
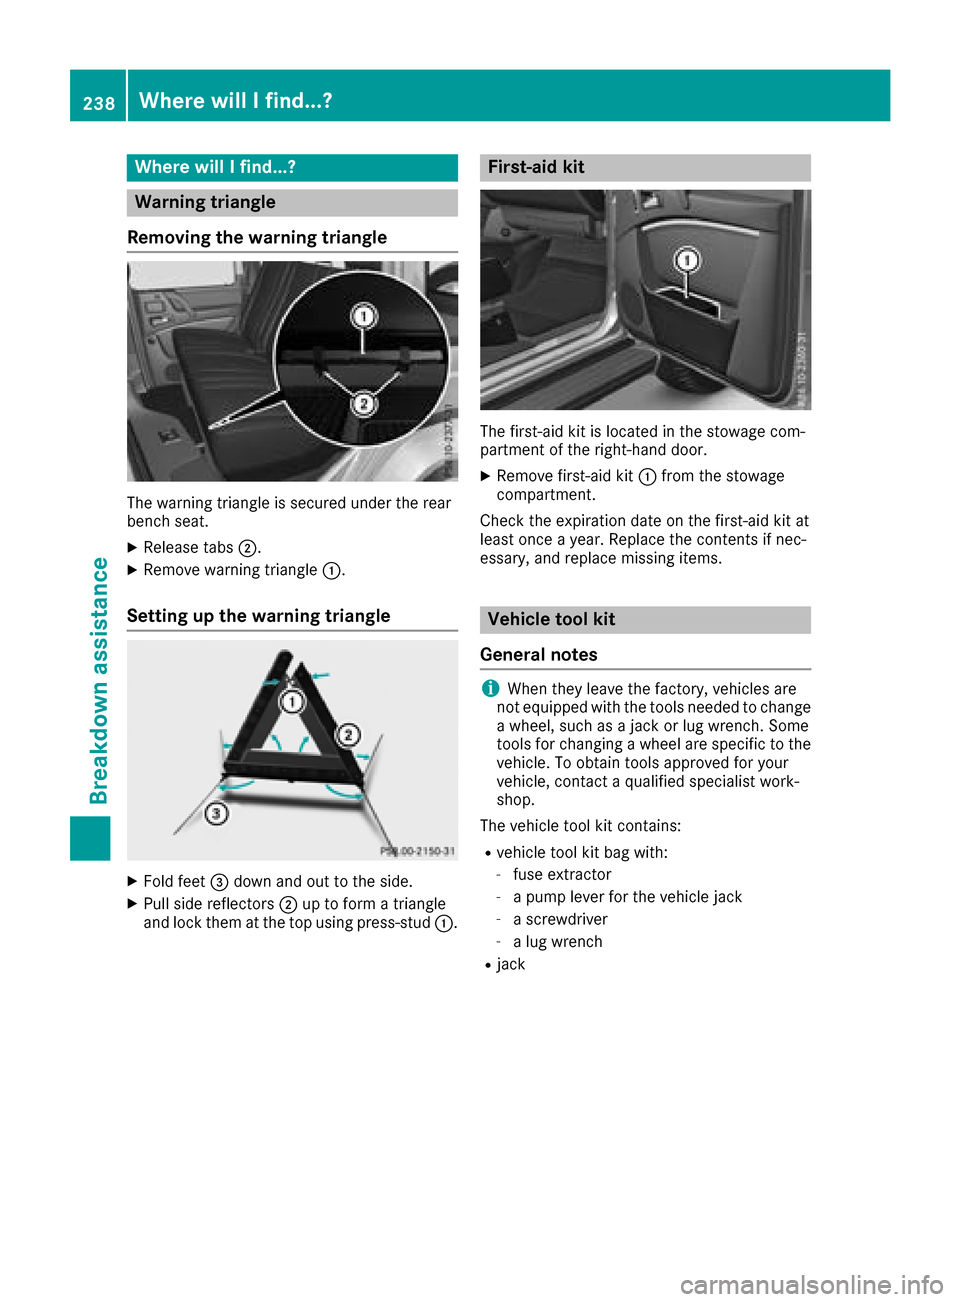
The warning triangl eissecure dunder the rear
bench seat.
XReleas etabs ;.
XRemove warning triangle :.
Setting up the warning triangle
XFold feet=downa nd out to the side.
XPullside reflectors ;up to form atriangle
and lock them at the top using press-stud :.
First-aid kit
The first-aidkit is located in the stowage com-
partment of the right-hand door.
XRemove first-ai dkit: from the stowage
compartment.
Check the expiration date on the first-ai dkit at
least once ayear. Replace the contents if nec-
essary, and replace missing items.
Vehicle tool kit
General notes
iWhen they leave the factory,v ehicles are
not equipped with the tools neededtoc hange
aw heel, such as ajack or lug wrench. Some
tools for changing awheel are specific to the
vehicle. To obtai ntools approved for your
vehicle, contact aqualified specialist work-
shop.
The vehiclet ool kit contains:
Rvehicletool kit bag with:
-fuse extractor
-apump leverf or the vehiclej ack
-ascrewdriver
-alug wrench
Rjack
238Where will Ifind...?
Breakdown assistance