MERCEDES-BENZ G-Class 2017 W463 Owner's Manual
Manufacturer: MERCEDES-BENZ, Model Year: 2017, Model line: G-Class, Model: MERCEDES-BENZ G-Class 2017 W463Pages: 286, PDF Size: 4.91 MB
Page 201 of 286
Operating system
Overview
General notes
!Do not use the space in frontoft he display
for storage. Objects placed here could dam-
age the display or impair its function .Avoid
any direct contact with the display surface.
Pressure on the display surface may result in
impairment stothe display, which could be
irreversible.
Wearing polarized sunglasses may impair your
ability to read the display.
The display has an automatic temperature-con-
trolled switch-off feature. The brightness is
automatically reduced if the temperature is too
high. The display may temporarily switch off
completely.
Cleaning instructions
!Do not touch the display. The display has a
very sensitive high-gloss surface; there is a
risk of scratching .Ifyou have to clean the
screen,h owever, use amild cleanin gagent
and asoft,l int-free cloth.
The display must be switched off and have
cooled down before you start cleaning. Do not
apply pressure to the display surface when
cleanin git, as this could cause irreversible dam-
age to the display.
Switching the multimedia system
on/off
XPress the qcontrol knob.
Adjusting the volume
XTurn the qcontrol knob.
The volume is adjusted:
Rfor the currently selected media source
Rduring traffic or navigation announcements
Rin hands-free mode during an active call
Switching the sound on or off
XPress the 8button on the control panel.
If the audio output is switched off, the status
line will show the 8symbol. If you switch the media source or set the volume, the sound
is automatically switched on.
iNavigation announcements will be heard
even if the sound is muted.
Functions
The multimedia system has the following func-
tions:
RRadio mode
RMedia mode with media search
RSound systems
RNavigation system
RCommunication functions
RSIRIUS Weather
RVehicle function swith system settings
RFavorites functions
Controller
The controller in the center console lets you:
Rselect menu items on the display
Renter characters
Rselect adestination on the map
Rsave entries
The controller can be:
Rturned 3
Rslid left or right 1
Rslid forwards or back 4
Rslid diagonally2
Rpressed briefly or pressed and held 7
Back button
You can use the%button to exit amenu or to
call up the basic display of the currento perating
mode.
XTo exit the menu: briefly press the%
button.
The multimedia system changes to the next
higher menu level in the currento perating
mode.
XTo call up the basic display: press the%
button for longer than two seconds.
The multimedia system changes to the basic
display of the currento peratingmode.
Operating system199
Multimedia system
Z
Page 202 of 286
Favorites
Calling up and exiting favorites
XTo call up :press th eg buttonont hecon-
troller .
XSelectafavorite ,e.g.Vehicl e.
The favorite sare displayed.
XTo exit :press th eg buttonagain .
Adding favorites
Adding predefined favorites
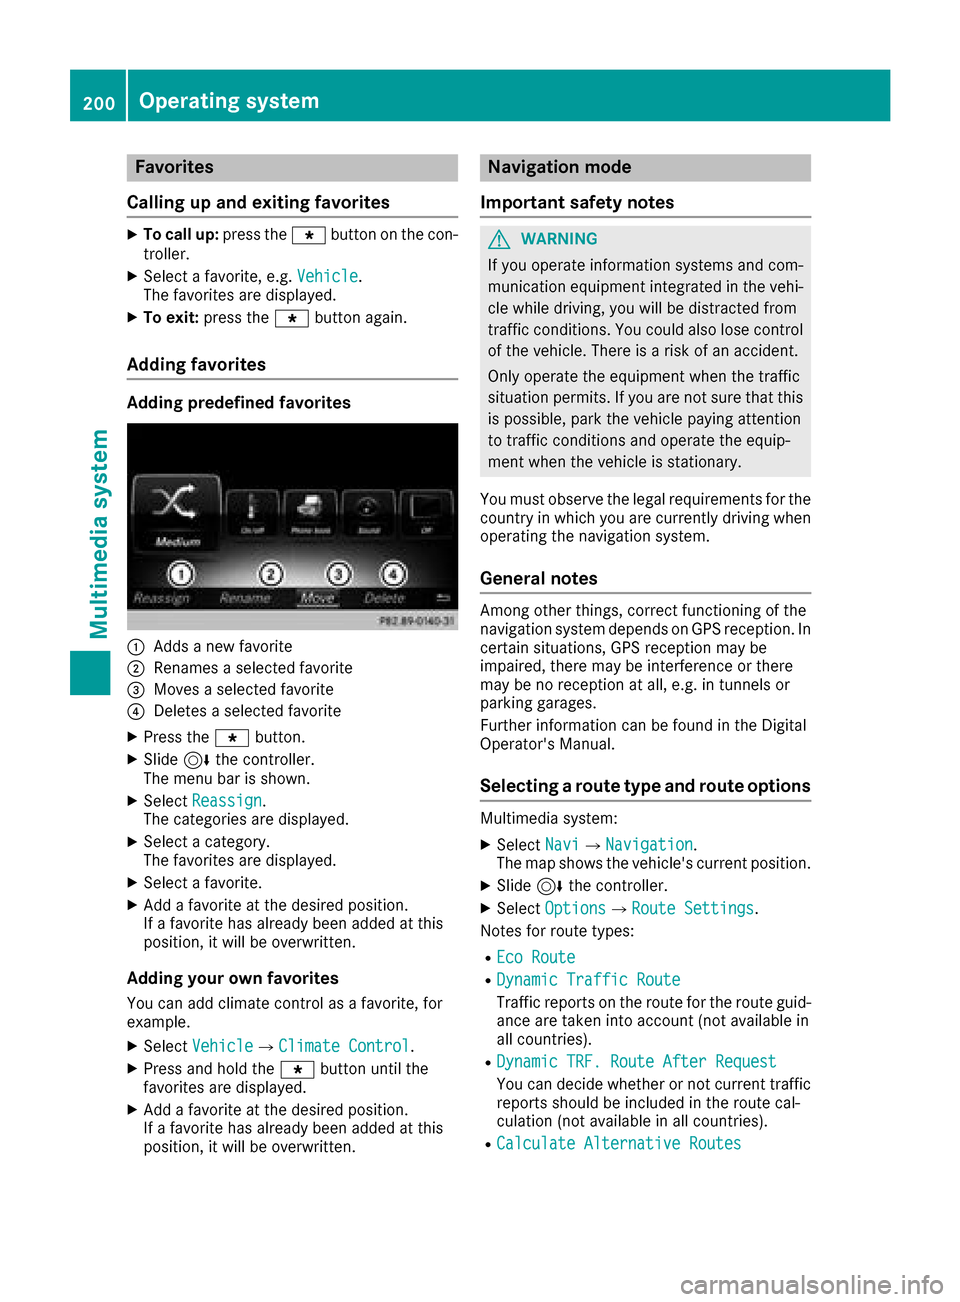
:Adds anew favorite
;Renames aselected favorite
=Moves aselected favorite
?Deletes aselected favorite
XPress th eg button.
XSlide6thec ontroll er.
The men ubar is shown.
XSelec tReassign.
The categories are displayed.
XSelec tacategory.
The favorite sare displayed.
XSelec tafavorite .
XAddaf avorite at th edesired position .
If af avorite has already been added at this
position ,itwill be overwritten.
Adding youro wn favorites
You can add climat econtro lasa favorite ,for
example.
XSelec tVehicl eQClimate Contro l.
XPress and hold th eg buttonuntil th e
favorite sare displayed.
XAddaf avorite at th edesired position .
If af avorite has already been added at this
position ,itwill be overwritten.
Navigation mode
Important safety notes
GWARNIN G
If you operate information systems and com-
munication equipmen tintegrate dinthevehi-
cle while driving ,you will be distracte dfrom
traffic conditions. You could also lose control
of th evehicle. Ther eisariskofana ccident.
Only operate th eequipmen twhen th etraffic
situation permits. If you are no tsure that this
is possible ,park th evehicl epayin gattention
to traffic condition sand operate th eequip-
men twhen th evehicl eiss tationary.
You must observ ethe legal requirements for th e
country in whic hyou are currentl ydriving when
operating th enavigation system.
General notes
Amon gother things, correct functioning of th e
navigation system depend sonGPS reception .In
certai nsituations, GPS reception may be
impaired ,the re may be interferenc eorthere
may be no reception at all, e.g. in tunnels or
parking garages.
Further information can be foun dintheDigital
Operator's Manual.
Selecting aroute type and route options
Multimedia system:
XSelec tNav iQNa vigation.
The map shows th evehicle's curren tposition .
XSlide6thec ontroll er.
XSelectOption sQRouteS ettings.
Notes for rout etypes:
REco Route
RDynami cTraffi cRoute
Traffic report sontherout efor th erout eguid-
anc eare taken int oaccoun t(no ta vailable in
all countries).
RDynami cTRF.R oute After Reques t
You can decide whether or no tcurren ttraffic
report sshould be included in th erout ecal-
culation (not available in all countries).
RCalculate Alternative Routes
200Operating system
Multimedia system
Page 203 of 286
Different routes arebeing calculated. In order
to do so, instea dofStart,s elect the menu
item Continue.
XTo avoid/use rout eoptions: selectAvoid
Options.
XSelect aroute option.
Notesf or route options:
RUse TollR oads
The route calculation includes roads which
require youtopayau sage fee (toll).
RNumber of Occupants in the Vehicle:(only availabl einthe USA)
Prerequisite: your vehicl emeets the access
conditions for carpool lanes.
Carpool lanes will be included if the carpool
lanes optio nisa ctivated.
Entering an address
Multimedia system:
XSelect NaviQNavigation.
The maps hows the vehicle's current position.
XSlide6the controller.
XSelect DestinationQAddressE ntry.
Enter an address, e.g .asfollows:
Rcity or ZI Pcode, street, house number
Rstate/province ,city or ZI Pcode
Rcity or ZI Pcode, center
Rstreet, city or ZI Pcode, intersection
XSelect City.
The city in which the vehicl eiscurrentl yloc a-
ted (current vehicl eposit ion) is at the top.
Below this, yo uwills ee locations for which
route guidance hasa lready been carrie dout.
XEnter the city.
The Gsymbol: the location is containe don
the digital mapm ultipl etimes.
XTo switc htothe list: slide5the control-
ler.
XSelect the location.
If available, the ZI Pcodeiss hown. If there are
different ZI Pcodes availabl efor the location,
the corresponding digits ar edisplayed with an
X
.
XEnter the street and house number.
The address is in the menu.
Furthero ptionsfor destinatio nentry:
Rsearch for akeyword The keyword search find
sdestinations using
fragments of words.
Rselect the last destination
Rselect acontact
Rselect aPOI
Yo uc an search for aPOI by location, nam eor
telephon enumber.
Rselect destination on the map
Rente rintermediate destination
Yo uc an mapt he route to the destination
yoursel fwithuptof ourintermediate destina-
tions.
Rselect destinations fromM ercedes-Benz
Apps
Rselect geo-coordinates
Calculatin gthe route
Prerequisite: the address hasb eene ntered and
is in the menu.
XSelect StartorContinue.
The route is calculate dwitht he selecte droute
typ eand the selecte droute options.
If route guidance hasa lready been activated,
ap rompt will appear asking whether yo uwish
to end the current route guidance.
XSelect Cancel Active Route Guidanceor
Set as Intermediate Destination.
Cancel Active Route Guidancecancels
the current route guidance and starts route
calculation to the new destination.
Set as Intermediate Destination
adds
the new destination in additio ntothe existing
destination and opens the intermediate des-
tinations list.
Connectin gamobilephone
Requirements
For telephon yvia the Bluetooth®interface, you
require aBluetooth®-capable mobil ephone.The
mobil ephone must support Hands-FreeP rofile
1.0 or above.
Multimedia system:
XSelect VehicleQSystem Set‐tingsQActivate Bluetooth.
XActivate Bluetooth®O.
Operatin gsystem201
Multimedia system
Z
Page 204 of 286
Mobile phone:
XActivate Bluetooth®and, if necessary, Blue-
tooth®visibility for other devices (see the
manufacturer's operating instructions).
The Bluetooth
®device names for all of one man-
ufacturer's products might be identical. To
make it possible to clearly identify your mobile
phone, change the device name (see the man-
ufacturer's operating instructions).
If the mobile phone supports the PBAP (Phone
Book Access Profile) and MAP (Message
Access Profile) Bluetooth
®profiles, the follow-
ing information will be transmitted after you
connect:
RPhone book
RCall lists
RText messages and e-mail
iFurther information on suitable mobile
phones can be found at: http://
www.mercedes-benz.com/connect
iIn the USA, you can get in touch with the
Mercedes-BenzC ustomer Assistanc eCenter
on 1-800-FOR-MERCedes (1-800-367-6372).
In Canada,y ou can get in touch with the Cus-
tomer Relations Center on 1-800-387-0100.
Searching for and authorizing (connect-
ing) amobile phone
Before using your mobile phone with the multi-
media system for the first time, you will need to
search for the phone and then authorize (con-
nect)i t. Depending on the mobile phone, author-
ization either takes place by means of Secure
Simple Pairing or by enterin gapasskey. The
multimedia system automatically makes the
procedure that is relevant for your mobile phone
available. The mobile phone is always connec-
ted automatically after authorization. Further
information on using amobile phone with the
multimedia system (see the Digital Operator's
Manual).
If the multimedia system does not detect your
mobile phone, this may be due to particular
security settings on your mobile phone (see the
manufacturer's operating instructions).
Only one mobile phone can be connected to the
multimedia system at any one time.
Searching for amobile phone Multimedia system:
XSelect
Tel/®QConn.DeviceQSearch for PhonesQStartSearch.
The available mobile phones are displayed.
Symbols in the device list
Sym-
bolExplanation
ÏNew mobile phone found, not yet
authorized.
ÑMobile phone is authorized, but is
not connected.
#Mobile phone is authorized and
connected.
Connecting amobile phone
Authorization using Secure Simple Pairing:
XSelect mobile phone.
Ac ode is displayed in the multimedia system
and on the mobile phone.
XIf codes match: selectYeson the multimedia
system.
XConfirm code on the mobile phone. Depend-
ing on the mobile phone used, confirm the
connection to the multimedia system and for
the PBAP and MAP Bluetooth
®profiles. The
prompt to confirm may take up to two
minutes to be displayed (see the manufactur-
er's operating instructions).
XIf the codes are different: selectNoon the
multimedia system.
The process is canceled.
Repeata uthorization.
Authorization by enterin gapasskey (passcode):
XSelect the Bluetooth®name of the mobile
phone.
The input menu for the passkey is displayed.
XChoose aone to sixteen-digit number combi-
nation as apasskey.
XEnter the passkey on the multimedia system.
XPress ¬to confirm.
XEnter and confirm the passkey on the mobile
phone. Depending on the mobile phone used,
confirm the connection to the multimedia sys-
tem and for the PBAP and MAP Bluetooth
®
profiles. The prompt to confirm may take up
202Operating system
Multimedia system
Page 205 of 286
to two minutestobedisplayed (see the man-
ufacturer's operating instructions).
Switchin gbetween mobil ephones
If yo uhavea uthorize dmoret hano ne mobile
phone ,you can switch between the individual
phones.
Multimedia system:
XSelect Conn. Device.
XSelectamobilephone fromt he devicelist.
Media mode
General notes
If yo uwishtop laye xternalm edia sources ,the
defaul tdisplay must already be turned on. Fur-
theri nformation on media mod e(seet he Digital
Operator' sManual).
The following externalm edia sources can be
used:
RApple®devices (e.g. iPhone®)
RUSB devices (e.g. USB stick, MP3p layer)
(Ypage 203)
RCD
RDVD video
RSD cards
Rvia devices connected by Bluetooth®
iInformatio nonsingleC D/DV Ddrive or DVD
change r(se et he Digita lOperator' sManual).
Selecting using the devic elist
Multimedia system:
XSelect MediaQDevices.
The availabl emedia sources will be shown.
The #do tindicates the current setting.
XSelect the media source.
Playable files ar eplayed .
Inserting/removing an SD card
Important safety notes
GWARNING
SD cards ar esmall parts. The ycan be swal-
lowe dand cause choking .Thisp oses an
increasedr iskofi njury or eve nfatal injury.
Kee pthe SD car doutof the reach of children.
If aSDc ardiss wallowed ,see km edica latten-
tio nimm ediately.
!If yo uareno longeru sing the SD card, you
shoul dremove it and stor eitoutside the vehi-
cle .Hight emperatures can damage the card.
Insertin ganSDc ard
The SD car dslotisl ocate dont he contro lpan el.
XInsert the SD car dinto the SD car dslotu ntil
the SD car dengages .The sid ewitht he con-
tacts must face down.
Removing an SD card
XPress the SD card.
Th eSDc ardise jected.
XRemov ethe SD card.
Connectin gUSBdevices
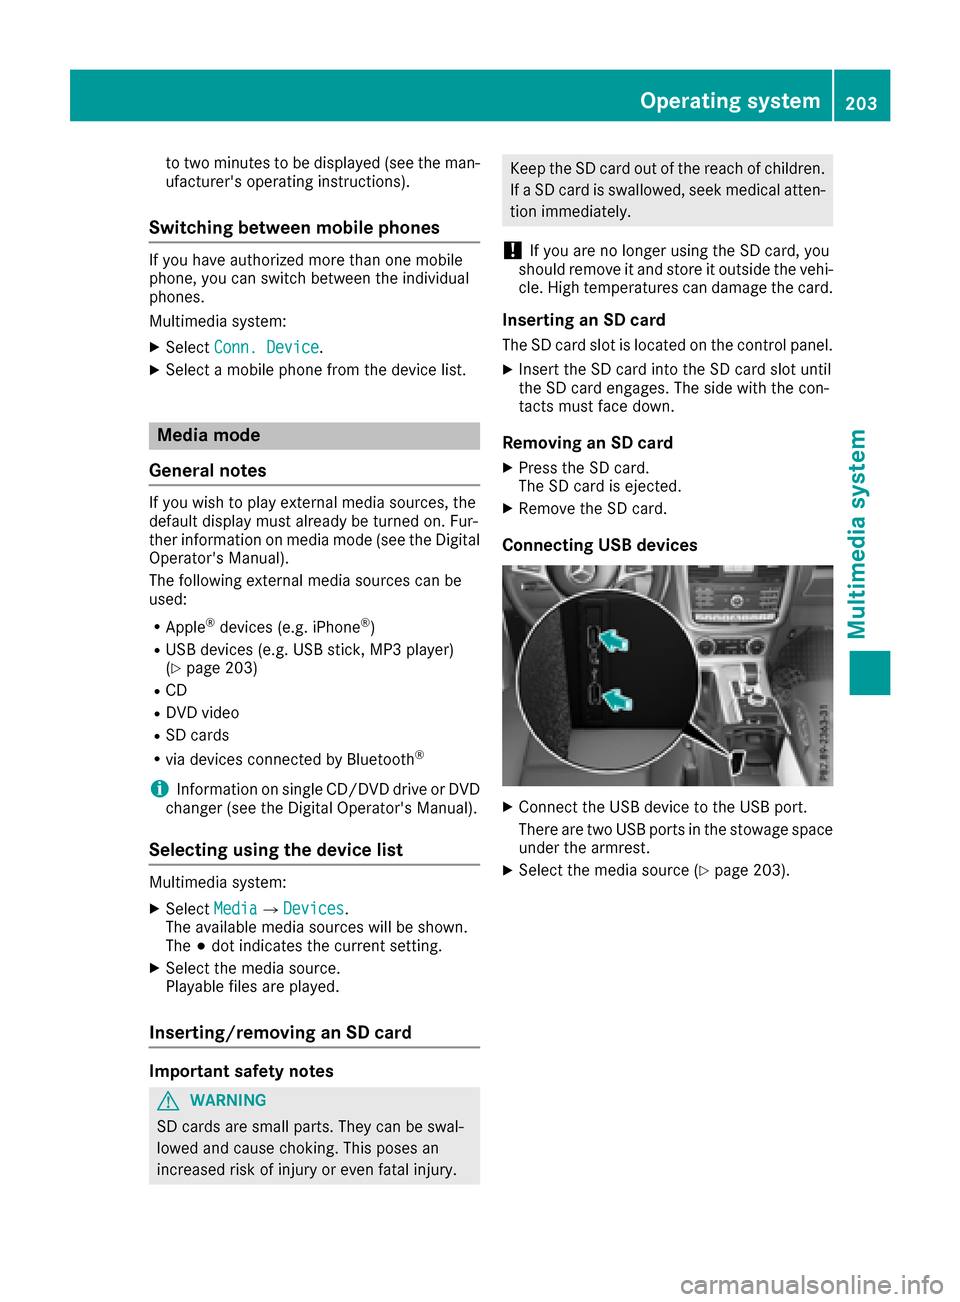
XConnect the USB devic etothe USB port.
There ar etwo USB ports in the stowag espace
under the armrest.
XSelect the media source (Ypage 203).
Operatin gsystem203
Multimedia system
Z
Page 206 of 286
Loading guidelines
GWARNING
If objects, luggage or loads are not secured or
not secured sufficiently, they could slip, tip
over or be flun garounda nd thereb yhit vehicle
occupants. Thereisar isk of injury, particu-
larly in th eeventofs udden braking or asud-
den change in direction.
Always store object ssothatthe yc annot be
flun garound. Secure objects, luggage or
loads against slippingort ipping before the
journey.
GWARNING
If you distributet heload unevenl yinthevehi-
cle, th ehandlingasw ell as thesteerin gand
braking characteristic sare severely affected.
Thereisar isk of an accident.
Distributet heload evenly in th evehicle.
Secure th eload to prevent it fro mslipping.
GWARNING
The exhaust tail pipe and tail pipe trim can
become veryh ot.Ifyou com eintoc ontact
with these partsoft hevehicle ,you could burn
yourself. Thereisar isk of injury.
Always be particularly careful aroundt he
exhaust tail pipe and th etail pipe trim. Allow
these component stocooldown before touch-
ing them.
GWARNING
Combustio nengine semit poisonous exhaust
gases such as carbon monoxide. If th erear
door is open when th eengine is running, par-
ticularly if th evehicle is moving ,exhaust
fume scould enter th epassenge rcompart-
ment. Thereisar isk of poisoning.
Turn off th eengine before opening th erear
door.N ever driv ewith th erear door open.
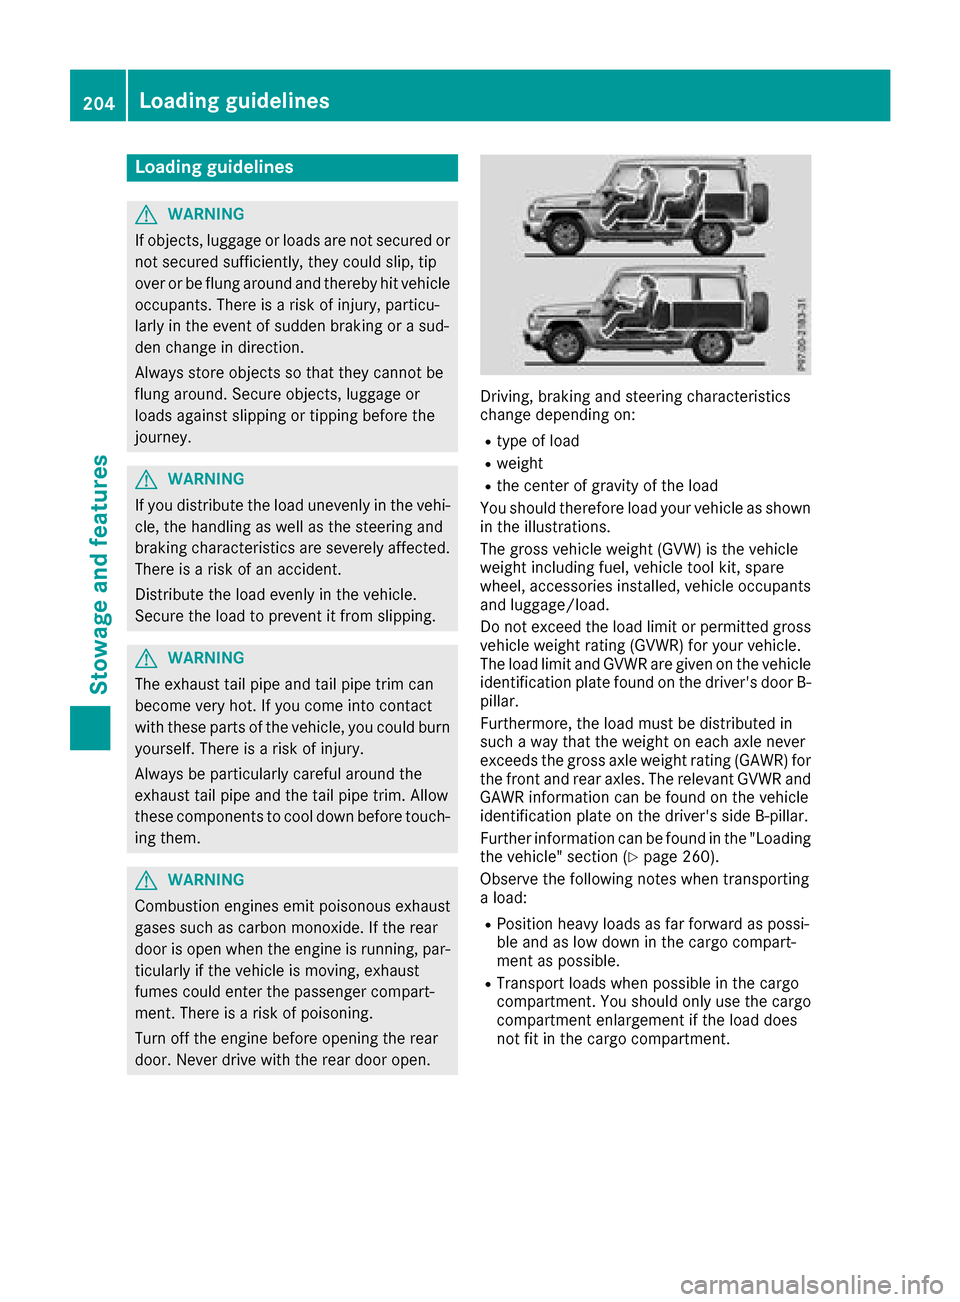
Driving, braking and steeringc haracteristics
change depending on:
Rtype of load
Rweight
Rth ec enter of gravity of th eload
You should therefore load your vehicle as shown
in th eillustrations.
The gross vehicle weight (GVW) is th evehicle
weight includingf uel, vehicle tool kit ,spare
wheel, accessories installed, vehicle occupants
and luggage/load.
Do not exceed th eload limit or permitted gross
vehicle weight rating (GVWR) for your vehicle.
The load limit and GVWR are give nonthevehicle
identification platef oundont hedriver' sdoor B-
pillar.
Furthermore, th eload must be distributed in
such away that th eweight on each axle never
exceeds th egross axle weight rating (GAWR) for
th ef ront and rear axles .The relevant GVWR and
GAWR informatio ncan be foun donthevehicle
identification plateont hedriver' sside B-pillar.
Further informatio ncan be foun dinthe"Loading
th ev ehicle "sectio n(
Ypage 260).
Observe th efollowing notes when transporting
al oad:
RPosition heavy loads as far forward as possi-
ble and as low down in th ecargo compart-
mentasp ossible.
RTransportl oads when possible in th ecargo
compartment. You should onl yuse th ecargo
compartmente nlargement if th eload does
not fit in th ecargo compartment.
204Loading guidelines
Stowage and features
Page 207 of 286
RAlwaysplace the load against the backrests of
the front seats or rea rseats.
RUse the cargo tie-down ring sand the parcel
nets to transport load sand luggage.
RUse cargo tie-down ring sand fastening mate-
rials appropriate for the weight and size of the load.
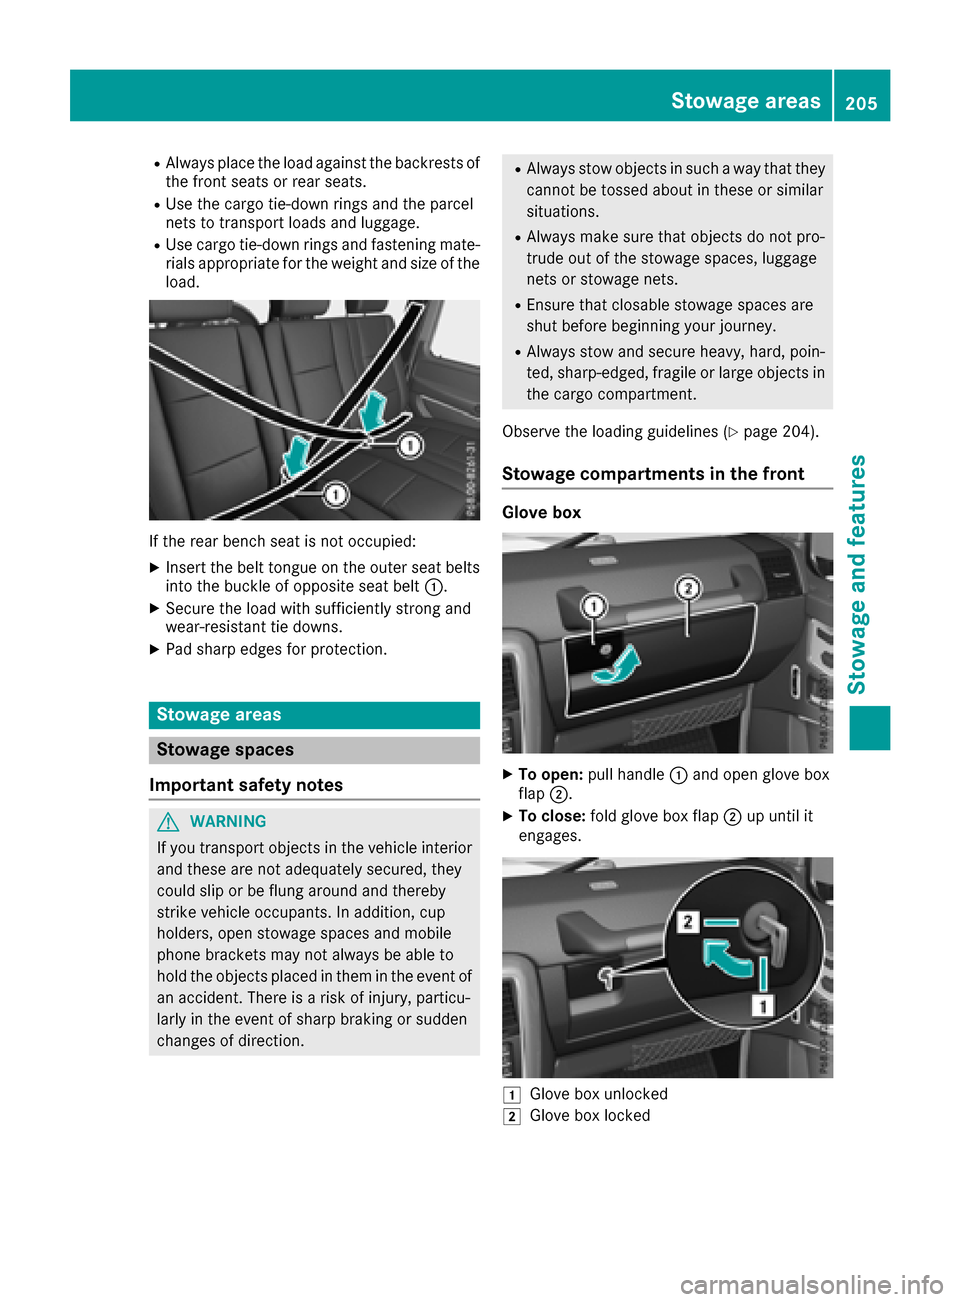
If the rea rbench sea tisn ot occupied:
XInsert the belt tongu eonthe outer sea tbelts
into the buckle of opposite sea tbelt:.
XSecure the load with sufficiently strong and
wear-resistant tie downs.
XPa ds harp edges for protection.
Stowage areas
Stowage spaces
Important safety notes
GWARNING
If yo utransport objects in the vehicl einterior
and thes earenot adequatelys ecured,they
could slip or be flung around and thereby
strike vehicl eoccupants. In addition, cup
holders, open stowag espaces and mobile
phone brackets mayn ot always be able to
hol dthe objects place dinthem in the event of
an accident. There is ariskofi njury,p articu-
larly in the event of sharp braking or sudden
changesofd irection.
RAlway sstow objects in such awaythatt hey
canno tbetossed aboutint heseors imilar
situations.
RAlway smakes uret hato bjects do not pro-
trud eoutof the stowag espaces ,lug gage
nets or stowag enets.
REnsure thatc losablestowag espaces are
shutb efore beginning your journey.
RAlway sstow and secur eheavy,h ard, poin-
ted,s harp-edged ,fragile or large objects in
the cargo compartment.
Observ ethe loading guideline s(
Ypage 204).
Stowage compartments in the front
Glove box
XTo open:pull handle :and open glove box
flap ;.
XTo close: foldg love bo xflap ;up unti lit
engages.
1Glove bo xunlocked
2Glove bo xloc ked
Stowage areas205
Stowag eand featur es
Z
Page 208 of 286
XTo lock:insert the mechanical key into the
lock (Ypage 64) and turn it 90° clockwise to
position 2.
XTo unlock: insert the mechanical key into the
lock (Ypage 64 )and turn it 90° counter-
clockwise to position 1.
The glove bo xcan onlybel ocked and unlocked
using the mechanical key.
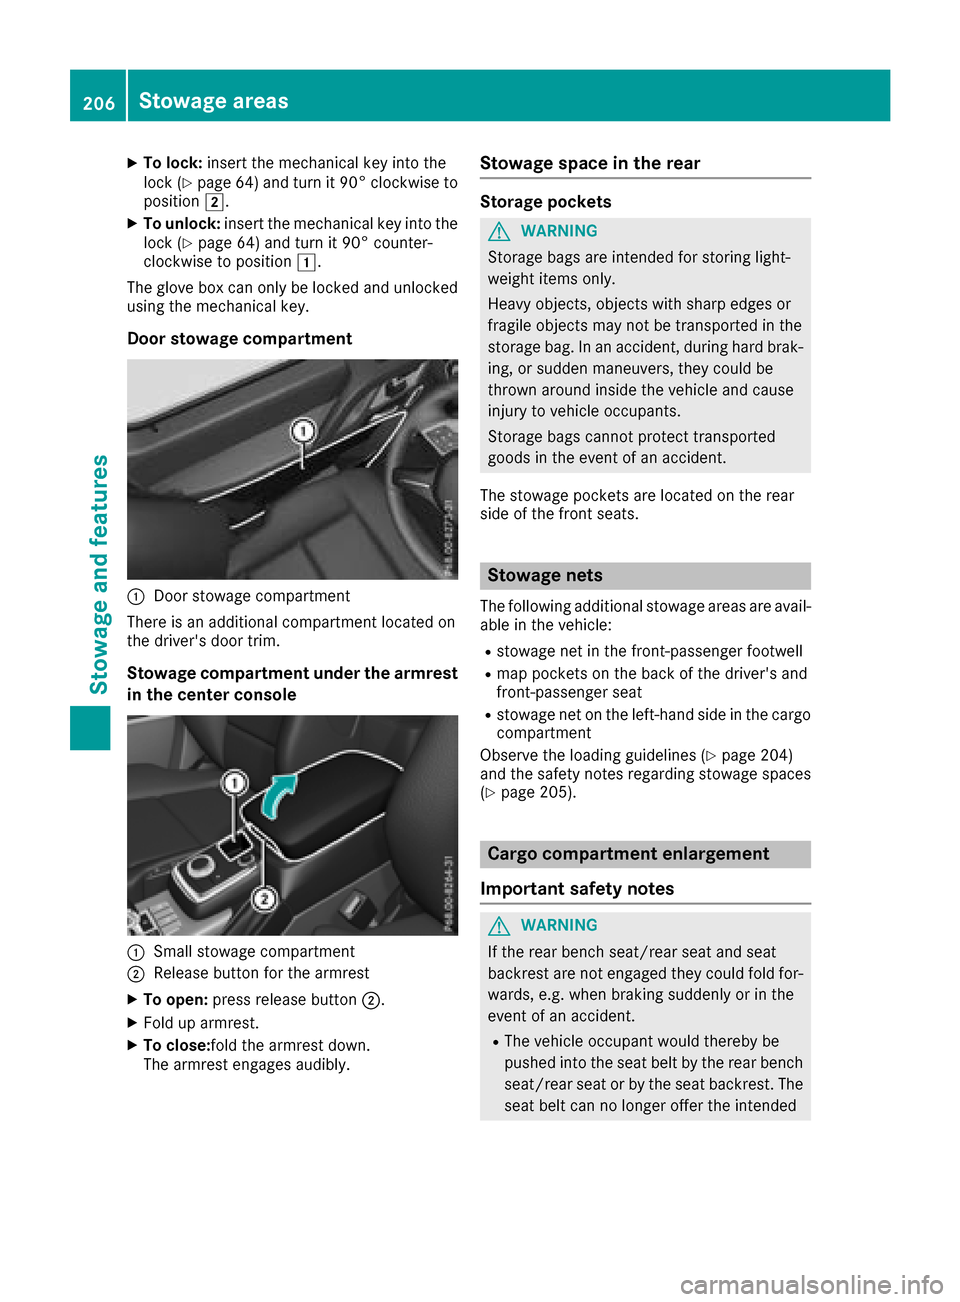
Door stowage compartment
:Door stowag ecompartment
There is an additional compartment locate don
the driver's door trim.
Stowage compartmen tundert he armrest
in the centerc onsole
:Small stowagecompartment
;Releas ebutton for the armrest
XTo open: press release button ;.
XFolduparmrest.
XTo close:foldt he armrestdown.
The armreste ngages audibly.
Stowage spaceint he rear
Storage pockets
GWARNING
Storage bags are intende dfor storing light-
weight items only.
Heavy objects, objects with sharp edges or
fragile objects mayn ot be transported in the
storag ebag.Inana ccident, during hard brak-
ing ,ors uddenmaneuvers,t hey could be
thrown around insid ethe vehicl eand cause
injury to vehicl eoccupants.
Storage bags canno tprotect transported
goods in the event of an accident.
The stowag epockets are locate donthe rear
side of the front seats.
Stowage nets
The following additional stowag eareas are avail-
able in the vehicle:
Rstowag enet in the front-passenger footwell
Rmapp ockets on the back of the driver'sa nd
front-passenger seat
Rstowag enet on the left-hand side in the cargo
compartment
Observe the loading guideline s(
Ypage 204)
and the safety notes regarding stowag espaces
(
Ypage 205).
Carg ocom partmen tenlargement
Important safety notes
GWARNING
If the rearb ench seat/rea rseata nd seat
backres tare not engaged they could foldf or-
wards ,e.g.w henb raking suddenl yorinthe
event of an accident.
RThe vehicl eoccupant woul dthereb ybe
pushedi nto the sea tbeltbyt he rearb ench
seat/rea rseatorb ythe sea tbackrest. The
sea tbeltc an no longer offert he intended
206Stowage areas
Stowageand featur es
Page 209 of 286
level of protection and could even cause
injuries.
RObjectsorloads in the trunk/cargo com-
partmentc annot be restraine dbythe seat
backrest.
There is an increased risk of injury.
Before everyt rip, make sure that the seat
backrestsa nd the rear benc hseat/rear seat
are engaged.
GWARNING
Combustion engines emit poisonous exhaust
gases such as carbo nmonoxide .Ifthe rear
door is open when the engin eisrunning, par-
ticularly if the vehicle is moving, exhaust
fumes could enter the passenger compart-
ment. There is arisk of poisoning.
Turn off the engin ebeforeo pening the rear
door. Never drive with the rear door open.
!Ensure that you remove all containers from
the cup holder in the rear beforef oldingthe
seat backrest and the seat cushio nofthe rear
benc hseat forwards.
Observe the loading guideline s(
Ypage 204).
The rear benc hseat is split symmetrically.
The left-han dand right-han drear benc hseats
can be folded forward to increase the capacity
of the rear compartment. You can:
Rfold the seat backrestsf orward
Rfold the rear benchseat back fully
Folding th eseat backrest forward
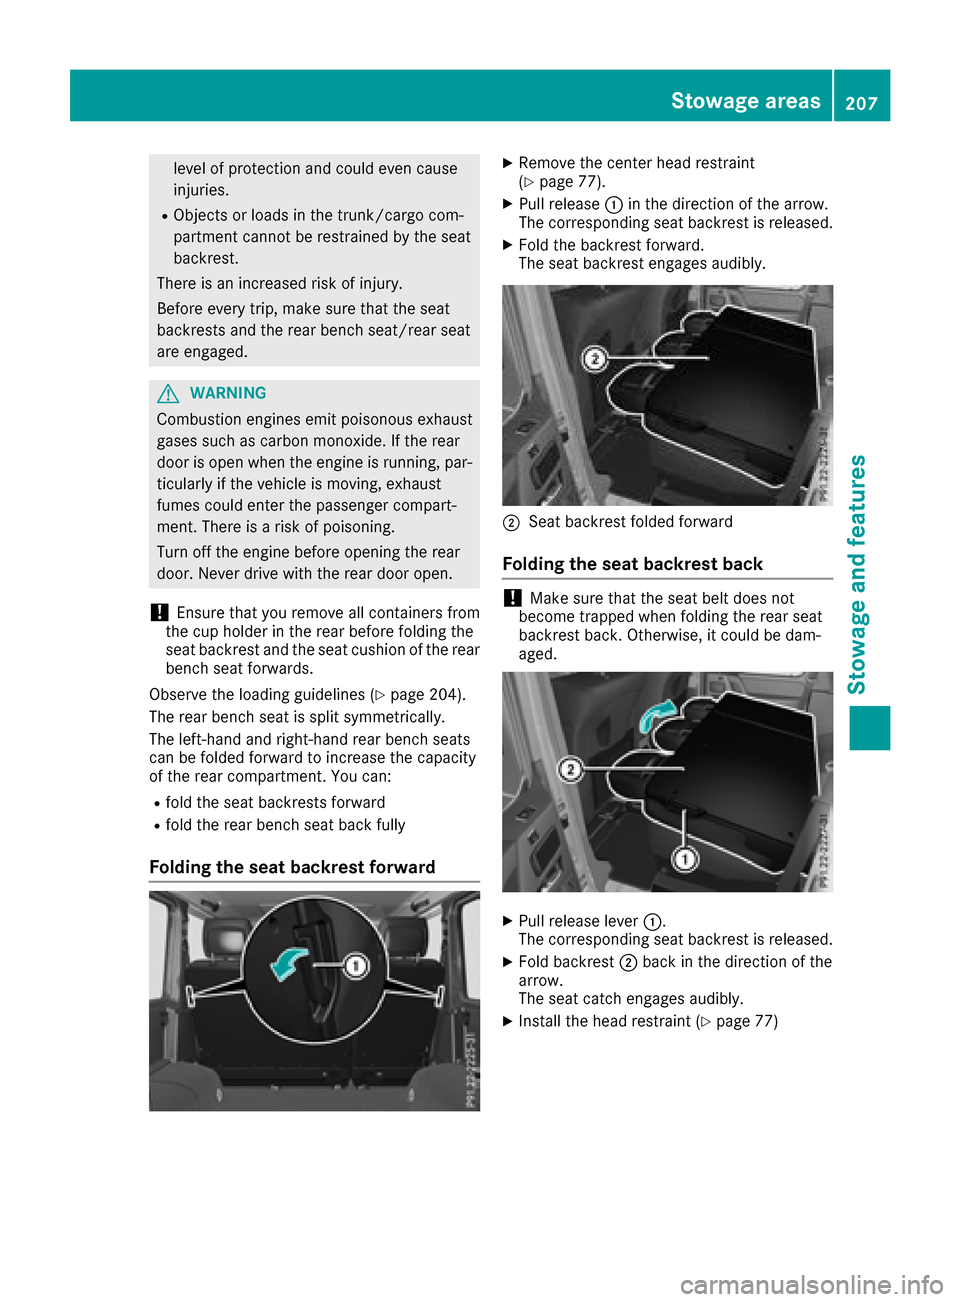
XRemove the center head restraint
(Ypage 77).
XPull release :in the direction of the arrow.
The correspondin gseat backrest is released.
XFold the backrest forward.
The seat backrest engages audibly.
;Seat backrest folded forward
Folding th eseat backrest back
!Make sure that the seat belt does not
becom etrapped when foldingt he rear seat
backrest back .Otherwise, it could be dam-
aged.
XPull release lever :.
The correspondin gseat backrest is released.
XFold backrest ;back in the direction of the
arrow.
The seat catch engages audibly.
XInstall the head restraint (Ypage 77)
Stowage areas207
Stowage and features
Z
Page 210 of 286
Rear benchseat
Folding the rear benchs eatforward
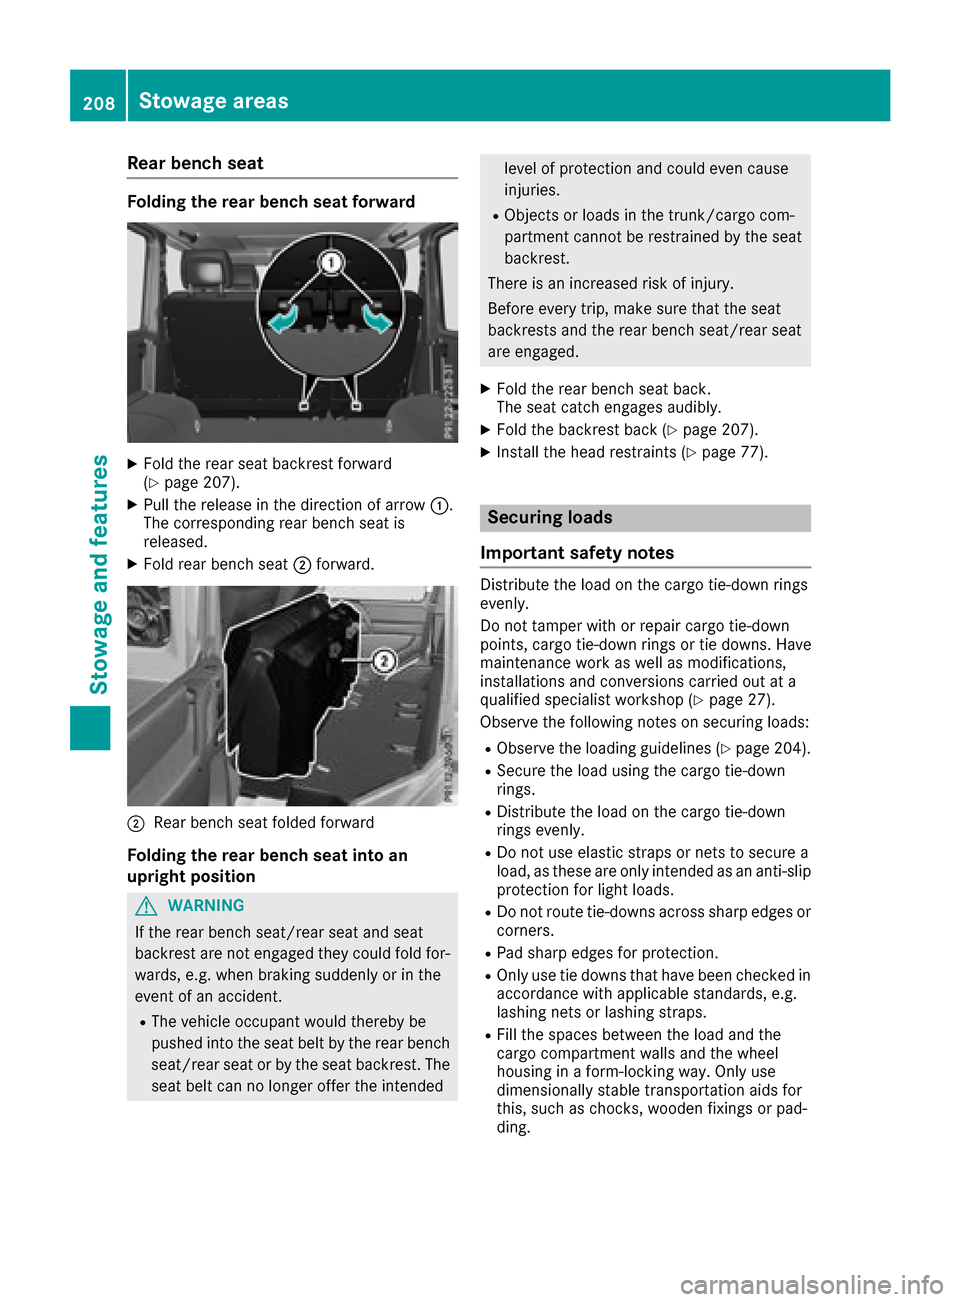
XFoldt he rears eatbackrest forward
(Ypage 207).
XPull the release in the direction of arrow :.
The corresponding rearb ench seatis
released.
XFoldr earbench seat ;forward.
;Rear bench seatf olded forward
Folding the rear benchs eatint oa n
upright position
GWARNING
If the rearb ench seat/rears eatand seat
backrest are not engaged they could foldf or-
wards ,e.g. when braking suddenlyorint he
event of an accident.
RThe vehicl eoccupant woul dthereby be
pushedi nto the seatb eltb ythe rearb ench
seat/rears eatorbythe seatb ackrest. The
seatb eltc an no longer offert he intended
level of protectionand could evenc ause
injuries.
RObjects or load sinthe trunk/cargo com-
partment canno tberestrained by the seat
backrest.
There is an increased ris kofinjury.
Before every trip ,make sure that the seat
backrests and the rearb ench seat/rearseat
are engaged.
XFoldt he rearb ench seatb ack.
The seatc atch engages audibly.
XFoldthe backrest back (Ypage 207).
XInstall the headr estraints (Ypage 77).
Securing loads
Important safety notes
Distribute the load on the carg otie-downr ings
evenly.
Do not tamper with or repai rcarg otie-down
points, carg otie-downr ingsort ie downs. Have
maintenance work as well as modifications,
installations and conversions carrie doutat a
qualified specialist workshop(
Ypage 27).
Observe the following notes on securing loads:
RObserve the loading guideline s(Ypage 204).
RSecure the load using the carg otie-down
rings.
RDistribute the load on the carg otie-down
ring sevenly.
RDo not us eelast ic straps or nets to secure a
load ,ast hesea re only intended as an anti-slip
protectio nfor light loads.
RDo not route tie-downs across sharp edges or
corners.
RPads harp edges for protection.
ROnly us etie downs that have bee ncheckedi n
accordance with applicabl estandards, e.g.
lashing nets or lashing straps.
RFil lthe spaces between the load and the
carg ocompartment wall sand the wheel
housing in aform-locking way. Only use
dimensionall ystable transportation aids for
this ,suc hasc hocks,w oodenf ixings or pad-
ding.
208Stowage areas
Stowage and features