MERCEDES-BENZ G-CLASS SUV 2008 Owners Manual
Manufacturer: MERCEDES-BENZ, Model Year: 2008, Model line: G-CLASS SUV, Model: MERCEDES-BENZ G-CLASS SUV 2008Pages: 293, PDF Size: 4.49 MB
Page 91 of 293
Driving and pa
rking 88
R
the vehicle is secured with the parking
brake
R ESP ®
is malfunctioning Parking
G
Risk of accident
Only remove the key from the ignition lock
when the vehicle is stationary as you can-
not steer the vehicle with the key removed.
Never leave children unsupervised in the
vehicle. They could release the parking
brake. This could lead to a serious or fatal
accident. G
Risk of fire
Make sure that the exhaust system does
not under any circumstances come into
contact with easily ignitable material such
as dry grass or petrol. The material could
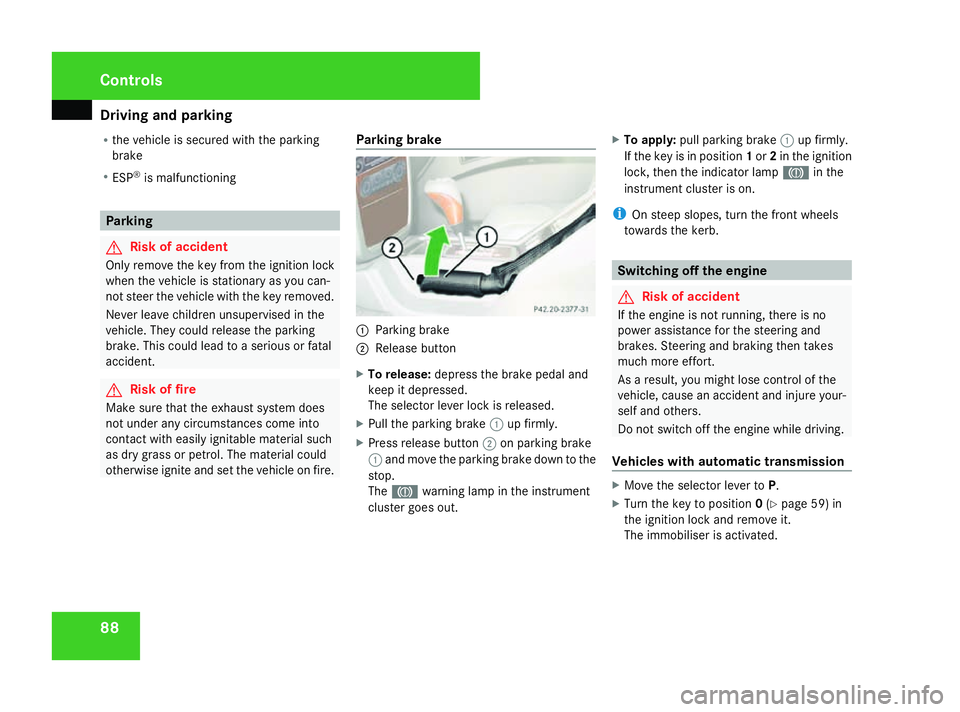
otherwise ignite and set the vehicle on fire. Parking brake 1
Parking brake
2 Release button
X To release: depress the brake pedal and
keep it depressed.
The selector lever lock is released.
X Pull the parking brake 1up firmly.
X Press release button 2on parking brake
1 and move the parking brake down to the
stop.
The 3 warning lamp in the instrument
cluster goes out. X
To apply: pull parking brake 1up firmly.
If the key is in position 1or 2in the ignition
lock, then the indicator lamp 3in the
instrument cluster is on.
i On steep slopes, turn the front wheels
towards the kerb. Switching off the engine
G
Risk of accident
If the engine is not running, there is no
power assistance for the steering and
brakes. Steering and braking then takes
much more effort.
As a result, you might lose control of the
vehicle, cause an accident and injure your-
self and others.
Do not switch off the engine while driving.
Vehicles with automatic transmission X
Move the selector lever to P.
X Turn the key to position 0(Y page 59) in
the ignition lock and remove it.
The immobiliser is activated. Controls
463_AKB; 1; 8, en-GB
wobuchh
,V ersion: 2.10.6
2008-07-17T15:19:41+02:00 - Seite 88 Dateiname: 6515_4091_02_buchblock.pdf; preflight
Page 92 of 293
Transmission
89Transmission
Notes on the transmission
G
Risk of accident
The movement of the pedals must not be
impaired in any way. Do not keep any
objects in the driver's footwell. Make sure
that floormats or carpets are correctly
secured and that there is sufficient clear-
ance for the pedals. G
Risk of accident
Do not change down for additional engine
braking on a slippery road surface. This
could cause the drive wheels to lose their
grip and the vehicle could skid. This could
cause you to lose control of your vehicle
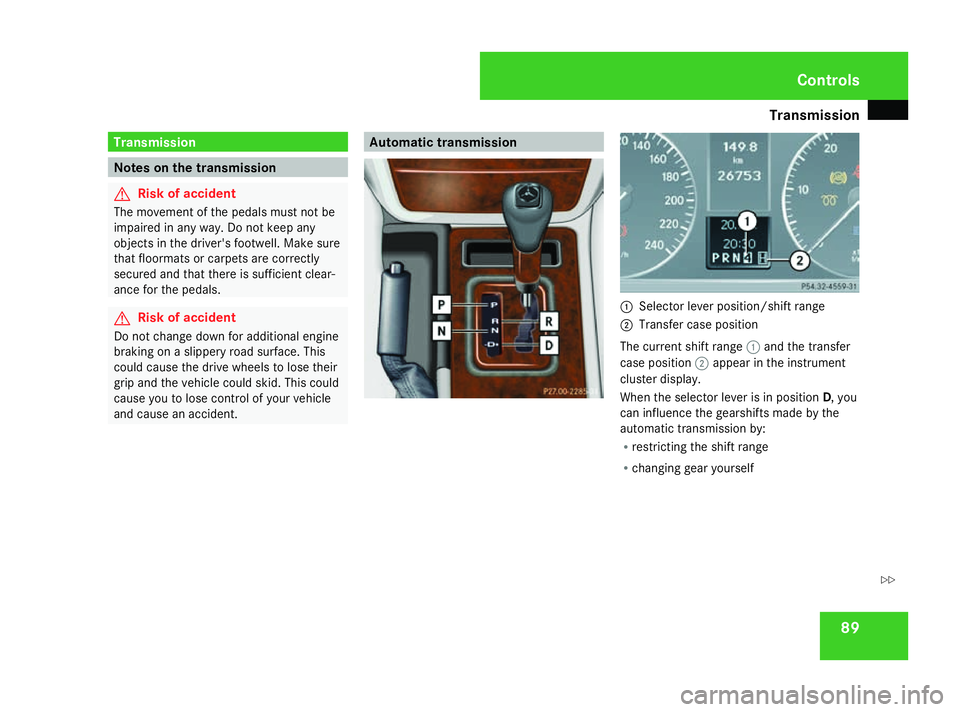
and cause an accident. Automatic transmission
1
Selector lever position/shift range
2 Transfer case position
The current shift range 1and the transfer
case position 2appear in the instrument
cluster display.
When the selector lever is in position D, you
can influence the gearshifts made by the
automatic transmission by:
R restricting the shift range
R changing gear yourself Controls
463_AKB; 1; 8, en-GB
wobuchh
,V ersion: 2.10.6
2008-07-17T15:19:41+02:00 - Seite 89 ZDateiname: 6515_4091_02_buchblock.pdf; preflight
Page 93 of 293
Transmission
90
Selector lever positions ì
Park position
Prevents the vehicle from rolling
away when stopped. Only move the
selector lever to Pwhen the vehicle
is stationary.
i The key can only be removed
when the selector lever is in posi-
tion P. If the key is removed from
the ignition lock, the selector
lever is locked in position P.í
Reverse gear
Only move the selector lever to
R
when the vehicle is stationary. ë
Neutral
Releasing the brakes will allow you
to move the vehicle freely, e.g. to
push it or tow it.
Do not move the selector lever to
N
while you are driving. The auto-
matic transmission could other-
wise be damaged.
If ESP ®
is deactivated or faulty:
only move the selector lever to Nif
the vehicle is in danger of skidding,
e.g. on icy roads. ê
Drive
The automatic transmission
changes gear automatically. All
forward gears are available.
One-touch gearshifting
When the selector lever is in position
D, you
can perform gearshifts yourself, even on vehi-
cles with automatic transmission.
X To shift up: briefly press the selector lever
to the right towards D+.
The automatic transmission shifts up to the
next gear, depending on the gearshift pro-
gram selected. This also extends the shift
range. X
To shift down: briefly press the selector
lever to the left towards D–.
The automatic transmission shifts down to
the next gear, depending on the gear cur-
rently selected. This also restricts the shift
range.
i To prevent the engine from overrevving,
the automatic transmission does not shift
down if you push the selector lever towards
D– while driving at too high a speed.
X To derestrict the shift range: press and
hold the selector lever towards D+until D
is shown once more in the display.
The automatic transmission shifts from the
current shift range directly to D.
X To select the most effective shift
range: press and hold the selector lever to
the left towards D–.
The automatic transmission will shift to a
range which allows ideal acceleration and
deceleration. To do this, the automatic
transmission will shift down one or more
gears.
i The automatic transmission cannot shift
down beyond second gear. To shift into first
gear, the selector lever must be moved
towards D–again. Controls
463_AKB; 1; 8, en-GB
wobuchh
,V ersion: 2.10.6
2008-07-17T15:19:41+02:00 - Seite 90 Dateiname: 6515_4091_02_buchblock.pdf; preflight
Page 94 of 293
Transmission
91
Shift ranges When the selector lever is in position
D, it is
possible to restrict or derestrict the shift
range for the automatic transmission.
X Briefly press the selector lever to the right
towards D+or to the left towards D–.
The shift range selected is shown in the
display. The automatic transmission shifts
only as far as the selected gear.
i If the maximum engine speed for the shift
range is reached and you continue to accel-
erate, the automatic transmission shifts up
in order to prevent the engine from over-
revving, even if the shift range is restricted.
! When the transfer case is in the off-road
driving position LOWrange, the automatic
transmission does not shift up, even when
the engine has reached the overrevving
limit. There is then a risk of engine damage.
Make sure that you do not exceed the max-
imum permissible engine speed. Driving situation
è
The braking effect of the engine can
be used in this position. ç
To use the braking effect of the
engine on downhill gradients and
for driving:
R
on steep mountain roads
R in mountainous terrain
R in arduous conditions æ
To use the braking effect of the
engine on extremely steep downhill
gradients and long downhill
stretches
Driving tips
Accelerator pedal position
Your style of driving influences how the auto-
matic transmission shifts gear:
R light throttle: early upshifts
R more throttle: late upshifts
Kickdown
Use kickdown for maximum acceleration. X
Depress the accelerator pedal beyond the
pressure point.
The transmission shifts to a lower gear
depending on the engine speed.
X Ease off the accelerator pedal once the
desired speed is reached.
The automatic transmission shifts back up.
Trailer towing
X Drive in the middle of the engine speed
range on uphill gradients.
X Shift down to shift range 3or 2depending
on the incline of the uphill or downhill gra-
dient (Y page 91), even if cruise control is
activated.
X Shift the transfer case into low-range driv-
ing position LOWon extreme uphill gradi-
ents or steep downhill gradients
(Y page 92). Controls
463_AKB; 1; 8, en-GB
wobuchh
,V ersion: 2.10.6
2008-07-17T15:19:41+02:00 - Seite 91 ZDateiname: 6515_4091_02_buchblock.pdf; preflight
Page 95 of 293
Transmission
92 Transfer case
The vehicle has permanent all-wheel drive.
The front and rear axles are being constantly
driven.
You will find further information about driving
off-road in the "Operation" section
(Y page 172). Shift ranges H HIGH
Position for all normal on-road driv-
ing conditions.
L LOW
Low-range position for driving off-
road.
Also for use on steep uphill or
downhill gradients, especially
when towing a trailer.
The vehicle travels around half the
speed of on-road driving range
HIGH. The drive power is corre-
spondingly higher.
N Neutral
Neutral position
No power is transmitted to the
drive wheels.
Changing gears
G
Risk of accident
Always apply the parking brake when park-
ing the vehicle. Make sure that the transfer
case is not set to Nwhen parking. Other-
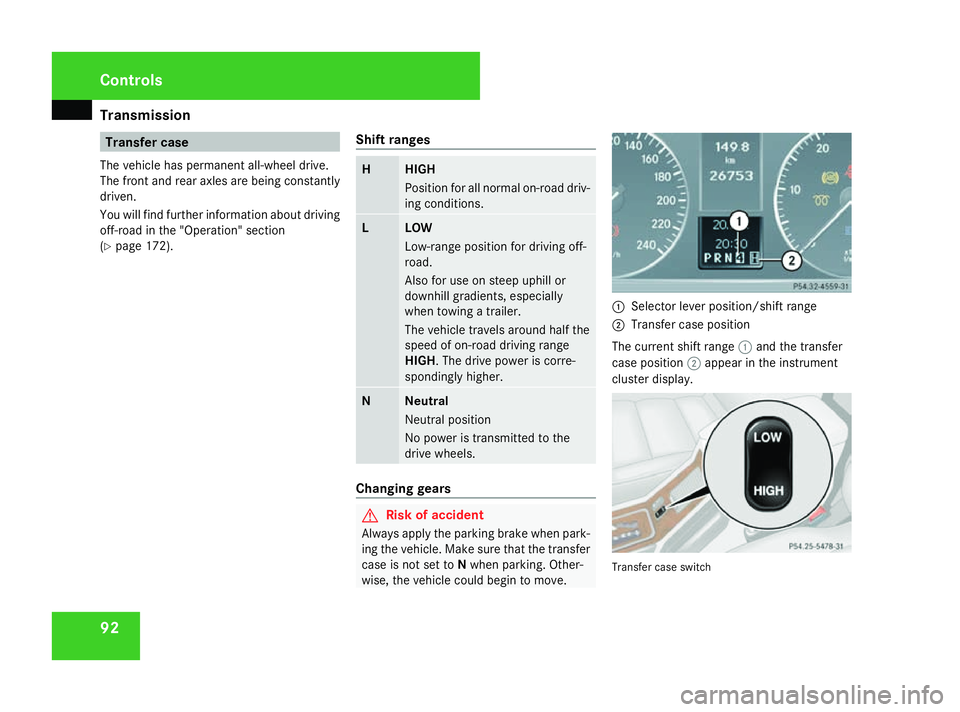
wise, the vehicle could begin to move. 1
Selector lever position/shift range
2 Transfer case position
The current shift range 1and the transfer
case position 2appear in the instrument
cluster display. Transfer case switchControls
463_AKB; 1; 8, en-GB
wobuchh
,V ersion: 2.10.6
2008-07-17T15:19:41+02:00 - Seite 92 Dateiname: 6515_4091_02_buchblock.pdf; preflight
Page 96 of 293
Transmission
93
From HIGH to LOW
!
Only carry out the gear selection if
R the engine is running.
R the vehicle is rolling
R the automatic transmission is in selector
lever position N
R you are not driving faster than 40 km/h
You could otherwise damage the transfer
case.
X Push the transfer case switch to LOW.
If the gear selection is complete, the trans-
fer case position Lappears in the display.
From LOW to HIGH
! Only complete the gear selection if
R the engine is running.
R the vehicle is rolling
R the automatic transmission is in selector
lever position N
R you are not driving faster than 70 km/h
You could otherwise damage the transfer
case. X
Push the transfer case switch to HIGH.
When the gear change process is complete,
the transfer case position Happears in the
display.
If the gear change is not completed, the fol-
lowing messages could appear in the display:
R TC Shift conditions not fulfilled
You have not met one or more shift condi-
tions.
R TC in Neutral
The transfer case has cancelled the gear
change process and is in N. The transfer
case position Nappears in the display.
R TC Gear change process cancelled
The transfer case has not performed the
gear change process.
X Carry out the gear change process again.
Make sure to meet all conditions for chang-
ing gears.
Shift to neutral
X Turn the key to position 2in the ignition
lock (Y page 59).
X Apply the parking brake.
X Depress the brake pedal. X
Move the selector lever to posi-
tion N(Y page 89).
X Push the transfer case switch to LOWfor
about 30 seconds.
When the gear selection is complete, the
transfer case position Nappears in the dis-
play.
i If the transfer case is in N, the key in the
ignition lock and you open the driver's door,
the message TC in Neutral appears in
the display. If you then release the parking
brake, a warning tone will sound. Differential locks
Differential locks improve the vehicle’s trac-
tion.
Your vehicle is equipped with the following:
R A differential lock for the transfer box: this
controls the balance between the front and
rear axles.
R A differential lock for the rear axle: this
controls the balance between the wheels
and the rear axle.
R A differential lock for the front axle: this
controls the balance between the wheels
and the front axle. Controls
463_AKB; 1; 8, en-GB
wobuchh
,V ersion: 2.10.6
2008-07-17T15:19:41+02:00 - Seite 93 ZDateiname: 6515_4091_02_buchblock.pdf; preflight
Page 97 of 293
Transmission
94
!
In order to avoid damage to the transfer
case, you may only operate the vehicle on
a roller dynamometer (single-axle roller
dynamometer), if:
R the undriven axle is raised
or
R the relevant propeller shaft is disconnec-
ted
and
R the differential lock of the transfer case
is engaged
Engaging the differential locks G
Risk of accident
When driving on a firm road surface, never
drive with the differential locks engaged.
Never drive through tight corners with the
differential lock on the front axle engaged.
When differential locks are engaged, the
vehicle's steerability is greatly impaired
and the risk of accident thereby increases.
Do not engage or disengage the differential
locks while cornering. The vehicle motion
could otherwise be jerky. You could lose
control of the vehicle as a result and cause
an accident. If you select a differential lock, ABS, 4ETS,
ESP
®
and BAS are deactivated.
Engage the differential locks:
R when driving off-road
R to deactivate ABS, 4ETS and ESP ®
when
off-road
R when fording
R on snowy, icy or rough road surfaces
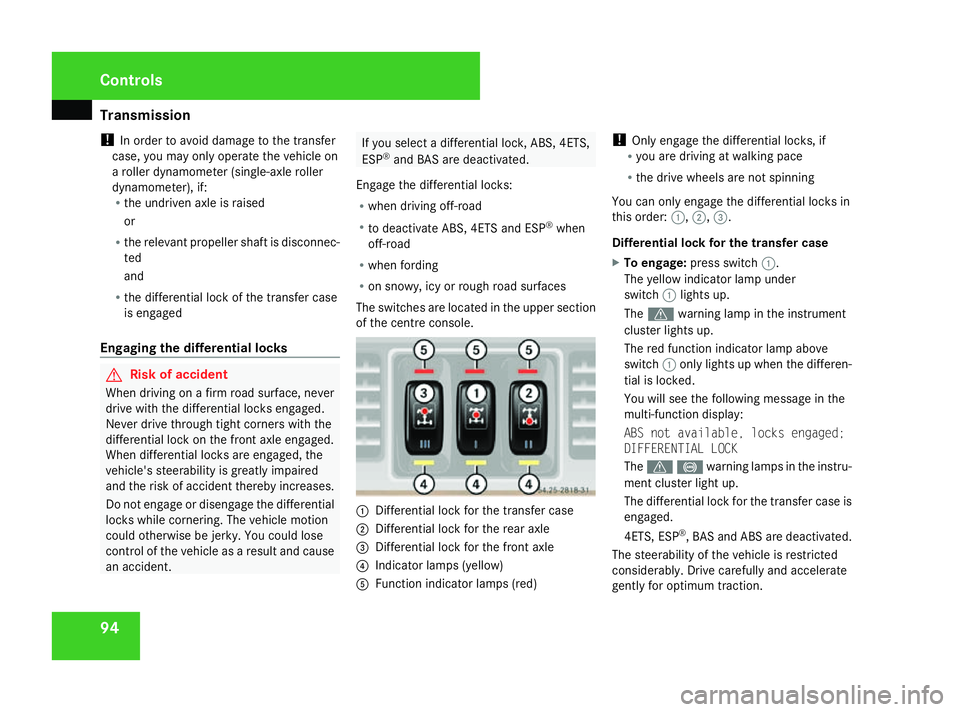
The switches are located in the upper section
of the centre console. 1
Differential lock for the transfer case
2 Differential lock for the rear axle
3 Differential lock for the front axle
4 Indicator lamps (yellow)
5 Function indicator lamps (red) !
Only engage the differential locks, if
R you are driving at walking pace
R the drive wheels are not spinning
You can only engage the differential locks in
this order: 1,2,3.
Differential lock for the transfer case
X To engage: press switch 1.
The yellow indicator lamp under
switch 1lights up.
The v warning lamp in the instrument
cluster lights up.
The red function indicator lamp above
switch 1only lights up when the differen-
tial is locked.
You will see the following message in the
multi-function display:
ABS not available, locks engaged;
DIFFERENTIAL LOCK
The v-warning lamps in the instru-
ment cluster light up.
The differential lock for the transfer case is
engaged.
4ETS, ESP ®
, BAS and ABS are deactivated.
The steerability of the vehicle is restricted
considerably. Drive carefully and accelerate
gently for optimum traction. Cont
rols
463_AKB; 1; 8, en-GB
wobuchh,
Version: 2.10.6 2008-07-17T15:19:41+02:00 - Seite 94Dateiname: 6515_4091_02_buchblock.pdf; preflight
Page 98 of 293
Instrument cluster
95
i
If necessary, you can now engage the dif-
ferential lock for the rear 2and front axle
3.
Differential lock for the rear axle
X To engage: press switch 2.
The yellow indicator lamp lights up first and
then the red function indicator lamp lights
up.
The differential lock of the rear axle is
engaged.
Differential lock for the front axle
X To engage: press switch 3.
The yellow indicator lamp lights up first and
then the red function indicator lamp lights
up.
The differential lock of the front axle is
engaged.
Disengaging differential locks You can disengage the differential locks in the
reverse order (3
,2, 1).
X To disengage all differential locks
simultaneously: press switch1.
Yellow indicator lamps 4go out. Red func-
tion indicator lamps 5go out when the
differentials are no longer locked. After three seconds of normal driving,
4ETS, ESP
®
, BAS and ABS are activated.
The message ABS not available;
locks engaged; DIFFERENTIAL LOCK in
the multi-function display and the v
- warning lamps in the instrument clus-
ter go out.
If red function indicator lamps 5do not go
out when the differential locks are disen-
gaged:
X Pay attention to traffic conditions.
X Only perform slow steering movements
when driving the vehicle.
The red function indicator lamp will then go
out. Instrument cluster
Points to remember
You will find an illustration of the instrument
cluster in the "At a glance" section . G
Risk of accident
No further messages can be displayed if the
instrument cluster and/or the multi-func-
tion display fails.
This means that you will not see information
about the driving situation, such as the
speed, outside temperature, warning/indi-
cator lamps, display messages or system
failures. The vehicle's handling character-
istics may be affected. Adjust your driving
style and speed accordingly.
Immediately consult a qualified specialist
workshop which has the necessary special-
ist knowledge and tools to carry out the
work required. Mercedes-Benz recom-
mends that you use a Mercedes-Benz
Service Centre for this purpose. In particu-
lar, work relevant to safety or on safety-
related systems must be carried out at a
qualified specialist workshop. Cont
rols
463_AKB; 1; 8, en-GB
wobuchh,
Version: 2.10.6 2008-07-17T15:19:41+02:00 - Seite 95 ZDateiname: 6515_4091_02_buchblock.pdf; preflight
Page 99 of 293
Instrument cluster
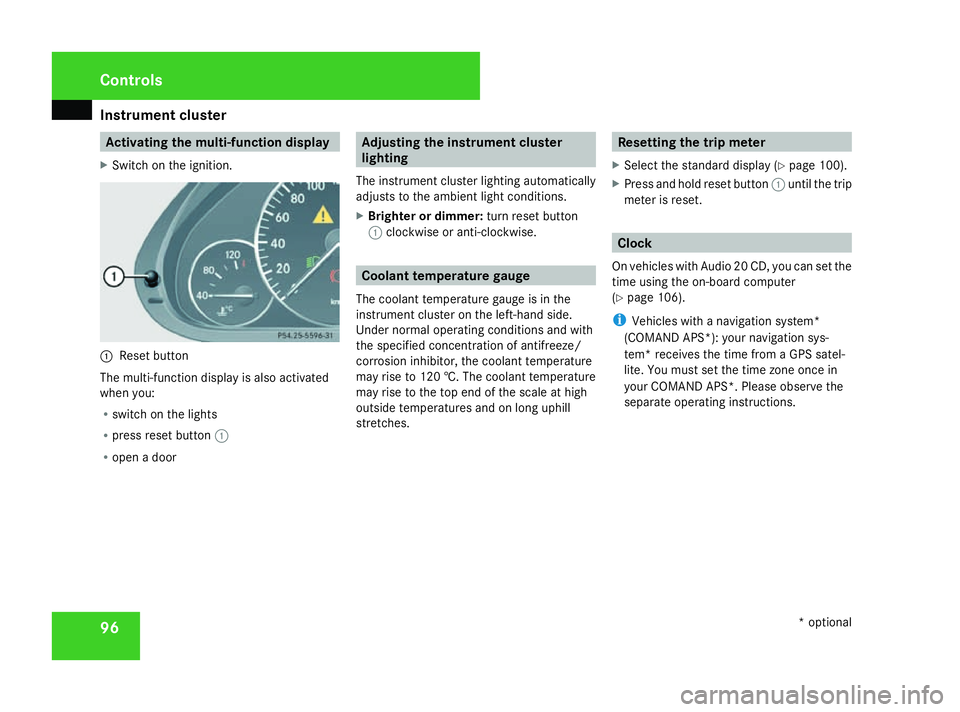
96 Activating the multi-function display
X Switch on the ignition. 1
Reset button
The multi-function display is also activated
when you:
R switch on the lights
R press reset button 1
R open a door Adjusting the instrument cluster
lighting
The instrument cluster lighting automatically
adjusts to the ambient light conditions.
X Brighter or dimmer: turn reset button
1 clockwise or anti-clockwise. Coolant temperature gauge
The coolant temperature gauge is in the
instrument cluster on the left-hand side.
Under normal operating conditions and with
the specified concentration of antifreeze/
corrosion inhibitor, the coolant temperature
may rise to 120 †. The coolant temperature
may rise to the top end of the scale at high
outside temperatures and on long uphill
stretches. Resetting the trip meter
X Select the standard display (Y page 100).
X Press and hold reset button 1until the trip
meter is reset. Clock
On vehicles with Audio 20 CD, you can set the
time using the on-board computer
(Y page 106).
i Vehicles with a navigation system*
(COMAND APS*): your navigation sys-
tem* receives the time from a GPS satel-
lite. You must set the time zone once in
your COMAND APS*. Please observe the
separate operating instructions. Cont
rols
* optional
463_AKB; 1; 8, en-GB
wobuchh,
Version: 2.10.6 2008-07-17T15:19:41+02:00 - Seite 96Dateiname: 6515_4091_02_buchblock.pdf; preflight
Page 100 of 293
On-board computer
97Rev counter
The red band in the rev counter indicates the
engine's overrevving range. The fuel supply is
interrupted to protect the engine when the
red band is reached.
! Do not drive in the overrevving range.
Doing so will damage the engine. H
Environmental note
Avoid driving at high engine speeds, as this
increases your vehicle's consumption
unnecessarily and pollutes the environ-
ment through increased emissions. Outside temperature display
G
Risk of accident
The road surface may be icy, especially in
wooded areas or on bridges, even if tem-
peratures are just above freezing point. The
vehicle could skid if you fail to adapt your
driving style. You should therefore always
adapt your driving style and speed to suit
the weather conditions.
There is a short delay before a change in out-
side temperature is displayed. On-board computer
Points to remember
The on-board computer is activated as soon
as you turn the key to position 1in the ignition
lock. You can use the on-board computer to
call up information relating to your vehicle
and to make and adjust settings.
You can call up the next service due date,
select the display language for the instrument
cluster and set other functions. G
Risk of accident
Only use the on-board computer when road
and traffic conditions permit. You would
otherwise be distracted and unable to con-
centrate properly on driving, and could
cause an accident.
The on-board computer shows information in
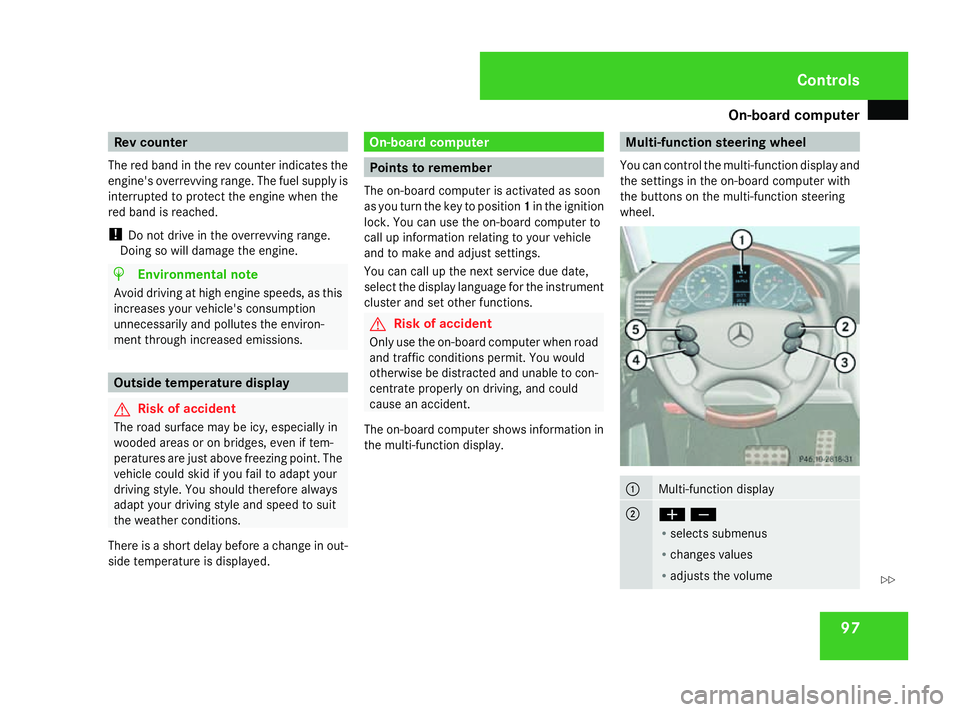
the multi-function display. Multi-function steering wheel
You can control the multi-function display and
the settings in the on-board computer with
the buttons on the multi-function steering
wheel. 1
Multi-function display
2
æç
R
selects submenus
R changes values
R adjusts the volume Controls
463_AKB; 1; 8, en-GB
wobuchh,
Version: 2.10.6 2008-07-17T15:19:41+02:00 - Seite 97 ZDateiname: 6515_4091_02_buchblock.pdf; preflight