MERCEDES-BENZ G-CLASS SUV 2008 Owners Manual
Manufacturer: MERCEDES-BENZ, Model Year: 2008, Model line: G-CLASS SUV, Model: MERCEDES-BENZ G-CLASS SUV 2008Pages: 293, PDF Size: 4.49 MB
Page 131 of 293
Air conditioning
128 Switching windscreen heating* on/
off G
Risk of accident
Clear all windows of ice or snow before set-
ting off. Impaired visibility could otherwise
endanger you and others. 1
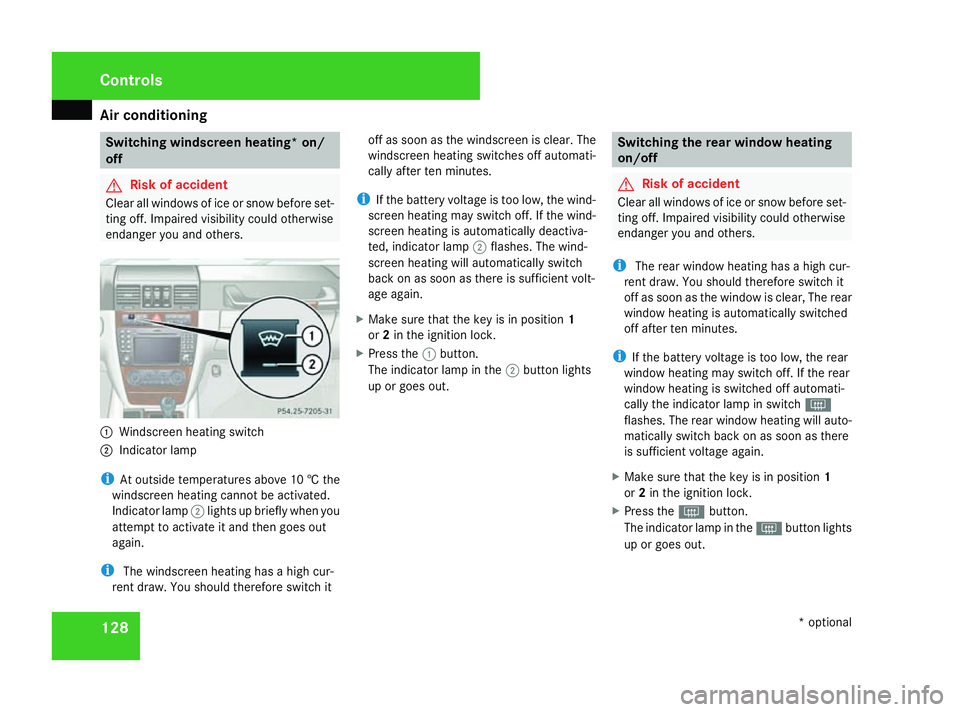
Windscreen heating switch
2 Indicator lamp
i At outside temperatures above 10 †the
windscreen heating cannot be activated.
Indicator lamp 2lights up briefly when you
attempt to activate it and then goes out
again.
i The windscreen heating has a high cur-
rent draw. You should therefore switch it off as soon as the windscreen is clear. The
windscreen heating switches off automati-
cally after ten minutes.
i If the battery voltage is too low, the wind-
screen heating may switch off. If the wind-
screen heating is automatically deactiva-
ted, indicator lamp 2flashes. The wind-
screen heating will automatically switch
back on as soon as there is sufficient volt-
age again.
X Make sure that the key is in position 1
or 2in the ignition lock.
X Press the 1button.
The indicator lamp in the 2button lights
up or goes out. Switching the rear window heating
on/off
G
Risk of accident
Clear all windows of ice or snow before set-
ting off. Impaired visibility could otherwise
endanger you and others.
i The rear window heating has a high cur-
rent draw. You should therefore switch it
off as soon as the window is clear, The rear
window heating is automatically switched
off after ten minutes.
i If the battery voltage is too low, the rear
window heating may switch off. If the rear
window heating is switched off automati-
cally the indicator lamp in switch F
flashes. The rear window heating will auto-
matically switch back on as soon as there
is sufficient voltage again.
X Make sure that the key is in position 1
or 2in the ignition lock.
X Press the Fbutton.
The indicator lamp in the Fbutton lights
up or goes out. Controls
* optional
463_AKB; 1; 8, en-GB
wobuchh
,V ersion: 2.10.6
2008-07-17T15:19:41+02:00 - Seite 128 Dateiname: 6515_4091_02_buchblock.pdf; preflight
Page 132 of 293
Air conditioning
129Activating/deactivating air-recircula-
tion mode
You can deactivate the flow of fresh air if
unpleasant odours are entering the vehicle
from outside. The air already inside the vehi-
cle will then be recirculated. G
Risk of accident
Only switch over to air-recirculation mode
briefly at low outside temperatures. Other-
wise, the windows could mist up, thus
impairing visibility and endangering your-
self and others. This may prevent you from
observing the traffic conditions, thereby
causing an accident.
X To activate: briefly press the ,button.
The indicator lamp in the ,button
comes on.
i Air-recirculation mode is activated auto-
matically at high outside temperatures.
When air-recirculation mode is activated
automatically, the indicator lamp in
the , button is not lit.
Outside air is added after about 30
minutes. X
To deactivate: press the,button.
The indicator lamp in the ,button goes
out.
i Air-recirculation mode switches off auto-
matically:
R after approximately five minutes at out-
side temperatures below approximately
5 †
R after approximately five minutes if cool-
ing with air dehumidification is deactiva-
ted
R after approximately 30 minutes at out-
side temperatures above approximately
5 † Switching the residual heat on/off
It is possible to make use of the residual heat
of the engine to continue heating the station-
ary vehicle for up to 30 minutes after the
engine has been switched off. The heating
time depends on the coolant temperature and
on the interior temperature that has been set.
i The blower will run at a low speed regard-
less of the airflow setting. i
If you activate the "residual heat" function
at high temperatures, only the ventilation
will be activated.
X Make sure that the key is in position 1or
0 in the ignition lock or that it has been
removed.
X To switch on: press the9button.
The indicator lamp in the 9button lights
up.
X To deactivate: press the9button.
The indicator lamp in the 9button goes
out.
i The auxiliary heating/ventilation is auto-
matically deactivated after about 30
minutes, or when:
R the ignition is switched on
R the battery voltage drops
R when the coolant temperature is too low Cont
rols
463_AKB; 1; 8, en-GB
wobuchh,
Version: 2.10.6 2008-07-17T15:19:41+02:00 - Seite 129 ZDateiname: 6515_4091_02_buchblock.pdf; preflight
Page 133 of 293
Air conditioning
130 Auxiliary heating/ventilation*
G
Risk of poisoning
Exhaust fumes are produced when the aux-
iliary heating is in operation. Inhaling these
exhaust fumes can be poisonous. You
should therefore switch off the auxiliary
heating in confined spaces without an
extraction system, e.g. a garage. G
Risk of fire
When operating the auxiliary heating, parts
of the vehicle may become very hot, and
highly inflammable material such as fuels
could be ignited. Operating the auxiliary
heating is thus prohibited at filling stations
or when your vehicle is being refuelled. You
must therefore switch off the auxiliary heat-
ing at filling stations.
The auxiliary heating heats the air in the vehi-
cle interior to the set temperature without
using the heat of the running engine. The aux-
iliary heating is operated using fuel directly
from the vehicle's fuel tank. For this reason,
the tank content must be at least at reserve
fuel level to ensure that the auxiliary heating
functions.
The auxiliary heating/ventilation automati-
cally adjusts to changes in temperature and weather conditions. For this reason, the aux-
iliary heating could switch from ventilation
mode to heating mode or from heating mode
to ventilation mode.
You cannot use the auxiliary ventilation to
cool the vehicle interior to a temperature
lower than the outside temperature.
Before activating
X
It is preferable to set the air conditioning to
U.
X Set the temperature.
The auxiliary heating/ventilation can be acti-
vated even when the air conditioning is being
controlled manually. Optimum comfort can
be obtained by activating automatic mode
and setting the temperature to 22 †.
Activating/deactivating the auxiliary
heating/ventilation The auxiliary heating/ventilation can be acti-
vated or deactivated using the remote control
or the button on the centre console.
The on-board computer can be used to spec-
ify up to three departure times, one of which
may be preselected (Y
page 108).
For direct access to the Heatersubmenu in
the on-board computer: X
Make sure that the key is in position 1
or 2in the ignition lock.
X Press the auxiliary heating/ventilation but-
ton for about three seconds.
The auxiliary heating switches off automati-
cally after 50 minutes.
i This time limit can be altered. To do this,
visit a qualified specialist workshop, e.g. a
Mercedes-Benz Service Centre.
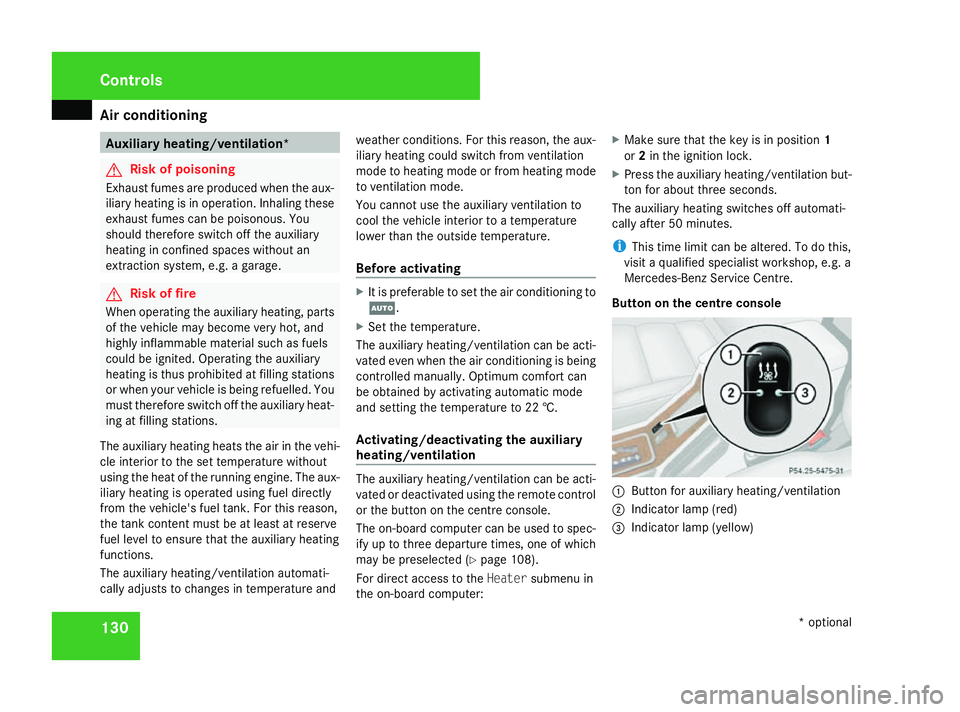
Button on the centre console 1
Button for auxiliary heating/ventilation
2 Indicator lamp (red)
3 Indicator lamp (yellow) Cont
rols
* optional
463_AKB; 1; 8, en-GB
wobuchh,
Version: 2.10.6 2008-07-17T15:19:41+02:00 - Seite 130Dateiname: 6515_4091_02_buchblock.pdf; preflight
Page 134 of 293
Air conditioning
131
The indicator lamps in the button may light up
in red or yellow.
R Red: auxiliary heating/ventilation is acti-
vated
R Yellow: departure time of the auxiliary
heating/ventilation is preselected
(Y page 108)
Activating the auxiliary heating/ventila-
tion
If the key is in position 1or 2in the ignition
lock:
X Press and hold button 1for more than two
seconds.
Red indicator lamp 2lights up.
If the key is removed from the ignition lock or
in position 0:
X Briefly press button 1.
Red indicator lamp 2lights up.
Deactivating the auxiliary heating/venti-
lation
X Press and hold button 1for more than two
seconds.
The red or yellow indicator lamp in the 1
button goes out. Remote control
Your vehicle comes with one remote control.
You may use one additional remote control
for your vehicle. For further information, con-
sult a qualified specialist workshop, e.g. a
Mercedes-Benz Service Centre.
The remote control has a maximum range of
approximately 300 metres. This range may be
reduced by:
R sources of radio interference
R solid objects between the remote control
and the vehicle
R the remote control being in an unfavoura-
ble position in relation to the vehicle
R transmitting from an enclosed space
i The optimum range can be achieved if you
hold the remote control vertically, pointing
upwards when you press one of the but-
tons.
i More information about the auxiliary
heating can be found in the "Practical
advice" section (Y page 228). Auxiliary heating remote control
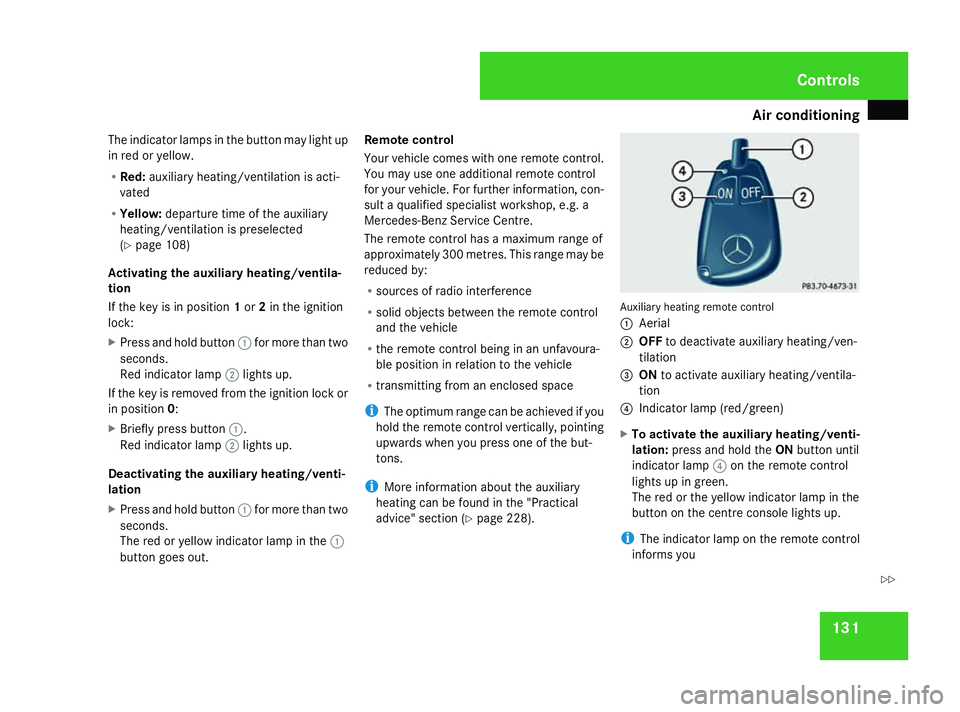
1
Aerial
2 OFF to deactivate auxiliary heating/ven-
tilation
3 ON to activate auxiliary heating/ventila-
tion
4 Indicator lamp (red/green)
X To activate the auxiliary heating/venti-
lation: press and hold the ONbutton until
indicator lamp 4on the remote control
lights up in green.
The red or the yellow indicator lamp in the
button on the centre console lights up.
i The indicator lamp on the remote control
informs you Controls
463_AKB; 1; 8, en-GB
wobuchh
, Version: 2.10.6
2008-07-17T15:19:41+02:00 - Seite 131 ZDateiname: 6515_4091_02_buchblock.pdf; preflight
Page 135 of 293
Sliding sunroof
132R
whether a signal has been transmitted to
the auxiliary heating or ventilation
R about the remote control's battery
charge status:
If the remote control indicator lamp first
lights up orange when you press one of
the buttons, the battery is almost dis-
charged.
If the remote control indicator lamp only
flashes orange when you press one of the
buttons, the battery is discharged.
Replace the battery (Y page 235).
The signal has been interrupted if the indi-
cator lamp on the remote control flashes
green when switching on or red when
switching off.
In this case, repeat the procedure. Stand
somewhere else or move closer to the vehi-
cle, if necessary.
X To deactivate the auxiliary heating/
ventilation: press and hold the OFFbutton
until indicator lamp 4on the remote con-
trol lights up in red.
The red or the yellow indicator lamp in the
button on the centre console goes out. Sliding sunroof
Sliding/tilting sunroof*
G
Risk of injury
Children could injure themselves if they
operate the sliding/tilting sunroof.
Never leave children unsupervised in the
vehicle. Always take the key with you when
leaving the vehicle, even if you are only
leaving it for a short time. G
Risk of injury
Make sure that nobody can become trap-
ped when you are opening and closing the
sliding/tilting sunroof. If there is a risk of
entrapment, release the switch and push it
briefly in any direction to stop the sliding/
tilting sunroof. G
Risk of injury
If you are not wearing a seat belt, there is
a risk that you could be thrown through the
opening in the event of the vehicle over-
turning. Therefore, always wear a seat belt
to reduce the risk of injuries.
! Only open the sliding/tilting sunroof if it
is free of snow and ice. Otherwise, mal-
functions may occur. Do not allow anything to protrude from the
sliding/tilting sunroof. The seals could oth-
erwise be damaged.
i Resonance noises can occur in addition
to the usual airflow noises when the slid-
ing/tilting sunroof is open. They are caused
by minor pressure fluctuations in the vehi-
cle interior.
Change the position of the sliding/tilting
sunroof or open a side window slightly to
reduce or eliminate these noises.
i It is also possible to open and close the
sliding/tilting sunroof from the outside
using the "Summer opening" and "Conve-
nience closing" features respectively. Controls
* optional
463_AKB; 1; 8, en-GB
wobuchh,
Version: 2.10.6 2008-07-17T15:19:41+02:00 - Seite 132Dateiname: 6515_4091_02_buchblock.pdf; preflight
Page 136 of 293
Cabriolet soft top
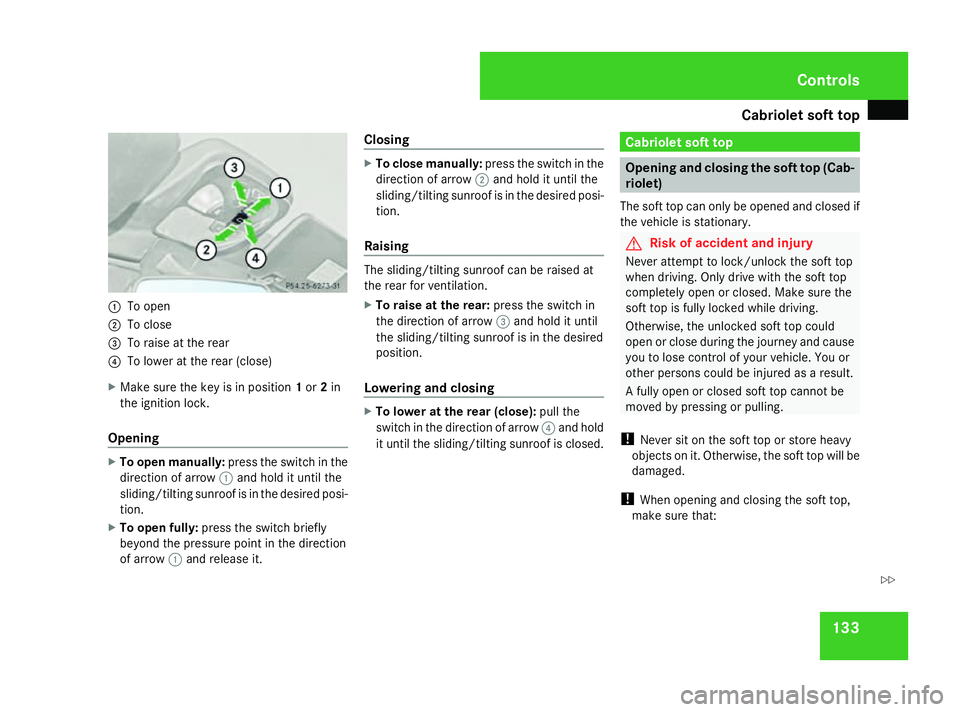
1331
To open
2 To close
3 To raise at the rear
4 To lower at the rear (close)
X Make sure the key is in position 1or 2in
the ignition lock.
Opening X
To open manually: press the switch in the
direction of arrow 1and hold it until the
sliding/tilting sunroof is in the desired posi-
tion.
X To open fully: press the switch briefly
beyond the pressure point in the direction
of arrow 1and release it. Closing X
To close manually: press the switch in the
direction of arrow 2and hold it until the
sliding/tilting sunroof is in the desired posi-
tion.
Raising The sliding/tilting sunroof can be raised at
the rear for ventilation.
X To raise at the rear: press the switch in
the direction of arrow 3and hold it until
the sliding/tilting sunroof is in the desired
position.
Lowering and closing X
To lower at the rear (close): pull the
switch in the direction of arrow 4and hold
it until the sliding/tilting sunroof is closed. Cabriolet soft top
Opening and closing the soft top (Cab-
riolet)
The soft top can only be opened and closed if
the vehicle is stationary. G
Risk of accident and injury
Never attempt to lock/unlock the soft top
when driving. Only drive with the soft top
completely open or closed. Make sure the
soft top is fully locked while driving.
Otherwise, the unlocked soft top could
open or close during the journey and cause
you to lose control of your vehicle. You or
other persons could be injured as a result.
A fully open or closed soft top cannot be
moved by pressing or pulling.
! Never sit on the soft top or store heavy
objects on it. Otherwise, the soft top will be
damaged.
! When opening and closing the soft top,
make sure that: Cont
rols
463_AKB; 1; 8, en-GB
wobuchh,
Version: 2.10.6 2008-07-17T15:19:41+02:00 - Seite 133 ZDateiname: 6515_4091_02_buchblock.pdf; preflight
Page 137 of 293
Cabriolet soft top
134R
the tonneau cover* is not attached to the
opened soft top
R there is sufficient clearance above it, as
the soft top swings upwards
R the load compartment is only loaded up
to the height of the load compartment
cover
R the load compartment cover is not being
forced upwards by the load
R no objects are lying on the luggage com-
partment cover
R no roof rack is fitted
R the outside temperature is above
–15 †
R the fabric is not frozen
R the soft top is not dirty or wet
R the vehicle is not parked at a steep angle,
e.g. off-road
R zip fasteners and quick-release fasteners
are closed ( Ypage 58)
You will otherwise damage the soft top and
other parts of the vehicle. Opening i
Make sure the soft top is dry before you
open it. Otherwise, water could enter the
interior or luggage compartment.
X Move the selector lever to P.
X Apply the parking brake.
X Make sure that the key is in position 2in
the ignition lock.
X Fold raised sun visors onto the windscreen. 1
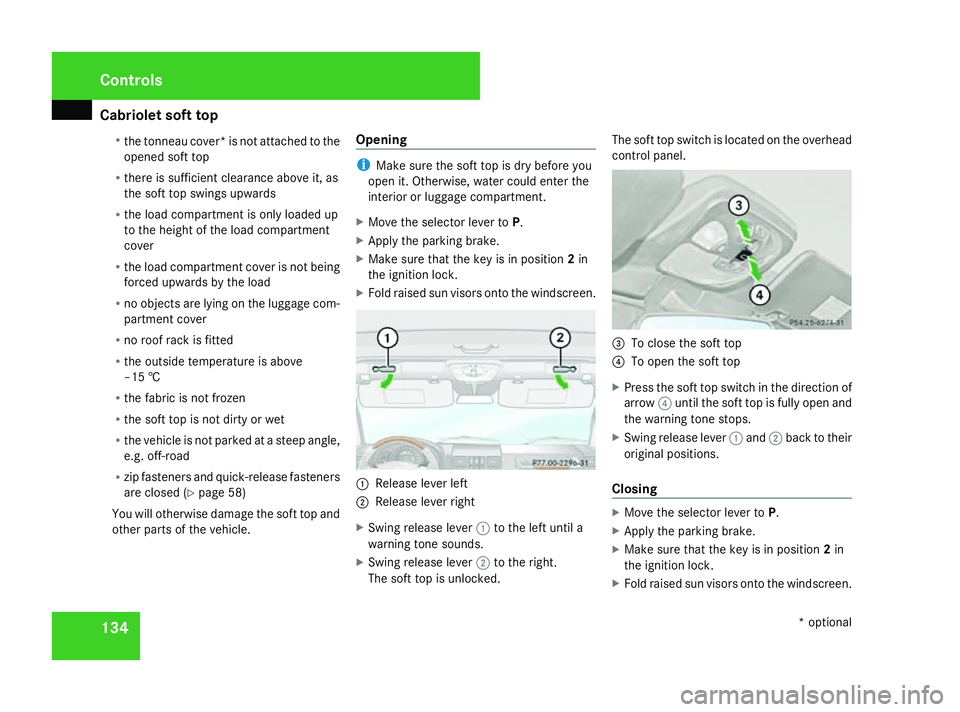
Release lever left
2 Release lever right
X Swing release lever 1to the left until a
warning tone sounds.
X Swing release lever 2to the right.
The soft top is unlocked. The soft top switch is located on the overhead
control panel.
3
To close the soft top
4 To open the soft top
X Press the soft top switch in the direction of
arrow 4until the soft top is fully open and
the warning tone stops.
X Swing release lever 1and 2back to their
original positions.
Closing X
Move the selector lever to P.
X Apply the parking brake.
X Make sure that the key is in position 2in
the ignition lock.
X Fold raised sun visors onto the windscreen. Cont
rols
* optional
463_AKB; 1; 8, en-GB
wobuchh,
Version: 2.10.6 2008-07-17T15:19:41+02:00 - Seite 134Dateiname: 6515_4091_02_buchblock.pdf; preflight
Page 138 of 293
Cabriolet soft top
1351
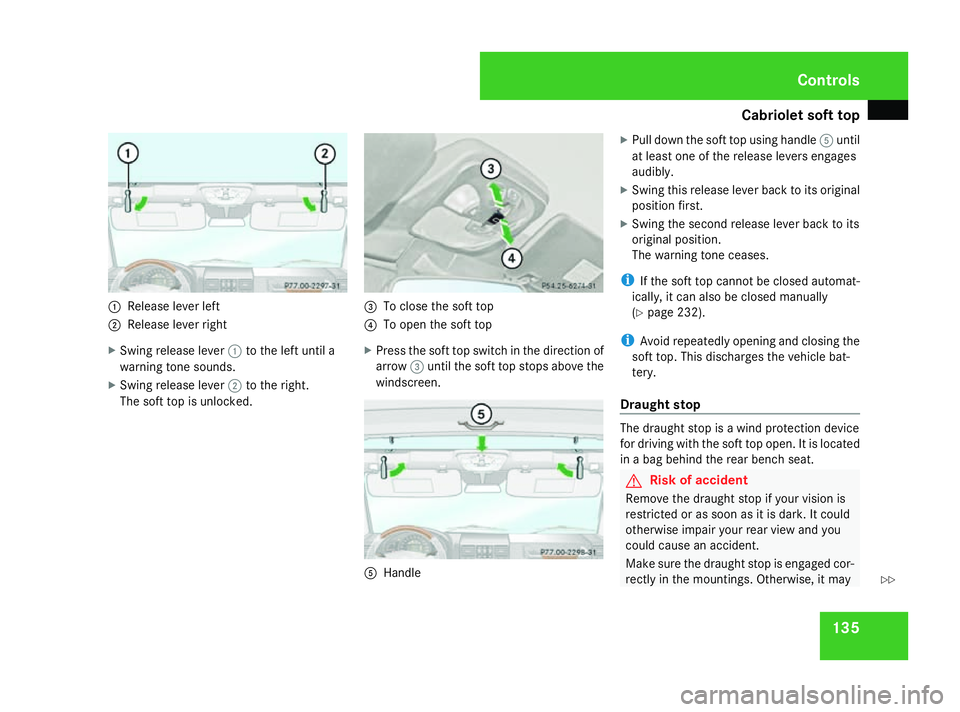
Release lever left
2 Release lever right
X Swing release lever 1to the left until a
warning tone sounds.
X Swing release lever 2to the right.
The soft top is unlocked. 3
To close the soft top
4 To open the soft top
X Press the soft top switch in the direction of
arrow 3until the soft top stops above the
windscreen. 5
Handle X
Pull down the soft top using handle 5until
at least one of the release levers engages
audibly.
X Swing this release lever back to its original
position first.
X Swing the second release lever back to its
original position.
The warning tone ceases.
i If the soft top cannot be closed automat-
ically, it can also be closed manually
(Y page 232).
i Avoid repeatedly opening and closing the
soft top. This discharges the vehicle bat-
tery.
Draught stop The draught stop is a wind protection device
for driving with the soft top open. It is located
in a bag behind the rear bench seat.
G
Risk of accident
Remove the draught stop if your vision is
restricted or as soon as it is dark. It could
otherwise impair your rear view and you
could cause an accident.
Make sure the draught stop is engaged cor-
rectly in the mountings. Otherwise, it may Controls
463_AKB; 1; 8, en-GB
wobuchh,
Version: 2.10.6
2008-07-17T15:19:41+02:00 - Seite 135 ZDateiname: 6515_4091_02_buchblock.pdf; preflight
Page 139 of 293
Cabriolet soft top
136 come loose. You could lose control of your
vehicle and injure yourself and other per-
sons.
Do not drive the vehicle with the draught
stop fitted if the rear seat is occupied.
Do not place any objects on top of the fitted
draught stop.
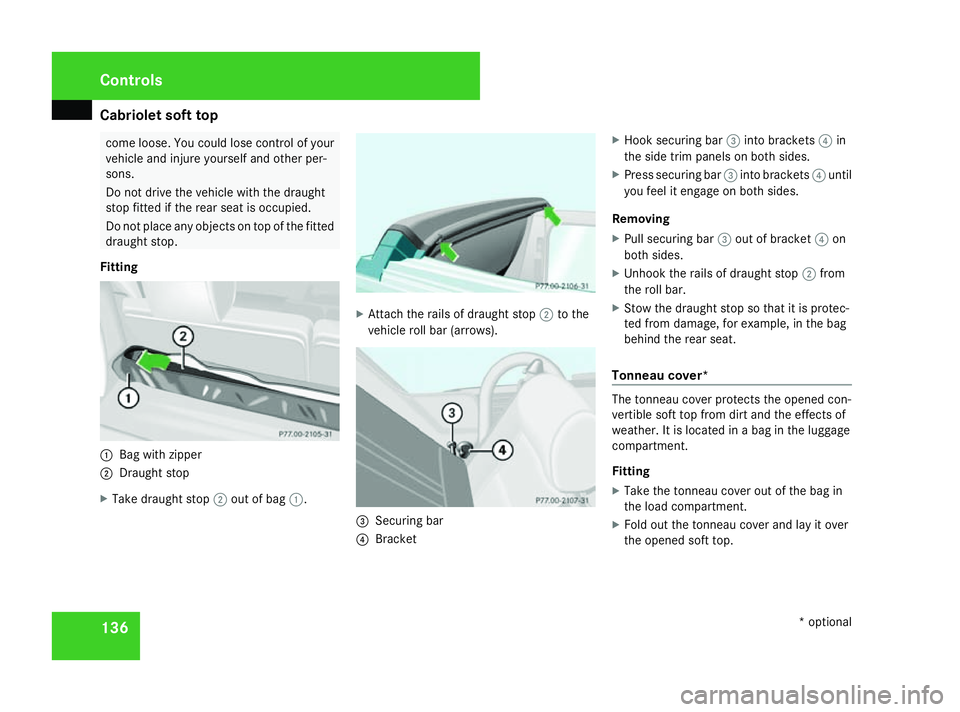
Fitting 1
Bag with zipper
2 Draught stop
X Take draught stop 2out of bag 1. X
Attach the rails of draught stop 2to the
vehicle roll bar (arrows). 3
Securing bar
4 Bracket X
Hook securing bar 3into brackets 4in
the side trim panels on both sides.
X Press securing bar 3into brackets 4until
you feel it engage on both sides.
Removing
X Pull securing bar 3out of bracket 4on
both sides.
X Unhook the rails of draught stop 2from
the roll bar.
X Stow the draught stop so that it is protec-
ted from damage, for example, in the bag
behind the rear seat.
Tonneau cover* The tonneau cover protects the opened con-
vertible soft top from dirt and the effects of
weather. It is located in a bag in the luggage
compartment.
Fitting
X
Take the tonneau cover out of the bag in
the load compartment.
X Fold out the tonneau cover and lay it over
the opened soft top. Controls
* optional
463_AKB; 1; 8, en-GB
wobuchh,
Version: 2.10.6
2008-07-17T15:19:41+02:00 - Seite 136 Dateiname: 6515_4091_02_buchblock.pdf; preflight
Page 140 of 293
Cabriolet soft top
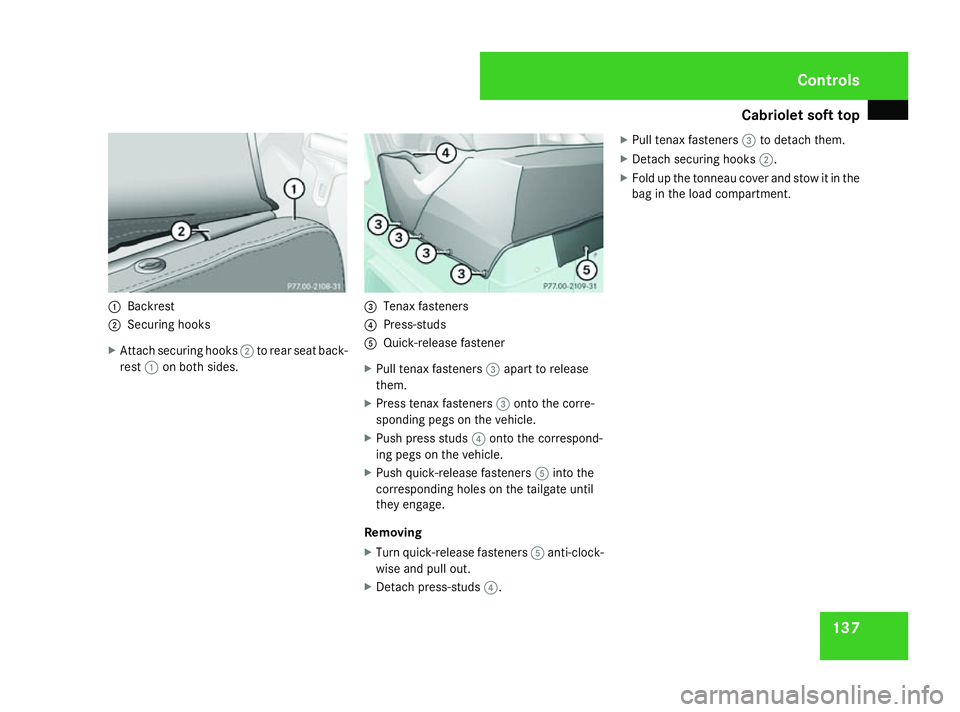
1371
Backrest
2 Securing hooks
X Attach securing hooks 2to rear seat back-
rest 1on both sides. 3
Tenax fasteners
4 Press-studs
5 Quick-release fastener
X Pull tenax fasteners 3apart to release
them.
X Press tenax fasteners 3onto the corre-
sponding pegs on the vehicle.
X Push press studs 4onto the correspond-
ing pegs on the vehicle.
X Push quick-release fasteners 5into the
corresponding holes on the tailgate until
they engage.
Removing
X Turn quick-release fasteners 5anti-clock-
wise and pull out.
X Detach press-studs 4. X
Pull tenax fasteners 3to detach them.
X Detach securing hooks 2.
X Fold up the tonneau cover and stow it in the
bag in the load compartment. Controls
463_AKB; 1; 8, en-GB
wobuchh,
Version: 2.10.6 2008-07-17T15:19:41+02:00 - Seite 137 ZDateiname: 6515_4091_02_buchblock.pdf; preflight