MERCEDES-BENZ G-CLASS SUV 2008 Owners Manual
Manufacturer: MERCEDES-BENZ, Model Year: 2008, Model line: G-CLASS SUV, Model: MERCEDES-BENZ G-CLASS SUV 2008Pages: 293, PDF Size: 4.49 MB
Page 121 of 293
Driving sys
tems 118 Ultrasonic reversing aid* (Station
wagon) G
Risk of accident
The ultrasonic reversing aid is only an aid
and may not detect all obstacles. It is not a
substitute for attentive driving.
You are always responsible for safety and
must continue to pay attention to your
immediate surroundings when parking and
manoeuvring. You could otherwise endan-
ger yourself and others. G
Risk of injury
Make sure that no persons or animals are
in the manoeuvring range. Otherwise, they
could be injured.
The ultrasonic reversing aid is an electronic
parking aid. It indicates visually and audibly
the distance between the rear area of your
vehicle and an object.
The ultrasonic reversing aid is activated auto-
matically when you switch on the ignition and
engage the reverse gear.
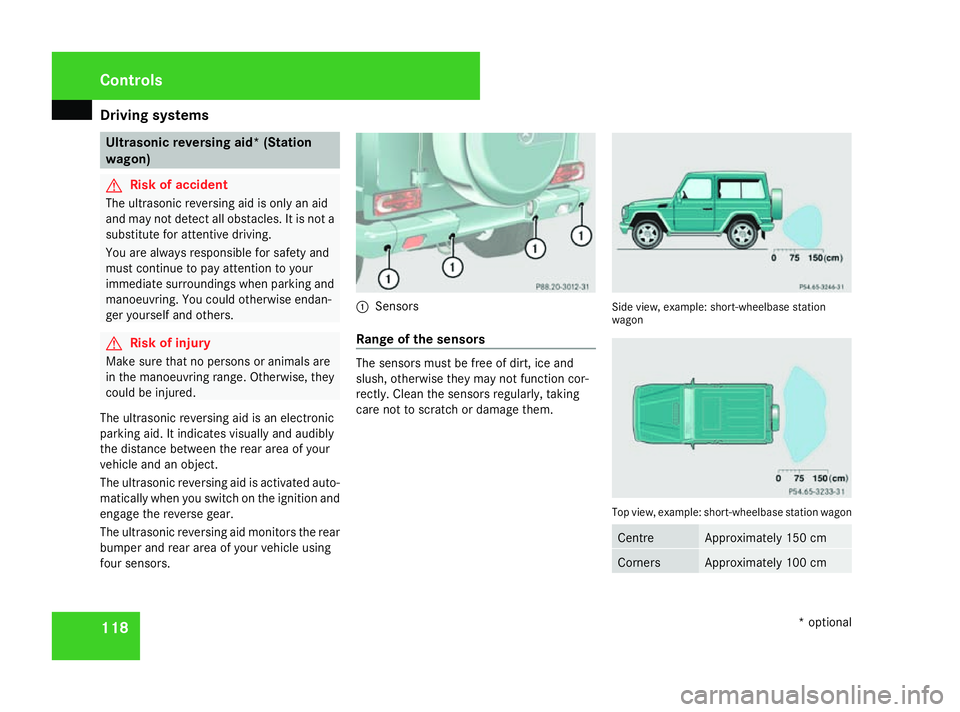
The ultrasonic reversing aid monitors the rear
bumper and rear area of your vehicle using
four sensors. 1
Sensors
Range of the sensors The sensors must be free of dirt, ice and
slush, otherwise they may not function cor-
rectly. Clean the sensors regularly, taking
care not to scratch or damage them. Side view, example: short-wheelbase station
wagon
Top view, example: short-wheelbase station wagon
Centre Approximately 150 cm
Corners Approximately 100 cmControls
* optional
463_AKB; 1; 8, en-GB
wobuchh
,V ersion: 2.10.6
2008-07-17T15:19:41+02:00 - Seite 118 Dateiname: 6515_4091_02_buchblock.pdf; preflight
Page 122 of 293
Driving sys
tems 119
!
When parking, pay particular attention to
objects above or below the sensors, such
as flower pots or trailer towbars. The ultra-
sonic reversing aid does not detect such
objects when they are in the immediate
vicinity of the vehicle. You could damage
the vehicle or the objects.
Ultrasonic sources such as an automatic
car wash, a lorry's compressed-air brakes
or a pneumatic drill could cause the ultra-
sonic reversing aid to malfunction.
Minimum distance Centre Approximately 30 cm
Corners Approximately 30 cm
If there is an obstacle within this range, all
warning displays flash and a warning tone
sounds. If the distance falls below the mini-
mum clearance, it may no longer be shown.
Warning displays
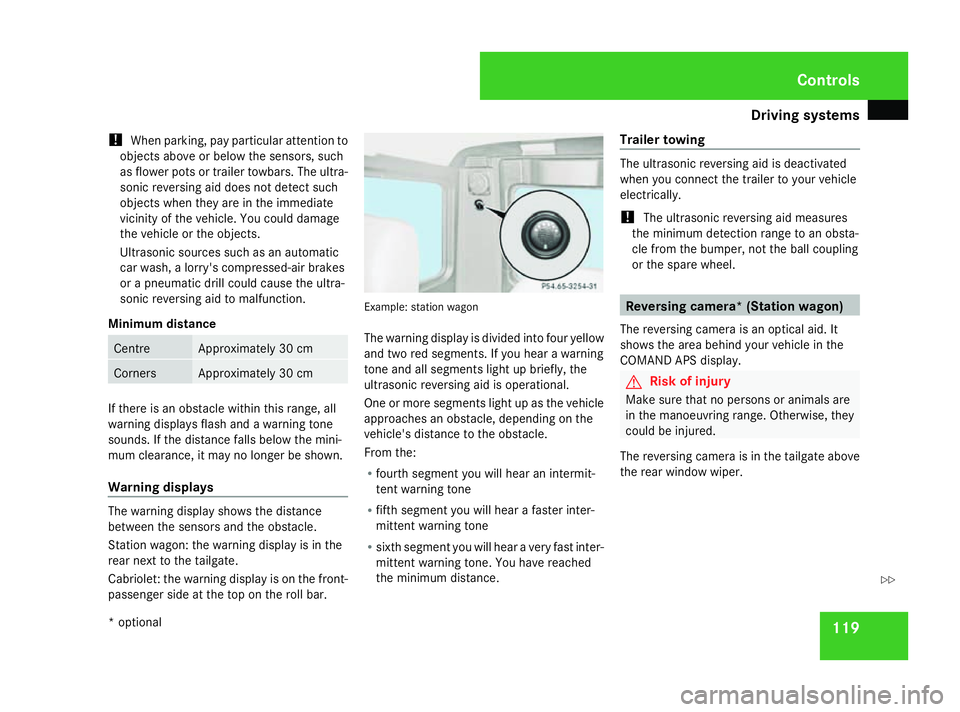
The warning display shows the distance
between the sensors and the obstacle.
Station wagon: the warning display is in the
rear next to the tailgate.
Cabriolet: the warning display is on the front-
passenger side at the top on the roll bar. Example: station wagon
The warning display is divided into four yellow
and two red segments. If you hear a warning
tone and all segments light up briefly, the
ultrasonic reversing aid is operational.
One or more segments light up as the vehicle
approaches an obstacle, depending on the
vehicle's distance to the obstacle.
From the:
R
fourth segment you will hear an intermit-
tent warning tone
R fifth segment you will hear a faster inter-
mittent warning tone
R sixth segment you will hear a very fast inter-
mittent warning tone. You have reached
the minimum distance. Trailer towing The ultrasonic reversing aid is deactivated
when you connect the trailer to your vehicle
electrically.
!
The ultrasonic reversing aid measures
the minimum detection range to an obsta-
cle from the bumper, not the ball coupling
or the spare wheel. Reversing camera* (Station wagon)
The reversing camera is an optical aid. It
shows the area behind your vehicle in the
COMAND APS display. G
Risk of injury
Make sure that no persons or animals are
in the manoeuvring range. Otherwise, they
could be injured.
The reversing camera is in the tailgate above
the rear window wiper. Controls
* optional
463_AKB; 1; 8, en-GB
wobuchh
,V ersion: 2.10.6
2008-07-17T15:19:41+02:00 - Seite 119 ZDateiname: 6515_4091_02_buchblock.pdf; preflight
Page 123 of 293
Driving sys
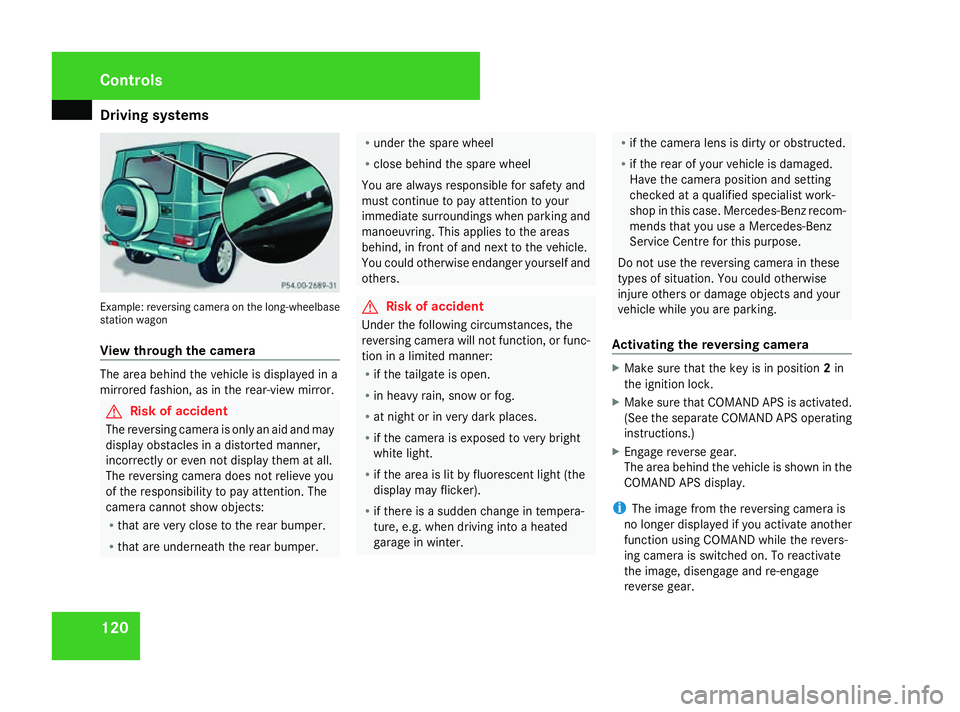
tems 120Example: reversing camera on the long-wheelbase
station wagon
View through the camera The area behind the vehicle is displayed in a
mirrored fashion, as in the rear-view mirror. G
Risk of accident
The reversing camera is only an aid and may
display obstacles in a distorted manner,
incorrectly or even not display them at all.
The reversing camera does not relieve you
of the responsibility to pay attention. The
camera cannot show objects:
R that are very close to the rear bumper.
R that are underneath the rear bumper. R
under the spare wheel
R close behind the spare wheel
You are always responsible for safety and
must continue to pay attention to your
immediate surroundings when parking and
manoeuvring. This applies to the areas
behind, in front of and next to the vehicle.
You could otherwise endanger yourself and
others. G
Risk of accident
Under the following circumstances, the
reversing camera will not function, or func-
tion in a limited manner:
R if the tailgate is open.
R in heavy rain, snow or fog.
R at night or in very dark places.
R if the camera is exposed to very bright
white light.
R if the area is lit by fluorescent light (the
display may flicker).
R if there is a sudden change in tempera-
ture, e.g. when driving into a heated
garage in winter. R
if the camera lens is dirty or obstructed.
R if the rear of your vehicle is damaged.
Have the camera position and setting
checked at a qualified specialist work-
shop in this case. Mercedes-Benz recom-
mends that you use a Mercedes-Benz
Service Centre for this purpose.
Do not use the reversing camera in these
types of situation. You could otherwise
injure others or damage objects and your
vehicle while you are parking.
Activating the reversing camera X
Make sure that the key is in position 2in
the ignition lock.
X Make sure that COMAND APS is activated.
(See the separate COMAND APS operating
instructions.)
X Engage reverse gear.
The area behind the vehicle is shown in the
COMAND APS display.
i The image from the reversing camera is
no longer displayed if you activate another
function using COMAND while the revers-
ing camera is switched on. To reactivate
the image, disengage and re-engage
reverse gear. Controls
463_AKB; 1; 8, en-GB
wobuchh
,V ersion: 2.10.6
2008-07-17T15:19:41+02:00 - Seite 120 Dateiname: 6515_4091_02_buchblock.pdf; preflight
Page 124 of 293
Air conditioning
121
i
The reversing camera also functions
when towing a trailer.
Switching off the reversing camera X
Shift the automatic transmission to P,Nor
D.
or
X In COMAND APS, activate another func-
tion. (See the separate COMAND APS oper-
ating instructions.) Air conditioning
General notes
The vehicle is equipped with the Thermatic
air-conditioning system. Thermatic combines
an automatic heating and ventilation system
with a cooling system.
Thermatic controls the temperature and the
humidity of the vehicle interior and filters out
undesirable substances from the air.
Thermatic is only operational when the
engine is running. Optimum operation is ach-
ieved only when you drive with the side win-
dows and sliding/tilting sunroof* closed.
i Ventilate the vehicle for a brief period
during warm weather, e.g. using the sum-
mer opening feature (Y page 85). This will
speed up the cooling process and the desired interior temperature will be
reached more quickly.
i The integrated filter filters out most par-
ticles of dust and completely filters out pol-
len. A clogged filter reduces the amount of
air supplied to the vehicle interior. For this
reason, you should always observe the
interval for replacing the filter, which is
specified in the Service Booklet. As it
depends on environmental conditions, e.g.
heavy air pollution, the interval may be
shorter than stated in the Service Booklet. G
Risk of accident
Observe the settings recommended on the
following pages. The windows could other-
wise mist up. This may obstruct your view
of the traffic situation, thereby causing an
accident. Cont
rols
* option al
463_AKB; 1; 8, en-GB
wobuchh,
Version: 2.10.6 2008-07-17T15:19:41+02:00 - Seite 121 ZDateiname: 6515_4091_02_buchblock.pdf; preflight
Page 125 of 293
Air conditioning
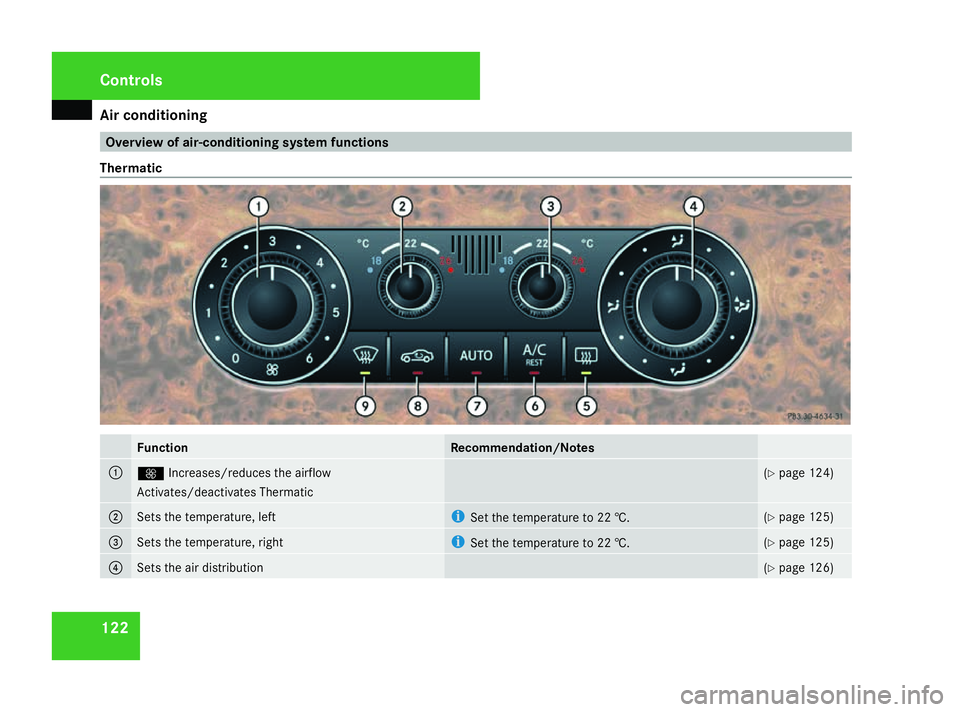
122 Overview of air-conditioning system functions
Thermatic Function Recommendation/Notes
1
Q
Increases/reduces the airflow
Activates/deactivates Thermatic (Y
page 124) 2
Sets the temperature, left i
Set the temperature to 22 †. (Y
page 125) 3
Sets the temperature, right i
Set the temperature to 22 †. (Y
page 125) 4
Sets the air distribution (Y
page 126) Cont
rols
463_AKB; 1; 8, en-GB
wobuchh,
Version: 2.10.6 2008-07-17T15:19:41+02:00 - Seite 122Dateiname: 6515_4091_02_buchblock.pdf; preflight
Page 126 of 293
Air conditioning
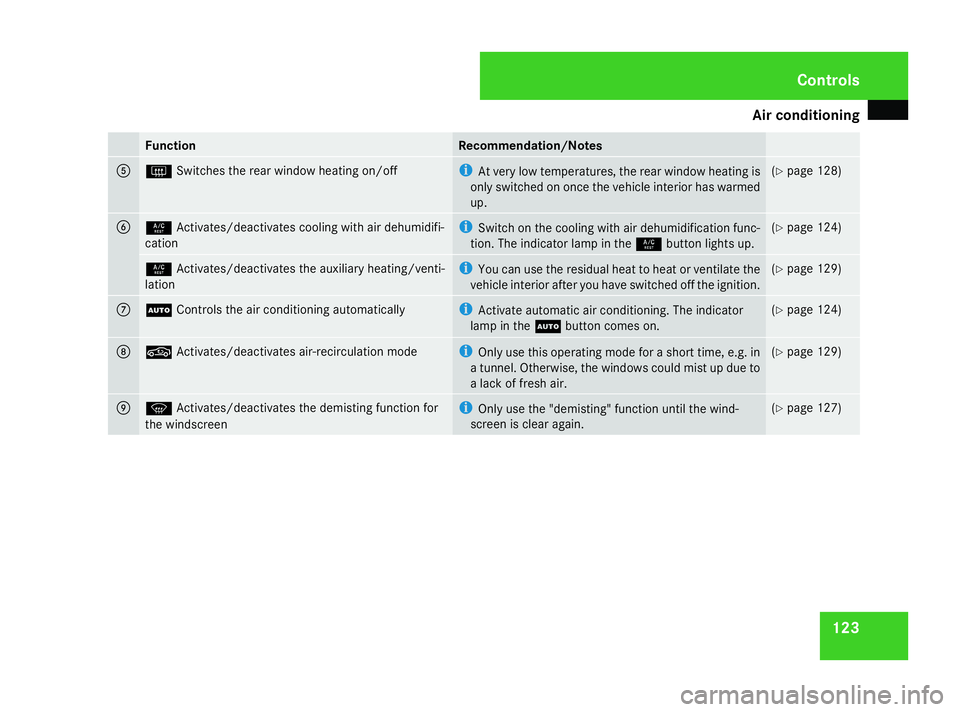
123Function Recommendation/Notes
5
F
Switches the rear window heating on/off i
At very low temperatures, the rear window heating is
only switched on once the vehicle interior has warmed
up. (Y
page 128) 6
9
Activates/deactivates cooling with air dehumidifi-
cation i
Switch on the cooling with air dehumidification func-
tion. The indicator lamp in the 9button lights up. (Y
page 124) 9
Activates/deactivates the auxiliary heating/venti-
lation i
You can use the residual heat to heat or ventilate the
vehicle interior after you have switched off the ignition. (Y
page 129) 7
U
Controls the air conditioning automatically i
Activate automatic air conditioning. The indicator
lamp in the Ubutton comes on. (Y
page 124) 8
,
Activates/deactivates air-recirculation mode i
Only use this operating mode for a short time, e.g. in
a tunnel. Otherwise, the windows could mist up due to
a lack of fresh air. (Y
page 129) 9
P
Activates/deactivates the demisting function for
the windscreen i
Only use the "demisting" function until the wind-
screen is clear again. (Y
page 127) Cont
rols
463_AKB; 1; 8, en-GB
wobuchh,
Version: 2.10.6 2008-07-17T15:19:41+02:00 - Seite 123 ZDateiname: 6515_4091_02_buchblock.pdf; preflight
Page 127 of 293
Air conditioning
124 Switching the air conditioning on/off
i When the air conditioning is switched off,
the air supply and air circulation are also
switched off. Only select this setting briefly,
otherwise the windows may mist up.
Thermatic X
Make sure that the key is in position 2in
the ignition lock or that the engine is run-
ning.
X To activate: turn thumbwheel 1clock-
wise to the desired position (apart from the
0 position) (Y page 122).
X The previously selected settings come into
effect again.
X To deactivate: turn thumbwheel 1anti-
clockwise to position 0(Y page 122). Switching cooling with air dehumidi-
fication on/off
The "cooling with dehumidification" function
is only available when the engine is running.
The air inside the vehicle is cooled and dehu-
midified according to the temperature selec-
ted. This prevents the windows from misting
up. G
Risk of accident
If the "cooling with air dehumidification"
function is deactivated, the air inside the
vehicle will not be cooled (during warm
weather) or dehumidified. The windows
could mist up more quickly. This may pre-
vent you from observing the traffic condi-
tions, thereby causing an accident. H
Environmental note
The cooling system uses the refrigerant
R134A. This refrigerant does not damage
the earth's ozone layer.
i Condensation may drip from the under-
side of the vehicle when Thermatic is in
cooling mode. X
To activate: press the9button.
The indicator lamp in the 9button lights
up.
X To deactivate: press the9button.
The indicator lamp in the 9button goes
out. Controlling the air conditioning auto-
matically
In automatic mode, the set temperature is
maintained automatically at a constant level.
To do so, the system automatically regulates
the temperature of the dispensed air, the air-
flow and the air distribution. The "cooling with
air dehumidification" function is on.
X Make sure that the engine is running.
X Set the desired temperature.
X To activate: press theUbutton
(Y page 122).
The indicator lamp in the Ubutton
comes on. Automatic air distribution and
airflow are activated.
X To deactivate: press theUbutton.
The indicator lamp in the Ubutton goes
out. Automatic air distribution and airflow
are deactivated. Cont
rols
463_AKB; 1; 8, en-GB
wobuchh,
Version: 2.10.6 2008-07-17T15:19:41+02:00 - Seite 124Dateiname: 6515_4091_02_buchblock.pdf; preflight
Page 128 of 293
Air conditioning
125Setting the temperature
Different temperatures can be set for the
driver's and front-passenger sides.
X To increase/reduce: turn thumbwheels
2 and 3clockwise or anti-clockwise .
Only change the temperature setting in
small increments. Start at 22 †.
i The temperature of the air from the rear-
compartment air vents and the centre air
vents is the same.
i If you turn the temperature thumbwheel
on one side of the vehicle fully to the right
or left, you will increase or reduce the tem-
perature on the other side of the vehicle at
the same time. Adjusting the air vents
G
Risk of injury
Very hot or very cold air can flow from the
air vents. This could cause burns or frost-
bite to bare skin in the immediate vicinity
of the vents. Keep bare skin away from
these air outlets. If necessary, direct the
airflow away to a different area of the vehi-
cle interior.
Please observe the following notes to ensure
that the air can flow freely through the air
vents:
R keep the air inlet between the windscreen
and the bonnet free of deposits, such as ice
and snow, to guarantee the supply of fresh
air into the vehicle interior.
R never cover the vents or air inlet and outlet
grilles in the vehicle interior.
i Position the sliders for the centre air
vents in the central position to provide vir-
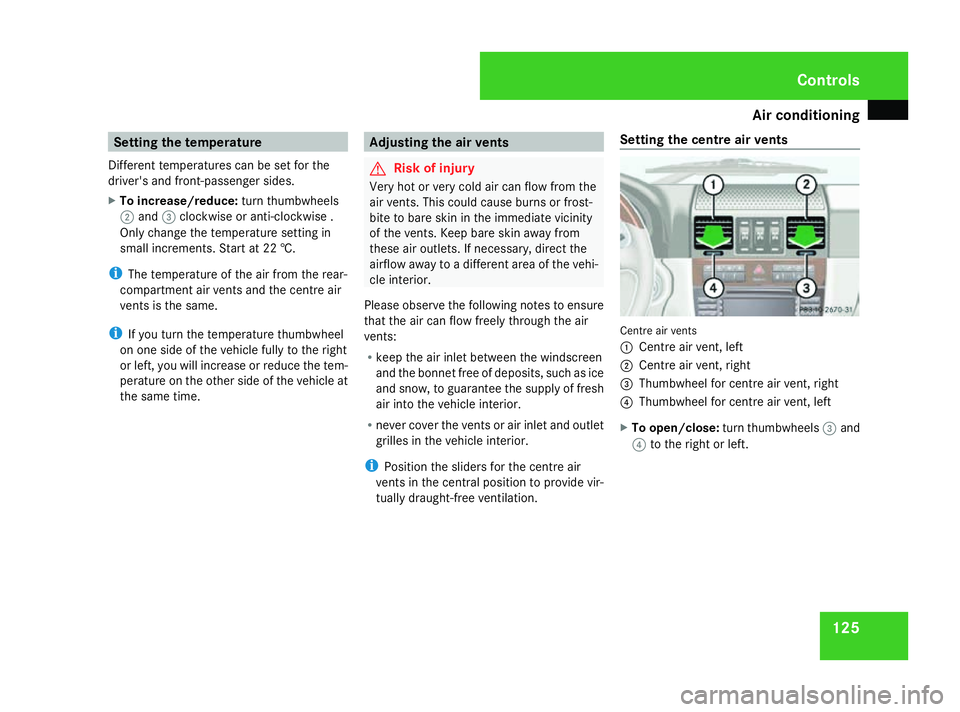
tually draught-free ventilation. Setting the centre air vents Centre air vents
1
Centre air vent, left
2 Centre air vent, right
3 Thumbwheel for centre air vent, right
4 Thumbwheel for centre air vent, left
X To open/close: turn thumbwheels 3and
4 to the right or left. Cont
rols
463_AKB; 1; 8, en-GB
wobuchh,
Version: 2.10.6 2008-07-17T15:19:41+02:00 - Seite 125 ZDateiname: 6515_4091_02_buchblock.pdf; preflight
Page 129 of 293
Air conditioning
126
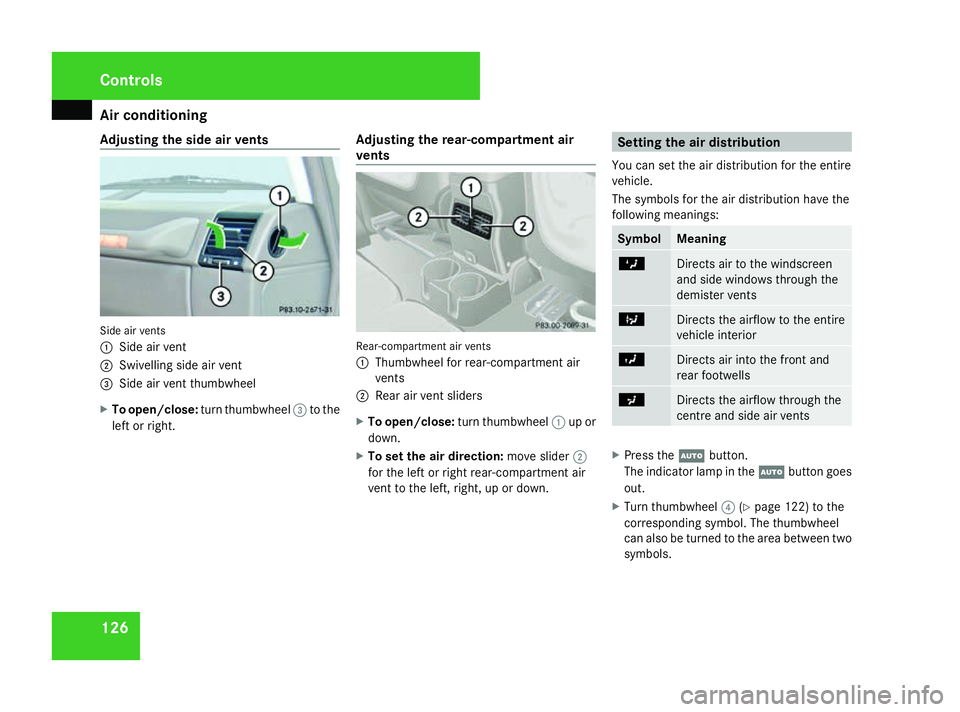
Adjusting the side air vents
Side air vents
1
Side air vent
2 Swivelling side air vent
3 Side air vent thumbwheel
X To open/close: turn thumbwheel 3to the
left or right. Adjusting the rear-compartment air
vents Rear-compartment air vents
1
Thumbwheel for rear-compartment air
vents
2 Rear air vent sliders
X To open/close: turn thumbwheel 1up or
down.
X To set the air direction: move slider2
for the left or right rear-compartment air
vent to the left, right, up or down. Setting the air distribution
You can set the air distribution for the entire
vehicle.
The symbols for the air distribution have the
following meanings: Symbol Meaning
Z
Directs air to the windscreen
and side windows through the
demister vents
b
Directs the airflow to the entire
vehicle interior
Y
Directs air into the front and
rear footwells
a
Directs the airflow through the
centre and side air vents
X
Press the Ubutton.
The indicator lamp in the Ubutton goes
out.
X Turn thumbwheel 4(Ypage 122) to the
corresponding symbol. The thumbwheel
can also be turned to the area between two
symbols. Cont
rols
463_AKB; 1; 8, en-GB
wobuchh,
Version: 2.10.6 2008-07-17T15:19:41+02:00 - Seite 126Dateiname: 6515_4091_02_buchblock.pdf; preflight
Page 130 of 293
Air conditioning
127Setting the airflow
X Press the Ubutton.
The indicator lamp in the Ubutton goes
out.
X To increase/reduce: turn thumbwheel
1 clockwise or anti-clockwise
(Y page 122).
i The airflow from the rear-compartment
vents and the centre vents is the same. Demisting the windscreen
i You should only select the "demisting"
function until the windscreen is clear again.
i If you have switched on the demisting
function with the Pbutton, you cannot
make any other settings.
X To activate: press thePbutton.
The indicator lamp in the Pbutton
comes on.
The system automatically switches to the
following functions:
R cooling with air dehumidification off
R high airflow
R high temperature R
air distribution to the windscreen and
front side windows
R air-recirculation mode off
i If necessary, also activate the windscreen
heating* (Y page 128).
X To switch off: press thePbutton.
The indicator lamp in the Pbutton goes
out. The previously selected settings come
into effect again.
or
X Press the Ubutton.
The indicator lamp in the Ubutton
comes on. The indicator lamp in the P
button goes out. Airflow and air distribution
are set to automatic mode. Demisting the windows
Windows misted up on the inside X
Activate the "demisting" function.
X If necessary, activate the windscreen heat-
ing* (Y page 128).
Windows misted up on the outside X
Activate the windscreen wipers.
X Close the centre air vents.
When automatic air distribution is switched
off:
X Turn the air distribution thumbwheel to the
Y ora symbol.
i You should only select this setting until
the windscreen is clear again.
X If necessary, activate the windscreen heat-
ing* (Y page 128). Cont
rols
* option al
463_AKB; 1; 8, en-GB
wobuchh,
Version: 2.10.6 2008-07-17T15:19:41+02:00 - Seite 127 ZDateiname: 6515_4091_02_buchblock.pdf; preflight