MERCEDES-BENZ G-CLASS SUV 2008 Owners Manual
Manufacturer: MERCEDES-BENZ, Model Year: 2008, Model line: G-CLASS SUV, Model: MERCEDES-BENZ G-CLASS SUV 2008Pages: 293, PDF Size: 4.49 MB
Page 141 of 293
Loading and stowing
138 Loading and stowing
Cup holder
G
Risk of injury
Keep the cup holder closed while the vehi-
cle is in motion. Otherwise, vehicle occu-
pants could be injured by objects being
thrown around if you:
R brake sharply
R change direction suddenly
R are involved in an accident
Only use the cup holders for containers of
a suitable size and which have lids. Other-
wise, the drinks could spill.
Cup holders should not be used for hot
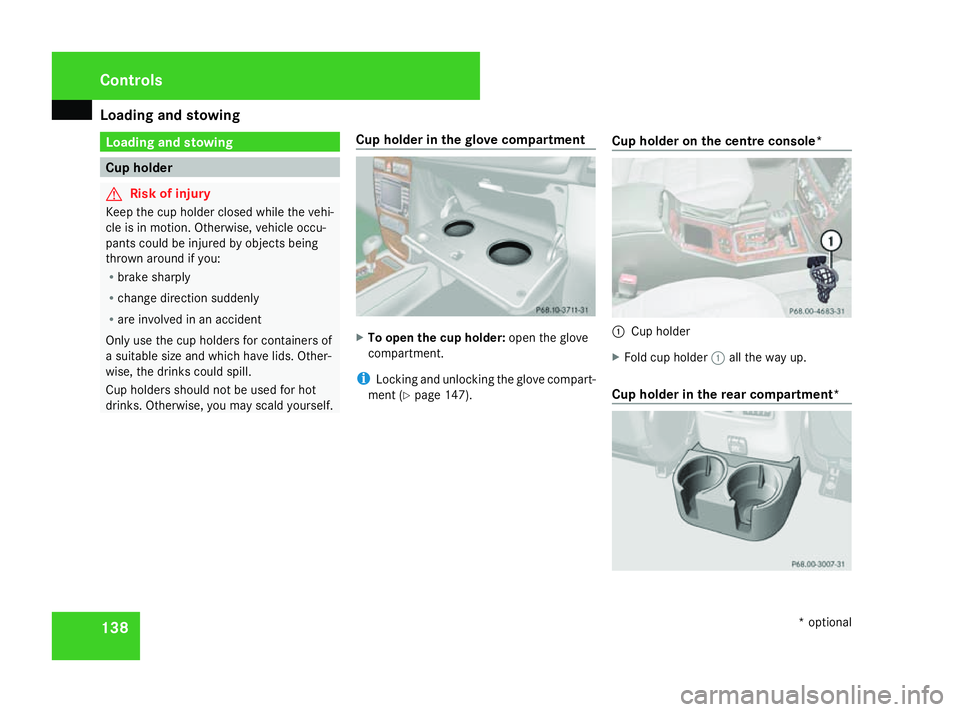
drinks. Otherwise, you may scald yourself. Cup holder in the glove compartment X
To open the cup holder: open the glove
compartment.
i Locking and unlocking the glove compart-
ment (Y page 147). Cup holder on the centre console* 1
Cup holder
X Fold cup holder 1all the way up.
Cup holder in the rear compartment* Controls
* optional
463_AKB; 1; 8, en-GB
wobuchh,
Version: 2.10.6 2008-07-17T15:19:41+02:00 - Seite 138Dateiname: 6515_4091_02_buchblock.pdf; preflight
Page 142 of 293
Loading and stowing
139Roof rack system*
G
Risk of accident and injury
An incorrectly secured roof rack, ski rack
or load could become detached from the
vehicle. These objects may then be thrown
around and can injure you or others or
cause an accident. Follow the roof rack/ski
rack manufacturer's installation instruc-
tions and special instructions for use.
The roof load raises the vehicle's centre of
gravity, thereby affecting vehicle handling.
Always observe the maximum roof load
(see the "Technical Data" section). Always
adapt your driving style to the prevailing
road, traffic and weather conditions and
drive with particular care if the roof is laden.
! Mercedes-Benz recommends that you
only use roof rack systems which have
been tested and approved for Mercedes-
Benz vehicles. This helps to prevent dam-
age to the vehicle.
Position the load on the roof rack in such a
way that the vehicle will not sustain dam-
age even when it is in motion.
Make sure that, depending on the vehicle's
equipment, you can fully raise the sliding/ tilting sunroof* and fully open the rear door
(station wagon).
X Follow the manufacturer’s installation
instructions when fitting the roof carrier
system. Luggage net in the front-passenger
footwell G
Risk of injury
Only place lightweight objects in the lug-
gage net. Do not use it to transport heavy,
sharp-edged or fragile objects. The luggage
net cannot secure the objects sufficiently
in the event of an accident. Loading guidelines
G
Risk of poisoning
Keep the boot lid/tailgate closed when the
engine is running. Otherwise, you could be
poisoned by exhaust fumes entering the
vehicle.
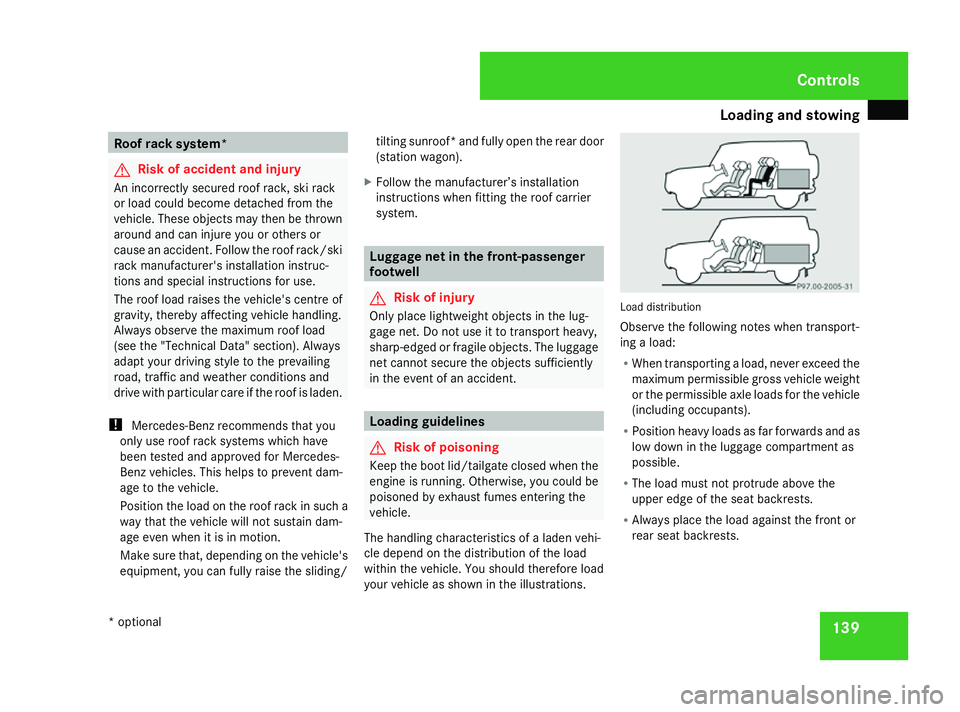
The handling characteristics of a laden vehi-
cle depend on the distribution of the load
within the vehicle. You should therefore load
your vehicle as shown in the illustrations. Load distribution
Observe the following notes when transport-
ing a load:
R When transporting a load, never exceed the
maximum permissible gross vehicle weight
or the permissible axle loads for the vehicle
(including occupants).
R Position heavy loads as far forwards and as
low down in the luggage compartment as
possible.
R The load must not protrude above the
upper edge of the seat backrests.
R Always place the load against the front or
rear seat backrests. Controls
* optional
463_AKB; 1; 8, en-GB
wobuchh,
Version: 2.10.6 2008-07-17T15:19:41+02:00 - Seite 139 ZDateiname: 6515_4091_02_buchblock.pdf; preflight
Page 143 of 293
Loading and stowing
140
R
Always place the load behind unoccupied
seats if possible.
R If possible, always transport the load in the
luggage compartment with the seat backr-
ests folded up and engaged. R
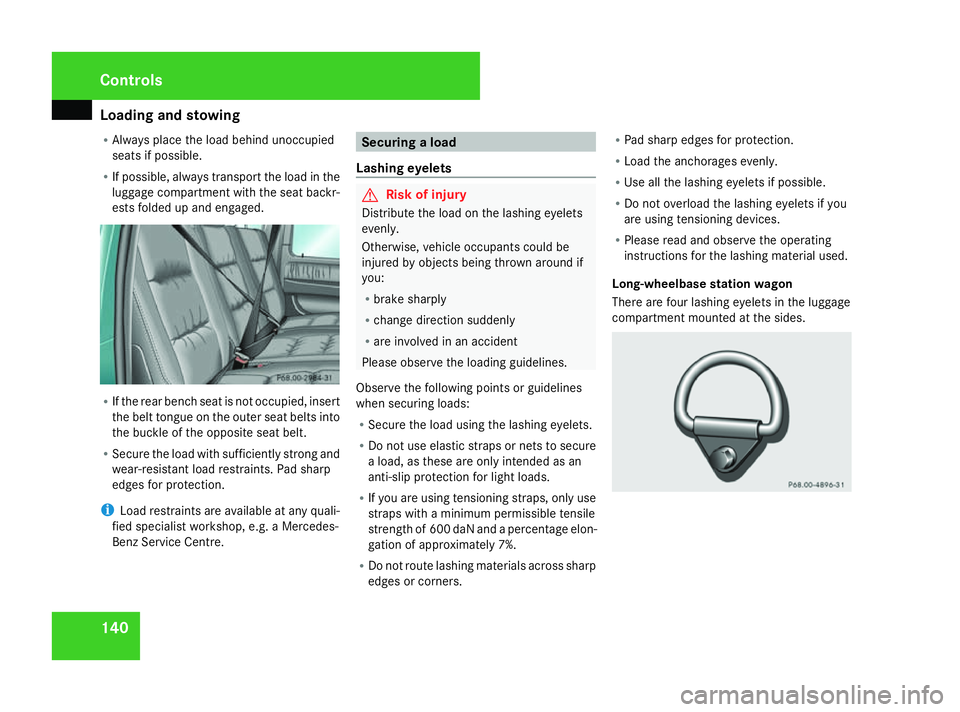
If the rear bench seat is not occupied, insert
the belt tongue on the outer seat belts into
the buckle of the opposite seat belt.
R Secure the load with sufficiently strong and
wear-resistant load restraints. Pad sharp
edges for protection.
i Load restraints are available at any quali-
fied specialist workshop, e.g. a Mercedes-
Benz Service Centre. Securing a load
Lashing eyelets G
Risk of injury
Distribute the load on the lashing eyelets
evenly.
Otherwise, vehicle occupants could be
injured by objects being thrown around if
you:
R brake sharply
R change direction suddenly
R are involved in an accident
Please observe the loading guidelines.
Observe the following points or guidelines
when securing loads:
R Secure the load using the lashing eyelets.
R Do not use elastic straps or nets to secure
a load, as these are only intended as an
anti-slip protection for light loads.
R If you are using tensioning straps, only use
straps with a minimum permissible tensile
strength of 600 daN and a percentage elon-
gation of approximately 7%.
R Do not route lashing materials across sharp
edges or corners. R
Pad sharp edges for protection.
R Load the anchorages evenly.
R Use all the lashing eyelets if possible.
R Do not overload the lashing eyelets if you
are using tensioning devices.
R Please read and observe the operating
instructions for the lashing material used.
Long-wheelbase station wagon
There are four lashing eyelets in the luggage
compartment mounted at the sides. Controls
463_AKB; 1; 8, en-GB
wobuchh,
Version: 2.10.6 2008-07-17T15:19:41+02:00 - Seite 140Dateiname: 6515_4091_02_buchblock.pdf; preflight
Page 144 of 293
Loading and stowing
141
Short-wheelbase station wagon and cab-
riolet
There are two further lashing eyelets moun-
ted at the sides in the luggage compartment
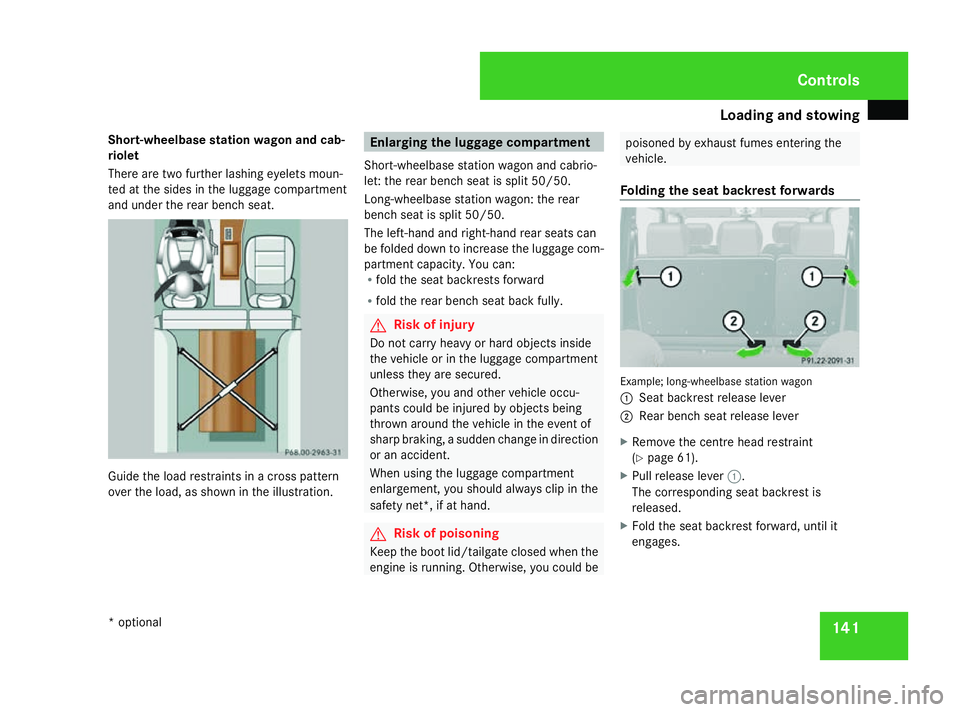
and under the rear bench seat. Guide the load restraints in a cross pattern
over the load, as shown in the illustration. Enlarging the luggage compartment
Short-wheelbase station wagon and cabrio-
let: the rear bench seat is split 50/50.
Long-wheelbase station wagon: the rear
bench seat is split 50/50.
The left-hand and right-hand rear seats can
be folded down to increase the luggage com-
partment capacity. You can:
R fold the seat backrests forward
R fold the rear bench seat back fully. G
Risk of injury
Do not carry heavy or hard objects inside
the vehicle or in the luggage compartment
unless they are secured.
Otherwise, you and other vehicle occu-
pants could be injured by objects being
thrown around the vehicle in the event of
sharp braking, a sudden change in direction
or an accident.
When using the luggage compartment
enlargement, you should always clip in the
safety net*, if at hand. G
Risk of poisoning
Keep the boot lid/tailgate closed when the
engine is running. Otherwise, you could be poisoned by exhaust fumes entering the
vehicle.
Folding the seat backrest forwards Example; long-wheelbase station wagon
1
Seat backrest release lever
2 Rear bench seat release lever
X Remove the centre head restraint
(Y page 61).
X Pull release lever 1.
The corresponding seat backrest is
released.
X Fold the seat backrest forward, until it
engages. Controls
* optional
463_AKB; 1; 8, en-GB
wobuchh, Version: 2.10.6 2008-07-17T15:19:41+02:00 - Seite 141 ZDateiname: 6515_4091_02_buchblock.pdf; preflight
Page 145 of 293
Loading and stowing
142
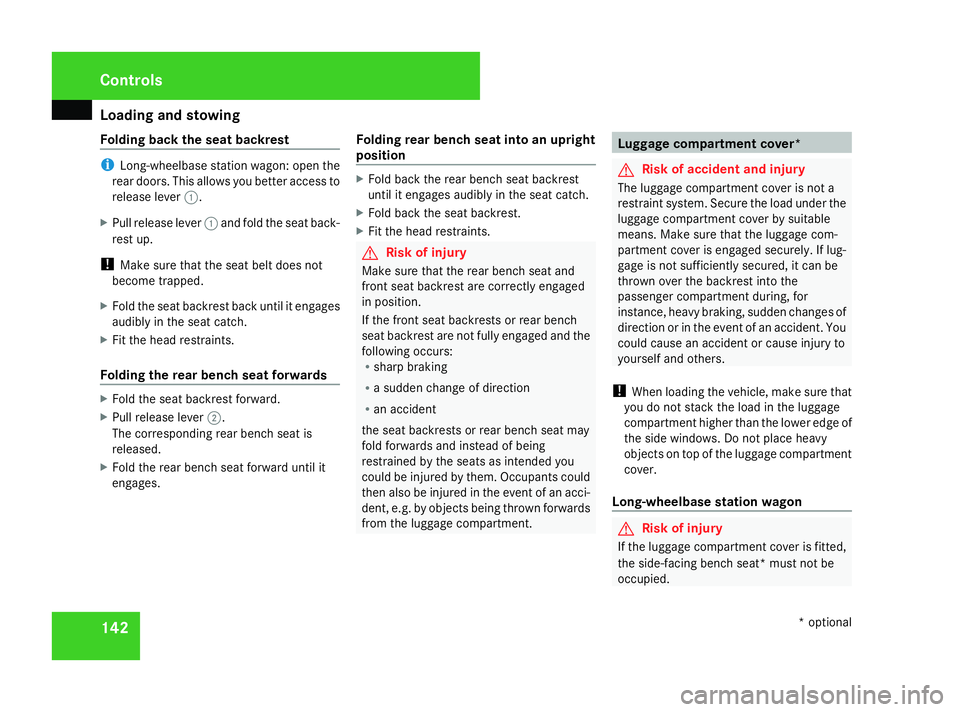
Folding back the seat backrest i
Long-wheelbase station wagon: open the
rear doors. This allows you better access to
release lever 1.
X Pull release lever 1and fold the seat back-
rest up.
! Make sure that the seat belt does not
become trapped.
X Fold the seat backrest back until it engages
audibly in the seat catch.
X Fit the head restraints.
Folding the rear bench seat forwards X
Fold the seat backrest forward.
X Pull release lever 2.
The corresponding rear bench seat is
released.
X Fold the rear bench seat forward until it
engages. Folding rear bench seat into an upright
position X
Fold back the rear bench seat backrest
until it engages audibly in the seat catch.
X Fold back the seat backrest.
X Fit the head restraints. G
Risk of injury
Make sure that the rear bench seat and
front seat backrest are correctly engaged
in position.
If the front seat backrests or rear bench
seat backrest are not fully engaged and the
following occurs:
R sharp braking
R a sudden change of direction
R an accident
the seat backrests or rear bench seat may
fold forwards and instead of being
restrained by the seats as intended you
could be injured by them. Occupants could
then also be injured in the event of an acci-
dent, e.g. by objects being thrown forwards
from the luggage compartment. Luggage compartment cover*
G
Risk of accident and injury
The luggage compartment cover is not a
restraint system. Secure the load under the
luggage compartment cover by suitable
means. Make sure that the luggage com-
partment cover is engaged securely. If lug-
gage is not sufficiently secured, it can be
thrown over the backrest into the
passenger compartment during, for
instance, heavy braking, sudden changes of
direction or in the event of an accident. You
could cause an accident or cause injury to
yourself and others.
! When loading the vehicle, make sure that
you do not stack the load in the luggage
compartment higher than the lower edge of
the side windows. Do not place heavy
objects on top of the luggage compartment
cover.
Long-wheelbase station wagon G
Risk of injury
If the luggage compartment cover is fitted,
the side-facing bench seat* must not be
occupied. Controls
* optional
463_AKB; 1; 8, en-GB
wobuchh,
Version: 2.10.6 2008-07-17T15:19:41+02:00 - Seite 142Dateiname: 6515_4091_02_buchblock.pdf; preflight
Page 146 of 293
Loading and stowing
143
i
The luggage compartment cover consists
of two roller blinds. You can cover the
entire luggage compartment even if the
rear seat backrest is folded down.
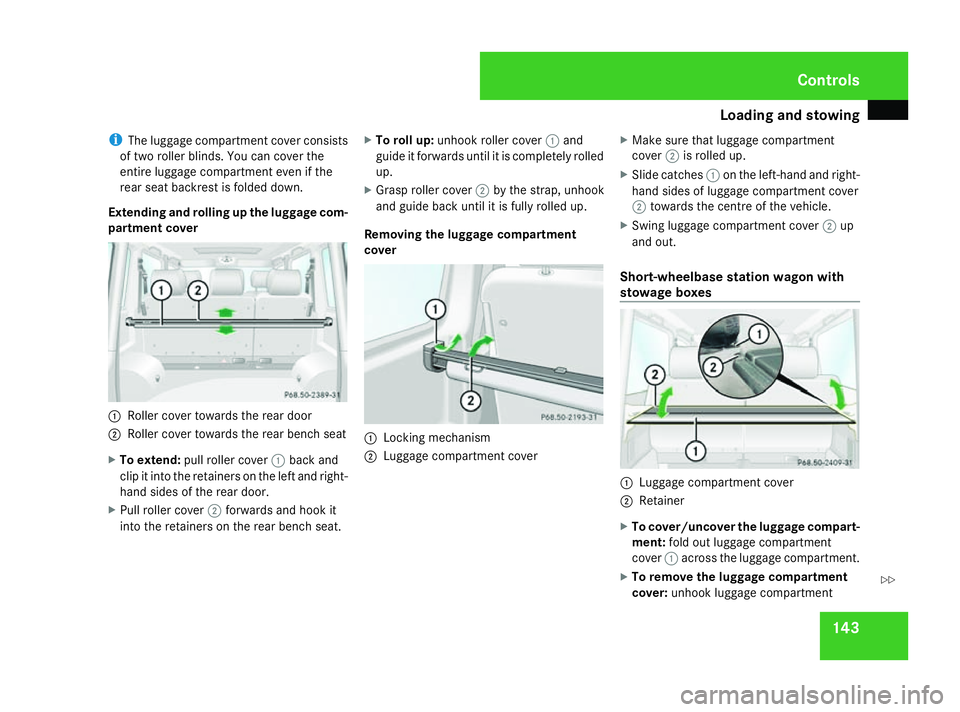
Extending and rolling up the luggage com-
partment cover 1
Roller cover towards the rear door
2 Roller cover towards the rear bench seat
X To extend: pull roller cover 1back and
clip it into the retainers on the left and right-
hand sides of the rear door.
X Pull roller cover 2forwards and hook it
into the retainers on the rear bench seat. X
To roll up: unhook roller cover 1and
guide it forwards until it is completely rolled
up.
X Grasp roller cover 2by the strap, unhook
and guide back until it is fully rolled up.
Removing the luggage compartment
cover 1
Locking mechanism
2 Luggage compartment cover X
Make sure that luggage compartment
cover 2is rolled up.
X Slide catches 1on the left-hand and right-
hand sides of luggage compartment cover
2 towards the centre of the vehicle.
X Swing luggage compartment cover 2up
and out.
Short-wheelbase station wagon with
stowage boxes 1
Luggage compartment cover
2 Retainer
X To cover/uncover the luggage compart-
ment: fold out luggage compartment
cover 1across the luggage compartment.
X To remove the luggage compartment
cover: unhook luggage compartment Controls
463_AKB; 1; 8, en-GB
wobuchh,
Version: 2.10.6 2008-07-17T15:19:41+02:00 - Seite 143 ZDateiname: 6515_4091_02_buchblock.pdf; preflight
Page 147 of 293
Loading and stowing
144cover
1from the left-hand and right-hand
retainers 2.
X Remove luggage compartment cover 1.Safety net*
G
Risk of injury
You must make sure that the safety net is
correctly secured at the top and bottom.
Do not use a damaged safety net.
The safety net cannot restrain heavy loads.
For this reason, you should always secure
the load.
Otherwise, objects that have not been
secured sufficiently might be thrown
around if you brake suddenly, change direc-
tion suddenly or are involved in an accident,
and could cause you an injury.
If the safety net is fitted the row of seats
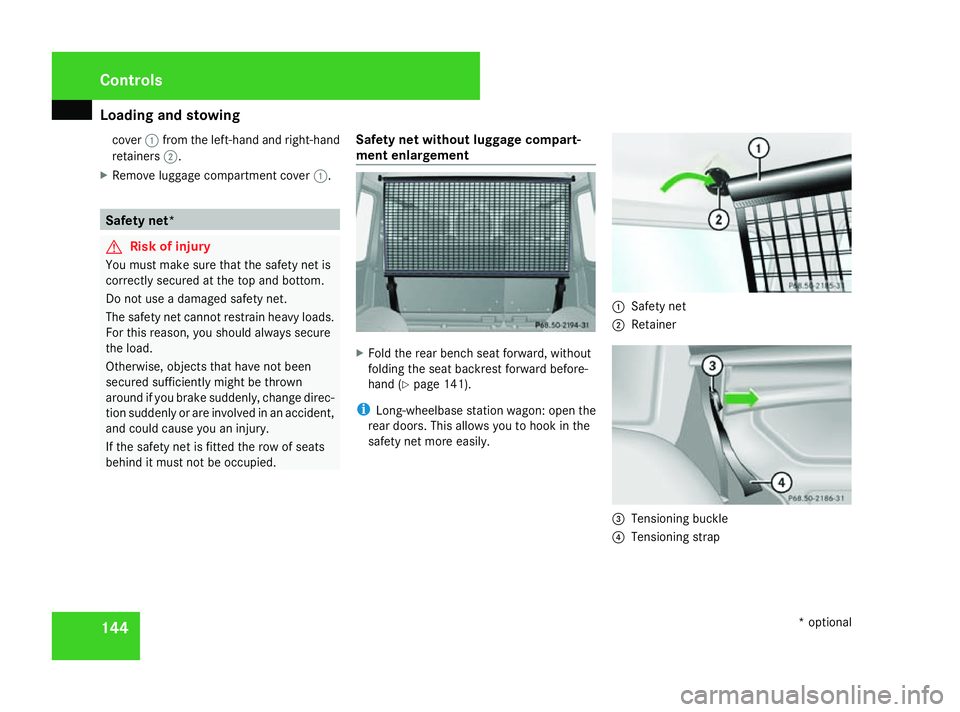
behind it must not be occupied. Safety net without luggage compart-
ment enlargement X
Fold the rear bench seat forward, without
folding the seat backrest forward before-
hand (Y page 141).
i Long-wheelbase station wagon: open the
rear doors. This allows you to hook in the
safety net more easily. 1
Safety net
2 Retainer 3
Tensioning buckle
4 Tensioning strap Controls
* optional
463_AKB; 1; 8, en-GB
wobuchh,
Version: 2.10.6 2008-07-17T15:19:41+02:00 - Seite 144Dateiname: 6515_4091_02_buchblock.pdf; preflight
Page 148 of 293
Loading and stowing
145
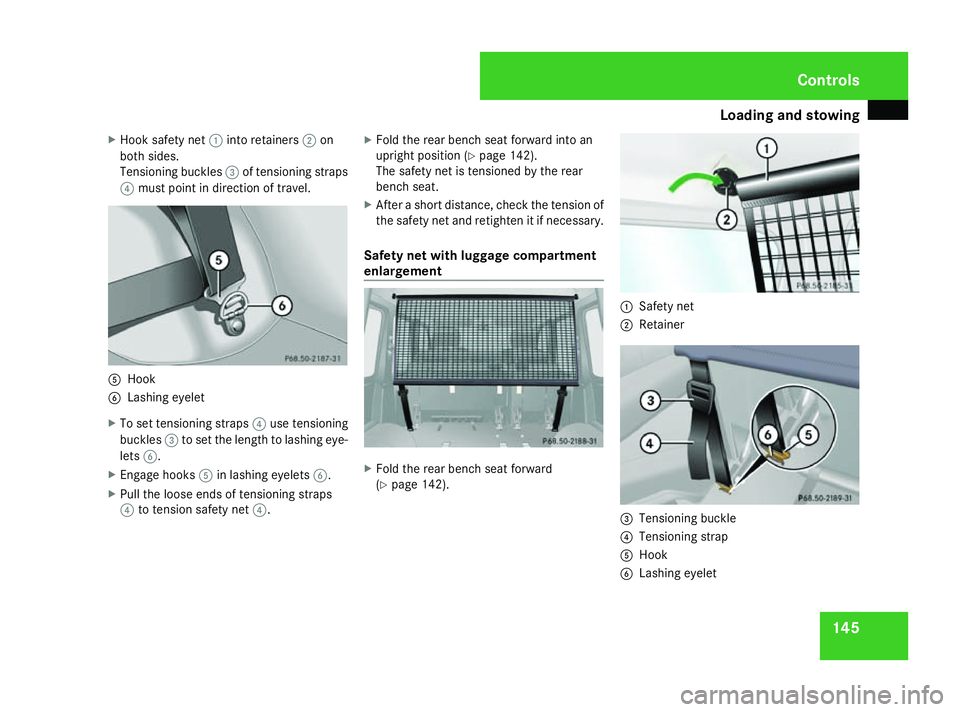
X
Hook safety net 1into retainers 2on
both sides.
Tensioning buckles 3of tensioning straps
4 must point in direction of travel. 5
Hook
6 Lashing eyelet
X To set tensioning straps 4use tensioning
buckles 3to set the length to lashing eye-
lets 6.
X Engage hooks 5in lashing eyelets 6.
X Pull the loose ends of tensioning straps
4 to tension safety net 4.X
Fold the rear bench seat forward into an
upright position (Y page 142).
The safety net is tensioned by the rear
bench seat.
X After a short distance, check the tension of
the safety net and retighten it if necessary.
Safety net with luggage compartment
enlargement X
Fold the rear bench seat forward
(Y page 142). 1
Safety net
2 Retainer 3
Tensioning buckle
4 Tensioning strap
5 Hook
6 Lashing eyelet Controls
463_AKB; 1; 8, en-GB
wobuchh,
Version: 2.10.6
2008-07-17T15:19:41+02:00 - Seite 145 ZDateiname: 6515_4091_02_buchblock.pdf; preflight
Page 149 of 293
Loading and stowing
146
X
Hook safety net 1into retainers 2on
both sides.
Tensioning buckles 3of tensioning straps
4 must point in direction of the luggage
compartment.
X The tensioning straps 4can be set to the
length for lashing eyelets 6using tension-
ing buckles 3.
X Engage hooks 5in lashing eyelets 6.
X Pull the loose ends of tensioning straps
4 tight, until tension safety net 1is ade-
quately tensioned.
X After driving a short distance, check the
tension of the safety net and retighten it if
necessary.
Detaching and storing the safety net X
Release tensioning straps 4.
X Move tensioning buckles 3into the hori-
zontal position.
X Disengage hooks 2.
X Unhook safety net 1at the top.
X Roll up safety net 1and secure it using the
Velcro strips from the glove compartment.
X Place safety net 1behind the rear bench
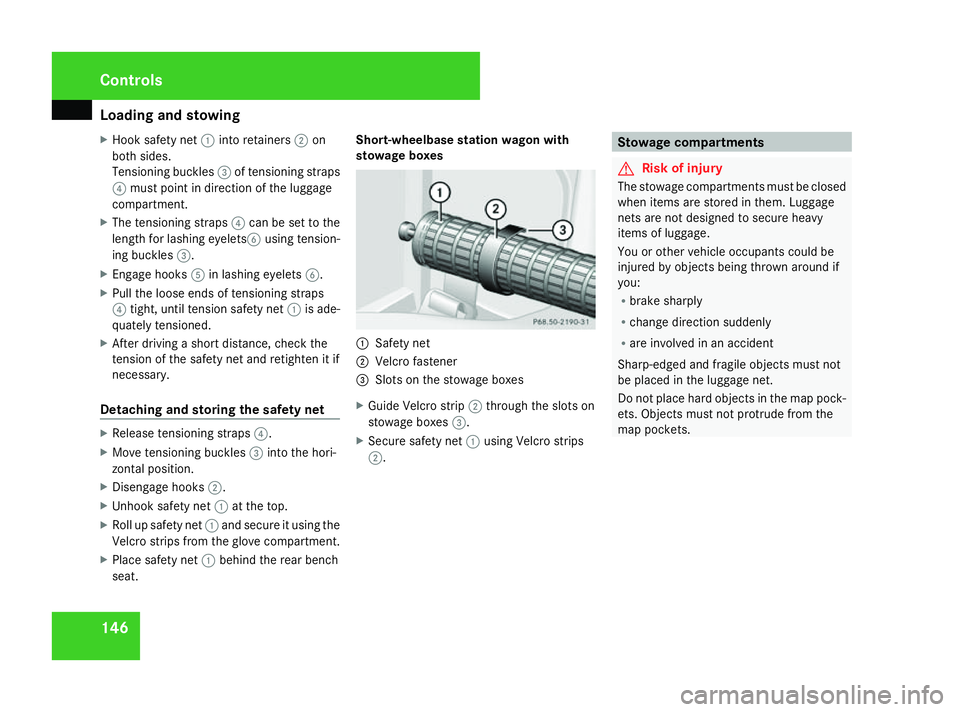
seat. Short-wheelbase station wagon with
stowage boxes
1
Safety net
2 Velcro fastener
3 Slots on the stowage boxes
X Guide Velcro strip 2through the slots on
stowage boxes 3.
X Secure safety net 1using Velcro strips
2. Stowage compartments
G
Risk of injury
The stowage compartments must be closed
when items are stored in them. Luggage
nets are not designed to secure heavy
items of luggage.
You or other vehicle occupants could be
injured by objects being thrown around if
you:
R brake sharply
R change direction suddenly
R are involved in an accident
Sharp-edged and fragile objects must not
be placed in the luggage net.
Do not place hard objects in the map pock-
ets. Objects must not protrude from the
map pockets. Controls
463_AKB; 1; 8, en-GB
wobuchh,
Version: 2.10.6 2008-07-17T15:19:41+02:00 - Seite 146Dateiname: 6515_4091_02_buchblock.pdf; preflight
Page 150 of 293
Loading and stowing
147
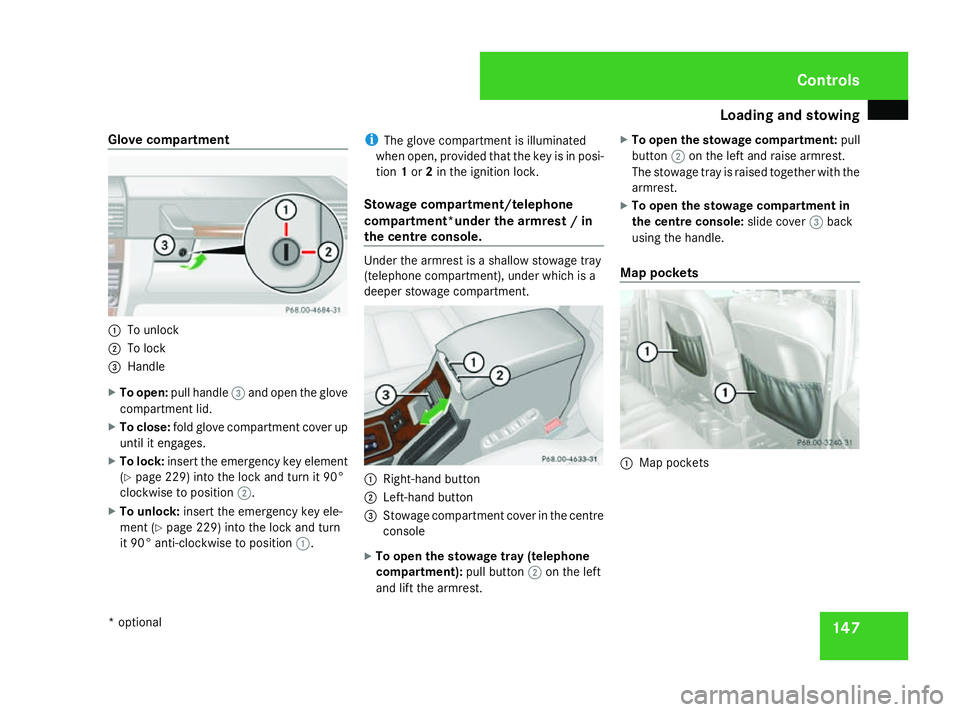
Glove compartment
1
To unlock
2 To lock
3 Handle
X To open: pull handle 3and open the glove
compartment lid.
X To close: fold glove compartment cover up
until it engages.
X To lock: insert the emergency key element
(Y page 229) into the lock and turn it 90°
clockwise to position 2.
X To unlock: insert the emergency key ele-
ment (Y page 229) into the lock and turn
it 90° anti-clockwise to position 1.i
The glove compartment is illuminated
when open, provided that the key is in posi-
tion 1or 2in the ignition lock.
Stowage compartment/telephone
compartment*under the armrest / in
the centre console. Under the armrest is a shallow stowage tray
(telephone compartment), under which is a
deeper stowage compartment. 1
Right-hand button
2 Left-hand button
3 Stowage compartment cover in the centre
console
X To open the stowage tray (telephone
compartment): pull button2on the left
and lift the armrest. X
To open the stowage compartment: pull
button 2on the left and raise armrest.
The stowage tray is raised together with the
armrest.
X To open the stowage compartment in
the centre console: slide cover3back
using the handle.
Map pockets 1
Map pockets Controls
* optional
463_AKB; 1; 8, en-GB
wobuchh,
Version: 2.10.6 2008-07-17T15:19:41+02:00 - Seite 147 ZDateiname: 6515_4091_02_buchblock.pdf; preflight