MERCEDES-BENZ GL SUV 2012 Owners Manual
Manufacturer: MERCEDES-BENZ, Model Year: 2012, Model line: GL SUV, Model: MERCEDES-BENZ GL SUV 2012Pages: 441, PDF Size: 10.66 MB
Page 211 of 441
clearance. You will oth
erwise damag ethe
vehicle.
Lev elcontro ladapt sthe vehicle level auto-
matically to the current operating and driving
situation. Thi sresults in reduced fuel con-
sumption and improved handling.
Make changes to the vehicle level whil ethe
vehicle is in motion. Thi senable sthe vehicle
to adjus ttothe new level as quickly as pos-
sible.
The vehicle level ma ychange visibly if you
par kthe vehicle and the outside temperature
changes. If the temperatur edrops, th evehi-
cle level lowers; with an increase in temper-
ature, the vehicle level rises.
If you unloc kthe vehicle or open adoor, the
vehicle begins to compensate for load dis-
crepancies while still parked. However, for
significant leve lchanges, e.g. after the vehi-
cle has been stationar yfor along period, the
engin emust be running. For safety reasons,
the vehicle is only lowered when the doors are
closed .Lowering is interrupted if adoor is
opened; it con tinues once the doo rhas been
closed.
For information about driving off-road, see
(Y page 188).
Basic settings The exten
ttowhich the vehicle is raised or
lowered depend sonthe basic setting selec-
ted.
Select:
R Highway/high-spee dlevel for driving on
normal roads
R Off -road level 1for drivin goneasily nego-
tiable off-road terrain
R Off-road level 2for drivin gonnormal off-
roa dterrain
R Off -road level 3for freeing the vehicle from
especially difficult off -road terrain at low
speeds The individual vehicle levels differ from high-
way level as follows:
R
highway level: +/– 0mm
R high-spee dlevel: –1 5mm
R off-road leve l1:30mma bove highway level
R off-road level 2: 60 mm above highway level
R off-road level 3: 90 mm above highway level
Highway/high-speed level !
Make sure there is enough groun dclear-
ance when the vehicle is being lowered. It
could otherwise hit the ground, damaging
the underbody. :
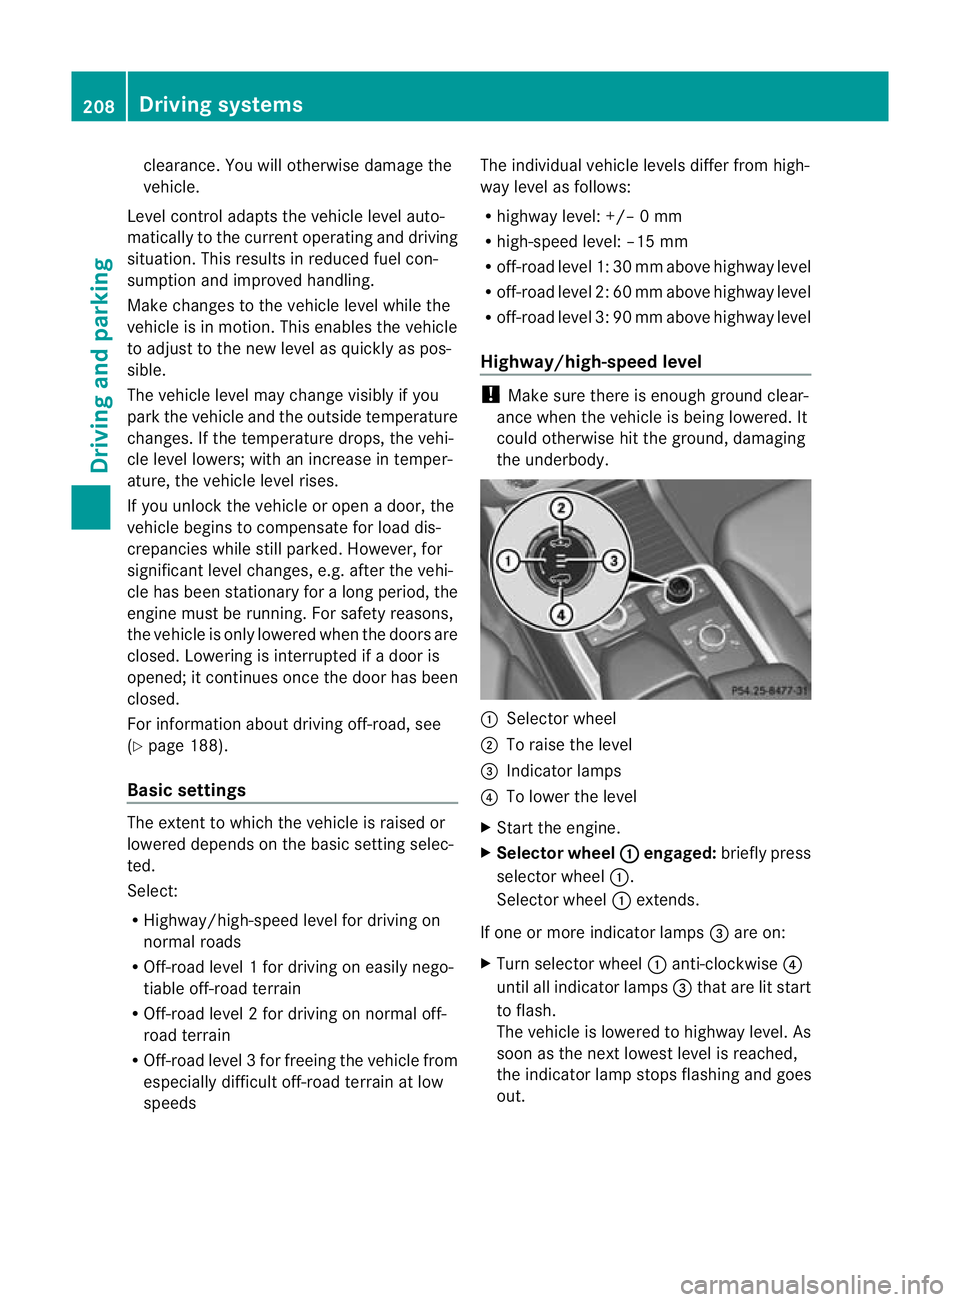
Selector wheel
; To raise the level
= Indicator lamps
? To lower the level
X Star tthe engine.
X Selector wheel : engaged:
brieflypress
selecto rwheel :.
Selector wheel :extends.
If one or mor eindicato rlamps =are on:
X Turn selector wheel :anti-clockwise ?
until all indicator lamps =that are lit start
to flash.
The vehicle is lowered to highway level. As
soon as the next lowes tlevel is reached,
the indicator lam pstops flashing and goes
out. 208
Drivin
gsystemsDrivin gand pa rking
Page 212 of 441
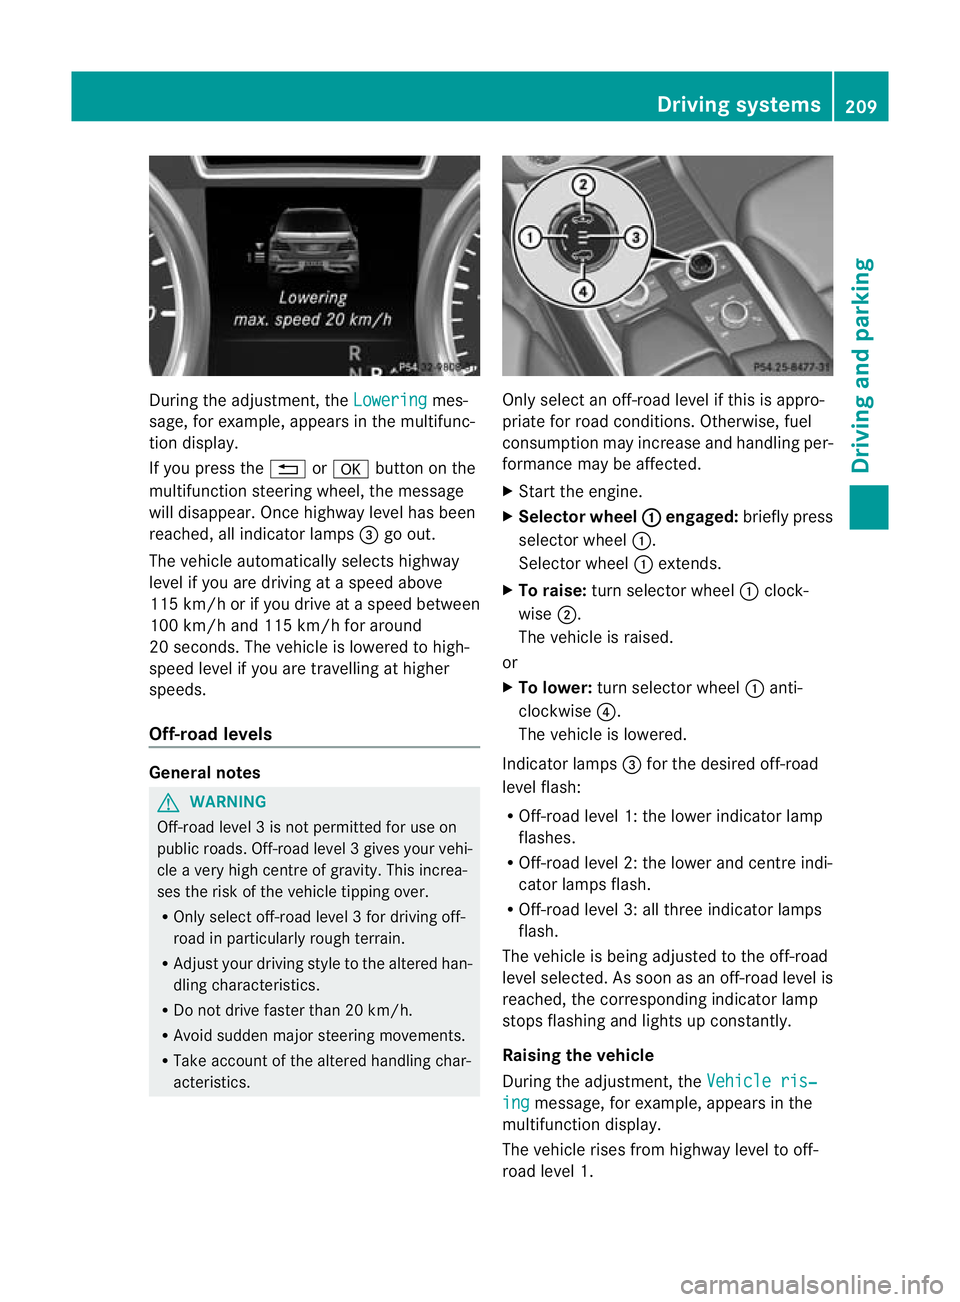
During the adjustment, the
Lowering mes-
sage ,for example, appears in the multifunc-
tion display.
If yo upressthe % ora button on the
multifunction steeri ngwheel, the message
will disappear. Onc ehighway level has been
reached, all indicator lamps =go out.
The vehicle automatically select shighway
level if you are drivin gataspeed above
11 5k m/ horify ou drive at aspeed between
10 0k m/ hand 115 km/h for around
20 seconds. The vehicle is lowered to high-
speed level if you are travelling at higher
speeds.
Off- road levels General notes
G
WARNING
Off-road level 3isn ot permitte dfor use on
public roads. Off -road level 3gives your vehi-
cle avery high centr eofgravity. This increa-
se st he risk of the vehi clet ippin gover.
R Onl yselec toff-road level 3for drivin goff-
road in particularl yrough terrain.
R Adjust your drivin gstyle to the altered han-
dling charac teristics.
R Do not drive faster than 20 km/h.
R Avoid sudden majo rsteering movements.
R Take account of th ealtered handling char-
acteristics. Only select an off-road level if this is appro-
priate for road conditions. Otherwise, fuel
consumption may increase and handling per-
formanc
emay be affected.
X Start the engine.
X Selector wheel : engaged:
briefly press
selector wheel :.
Selector wheel :extends.
X To raise: turn selector wheel :clock-
wise ;.
The vehicle is raised.
or
X To lower: turn selector wheel :anti-
clockwise ?.
The vehicle is lowered.
Indicator lamps =for the desired off-road
level flash:
R Off-road level 1: the lower indicator lamp
flashes.
R Off-road level 2: the lower and centre indi-
cator lamps flash.
R Off-road level 3: all three indicator lamps
flash.
The vehicle is being adjusted to the off-road
level selected .Assoon as an off-road leve lis
reached, th ecorresponding indicator lamp
stops flashing and lights up constantly.
Raising th evehicle
During the adjustment, the Vehicleris‐ ing message
,for example, appear sint he
multifunc tion display.
The vehicle rises from highway leve ltooff-
roa dlevel 1. Driving systems
209Driving and parking Z
Page 213 of 441
If yo
upressthe % ora button on the
multifunction steering wheel, the messa ge
wil ldisappear.
i Up to off-road level 2, you can hide the
messages using the %ora button
on the multif unctio nsteering wheel.
Once off-road level 2has been reached, the
lower and centr eindicator lamps of the selec-
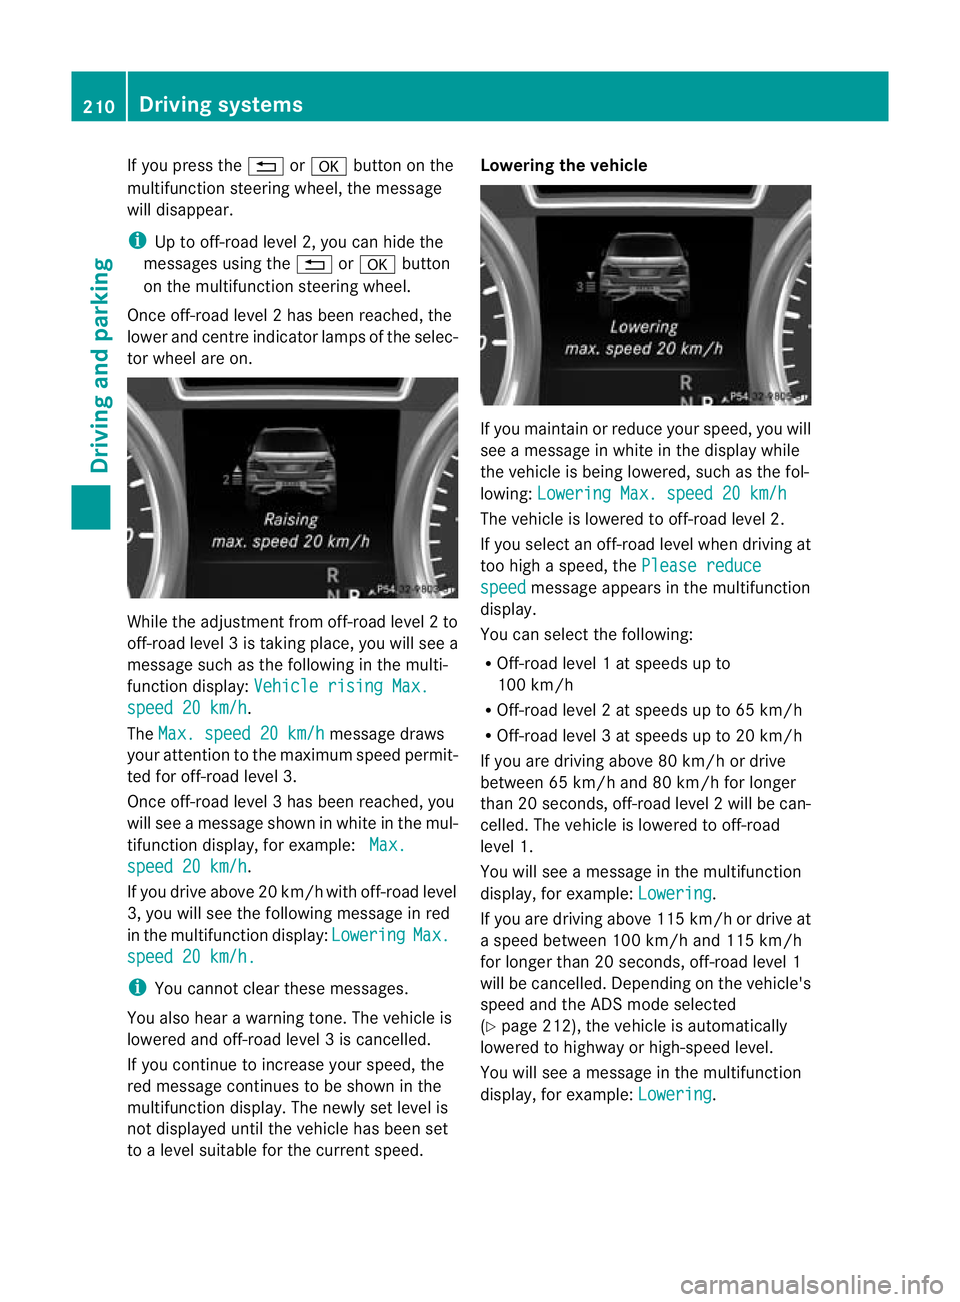
tor wheel are on. While the adjustment from off-road level
2to
off -ro ad level 3istaking place, you will see a
message such as the following in the multi-
function displ ay:Vehicle rising Max. speed 20 km/h .
The Max. speed 20 km/h message draws
your attentio ntothe maximum speed permit-
ted for off-road level 3.
Onc eoff-roa dlevel 3has been reached, you
will see amessage shown in whit eint he mul-
ti fu nction display, for example: Max.spee
d20k m/h .
If yo udrive above 20 km/h wit hoff-road level
3, you wil lsee the followi ngmessage in red
in th emultifunction display: Lowering Max.
spee
d20k m/h. i
Youc annot clear these messages.
You also hear awarnin gtone. The vehicle is
lowered and off-road leve l3iscancelled.
If you continue to increase your speed, the
red message continues to be shown in the
multifunction displ ay.T he newl yset level is
not displayed until the vehicle has been set
to alevel suitable for the curren tspeed. Lowering the vehicle
If you maintain or reduc
eyour speed, you will
see amessage in white in the display while
the vehicle is being lowered, such as the fol-
lowing: Lowering Max. spee d20km/h Th
ev ehicle is lowered to off-road level 2.
If you select an off-road level when driving at
too high aspeed, the Please reduce speed message appears in the multifunction
display.
You can select the following:
R Off-road level 1atspeeds up to
10 0k m/h
R Off-road level 2atspeeds up to 65 km/h
R Off -road leve l3atspeeds up to 20 km/h
If you are drivin gabove 80 km/ hordrive
between 65 km/h and 80 km/h for longer
than 20 seconds ,off-roa dlevel 2will be can-
celled. The vehicle is lowered to off-road
level 1.
You will see amessage in the mul tifunction
display, for example: Lowering .
If you are drivin gabove 11 5km/ hordrive at
as peed between 10 0km/ hand 115 km/h
for longer than 20 seconds ,off-road level 1
wil lbec ancelled. Dependin gonthe vehicle's
speed and the ADS mode selected
(Y page 212), the vehicle is automatically
lowered to highway or high-spee dlevel.
You will see amessage in the multifunction
display, for example: Lowering .210
Driving systemsDriving and parking
Page 214 of 441
HOL
Dfunction
Gen eral notes Th
eH OLD function ca nassist the driver in the
foll owing situations:
R when pulling away, especially on steep
slopes
R when manoeuvrin gonsteep slopes
R when waiting in traffic
The vehicle is kept stationary without the
driver having to depress the brake pedal.
The braking effect is cancelled and the HOLD
function is deactivated when you depress the
accelerator peda ltop ull away.
i Do not use the HOLD function when driv-
ing off-road, on steep downhill or uphill
inclines or on aslippery or loose surface.
Under such circumstances, the HOLD func-
tion may not be able to keep the vehicle
stationary.
Activation conditions You can activate the HOLD func
tion if:
R the vehicle is stationary.
R the engin eisrunning or if it has been auto-
matically switched off by the ECO start/
stop function.
R the driver' sdoor is closed or if your seat
belt is fastened.
R the electric parkin gbrake is released.
R thet ransmission is in position D,Ror N.
R DISTRONIC PLUS is deactivated.
Activatin gthe HOL Dfunction G
WARNING
Th ev ehicle' sbrake sare applied when the
HOLD functio nisactivated. For thi sreason,
deactivat ethe HOL Dfunction if the vehicle is
to be set in motion by other means (e.g. in a
car wash or by towing). X
Make sure that the activation conditions
are met.
X Depress the brake pedal.
X Quickly depres sthe brake pedal further
until ë appears in the multifunction dis-
play.
The HOL Dfunction is activated. You can
release the brake pedal.
i If depressing the brake pedal the first
time does not activate the HOLD function,
wait briefly and then try again.
Deactivating the HOLD function G
WARNING
Never get out of the vehicle when the HOLD
function is activated.
The HOLD function must never be operated
or deactivated by apassenger or from outside
the vehicle.
The HOLD function does not replace the elec-
tric parking brake and must not be used for
parking.
The braking effect of the HOLD function is
cancelled and the vehicle could roll away if:
R the HOLD function is deactivated by
depressing the accelerator pedal or the
brake pedal.
R there is amalfunction in the system or an
interruption in the power supply ,e.g. bat-
tery failure.
R the electrical system in the engine com-
partment, the battery or the fuses are tam-
pere dwith.
R the battery is disconnected.
If you leave the vehicle or park it, deactivate
the HOLD func tion and secur ethe vehicle
against rolling away.
The HOL Dfunction is deactivated automati-
cally if:
R you accelerate and the transmission is in
position Dor R.
R you shift the transmission to position P. Driving systems
211Drivingand pa rking Z
Page 215 of 441
R
you depress the brak epedal again wit ha
certain amount of pressure until ëdis-
appears from themultifun ctiondisplay.
R you secur ethe vehi cleu sing the elec tric
parking brake.
R you activat eDISTRONIC PLU S.
i After atime, the electric parking brake
secures the vehicle and relieves the service
brake.
The electric parking brak esecures the vehicle
automatically if the HOL Dfunction is activa-
ted and:
R the driver' sdoor is open and the driver's
seat belt is unfastened.
R the engin eisswitched off, unless it is auto-
matically switched off by the ECO start/
stop function.
R as ystem fault occurs.
R the powe rsupply is not sufficient.
On steep uphill or downhill inclines or if there
is am alfunction, the transmissio nmay also
be automatically shifted int oposition P. AIRMATIC package
Genera lnotes AIRMATI
Cenable sasuspension tuning set-
ting to be selected and regulates the damping
behaviour and level of your vehicle. The sys-
tem comprises aminimum of two compo-
nents. These are AD S(Adaptive Damp ingS ys-
tem) (Y page 212) and level control
(Y page 213) .Your vehicle ma yalso be equip-
ped with the Active Curv eSystem
(Y page 213).
Observe the notes on driving with atrailer
(Y page 257).
ADS (Adaptive Damping System) General notes
ADS adapts th
edamping characteristic sto
the curren toperatin gand driving situation. Thi
sd epends on:
R your drivin gstyle
R the road surface conditions
R the AD Ssetting
R the vehicle level setting
Your selection remains stored even if you
remov ethe key from the igni tion lock.
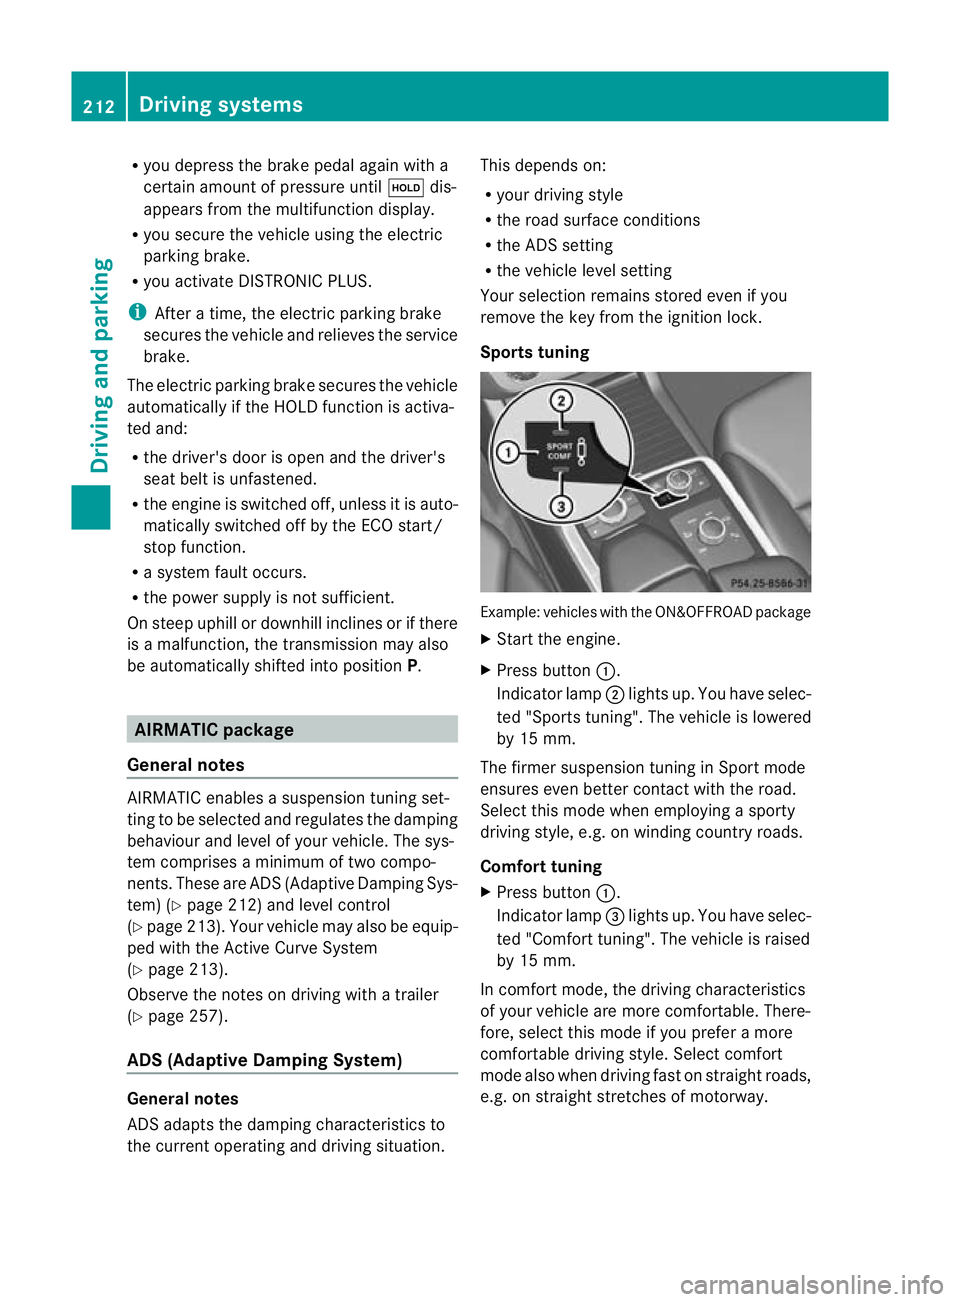
Sports tuning Example: vehicles wit
hthe ON&OFFROA Dpackage
X Start the engine.
X Press button :.
Indicator lamp ;ligh tsup. You have sele c-
ted "Sport stuning". The vehicle is lowered
by 15 mm.
The firmer suspension tuning in Spor tmode
ensures even bette rcontac twith th eroad.
Select this mode when empl oyingasporty
driving style, e.g .onwindingcountr yroads.
Comfor ttun ing
X Press button :.
Indicator lamp =light sup. You have selec-
ted "Comfor ttuning". The vehicle is raised
by 15 mm.
In com fort mode, the dri ving characteristics
of your vehicl eare more comfortable. There-
fore, select this mode if you prefer amore
comfortable drivin gstyle. Select comfort
mode also when driving fast on straigh troads,
e.g. on straight stretches of motorway. 212
Driving systemsDriving and pa
rking
Page 216 of 441
Active Curve System
The Active Curv
eSyste muses activ estabil-
isers to optimis eboth drivin gcomfort and
vehicle agility. Depending on the ADS mode
selected (Y page 212), the Active Curve Sys-
tem also changes the setting.
If you select ADS comfor tmode:
R rolling movemen tisr educed in the even tof
changing surface undul ations.
R the roll angle when cornering is reduced.
R the drivin gstyle is agile.
If you select ADS sport mode:
R the roll angle is reduced significantly.
R the driving style is even more agile.
Leve lcontrol Import
ants afety notes G
WARNING
Mak esure that nobody is near the wheel arch
or vehicle underside when you make achange
to the vehicle level. Otherwise, you or others
ma ybet rapped. G
WARNING
Always select as lo wavehicle level as possi-
ble. If the vehicle level is high, the vehicle
centre of gravity shifts upwards. This increa-
ses the risk of the vehicle tipping over.
Adapt your driving style to suit the vehicle
level. ESP ®
cannot reduc ethe risk of an acci-
dent if you drive too fast. ESP ®
cannot over-
rid ethe laws of physics.
! When driving on extremel yrough terrain,
select ahigh vehicle level in good time.
Make sure there is always sufficient ground
clearance. You will otherwise damage the
vehicle.
Genera lnotes
Further information abou t"Driving off-road"
(Y page 188).
Level control adapts the vehicle level auto-
matically to the current operating and driving situation. Thi
sresults in reduced fuel con-
sumption and improved handling.
If you select ADS comfor tmode
(Y page 212), the vehicle is lowered to high-
speed leve lasthe speed increases. As the
vehicle decelerates, the vehicle is raised back
up to highway level.
If you selec tADS sport mode (Y page 212),
the vehicle skip shighwa ylevel and lowers
directly to high-speed level dependin gonthe
basic setting (Y page 213).
Make changes to the vehicle level while the
vehicle is in motion. This enables the vehicle
to adjust to the new level as quickly as pos-
sible.
The vehicle level ma ychange visibly if you
par kthe vehicle and the outside temperature
changes. If the temperature drops, the vehi-
cle level lowers; with an increase in temper-
ature, the vehicle level rises.
If you unlock the vehicle or open adoor, the
vehicle begins to compensat efor load dis-
crepancies while still parked. However, for
significant leve lchanges, e.g. after the vehi-
cle has been stationary for along period, the
engin emust be running. For safety reasons,
the vehicle is only lowered when the doors are
closed .Lowering is interrupted if adoor is
opened; it con tinues once the doo rhas been
closed.
Basic settings
The extent to which the vehicle is raised or
lowered depends on the basic setting selec-
ted. Select raised level for off-road driving or
highway/high-speed level for normal roads.
The individua lvehicle levels differ from high-
way level as follows:
R highway level: +/ –0mm
R high-spee dlevel: –1 5mm
R raised level :+60 mm Driving systems
213Driving and parking Z
Page 217 of 441
Raised level
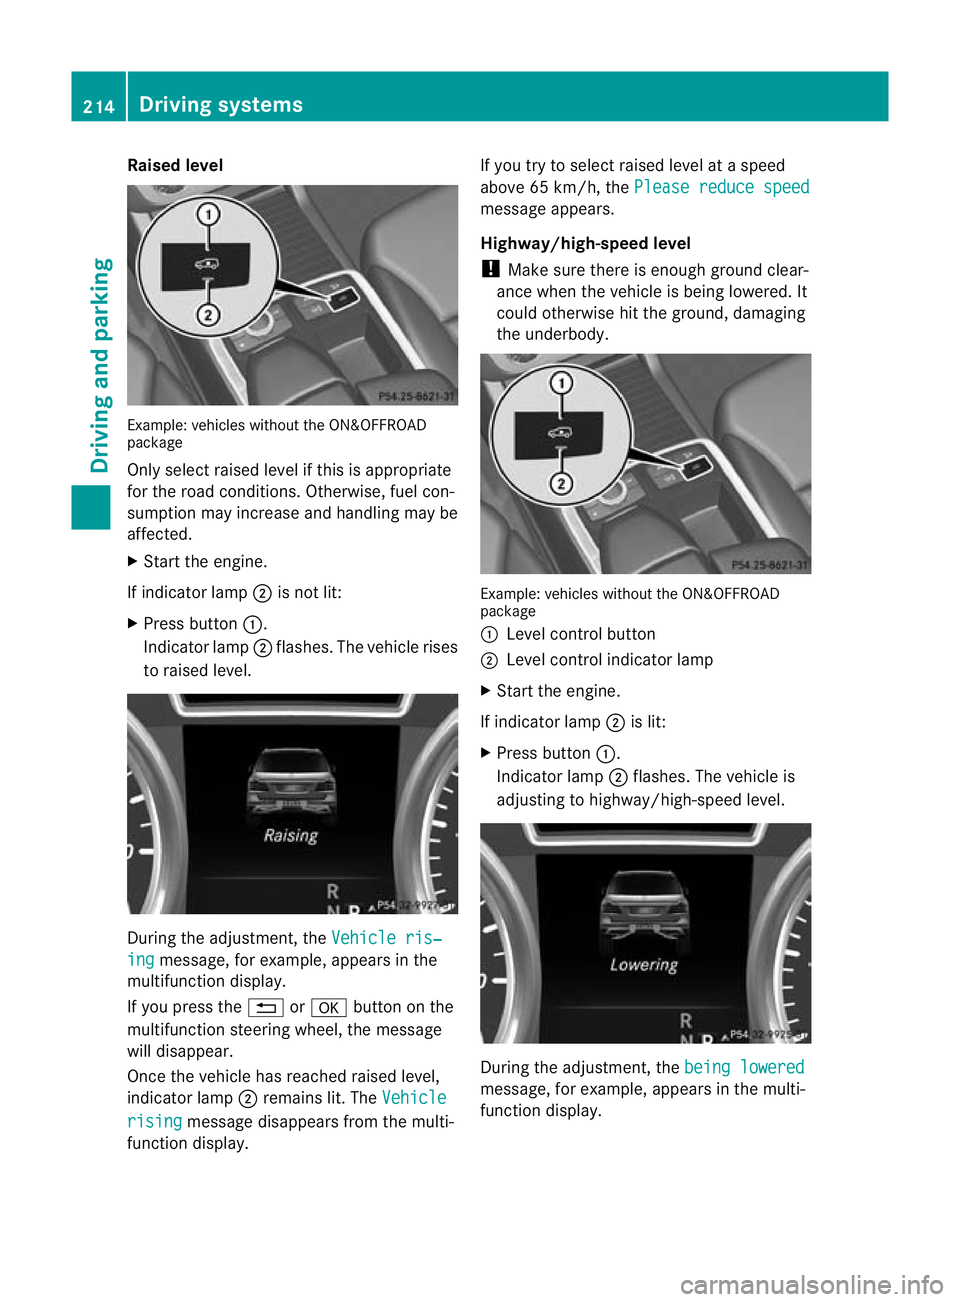
Example
:vehicles without the ON&OFFROAD
package
Only select raised level if this is appropriate
for the road conditions. Otherwise, fuel con-
sumption may increase and handling may be
affected.
X Start the engine.
If indicator lamp ;is not lit:
X Press button :.
Indicator lamp ;flashes. The vehicle rises
to raised level. During the adjustment, the
Vehicleris‐ ing message
,for example, appear sint he
multifunction display.
If you press the %ora button on the
multifunction steerin gwheel, the message
will disappear.
Onc ethe vehicle has reached raised level,
indicat or lamp ;remains lit.T he Vehicle rising message disappear
sfrom th emulti-
function display. If you try to select raised level at
aspeed
above 65 km/h, the Please reduce speed message appears.
Highway/high-speed level
!
Make sure there is enough groun dclear-
ance when the vehicle is being lowered. It
could otherwise hit the ground, damaging
the underbody. Example: vehicles without the ON&OF
FROAD
package
: Level control button
; Level control indicator lamp
X Start the engine.
If indicator lamp ;is lit:
X Press button :.
Indicator lamp ;flashes. The vehicle is
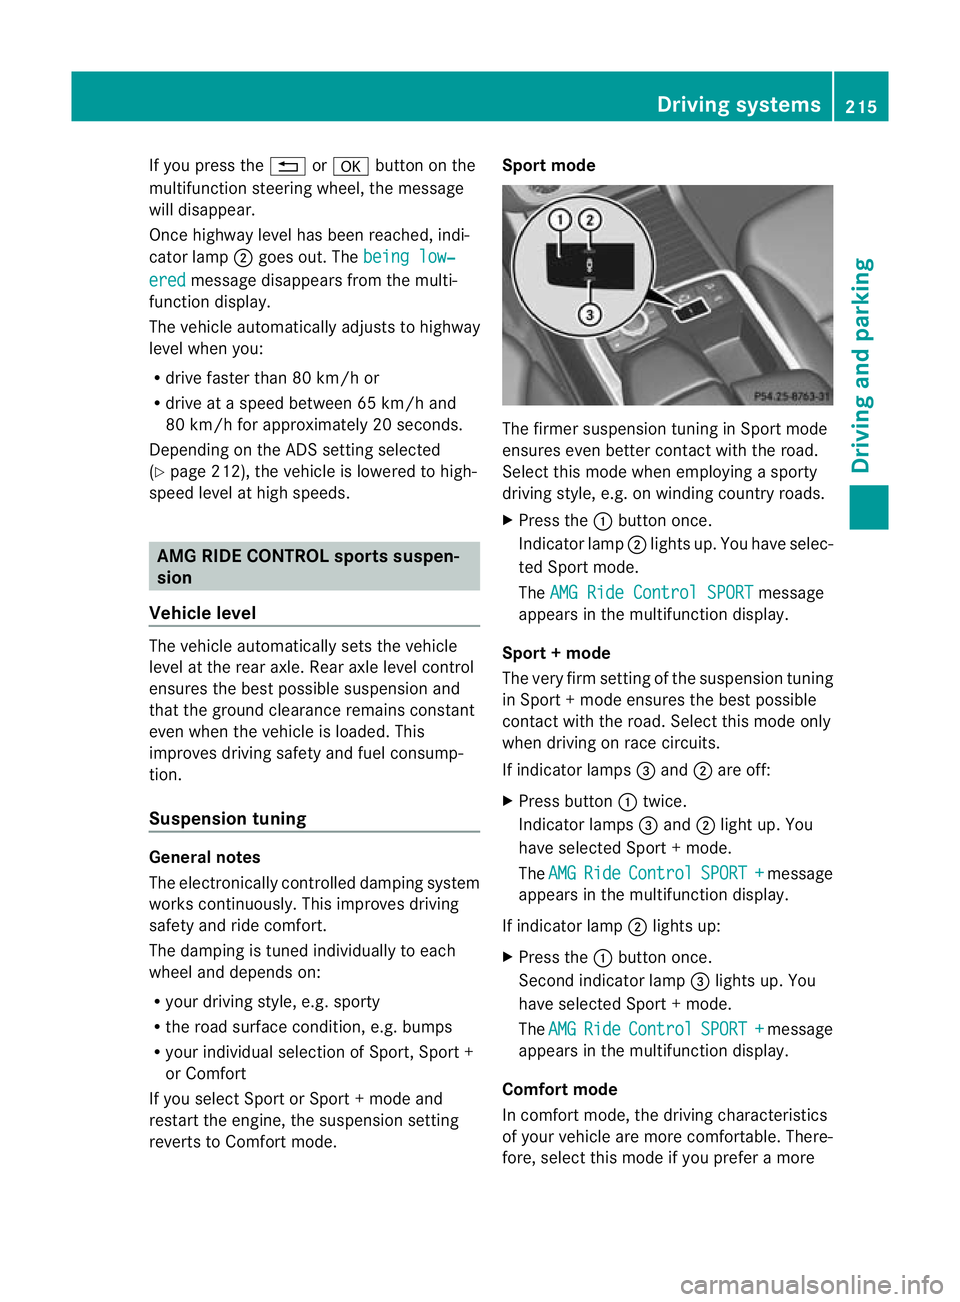
adjusting to highway/high-speed level. During the adjustment
,the bein glowered message
,for example, appears in the multi-
func tion display. 214
Driving systemsDriving and pa
rking
Page 218 of 441
If yo
upressthe % ora button on the
multifunction steering wheel, the messa ge
wil ldisappear.
Once highway level has been reached, indi-
cator lamp ;goes out. The beinglow‐ ered messa
gedisappears from the multi-
function display.
The vehicle autom atically adjusts to highway
level when you:
R drive faster than 80 km/ hor
R driv eatas peed between 65 km/ hand
80 km/h for approximatel y20seconds.
Dependin gonthe ADS setting selected
(Y page 212), the vehicle is lowered to high-
speed level at high speeds. AM
GR IDE CONTROL sports suspen-
sion
Vehicl elevel The vehicle automatically sets the vehicle
level at the rear axle. Rea raxle level control
ensures the best poss iblesuspension and
that the ground clearanc eremains const ant
even when the vehicle is loaded .This
improves drivin gsafety and fuel consump-
tion.
Suspensio ntuning General notes
Th
ee lectronically controlled damping system
works continuously. This improves driving
safety and ride comfort.
The damping is tuned individually to each
wheel and depends on:
R your drivin gstyle, e.g. sporty
R the road surface conditio n,e.g .bum ps
R your individual selection of Sport, Sport +
or Comfort
If you select Sport or Sport +mode and
restar tthe engine, the suspension setting
revert stoComfort mode. Spor
tmode The firmer suspension tuning in Sport mode
ensures even better contact with the road.
Select this mode when employing
asporty
driving style, e.g. on windin gcountry roads.
X Press the :button once.
Indica torlamp ;lights up. You have selec-
ted Sport mode.
The AMGR ide Control SPORT message
appears in th emultifunction display.
Sport +mode
The very firm settin gofthe suspension tuning
in Spor t+mode ensures the best possible
con tact with the road .Select this mode only
when driving on rac ecircuits.
If indicator lamps =and ;are off:
X Press button :twice.
Indicator lamps =and ;light up. You
have selected Sport +mode.
The AMG Ride Control SPORT + message
appear sint he multifunc tion display.
If indicator lamp ;lights up:
X Press the :button once.
Secon dindicato rlamp =lights up. You
have selected Sport +mode.
The AMG Ride Control SPORT + message
appear sint he multifunc tion display.
Comfort mode
In comfor tmode, the drivin gcharacteristics
of your vehicle ar emore comfortable .There-
fore, selec tthis mode if you prefer amore Driving systems
215Driving and parking Z
Page 219 of 441
comfortable driving style. Select comfort
mod
ealsow hend riving fas tonstraightroads,
e.g. on straight str etche sofm otorway.
X Press button :repeatedly unt ilindicator
lamps =and ;go out.
Yo uh aves elec ted Comfort mode.
The AMG Ride Control COMFORT mes-
sage appears in the multifunctio ndisplay. PARKTRONIC
Important safety notes G
WAR
NING
PARKTRONI Cisonly an aid and may not
detect all obs tacles .Itisnotas ubstitut efor
attentive driving.
You are alway sresponsible for safet yand
must continue to pay attention to your imme-
diate surroundings whe nparking and
manoeuvring. You could otherwise endanger
yourself and others. G
WARNING
Make sure that no persons or animals are in
the manoeuvrin grange. Otherwise, they
could be injured.
PARKTRONI Cisanelectronic parking aid with
ultrasonic sensors. It indicates visuallyand
audibl ythe distanc ebetween your vehicle
and an object.
PARKTRONIC is activated automaticall yif
you:
R switch on the ignition
R shift the transmission to position D,Ror N
R release the electri cparking brake
PARKTRONIC is deactivated at speeds above
18 km/h. It is reactivated at lower speeds.
PARKTRONIC monitor sthe ar ea arou ndyour
vehicle using six sensor sint he front bumper
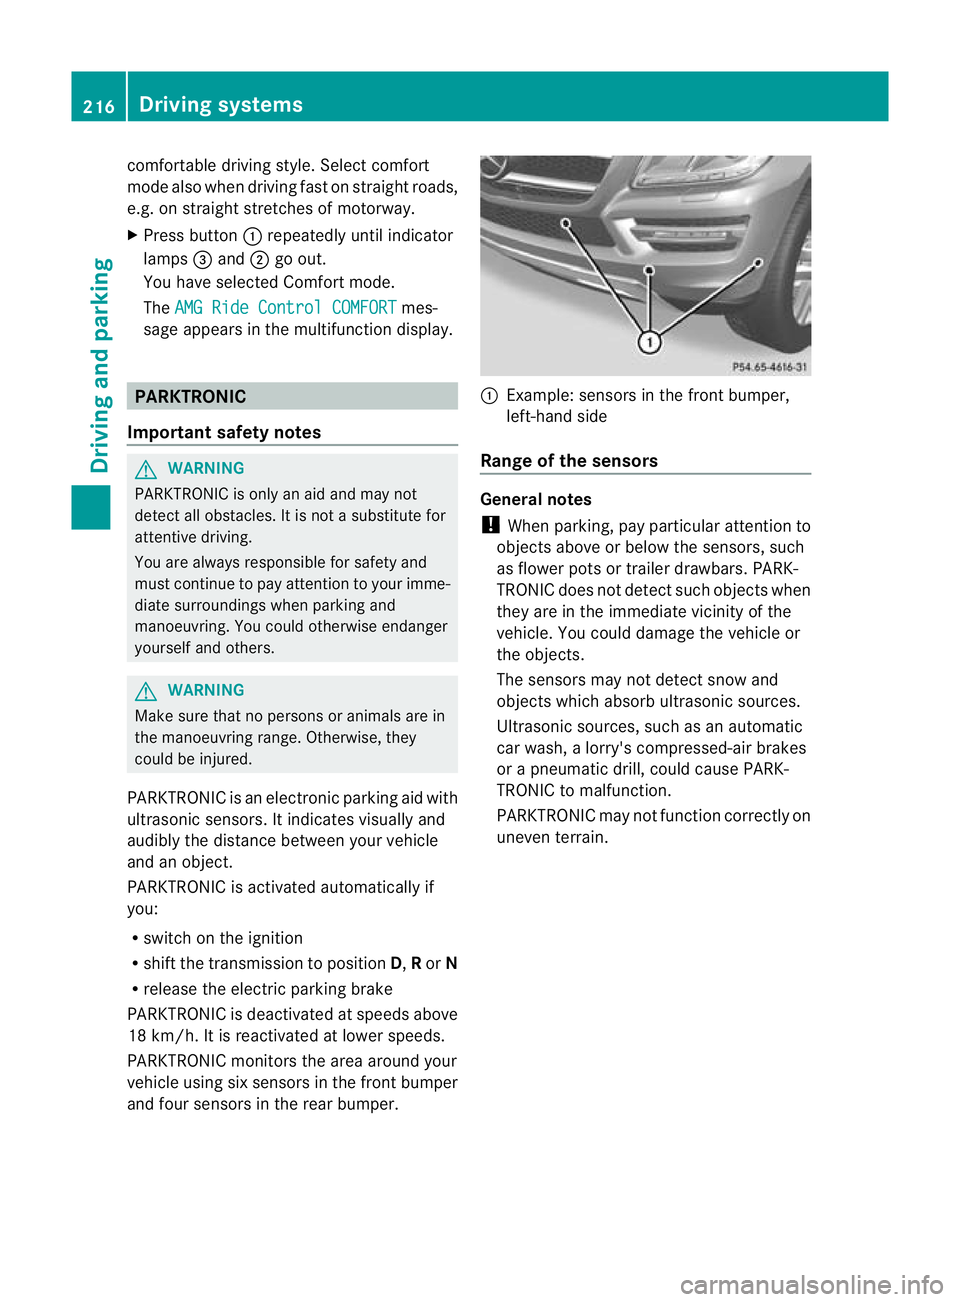
an df our sensor sint he rear bumper. :
Example :sensor sint he front bumper,
left-hand side
Range of th esensors General notes
! When parking ,pay particular attention to
object sabov eorbelow th esensors, such
as flower pot sortrailer drawbars. PARK-
TRONIC does no tdetec tsuch objects when
they are in the immediate vicinity of the
vehicle. You could damage the vehicle or
the objec ts.
The sensors ma ynot detect sno wand
object swhich absor bultrasonic sources.
Ultrasonic sources, such as an automatic
car wash, alorry' scompressed-ai rbrakes
or ap neumatic drill, could cause PARK-
TRONI Ctom alfunction.
PARKTRONI Cmay not function correctly on
uneven terrain. 216
Driving systemsDriving and parking
Page 220 of 441
Sid
eview Top view
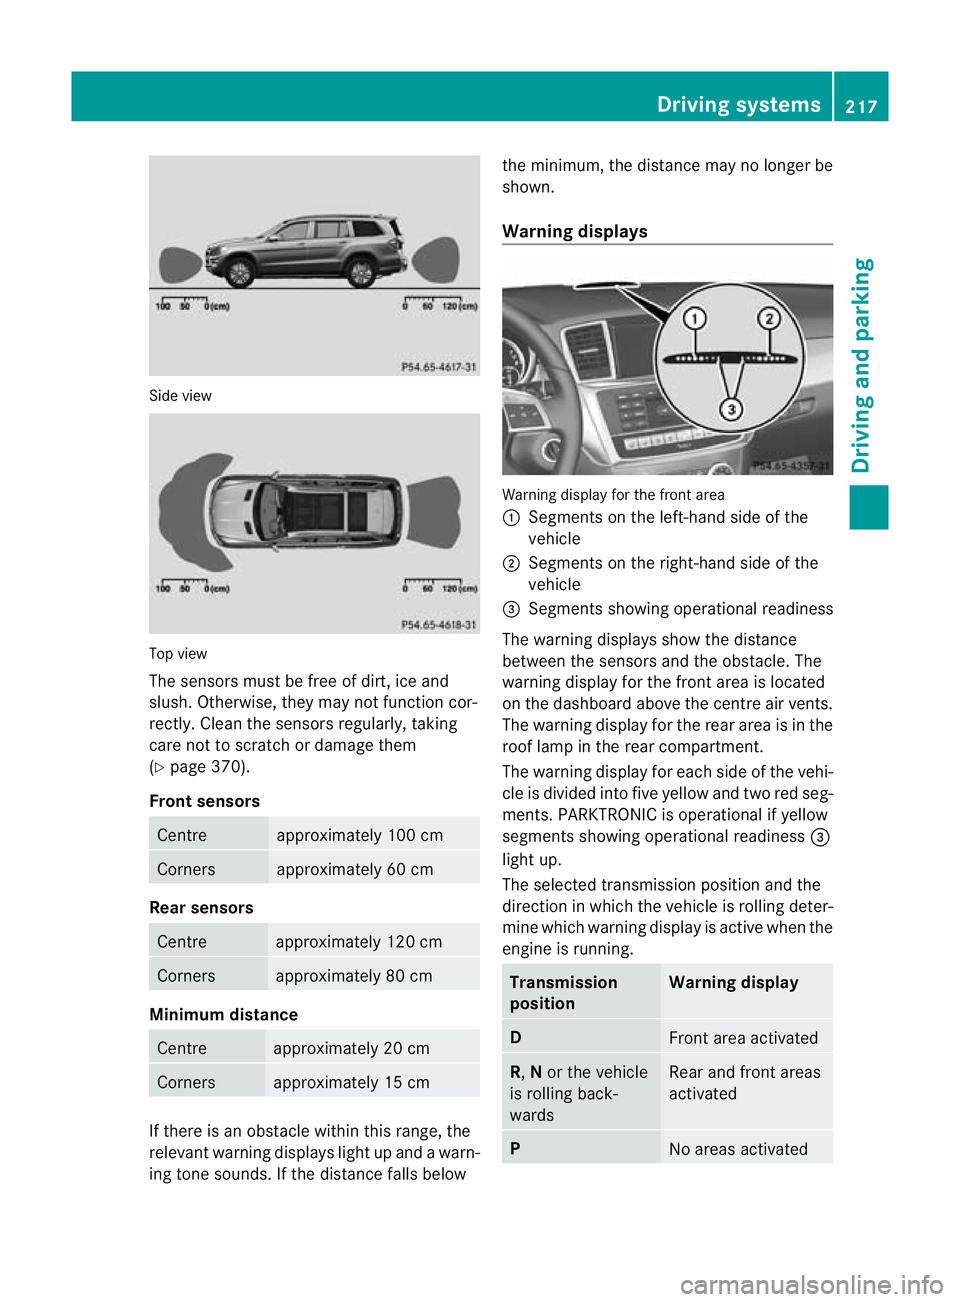
The sensors mus
tbefree of dirt, ice and
slush. Othe rwise, they may not function cor-
rectly. Clean the sensor sregularly, taki ng
care not to scratch or damag ethem
(Y page 37 0).
Front sensors Centre approximately 100 cm
Corners approximately 60 cm
Rear sensors
Centre approximately 120 cm
Corners approximately 80 cm
Minimu
mdistance Centre approximately 20 cm
Corners approximately 15 cm
If ther
eisano bstacle within this range, the
relevant warning displays light up and awarn-
ing ton esounds. If the distan cefall sbelow the minimum, the distanc
emay no longer be
shown.
Warning displays Warning display for th
efront area
: Segment sonthe left-hand side of the
vehicle
; Segment sonthe right-hand side of the
vehicle
= Segment sshowing operational readiness
The warning display sshow the distance
betwe enthe sensor sand the obstacle. The
warning displa yfor the front area is located
on the dashboar dabove the centre air vents.
The warning display for the rear area is in the
roof lamp in the rear compartment.
The warning display for each side of the vehi-
cle is divided into fiv eyellow and two red seg-
men ts.P ARKTRONIC is operational if yellow
segments showing operational readiness =
ligh tup.
The selected transmission position and the
direction in which the vehicle is rollin gdeter-
min ewhich warnin gdispla yisa ctive whe nthe
engin eisrunning. Transmission
position Warning display
D
Front area activated
R,
Nor the vehicle
is rolling back-
wards Rear and front areas
activated
P
No areas activatedDriving systems
217Drivingand pa rking Z