weight MERCEDES-BENZ METRIS 2020 MY20 Operator’s Manual
[x] Cancel search | Manufacturer: MERCEDES-BENZ, Model Year: 2020, Model line: METRIS, Model: MERCEDES-BENZ METRIS 2020Pages: 320, PDF Size: 26.38 MB
Page 14 of 320
Activating/deactivating (vehicle
without steering wheel buttons)
.... 179
Crosswind Assist ............................. 70
Deactivating/activating ................... 69
Display message (vehicle with
steering wheel buttons) ................. 214
Display message (vehicle without
steering wheel buttons) ................. 200
Function/notes ................................ 68
Important safety information ........... 68
Trailer stabilization ........................... 69
Warning lamp ................................. 230
Exhaust check ................................... 141
Exterior lighting
see Lights
Exterior mirror
Heating ............................................ 97
Exterior mirrors
Adjusting ......................................... 97
Out of position (troubleshooting) ..... 97
Eyeglasses compartment ................. 238 F
First-aid kit .........................................
272
Flat tire
Changing a wheel/mounting the
spare wheel ................................... 298
Frequencies
Mobile phone ................................. 304
Two-way radio ................................ 304
Front fog lamps
Changing bulbs .............................. 105
Display messages (vehicle with
steering wheel buttons) ................. 217
Display messages (vehicle with-
out steering wheel buttons) ........... 203
Switching on/off ........................... 100
Front-passenger front air bag
Display message (vehicle without
steering-wheel buttons) ................. 197
Fuel
Additives (gasoline) ........................ 307
Consumption information .............. 307
Consumption statistics (vehicle
with steering wheel buttons) ......... 184
Consumption statistics (vehicle
without steering wheel buttons) .... 177 Displaying the current consump-
tion (vehicle with steering wheel
buttons) .........................................
184
Displaying the current consump-
tion (vehicle without steering
wheel buttons) ............................... 178
Displaying the range (vehicle
with steering wheel buttons) ......... 184
Displaying the range (vehicle
without steering wheel buttons) .... 178
Driving abroad ............................... 141
Driving tips .................................... 140
Fuel content display (vehicle
without steering wheel buttons) .... 176
Fuel gauge (vehicle with steering
wheel buttons) ................................. 40
Grade (gasoline) ............................ 306
Important safety notes .................. 306
Problem (malfunction) ................... 138
Refueling ........................................ 136
Tank content/reserve fuel ............. 306
Fuel content
Display (vehicle without steering
wheel buttons) ............................... 176
Fuel level
Gauge (vehicle with steering
wheel buttons) ................................. 40
Fuel tank
Problem (malfunction) ................... 138
Fuel tank reserve level
Display messages (vehicle with
steering wheel buttons) ................. 221
Display messages (vehicle with-
out steering wheel buttons) ........... 206
Fuses .................................................. 277 G
Gasoline .............................................
306
Gearshift recommendation
Display (vehicle with steering
wheel buttons) ............................... 183
Display (vehicle without steering
wheel buttons) ............................... 176
Genuine parts ...................................... 34
Glove box ........................................... 238
GTW (Gross Trailer Weight) (defi-
nition) ................................................. 29612
Index
Page 24 of 320
Coolant (display in the on-board
computer) ......................................
178
Outside temperature ...................... 175
Setting (climate control) ................ 119
Theft deterrent systems
ATA (Anti-Theft Alarm system) ......... 70
Immobilizer ...................................... 70
Time
Setting (vehicle with steering
wheel buttons) ............................... 192
Setting the time (vehicle with
steering wheel buttons) ................. 192
Setting the time (vehicle without
steering wheel buttons) ................. 181
Tire pressure
Calling up (on-board computer) ..... 285
Checking manually ........................ 285
Display messages (vehicle with
steering wheel buttons) ................. 224
Display messages (vehicle with-
out steering wheel buttons) ........... 207
Maximum ....................................... 285
Notes ............................................. 284
Recommended ............................... 282
Tables ............................................ 289
Tire label ........................................ 282
Tire pressure monitor
Checking the tire pressure elec-
tronically ........................................ 287
Function/notes ............................. 285
General notes ................................ 285
Important safety notes .................. 286
Restarting ...................................... 288
Warning lamp ................................. 236
Warning message .......................... 287
Tire pressure table ............................ 289
Tires
Aspect ratio (definition) ................. 296
Average weight of the vehicle
occupants (definition) .................... 295
Bar (definition) ............................... 295
Changing a wheel .......................... 297
Characteristics .............................. 295
Checking ........................................ 279
Curb weight (definition) ................. 296
Definition of terms ......................... 295
Direction of rotation ...................... 297 Display messages (vehicle with
steering wheel buttons) .................
224
Display messages (vehicle with-
out steering wheel buttons) ........... 207
Distribution of the vehicle occu-
pants (definition) ............................ 297
DOT (Department of Transporta-
tion) (definition) ............................. 295
DOT, Tire Identification Number
(TIN) ............................................... 294
GAWR (Gross Axle Weight Rat-
ing) (definition) .............................. 296
GTW (Gross Trailer Weight) (defi-
nition) ............................................ 296
GVW (Gross Vehicle Weight) (def-
inition) ........................................... 296
GVWR (Gross Vehicle Weight
Rating) (definition) ......................... 296
Important safety notes .................. 278
Increased vehicle weight due to
optional equipment (definition) ...... 295
Information on driving .................... 278
Kilopascal (kPa) (definition) ........... 296
Labeling (overview) ........................ 292
Load bearing index (definition) ...... 297
Load index ..................................... 294
Load index (definition) ................... 296
M+S tires ....................................... 280
Maximum load on a tire (defini-
tion) ............................................... 296
Maximum loaded vehicle weight
(definition) ..................................... 296
Maximum permissible tire pres-
sure (definition) ............................. 296
Maximum tire load ......................... 294
Maximum tire load (definition) ....... 296
Optional equipment weight (defi-
nition) ............................................ 297
PSI (pounds per square inch)
(definition) ..................................... 296
Replacing ....................................... 297
Service life ..................................... 279
Sidewall (definition) ....................... 297
Snow chains .................................. 281
Speed rating (definition) ................ 296
Storing ........................................... 298
Structure and characteristics
(definition) ..................................... 295 22
Index
Page 25 of 320
Summer tires in winter .................. 280
TIN (Tire Identification Number)
(definition) .....................................
297
Tire bead (definition) ...................... 297
Tire pressure (definition) ................ 296
Tire pressures (recommended) ...... 295
Tire size designation, load-bear-
ing capacity, speed rating .............. 293
Tire tread ....................................... 279
Tire tread (definition) ..................... 297
Total load limit (definition) ............. 297
Traction (definition) ....................... 297
TWR (permissible trailer drawbar
noseweight) (definition) ................. 297
Uniform Tire Quality Grading
Standards (definition) .................... 295
Wear indicator (definition) ............. 297
Wheel and tire combination ........... 302
Wheel rim (definition) .................... 296
Wheel/tire combinations ............... 301
Tool
see Vehicle tool kit
Top Tether ............................................ 63
Tow-starting
Emergency engine starting ............ 277
Important safety notes .................. 274
Towing
If the vehicle is stuck ..................... 276
Installing/removing the towing
eye ................................................. 275
Towing a trailer
Active Parking Assist ..................... 159
Axle load, permissible .................... 315
Cleaning the trailer tow hitch ......... 268
Coupling up a trailer ...................... 170
Decoupling a trailer ....................... 171
Driving tips .................................... 168
Notes on retrofitting ...................... 315
Power supply ................................. 173
Trailer loads ................................... 315
Towing away
Important safety guidelines ........... 274
With both axles on the ground ....... 276
With the rear axle raised ................ 276
Towing eye
Storage location ............................ 270
Trailer coupling
see Towing a trailer Trailer loads and drawbar nose-
weights
...............................................
172
Trailer operation
Lights display messages (vehicle
with steering wheel buttons) ......... 216
Lights display messages (vehicle
without steering wheel buttons) .... 202
Trailer towing
Blind Spot Assist ............................ 153
ESP ®
................................................ 69
PARKTRONIC ................................. 159
Permissible trailer loads and
drawbar noseweights ..................... 172
Transmission
see Automatic transmission
Transmission oil ................................ 310
Transmission positions
Automatic transmission ................. 132
Display (DIRECT SELECT lever) ...... 132
Transport
Lashing straps ............................... 246
Loading guidelines ......................... 242
Stickers ......................................... 246
Vehicle ........................................... 276
Transport by rail ................................ 142
Transportation
Rail ................................................ 142
Transportation aids
Load protection net ....................... 248
Transporting
Cargo compartment variations ...... 244
Load distribution ............................ 243
Securing a load .............................. 244
Trim pieces (cleaning instruc-
tions) .................................................. 269
Trip computer
Displaying (vehicle with steering
wheel buttons) ............................... 184
Displaying (vehicle without steer-
ing wheel buttons) ......................... 177
Resetting (vehicle with steering
wheel buttons) ............................... 185
Resetting (vehicle without steer-
ing wheel buttons) ......................... 177
Selecting the display units (vehi-
cle with steering wheel buttons) .... 192 Index
23
Page 26 of 320
Selecting the display units (vehi-
cle without steering wheel but-
tons) ..............................................
180
Trip meter
see Trip odometer
Trip odometer
Displaying (vehicle with steering
wheel buttons) ............................... 183
Displaying (vehicle without steer-
ing wheel buttons) ......................... 177
Resetting (vehicle with steering
wheel buttons) ............................... 185
Resetting (vehicle without steer-
ing wheel buttons) ......................... 177
Setting the display unit (vehicle
with steering wheel buttons) ......... 192
Setting the display unit (vehicle
without steering wheel buttons) .... 180
Truck
see Vehicle
Truck key
see SmartKey
Turn signal
Changing bulbs (additional turn
signals) .......................................... 107
Turn signals
Display messages (vehicle with
steering wheel buttons) ................. 216
Display messages (vehicle with-
out steering wheel buttons) ........... 202
Replacing bulbs (front) ................... 107
Replacing bulbs (rear) .................... 108
Switching on/off ........................... 101
Trailer display messages (vehicle
with steering wheel buttons) ......... 216
Trailer display messages (vehicle
without steering wheel buttons) .... 202
Turn signals
see Turn signals
Two-way radios
Type approval/frequency .............. 304
TWR (Tongue Weight Rating) (def-
inition) ................................................ 297
Type identification plate
see Vehicle identification plate U
Unlocking Emergency unlocking
....................... 73
From inside the vehicle (central
unlocking button) ............................. 75
With emergency key element ........... 72
USB (audio)
Playing ........................................... 187 V
Vanity mirror Changing a bulb (mirror lamp)
....... 104
Sun visor ........................................ 239
Vehicle
Data acquisition ............................... 35
Display messages (vehicle with
steering wheel buttons) ................. 225
Display messages (vehicle with-
out steering wheel buttons) ........... 208
Electronics ..................................... 304
Emergency unlocking ....................... 72
Equipment ....................................... 27
Limited Warranty ............................. 27
Loading .......................................... 289
Locking (in an emergency) ............... 73
Locking (SmartKey) .......................... 71
Lowering ........................................ 300
Maintenance .................................... 28
Operating safety .............................. 30
Parking for a long period ................ 140
Pulling away ................................... 128
Raising ........................................... 298
Registration ..................................... 33
Reporting problems ......................... 32
Securing from rolling away ............ 138
Towing away .................................. 274
Transporting .................................. 276
Unlocking (in an emergency) ........... 73
Unlocking (SmartKey) ...................... 71
Vehicle battery
see Battery (vehicle)
Vehicle bodies ..................................... 33
Body/equipment mounting
directives for trucks ......................... 33
Vehicle check
see Preparing for a journey24
Index
Page 32 of 320
that takes the requirements of both nature
and humanity into account.
You too can help to protect the environment
by operating your vehicle in an environmen-
tally responsible manner.
Fuel consumption and the rate of engine,
transmission, brake and tire wear are affec-
ted by these factors:
R operating conditions of your vehicle
R your personal driving style
You can influence both factors. You should
bear the following in mind:
Operating conditions:
R avoid short trips as these increase fuel
consumption.
R always make sure that the tire pressures
are correct.
R do not carry any unnecessary weight.
R remove roof racks once you no longer
need them.
R a regularly serviced vehicle will contribute
to environmental protection. You should
therefore adhere to the service intervals.
R always have service work carried out at a
qualified specialist workshop.
Personal driving style:
R do not depress the accelerator pedal
when starting the engine.
R do not warm up the engine when the vehi-
cle is stationary.
R drive carefully and maintain a safe dis-
tance from the vehicle in front.
R avoid frequent, sudden acceleration and
braking.
R change gear in good time and use each
gear only up to Ô of its maximum engine
speed.
R switch off the engine in stationary traffic.
R keep an eye on the vehicle's fuel con-
sumption. Environmental issues and recom-
mendations
When prompted by this Operator's Manual to
dispose of materials, please try to regenerate
and recycle these materials. Observe all rele-
vant environmental guidelines and regulations
when disposing of materials. This helps to pro-
tect the environment. Operating safety and vehicle
approval
Important safety notes
G
WARNING
If you do not have the prescribed service/
maintenance work or any required repairs
carried out, this can result in malfunctions
or system failures. There is a risk of an acci-
dent.
Always have the prescribed service/mainte-
nance work as well as any required repairs
carried out at a qualified specialist work-
shop.
Airbags and pyrotechnic Emergency Tension-
ing Devices contain perchlorate material,
which may require special handling or environ-
mental protection measures. National guide-
lines must be observed during disposal.
For California, you will find further information
online at: http://www.dtsc.ca.gov Notes on driving
Damage to the vehicle may occur in the follow-
ing cases:
R The vehicle becomes grounded, e.g. on a
high curb or an unpaved road.
R You drive too fast over an obstacle, e.g. a
curb, a speed bump or a pothole in the road.
R A heavy object strikes the underbody or
chassis components.
In such situations, the body, frame, under-
body, chassis parts, wheels or tires could be
damaged without the damage being visible.
Components damaged in this way can unex-
pectedly fail or, in the case of an accident, no 30
Introduction
Page 50 of 320
back in the direction of the seat backrest,
however.
In addition, the Emergency Tensioning Device
cannot compensate for the seat position being
incorrect or for an incorrectly worn seat belt.
When triggered, seat belt force limiters help to
reduce the peak force exerted by the seat belt
on the vehicle occupant.
The belt force limiters on the front seats are
synchronized with the front air bags, which
take on a part of the deceleration force. This
helps to reduce the forces to which vehicle
occupants are subjected during an accident.
! If the front-passenger seat is not occupied,
do not engage the seat belt tongue in the
buckle on the front-passenger seat. Other-
wise, in addition to other systems, the Emer-
gency Tensioning Device could also be trig-
gered in the event of an accident and would
need to be replaced.
Important safety notes The use of seat belts and child restraint sys-
tems is required by law in:
R all 50 states
R the US territories
R the District of Columbia
R all Canadian provinces
Even where this is not required by law, all vehi-
cle occupants should correctly fasten their
seat belts before starting the journey. G
WARNING
If the seat belt is not worn correctly, it can-
not perform its intended protective function.
An incorrectly fastened seat belt can also
cause injuries, for example, in the event of
an accident or when braking or changing
direction abruptly. This poses an increased
risk of injury or even fatal injury.
Always ensure that all vehicle occupants
have their seat belts fastened correctly and
are sitting properly. The various components of the restraint sys-
tem work complementary to one another. They
can only perform their intended protective
function if all vehicle occupants:
R have correctly fastened their seat belt
(Y page
49)
R have correctly adjusted their seat and head
restraint ( Y page 87) G
WARNING
The seat belt does not offer the intended
level of protection if you have not moved the
backrest to an almost vertical position.
When braking or in the event of an accident,
you could slide underneath the seat belt and
sustain abdomen or neck injuries, for exam-
ple. This poses an increased risk of injury or
even fatal injury.
Adjust the seat properly before beginning
your journey. Always ensure that the back-
rest is in an almost vertical position and that
the shoulder section of your seat belt is
routed across the center of your shoulder. G
WARNING
Persons less than 5 ft (1.50 m) tall cannot
wear the seat belt correctly without an addi-
tional and suitable restraint system. If the
seat belt is not worn correctly, it cannot per-
form its intended protective function. An
incorrectly fastened seat belt can also cause
injuries, for example, in the event of an acci-
dent or when braking or changing direction
abruptly. This poses an increased risk of
injury or even fatal injury.
For this reason, always secure persons
under 5 ft
(1.50 m) tall in suitable additional
restraint systems.
If a child younger than twelve years old and
under 5 ft (1.50 m) in height is traveling in the
vehicle: R always secure the child in a child restraint
system suitable for this Mercedes-Benz
vehicle. The child restraint system must be
appropriate to the age, weight and size of
the child.
R ensure that you observe the instructions
and safety notes in the "Children in the vehi- 48
Occupant safety
Safety
Page 56 of 320
Occupant Classification System
(OCS)
Introduction The Occupant Classification System (OCS) cat-
egorizes the person in the front-passenger
seat. Depending on that result, the front-
passenger front air bag is either enabled or
deactivated.
The system does not deactivate:
R the side impact air bag
R the window curtain air bag
R the Emergency Tensioning Devices
Conditions To be classified correctly, the front passenger
must sit:
R with the seat belt fastened correctly
R in an almost upright position with their back
against the seat backrest
R with their feet resting on the floor, if possi-
ble
If the front passenger does not observe these
conditions, OCS may produce a false classifi-
cation, e.g. because the front passenger:
R transfers their weight by supporting them-
selves on a vehicle armrest
R sits in such a way that their weight is raised
from the seat cushion
If it is absolutely necessary to install a child
restraint system on the front-passenger seat,
be sure to observe the correct positioning of
the child restraint system. Never place objects
under or behind the child restraint system, e.g.
a cushion. The entire base of the child
restraint system must always rest on the seat
cushion of the front-passenger seat. The back-
rest of the forward-facing child restraint sys-
tem must lie as flat as possible against the
backrest of the front-passenger seat.
The child restraint system must not touch the
roof or be subjected to a load by the head
restraint. Adjust the angle of the seat backrest
and the head restraint position accordingly.
Only then can OCS be guaranteed to function
correctly. Always observe the child restraint
system manufacturer's installation and operat-
ing instructions. Occupant Classification System (OCS)
operation
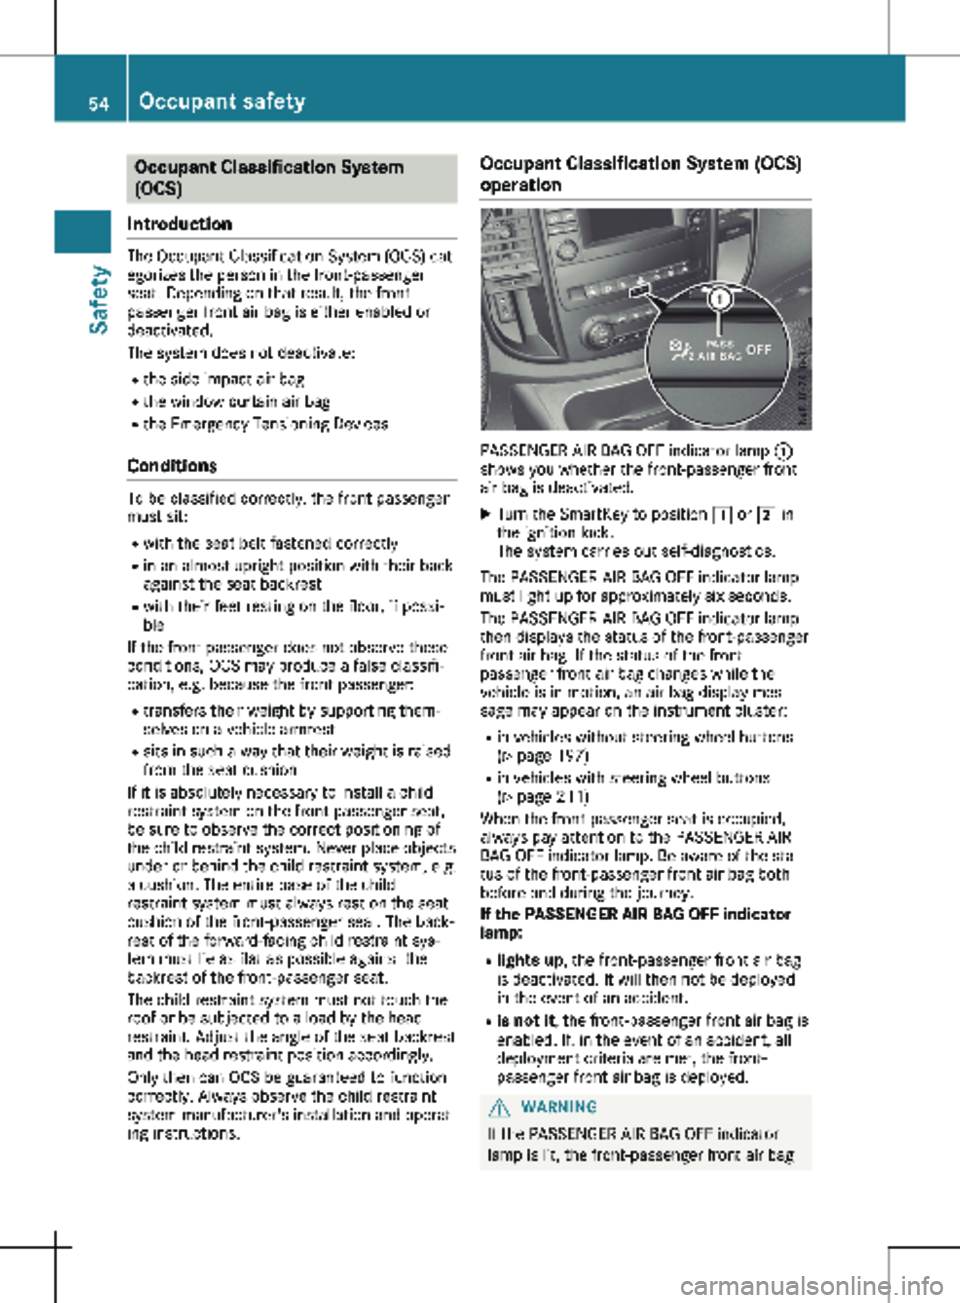
PASSENGER AIR BAG OFF indicator lamp
:
shows you whether the front-passenger front
air bag is deactivated.
X Turn the SmartKey to position 1 or 2 in
the ignition lock.
The system carries out self-diagnostics.
The PASSENGER AIR BAG OFF indicator lamp
must light up for approximately six seconds.
The PASSENGER AIR BAG OFF indicator lamp
then displays the status of the front-passenger
front air bag. If the status of the front-
passenger front air bag changes while the
vehicle is in motion, an air bag display mes-
sage may appear on the instrument cluster: R in vehicles without steering wheel buttons
(Y page
197)
R in vehicles with steering wheel buttons
(Y page 211)
When the front-passenger seat is occupied,
always pay attention to the PASSENGER AIR
BAG OFF indicator lamp. Be aware of the sta-
tus of the front-passenger front air bag both
before and during the journey.
If the PASSENGER AIR BAG OFF indicator
lamp:
R lights up, the front-passenger front air bag
is deactivated. It will then not be deployed
in the event of an accident.
R is not it , the front-passenger front air bag is
enabled. If, in the event of an accident, all
deployment criteria are met, the front-
passenger front air bag is deployed. G
WARNING
If the PASSENGER AIR BAG OFF indicator
lamp is lit, the front-passenger front air bag 54
Occupant safety
Safety
Page 60 of 320
Problem
Possible causes/consequences and
M SolutionsThe PASSENGER AIR
BAG OFF indicator lamp
lights up and remains
lit, even though the
front-passenger seat is
occupied by an adult or
a person of a stature
corresponding to that of
an adult. The classification of the person on the front-passenger seat is incor-
rect.
X Make sure the conditions for a correct classification of the per-
son on the front-passenger seat are met (Y page 54).
X If the PASSENGER AIR BAG OFF indicator lamp remains lit, the
front-passenger seat may not be used.
X Have OCS checked as soon as possible at a Mercedes-Benz Com-
mercial Van Center. The PASSENGER AIR
BAG OFF indicator lamp
does not light up
and/or does not stay
on.
The front-passenger
seat is:
R
unoccupied
R occupied by the
weight of a child up
to twelve months old
in a child restraint
system OCS is malfunctioning.
X Make sure there is nothing between the seat cushion and the
child seat.
X Make sure that the entire base of the child restraint system rests
on the seat cushion of the front-passenger seat. The backrest of
the forward-facing child restraint system must lie as flat as possi-
ble against the backrest of the front passenger seat. If necessary,
adjust the position of the front-passenger seat.
X When installing the child restraint system, make sure that the
seat belt is tight. Do not pull the seat belt tight using the front-
passenger seat adjustment. This could result in the seat belt and
the child restraint system being pulled too tightly.
X Check for correct installation of the child restraint system.
Make sure that the head restraint does not apply a load to the
child restraint system. If necessary, adjust the head restraint
accordingly.
X Make sure that no objects are applying additional weight onto the
seat.
X If the PASSENGER AIR BAG OFF indicator lamp remains off, do
not install a child restraint system on the front-passenger seat. It
is recommended that you install the child restraint system on a
suitable rear seat.
X Have OCS checked as soon as possible at a Mercedes-Benz Com-
mercial Van Center. Deployment of Emergency Tension-
ing Devices and air bags
Important safety notes G
WARNING
The air bag parts are hot after an air bag has
been deployed. There is a risk of injury.
Do not touch the air bag parts. Have a
deployed air bag replaced at a qualified spe-
cialist workshop as soon as possible. G
WARNING
A deployed air bag no longer offers any pro-
tection and cannot provide the intended pro-
tection in an accident. There is an increased
risk of injury.
Have the vehicle towed to a qualified spe-
cialist workshop in order to have a deployed
air bag replaced.
It is important for your safety and that of your
passenger to have deployed air bags replaced
and to have any malfunctioning air bags
repaired. This will help to make sure the air 58
Occupant safety
Safety
Page 62 of 320
ation is not high. Conversely, air bags may be
deployed even though the vehicle suffers only
minor deformation. This is the case if, for
example, very rigid vehicle parts such as longi-
tudinal body members are hit, and sufficient
deceleration occurs as a result.
If the restraint system control unit detects a
side impact or if the vehicle rolls over, the
applicable components of the restraint system
are deployed independently of each other
depending on the apparent type of accident.
R Side impact air bag and pelvis air bag on the
side on which an impact occurs, independ-
ent from the Emergency Tensioning Device
and seat belt usage
The side impact air bag on the front
passenger side deploys under the following
conditions:
- the OCS system detects that the front
passenger seat is occupied or
- the seat belt buckle tongue is engaged in
the belt buckle of the front passenger
seat
R Window curtain air bag on the side of
impact, independently of the use of the seat
belt and independently of whether the front-
passenger seat is occupied
R Emergency Tensioning Devices, if the sys-
tem determines that deployment can offer
additional protection in this situation
R Window curtain air bags on the driver's and
front-passenger side in certain situations
when the vehicle rolls over, if the system
determines that deployment can offer addi-
tional protection to that provided by the
seat belt
i Not all air bags are deployed in an acci-
dent. The various air bags work independ-
ently of each other.
How the air bag works is determined by the
severity of the accident detected, especially
the vehicle deceleration or acceleration and
the apparent type of accident:
R Head-on collision
R Side impact
R Rollover Automatic measures after an acci-
dent
Immediately after an accident, the following
measures are implemented, depending on the
type and severity of the impact:
R the hazard warning lamps are switched on
R the emergency lighting in the interior is acti-
vated
R the vehicle doors are unlocked
R the front side windows are lowered
R air-recirculation mode is activated
R climate control is switched off
R the engine is switched off and the fuel sup-
ply is cut off Children in the vehicle
Important safety notes
Accident statistics show that children secured
on the rear seats are safer than children
secured on the front seats. For this reason,
Mercedes-Benz strongly advises that you fit
the child restraint system to a rear seat. The
child is generally better protected there.
If a child younger than twelve years old and
under 5 ft
(1.50 m) in height is traveling in the
vehicle:
R always secure the child in a child restraint
system suitable for Mercedes-Benz vehicles.
The child restraint system must be appropri-
ate to the age, weight and size of the child.
R always observe the instructions and safety
notes in this section in addition to the child
restraint system manufacturer's instruc-
tions.
R always observe the instructions and safety
notes on the "Occupant Classification Sys-
tem (OCS)" ( Y page 54). G
WARNING
If children are left unsupervised in the vehi-
cle, they could, in particular:
R open doors, thereby endangering other
persons or road users.
R get out and be struck by oncoming traffic.
R operate vehicle equipment and become
trapped, for example.60
Children in the vehicle
Safety
Page 65 of 320
All child restraint systems must meet the fol-
lowing standards:
R U.S. Federal Motor Vehicle Safety Standards
213 and 225
R Canadian Motor Vehicle Safety Standards
213 and 210.2
Confirmation that the child restraint system
corresponds to the standards can be found on
an instruction label on the child restraint sys-
tem. This confirmation can also be found in
the installation instructions that are included
with the child restraint system.
Observe the warning labels in the vehicle inte-
rior and on the child restraint. LATCH-type (ISOFIX) child seat
securing system
G
WARNING
For LATCH-type (ISOFIX) child restraint sys-
tems in which the child is secured using the
safety belt integrated in the child restraint
system, the maximum permissible weight of
the child and child restraint system together
is 73 lbs (33 kg
).
If the child and the child restraint system
together weigh more than 73 lbs (33 kg), the
LATCH-type (ISOFIX) child restraint system
with integrated safety belt no longer offers
sufficient protection. The LATCH-type (ISO-
FIX) child seat securing system may be over-
loaded, and the child may not be restrained
in an accident, for example. This poses an
increased risk of injury or even fatal injury.
If the child and the child restraint system
together weigh more than 73 lbs (33 kg),
use only a LATCH-type (ISOFIX) child
restraint system in which the child is also
secured with the vehicle seat belt. Also
secure the child restraint system with the
Top Tether belt, if available.
Regularly check that the permissible gross
weight of the child together with the child
restraint system is still maintained.
Always comply with the manufacturer's instal-
lation and operating instructions for the child
restraint system used. Before installing a child seat, move the rear
seat backrest to an upright position. Do not
adjust the backrest of a seat with a LATCH-
type (ISOFIX) child restraint system installed.
Before every trip, make sure that the LATCH-
type (ISOFIX) child restraint system is engaged
correctly in both LATCH-type (ISOFIX) securing
rings
! When fitting the child restraint system in
vehicles with a rear bench seat, make sure
that the seat belt for the center seat does
not get trapped. Otherwise, the seat belt
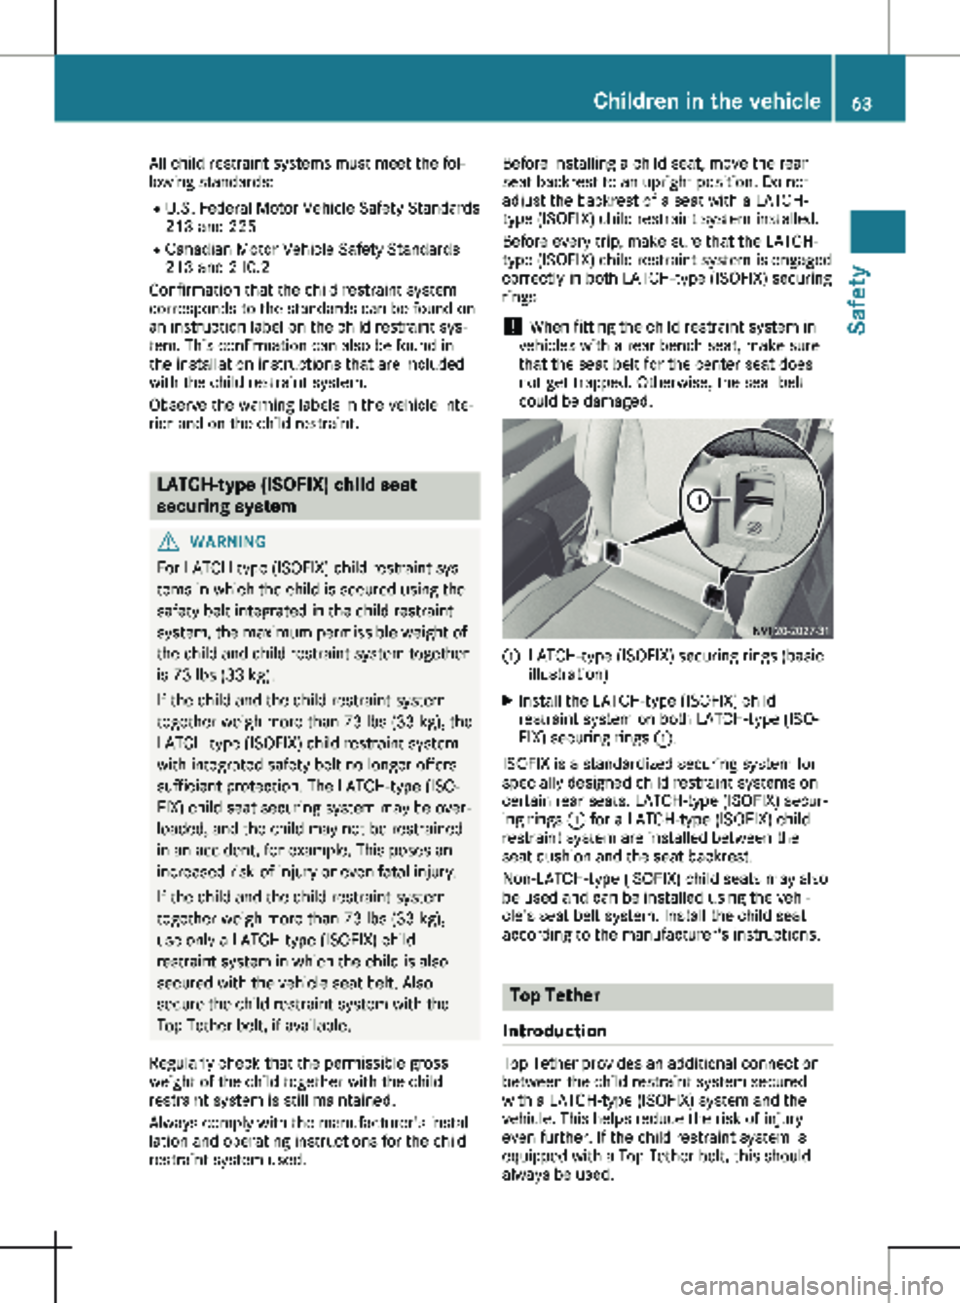
could be damaged. :
LATCH-type (ISOFIX) securing rings (basic
illustration)
X Install the LATCH-type (ISOFIX) child
restraint system on both LATCH-type (ISO-
FIX) securing rings :.
ISOFIX is a standardized securing system for
specially designed child restraint systems on
certain rear seats. LATCH-type (ISOFIX) secur-
ing rings : for a LATCH-type (ISOFIX) child
restraint system are installed between the
seat cushion and the seat backrest.
Non-LATCH-type (ISOFIX) child seats may also
be used and can be installed using the vehi-
cle's seat belt system. Install the child seat
according to the manufacturer's instructions. Top Tether
Introduction Top Tether provides an additional connection
between the child restraint system secured
with a LATCH-type (ISOFIX) system and the
vehicle. This helps reduce the risk of injury
even further. If the child restraint system is
equipped with a Top Tether belt, this should
always be used. Children in the vehicle
63
Safety Z