MERCEDES-BENZ SL ROADSTER 2012 Owners Manual
Manufacturer: MERCEDES-BENZ, Model Year: 2012, Model line: SL ROADSTER, Model: MERCEDES-BENZ SL ROADSTER 2012Pages: 637, PDF Size: 20.68 MB
Page 471 of 637
audio signal from the currently activated
audio or video source.
i Telephone conversations and navigation
announcements are not interrupted.
A display message appears in the display in all
audio operating modes.
Interrupting a traffic announcement
During a traffic announcement:
X On COMAND Onlin eor on the multifunction
steering wheel, briefly press the 8but-
ton.
or
X Press the 9,:or9 button on the
multifunction steering wheel.
COMAND Online switches back to the
audio source that was selected before the
announcement. Any subsequent new
announcements will continue to interrupt
the audio source.
Radio text/radio text plus Messages in the display
The function is available in FM mode and in
DAB radio mode.
Radio text/radio text plus consists of addi-
tionally transmitted data, e.g. information on
the current programme, which is displayed in the COMAND display.
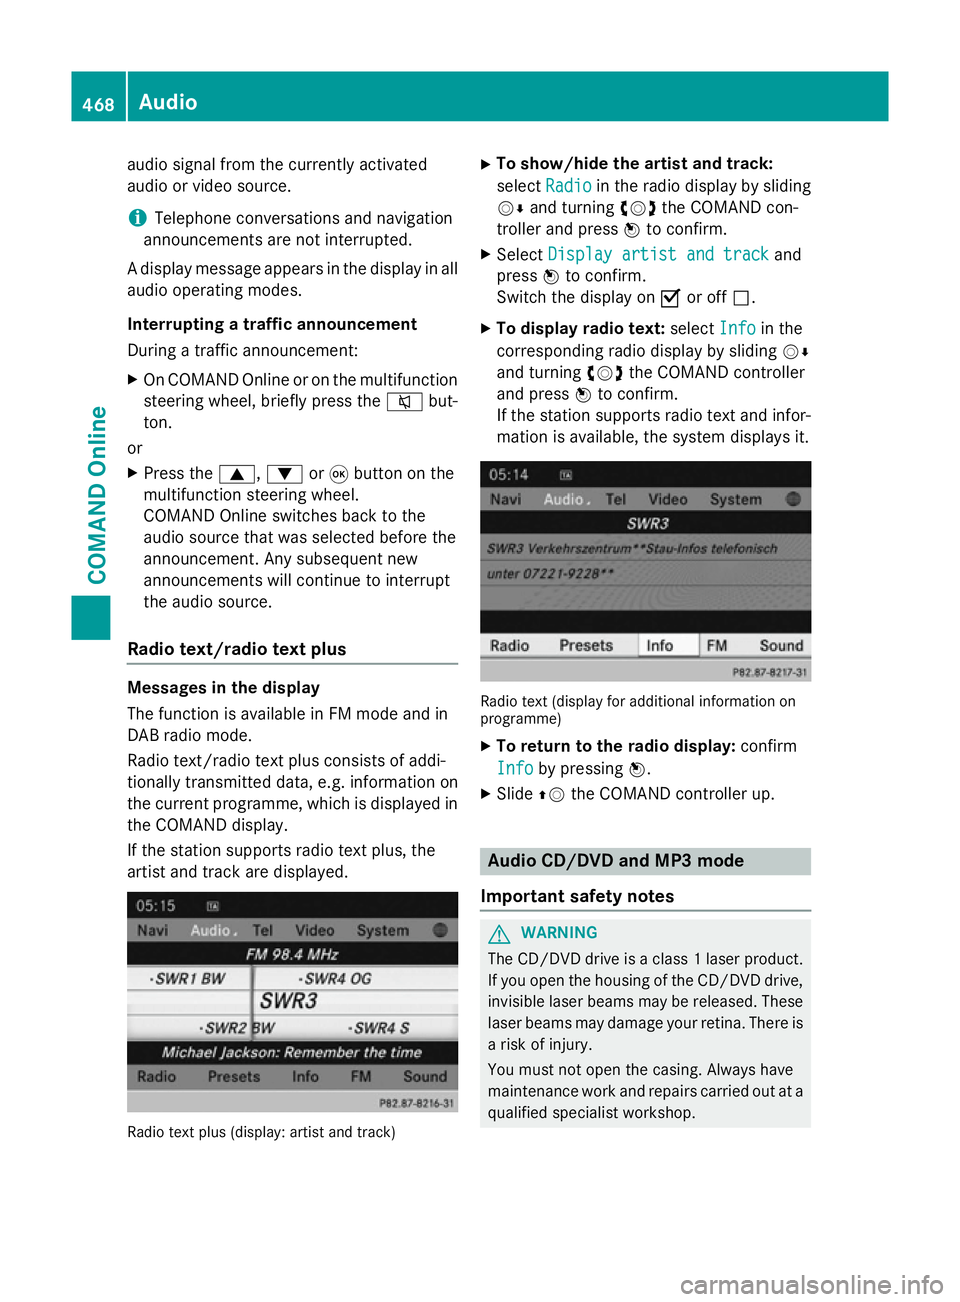
If the station supports radio text plus, the
artist and track are displayed. Radio text plus (display: artist and track) X
To show/hide the artist and track:
select Radio Radio in the radio display by sliding
VÆ and turning cVdthe COMAND con-
troller and press Wto confirm.
X Select Display artist and track
Display artist and track and
press Wto confirm.
Switch the display on Oor off ª.
X To display radio text: selectInfo
Info in the
corresponding radio display by sliding VÆ
and turning cVdthe COMAND controller
and press Wto confirm.
If the station supports radio text and infor- mation is available, the system displays it. Radio text (display for additional information on
programme)
X To return to the radio display: confirm
Info
Info by pressing W.
X Slide ZVthe COMAND controller up. Audio CD/DVD and MP3 mode
Important safety notes G
WARNING
The CD/DVD drive is a class 1 laser product. If you open the housing of the CD/DVD drive,
invisible laser beams may be released. These laser beams may damage your retina. There is
a risk of injury.
You must not open the casing. Always have
maintenance work and repairs carried out at a
qualified specialist workshop. 468
AudioCOMAND Online
Page 472 of 637
G
WARNING
Handling discs while driving will distract you
from traffic conditions. You could then lose
control of the vehicle. There is a risk of an
accident.
Handle discs only when the vehicle is station- ary.
Bear in mind that, at a speed of only 50 km/h, your vehicle is already covering a distance of
14 m per second. G
WARNING
SD memory cards are small parts. They can be swallowed and cause asphyxiation. This
poses an increased risk of injury or even fatal injury.
Keep SD memory cards out of the reach of
children. If an SD memory card is swallowed,
seek immediate medical attention.
Inserting/ejecting CDs/DVDs Notes
If the CD/DVD has a printed side, this must
face upwards when the CD/DVD is inserted.
If neither side is printed, the side to be played
should face downwards. CDs/DVDs with
copy protection may not be able to be played
by the system.
i If a medium contains other files in addi-
tion to music files, the loading time before
the first track starts to play may be longer.
Inserting a disc into the single DVD drive
X Press the 8button.
If there is a disc already inserted, it will be
ejected.
X Take the disc out of the slot.
X Insert a disc into the slot.
The disc is drawn in and playback starts if
the disc has been inserted correctly and it
is a permissible type. Ejecting a disc from the single DVD drive
X Press the 8button.
X Take the disc out of the slot.
If you do not take the disc out of the slot, it
is drawn in again automatically after a short
while and reloaded.
Inserting discs into the DVD changer
The DVD changer has a fixed magazine with
six trays. X To insert a CD/DVD into the magazine
tray: press the Vbutton.
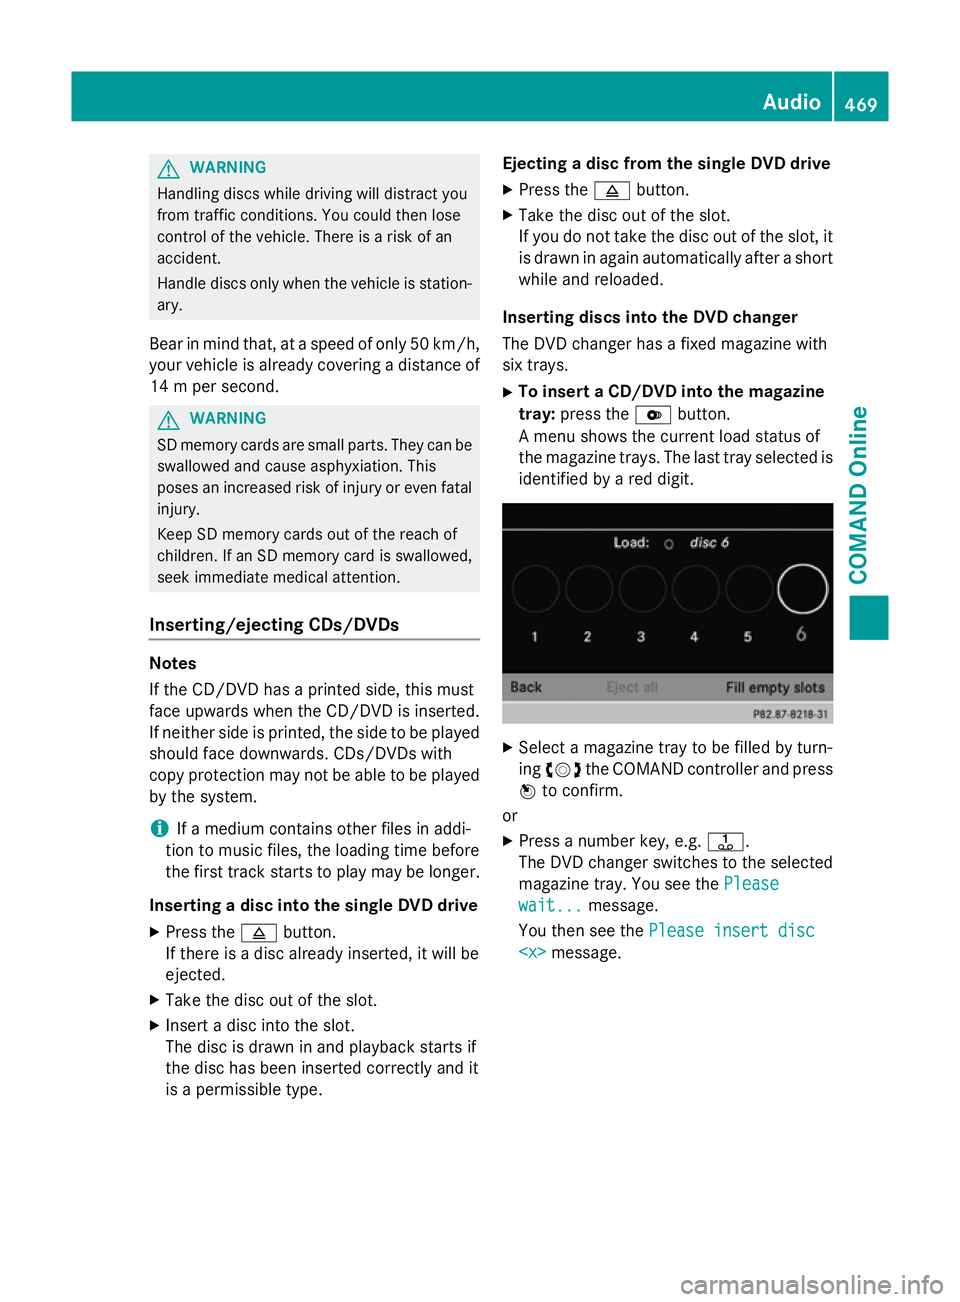
A menu shows the current load status of
the magazine trays. The last tray selected is identified by a red digit. X
Select a magazine tray to be filled by turn-
ing cVd the COMAND controller and press
W to confirm.
or
X Press a number key, e.g. j.
The DVD changer switches to the selected
magazine tray. You see the Please Please
wait...
wait... message.
You then see the Please insert disc Please insert disc
469COMAND Online Z
Page 473 of 637
X
Insert a disc into the disc slot with the prin-
ted side facing upwards.
The DVD changer loads the disc into the
selected magazine tray. The Loading Loading
disc
disc
i It may take some time for the disc to be
loaded, depending on the type of disc. If no
disc is inserted for approximately 20 sec-
onds, the display returns to the magazine
menu.
The DVD changer plays the disc if: R it has been inserted correctly
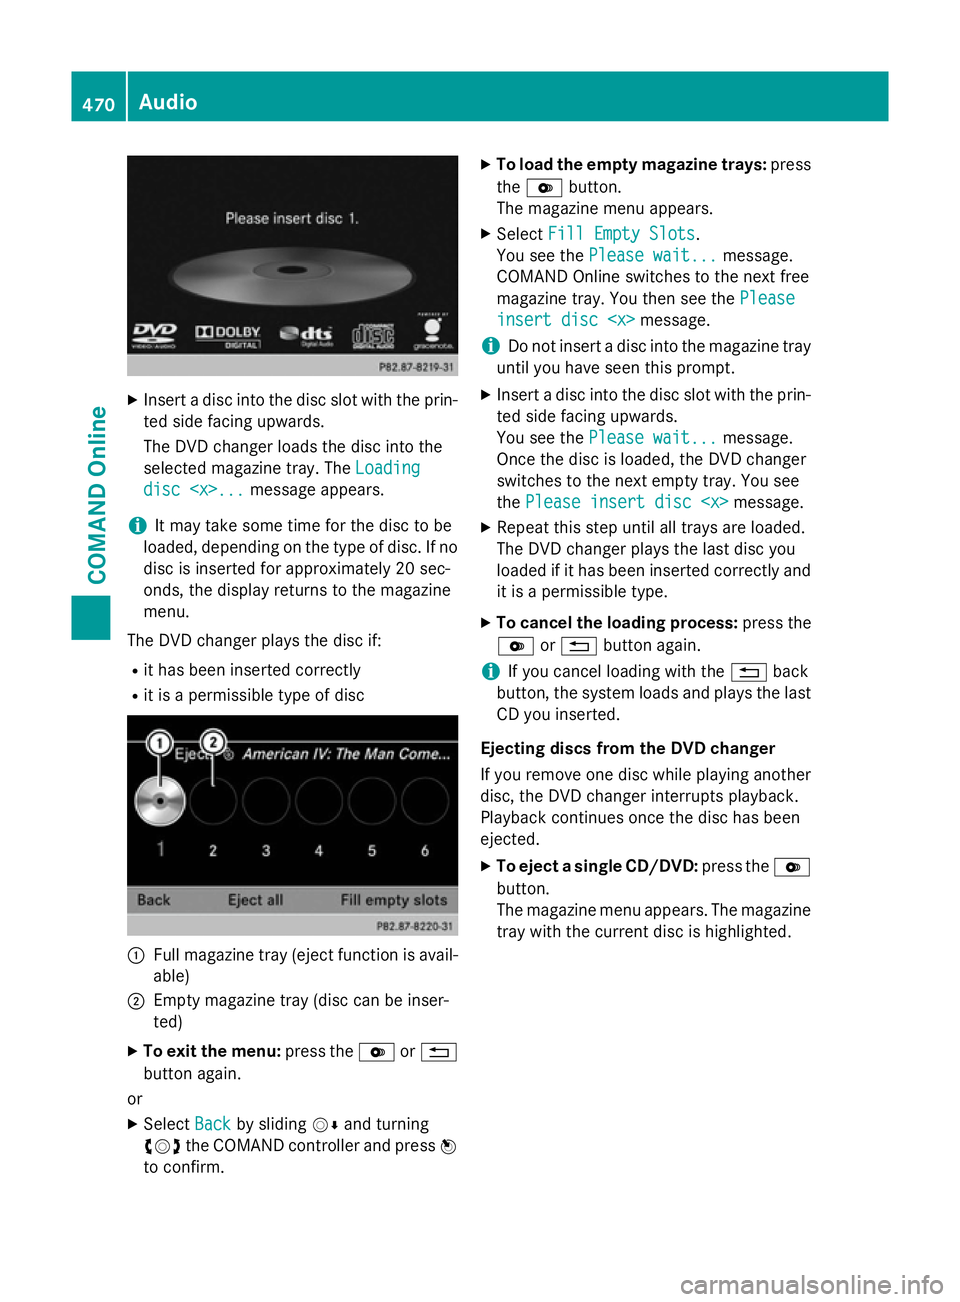
R it is a permissible type of disc :
Full magazine tray (eject function is avail-
able)
; Empty magazine tray (disc can be inser-
ted)
X To exit the menu: press theVor%
button again.
or
X Select Back Backby sliding VÆand turning
cVd the COMAND controller and press W
to confirm. X
To load the empty magazine trays: press
the V button.
The magazine menu appears.
X Select Fill Empty Slots Fill Empty Slots.
You see the Please wait...
Please wait... message.
COMAND Online switches to the next free
magazine tray. You then see the Please Please
insert disc
insert disc
i Do not insert a disc into the magazine tray
until you have seen this prompt.
X Insert a disc into the disc slot with the prin-
ted side facing upwards.
You see the Please wait... Please wait... message.
Once the disc is loaded, the DVD changer
switches to the next empty tray. You see
the Please insert disc
X Repeat this step until all trays are loaded.
The DVD changer plays the last disc you
loaded if it has been inserted correctly and it is a permissible type.
X To cancel the loading process: press the
V or% button again.
i If you cancel loading with the
%back
button, the system loads and plays the last
CD you inserted.
Ejecting discs from the DVD changer
If you remove one disc while playing another
disc, the DVD changer interrupts playback.
Playback continues once the disc has been
ejected. X To eject a single CD/DVD: press theV
button.
The magazine menu appears. The magazine tray with the current disc is highlighted. 470
AudioCOMAND Online
Page 474 of 637
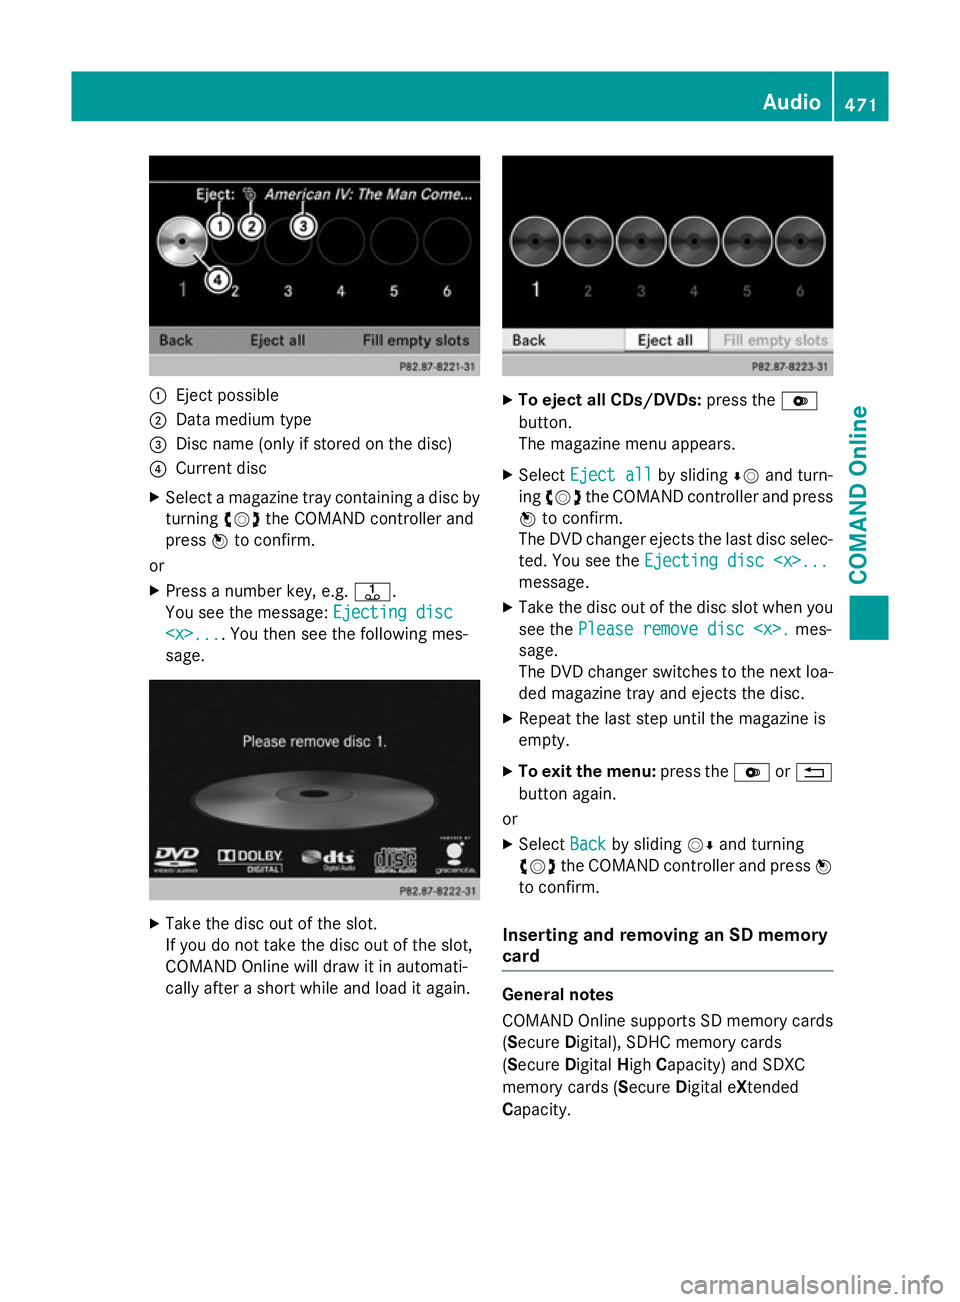
:
Eject possible
; Data medium type
= Disc name (only if stored on the disc)
? Current disc
X Select a magazine tray containing a disc by
turning cVdthe COMAND controller and
press Wto confirm.
or
X Press a number key, e.g. j.
You see the message: Ejecting disc
Ejecting disc
sage. X
Take the disc out of the slot.
If you do not take the disc out of the slot,
COMAND Online will draw it in automati-
cally after a short while and load it again. X
To eject all CDs/DVDs: press theV
button.
The magazine menu appears.
X Select Eject all Eject all by slidingÆVand turn-
ing cVd the COMAND controller and press
W to confirm.
The DVD changer ejects the last disc selec-
ted. You see the Ejecting disc
Ejecting disc
message.
X Take the disc out of the disc slot when you
see the Please remove disc
Please remove disc
sage.
The DVD changer switches to the next loa-
ded magazine tray and ejects the disc.
X Repeat the last step until the magazine is
empty.
X To exit the menu: press theVor%
button again.
or
X Select Back Backby sliding VÆand turning
cVd the COMAND controller and press W
to confirm.
Inserting and removing an SD memory
card General notes
COMAND Online supports SD memory cards
(S
ecure Digital), SDHC memory cards
(S ecure Digital HighCapacity) and SDXC
memory cards (Secure Digital eXtended
Capacity. Audio
471COMAND Online Z
Page 475 of 637
i
Not all memory cards available on the
market are designed for the temperatures
which may be reached in the vehicle.
If the SD memory card is no longer in use,
you should remove it from
COMAND Online. High temperatures can
damage the card.
Due to the wide range of SD memory cards
available on the market, playback cannot
be guaranteed for all brands of SD memory card.
The readable storage capacity depends on
the memory card used. You can obtain fur-
ther information at any Mercedes-Benz
Service Centre.
Inserting an SD memory card X Insert the memory card into the slot on the
control panel until it engages in place. The
side with the contacts must face down-
wards and point towards the slot.
If no MP3 tracks can be found, you will see
a message to this effect.
The first 100 MP3 tracks are loaded. The
first MP3 track is then played. An hourglass symbol indicates that further tracks are
being loaded in the background.
Ejecting an SD memory card
X Press the memory card.
The memory card is ejected.
X Remove the memory card from the slot.
Connecting a USB device The USB port is located in the stowage com-
partment in the centre console.
Electrical consumption at this connection
must not exceed a continuous current of
500 mA. If the electrical consumption is
higher, use a separate source to provide
power for the USB device (e.g.
12 V power supply).
X Connect the USB device (e.g. USB stick) to
the USB port.
If no MP3 tracks can be found, you will seea message to this effect. The first 100 MP3 tracks are loaded. The
first MP3 track is then played. An hourglass
symbol indicates that further tracks are
being loaded in the background.
i Due to the wide range of USB devices
available on the market, playback cannot
be guaranteed for all brands of USB device.
Information about suitable USB devices
can be obtained from a Mercedes-Benz
Service Centre.
MP3 players must support Media Transfer
Protocol (MTP). The MTP mode must be
active.
Switching to audio CD/audio DVD or
MP3 mode Inserting or connecting a data medium
X Insert CDs/DVDs (Y page 469)
or
X Inserting an SD memory card
(Y page 472)
or
X Connect a USB device (Y page 472).
COMAND loads the medium inserted and
starts to play it.
Switching on using the button X Press the hfunction button one or more
times.
By pressing the function button repeatedly,
you can change the operating mode in the
following order: R audio CD/DVD/video DVD/MP3 CD/MP3
DVD in the DVD changer or single DVD
drive (disc mode)
R memory card mode
R MUSIC REGISTER
R USB memory
R Media Interface or audio AUX mode
R operation with Bluetooth ®
audio
X Select an audio medium from the media list
(Y page 474). 472
AudioCOMAND Online
Page 476 of 637
Switching on with the audio menu
X Select Audio
Audioin the main function bar by
sliding ZVand turning cVdthe COMAND
controller and press Wto confirm.
The last active audio source is now activa-
ted.
You can activate a different audio source
using the audio menu.
X Select Audio Audioby sliding ZVand turning
cVdthe COMAND controller and press W
to confirm.
The audio menu appears.
X Select Disc
Disc, Memory Memory card
card,Music
Music Regis‐
Regis‐
ter
ter ,USB storage
USB storage orMedia Interface
Media Interface
and press Wto confirm.
This switches to the desired audio source.
X Select an audio medium from the media list
(Y page 474).
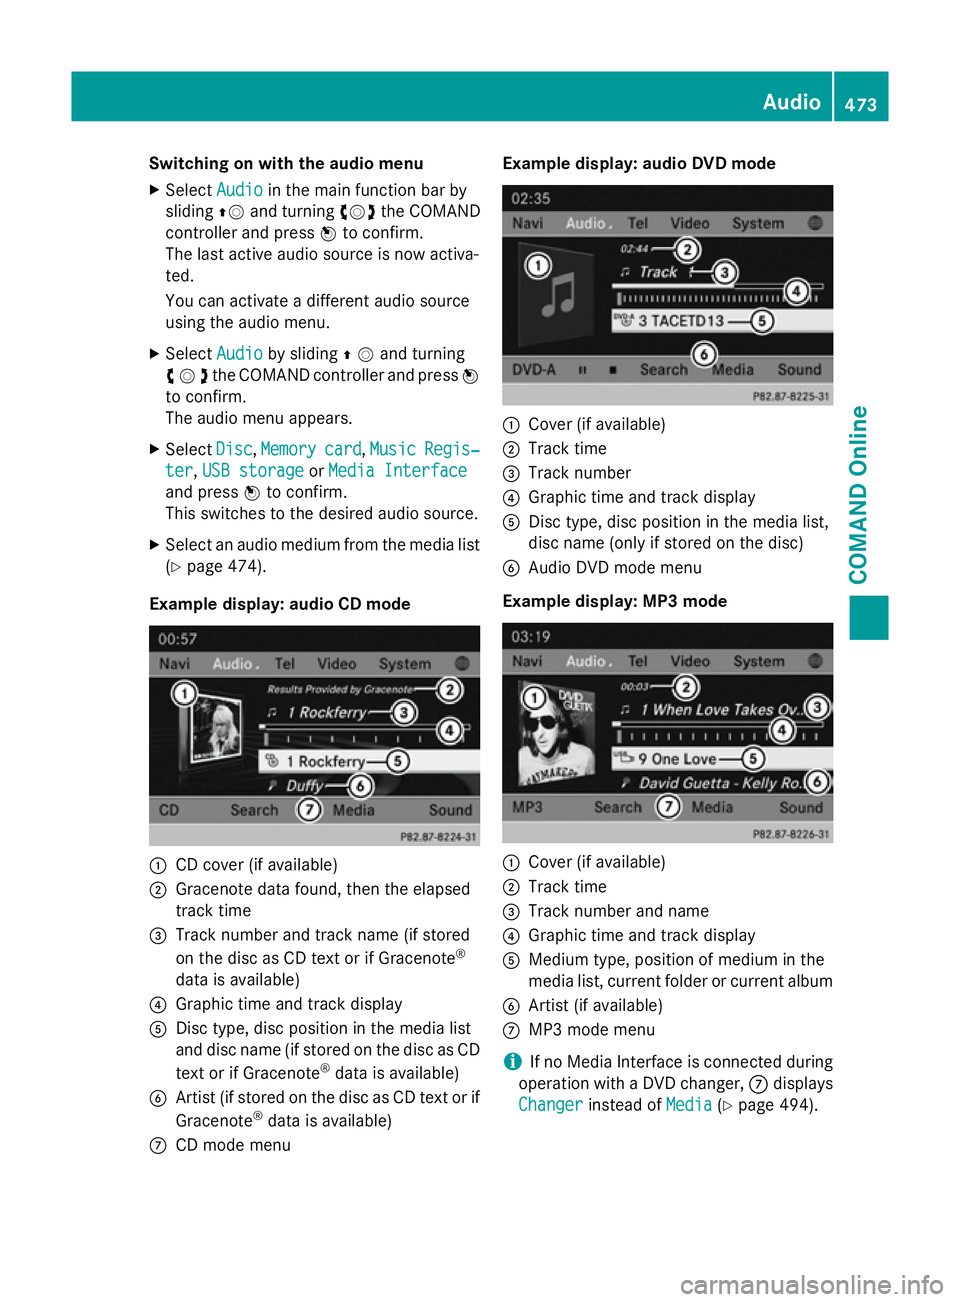
Example display: audio CD mode :
CD cover (if available)
; Gracenote data found, then the elapsed
track time
= Track number and track name (if stored
on the disc as CD text or if Gracenote ®
data is available)
? Graphic time and track display
A Disc type, disc position in the media list
and disc name (if stored on the disc as CD
text or if Gracenote ®
data is available)
B Artist (if stored on the disc as CD text or if
Gracenote ®
data is available)
C CD mode menu Example display: audio DVD mode
:
Cover (if available)
; Track time
= Track number
? Graphic time and track display
A Disc type, disc position in the media list,
disc name (only if stored on the disc)
B Audio DVD mode menu
Example display: MP3 mode :
Cover (if available)
; Track time
= Track number and name
? Graphic time and track display
A Medium type, position of medium in the
media list, current folder or current album
B Artist (if available)
C MP3 mode menu
i If no Media Interface is connected during
operation with a DVD changer, Cdisplays
Changer Changer instead of Media
Media(Ypage 494). Audio
473COMAND Online Z
Page 477 of 637
Pause function
In CD/audio DVD and MP3 mode
X To pause playback: briefly press the8
button.
The , symbol appears at the top left in
the status bar.
X To continue playback: briefly press the
8 button again.
The , symbol disappears.
Only in audio DVD mode
X To pause playback: switch on audio DVD
mode (Y page 472).
X Select Ëby sliding VÆand turning
cVd the COMAND controller and press W
to confirm.
The Ë symbol changes to Ì.
X To continue playback: selectÌand
press Wto confirm.
Playback continues from the point where it
was interrupted. The Ìsymbol changes
to Ë.
Stop function This function is only available in audio DVD
mode.
X Switch on audio DVD mode (Y page 472).
X To interrupt playback: selectÉby
sliding VÆand turning cVdthe COMAND
controller and press Wto confirm.
The Ë symbol changes to Ì. The
É symbol remains highlighted.
X To continue playback: selectÌand
press Wto confirm.
Playback continues from the point where it
was interrupted.
X To stop playback: while playback is inter-
rupted, select Éagain and press Wto
confirm.
or
X Select Éand confirm by pressing W
twice in rapid succession.
Ì is highlighted. X
To restart playback: selectÌand
press Wto confirm.
Playback starts at the beginning of the
DVD.
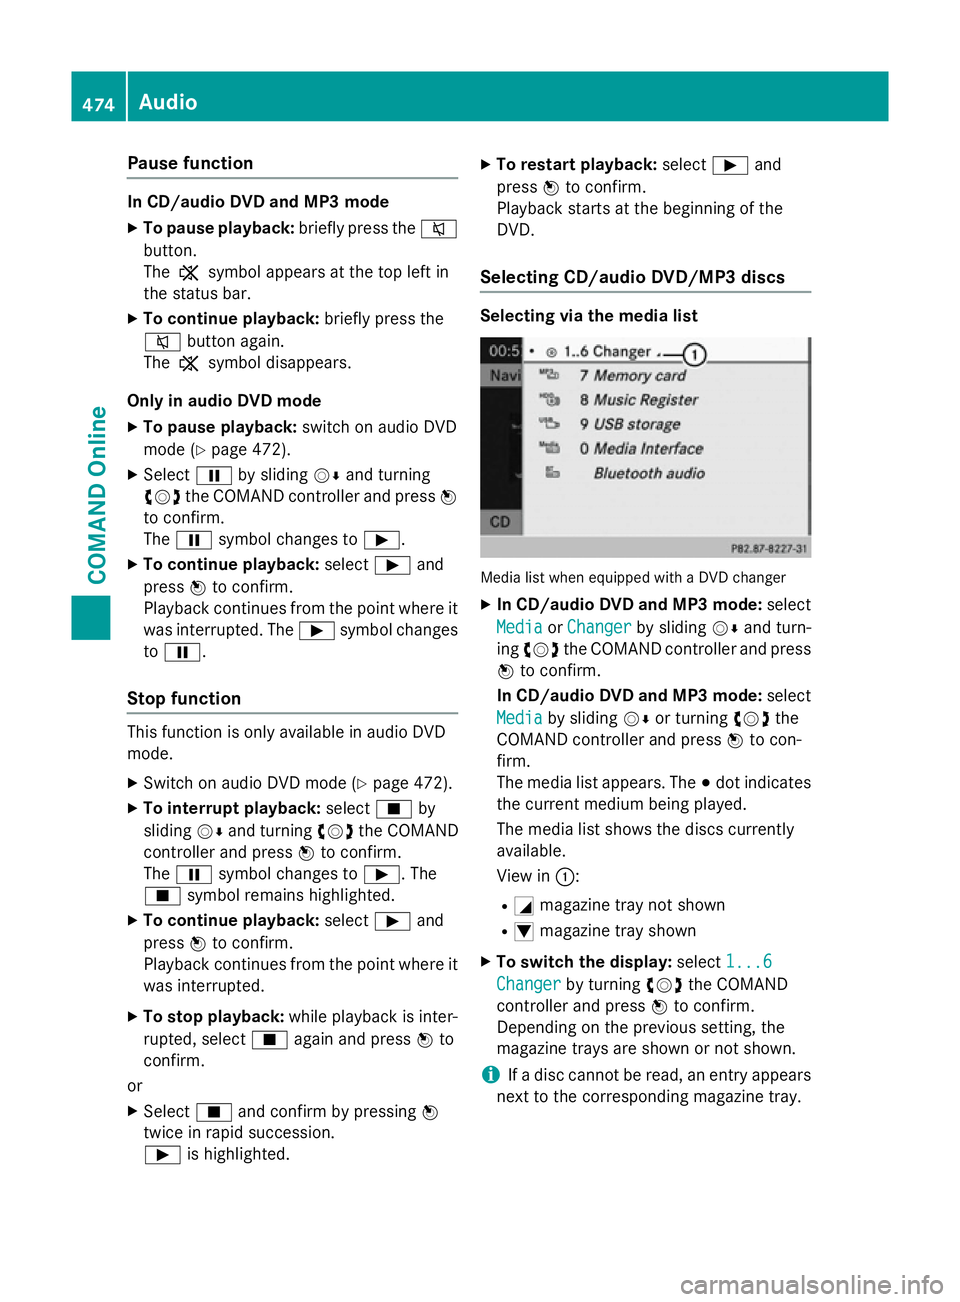
Selecting CD/audio DVD/MP3 discs Selecting via the media list
Media list when equipped with a DVD changer
X In CD/audio DVD and MP3 mode: select
Media Media orChanger
Changer by sliding VÆand turn-
ing cVd the COMAND controller and press
W to confirm.
In CD/audio DVD and MP3 mode: select
Media
Media by sliding VÆor turning cVdthe
COMAND controller and press Wto con-
firm.
The media list appears. The #dot indicates
the current medium being played.
The media list shows the discs currently
available.
View in ::
R G magazine tray not shown
R I magazine tray shown
X To switch the display: select1...6 1...6
Changer
Changer by turning cVdthe COMAND
controller and press Wto confirm.
Depending on the previous setting, the
magazine trays are shown or not shown.
i If a disc cannot be read, an entry appears
next to the corresponding magazine tray. 474
AudioCOMAND Online
Page 478 of 637
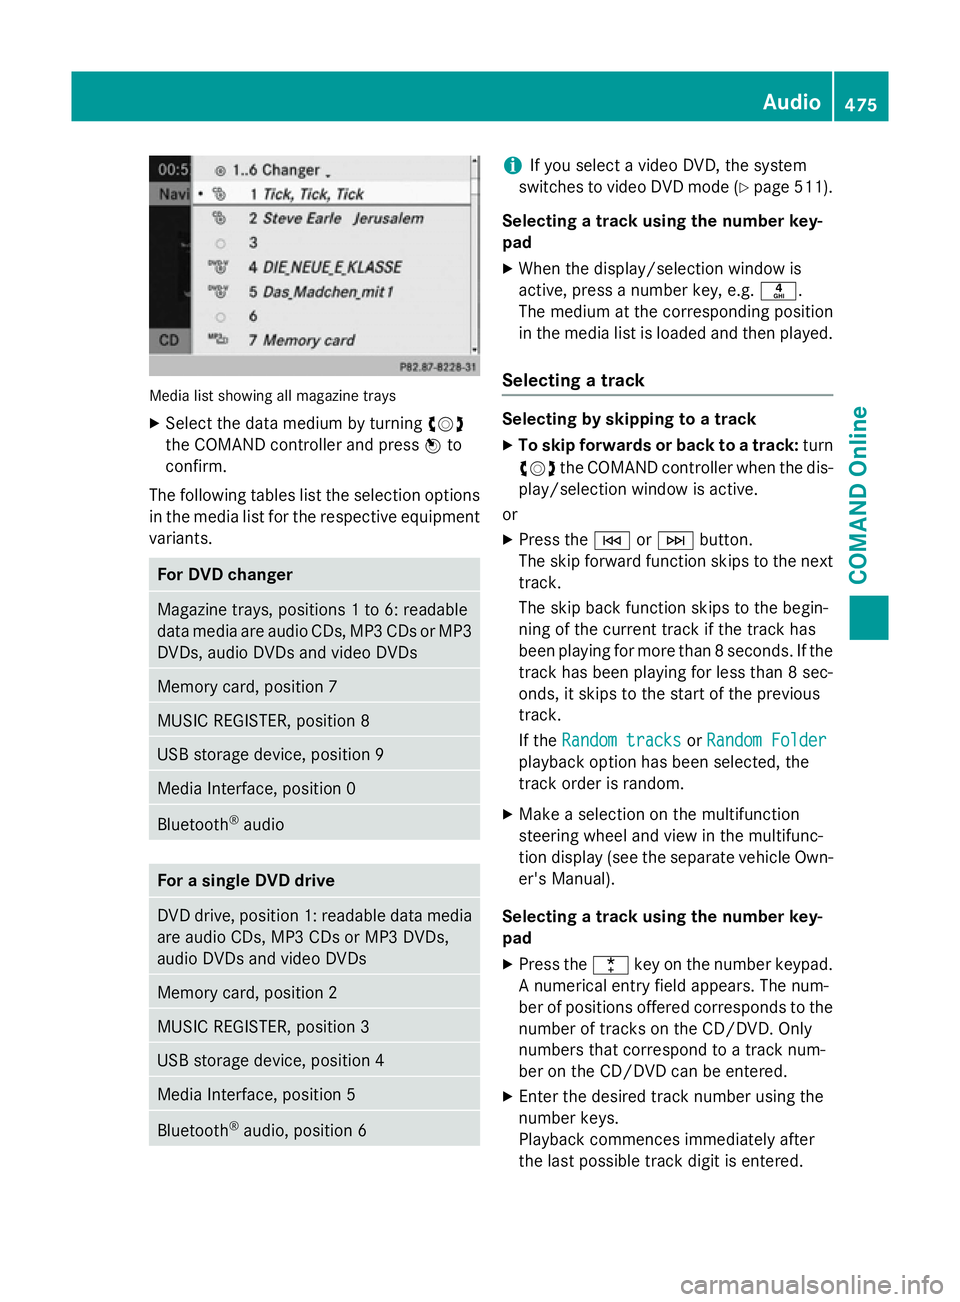
Media list showing all magazine trays
X Select the data medium by turning cVd
the COMAND controller and press Wto
confirm.
The following tables list the selection options
in the media list for the respective equipment variants. For DVD changer
Magazine trays, positions 1 to 6: readable
data media are audio CDs, MP3 CDs or MP3 DVDs, audio DVDs and video DVDs Memory card, position 7
MUSIC REGISTER, position 8
USB storage device, position 9
Media Interface, position 0
Bluetooth
®
audio For a single DVD drive
DVD drive, position 1: readable data media
are audio CDs, MP3 CDs or MP3 DVDs,
audio DVDs and video DVDs Memory card, position 2
MUSIC REGISTER, position 3
USB storage device, position 4
Media Interface, position 5
Bluetooth
®
audio, position 6 i
If you select a video DVD, the system
switches to video DVD mode (Y page 511).
Selecting a track using the number key-
pad X When the display/selection window is
active, press a number key, e.g. n.
The medium at the corresponding position
in the media list is loaded and then played.
Selecting a track Selecting by skipping to a track
X To skip forwards or back to a track: turn
cVd the COMAND controller when the dis-
play/selection window is active.
or
X Press the EorF button.
The skip forward function skips to the next track.
The skip back function skips to the begin-
ning of the current track if the track has
been playing for more than 8 seconds. If the
track has been playing for less than 8 sec-
onds, it skips to the start of the previous
track.
If the Random tracks Random tracks orRandom Folder
Random Folder
playback option has been selected, the
track order is random.
X Make a selection on the multifunction
steering wheel and view in the multifunc-
tion display (see the separate vehicle Own-
er's Manual).
Selecting a track using the number key-
pad X Press the ¯key on the number keypad.
A numerical entry field appears. The num-
ber of positions offered corresponds to the
number of tracks on the CD/DVD. Only
numbers that correspond to a track num-
ber on the CD/DVD can be entered.
X Enter the desired track number using the
number keys.
Playback commences immediately after
the last possible track digit is entered. Audio
475COMAND Online Z
Page 479 of 637
i
Pressing and holding a number key for
more than 2 seconds completes the entry
and the corresponding track is played.
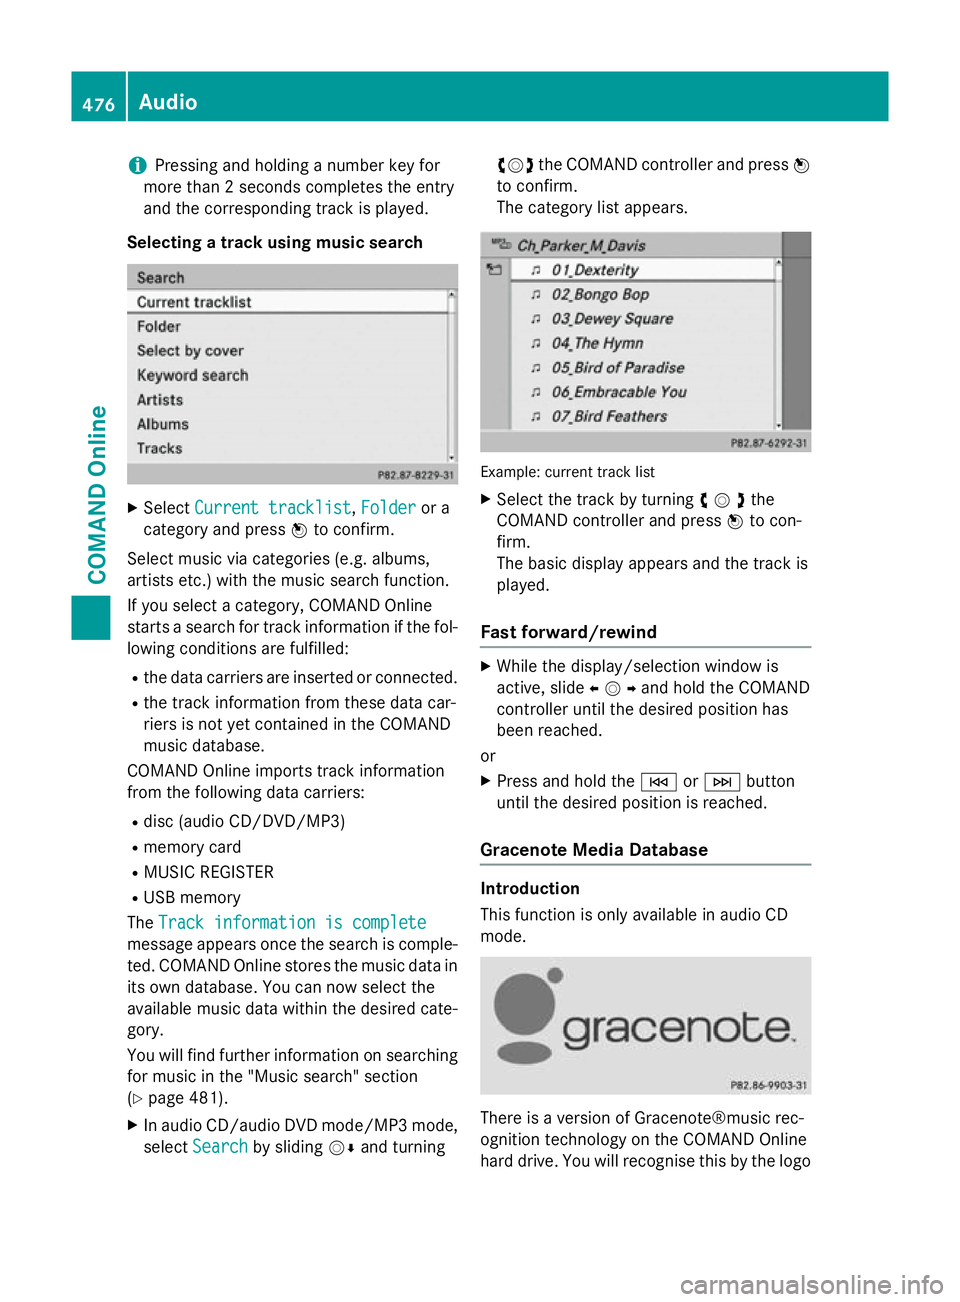
Selecting a track using music search X
Select Current tracklist
Current tracklist ,Folder
Folder or a
category and press Wto confirm.
Select music via categories (e.g. albums,
artists etc.) with the music search function.
If you select a category, COMAND Online
starts a search for track information if the fol-
lowing conditions are fulfilled:
R the data carriers are inserted or connected.
R the track information from these data car-
riers is not yet contained in the COMAND
music database.
COMAND Online imports track information
from the following data carriers:
R disc (audio CD/DVD/MP3)
R memory card
R MUSIC REGISTER
R USB memory
The Track information is complete
Track information is complete
message appears once the search is comple-
ted. COMAND Online stores the music data in its own database. You can now select the
available music data within the desired cate-
gory.
You will find further information on searching
for music in the "Music search" section
(Y page 481).
X In audio CD/audio DVD mode/MP3 mode,
select Search
Search by sliding VÆand turning cVd
the COMAND controller and press W
to confirm.
The category list appears. Example: current track list
X Select the track by turning cVdthe
COMAND controller and press Wto con-
firm.
The basic display appears and the track is
played.
Fast forward/rewind X
While the display/selection window is
active, slide XVYand hold the COMAND
controller until the desired position has
been reached.
or X Press and hold the EorF button
until the desired position is reached.
Gracenote Media Database Introduction
This function is only available in audio CD
mode.
There is a version of Gracenote®music rec-
ognition technology on the COMAND Online
hard drive. You will recognise this by the logo 476
AudioCOMAND Online
Page 480 of 637
in the bottom right-hand corner of certain
audio displays.
Many audio CDs contain CD text.
COMAND Online uses the information con-
tained therein to display the artist, album and track name.
If the audio CD does not contain any CD text
information, COMAND Online can use the
Gracenote ®
Media Database to identify
unknown audio tracks when in audio CD
mode. This is only possible if the relevant
information is saved in the Gracenote Media
Database and if the Gracenote Media Data-
base function is activated.
If this is the case, COMAND Online will display
the corresponding data such as artist, album
and track name in the relevant displays and
lists.
Selecting Gracenote ®
data to be displayed X
Switch on audio CD mode (Y page 472).
X Select CD
CD by sliding VÆand turning cVd
the COMAND controller and press Wto
confirm.
X Select Gracenote Media Database
Gracenote Media Database by
turning cVdthe COMAND controller and
press Wto confirm.
A menu appears.
The #dot indicates the current selection
for the display.
If several entries exist for the CD of a partic-
ular artist, you can select which of the entries
should be shown.
If the inserted CD does not contain any
Gracenote® data, the Gracenote Media
Gracenote Media Database Database
menu item is shown in grey and
cannot be selected.
X Select an entry by turning cVdthe
COMAND controller and press Wto con-
firm.
Switching the Gracenote ®
data display
on/off
X Switch on audio CD mode (Y page 472).
X Select CD
CDby sliding VÆand turning cVd
the COMAND controller and press Wto
confirm.
X Select Gracenote Media Database
Gracenote Media Database by
turning cVdthe COMAND controller and
press Wto confirm.
X To switch off the display: selectNone
Noneand
press Wto confirm.
In the basic display, Track 1
Track 1,Track 2
Track 2etc.
are shown instead of the Gracenote ®
data,
for example (Y page 473).
X To switch on the display: select an entry
in the menu by turning cVdthe COMAND
controller and press Wto confirm.
Updating Gracenote ®
music recognition
technology and the Gracenote Media
Database
Due to the release of new CDs, the digital data
on the Gracenote Media Database must be
updated. Optimum functionality can only be
attained with up-to-date Gracenote ®
music
recognition technology. Information about
new versions can be obtained from a
Mercedes-Benz Service Centre.
You can have your music recognition soft-
ware updated there with a DVD, or you can
update it yourself.
i The Gracenote Media Database is upda-
ted in conjunction with the navigation sys-
tem's digital map (Y page 382). Audio
477COMAND Online Z