MERCEDES-BENZ SPRINTER 2006 Service Manual
Manufacturer: MERCEDES-BENZ, Model Year: 2006, Model line: SPRINTER, Model: MERCEDES-BENZ SPRINTER 2006Pages: 2305, PDF Size: 48.12 MB
Page 2121 of 2305
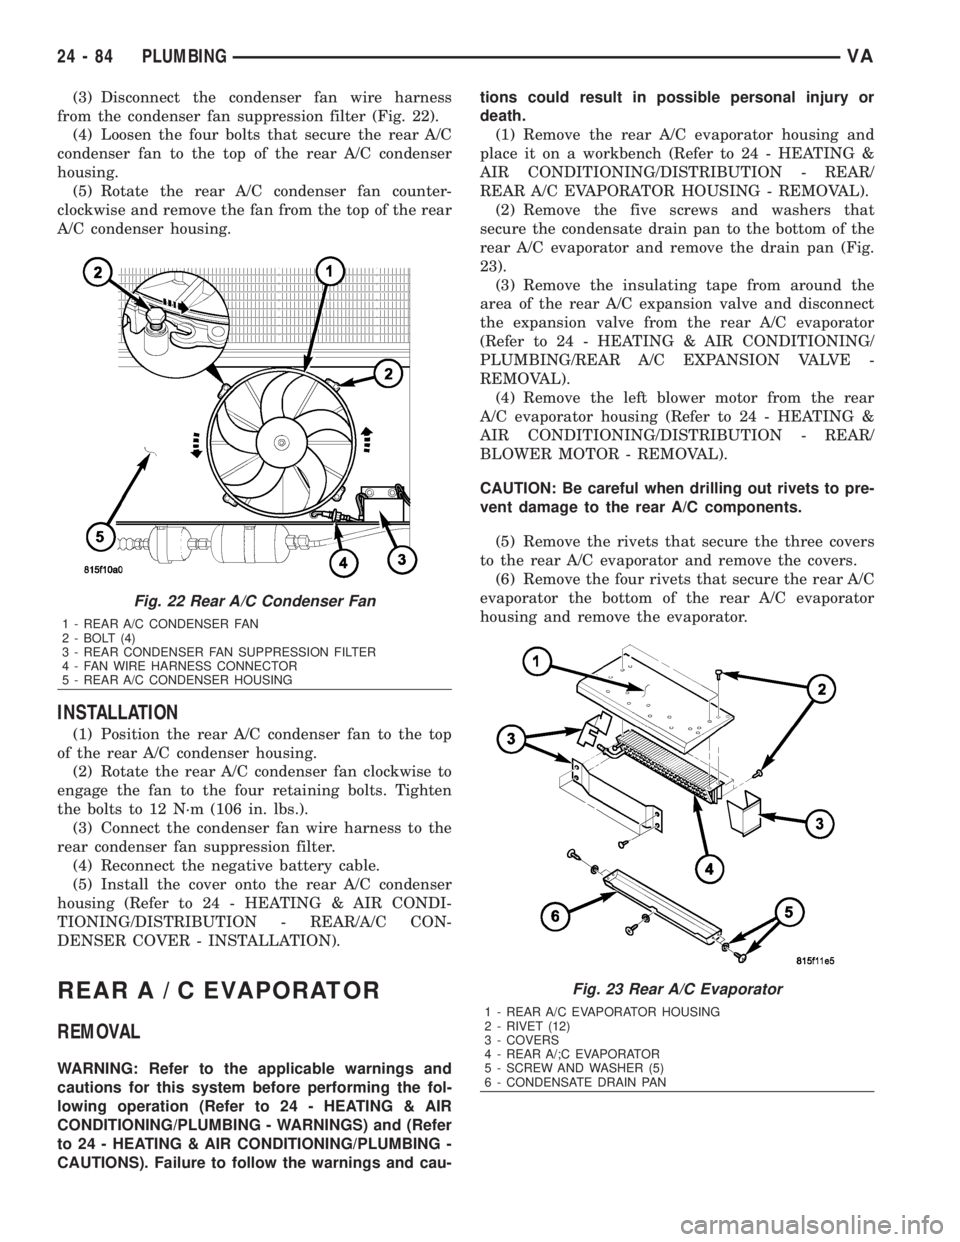
(3) Disconnect the condenser fan wire harness
from the condenser fan suppression filter (Fig. 22).
(4) Loosen the four bolts that secure the rear A/C
condenser fan to the top of the rear A/C condenser
housing.
(5) Rotate the rear A/C condenser fan counter-
clockwise and remove the fan from the top of the rear
A/C condenser housing.
INSTALLATION
(1) Position the rear A/C condenser fan to the top
of the rear A/C condenser housing.
(2) Rotate the rear A/C condenser fan clockwise to
engage the fan to the four retaining bolts. Tighten
the bolts to 12 N´m (106 in. lbs.).
(3) Connect the condenser fan wire harness to the
rear condenser fan suppression filter.
(4) Reconnect the negative battery cable.
(5) Install the cover onto the rear A/C condenser
housing (Refer to 24 - HEATING & AIR CONDI-
TIONING/DISTRIBUTION - REAR/A/C CON-
DENSER COVER - INSTALLATION).
REARA/CEVAPORATOR
REMOVAL
WARNING: Refer to the applicable warnings and
cautions for this system before performing the fol-
lowing operation (Refer to 24 - HEATING & AIR
CONDITIONING/PLUMBING - WARNINGS) and (Refer
to 24 - HEATING & AIR CONDITIONING/PLUMBING -
CAUTIONS). Failure to follow the warnings and cau-tions could result in possible personal injury or
death.
(1) Remove the rear A/C evaporator housing and
place it on a workbench (Refer to 24 - HEATING &
AIR CONDITIONING/DISTRIBUTION - REAR/
REAR A/C EVAPORATOR HOUSING - REMOVAL).
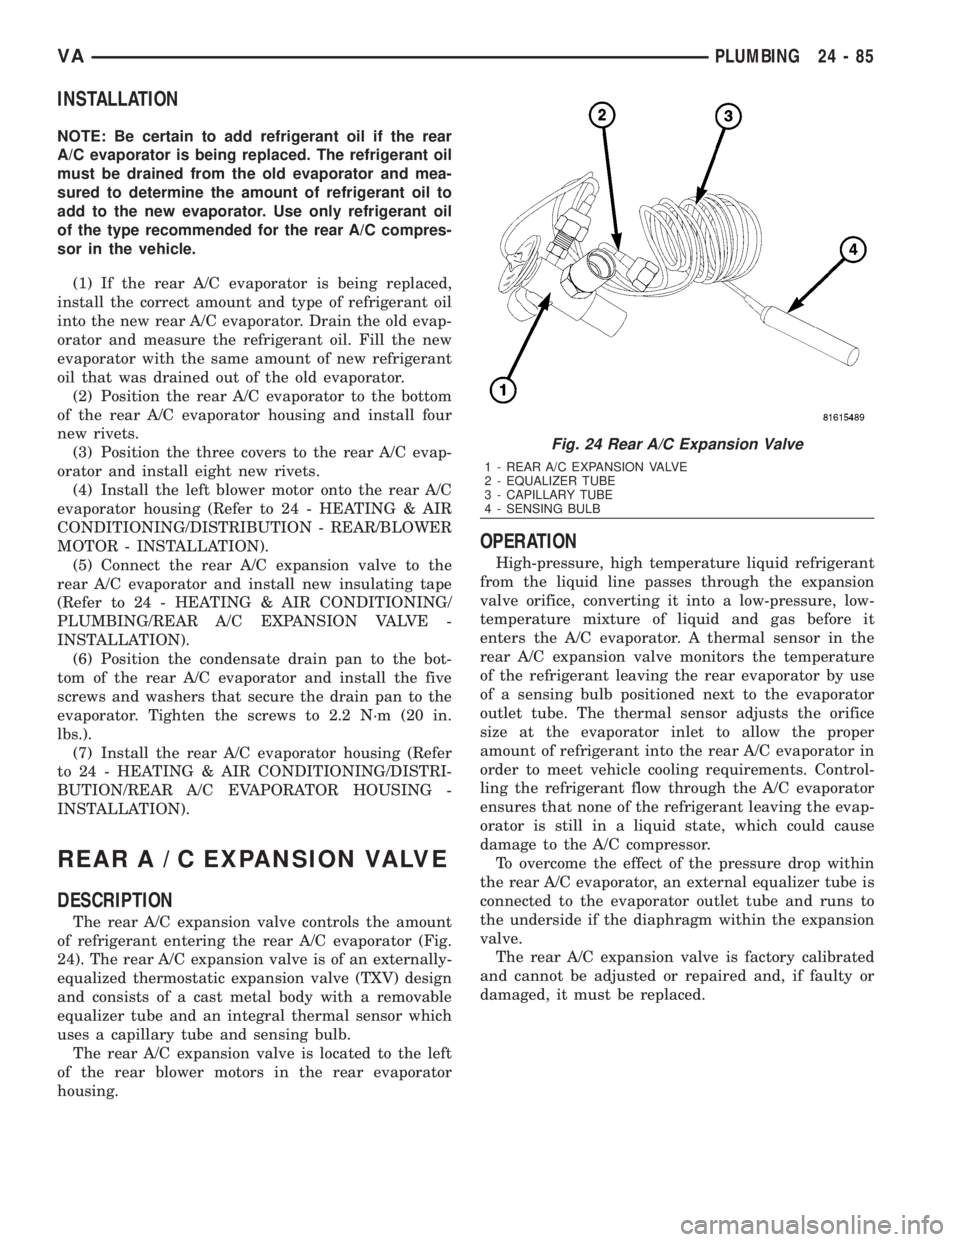
(2) Remove the five screws and washers that
secure the condensate drain pan to the bottom of the
rear A/C evaporator and remove the drain pan (Fig.
23).
(3) Remove the insulating tape from around the
area of the rear A/C expansion valve and disconnect
the expansion valve from the rear A/C evaporator
(Refer to 24 - HEATING & AIR CONDITIONING/
PLUMBING/REAR A/C EXPANSION VALVE -
REMOVAL).
(4) Remove the left blower motor from the rear
A/C evaporator housing (Refer to 24 - HEATING &
AIR CONDITIONING/DISTRIBUTION - REAR/
BLOWER MOTOR - REMOVAL).
CAUTION: Be careful when drilling out rivets to pre-
vent damage to the rear A/C components.
(5) Remove the rivets that secure the three covers
to the rear A/C evaporator and remove the covers.
(6) Remove the four rivets that secure the rear A/C
evaporator the bottom of the rear A/C evaporator
housing and remove the evaporator.
Fig. 22 Rear A/C Condenser Fan
1 - REAR A/C CONDENSER FAN
2 - BOLT (4)
3 - REAR CONDENSER FAN SUPPRESSION FILTER
4 - FAN WIRE HARNESS CONNECTOR
5 - REAR A/C CONDENSER HOUSING
Fig. 23 Rear A/C Evaporator
1 - REAR A/C EVAPORATOR HOUSING
2 - RIVET (12)
3 - COVERS
4 - REAR A/;C EVAPORATOR
5 - SCREW AND WASHER (5)
6 - CONDENSATE DRAIN PAN
24 - 84 PLUMBINGVA
Page 2122 of 2305
INSTALLATION
NOTE: Be certain to add refrigerant oil if the rear
A/C evaporator is being replaced. The refrigerant oil
must be drained from the old evaporator and mea-
sured to determine the amount of refrigerant oil to
add to the new evaporator. Use only refrigerant oil
of the type recommended for the rear A/C compres-
sor in the vehicle.
(1) If the rear A/C evaporator is being replaced,
install the correct amount and type of refrigerant oil
into the new rear A/C evaporator. Drain the old evap-
orator and measure the refrigerant oil. Fill the new
evaporator with the same amount of new refrigerant
oil that was drained out of the old evaporator.
(2) Position the rear A/C evaporator to the bottom
of the rear A/C evaporator housing and install four
new rivets.
(3) Position the three covers to the rear A/C evap-
orator and install eight new rivets.
(4) Install the left blower motor onto the rear A/C
evaporator housing (Refer to 24 - HEATING & AIR
CONDITIONING/DISTRIBUTION - REAR/BLOWER
MOTOR - INSTALLATION).
(5) Connect the rear A/C expansion valve to the
rear A/C evaporator and install new insulating tape
(Refer to 24 - HEATING & AIR CONDITIONING/
PLUMBING/REAR A/C EXPANSION VALVE -
INSTALLATION).
(6) Position the condensate drain pan to the bot-
tom of the rear A/C evaporator and install the five
screws and washers that secure the drain pan to the
evaporator. Tighten the screws to 2.2 N´m (20 in.
lbs.).
(7) Install the rear A/C evaporator housing (Refer
to 24 - HEATING & AIR CONDITIONING/DISTRI-
BUTION/REAR A/C EVAPORATOR HOUSING -
INSTALLATION).
REARA/CEXPANSION VALVE
DESCRIPTION
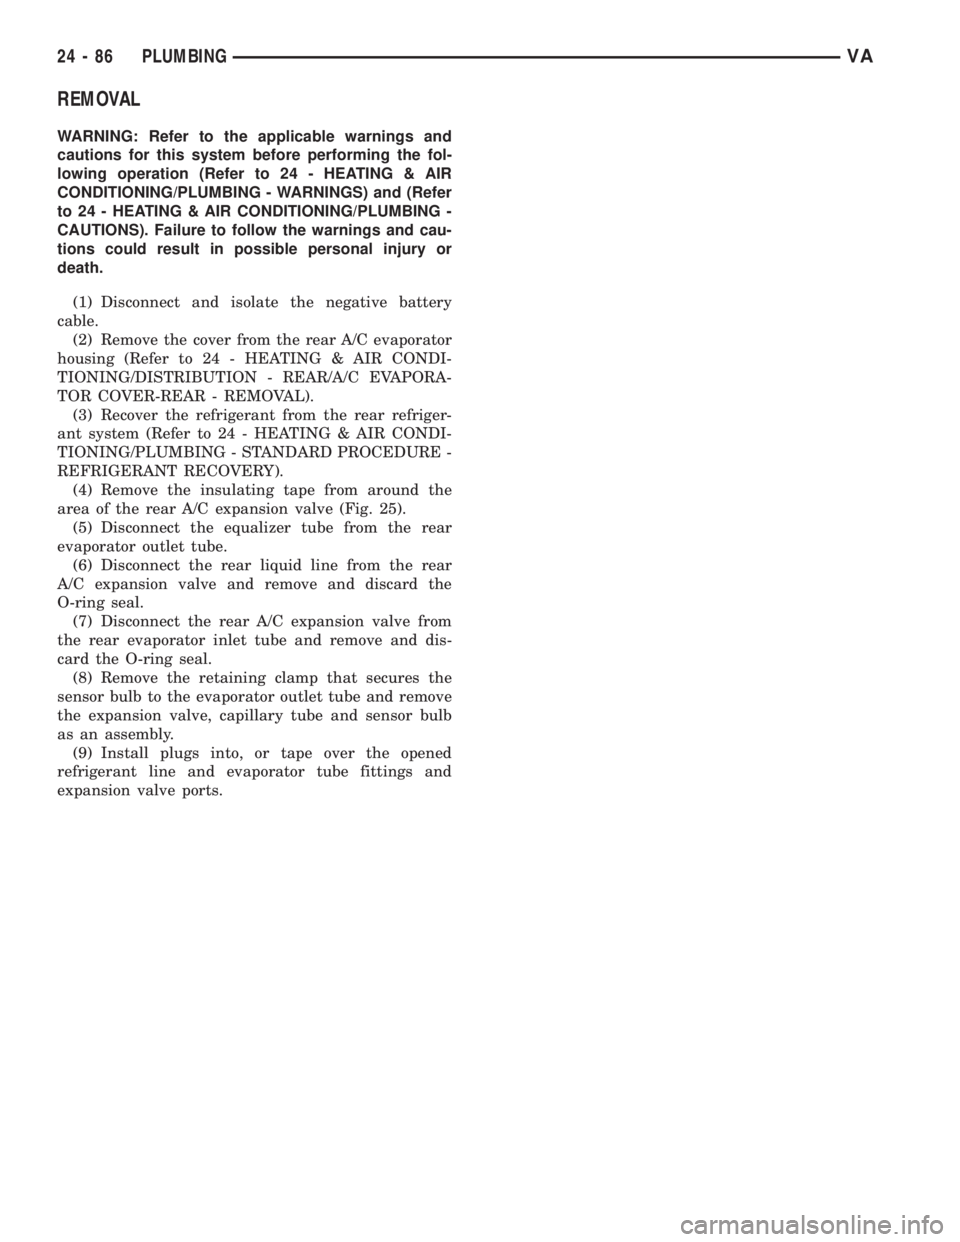
The rear A/C expansion valve controls the amount
of refrigerant entering the rear A/C evaporator (Fig.
24). The rear A/C expansion valve is of an externally-
equalized thermostatic expansion valve (TXV) design
and consists of a cast metal body with a removable
equalizer tube and an integral thermal sensor which
uses a capillary tube and sensing bulb.
The rear A/C expansion valve is located to the left
of the rear blower motors in the rear evaporator
housing.
OPERATION
High-pressure, high temperature liquid refrigerant
from the liquid line passes through the expansion
valve orifice, converting it into a low-pressure, low-
temperature mixture of liquid and gas before it
enters the A/C evaporator. A thermal sensor in the
rear A/C expansion valve monitors the temperature
of the refrigerant leaving the rear evaporator by use
of a sensing bulb positioned next to the evaporator
outlet tube. The thermal sensor adjusts the orifice
size at the evaporator inlet to allow the proper
amount of refrigerant into the rear A/C evaporator in
order to meet vehicle cooling requirements. Control-
ling the refrigerant flow through the A/C evaporator
ensures that none of the refrigerant leaving the evap-
orator is still in a liquid state, which could cause
damage to the A/C compressor.
To overcome the effect of the pressure drop within
the rear A/C evaporator, an external equalizer tube is
connected to the evaporator outlet tube and runs to
the underside if the diaphragm within the expansion
valve.
The rear A/C expansion valve is factory calibrated
and cannot be adjusted or repaired and, if faulty or
damaged, it must be replaced.
Fig. 24 Rear A/C Expansion Valve
1 - REAR A/C EXPANSION VALVE
2 - EQUALIZER TUBE
3 - CAPILLARY TUBE
4 - SENSING BULB
VAPLUMBING 24 - 85
Page 2123 of 2305
REMOVAL
WARNING: Refer to the applicable warnings and
cautions for this system before performing the fol-
lowing operation (Refer to 24 - HEATING & AIR
CONDITIONING/PLUMBING - WARNINGS) and (Refer
to 24 - HEATING & AIR CONDITIONING/PLUMBING -
CAUTIONS). Failure to follow the warnings and cau-
tions could result in possible personal injury or
death.
(1) Disconnect and isolate the negative battery
cable.
(2) Remove the cover from the rear A/C evaporator
housing (Refer to 24 - HEATING & AIR CONDI-
TIONING/DISTRIBUTION - REAR/A/C EVAPORA-
TOR COVER-REAR - REMOVAL).
(3) Recover the refrigerant from the rear refriger-
ant system (Refer to 24 - HEATING & AIR CONDI-
TIONING/PLUMBING - STANDARD PROCEDURE -
REFRIGERANT RECOVERY).
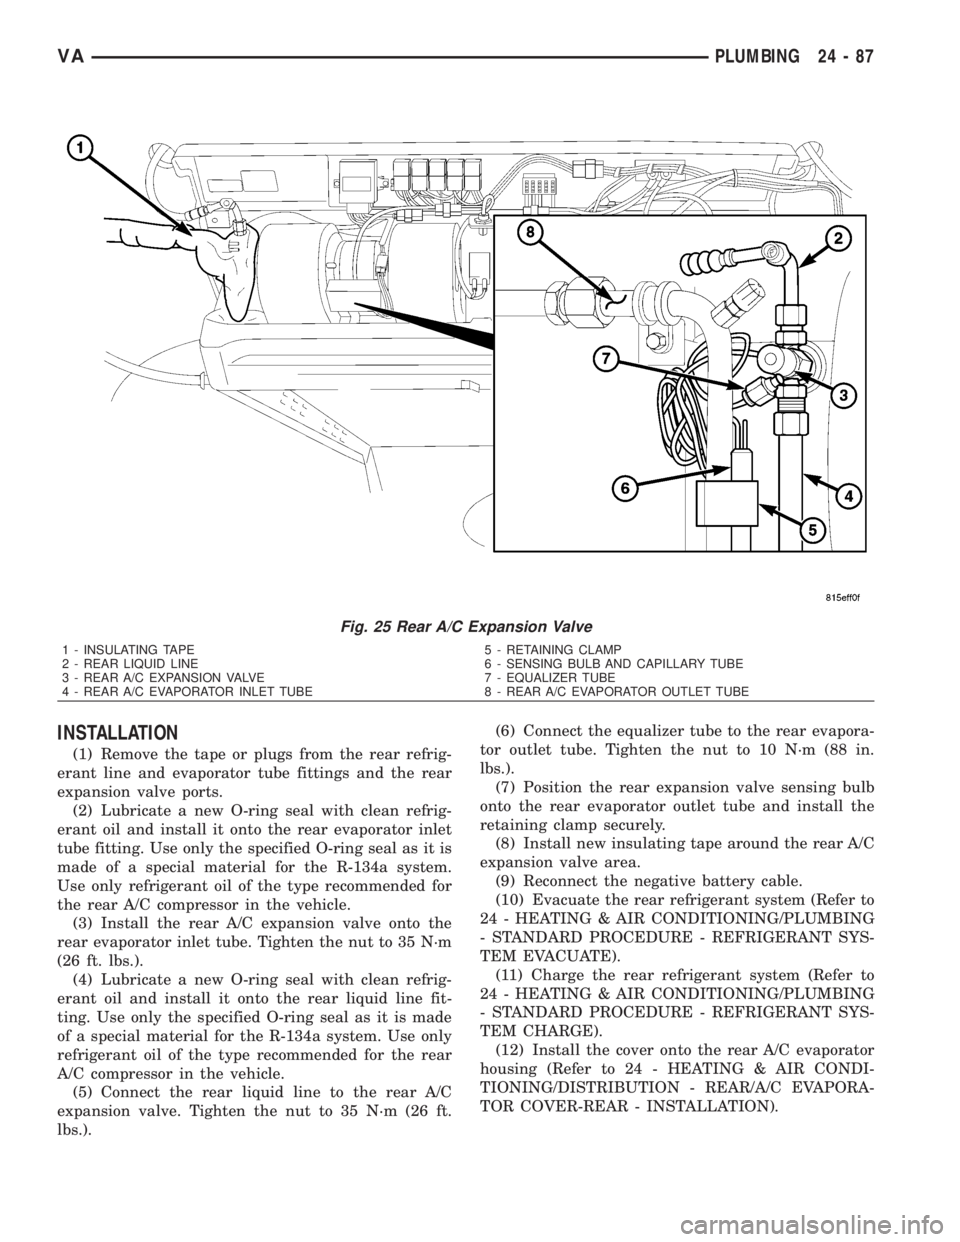
(4) Remove the insulating tape from around the
area of the rear A/C expansion valve (Fig. 25).
(5) Disconnect the equalizer tube from the rear
evaporator outlet tube.
(6) Disconnect the rear liquid line from the rear
A/C expansion valve and remove and discard the
O-ring seal.
(7) Disconnect the rear A/C expansion valve from
the rear evaporator inlet tube and remove and dis-
card the O-ring seal.
(8) Remove the retaining clamp that secures the
sensor bulb to the evaporator outlet tube and remove
the expansion valve, capillary tube and sensor bulb
as an assembly.
(9) Install plugs into, or tape over the opened
refrigerant line and evaporator tube fittings and
expansion valve ports.
24 - 86 PLUMBINGVA
Page 2124 of 2305
INSTALLATION
(1) Remove the tape or plugs from the rear refrig-
erant line and evaporator tube fittings and the rear
expansion valve ports.
(2) Lubricate a new O-ring seal with clean refrig-
erant oil and install it onto the rear evaporator inlet
tube fitting. Use only the specified O-ring seal as it is
made of a special material for the R-134a system.
Use only refrigerant oil of the type recommended for
the rear A/C compressor in the vehicle.
(3) Install the rear A/C expansion valve onto the
rear evaporator inlet tube. Tighten the nut to 35 N´m
(26 ft. lbs.).
(4) Lubricate a new O-ring seal with clean refrig-
erant oil and install it onto the rear liquid line fit-
ting. Use only the specified O-ring seal as it is made
of a special material for the R-134a system. Use only
refrigerant oil of the type recommended for the rear
A/C compressor in the vehicle.
(5) Connect the rear liquid line to the rear A/C
expansion valve. Tighten the nut to 35 N´m (26 ft.
lbs.).(6) Connect the equalizer tube to the rear evapora-
tor outlet tube. Tighten the nut to 10 N´m (88 in.
lbs.).
(7) Position the rear expansion valve sensing bulb
onto the rear evaporator outlet tube and install the
retaining clamp securely.
(8) Install new insulating tape around the rear A/C
expansion valve area.
(9) Reconnect the negative battery cable.
(10) Evacuate the rear refrigerant system (Refer to
24 - HEATING & AIR CONDITIONING/PLUMBING
- STANDARD PROCEDURE - REFRIGERANT SYS-
TEM EVACUATE).
(11) Charge the rear refrigerant system (Refer to
24 - HEATING & AIR CONDITIONING/PLUMBING
- STANDARD PROCEDURE - REFRIGERANT SYS-
TEM CHARGE).
(12) Install the cover onto the rear A/C evaporator
housing (Refer to 24 - HEATING & AIR CONDI-
TIONING/DISTRIBUTION - REAR/A/C EVAPORA-
TOR COVER-REAR - INSTALLATION).
Fig. 25 Rear A/C Expansion Valve
1 - INSULATING TAPE
2 - REAR LIQUID LINE
3 - REAR A/C EXPANSION VALVE
4 - REAR A/C EVAPORATOR INLET TUBE5 - RETAINING CLAMP
6 - SENSING BULB AND CAPILLARY TUBE
7 - EQUALIZER TUBE
8 - REAR A/C EVAPORATOR OUTLET TUBE
VAPLUMBING 24 - 87
Page 2125 of 2305
REAR DISCHARGE LINE
DESCRIPTION
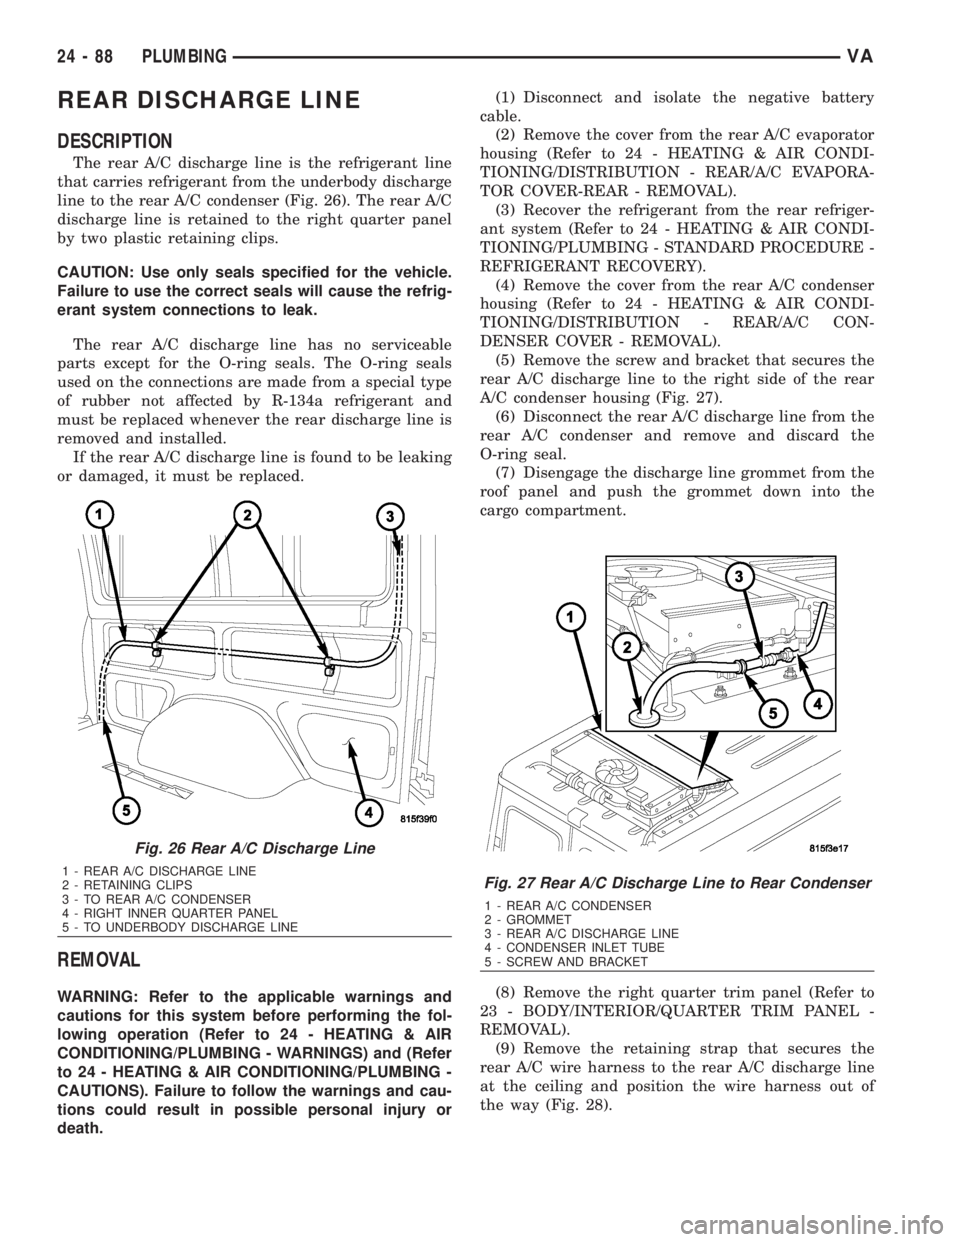
The rear A/C discharge line is the refrigerant line
that carries refrigerant from the underbody discharge
line to the rear A/C condenser (Fig. 26). The rear A/C
discharge line is retained to the right quarter panel
by two plastic retaining clips.
CAUTION: Use only seals specified for the vehicle.
Failure to use the correct seals will cause the refrig-
erant system connections to leak.
The rear A/C discharge line has no serviceable
parts except for the O-ring seals. The O-ring seals
used on the connections are made from a special type
of rubber not affected by R-134a refrigerant and
must be replaced whenever the rear discharge line is
removed and installed.
If the rear A/C discharge line is found to be leaking
or damaged, it must be replaced.
REMOVAL
WARNING: Refer to the applicable warnings and
cautions for this system before performing the fol-
lowing operation (Refer to 24 - HEATING & AIR
CONDITIONING/PLUMBING - WARNINGS) and (Refer
to 24 - HEATING & AIR CONDITIONING/PLUMBING -
CAUTIONS). Failure to follow the warnings and cau-
tions could result in possible personal injury or
death.(1) Disconnect and isolate the negative battery
cable.
(2) Remove the cover from the rear A/C evaporator
housing (Refer to 24 - HEATING & AIR CONDI-
TIONING/DISTRIBUTION - REAR/A/C EVAPORA-
TOR COVER-REAR - REMOVAL).
(3) Recover the refrigerant from the rear refriger-
ant system (Refer to 24 - HEATING & AIR CONDI-
TIONING/PLUMBING - STANDARD PROCEDURE -
REFRIGERANT RECOVERY).
(4) Remove the cover from the rear A/C condenser
housing (Refer to 24 - HEATING & AIR CONDI-
TIONING/DISTRIBUTION - REAR/A/C CON-
DENSER COVER - REMOVAL).
(5) Remove the screw and bracket that secures the
rear A/C discharge line to the right side of the rear
A/C condenser housing (Fig. 27).
(6) Disconnect the rear A/C discharge line from the
rear A/C condenser and remove and discard the
O-ring seal.
(7) Disengage the discharge line grommet from the
roof panel and push the grommet down into the
cargo compartment.
(8) Remove the right quarter trim panel (Refer to
23 - BODY/INTERIOR/QUARTER TRIM PANEL -
REMOVAL).
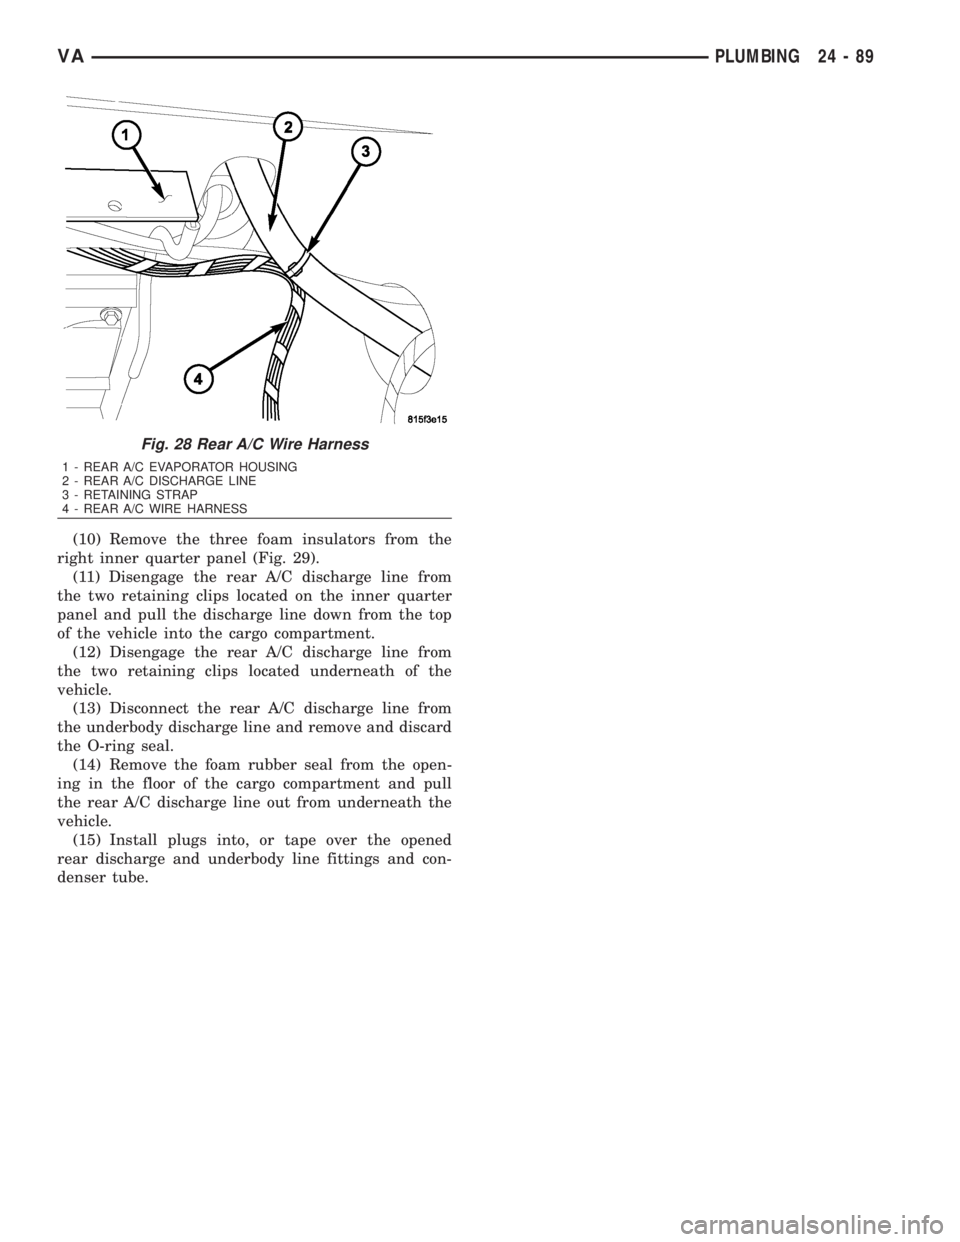
(9) Remove the retaining strap that secures the
rear A/C wire harness to the rear A/C discharge line
at the ceiling and position the wire harness out of
the way (Fig. 28).
Fig. 26 Rear A/C Discharge Line
1 - REAR A/C DISCHARGE LINE
2 - RETAINING CLIPS
3 - TO REAR A/C CONDENSER
4 - RIGHT INNER QUARTER PANEL
5 - TO UNDERBODY DISCHARGE LINEFig. 27 Rear A/C Discharge Line to Rear Condenser
1 - REAR A/C CONDENSER
2 - GROMMET
3 - REAR A/C DISCHARGE LINE
4 - CONDENSER INLET TUBE
5 - SCREW AND BRACKET
24 - 88 PLUMBINGVA
Page 2126 of 2305
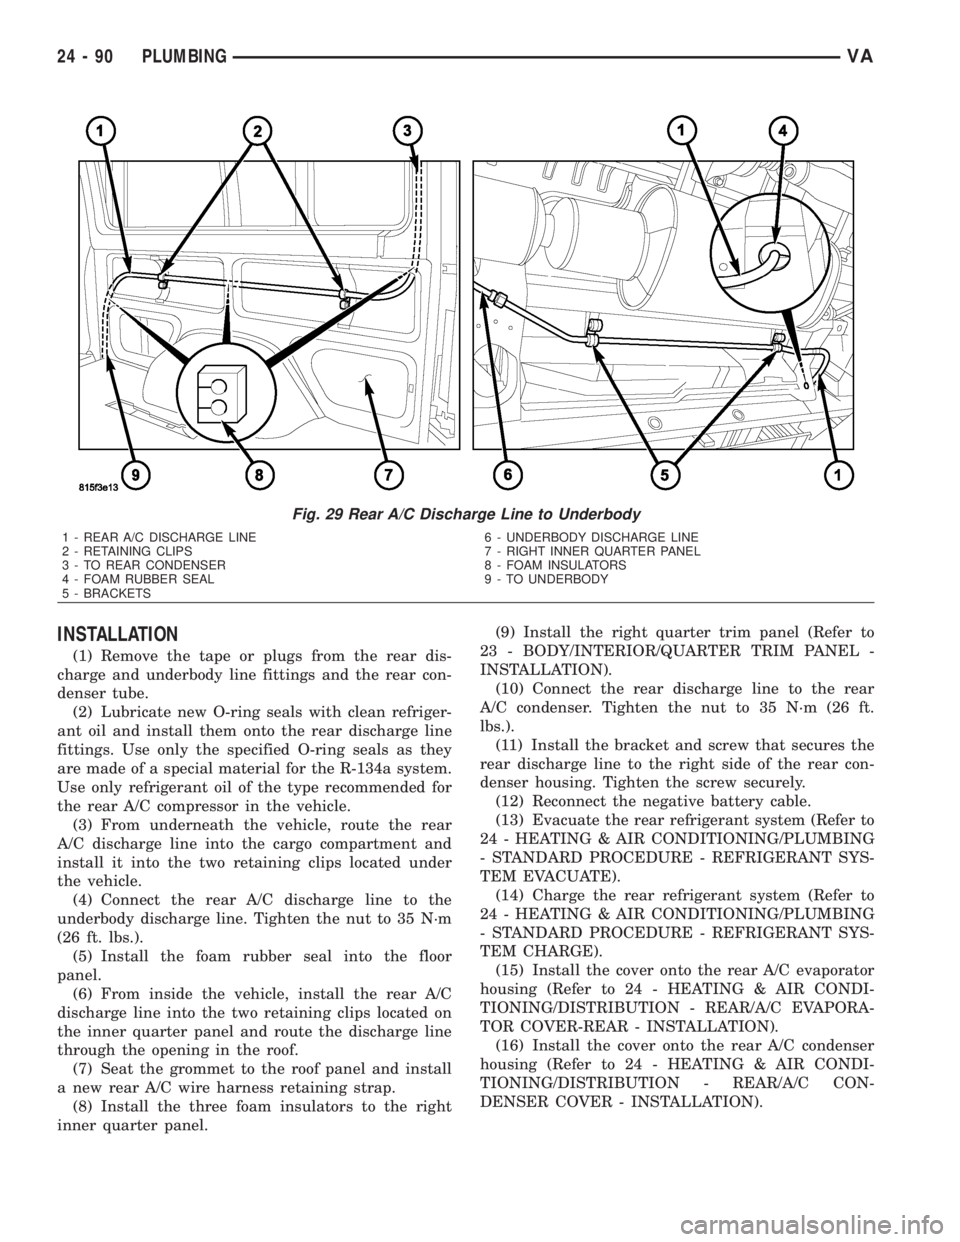
(10) Remove the three foam insulators from the
right inner quarter panel (Fig. 29).
(11) Disengage the rear A/C discharge line from
the two retaining clips located on the inner quarter
panel and pull the discharge line down from the top
of the vehicle into the cargo compartment.
(12) Disengage the rear A/C discharge line from
the two retaining clips located underneath of the
vehicle.
(13) Disconnect the rear A/C discharge line from
the underbody discharge line and remove and discard
the O-ring seal.
(14) Remove the foam rubber seal from the open-
ing in the floor of the cargo compartment and pull
the rear A/C discharge line out from underneath the
vehicle.
(15) Install plugs into, or tape over the opened
rear discharge and underbody line fittings and con-
denser tube.
Fig. 28 Rear A/C Wire Harness
1 - REAR A/C EVAPORATOR HOUSING
2 - REAR A/C DISCHARGE LINE
3 - RETAINING STRAP
4 - REAR A/C WIRE HARNESS
VAPLUMBING 24 - 89
Page 2127 of 2305
INSTALLATION
(1) Remove the tape or plugs from the rear dis-
charge and underbody line fittings and the rear con-
denser tube.
(2) Lubricate new O-ring seals with clean refriger-
ant oil and install them onto the rear discharge line
fittings. Use only the specified O-ring seals as they
are made of a special material for the R-134a system.
Use only refrigerant oil of the type recommended for
the rear A/C compressor in the vehicle.
(3) From underneath the vehicle, route the rear
A/C discharge line into the cargo compartment and
install it into the two retaining clips located under
the vehicle.
(4) Connect the rear A/C discharge line to the
underbody discharge line. Tighten the nut to 35 N´m
(26 ft. lbs.).
(5) Install the foam rubber seal into the floor
panel.
(6) From inside the vehicle, install the rear A/C
discharge line into the two retaining clips located on
the inner quarter panel and route the discharge line
through the opening in the roof.
(7) Seat the grommet to the roof panel and install
a new rear A/C wire harness retaining strap.
(8) Install the three foam insulators to the right
inner quarter panel.(9) Install the right quarter trim panel (Refer to
23 - BODY/INTERIOR/QUARTER TRIM PANEL -
INSTALLATION).
(10) Connect the rear discharge line to the rear
A/C condenser. Tighten the nut to 35 N´m (26 ft.
lbs.).
(11) Install the bracket and screw that secures the
rear discharge line to the right side of the rear con-
denser housing. Tighten the screw securely.
(12) Reconnect the negative battery cable.
(13) Evacuate the rear refrigerant system (Refer to
24 - HEATING & AIR CONDITIONING/PLUMBING
- STANDARD PROCEDURE - REFRIGERANT SYS-
TEM EVACUATE).
(14) Charge the rear refrigerant system (Refer to
24 - HEATING & AIR CONDITIONING/PLUMBING
- STANDARD PROCEDURE - REFRIGERANT SYS-
TEM CHARGE).
(15) Install the cover onto the rear A/C evaporator
housing (Refer to 24 - HEATING & AIR CONDI-
TIONING/DISTRIBUTION - REAR/A/C EVAPORA-
TOR COVER-REAR - INSTALLATION).
(16) Install the cover onto the rear A/C condenser
housing (Refer to 24 - HEATING & AIR CONDI-
TIONING/DISTRIBUTION - REAR/A/C CON-
DENSER COVER - INSTALLATION).
Fig. 29 Rear A/C Discharge Line to Underbody
1 - REAR A/C DISCHARGE LINE
2 - RETAINING CLIPS
3 - TO REAR CONDENSER
4 - FOAM RUBBER SEAL
5 - BRACKETS6 - UNDERBODY DISCHARGE LINE
7 - RIGHT INNER QUARTER PANEL
8 - FOAM INSULATORS
9 - TO UNDERBODY
24 - 90 PLUMBINGVA
Page 2128 of 2305
REAR LIQUID LINE
DESCRIPTION
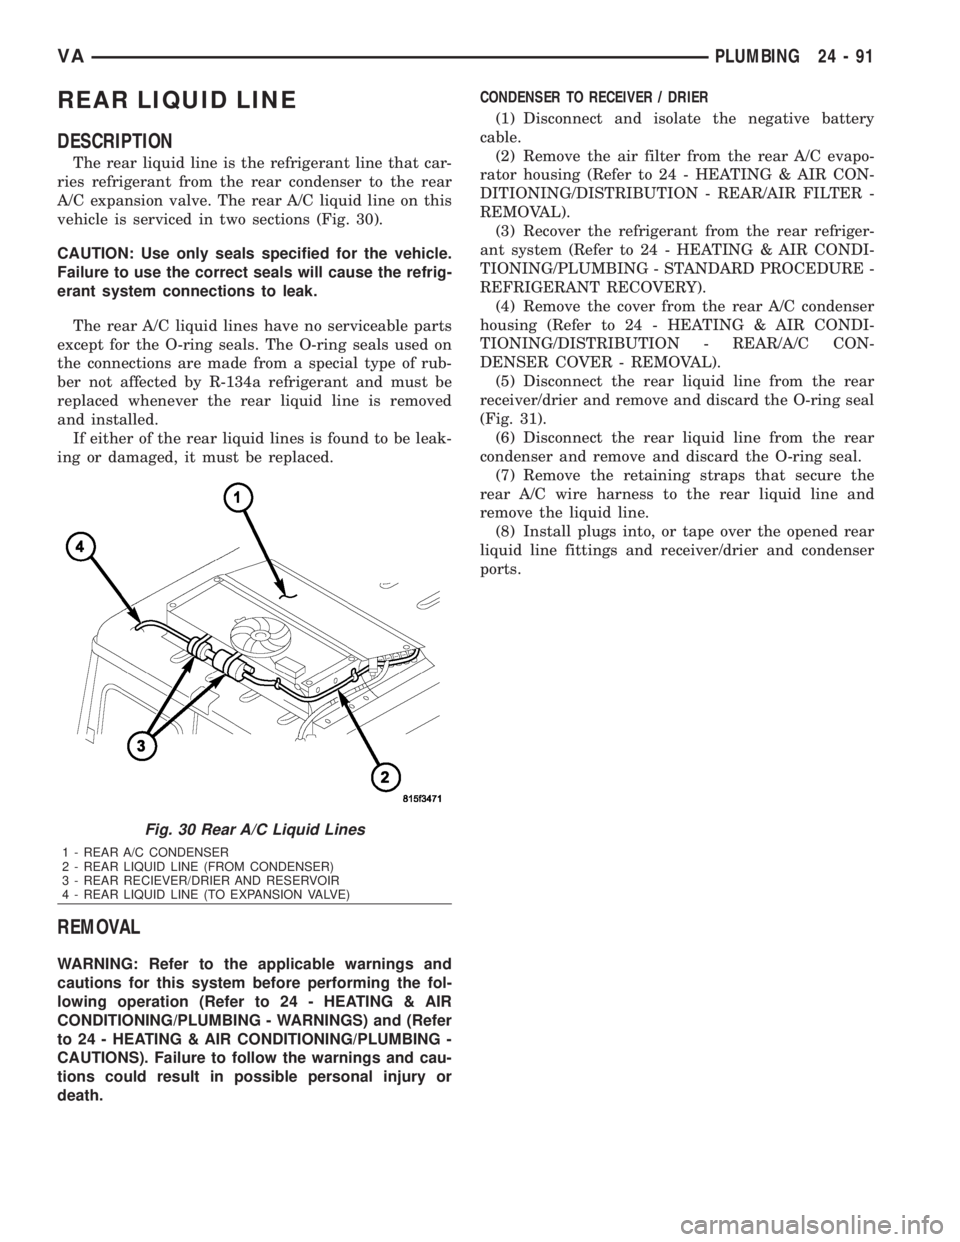
The rear liquid line is the refrigerant line that car-
ries refrigerant from the rear condenser to the rear
A/C expansion valve. The rear A/C liquid line on this
vehicle is serviced in two sections (Fig. 30).
CAUTION: Use only seals specified for the vehicle.
Failure to use the correct seals will cause the refrig-
erant system connections to leak.
The rear A/C liquid lines have no serviceable parts
except for the O-ring seals. The O-ring seals used on
the connections are made from a special type of rub-
ber not affected by R-134a refrigerant and must be
replaced whenever the rear liquid line is removed
and installed.
If either of the rear liquid lines is found to be leak-
ing or damaged, it must be replaced.
REMOVAL
WARNING: Refer to the applicable warnings and
cautions for this system before performing the fol-
lowing operation (Refer to 24 - HEATING & AIR
CONDITIONING/PLUMBING - WARNINGS) and (Refer
to 24 - HEATING & AIR CONDITIONING/PLUMBING -
CAUTIONS). Failure to follow the warnings and cau-
tions could result in possible personal injury or
death.CONDENSER TO RECEIVER / DRIER
(1) Disconnect and isolate the negative battery
cable.
(2) Remove the air filter from the rear A/C evapo-
rator housing (Refer to 24 - HEATING & AIR CON-
DITIONING/DISTRIBUTION - REAR/AIR FILTER -
REMOVAL).
(3) Recover the refrigerant from the rear refriger-
ant system (Refer to 24 - HEATING & AIR CONDI-
TIONING/PLUMBING - STANDARD PROCEDURE -
REFRIGERANT RECOVERY).
(4) Remove the cover from the rear A/C condenser
housing (Refer to 24 - HEATING & AIR CONDI-
TIONING/DISTRIBUTION - REAR/A/C CON-
DENSER COVER - REMOVAL).
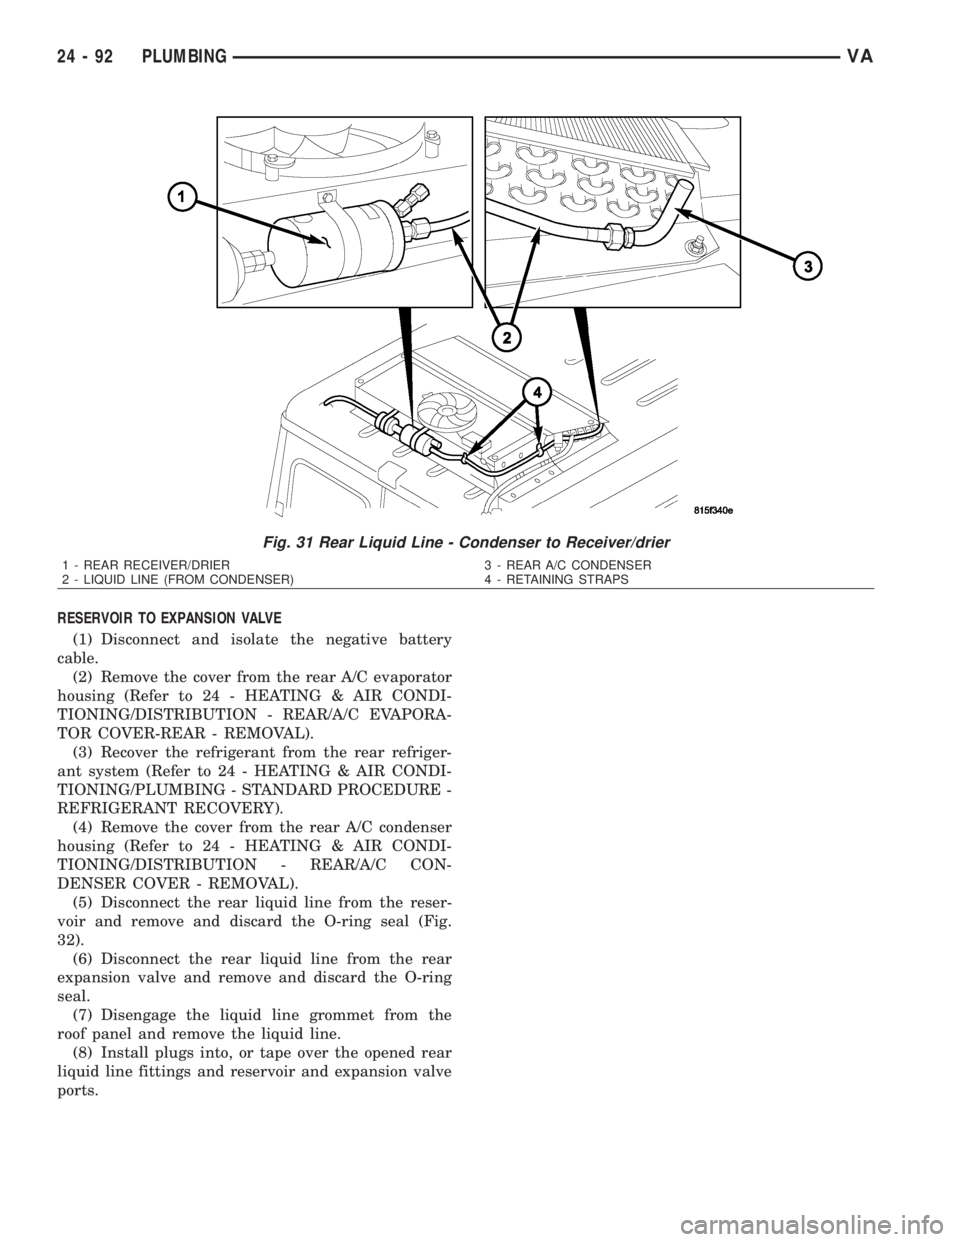
(5) Disconnect the rear liquid line from the rear
receiver/drier and remove and discard the O-ring seal
(Fig. 31).
(6) Disconnect the rear liquid line from the rear
condenser and remove and discard the O-ring seal.
(7) Remove the retaining straps that secure the
rear A/C wire harness to the rear liquid line and
remove the liquid line.
(8) Install plugs into, or tape over the opened rear
liquid line fittings and receiver/drier and condenser
ports.
Fig. 30 Rear A/C Liquid Lines
1 - REAR A/C CONDENSER
2 - REAR LIQUID LINE (FROM CONDENSER)
3 - REAR RECIEVER/DRIER AND RESERVOIR
4 - REAR LIQUID LINE (TO EXPANSION VALVE)
VAPLUMBING 24 - 91
Page 2129 of 2305
RESERVOIR TO EXPANSION VALVE
(1) Disconnect and isolate the negative battery
cable.
(2) Remove the cover from the rear A/C evaporator
housing (Refer to 24 - HEATING & AIR CONDI-
TIONING/DISTRIBUTION - REAR/A/C EVAPORA-
TOR COVER-REAR - REMOVAL).
(3) Recover the refrigerant from the rear refriger-
ant system (Refer to 24 - HEATING & AIR CONDI-
TIONING/PLUMBING - STANDARD PROCEDURE -
REFRIGERANT RECOVERY).
(4) Remove the cover from the rear A/C condenser
housing (Refer to 24 - HEATING & AIR CONDI-
TIONING/DISTRIBUTION - REAR/A/C CON-
DENSER COVER - REMOVAL).
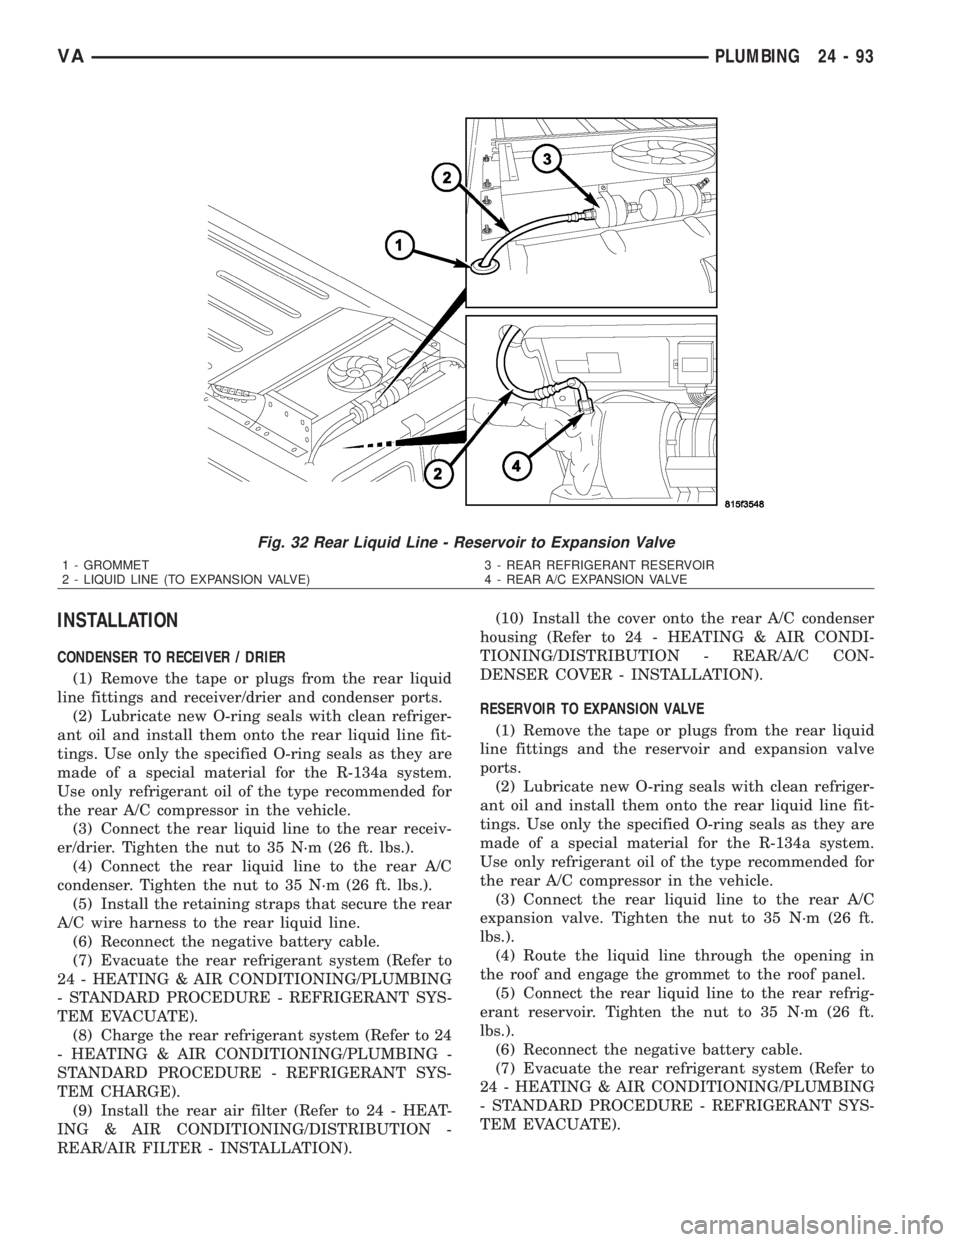
(5) Disconnect the rear liquid line from the reser-
voir and remove and discard the O-ring seal (Fig.
32).
(6) Disconnect the rear liquid line from the rear
expansion valve and remove and discard the O-ring
seal.
(7) Disengage the liquid line grommet from the
roof panel and remove the liquid line.
(8) Install plugs into, or tape over the opened rear
liquid line fittings and reservoir and expansion valve
ports.
Fig. 31 Rear Liquid Line - Condenser to Receiver/drier
1 - REAR RECEIVER/DRIER
2 - LIQUID LINE (FROM CONDENSER)3 - REAR A/C CONDENSER
4 - RETAINING STRAPS
24 - 92 PLUMBINGVA
Page 2130 of 2305
INSTALLATION
CONDENSER TO RECEIVER / DRIER
(1) Remove the tape or plugs from the rear liquid
line fittings and receiver/drier and condenser ports.
(2) Lubricate new O-ring seals with clean refriger-
ant oil and install them onto the rear liquid line fit-
tings. Use only the specified O-ring seals as they are
made of a special material for the R-134a system.
Use only refrigerant oil of the type recommended for
the rear A/C compressor in the vehicle.
(3) Connect the rear liquid line to the rear receiv-
er/drier. Tighten the nut to 35 N´m (26 ft. lbs.).
(4) Connect the rear liquid line to the rear A/C
condenser. Tighten the nut to 35 N´m (26 ft. lbs.).
(5) Install the retaining straps that secure the rear
A/C wire harness to the rear liquid line.
(6) Reconnect the negative battery cable.
(7) Evacuate the rear refrigerant system (Refer to
24 - HEATING & AIR CONDITIONING/PLUMBING
- STANDARD PROCEDURE - REFRIGERANT SYS-
TEM EVACUATE).
(8) Charge the rear refrigerant system (Refer to 24
- HEATING & AIR CONDITIONING/PLUMBING -
STANDARD PROCEDURE - REFRIGERANT SYS-
TEM CHARGE).
(9) Install the rear air filter (Refer to 24 - HEAT-
ING & AIR CONDITIONING/DISTRIBUTION -
REAR/AIR FILTER - INSTALLATION).(10) Install the cover onto the rear A/C condenser
housing (Refer to 24 - HEATING & AIR CONDI-
TIONING/DISTRIBUTION - REAR/A/C CON-
DENSER COVER - INSTALLATION).
RESERVOIR TO EXPANSION VALVE
(1) Remove the tape or plugs from the rear liquid
line fittings and the reservoir and expansion valve
ports.
(2) Lubricate new O-ring seals with clean refriger-
ant oil and install them onto the rear liquid line fit-
tings. Use only the specified O-ring seals as they are
made of a special material for the R-134a system.
Use only refrigerant oil of the type recommended for
the rear A/C compressor in the vehicle.
(3) Connect the rear liquid line to the rear A/C
expansion valve. Tighten the nut to 35 N´m (26 ft.
lbs.).
(4) Route the liquid line through the opening in
the roof and engage the grommet to the roof panel.
(5) Connect the rear liquid line to the rear refrig-
erant reservoir. Tighten the nut to 35 N´m (26 ft.
lbs.).
(6) Reconnect the negative battery cable.
(7) Evacuate the rear refrigerant system (Refer to
24 - HEATING & AIR CONDITIONING/PLUMBING
- STANDARD PROCEDURE - REFRIGERANT SYS-
TEM EVACUATE).
Fig. 32 Rear Liquid Line - Reservoir to Expansion Valve
1 - GROMMET
2 - LIQUID LINE (TO EXPANSION VALVE)3 - REAR REFRIGERANT RESERVOIR
4 - REAR A/C EXPANSION VALVE
VAPLUMBING 24 - 93