MERCEDES-BENZ SPRINTER 2006 Service Manual
Manufacturer: MERCEDES-BENZ, Model Year: 2006, Model line: SPRINTER, Model: MERCEDES-BENZ SPRINTER 2006Pages: 2305, PDF Size: 48.12 MB
Page 331 of 2305
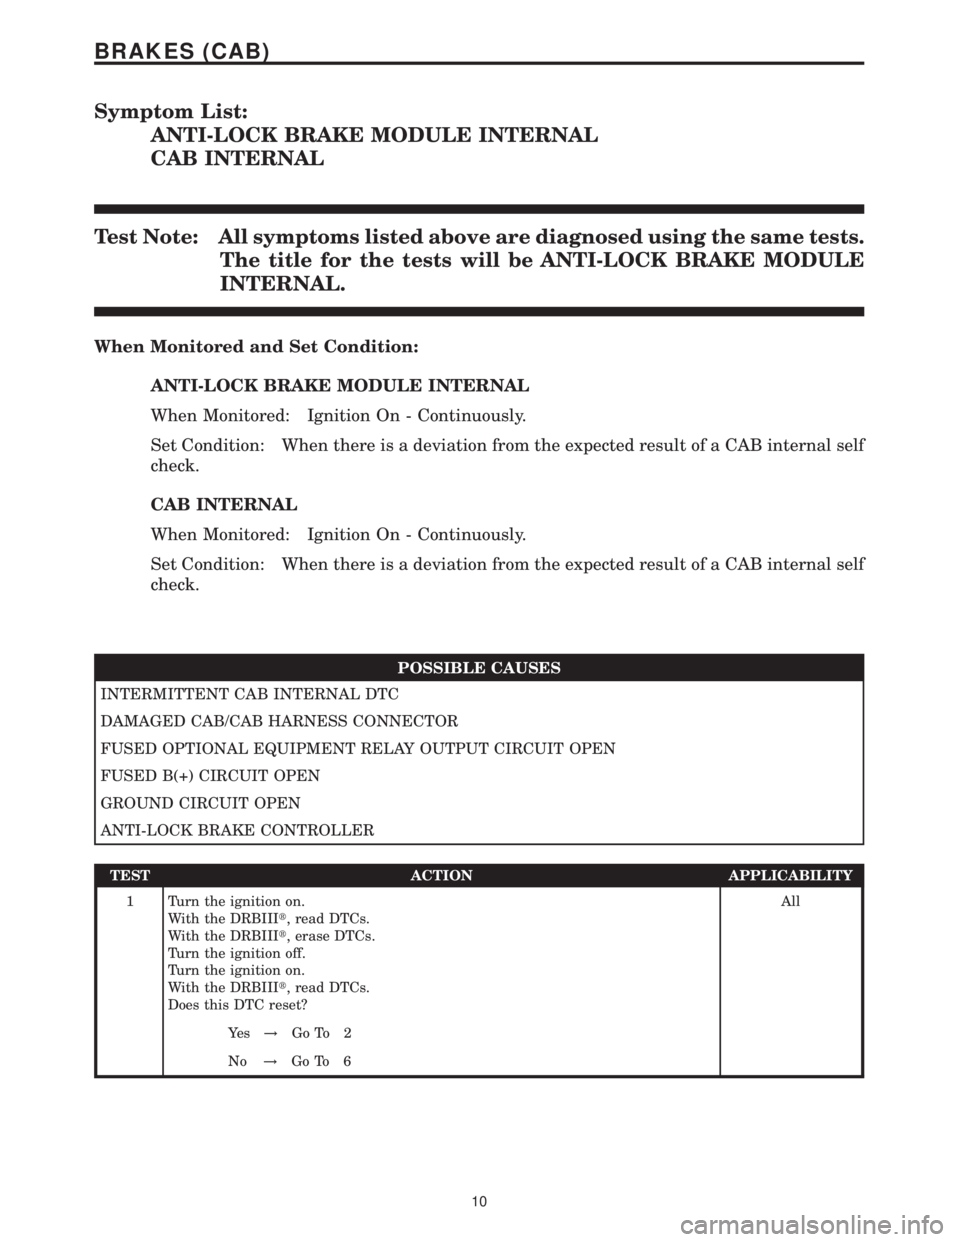
Symptom List:
ANTI-LOCK BRAKE MODULE INTERNAL
CAB INTERNAL
Test Note: All symptoms listed above are diagnosed using the same tests.
The title for the tests will be ANTI-LOCK BRAKE MODULE
INTERNAL.
When Monitored and Set Condition:
ANTI-LOCK BRAKE MODULE INTERNAL
When Monitored: Ignition On - Continuously.
Set Condition: When there is a deviation from the expected result of a CAB internal self
check.
CAB INTERNAL
When Monitored: Ignition On - Continuously.
Set Condition: When there is a deviation from the expected result of a CAB internal self
check.
POSSIBLE CAUSES
INTERMITTENT CAB INTERNAL DTC
DAMAGED CAB/CAB HARNESS CONNECTOR
FUSED OPTIONAL EQUIPMENT RELAY OUTPUT CIRCUIT OPEN
FUSED B(+) CIRCUIT OPEN
GROUND CIRCUIT OPEN
ANTI-LOCK BRAKE CONTROLLER
TEST ACTION APPLICABILITY
1 Turn the ignition on.
With the DRBIIIt, read DTCs.
With the DRBIIIt, erase DTCs.
Turn the ignition off.
Turn the ignition on.
With the DRBIIIt, read DTCs.
Does this DTC reset?All
Ye s!Go To 2
No!Go To 6
10
BRAKES (CAB)
Page 332 of 2305
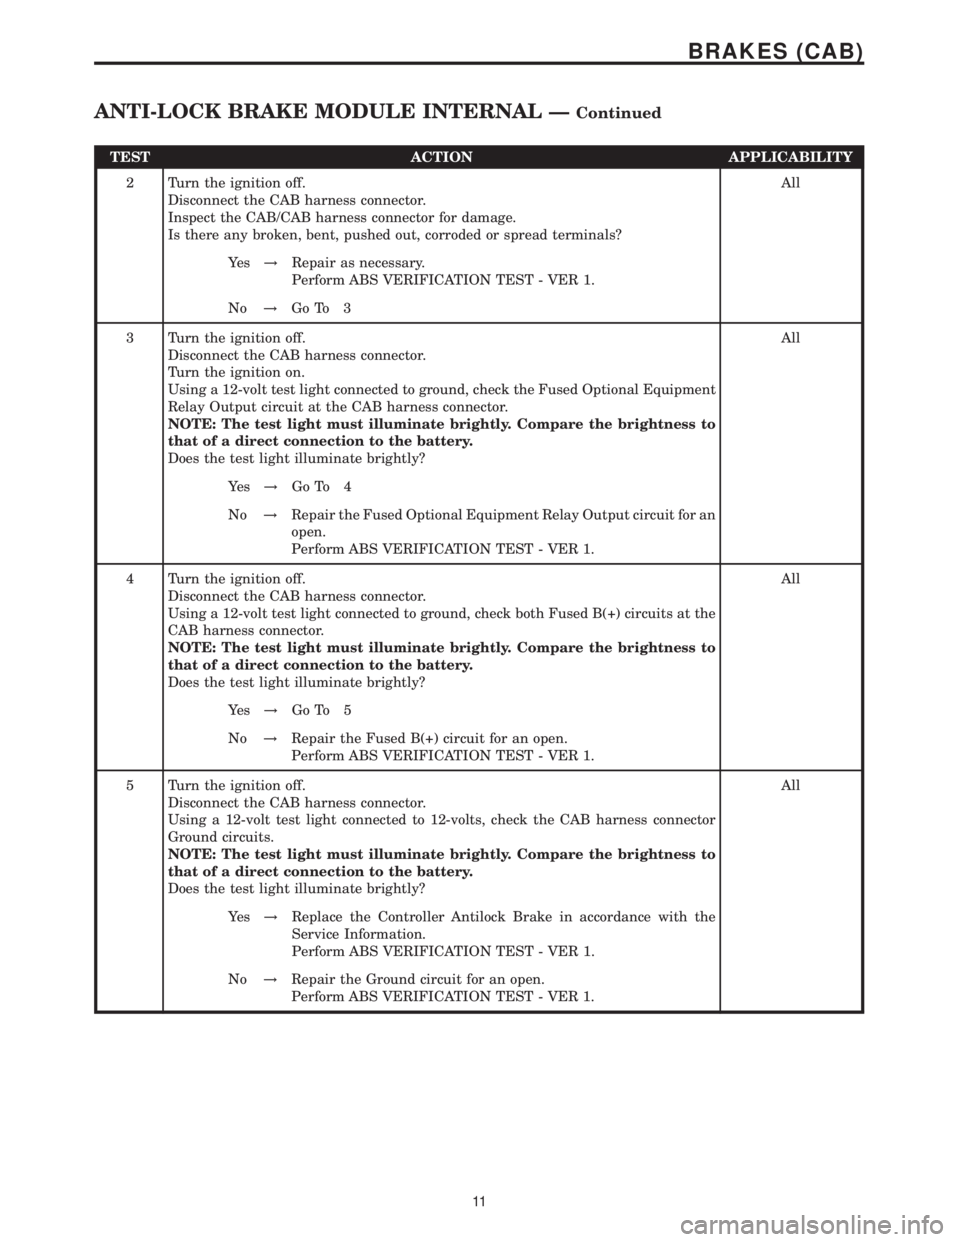
TEST ACTION APPLICABILITY
2 Turn the ignition off.
Disconnect the CAB harness connector.
Inspect the CAB/CAB harness connector for damage.
Is there any broken, bent, pushed out, corroded or spread terminals?All
Ye s!Repair as necessary.
Perform ABS VERIFICATION TEST - VER 1.
No!Go To 3
3 Turn the ignition off.
Disconnect the CAB harness connector.
Turn the ignition on.
Using a 12-volt test light connected to ground, check the Fused Optional Equipment
Relay Output circuit at the CAB harness connector.
NOTE: The test light must illuminate brightly. Compare the brightness to
that of a direct connection to the battery.
Does the test light illuminate brightly?All
Ye s!Go To 4
No!Repair the Fused Optional Equipment Relay Output circuit for an
open.
Perform ABS VERIFICATION TEST - VER 1.
4 Turn the ignition off.
Disconnect the CAB harness connector.
Using a 12-volt test light connected to ground, check both Fused B(+) circuits at the
CAB harness connector.
NOTE: The test light must illuminate brightly. Compare the brightness to
that of a direct connection to the battery.
Does the test light illuminate brightly?All
Ye s!Go To 5
No!Repair the Fused B(+) circuit for an open.
Perform ABS VERIFICATION TEST - VER 1.
5 Turn the ignition off.
Disconnect the CAB harness connector.
Using a 12-volt test light connected to 12-volts, check the CAB harness connector
Ground circuits.
NOTE: The test light must illuminate brightly. Compare the brightness to
that of a direct connection to the battery.
Does the test light illuminate brightly?All
Ye s!Replace the Controller Antilock Brake in accordance with the
Service Information.
Perform ABS VERIFICATION TEST - VER 1.
No!Repair the Ground circuit for an open.
Perform ABS VERIFICATION TEST - VER 1.
11
BRAKES (CAB)
ANTI-LOCK BRAKE MODULE INTERNAL ÐContinued
Page 333 of 2305
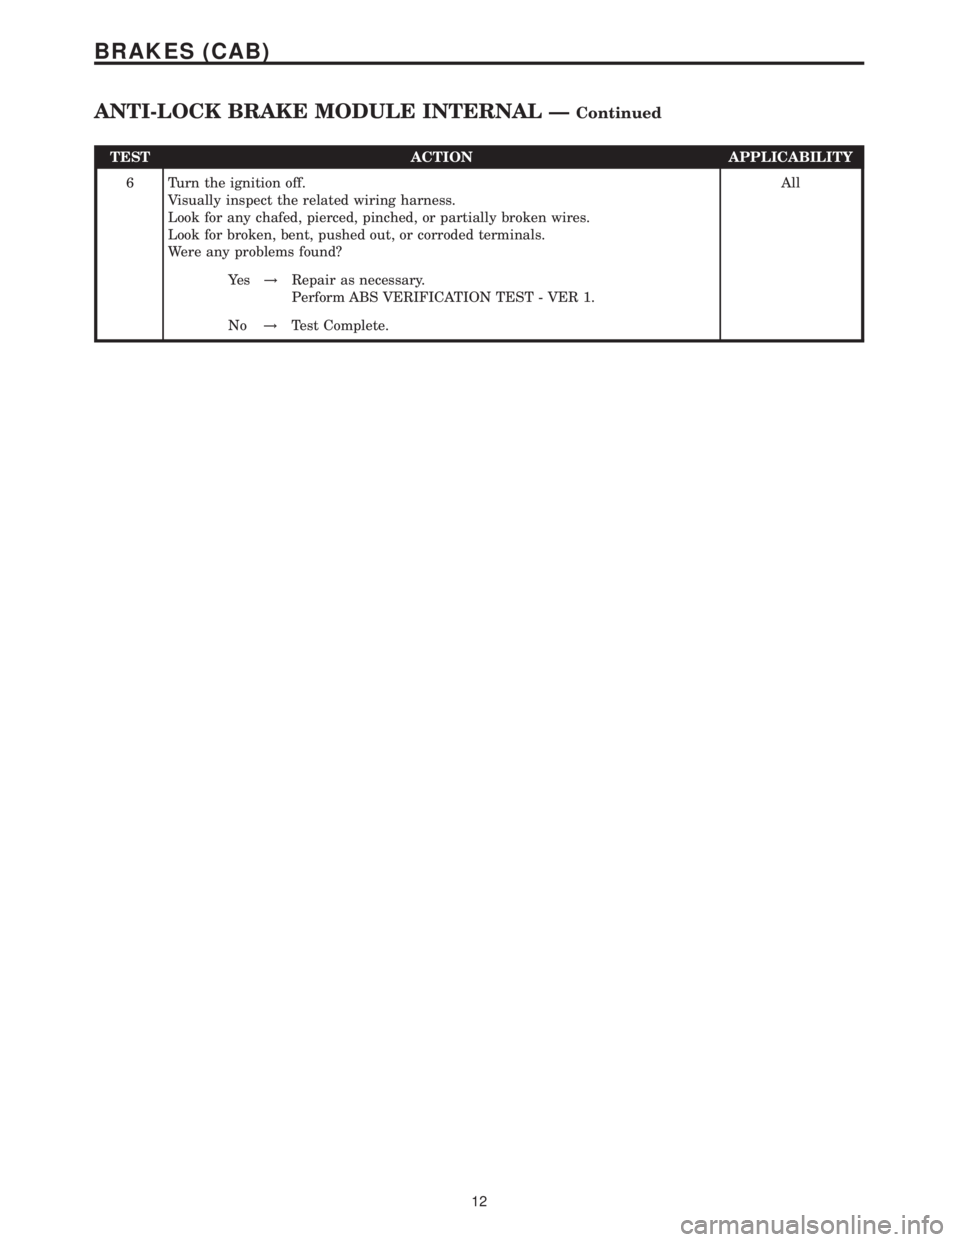
TEST ACTION APPLICABILITY
6 Turn the ignition off.
Visually inspect the related wiring harness.
Look for any chafed, pierced, pinched, or partially broken wires.
Look for broken, bent, pushed out, or corroded terminals.
Were any problems found?All
Ye s!Repair as necessary.
Perform ABS VERIFICATION TEST - VER 1.
No!Test Complete.
12
BRAKES (CAB)
ANTI-LOCK BRAKE MODULE INTERNAL ÐContinued
Page 334 of 2305
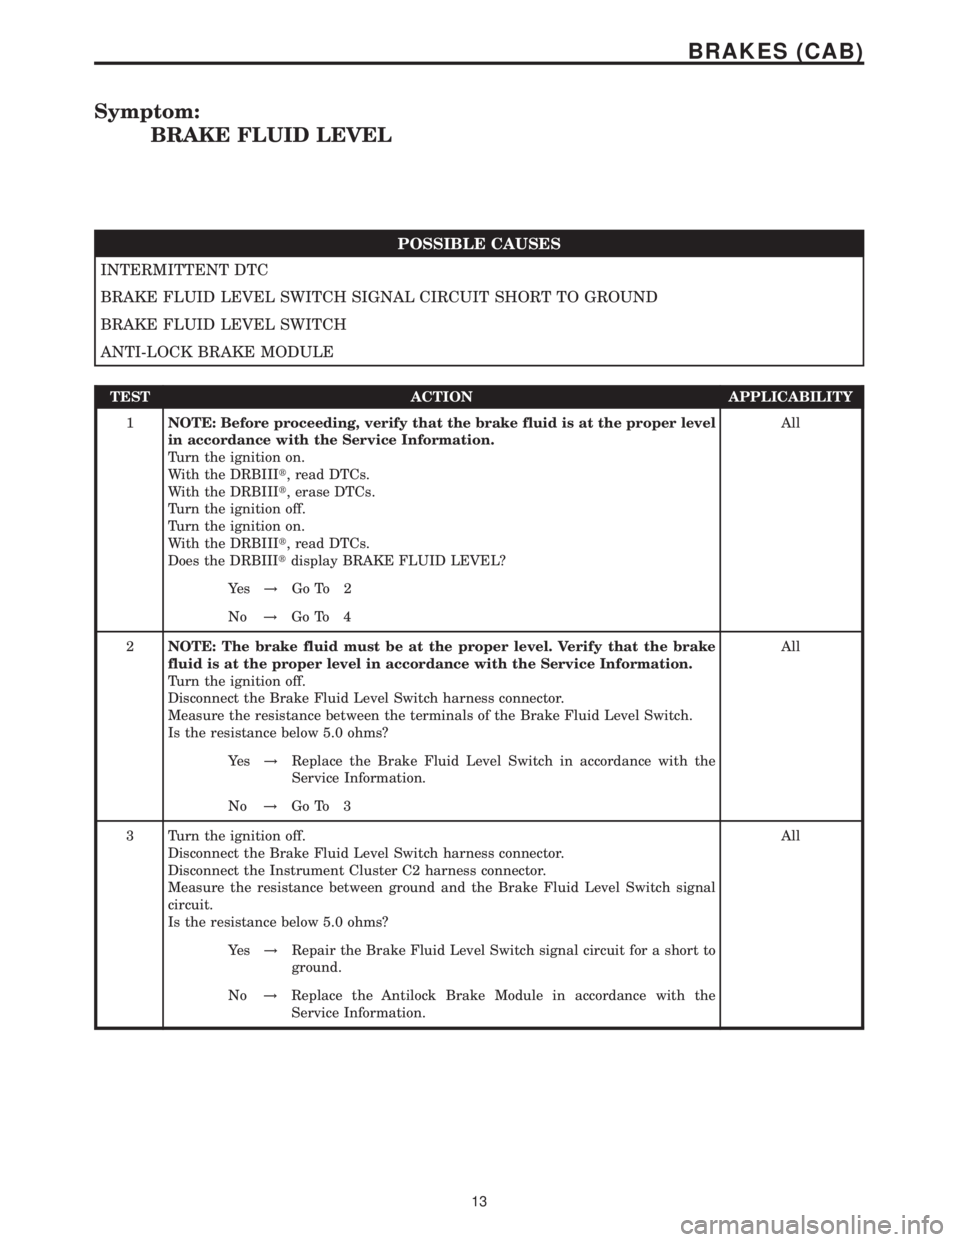
Symptom:
BRAKE FLUID LEVEL
POSSIBLE CAUSES
INTERMITTENT DTC
BRAKE FLUID LEVEL SWITCH SIGNAL CIRCUIT SHORT TO GROUND
BRAKE FLUID LEVEL SWITCH
ANTI-LOCK BRAKE MODULE
TEST ACTION APPLICABILITY
1NOTE: Before proceeding, verify that the brake fluid is at the proper level
in accordance with the Service Information.
Turn the ignition on.
With the DRBIIIt, read DTCs.
With the DRBIIIt, erase DTCs.
Turn the ignition off.
Turn the ignition on.
With the DRBIIIt, read DTCs.
Does the DRBIIItdisplay BRAKE FLUID LEVEL?All
Ye s!Go To 2
No!Go To 4
2NOTE: The brake fluid must be at the proper level. Verify that the brake
fluid is at the proper level in accordance with the Service Information.
Turn the ignition off.
Disconnect the Brake Fluid Level Switch harness connector.
Measure the resistance between the terminals of the Brake Fluid Level Switch.
Is the resistance below 5.0 ohms?All
Ye s!Replace the Brake Fluid Level Switch in accordance with the
Service Information.
No!Go To 3
3 Turn the ignition off.
Disconnect the Brake Fluid Level Switch harness connector.
Disconnect the Instrument Cluster C2 harness connector.
Measure the resistance between ground and the Brake Fluid Level Switch signal
circuit.
Is the resistance below 5.0 ohms?All
Ye s!Repair the Brake Fluid Level Switch signal circuit for a short to
ground.
No!Replace the Antilock Brake Module in accordance with the
Service Information.
13
BRAKES (CAB)
Page 335 of 2305
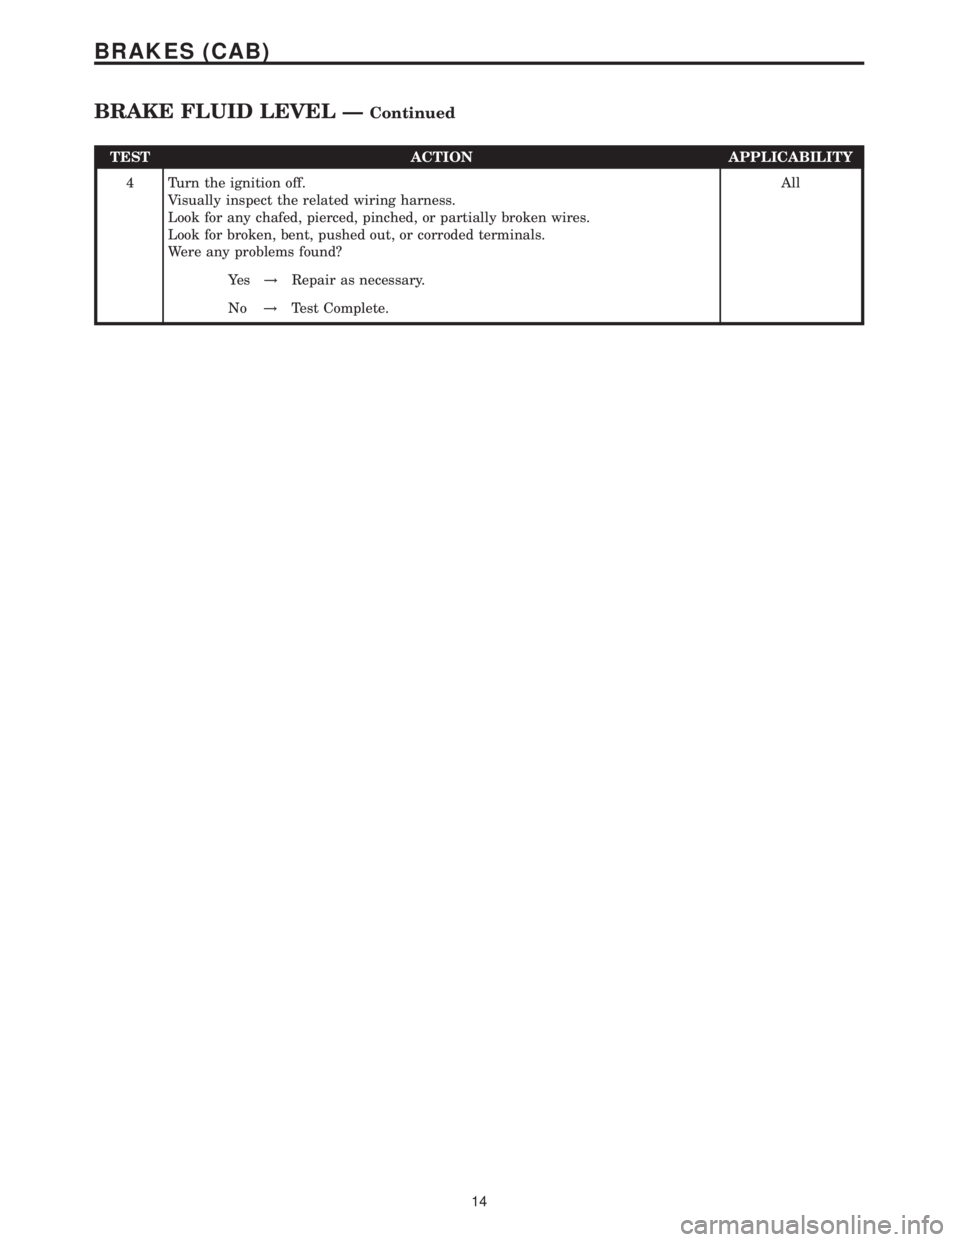
TEST ACTION APPLICABILITY
4 Turn the ignition off.
Visually inspect the related wiring harness.
Look for any chafed, pierced, pinched, or partially broken wires.
Look for broken, bent, pushed out, or corroded terminals.
Were any problems found?All
Ye s!Repair as necessary.
No!Test Complete.
14
BRAKES (CAB)
BRAKE FLUID LEVEL ÐContinued
Page 336 of 2305
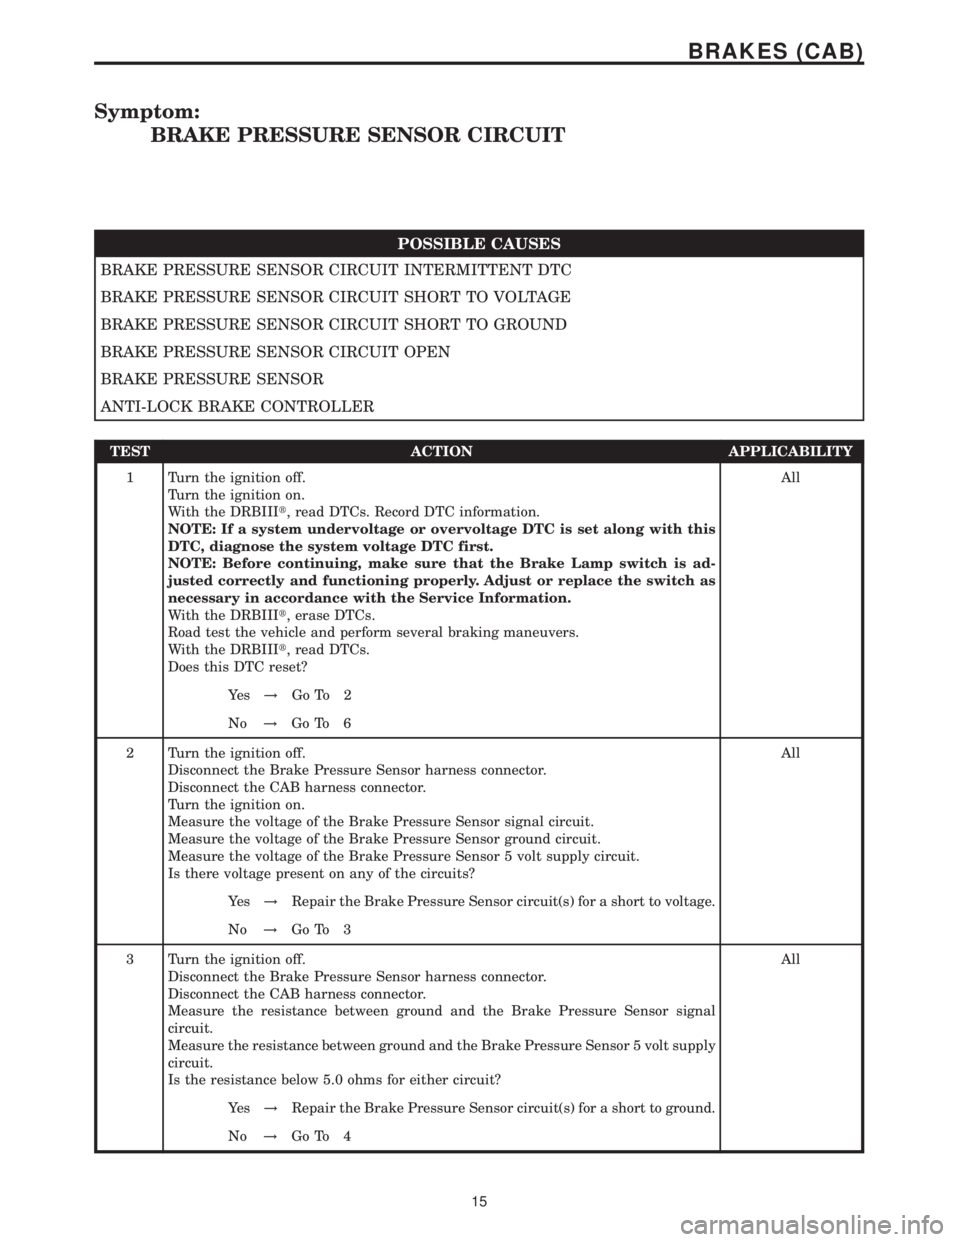
Symptom:
BRAKE PRESSURE SENSOR CIRCUIT
POSSIBLE CAUSES
BRAKE PRESSURE SENSOR CIRCUIT INTERMITTENT DTC
BRAKE PRESSURE SENSOR CIRCUIT SHORT TO VOLTAGE
BRAKE PRESSURE SENSOR CIRCUIT SHORT TO GROUND
BRAKE PRESSURE SENSOR CIRCUIT OPEN
BRAKE PRESSURE SENSOR
ANTI-LOCK BRAKE CONTROLLER
TEST ACTION APPLICABILITY
1 Turn the ignition off.
Turn the ignition on.
With the DRBIIIt, read DTCs. Record DTC information.
NOTE: If a system undervoltage or overvoltage DTC is set along with this
DTC, diagnose the system voltage DTC first.
NOTE: Before continuing, make sure that the Brake Lamp switch is ad-
justed correctly and functioning properly. Adjust or replace the switch as
necessary in accordance with the Service Information.
With the DRBIIIt, erase DTCs.
Road test the vehicle and perform several braking maneuvers.
With the DRBIIIt, read DTCs.
Does this DTC reset?All
Ye s!Go To 2
No!Go To 6
2 Turn the ignition off.
Disconnect the Brake Pressure Sensor harness connector.
Disconnect the CAB harness connector.
Turn the ignition on.
Measure the voltage of the Brake Pressure Sensor signal circuit.
Measure the voltage of the Brake Pressure Sensor ground circuit.
Measure the voltage of the Brake Pressure Sensor 5 volt supply circuit.
Is there voltage present on any of the circuits?All
Ye s!Repair the Brake Pressure Sensor circuit(s) for a short to voltage.
No!Go To 3
3 Turn the ignition off.
Disconnect the Brake Pressure Sensor harness connector.
Disconnect the CAB harness connector.
Measure the resistance between ground and the Brake Pressure Sensor signal
circuit.
Measure the resistance between ground and the Brake Pressure Sensor 5 volt supply
circuit.
Is the resistance below 5.0 ohms for either circuit?All
Ye s!Repair the Brake Pressure Sensor circuit(s) for a short to ground.
No!Go To 4
15
BRAKES (CAB)
Page 337 of 2305
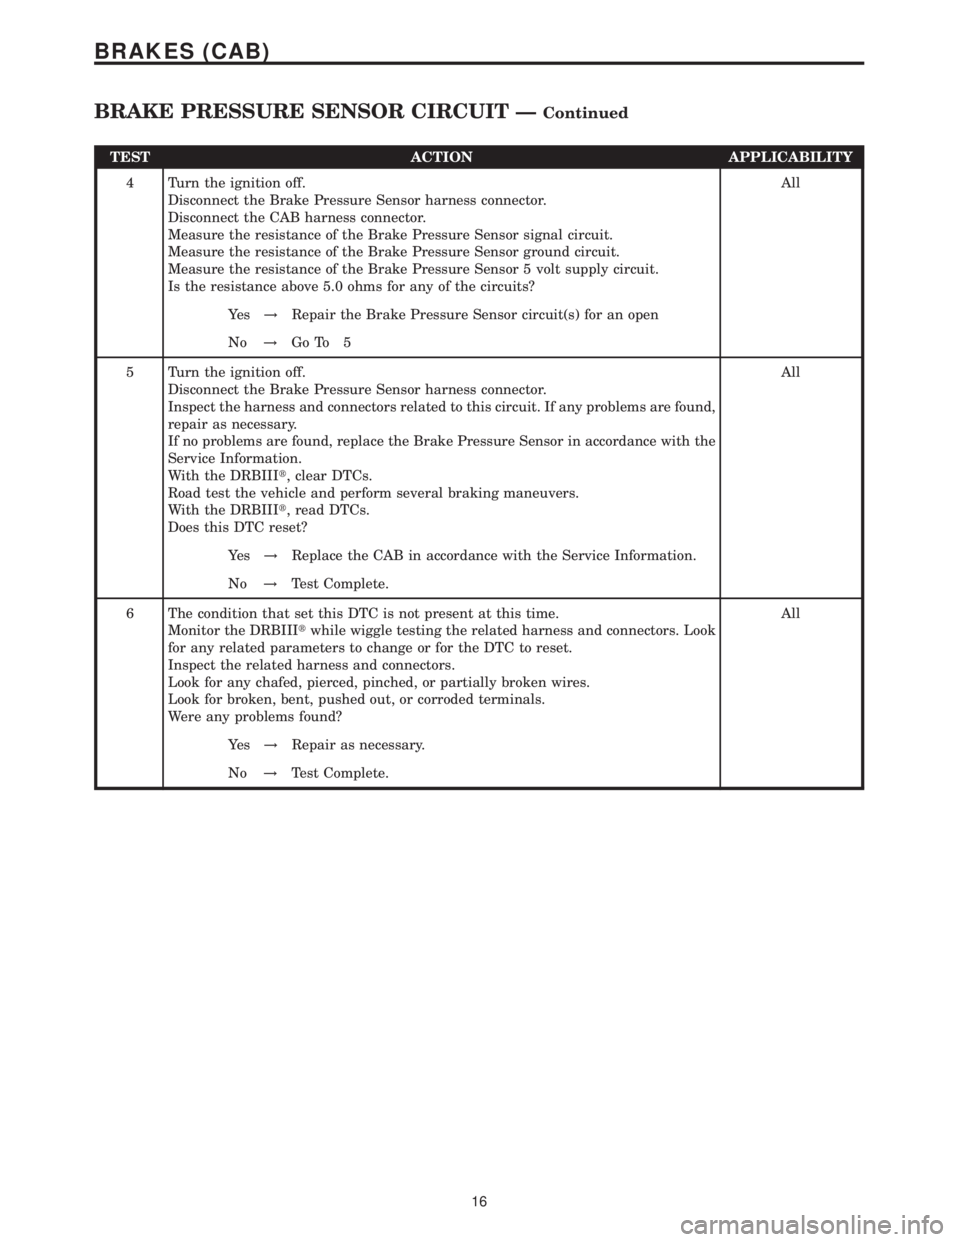
TEST ACTION APPLICABILITY
4 Turn the ignition off.
Disconnect the Brake Pressure Sensor harness connector.
Disconnect the CAB harness connector.
Measure the resistance of the Brake Pressure Sensor signal circuit.
Measure the resistance of the Brake Pressure Sensor ground circuit.
Measure the resistance of the Brake Pressure Sensor 5 volt supply circuit.
Is the resistance above 5.0 ohms for any of the circuits?All
Ye s!Repair the Brake Pressure Sensor circuit(s) for an open
No!Go To 5
5 Turn the ignition off.
Disconnect the Brake Pressure Sensor harness connector.
Inspect the harness and connectors related to this circuit. If any problems are found,
repair as necessary.
If no problems are found, replace the Brake Pressure Sensor in accordance with the
Service Information.
With the DRBIIIt, clear DTCs.
Road test the vehicle and perform several braking maneuvers.
With the DRBIIIt, read DTCs.
Does this DTC reset?All
Ye s!Replace the CAB in accordance with the Service Information.
No!Test Complete.
6 The condition that set this DTC is not present at this time.
Monitor the DRBIIItwhile wiggle testing the related harness and connectors. Look
for any related parameters to change or for the DTC to reset.
Inspect the related harness and connectors.
Look for any chafed, pierced, pinched, or partially broken wires.
Look for broken, bent, pushed out, or corroded terminals.
Were any problems found?All
Ye s!Repair as necessary.
No!Test Complete.
16
BRAKES (CAB)
BRAKE PRESSURE SENSOR CIRCUIT ÐContinued
Page 338 of 2305
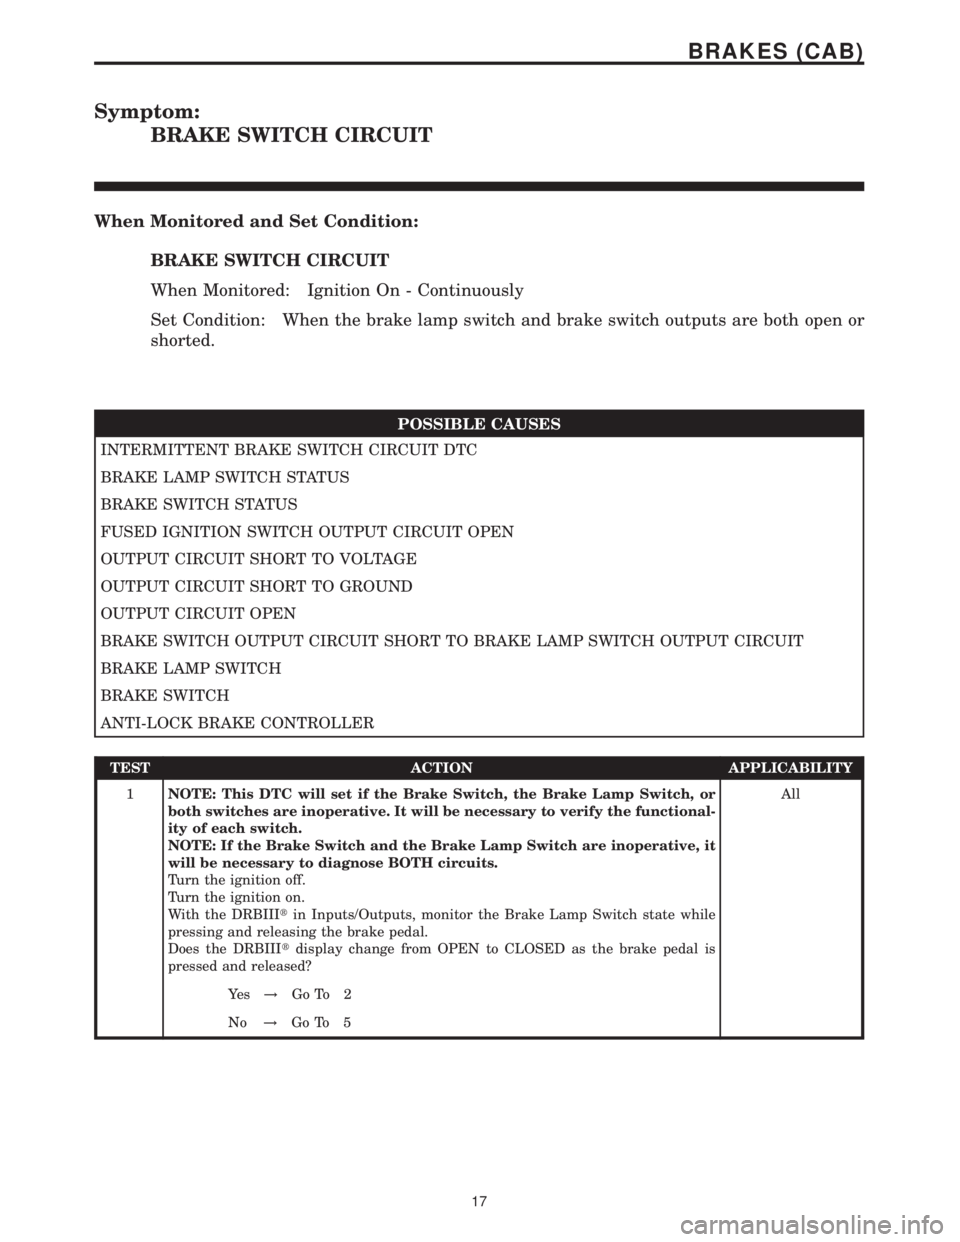
Symptom:
BRAKE SWITCH CIRCUIT
When Monitored and Set Condition:
BRAKE SWITCH CIRCUIT
When Monitored: Ignition On - Continuously
Set Condition: When the brake lamp switch and brake switch outputs are both open or
shorted.
POSSIBLE CAUSES
INTERMITTENT BRAKE SWITCH CIRCUIT DTC
BRAKE LAMP SWITCH STATUS
BRAKE SWITCH STATUS
FUSED IGNITION SWITCH OUTPUT CIRCUIT OPEN
OUTPUT CIRCUIT SHORT TO VOLTAGE
OUTPUT CIRCUIT SHORT TO GROUND
OUTPUT CIRCUIT OPEN
BRAKE SWITCH OUTPUT CIRCUIT SHORT TO BRAKE LAMP SWITCH OUTPUT CIRCUIT
BRAKE LAMP SWITCH
BRAKE SWITCH
ANTI-LOCK BRAKE CONTROLLER
TEST ACTION APPLICABILITY
1NOTE: This DTC will set if the Brake Switch, the Brake Lamp Switch, or
both switches are inoperative. It will be necessary to verify the functional-
ity of each switch.
NOTE: If the Brake Switch and the Brake Lamp Switch are inoperative, it
will be necessary to diagnose BOTH circuits.
Turn the ignition off.
Turn the ignition on.
With the DRBIIItin Inputs/Outputs, monitor the Brake Lamp Switch state while
pressing and releasing the brake pedal.
Does the DRBIIItdisplay change from OPEN to CLOSED as the brake pedal is
pressed and released?All
Ye s!Go To 2
No!Go To 5
17
BRAKES (CAB)
Page 339 of 2305
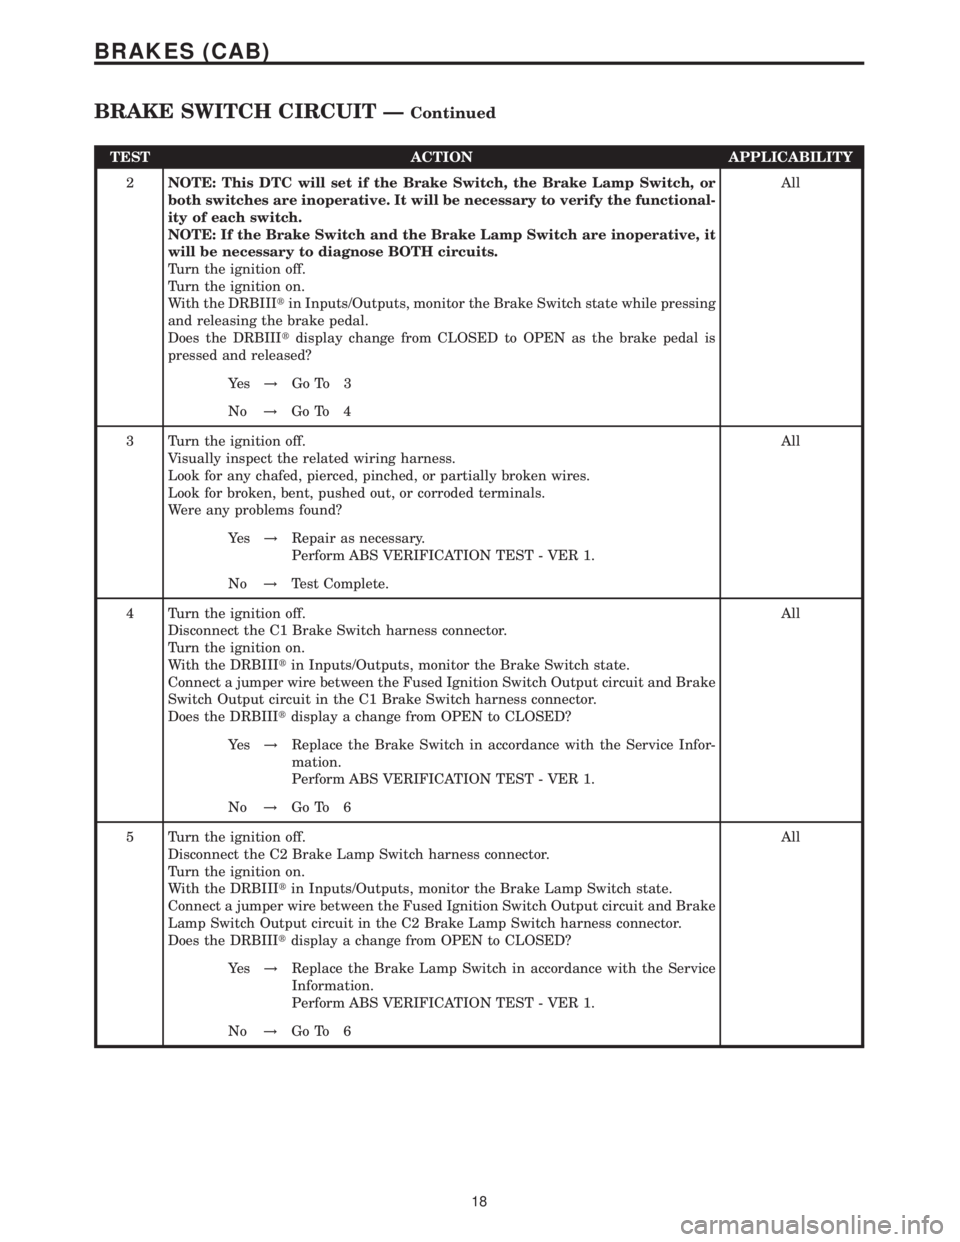
TEST ACTION APPLICABILITY
2NOTE: This DTC will set if the Brake Switch, the Brake Lamp Switch, or
both switches are inoperative. It will be necessary to verify the functional-
ity of each switch.
NOTE: If the Brake Switch and the Brake Lamp Switch are inoperative, it
will be necessary to diagnose BOTH circuits.
Turn the ignition off.
Turn the ignition on.
With the DRBIIItin Inputs/Outputs, monitor the Brake Switch state while pressing
and releasing the brake pedal.
Does the DRBIIItdisplay change from CLOSED to OPEN as the brake pedal is
pressed and released?All
Ye s!Go To 3
No!Go To 4
3 Turn the ignition off.
Visually inspect the related wiring harness.
Look for any chafed, pierced, pinched, or partially broken wires.
Look for broken, bent, pushed out, or corroded terminals.
Were any problems found?All
Ye s!Repair as necessary.
Perform ABS VERIFICATION TEST - VER 1.
No!Test Complete.
4 Turn the ignition off.
Disconnect the C1 Brake Switch harness connector.
Turn the ignition on.
With the DRBIIItin Inputs/Outputs, monitor the Brake Switch state.
Connect a jumper wire between the Fused Ignition Switch Output circuit and Brake
Switch Output circuit in the C1 Brake Switch harness connector.
Does the DRBIIItdisplay a change from OPEN to CLOSED?All
Ye s!Replace the Brake Switch in accordance with the Service Infor-
mation.
Perform ABS VERIFICATION TEST - VER 1.
No!Go To 6
5 Turn the ignition off.
Disconnect the C2 Brake Lamp Switch harness connector.
Turn the ignition on.
With the DRBIIItin Inputs/Outputs, monitor the Brake Lamp Switch state.
Connect a jumper wire between the Fused Ignition Switch Output circuit and Brake
Lamp Switch Output circuit in the C2 Brake Lamp Switch harness connector.
Does the DRBIIItdisplay a change from OPEN to CLOSED?All
Ye s!Replace the Brake Lamp Switch in accordance with the Service
Information.
Perform ABS VERIFICATION TEST - VER 1.
No!Go To 6
18
BRAKES (CAB)
BRAKE SWITCH CIRCUIT ÐContinued
Page 340 of 2305
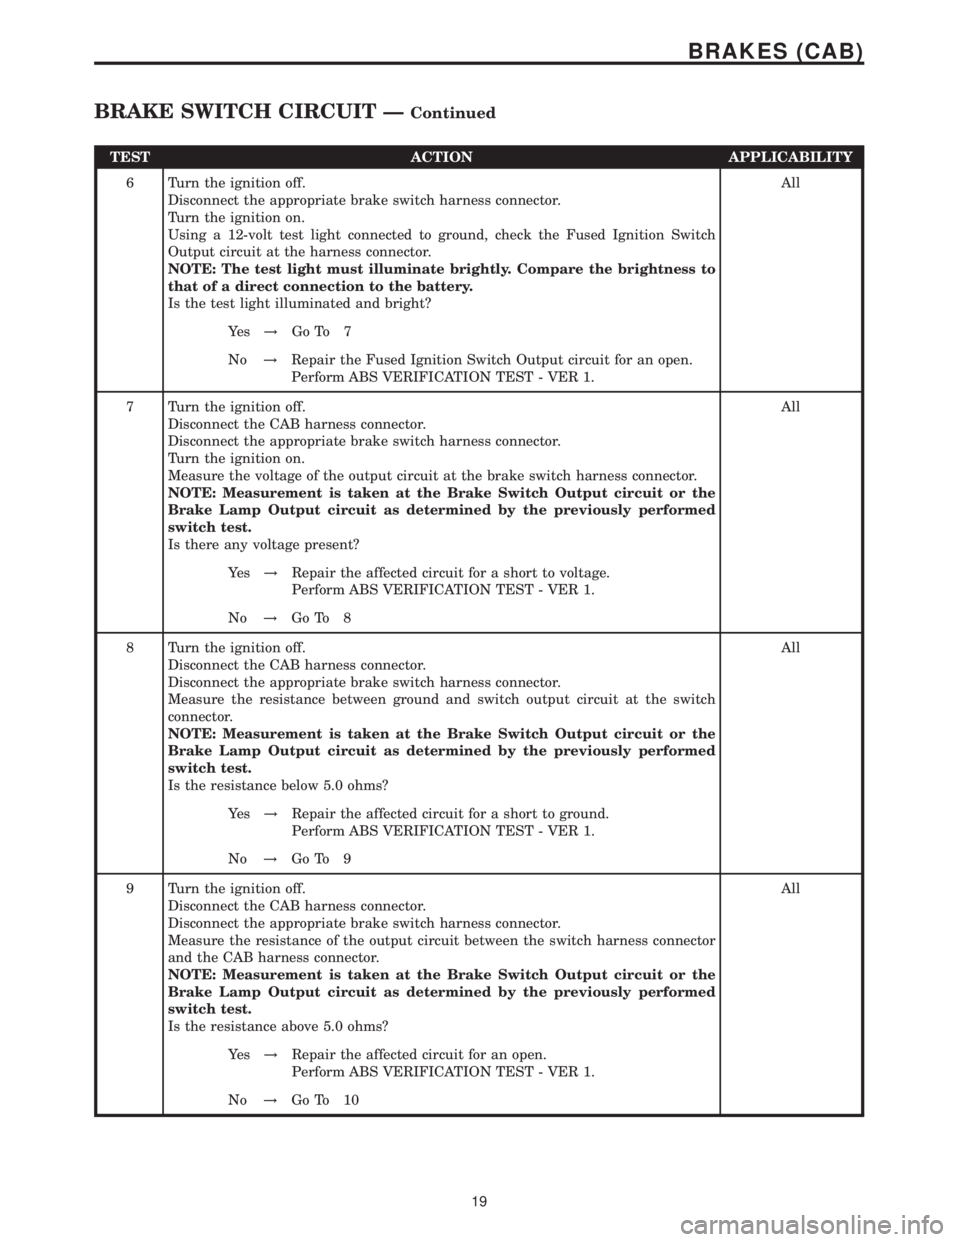
TEST ACTION APPLICABILITY
6 Turn the ignition off.
Disconnect the appropriate brake switch harness connector.
Turn the ignition on.
Using a 12-volt test light connected to ground, check the Fused Ignition Switch
Output circuit at the harness connector.
NOTE: The test light must illuminate brightly. Compare the brightness to
that of a direct connection to the battery.
Is the test light illuminated and bright?All
Ye s!Go To 7
No!Repair the Fused Ignition Switch Output circuit for an open.
Perform ABS VERIFICATION TEST - VER 1.
7 Turn the ignition off.
Disconnect the CAB harness connector.
Disconnect the appropriate brake switch harness connector.
Turn the ignition on.
Measure the voltage of the output circuit at the brake switch harness connector.
NOTE: Measurement is taken at the Brake Switch Output circuit or the
Brake Lamp Output circuit as determined by the previously performed
switch test.
Is there any voltage present?All
Ye s!Repair the affected circuit for a short to voltage.
Perform ABS VERIFICATION TEST - VER 1.
No!Go To 8
8 Turn the ignition off.
Disconnect the CAB harness connector.
Disconnect the appropriate brake switch harness connector.
Measure the resistance between ground and switch output circuit at the switch
connector.
NOTE: Measurement is taken at the Brake Switch Output circuit or the
Brake Lamp Output circuit as determined by the previously performed
switch test.
Is the resistance below 5.0 ohms?All
Ye s!Repair the affected circuit for a short to ground.
Perform ABS VERIFICATION TEST - VER 1.
No!Go To 9
9 Turn the ignition off.
Disconnect the CAB harness connector.
Disconnect the appropriate brake switch harness connector.
Measure the resistance of the output circuit between the switch harness connector
and the CAB harness connector.
NOTE: Measurement is taken at the Brake Switch Output circuit or the
Brake Lamp Output circuit as determined by the previously performed
switch test.
Is the resistance above 5.0 ohms?All
Ye s!Repair the affected circuit for an open.
Perform ABS VERIFICATION TEST - VER 1.
No!Go To 10
19
BRAKES (CAB)
BRAKE SWITCH CIRCUIT ÐContinued