MERCEDES-BENZ SPRINTER 2013 MY13 Operator’s Manual
Manufacturer: MERCEDES-BENZ, Model Year: 2013, Model line: SPRINTER, Model: MERCEDES-BENZ SPRINTER 2013Pages: 334, PDF Size: 3.88 MB
Page 101 of 334
X
Switch off the lighting system.
X Ope nthe hood (Y page 240).
X Turn housing cover 0005counter-clockwise
and remove it.
X Pull out the bulb holder with the bulb.
X Pull the bulb out of the bulb holder.
X Press a new bulb into the bulb holder.
X Insert the bulb holder into the lamp.
X Position housing cover 0005and turn it
clockwise as far as it will go.
X Close the hood. Rear bulbs (Cargo Van/Passenger
Van)
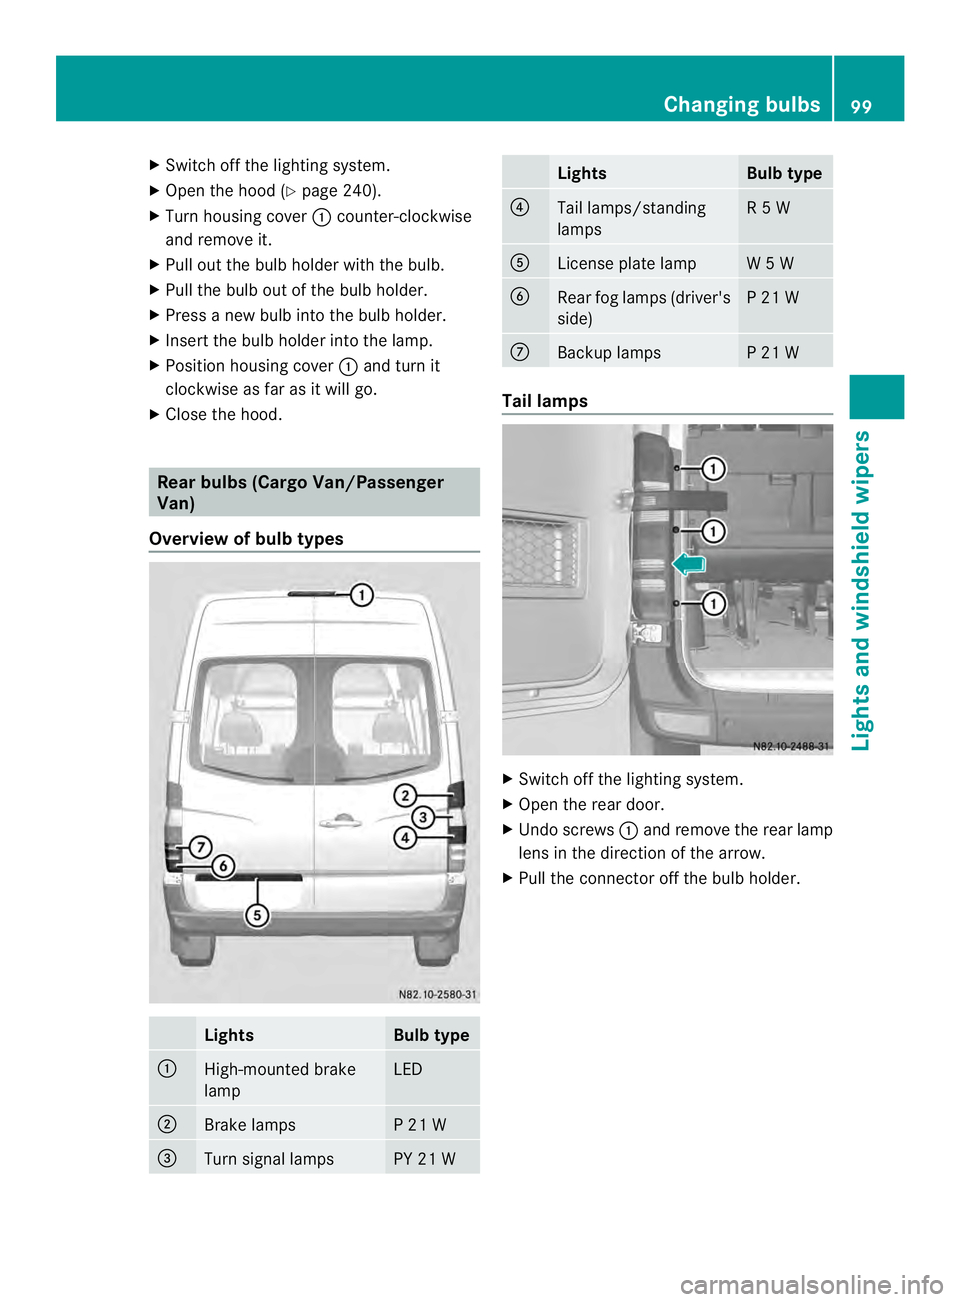
Overview of bulb types Lights Bulb type
0005
High-mounted brake
lamp LED
0006
Brake lamps P 21 W
0026
Turn signal lamps PY 21 W Lights Bulb type
0025
Tail lamps/standing
lamps R 5 W
0023
License plate lamp W 5 W
0024
Rear fog lamps (driver's
side) P 21 W
0018
Backup lamps P 21 W
Tail lamps
X
Switch off the lighting system.
X Open the rear door.
X Undo screws 0005and remove the rear lamp
lens in the direction of the arrow.
X Pull the connector off the bulb holder. Changing bulbs
99Lights and windshield wipers Z
Page 102 of 334
0006
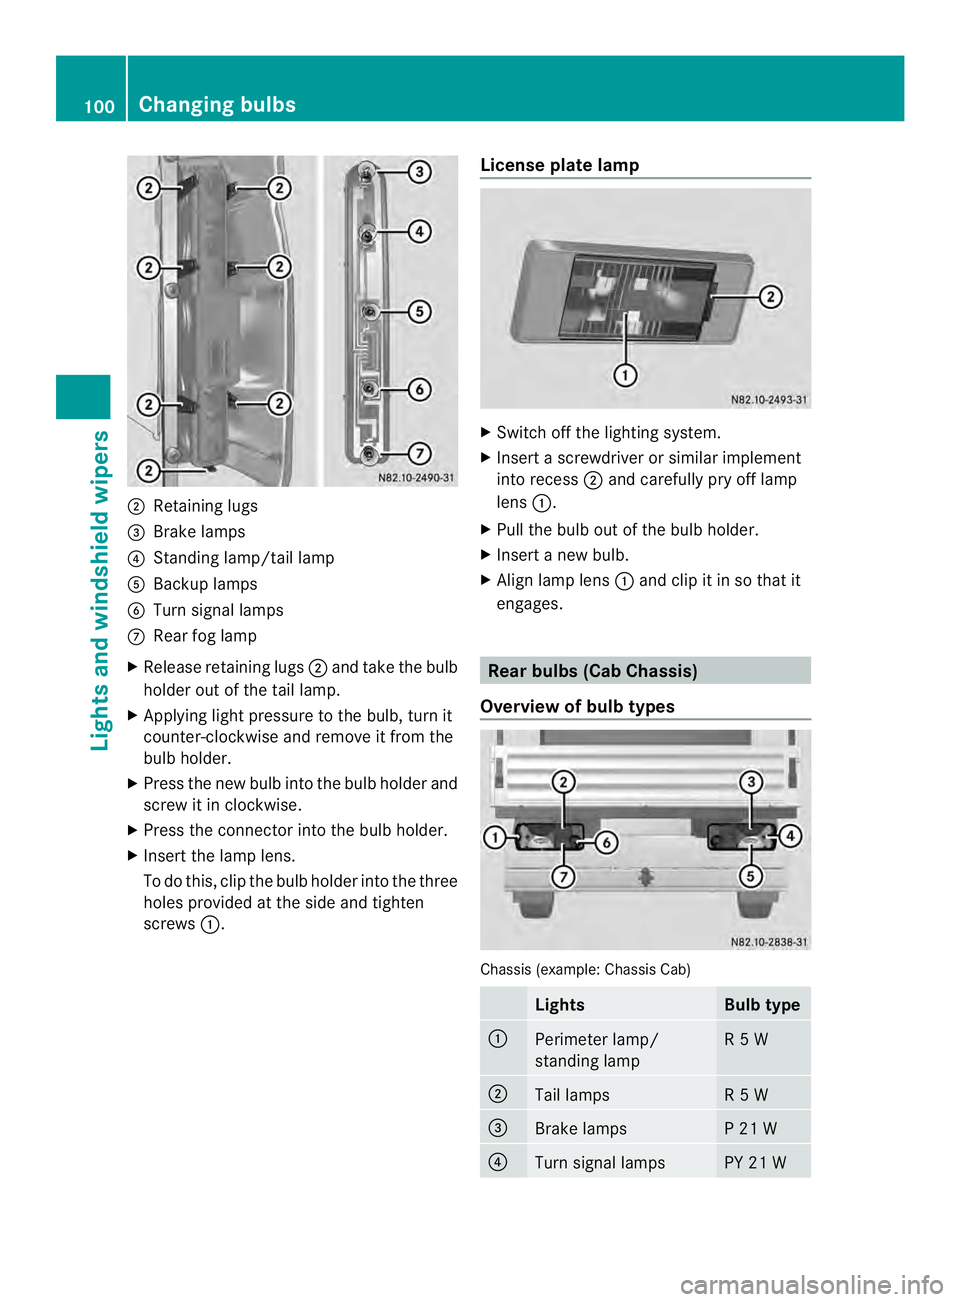
Retaining lugs
0026 Brake lamps
0025 Standing lamp/tail lamp
0023 Backup lamps
0024 Turn signal lamps
0018 Rear fog lamp
X Release retaining lugs 0006and take the bulb
holder out of the tail lamp.
X Applying ligh tpressure to the bulb, turn it
counter-clockwise and remove it from the
bulb holder.
X Press the new bulb into the bulb holder and
screw it in clockwise.
X Press the connector into the bulb holder.
X Insert the lamp lens.
To do this, clip the bulbh older into the three
holes provided at the side and tighten
screws 0005. License plate lamp X
Switch off the lighting system.
X Insert a screwdriver or similar implement
into recess 0006and carefully pry off lamp
lens 0005.
X Pull the bulb out of the bulb holder.
X Insert a new bulb.
X Align lamp lens 0005and clip it in so that it
engages. Rear bulbs (Cab Chassis)
Overview of bulb types Chassis (example: Chassis Cab)
Lights Bulb type
0005
Perimeter lamp/
standing lamp R 5 W
0006
Tail lamps R 5 W
0026
Brake lamps P 21 W
0025
Turn signal lamps PY 21 W100
Changing bulbsLights and windshiel
dwipers
Page 103 of 334
Lights Bulb type
0023
Backup lamps P 21 W
0024
Rear fog lamps (driver's
side) P 21 W
0018
License plate lamp R 5 W
Tail lamps
0005
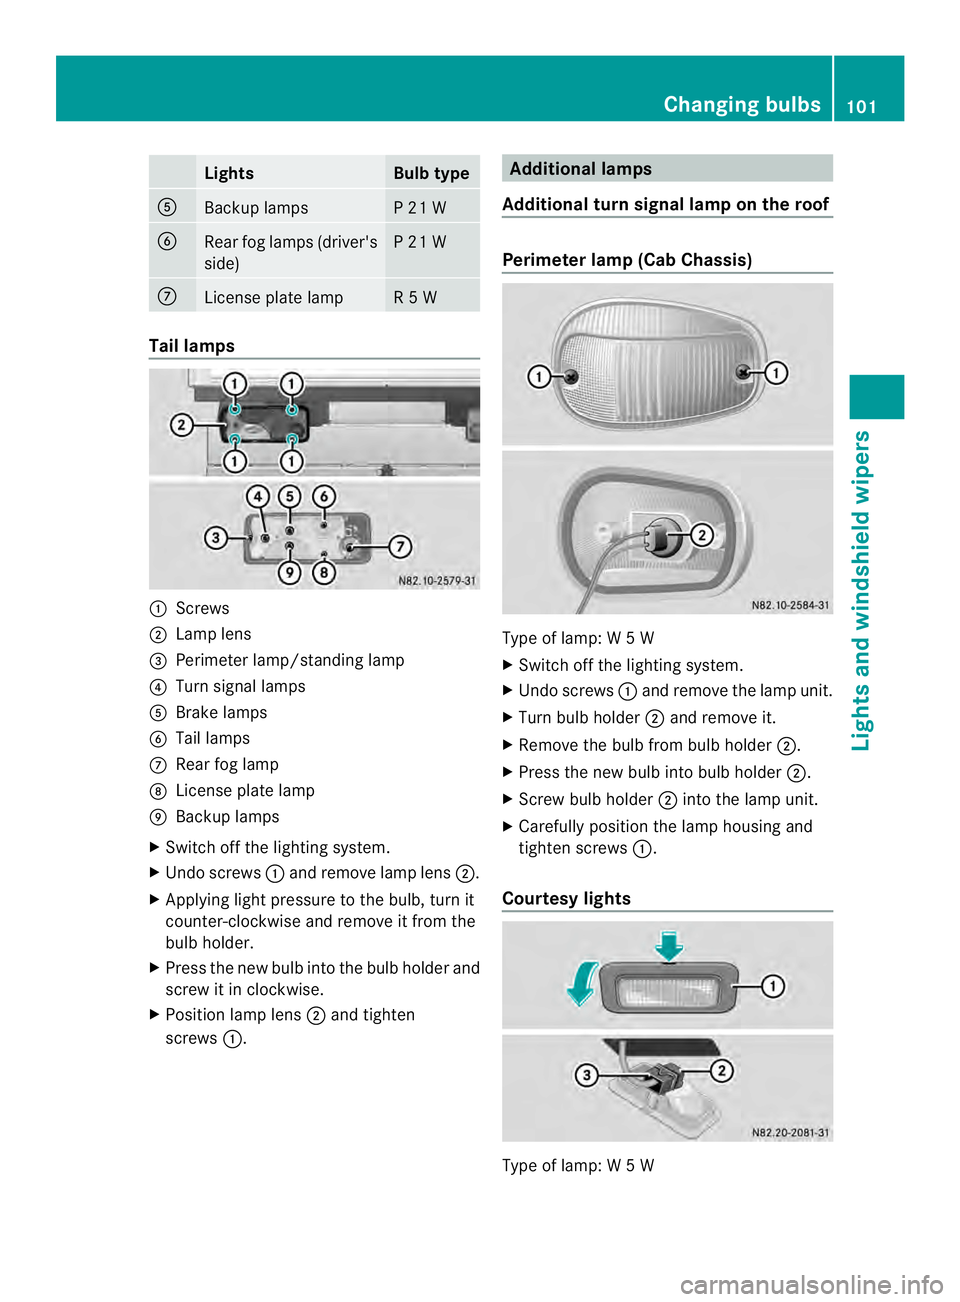
Screws
0006 Lamp lens
0026 Perimete rlamp/standing lamp
0025 Turn signal lamps
0023 Brake lamps
0024 Tail lamps
0018 Rear fog lamp
0019 License plate lamp
001A Backup lamps
X Switch off the lighting system.
X Undo screws 0005and remove lamp lens 0006.
X Applying light pressure to the bulb, tur nit
counter-clockwise and remove it from the
bulb holder.
X Press the new bulb into the bulb holder and
screw it in clockwise.
X Position lamp lens 0006and tighten
screws 0005. Additional lamps
Additional turn signal lamp on the roof Perimete
rlamp (Cab Chassis) Type of lamp: W
5W
X Switch off the lighting system.
X Undo screws 0005and remove the lamp unit.
X Turn bulb holder 0006and remove it.
X Remove the bulb from bulb holder 0006.
X Press the new bulb into bulb holder 0006.
X Screw bulb holder 0006into the lamp unit.
X Carefully position the lamp housing and
tighten screws 0005.
Courtes ylights Type of lamp: W
5W Changing bulbs
101Lights an dwindshield wipers Z
Page 104 of 334
X
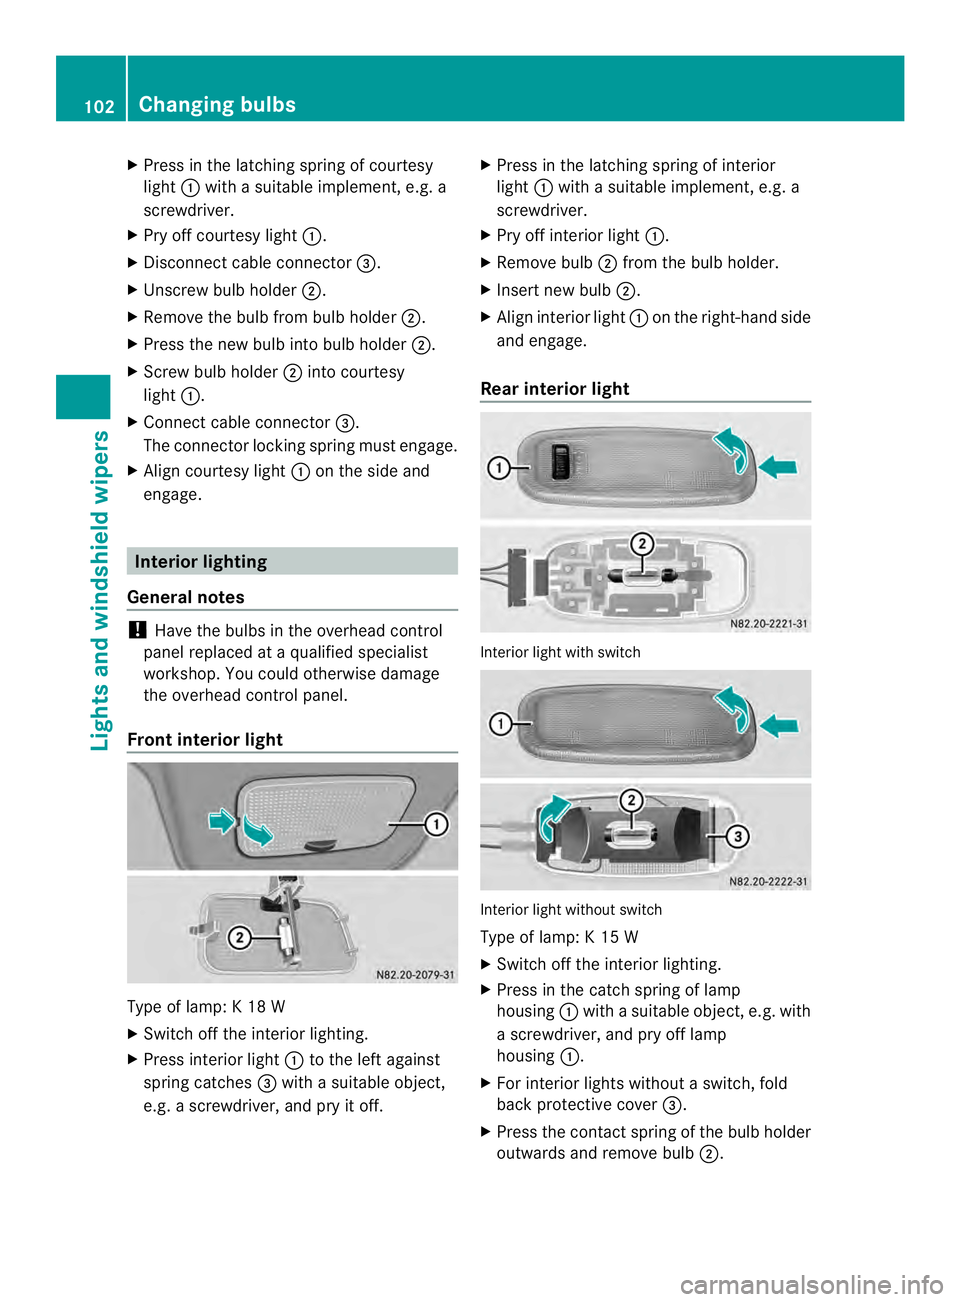
Press in the latching spring of courtesy
light 0005with a suitable implement ,e.g. a
screwdriver.
X Pry off courtesy light 0005.
X Disconnect cable connector 0026.
X Unscrew bulb holder 0006.
X Remove the bulb from bulb holder 0006.
X Press the new bulb into bulb holder 0006.
X Screw bulb holder 0006into courtesy
light 0005.
X Connect cable connector 0026.
The connecto rlocking spring must engage.
X Align courtesy light 0005on the side and
engage. Interior lighting
General notes !
Have the bulbs in the overhead control
panel replaced at a qualified specialist
workshop. You could otherwise damage
the overhead control panel.
Front interior light Type of lamp: K 18 W
X
Switch off the interior lighting.
X Press interior light 0005to the left against
spring catches 0026with a suitable object,
e.g. a screwdriver, and pry it off. X
Press in the latching spring of interior
light 0005with a suitable implement, e.g. a
screwdriver.
X Pry off interior light 0005.
X Remove bulb 0006from the bulb holder.
X Insert new bulb 0006.
X Align interior light 0005on the right-hand side
and engage.
Rear interior light Interior light with switch
Interior light without switch
Type of lamp: K 15 W
X
Switch off the interior lighting.
X Press in the catch spring of lamp
housing 0005with a suitable object, e.g. with
a screwdriver, and pry off lamp
housing 0005.
X For interior lights without a switch, fold
back protective cover 0026.
X Press the contact spring of the bulb holder
outwards and remove bulb 0006.102
Changing bulbsLights and windshiel
dwipers
Page 105 of 334
X
Insert new bulb 0006.
X For interior lights withou taswitch, fold
back protective cover 0026.
X Align lamp housing 0005on the left-hand side
and engage.
i Vehicles with LED lighting: if an LED is
faulty, consult a qualified specialist
workshop.
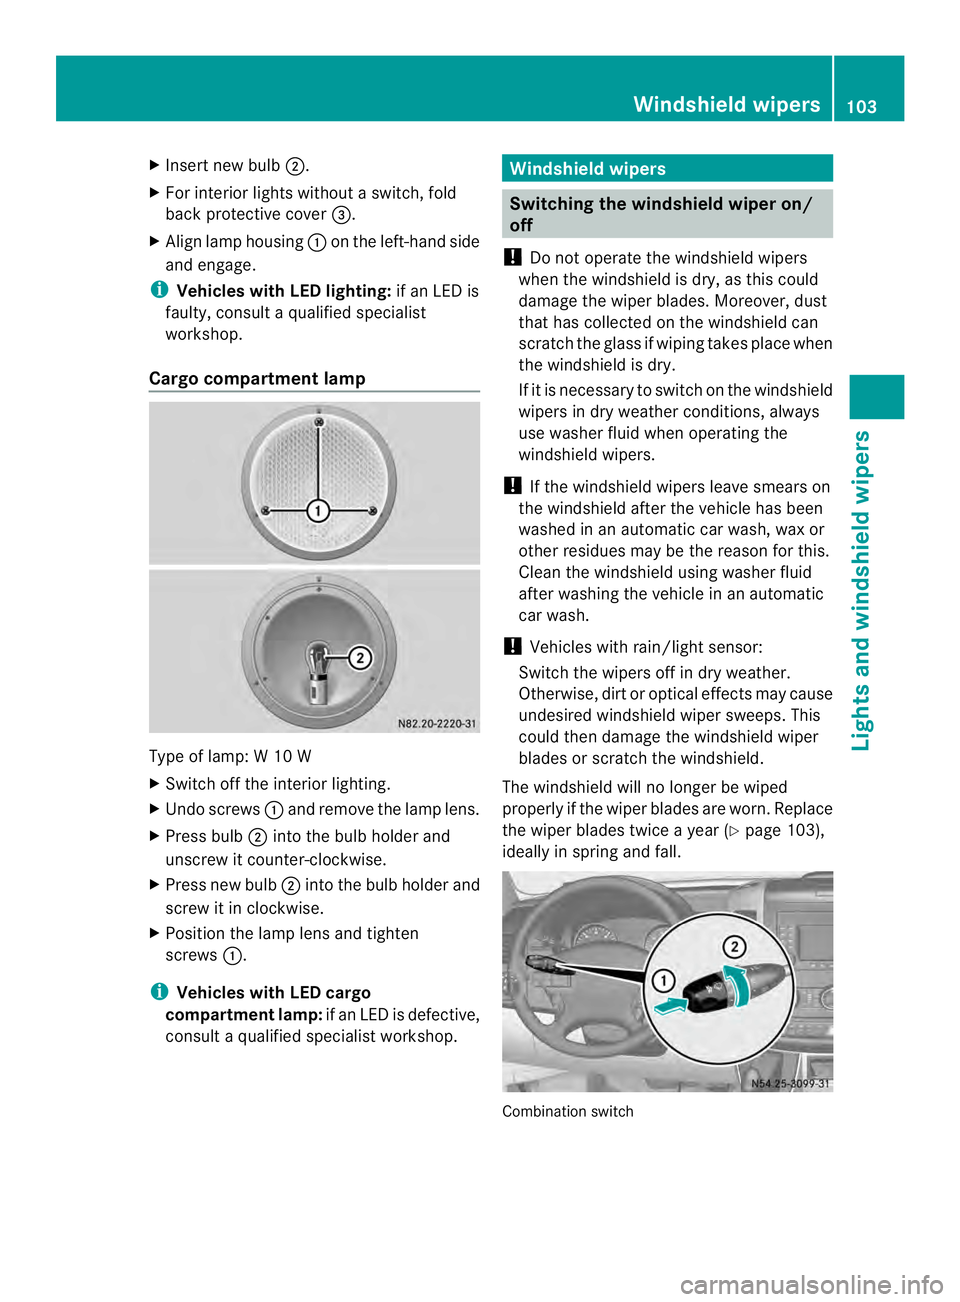
Cargo compartment lamp Type of lamp: W 10 W
X
Switch off the interior lighting.
X Undo screws 0005and remove the lamp lens.
X Press bulb 0006into the bulb holder and
unscrew it counter-clockwise.
X Press new bulb 0006into the bulb holder and
screw it in clockwise.
X Position the lamp lens and tighten
screws 0005.
i Vehicles with LED cargo
compartment lamp: if an LED is defective,
consult a qualified specialist workshop. Windshield wipers
Switching the windshield wiper on/
off
! Do not operate the windshieldw ipers
when the windshield is dry, as this could
damage the wiper blades. Moreover, dust
that has collected on the windshield can
scratch the glass if wiping takes place when
the windshield is dry.
If it is necessary to switch on the windshield
wipers in dry weathe rconditions, always
use washer fluid when operating the
windshield wipers.
! If the windshield wipers leave smears on
the windshield after the vehicle has been
washed in an automatic car wash, wax or
other residues may be the reason for this.
Clean the windshield using washer fluid
after washing the vehicle in an automatic
car wash.
! Vehicles with rain/light sensor:
Switch the wipers off in dry weather.
Otherwise, dirt or optical effects may cause
undesired windshield wiper sweeps. This
could then damage the windshield wiper
blades or scratch the windshield.
The windshield will no longer be wiped
properly if the wiper blades are worn. Replace
the wiper blades twice a year (Y page 103),
ideally in spring and fall. Combination switch Windshield wipers
103Lights and windshiel dwipers Z
Page 106 of 334
X
Turn the key to position 1or 2in the
ignition lock.
X Turn the combination switch in the
direction of arrow 0005to the appropriate
setting depending on the intensity of the
rain.
X Single wipe: push the combination switch
briefly up to the pressure point in the
direction of arrow 0006.
X To wipe with washer fluid: press the
combination switch beyond the pressure
point in the direction of arrow 0006.
i Wipe the windshield using washer fluid
even if it is raining. By doing so, you will
prevent smears on the windshield.
The detent positions of the combination
switch correspond to the following wiper
speeds:
0W indshield wipers off
II ntermittent wipe
II Normal wipe
III Rapid wipe
i Canada only:
If the windshield wipers are switched on
and you stop the vehicle, the windshield
wipe rspeed is reduced. For example, if you
have selected level IIand stop the vehicle,
wiping continues with intermitten twipe
while the vehicle is stationary. If
intermitten twipe is selected, the intervals
become longer.
Vehicles with arain and light sensor:
you can use level Ias the universal setting.
The rai nand light sensor sets the
appropriate wiping frequency
automatically, according to the intensity of
the rain. Whe nyou stop the vehicle, levels
III and IIare switched down to level I
automatically.
The windshield wiper will return to the
original level when you drive faster than
5 mph (8 km/h) again. You can adjust the sensitivity of the rain and
light sensor using the on-board computer
(Y
page 189).
Information on checking the washer fluid
level can be found in the "Maintenance and
care" (Y page 246) section. Switching the rear window wiper on/
off
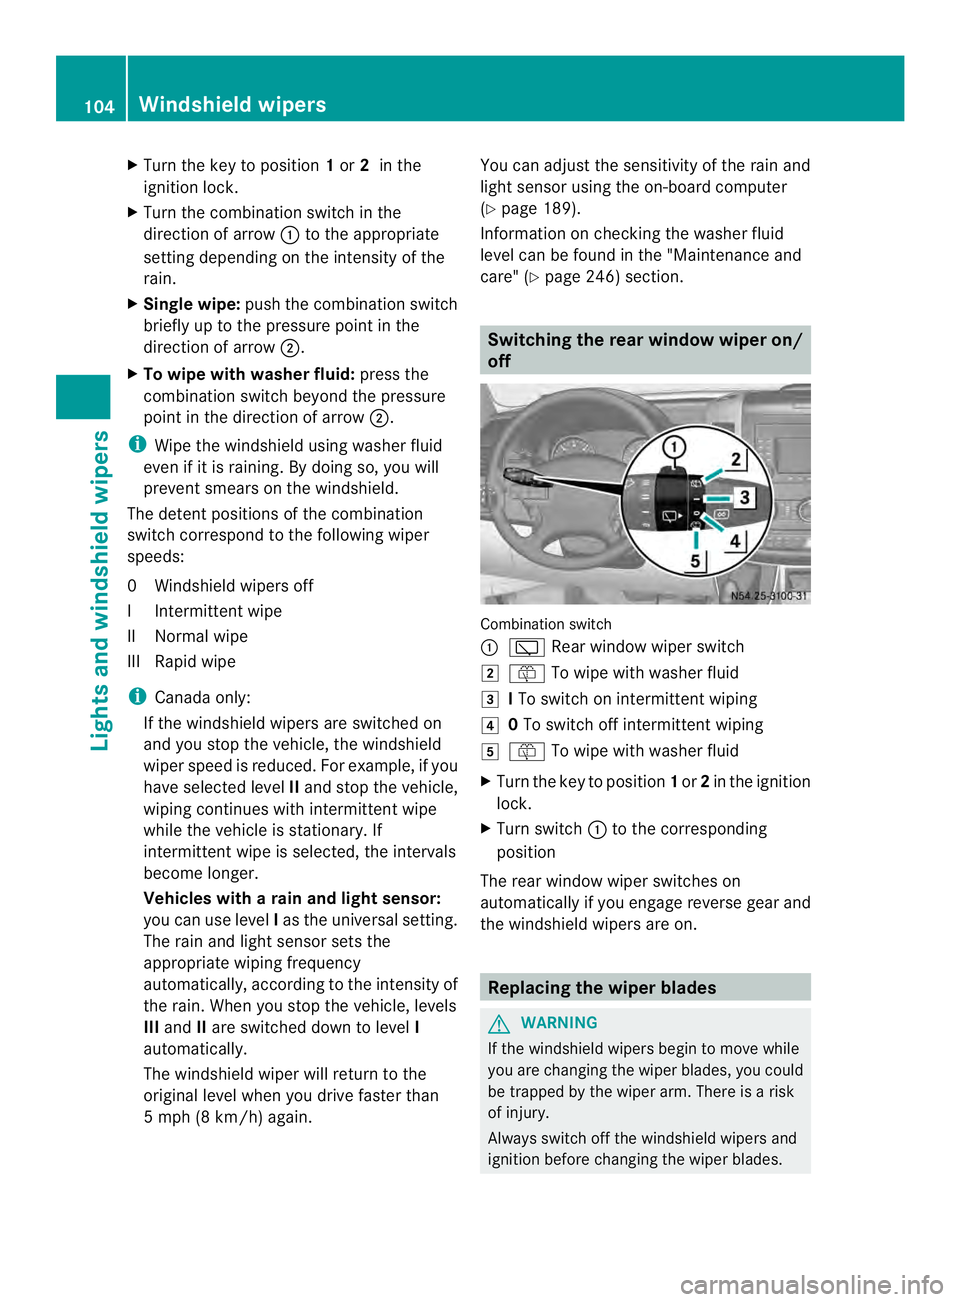
Combination switch
0005
0001 Rear window wiper switch
0009 0006 To wipe with washer fluid
000A ITo switch on intermittent wiping
000E 0To switch off intermittent wiping
000F 0006 To wipe with washer fluid
X Turn the key to position 1or 2in the ignition
lock.
X Turn switch 0005to the corresponding
position
The rear window wiper switches on
automatically if you engage reverse gear and
the windshield wipers are on. Replacing the wiper blades
G
WARNING
If the windshield wipers begin to move while
you are changing the wiper blades, you could
be trapped by the wiper arm. There is a risk
of injury.
Always switch off the windshield wipers and
ignition before changing the wiper blades. 104
Windshield wipersLights and windshiel
dwipers
Page 107 of 334
!
Never open the hood if a windshield wiper
arm has been folded away from the
windshield.
Never fold a windshield wiper arm without
a wiper blade back onto the windshield/
rear window.
Hold the windshield wiper arm firmly when
you change the wiper blade. If you release
the windshield wiper arm without a wiper
blade and it falls onto the windshield, the
windshield may be damaged by the force of
the impact.
We recommend that you have the wiper
blades replaced at a qualified specialist
workshop.
! Only hold the wiper blade by the wiper
arm. You could otherwise damage the
wiper rubber.
The windshield will no longer be wiped
properly if the wiper blades are worn. Replace
the wiper blades twice a year, ideally in spring
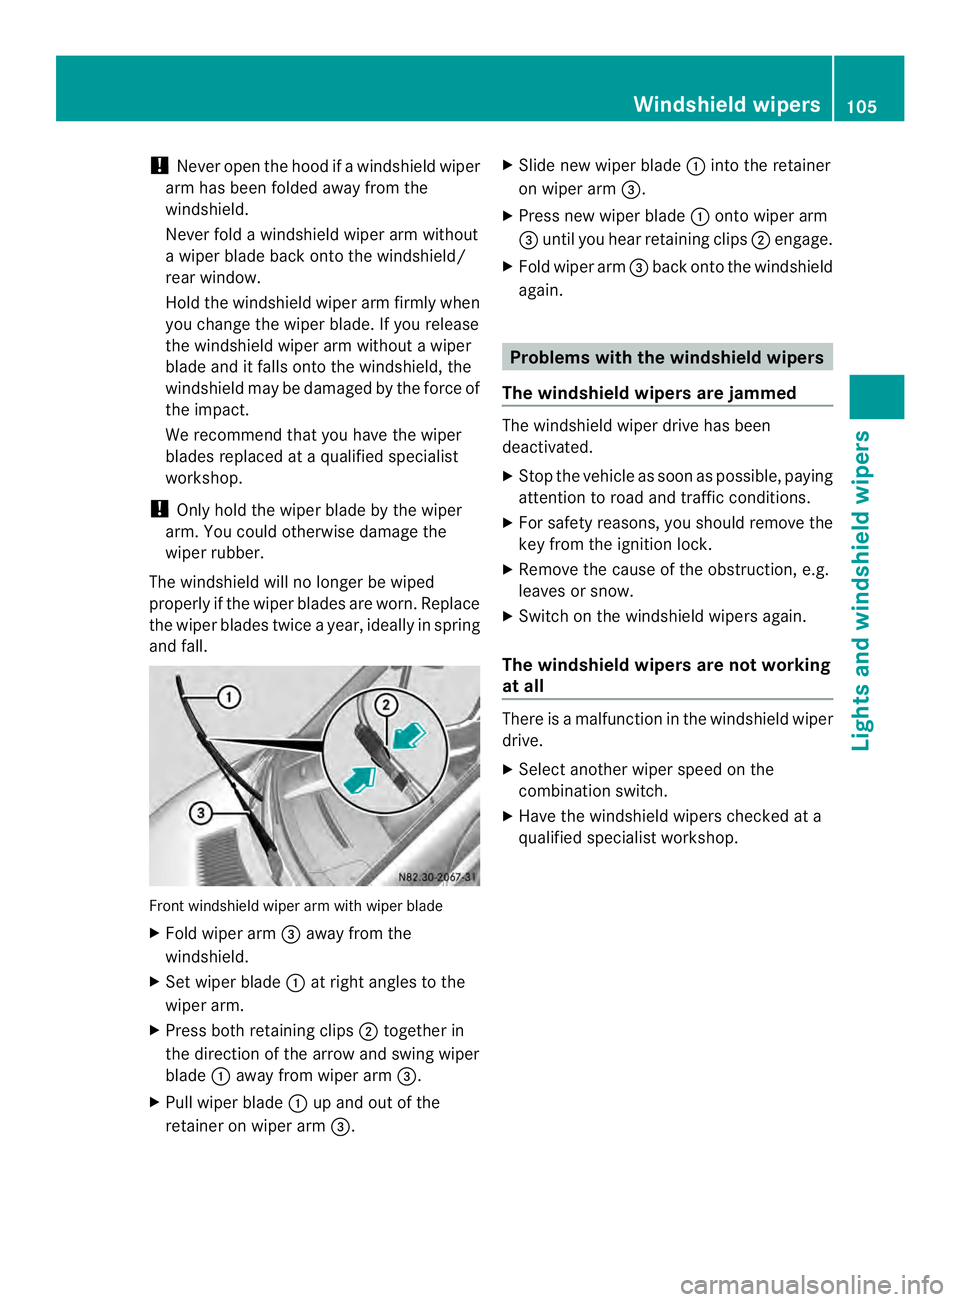
and fall. Front windshield wiper arm with wiper blade
X Fold wiper arm 0026away from the
windshield.
X Set wiper blade 0005at right angles to the
wiper arm.
X Press both retaining clips 0006together in
the direction of the arrow and swing wiper
blade 0005away from wiper arm 0026.
X Pull wiper blade 0005up and out of the
retainer on wiper arm 0026. X
Slide new wiper blade 0005into the retainer
on wiper arm 0026.
X Press new wiper blade 0005onto wiper arm
0026 until you hear retaining clips 0006engage.
X Fold wiper arm 0026back onto the windshield
again. Problems with the windshield wipers
The windshield wipers are jammed The windshield wiper drive has been
deactivated.
X
Stop the vehicle as soon as possible, paying
attention to road and traffic conditions.
X For safety reasons, you should remove the
key from the ignition lock.
X Remove the cause of the obstruction, e.g.
leaves or snow.
X Switch on the windshield wipers again.
The windshield wipers are not working
at all There is a malfunction in the windshield wiper
drive.
X
Select another wiper speed on the
combination switch.
X Have the windshield wipers checked at a
qualified specialist workshop. Windshield wipers
105Lights and windshield wipers Z
Page 108 of 334

106
Page 109 of 334
Useful information
............................108
Overview of climate control sys-
tems ................................................... 108
Operating the climate control sys-
tem ..................................................... 112
Adjusting the air vents .....................117
Operating the auxiliary heating
system ............................................... 118
Operating the cargo compartment
air vents ............................................. 129 107Climate control
Page 110 of 334

Useful information
This Operator's Manual describes all models
as well as standard and optional equipment
of your vehicle that were available at the time
of going to print. Country-specific variations
are possible. Note that your vehicle may not
be equipped with all of the described
functions. This also applies to systems and
functions relevant to safety.
Read the information on qualified specialist
workshops (Y page 26). Overview of climate control systems
Important safety notes
Observe the recommended settings on the
following pages. Otherwise, the windows
could fog up.
Climate control regulates the temperature
and the humidity in the vehicle interior and
filters undesirable substances from the air.
Climate control is only operational when the
engine is running. The system only functions
optimally when the side windows are closed.
i Ventilate the vehicle for a brief period
during warm weather. In order to cool the
vehicle more rapidly, switch climate control
to air-recirculation mode briefly. This will
speed up the cooling process and the
desired vehicle interior temperature will be
reached more quickly.
i The integrated filter can filter out most
particles of dust and completely filters out
pollen. Aclogged filter reduces the airflow
into the vehicle interior .For this reason,
you should always observe the interval for
replacing the filter, which is specified in the
Maintenance Booklet .As it depends on
environmental conditions, e.g. heavy air
pollution, the interval may be shorter than
stated in the Maintenance Booklet. 108
Overview of climate control systemsClimate control