differential MITSUBISHI 3000GT 1991 Workshop Manual
[x] Cancel search | Manufacturer: MITSUBISHI, Model Year: 1991, Model line: 3000GT, Model: MITSUBISHI 3000GT 1991Pages: 1146, PDF Size: 76.68 MB
Page 628 of 1146
27-32
REAR AXLE
REASSEMBLYM2711- .
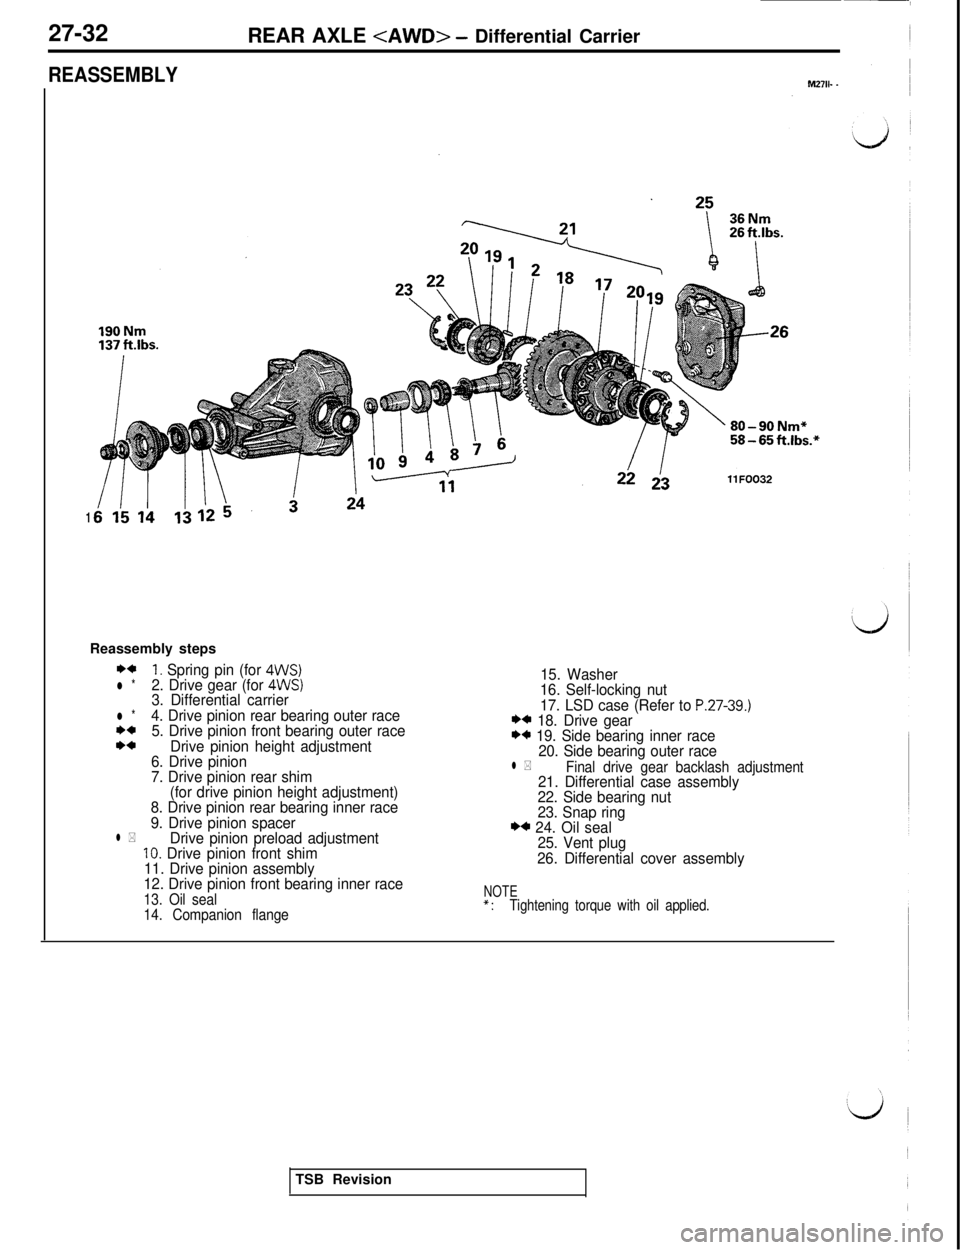
1Reassembly steps
**1. Spring pin (for 4WS)l *2. Drive gear (for 4WS)3. Differential carrierl *4. Drive pinion rear bearing outer race**5. Drive pinion front bearing outer race*aDrive pinion height adjustment
6. Drive pinion
7. Drive pinion rear shim
(for drive pinion height adjustment)
8. Drive pinion rear bearing inner race
9. Drive pinion spacer
l *Drive pinion preload adjustment10. Drive pinion front shim
11. Drive pinion assembly
12. Drive pinion front bearing inner race
13. Oil seal
14. Companion flange
15. Washer
16. Self-locking nut
17. LSD case (Refer to
P.27-39.)** 18. Drive gear** 19. Side bearing inner race
20. Side bearing outer race
l *Final drive gear backlash adjustment21. Differential case assembly
22. Side bearing nut
23. Snap ring
** 24. Oil seal
25. Vent plug
26. Differential cover assembly
NOTE*:Tightening torque with oil applied.TSB Revision
Page 629 of 1146
REAR AXLE
27-33
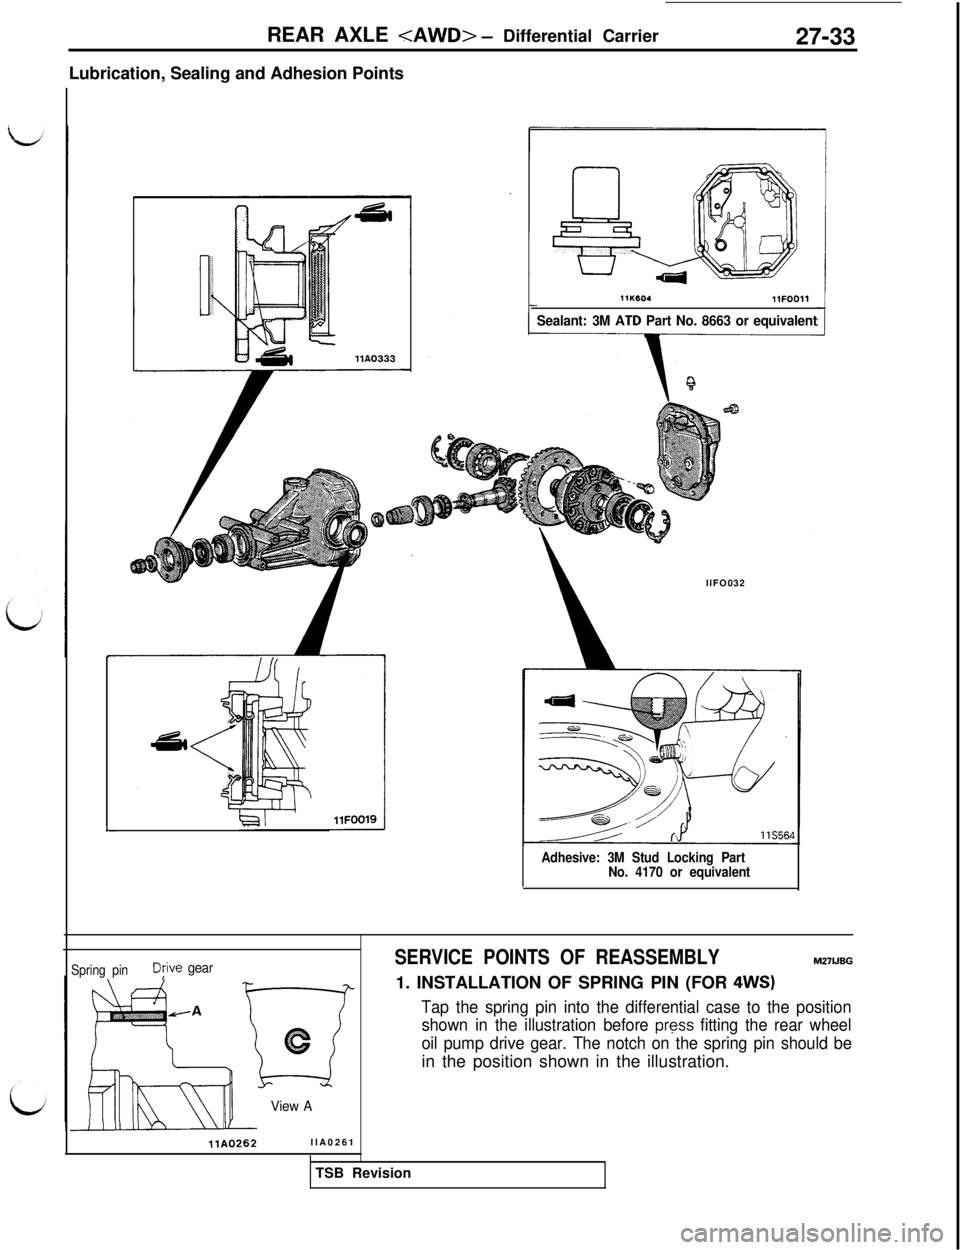
Lubrication, Sealing and Adhesion Points
L
11lwO.llFOO11
Sealant: 3M AID Part No. 8663 or equivalentllFO032
Adhesive: 3M Stud Locking Part
No. 4170 or equivalent
Spring pinDjive gear
View A
ilA0262llA0261
SERVICE POINTS OF REASSEMBLYM27UBG
1. INSTALLATION OF SPRING PIN (FOR
4WS)
Tap the spring pin into the differential case to the position
shown in the illustration before
press fitting the rear wheel
oil pump drive gear. The notch on the spring pin should bein the position shown in the illustration.
TSB Revision
Page 630 of 1146
27-34
REAR AXLE
YYW!-01
I1 11AOlOl
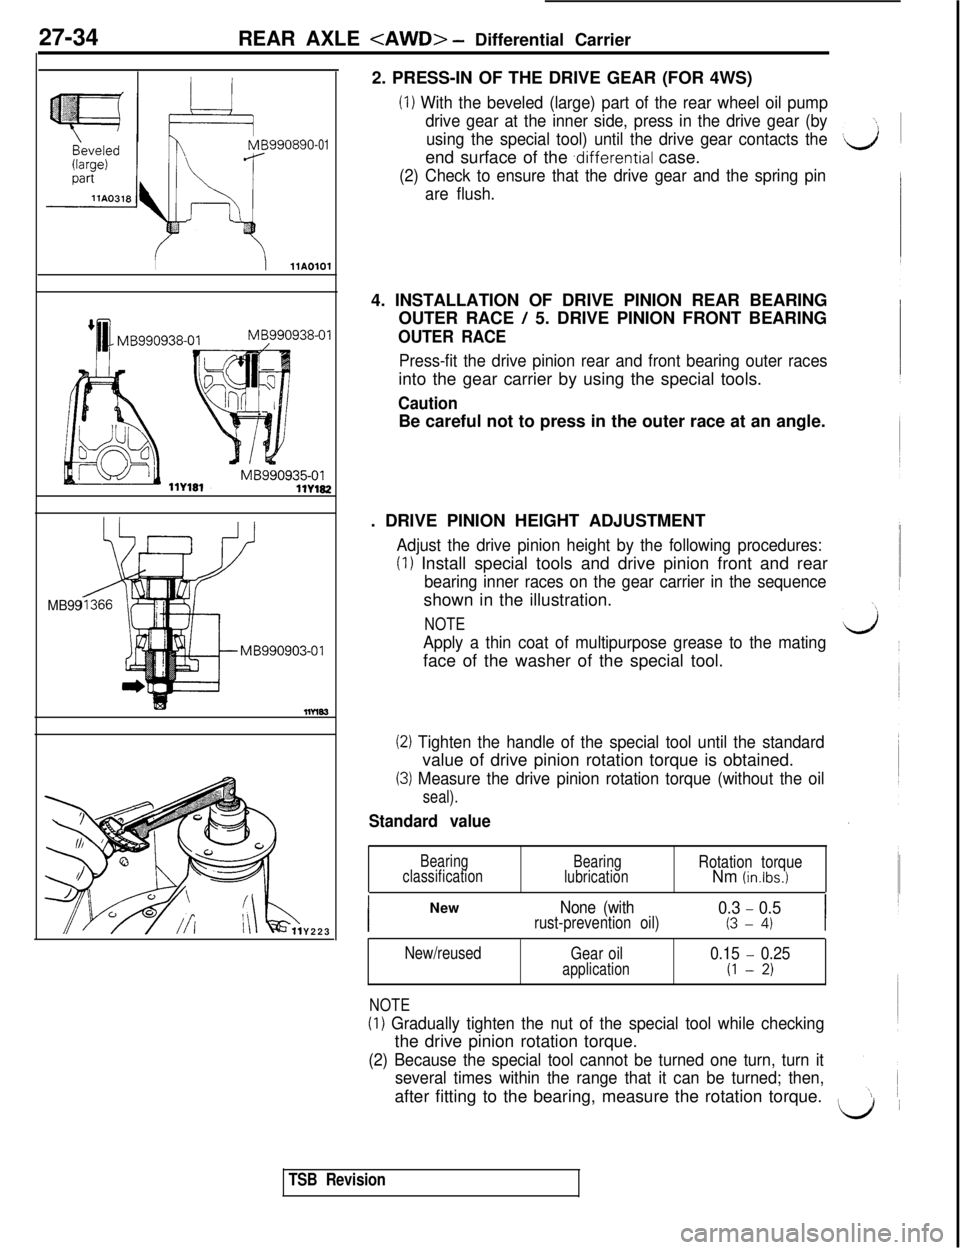
MB99Y2232. PRESS-IN OF THE DRIVE GEAR (FOR 4WS)
(1) With the beveled (large) part of the rear wheel oil pump
drive gear at the inner side, press in the drive gear (by
using the special tool) until the drive gear contacts theend surface of the
.differential case.
(2) Check to ensure that the drive gear and the spring pin
are flush.4. INSTALLATION OF DRIVE PINION REAR BEARING
OUTER RACE
/ 5. DRIVE PINION FRONT BEARING
OUTER RACE
Press-fit the drive pinion rear and front bearing outer racesinto the gear carrier by using the special tools.
CautionBe careful not to press in the outer race at an angle.
. DRIVE PINION HEIGHT ADJUSTMENT
Adjust the drive pinion height by the following procedures:
(1) Install special tools and drive pinion front and rear
bearing inner races on the gear carrier in the sequenceshown in the illustration.
NOTE
Apply a thin coat of multipurpose grease to the matingface of the washer of the special tool.
(2) Tighten the handle of the special tool until the standardvalue of drive pinion rotation torque is obtained.
(3) Measure the drive pinion rotation torque (without the oil
seal).
Standard value
Bearing
classificationBearing
lubricationRotation torqueNm (in.lbs.1
INew
None (with0.3 - 0.5rust-prevention oil)(3 - 4)I
New/reused
NOTEGear oil
application0.15 - 0.25
(1 - 2)
(1) Gradually tighten the nut of the special tool while checkingthe drive pinion rotation torque.
(2) Because the special tool cannot be turned one turn, turn it
several times within the range that it can be turned; then,after fitting to the bearing, measure the rotation torque.
L/1 1
TSB Revision
Page 631 of 1146
REAR AXLE
MB990802-01
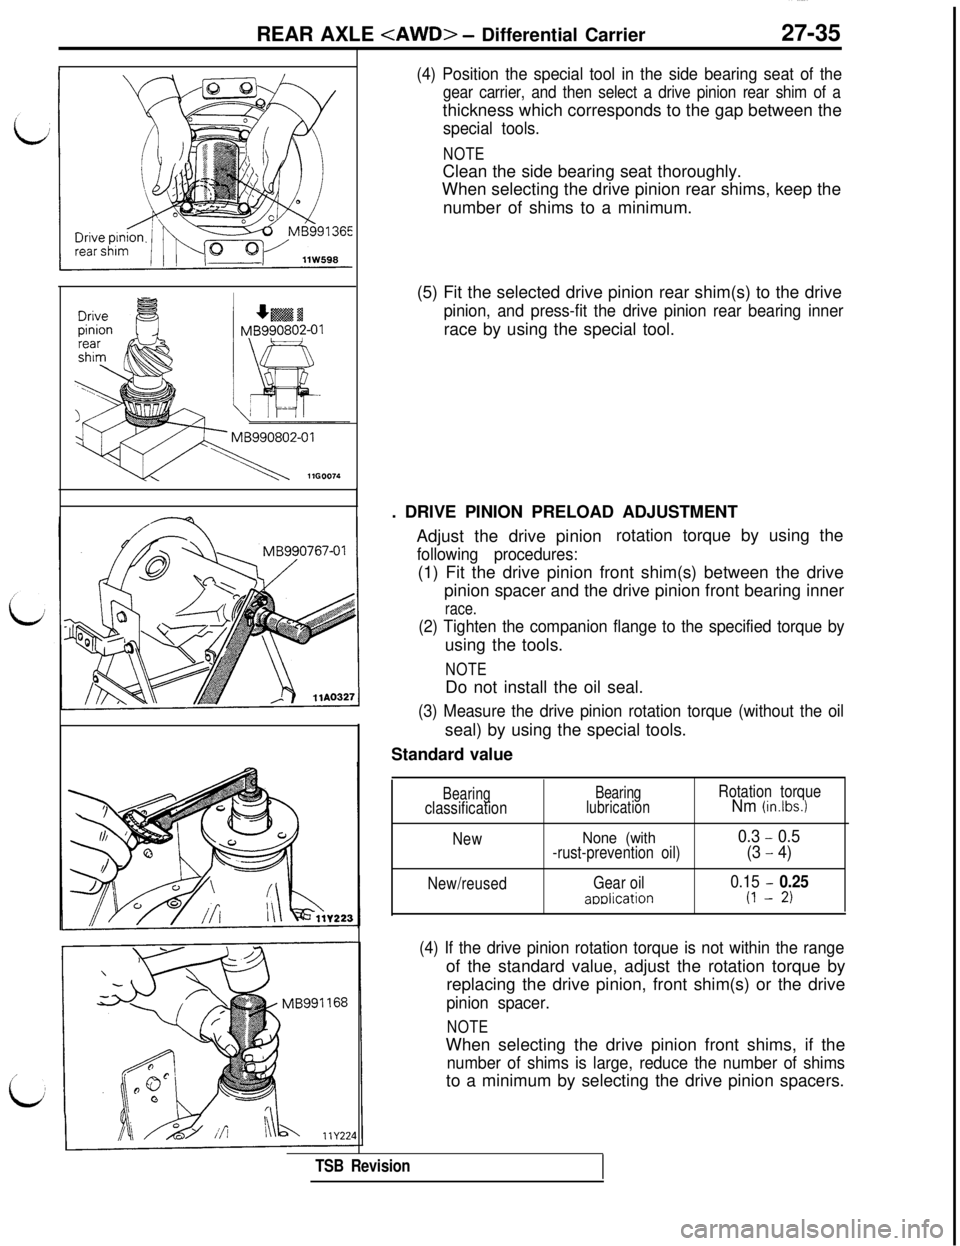
(4) Position the special tool in the side bearing seat of the
gear carrier, and then select a drive pinion rear shim of athickness which corresponds to the gap between the
special tools.
NOTEClean the side bearing seat thoroughly.
When selecting the drive pinion rear shims, keep the
number of shims to a minimum.
(5) Fit the selected drive pinion rear shim(s) to the drive
pinion, and press-fit the drive pinion rear bearing innerrace by using the special tool.
. DRIVE PINION PRELOAD ADJUSTMENT
Adjust the drive pinionrotation torque by using the
following procedures:(1) Fit the drive pinion front shim(s) between the drive
pinion spacer and the drive pinion front bearing inner
race.
(2) Tighten the companion flange to the specified torque byusing the tools.
NOTEDo not install the oil seal.
(3) Measure the drive pinion rotation torque (without the oilseal) by using the special tools.
Standard value
Bearingclassification
New
New/reusedBearing
lubrication
None (with-rust-prevention oil)
Gear oil
amlication
Rotation torqueNm (in.lbs.)
0.3 - 0.5
(3
- 4)
0.15 - 0.25
(I - 2)
(4) If the drive pinion rotation torque is not within the rangeof the standard value, adjust the rotation torque by
replacing the drive pinion, front shim(s) or the drive
pinion spacer.
NOTEWhen selecting the drive pinion front shims, if the
number of shims is large, reduce the number of shimsto a minimum by selecting the drive pinion spacers.
TSB Revision
Page 632 of 1146

27-36REAR AXLE
:$.:::..::..&‘p
.!I Ia
.:...:.:::.:B. . ..i
\Grease
J
11 D55411223(5) Remove the companion flange and drive pinion once
again.
Drive the oil seal into the qear carrier front lip by using_
the special tool.Apply multipurpose grease to the oil seal lip.
(6) Apply a thin coat of multipurpose grease to the
companion flange contacting surface of the washer
before installing drive pinion assembly.
(7) Install the drive pinion assembly and companion flangewith mating marks properly aligned, and tighten the
companion flange self-locking nut to the specified
torque by using the special tools.
(8) Measure the drive pinion rotation torque (with oil seal)
to verify that the drive pinion rotation torque complies
with the standard value.
Standard value
Bearing
classificationBearrng
lubricationRotation torqueNm (in.lbs.)
Nt?WNone (with
0.5 - 0.7rust-prevention oil)(4 - 6)New/reused
Gear oil0.35 - 0.45
application
(3 - 4)If there is a deviation from the standard value, check
whether or not there is incorrect tightening torque of
the companion flange tightening self-locking nut, or
incorrect fitting of the oil seal.
18. INSTALLATION OF DRIVE GEAR
(I) Clean the drive gear attaching bolts.
(2) Use an Ml0 x 1.25 tap to remove the adhesive adhering
to the threaded holes of the drive gear, and then cleanthe threaded holes by applying compressed air.
TSB Revision
Page 633 of 1146

REAR AXLE
III IllFO024
llFO021
When backlash is
1 When backlash is 1
(3) Apply multipurpose adhesive to the threaded holes ofthe drive gear.
Specified adhesive: 3M Stud Locking Part No. 4170or equivalent
(4) Install the drive gear onto the differential case with the
mating marks properly aligned. Tighten the bolts to the
specified torque in a diagonal sequence.
19. PRESS-FITTING OF SIDE BEARING INNER RACE
Press-fit the side bearing inner races to the differential caseby using the special tool.
. FINAL DRIVE GEAR BACKLASH ADJUSTMENT
(1) Using the special tool, temporarily tighten the side
bearing nut until it is in the state just before preloadingof the side bearing.
(2) Measure the final drive gear backlash.
Standard value: 0.11
- 0.16 mm (.004 - .006 in.)
NOTE
Measure at four or more points around the drive gear
circumference.(3) Using the special tool (MB991367 and
MB991385),adjust the backlash to standard value by moving the
side bearing nut as shown.
NOTE
First turn the side bearing nut for loosening, and thenturn (by the same amount) the side bearing nut for
tightening.
excesswe 1102671TSB Revision
Page 634 of 1146

27-38REAR AXLE
L
Snap ringllFOOO9
llFOOl0
11 FOO20
8-01
380
F‘/T\br -1lFOO12
(4) Using the special tool, to apply the preload, turn down
both right and left side bearing nuts on half the distancebetween centers of two neighboring holes.
\d(5) Fit the snap ring at either position shown to lock the
side bearing nut.
(6) Check the drive gear and drive pinion for tooth contact.
If poor contact is evident, make adjustment. (Refer to
P.27-28.)(7) Measure the drive gear
runout at the shoulder on the
reverse side of the drive gear.
Limit: 0.05 mm
(.002 in.)
(8) If the drive gear
runout exceeds the limit, reinstall by
changing the phase of the drive gear and differential
’
case, and remeasure.d
24. INSTALLATION OF OIL SEAL
(1) Using the special tool, install the oil seal flush with the
gear carrier end face.
(2) Apply a thin coat of Multi-purpose grease to the oil seal
lip.
TSB Revision
Page 635 of 1146

REAR AXLE
LSD CASE ASSEMBLY
/DISASSEMBLY AND REASSEMBLYM27NE- -
L
Disassemblysteps1. Screw
l +2. Differential case A+I) I)+3. Thrust washer (L.H.)1 lFOO33
4. Viscous unit‘M 5. Pinion mate washer*a 6. Differential pinion mate7. Differential pinion shaft
8. Differential side gear (R.H.)l *9. Thrust washer (R.H.)l 10. Differential case B
Feeler gauge
INSPECTION BEFORE DISASSEMBLYM27NFAA
1. CHECKING THE DIFFERENTIAL GEAR BACKLASH
(1) Secure the differential case assembly in a vise so thatthe differential side gear (right) is facing upward.
CautionWhen securing the vise, be sure not to hold the
differential case assembly too tightly.
(2) Insert a 0.03 mm LOO12 in.) feeler gauge at two places
(diagonally) between differential case
I3 and the thrust
washer (right).
CautionDo not insert a feeler gauge in the oil groove of
differential case
B.
7--u/Differential side Thrust washer
gear (right)(right)llFO037
Page 636 of 1146

27-40REAR AXLE
r
Differential side
Differential
Differential
pinion mate
Thrust washer
llPO128
Pinion matewasherllPO12’
1 lFOO35(3) Insert the special tool at the spline part of differential
case B (right) and check to be sure the side gear (right)
rotates.
(4) Then insert a 0.09 mm t.0035 in.) feeler gauge to \Ljreplace a 0.03 mm
(.0012 in.) gauge.
(5) Insert the special tool at the spline part of the
differential side gear (right) and check to be sure the
side gear (right) does not rotate.
Differential gear backlash
Standard value (clearance in thiust direction ofside gear): 0.03
- 0.09 mm (.0012 - .0035 in.)
NOTE
If the clearance in the thrust direction of the side gear iswithin the standard value range, the backlash of the
differential gear is normal.
(6) If the clearance in the thrust direction of the side gear is
not within the standard value range, remove differentialcase A and make the adjustment by adjusting the
thickness of the thrust washer (left).
SERVICE POINTS OF DISASSEMBLYM27NGAA
3. REMOVAL OF THE THRUST WASHER (LEFT)
/ 9.
THRUST WASHER (RIGHT)The thrust washers (left and right) are of different thick-
ness, and so should be discriminated in some way for
reference during installation.
INSPECTIONM27NHAA
(1) Check the gears and differential pinion shaft for unusual
wear or damage.
(2) Check the spline part of the differential side gear (right) forstepped wear or damage.
(3) Check the thrust washer and pinion mate washer for
unusual wear of contact surfaces, heat damage or other
damage.(4) Check differential cases A and B for unusual wear of
contact surfaces, heat damage or other damage.
0: Contact surface with the viscous unit
0: Contact sur acef
with the pinion mate washer
@ and 0: Contact surfaces with thrust washer
TSB Revision
1
Page 637 of 1146

iREAR AXLE
viscous unit
bSpline part
(5) Check the spline part of the viscous unit for stepped wear
or damage, and check the contact surface with differentialcase
B.(6) Check the side gear (left) of the viscous unit for unusual
wear or damage.
Pinion mate
llPO134
Feeler qauqe
/11 FO03Feeler
Differential g;ar (right)Th‘rust kasher (righl
11 FOO3i
SERVICE POINTS OF REASSEMBLYM27NlhA
10. INSTALLATION OF THE DIFFERENTIAL CASE B
/ 2.
DIFFERENTIAL CASE A
Align the mating marks of differential cases B and A, and
assemble the cases.
6.INSTALLATION OF THE DIFFERENTIAL PINION MATE /5. PINION MATE WASHER
With the washer in the position shown in the illustration,
install to the differential pinion shaft, and then install to
differential case B.3. SELECTION OF THE THRUST WASHER (LEFT)
If the differential side gear and pinion mate gear have beenreplaced, select the thrust washer (left) by following the
steps below.
(1) Wash the differential side gear and pinion mate gear inunleaded gasoline to remove all oil, grease, etc.
(2) Install the previously used thrust washers (being carefulthe left and right ones are used at the correct side),
together with the gears, viscous unit, pinion mate
washer and pinion shaft, to differential cases A and B,and then, using screws, secure them temporarily.
(3) Secure the differential case assembly in a vise so thatthe differential side gear (right) is facing upward.
Caution
When securing in the vise, be sure not to hold thedifferential case assembly too tightly.
(4) Insert a 0.03 mm j.0012 in.) feeler gauge at two places
(diagonally) between differential case B and the thrust
washer (right).
CautionDo not insert a feeler gauge in the oil groove of
differential case B.
TSB
Revision