engine MITSUBISHI 3000GT 1991 Manual PDF
[x] Cancel search | Manufacturer: MITSUBISHI, Model Year: 1991, Model line: 3000GT, Model: MITSUBISHI 3000GT 1991Pages: 1146, PDF Size: 76.68 MB
Page 96 of 1146
11-46ENGINE - Piston and Connecting Rod
7EN246 1
7EN247
MD998765
(Pus:rod)
7EN25;
lENOl17
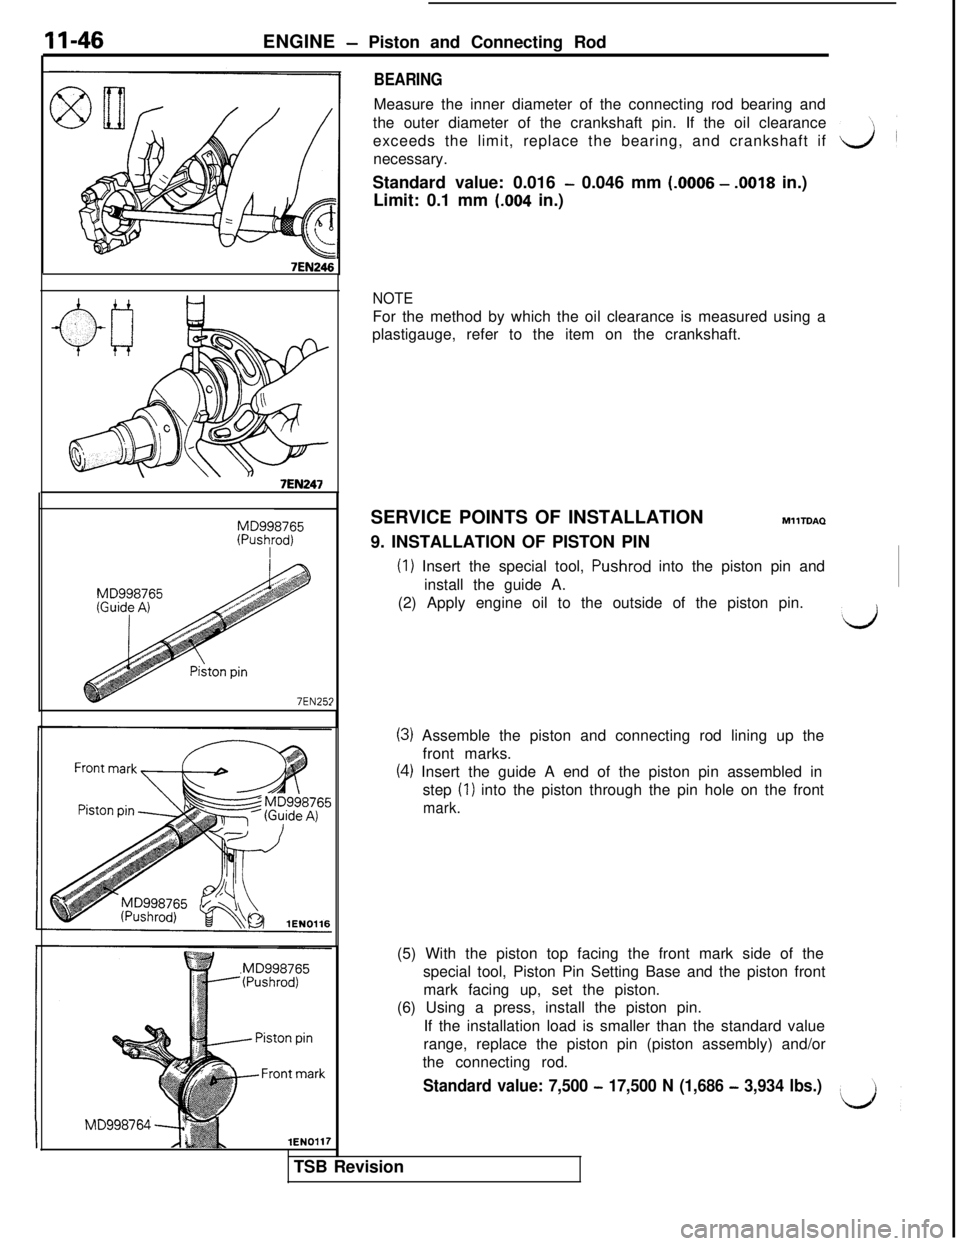
BEARINGMeasure the inner diameter of the connecting rod bearing and
the outer diameter of the crankshaft pin. If the oil clearance
exceeds the limit, replace the bearing, and crankshaft if
necessary.
Standard value: 0.016
- 0.046 mm (.OOOS - .0018 in.)
Limit: 0.1 mm
(.004 in.)
NOTEFor the method by which the oil clearance is measured using a
plastigauge, refer to the item on the crankshaft.
SERVICE POINTS OF INSTALLATION
MllTDAQ9. INSTALLATION OF PISTON PIN
(1) Insert the special tool, Pushrod into the piston pin and
install the guide A.
(2) Apply engine oil to the outside of the piston pin.
(3) Assemble the piston and connecting rod lining up the
front marks.
(4) Insert the guide A end of the piston pin assembled in
step
(1) into the piston through the pin hole on the front
mark.(5) With the piston top facing the front mark side of the
special tool, Piston Pin Setting Base and the piston front
mark facing up, set the piston.
(6) Using a press, install the piston pin.
If the installation load is smaller than the standard value
range, replace the piston pin (piston assembly) and/or
the connecting rod.
Standard value: 7,500 - 17,500 N (1,686 - 3,934 Ibs.)TSB Revision
Page 97 of 1146
ENGINE - Piston and Connecting RodII-47
6EN0223
Side rail
Side rail end
7EN249
7EN250
ldentiftcation mark embossed
No. 1
7Barrel
weldenthcation mark
Tapered
we7EN013i
LI(7) Check that the piston moves smoothly.
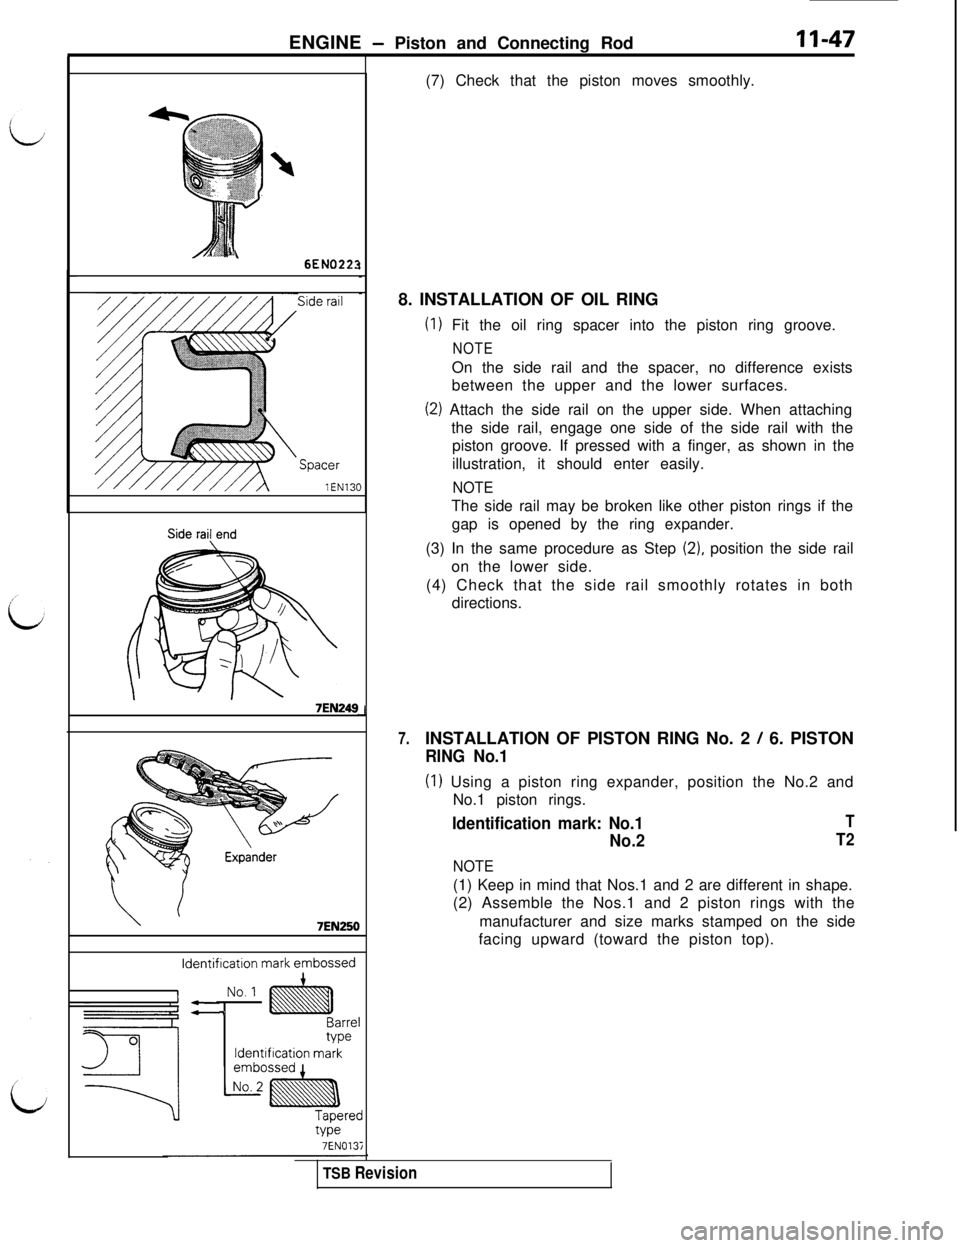
8. INSTALLATION OF OIL RING
(1) Fit the oil ring spacer into the piston ring groove.
NOTEOn the side rail and the spacer, no difference exists
between the upper and the lower surfaces.
(2) Attach the side rail on the upper side. When attaching
the side rail, engage one side of the side rail with the
piston groove. If pressed with a finger, as shown in the
illustration, it should enter easily.
NOTEThe side rail may be broken like other piston rings if the
gap is opened by the ring expander.
(3) In the same procedure as Step
(2), position the side rail
on the lower side.
(4) Check that the side rail smoothly rotates in both
directions.
7.INSTALLATION OF PISTON RING No. 2 / 6. PISTON
RING No.1
(1) Using a piston ring expander, position the No.2 and
No.1 piston rings.
Identification mark: No.1
No.2
NOTE
T
T2(1) Keep in mind that Nos.1 and 2 are different in shape.
(2) Assemble the Nos.1 and 2 piston rings with the
manufacturer and size marks stamped on the side
facing upward (toward the piston top).
TSB Revision
Page 98 of 1146
11-48ENGINE - Piston and Connecting Rod
Side railNo.1
spacer slotrail
6ENO41
7EN0032
Cylindcnumbe
Stopper notch4. INSTALLATION OF PISTON, CONNECTING ROD~
ASSEMBLY
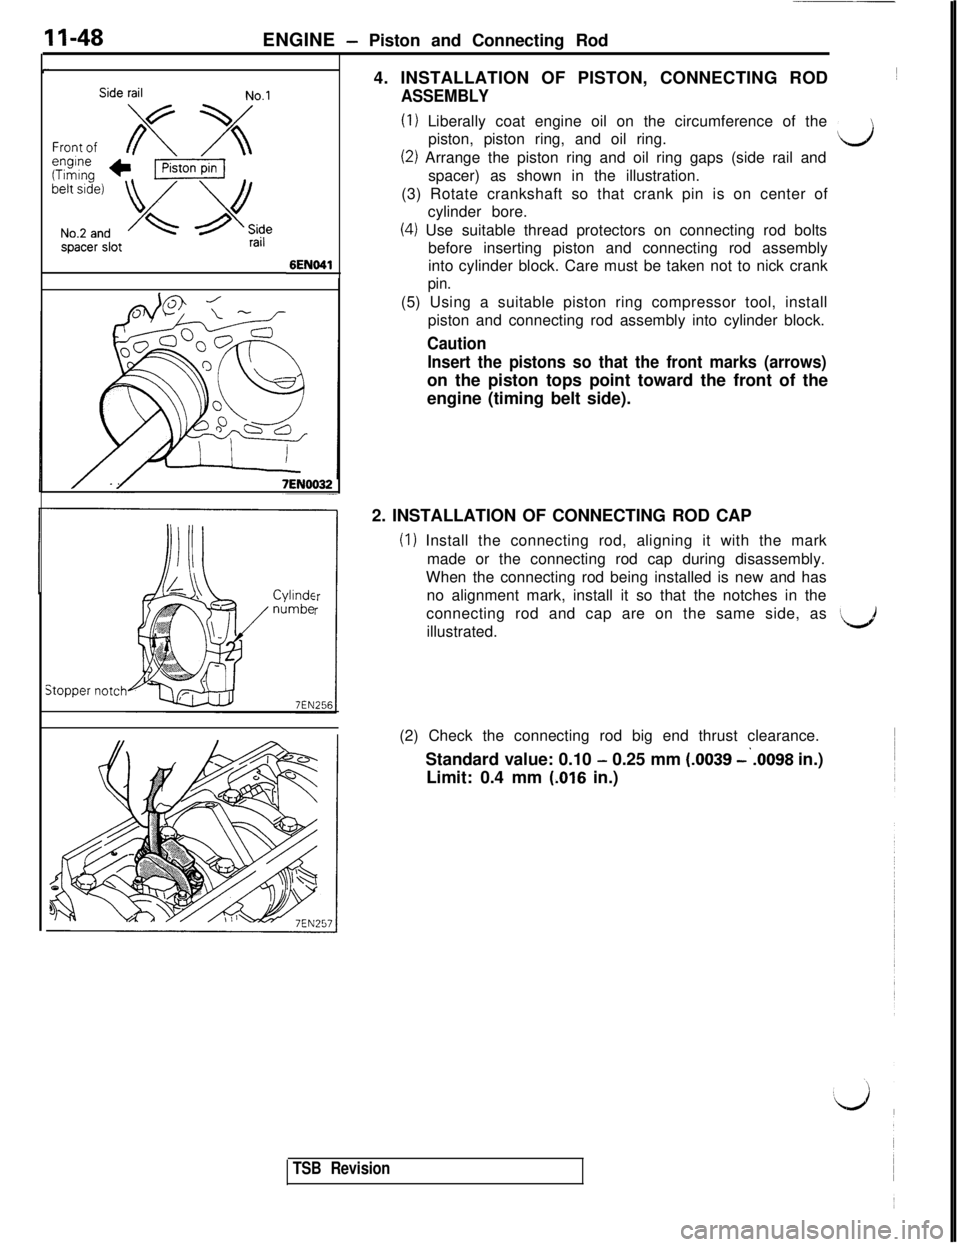
(1) Liberally coat engine oil on the circumference of the
piston, piston ring, and oil ring.
d
(2) Arrange the piston ring and oil ring gaps (side rail and
spacer) as shown in the illustration.
(3) Rotate crankshaft so that crank pin is on center of
cylinder bore.
(4) Use suitable thread protectors on connecting rod bolts
before inserting piston and connecting rod assembly
into cylinder block. Care must be taken not to nick crank
pin.(5) Using a suitable piston ring compressor tool, install
piston and connecting rod assembly into cylinder block.
Caution
Insert the pistons so that the front marks (arrows)on the piston tops point toward the front of the
engine (timing belt side).
2. INSTALLATION OF CONNECTING ROD CAP
(1) Install the connecting rod, aligning it with the mark
made or the connecting rod cap during disassembly.
When the connecting rod being installed is new and has
no alignment mark, install it so that the notches in the
connecting rod and cap are on the same side, as
illustrated.
‘d(2) Check the connecting rod big end thrust clearance.
Standard value: 0.10
- 0.25 mm (.0039 -‘.0098 in.)
Limit: 0.4 mm
(-016 in.)
TSB Revision
Page 99 of 1146
ENGINE - Crankshaft, Flywheel and Drive Plate
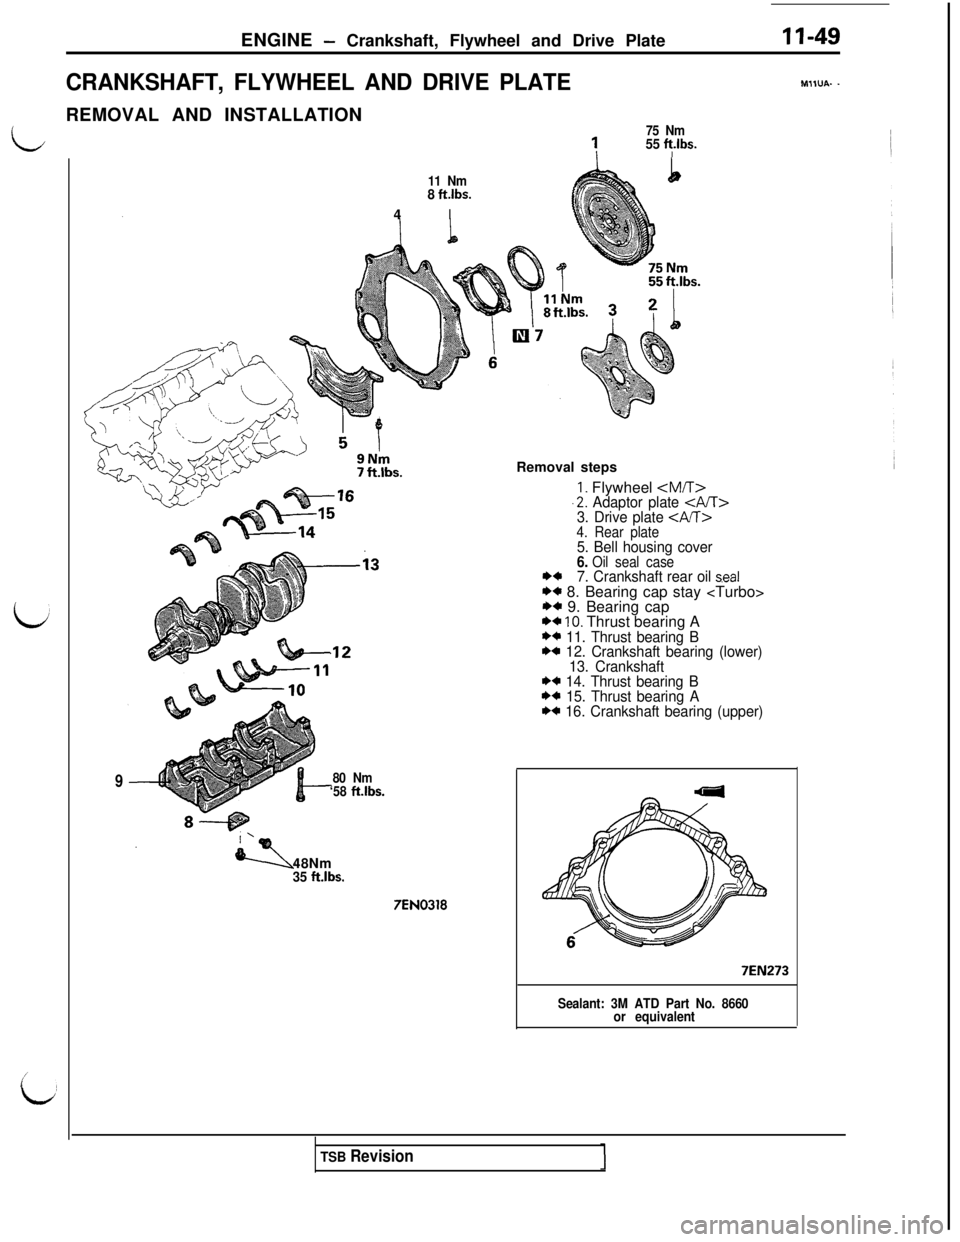
CRANKSHAFT, FLYWHEEL AND DRIVE PLATE
II-49
MIIUA- -REMOVAL AND INSTALLATION
L
/
id
75 Nm
155 ft.lbs.
11 Nmb4
8 ft.lbs.
I
9Removal steps
,12
80 Nm
‘58 ft.lbs.48Nm
35 ft.lbs.
7EN0318
1. Flywheel
13. Crankshaft
** 14. Thrust bearing B*+ 15. Thrust bearing AI)* 16. Crankshaft bearing (upper)
7EN273
Sealant: 3M ATD Part No. 8660
or equivalent
TSB Revision
Page 100 of 1146
II-50ENGINE - Crankshaft, FlYwheel and Drive Plate
\7EN262
7EN261INSPECTION
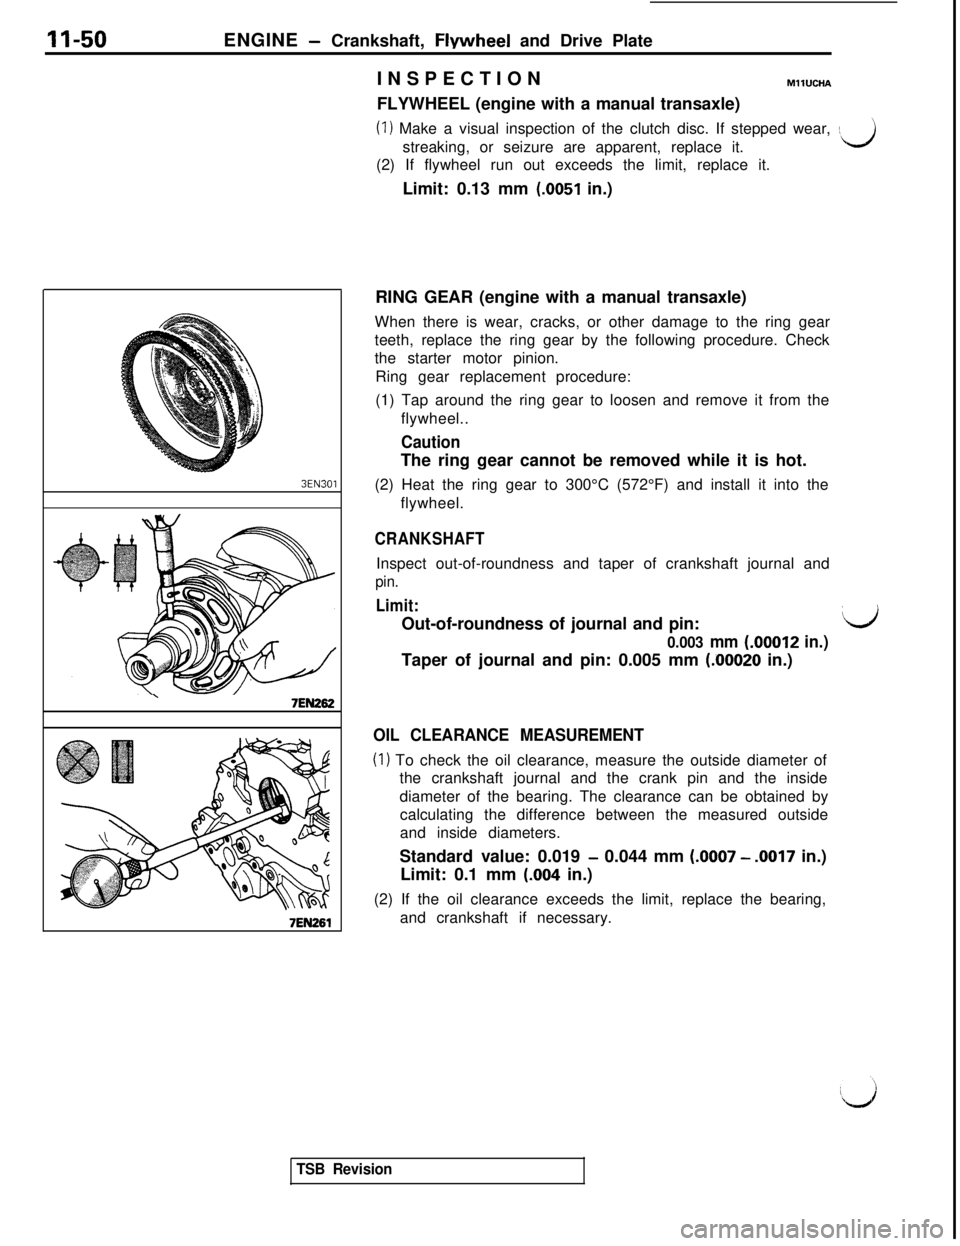
MllUCHAFLYWHEEL (engine with a manual transaxle)
(I) Make a visual inspection of the clutch disc. If stepped wear, :streaking, or seizure are apparent, replace it.\J(2) If flywheel run out exceeds the limit, replace it.
Limit: 0.13 mm
t.0051 in.)
RING GEAR (engine with a manual transaxle)
When there is wear, cracks, or other damage to the ring gear
teeth, replace the ring gear by the following procedure. Check
the starter motor pinion.
Ring gear replacement procedure:
(1) Tap around the ring gear to loosen and remove it from the
flywheel..
CautionThe ring gear cannot be removed while it is hot.
(2) Heat the ring gear to 300°C (572°F) and install it into the
flywheel.
CRANKSHAFTInspect out-of-roundness and taper of crankshaft journal and
pin.
Limit:Out-of-roundness of journal and pin:
LJ
0.003 mm (.00012 in.)Taper of journal and pin: 0.005 mm
(.00020 in.)
OIL CLEARANCE MEASUREMENT
(I) To check the oil clearance, measure the outside diameter of
the crankshaft journal and the crank pin and the inside
diameter of the bearing. The clearance can be obtained by
calculating the difference between the measured outside
and inside diameters.
Standard value: 0.019
- 0.044 mm i.0007 - .0017 in.)
Limit: 0.1 mm
(.004 in.)
(2) If the oil clearance exceeds the limit, replace the bearing,
and crankshaft if necessary.
TSB Revision
Page 101 of 1146
ENGINE - Crankshaft. Flvwheel and Drive Plate11-51
id
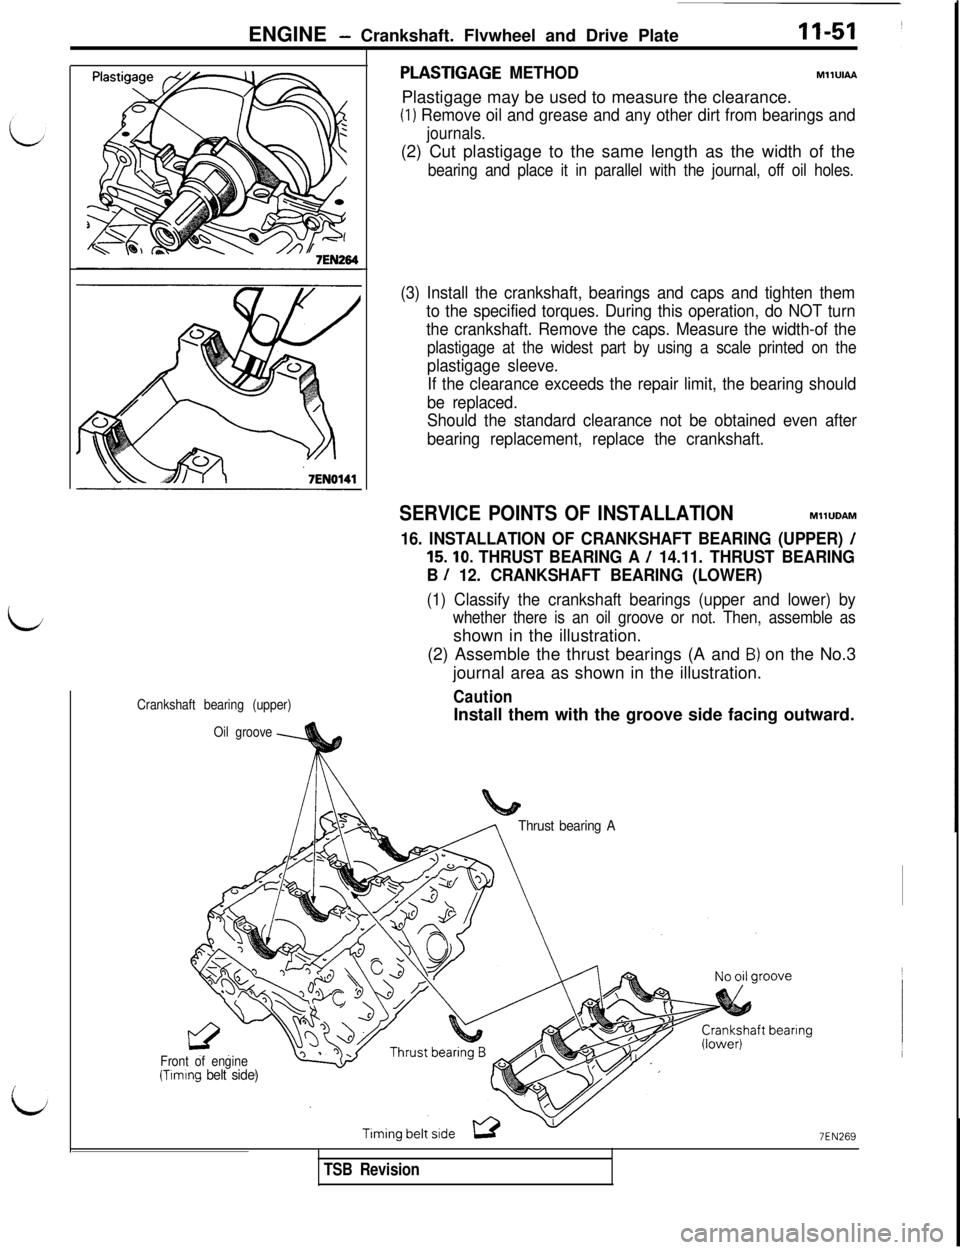
PLASTIGAGE METHODMllUlAA
Plastigage may be used to measure the clearance.
(1) Remove oil and grease and any other dirt from bearings and
journals.(2) Cut plastigage to the same length as the width of the
bearing and place it in parallel with the journal, off oil holes.
(3) Install the crankshaft, bearings and caps and tighten them
to the specified torques. During this operation, do NOT turn
the crankshaft. Remove the caps. Measure the width-of the
plastigage at the widest part by using a scale printed on the
plastigage sleeve.
If the clearance exceeds the repair limit, the bearing should
be replaced.
Should the standard clearance not be obtained even after
bearing replacement, replace the crankshaft.
SERVICE POINTS OF INSTALLATIONMllUDAM
16. INSTALLATION OF CRANKSHAFT BEARING (UPPER) /
15.10. THRUST BEARING A / 14.11. THRUST BEARING
B
/ 12. CRANKSHAFT BEARING (LOWER)
(1) Classify the crankshaft bearings (upper and lower) by
whether there is an oil groove or not. Then, assemble asshown in the illustration.
(2) Assemble the thrust bearings (A and
B) on the No.3
journal area as shown in the illustration.
CautionInstall them with the groove side facing outward.Crankshaft bearing (upper)
Oil groove
Thrust bearing A
Front of engine(Tlmlng belt side)
EN269
TSB Revision
Page 102 of 1146
11-52ENGINE - Crankshaft, Flywheel and Drive Plate
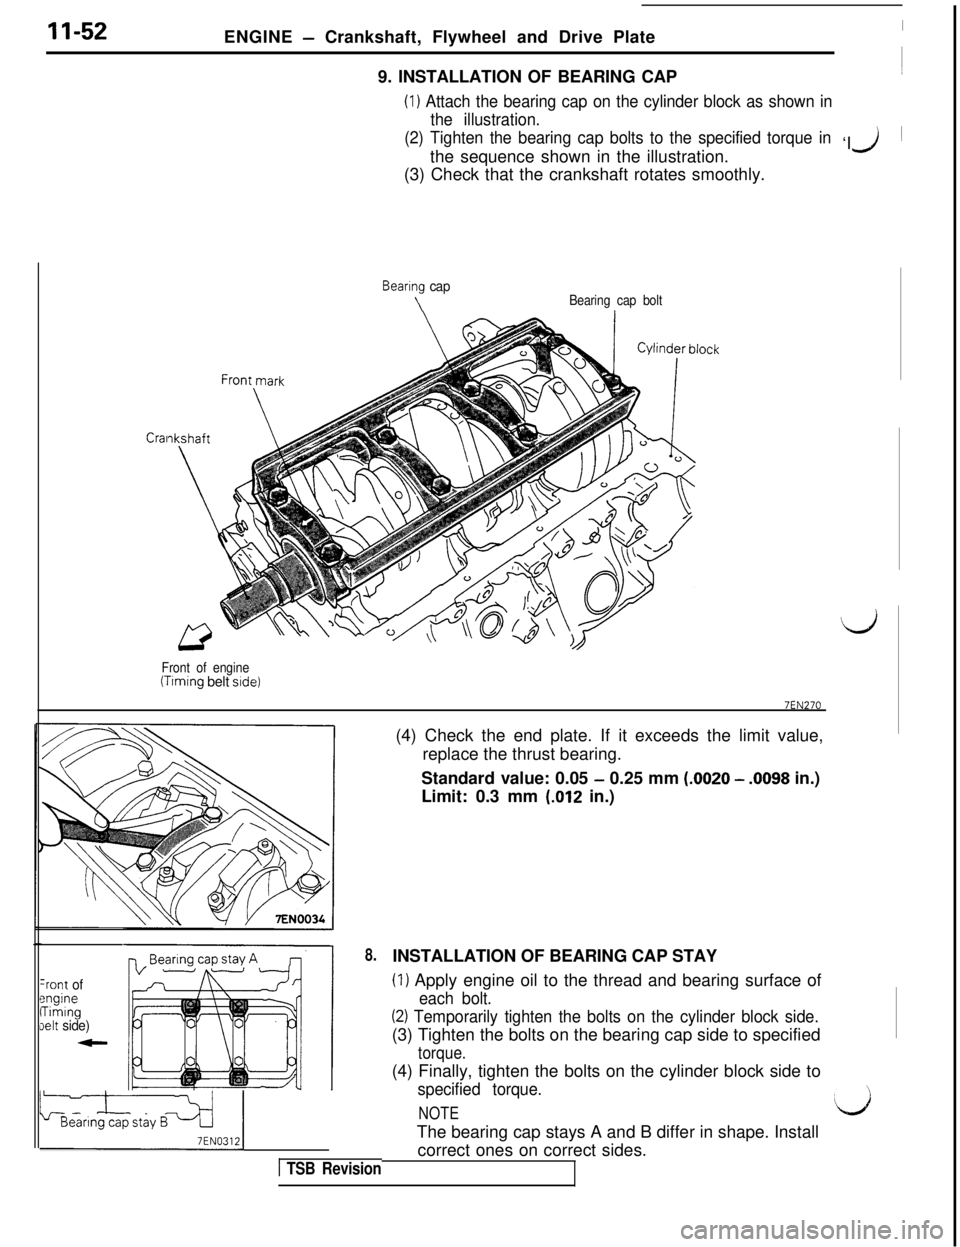
9. INSTALLATION OF BEARING CAP
(1) Attach the bearing cap on the cylinder block as shown in
the illustration.
(2) Tighten the bearing cap bolts to the specified torque in‘I
the sequence shown in the illustration.
J ~
(3) Check that the crankshaft rotates smoothly.
Cral
Bearing cap
\Bearing cap bolt
Front of engine
(Timing belt side)
7EN270(4) Check the end plate. If it exceeds the limit value,
replace the thrust bearing.
Standard value: 0.05
- 0.25 mm (.0020 - .0098 in.)
Limit: 0.3 mm
(.012 in.)
-rent ofengineTimingIelt side)
8.
LLiN03,ij
1 TSB RevisionINSTALLATION OF BEARING CAP STAY
(1) Apply engine oil to the thread and bearing surface of
each bolt.
(2) Temporarily tighten the bolts on the cylinder block side.(3) Tighten the bolts on the bearing cap side to specified
torque.(4) Finally, tighten the bolts on the cylinder block side to
specified torque.
NOTEThe bearing cap stays A and B differ in shape. Install
correct ones on correct sides.d
Page 103 of 1146
ENGINE -Crankshaft, Flywheel and Drive Plate / Cylinder Block11-53
MB990938-01
CYLINDER BLOCK
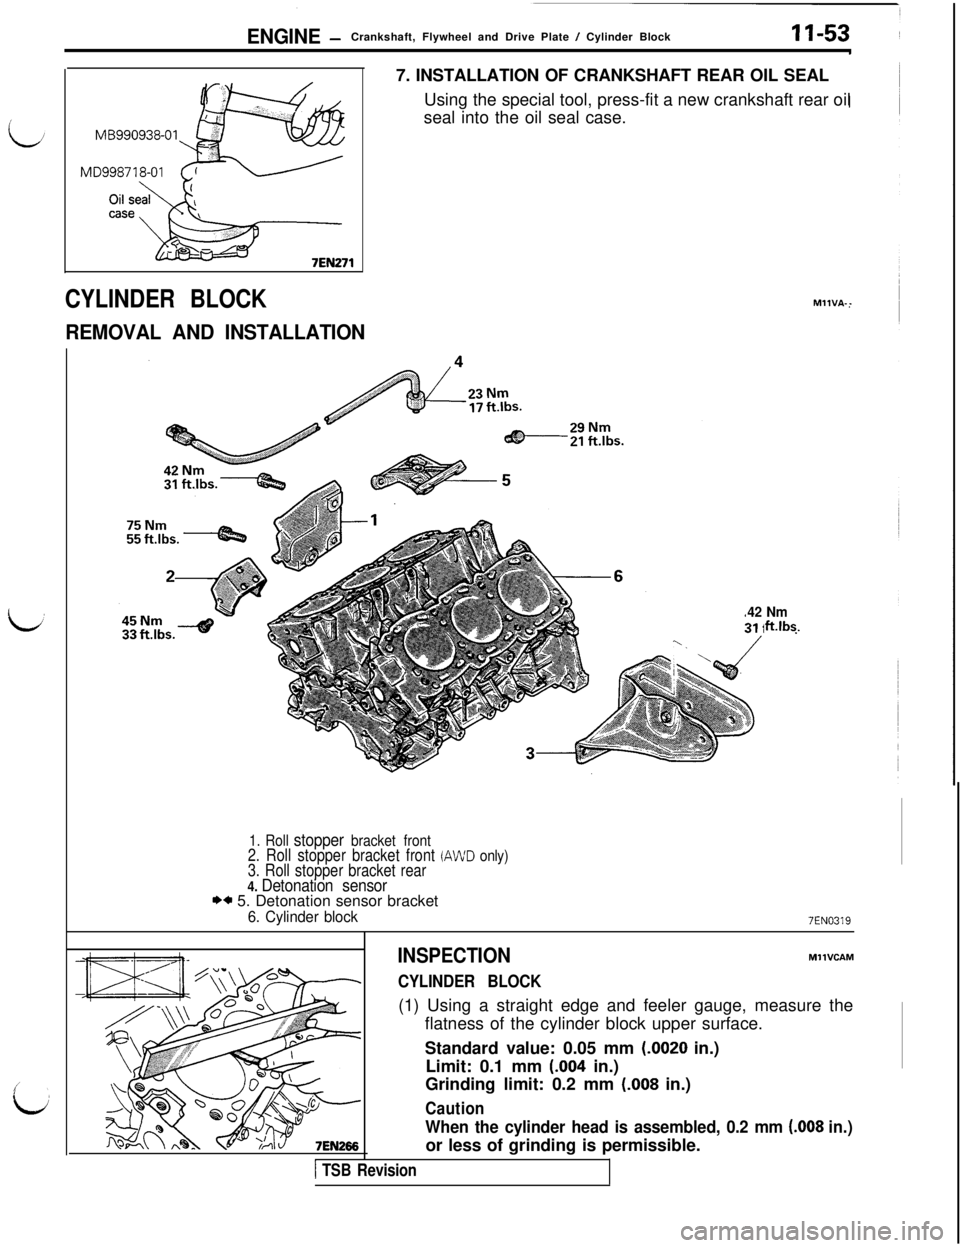
REMOVAL AND INSTALLATION7. INSTALLATION OF CRANKSHAFT REAR OIL SEAL
Using the special tool, press-fit a new crankshaft rear oil
seal into the oil seal case.MllVA--
42 Nmftlbs.
1. Roll stopper bracket front2. Roll stopper bracket front (AWD only)3. Roll stopper bracket rear4. Detonation sensorI)* 5. Detonation sensor bracket
6. Cylinder block7EN0319
INSPECTION
CYLINDER BLOCK
MllVCAM(1) Using a straight edge and feeler gauge, measure the
flatness of the cylinder block upper surface.
Standard value: 0.05 mm
(-0020 in.)
Limit: 0.1 mm
(.004 in.)
Grinding limit: 0.2 mm
(.008 in.)
Caution
When the cylinder head is assembled, 0.2 mm (.008 in.)or less of grinding is permissible.
1 TSB Revision
Page 104 of 1146
11-54ENGINE - Cylinder Block
I
$jA A@/
,12 mm (.47 in.)
I
t+ ‘: ;I 2 Center -
Thrust
direction
-point7EN268
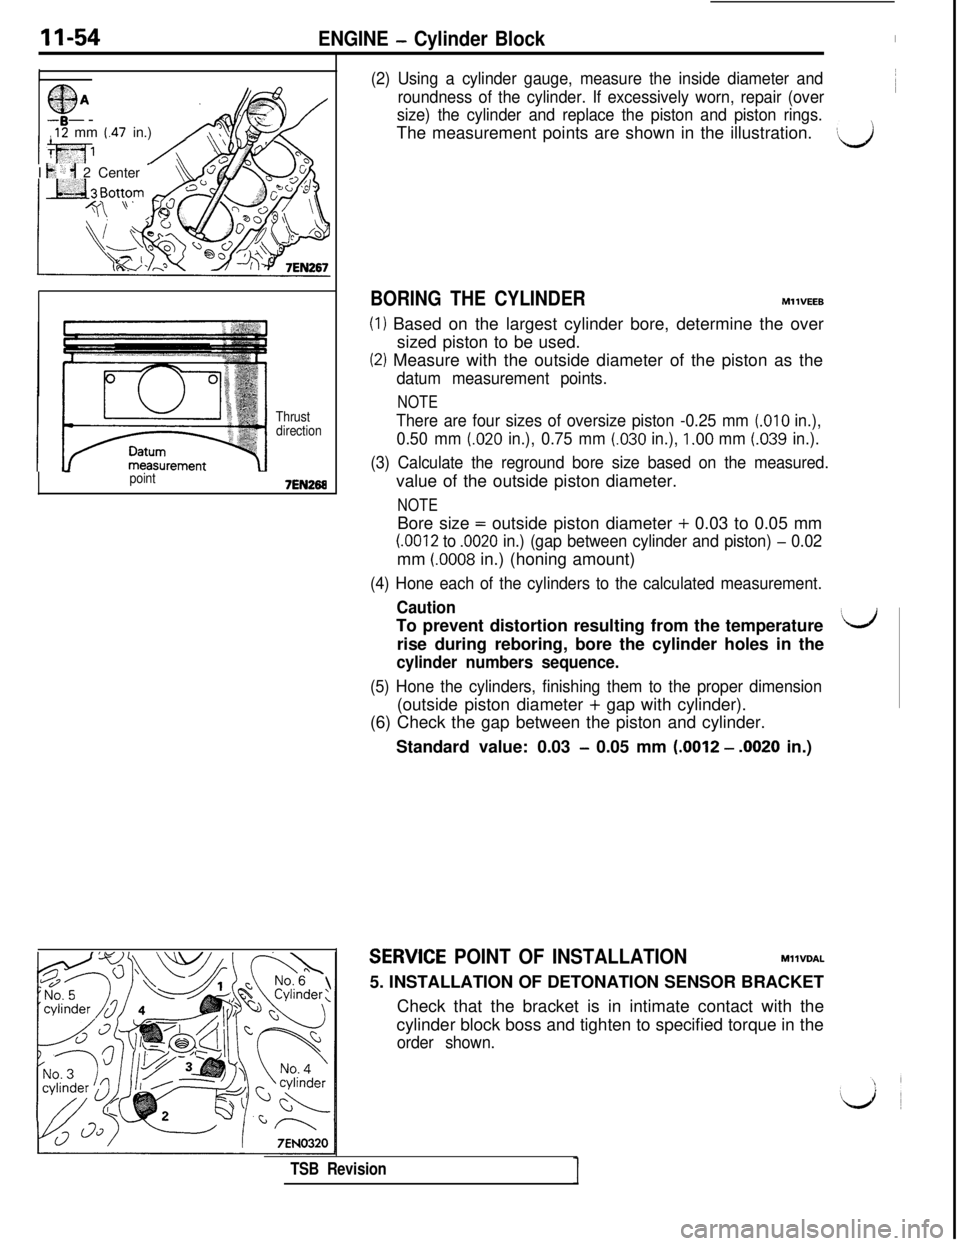
(2) Using a cylinder gauge, measure the inside diameter and
roundness of the cylinder. If excessively worn, repair (over~
size) the cylinder and replace the piston and piston rings.The measurement points are shown in the illustration.
)d
BORING THE CYLINDERMllVEEB
(1) Based on the largest cylinder bore, determine the over
sized piston to be used.
(2) Measure with the outside diameter of the piston as the
datum measurement points.
NOTE
There are four sizes of oversize piston -0.25 mm (.OlO in.),
0.50 mm
(.020 in.), 0.75 mm (.030 in.), 1.00 mm (.039 in.).
(3) Calculate the reground bore size based on the measured.value of the outside piston diameter.
NOTEBore size = outside piston diameter + 0.03 to 0.05 mm
(.0012 to .0020 in.) (gap between cylinder and piston) - 0.02mm (0008 in.) (honing amount)
(4) Hone each of the cylinders to the calculated measurement.
CautionTo prevent distortion resulting from the temperature‘drise during reboring, bore the cylinder holes in the
cylinder numbers sequence.
(5) Hone the cylinders, finishing them to the proper dimension(outside piston diameter + gap with cylinder).
(6) Check the gap between the piston and cylinder.
Standard value: 0.03
- 0.05 mm (.0012 - .0020 in.)
SERWCE POINT OF INSTALLATIONMllVDAL
5. INSTALLATION OF DETONATION SENSOR BRACKET
Check that the bracket is in intimate contact with the
cylinder block boss and tighten to specified torque in the
order shown.
TSB Revision
Page 105 of 1146
ENGINE - Engine Oil Cooler
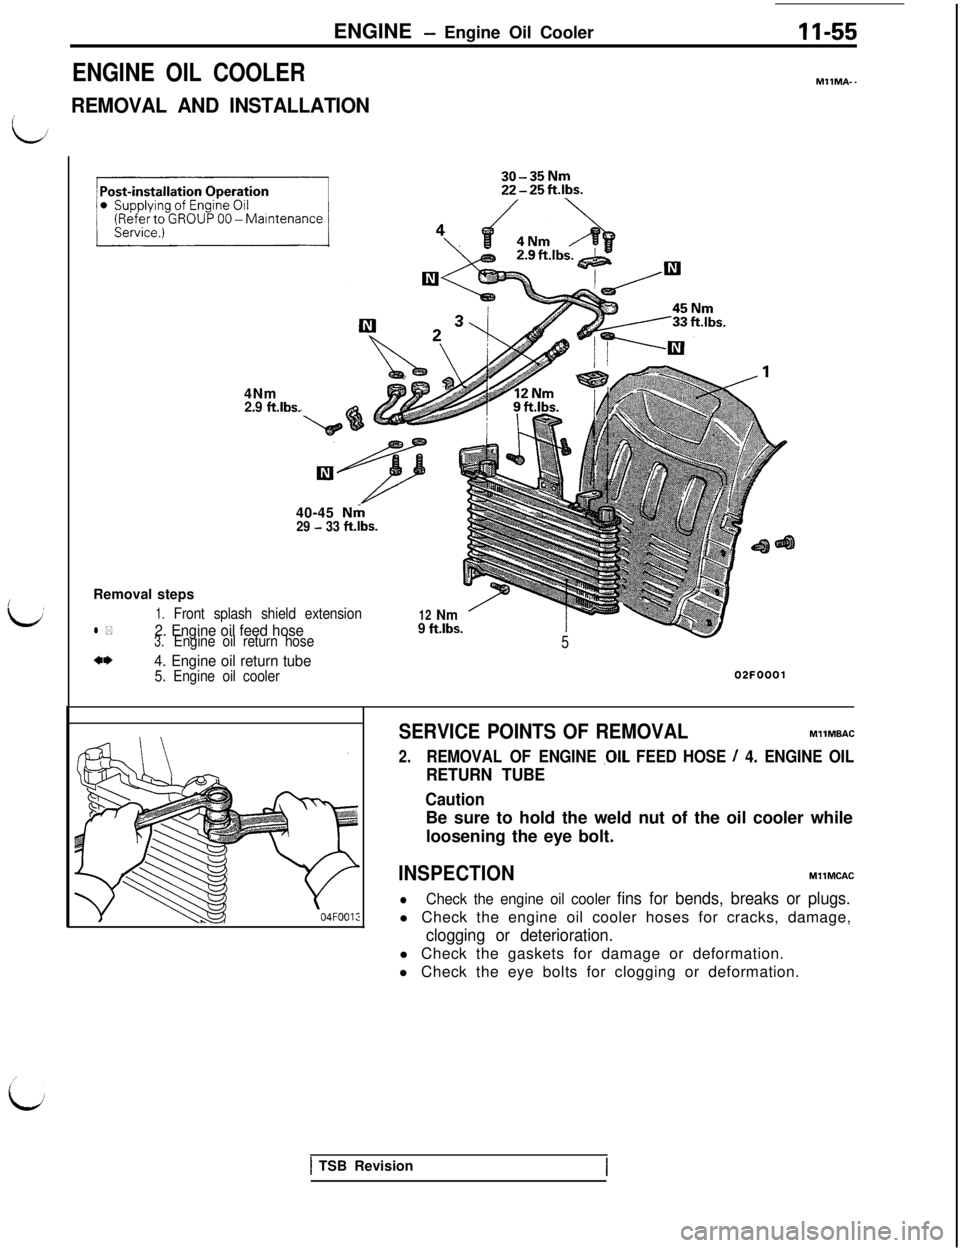
ENGINE OIL COOLER
REMOVAL AND INSTALLATION
11-55
MllMA-.4Nm
2.9 ft.lbs.40-45
Nrh
29 - 33 ft.lbs.Removal steps
1.Front splash shield extensionl *2. Engine oil feed hose3.Engine oil return hose
4*4. Engine oil return tube5. Engine oil cooler
12Nm
9 ft.lbs.5
02FOOOi
SERVICE POINTS OF REMOVALMllMBAC
2.REMOVAL OF ENGINE .OIL FEED HOSE / 4. ENGINE OIL
RETURN TUBE
CautionBe sure to hold the weld nut of the oil cooler while
loosening the eye bolt.
INSPECTIONMllMCAC
l
Check the engine oil cooler fins for bends, breaks or plugs.l Check the engine oil cooler hoses for cracks, damage,
clogging or deterioration.l Check the gaskets for damage or deformation.
l Check the eye bolts for clogging or deformation.
1 TSB Revision