service MITSUBISHI 380 2005 Workshop Manual
[x] Cancel search | Manufacturer: MITSUBISHI, Model Year: 2005, Model line: 380, Model: MITSUBISHI 380 2005Pages: 1500, PDF Size: 47.87 MB
Page 991 of 1500

CHARGING SYSTEM
ENGINE ELECTRICAL16-14
ALTERNATOR ASSEMBLY
REMOVAL AND INSTALLATION M1161001400601
REMOVAL SERVICE POINT
.
<> A/C COMPRESSOR ASSEMBLY REMOVAL
Remove the compressor from the compressor bracket with the
hose still attached.
Pre-removal and Post-installation Operation
Under Cover Removal and Installation (Refer to GROUP
51, Under Cover P.51-13).
Side Under Cover Removal and Installation (Refer to
GROUP 51, Under Cover P.51-13).
REMOVAL STEPS
1.
ALTERNATOR DRIVE BELT
2.
ALTERNATOR CONNECTOR3. A/C COMPRESSOR ASSEMBLY
CONNECTOR
<>4. A/C COMPRESSOR ASSEMBLY
<>5.
ALTERNATOR ASSEMBLY REMOVAL STEPS (Continued)
Page 993 of 1500
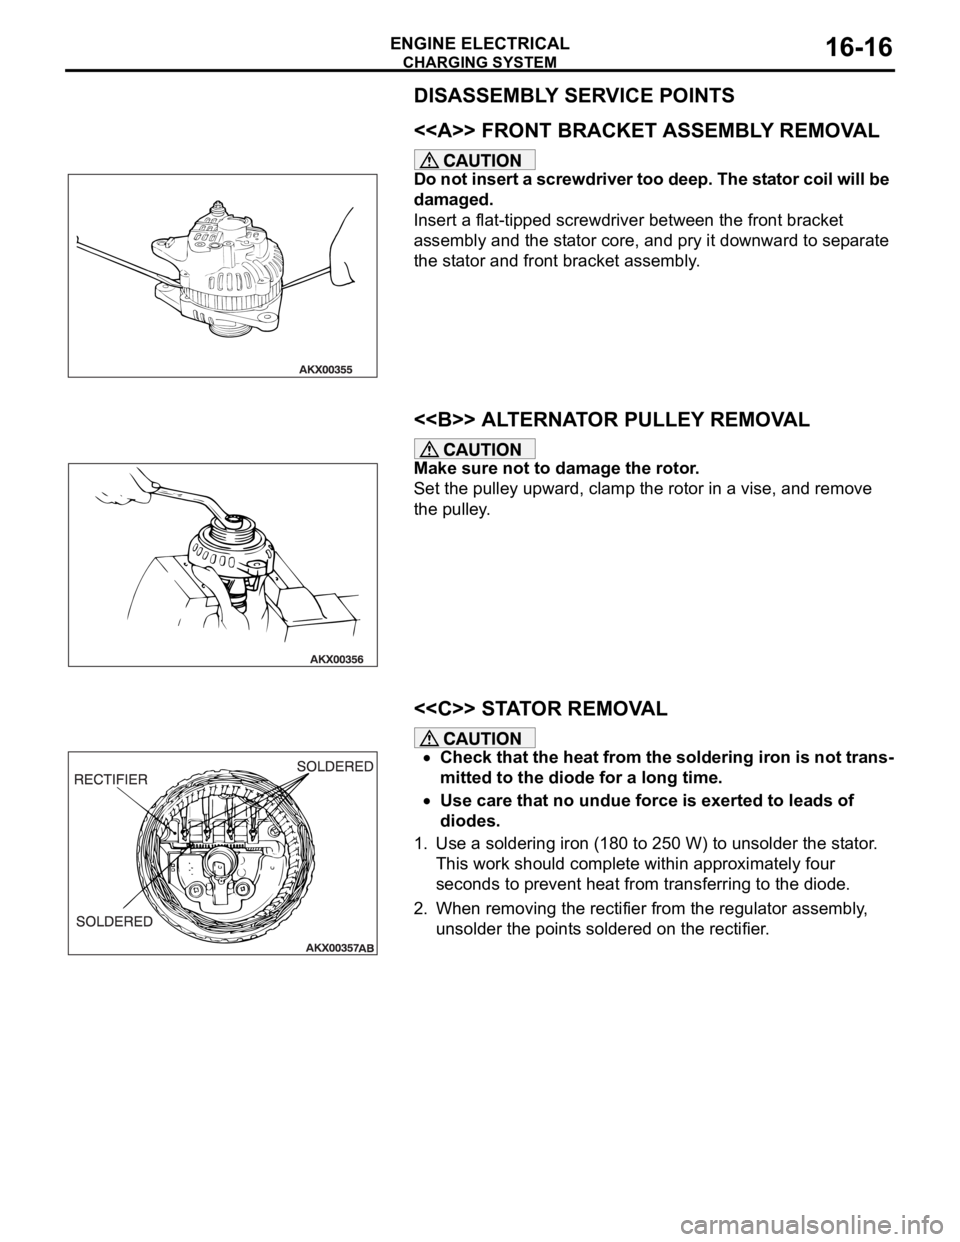
Page 994 of 1500
CHARGING SYSTEM
ENGINE ELECTRICAL16-17
ASSEMBLY SERVICE POINTS
.
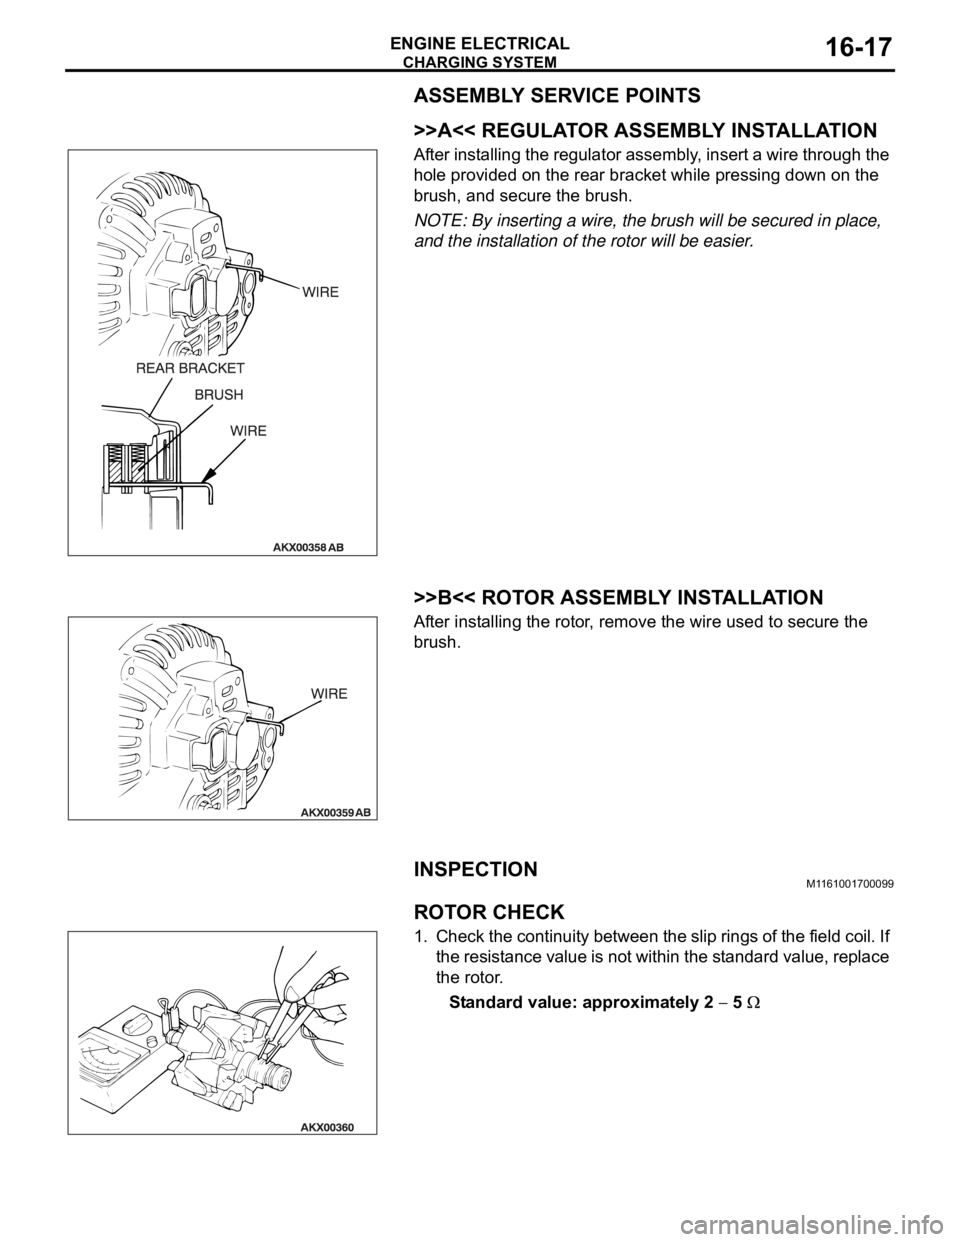
>>A<< REGULATOR ASSEMBLY INSTALLATION
After installing the regulator assembly, insert a wire through the
hole provided on the rear bracket while pressing down on the
brush, and secure the brush.
NOTE: By inserting a wire, the brush will be secured in place,
and the installation of the rotor will be easier.
.
>>B<< ROTOR ASSEMBLY INSTALLATION
After installing the rotor, remove the wire used to secure the
brush.
INSPECTIONM1161001700099.
ROTOR CHECK
1. Check the continuity between the slip rings of the field coil. If
the resistance value is not within the standard value, replace
the rotor.
Standard value: approximately 2
5
Page 998 of 1500
STARTING SYSTEM
ENGINE ELECTRICAL16-21
STARTING SYSTEM DIAGNOSISM1162000700293
TROUBLESHOOTING HINTS
The starter motor does not operate at all.
Battery posts, terminals and related accessories con-
tain lead and lead compounds. WASH HANDS AFTER
HANDLING.
Check the starter (coil).
Check for poor contact at the battery terminals and
starter.
Check the transmission range switch.
The starter motor doesn't stop
Check the starter (magnetic switch).
TROUBLESHOOTING GUIDE
The starting system troubleshooting guide is shown in the fol-
lowing steps.
Battery posts, terminals and related accessories con-
tain lead and lead compounds. WASH HANDS AFTER
HANDLING.
STEP 1.
Q: Is the battery in good condition? (Refer to GROUP 54A,
Chassis Electrical
Battery On-vehicle Service
Battery Check P.54A-5.)
YES : Go to Step 2.
NO : Charge or replace the battery.
STEP 2.
Disconnect the starter motor S (solenoid) terminal connec-
tor.
Using a jumper wire, apply battery positive voltage to the
starter motor S (solenoid) terminal.
Check the engine condition.
OK: Turns normally
Q: Dose the starter motor operate normally?
YES :
Check the ignition switch (Refer to GROUP 54A,
Chassis Electrical
Ignition Switch Ignition
Switch
Inspection P.54A-44.)
Check the transmission range switch. (Refer to
GROUP 23A, Automatic Transaxle
On-vehicle
Service
Essential Service Transmission Range
Switch Check P.23A-294.)
Check the wire between the battery and starter
motor S (solenoid) terminal.
NO : Go to Step 3.
Page 1001 of 1500
Page 1004 of 1500
Page 1008 of 1500

IGNITION SYSTEM
ENGINE ELECTRICAL16-31
ON-VEHICLE SERVICE
KNOCK CONTROL SYSTEM CHECKM1163001800081
Check the knock sensor circuit if diagnostic trouble code, No.
P0325 is shown.
Refer to GROUP 13B, Multiport Fuel Injection (MPI)
Multiport
Fuel Injection (MPI) Diagnosis
Diagnostic Trouble Code Pro-
cedures
DTC P0325 : Knock Sensor Circuit 13A-346.
IGNITION COIL CHECK M1163001200380
Check by the following procedure, and replace the coil if there
is a malfunction.
.
PRIMARY COIL AND IGNITION POWER
TRANSISTOR CONTINUITY CHECK
NOTE: No test can be performed on the Primary side of coil.
.
SECONDARY COIL CHECK
NOTE: It is impossible to check the secondary coil through the
continuity check as a diode is integrated in the secondary coil
circuit of this ignition coil. Accordingly, check the secondary coil
in the following procedure.
1. Disconnect the ignition coil connector.
2. Remove the ignition coil and install a new spark plug to the
ignition coil.
3. Connect the ignition coil connector.
4. Disable vehicle fuel pump by removing fuel pump relay or
disconnecting fuel pump connector D-18 (under rear seat).
5. Ground the side electrode of the spark plug and crank the
engine.
6. Check that spark is produced between the electrodes of the
spark plug.
7. If no spark is produced, replace the ignition coil with a new
one and recheck.
8. If spark is produced with the new ignition coil, replace the
old one as it is faulty. If no spark is produced again, the
ignition circuit is suspected as faulty. Check the ignition
circuit.
Page 1013 of 1500
IGNITION SYSTEM
ENGINE ELECTRICAL16-36
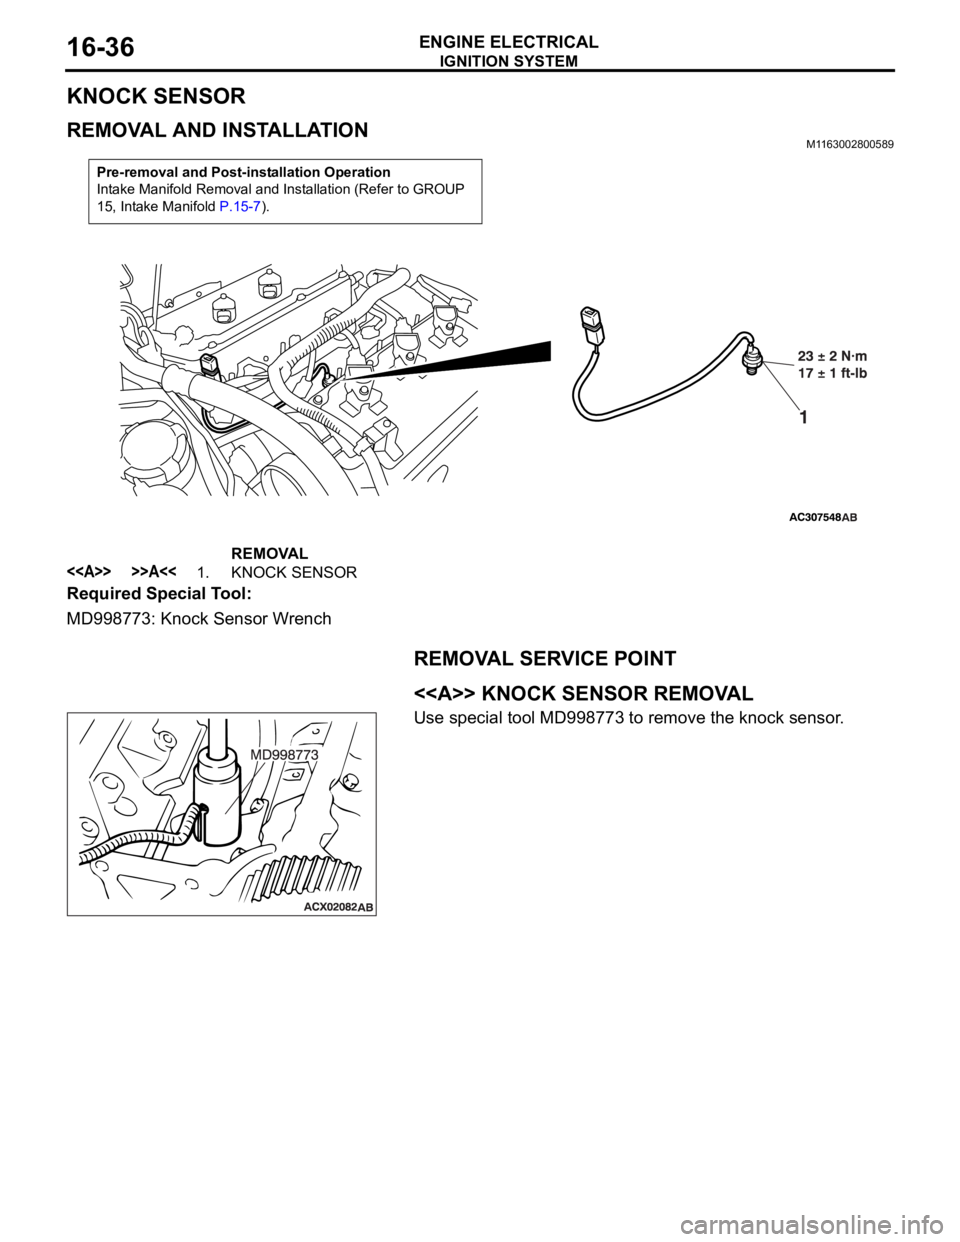
KNOCK SENSOR
REMOVAL AND INSTALLATION M1163002800589
Required Special Tool:
MD998773: Knock Sensor Wrench
REMOVAL SERVICE POINT
.
<> KNOCK SENSOR REMOVAL
Use special tool MD998773 to remove the knock sensor.
Pre-removal and Post-installation Operation
Intake Manifold Removal and Installation (Refer to GROUP
15, Intake Manifold P.15-7).
REMOVAL
<> >>A<<1. KNOCK SENSOR
Page 1014 of 1500
IGNITION SYSTEM
ENGINE ELECTRICAL16-37
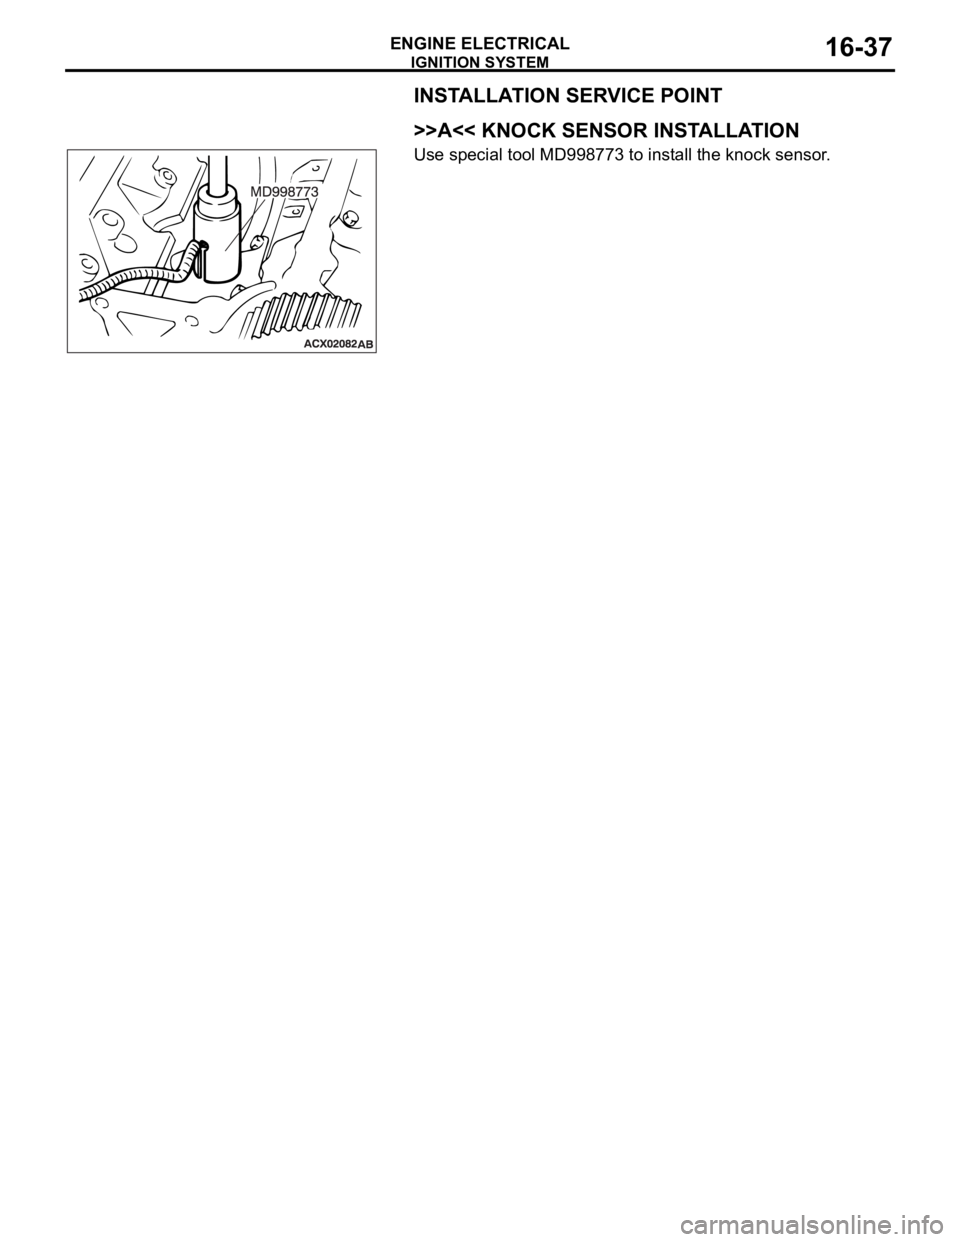
INSTALLATION SERVICE POINT
.
>>A<< KNOCK SENSOR INSTALLATION
Use special tool MD998773 to install the knock sensor.
Page 1016 of 1500

SPECIFICATIONS
ENGINE ELECTRICAL16-39
SERVICE SPECIFICATIONSM1161000300322
ITEMS STANDARD VALUE LIMIT
Alternator
Regulated voltage
(Ambient temperature at voltage
regulator)
20C (4F)14.2 15.4
20C (68F) 13.9 14.9
60C (140F) 13.4 14.5
80C (176F) 13.1 14.5
Alternator output wire voltage drop (at 30 A) VMaximum 0.3
Nominal Output current 110A 70 % of normal output
current
Field coil resistance
Approximately 2 5
Brush protrusion length mm (in)Minimum 2 (0.08)
Starter motor
Free running characteristics Terminal voltage
V11
Current A 95
Speed r/min 2,500 or more
Pinion gap mm (in) 0.5 2.0 (0.02 0.07)
Commutator run-out mm (in) 0.05 (0.002) Minimum 0.1 (0.004)
Commutator diameter mm (in) 29.4 (1.16) Minimum 28.8 (1.13)
Undercut depth mm (in) 0.5 (0.02) Minimum 0.2 (0.008)
Ignition parts
Spark plug gap mm 1.0 1.1