display MITSUBISHI 380 2005 Workshop Manual
[x] Cancel search | Manufacturer: MITSUBISHI, Model Year: 2005, Model line: 380, Model: MITSUBISHI 380 2005Pages: 1500, PDF Size: 47.87 MB
Page 835 of 1500

AUTO A/C DIAGNOSIS
HEATER, AIR CONDITIONING AND VENTILATION55-134
Air outlet c/o
potentiometer55 Mode selection
damper control
motor potentiometerIgnition switch: ON Damper
positionOpening degree (V)
FA C E A p pr o x . 5
FOOT Approx. 3.75
FOOT/DEF. Approx. 2.5
DEF. Approx. 1.75
Air outlet c/o
potentiometer
(target)56 Target value for
mode selection
damper control
motor potentiometerIgnition switch: ON Damper
positionOpening degree (V)
FA C E A p pr o x . 5
FOOT Approx. 3.75
FOOT/DEF. Approx. 2.5
DEF. Approx. 1.75
In/out air
changeover
damper motor65 Outside/inside air
selection damper
control motorIgnition switch: ON Damper set
positionDamper position
Fresh air
positionFRESH
Air recirculation
positionRECIRC
Front blower fan 68 Blower motor Ignition switch: ON The actual air
volume (blower
motor speed)
corresponds to the
air volume shown on
the diagnostic tool.
Front blower
motor voltage 71 Blower motor Ignition switch: ON The air volume set
by the heater control
corresponds to the
value shown on the
diagnostic tool. (V)
Air conditioning
switch state1 Air conditioning
switchIgnition switch: ON Air conditioning
switch: ONDiagnostic tool
indication: "pressed"
Air conditioning
switch: OFFDiagnostic tool
indication: "release"
Rear defogger
switch state7 Rear window
defogger switchIgnition switch: ON Rear window
defogger
switch: ONDiagnostic tool
indication: "pressed"
Rear window
defogger
switch: OFFDiagnostic tool
indication: "release"
Refrigerant
pressure73 Refrigerant pressure Ignition switch: ON The diagnostic tool
indication is normal MUT-III
DIAGNOSTIC
TOOL DISPLAYITEM
NO.INSPECTION ITEM INSPECTION REQUIREMENT NORMAL VALUE
Page 836 of 1500

AUTO A/C DIAGNOSIS
HEATER, AIR CONDITIONING AND VENTILATION55-135
Temperature
setting23 Temperature setting
actualIgnition switch: ON The actual setting
corresponds with
diagnostic tool
display.
Vehicle speed 26 Actual vehicle speed Ignition switch: ON The vehicle speed
corresponds with
diagnostic tool
display.
A/C compressor
drive request27 Compressor clutch Engine: ON
Compressor:
ONDiagnostic tool
indication: "ON"
Compressor:
OFFDiagnostic tool
indication: "OFF"
Illumination 15 Display lighting Ignition switch: ON
Lights: ON
Diagnostic tool
indication: "ON"
Lights: OFF
Diagnostic tool
indication: "OFF"
Engine speed 23 Actual engine speed Engine: ON The engine speed
corresponds with
diagnostic tool
display.
In/out air select
switch state3 In/out air select
switch Ignition switch: ON In/out air
switch: ONDiagnostic tool
indication: "pressed"
In/out air
switch: OFFDiagnostic tool
indication: "release"
Rear defogger
relay72 Rear defogger relay Ignition switch: ON
Rear defogger:
ONDiagnostic tool
indication: "ON"
Rear defogger:
OFFDiagnostic tool
indication: "OFF" MUT-III
DIAGNOSTIC
TOOL DISPLAYITEM
NO.INSPECTION ITEM INSPECTION REQUIREMENT NORMAL VALUE
Page 837 of 1500

AUTO A/C DIAGNOSIS
HEATER, AIR CONDITIONING AND VENTILATION55-136
ACTUATOR TEST REFERENCEM1554005200133
MUT-III DIAGNOSTIC
TOOL DISPLAYITEM NO. INSPECTION ITEM DRIVE CONTENT
Blower fan: OFF 83 Blower motor OFF
Blower fan: Middle 84 Middle speed
Blower fan: High 85 High speed
Air mix damper motor:
0%42 Air mixing damper control motor Opening degree: approx.
0% (Max cool)
Air mix damper motor:
100%43 Opening degree: approx.
100% (Max hot)
Air outlet c/o damper:
FA C E70 Mode selection damper control
motorFA C E
Air outlet c/o damper: Bi_
Level67 FOOT/FACE
Air outlet c/o damper:
FOOT71 FOOT
Air outlet c/o damper:
DEF/FOOT69 DEF/FOOT
Air outlet c/o damper:
DEF68 DEF
Idle up request: high load 74 Idle speed HIGH idle up
Idle up request: low load 75 LOW idle up
Idle up request: OFF 76 OFF
Rear defogger switch:
OFF40 Rear window defogger switch Rear window defogger: OFF
Rear defogger switch:
ON41 Rear window defogger: ON
Idle up request: OFF 50 Idle up operation Idle up: OFF
Idle up request: low load 51 Idle up: low load
Idle up request: high load 52 Idle up: high load
Condenser: 0% 77 Condenser fan OFF
Condenser: 50% 79 Middle speed
Rheostat: 0% 80 Rheostat- Illumination control OFF
Rheostat: 100% 81 Full duty
Rheostat: 50% 82 Half duty
Page 862 of 1500
SENSORS
HEATER, AIR CONDITIONING AND VENTILATION55-161
INSPECTIONM1554002000130.
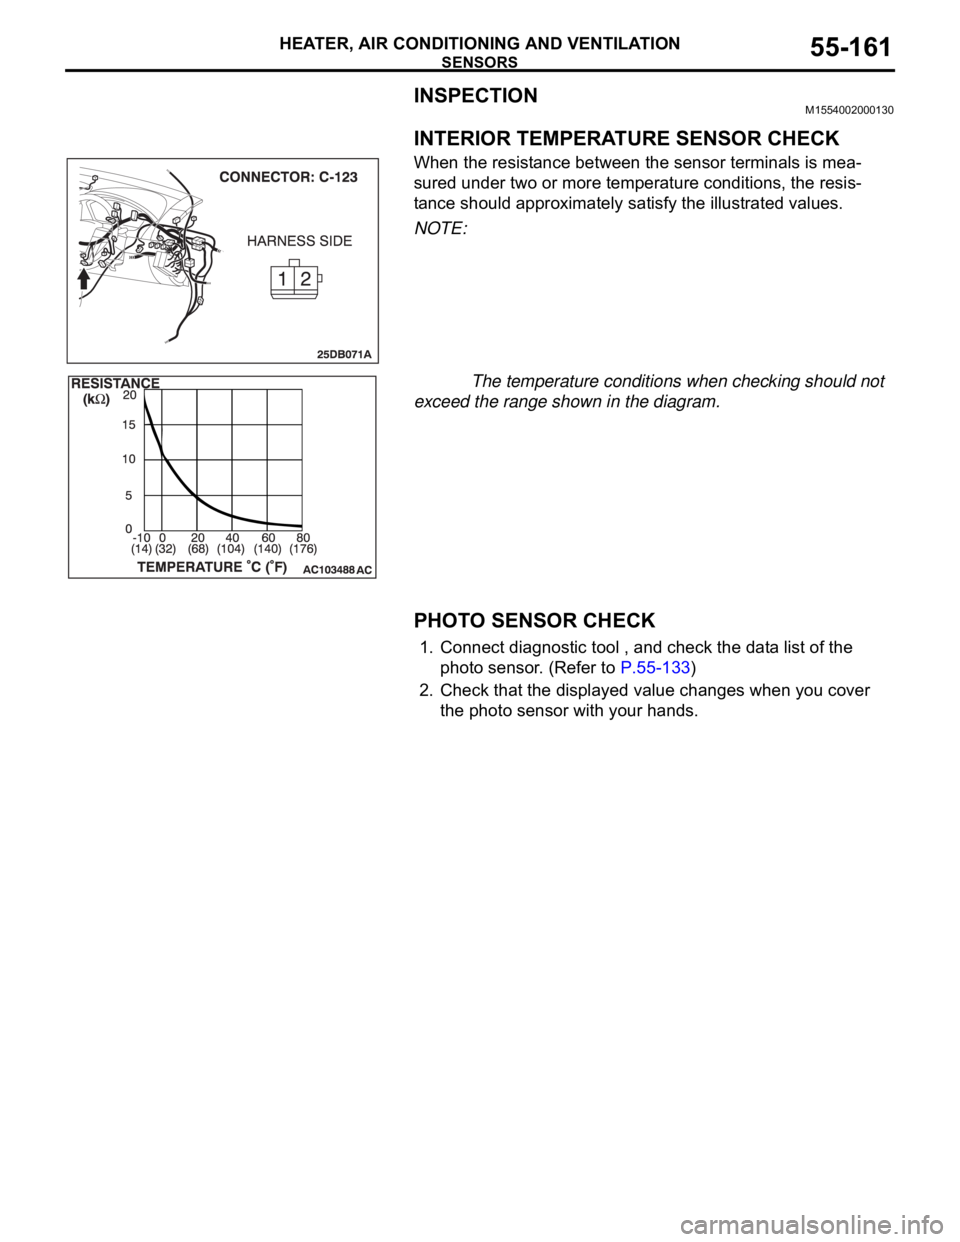
INTERIOR TEMPERATURE SENSOR CHECK
When the resistance between the sensor terminals is mea-
sured under two or more temperature conditions, the resis-
tance should approximately satisfy the illustrated values.
NOTE:
The temperature conditions when checking should not
exceed the range shown in the diagram.
.
PHOTO SENSOR CHECK
1. Connect diagnostic tool , and check the data list of the
photo sensor. (Refer to P.55-133)
2. Check that the displayed value changes when you cover
the photo sensor with your hands.
Page 893 of 1500
CONTROL UNIT
COMPONENT LOCATIONS70-14
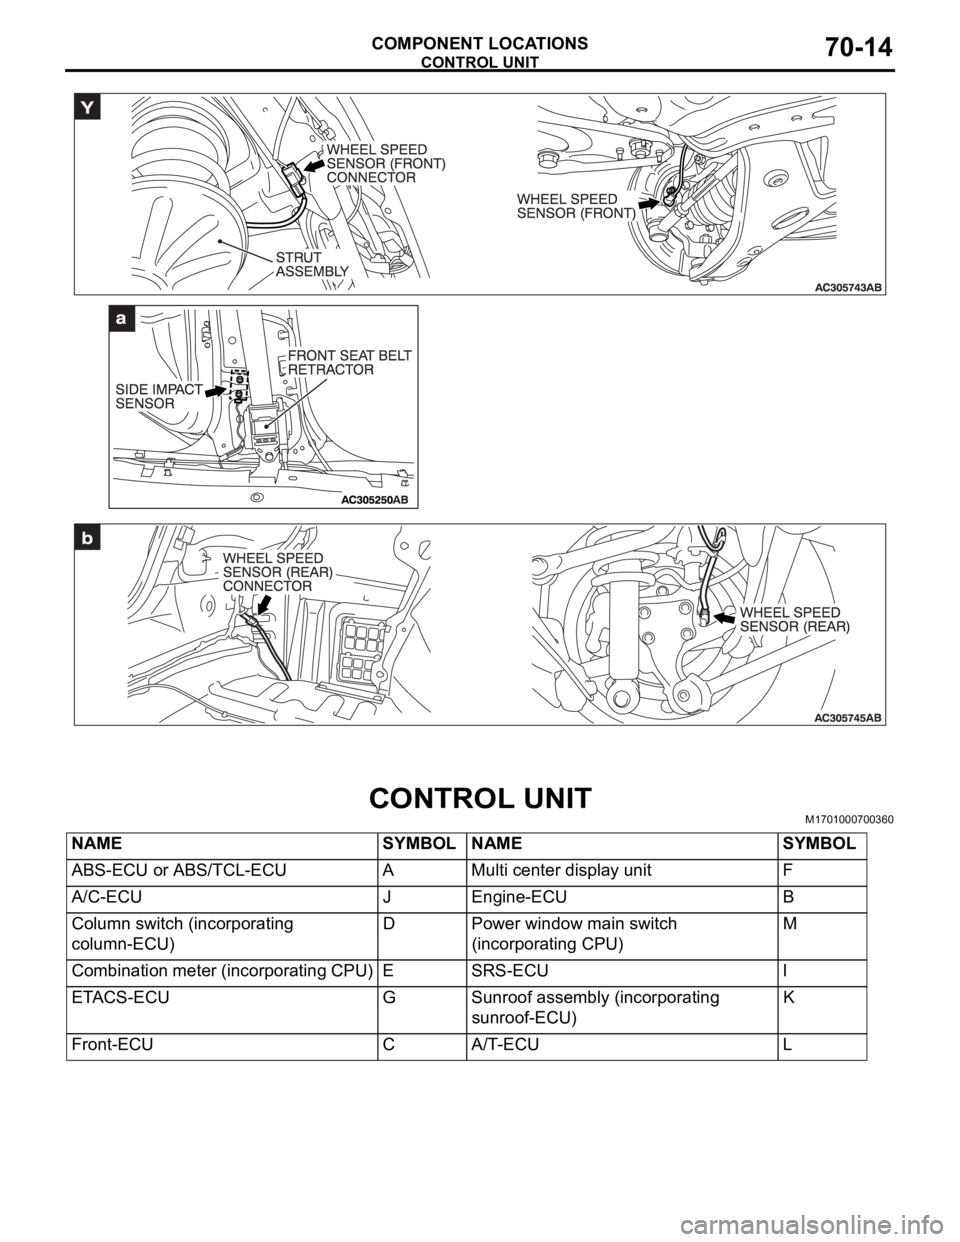
CONTROL UNITM1701000700360
NAME SYMBOL NAME SYMBOL
ABS-ECU or ABS/TCL-ECU A Multi center display unit F
A/C-ECU J Engine-ECU B
Column switch (incorporating
column-ECU)D Power window main switch
(incorporating CPU)M
Combination meter (incorporating CPU) E SRS-ECU I
ETACS-ECU G Sunroof assembly (incorporating
sunroof-ECU)K
Front-ECU C A/T-ECU L
Page 985 of 1500
CHARGING SYSTEM
ENGINE ELECTRICAL16-8
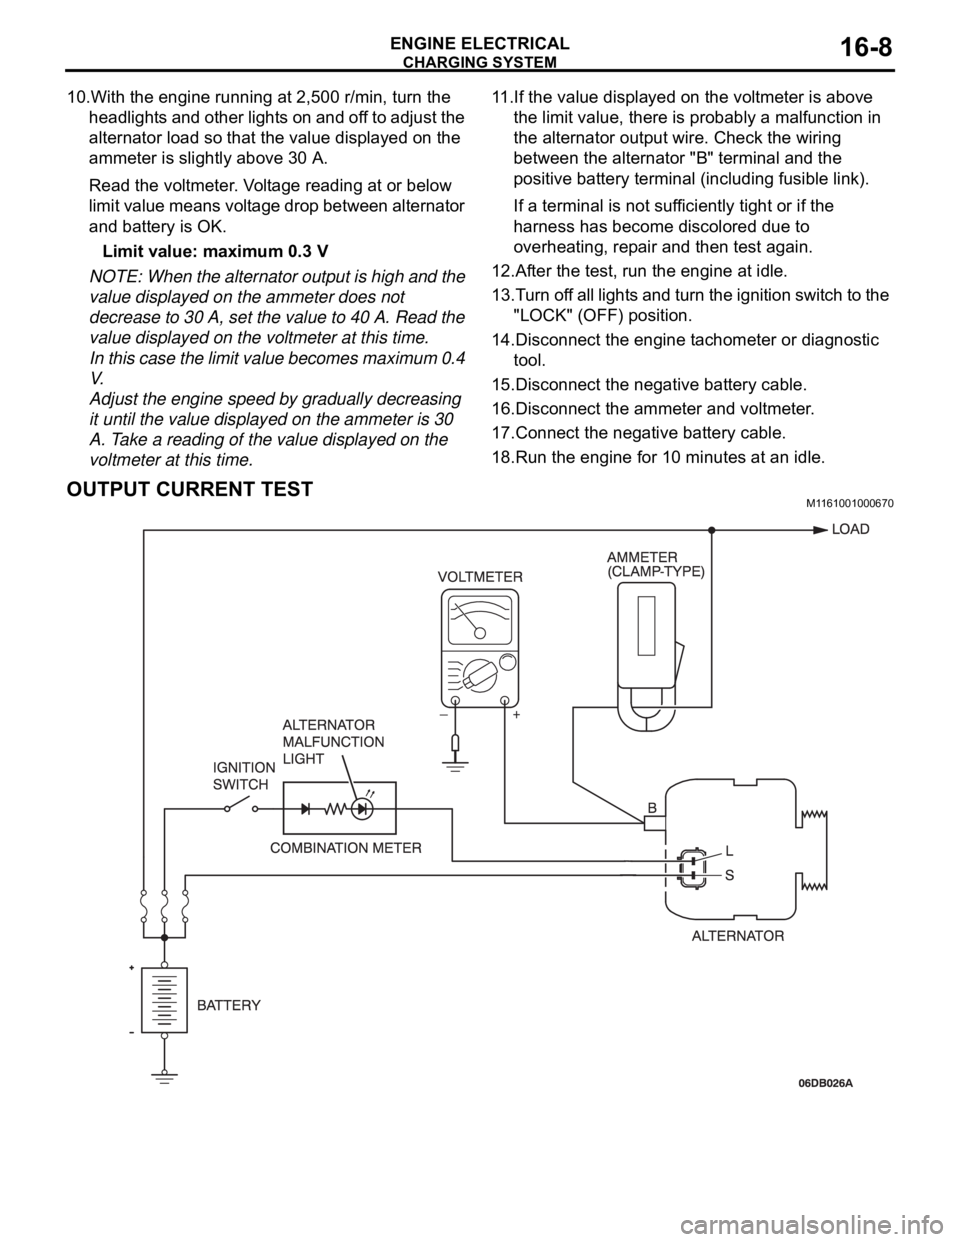
10.With the engine running at 2,500 r/min, turn the
headlights and other lights on and off to adjust the
alternator load so that the value displayed on the
ammeter is slightly above 30 A.
Read the voltmeter. Voltage reading at or below
limit value means voltage drop between alternator
and battery is OK.
Limit value: maximum 0.3 V
NOTE: When the alternator output is high and the
value displayed on the ammeter does not
decrease to 30 A, set the value to 40 A. Read the
value displayed on the voltmeter at this time.
In this case the limit value becomes maximum 0.4
V.
Adjust the engine speed by gradually decreasing
it until the value displayed on the ammeter is 30
A. Take a reading of the value displayed on the
voltmeter at this time.11.If the value displayed on the voltmeter is above
the limit value, there is probably a malfunction in
the alternator output wire. Check the wiring
between the alternator "B" terminal and the
positive battery terminal (including fusible link).
If a terminal is not sufficiently tight or if the
harness has become discolored due to
overheating, repair and then test again.
12.After the test, run the engine at idle.
13.Turn off all lights and turn the ignition switch to the
"LOCK" (OFF) position.
14.Disconnect the engine tachometer or diagnostic
tool.
15.Disconnect the negative battery cable.
16.Disconnect the ammeter and voltmeter.
17.Connect the negative battery cable.
18.Run the engine for 10 minutes at an idle.
OUTPUT CURRENT TESTM1161001000670
Page 986 of 1500

CHARGING SYSTEM
ENGINE ELECTRICAL16-9
Required Special Tool:
: Diagnostic Tool (MUT-III)
MB991824: V.C.I.
MB991827: MUT-III USB Cable
MB991910: MUT-III Main Harness A
This test determines whether the alternator outputs
normal current. For best results, use a charging sys-
tem tester. If not available, follow the steps below.
Battery posts, terminals and related acces-
sories contain lead and lead compounds.
WASH HANDS AFTER HANDLING.
1. Before the test, always be sure to check the
following.
Alternator installation
Battery (Refer to GROUP 54A, Chassis Electrical
Battery On-vehicle Service Battery Check
P.54A-5.)
NOTE: The battery to be used should be slightly
discharged. The load in a fully-charged battery
will be insufficient and the test may not be able to
be carried out correctly.
Alternator drive belt tension (Refer to GROUP 00,
General
Maintenance Service Drive Belts
(For Alternator, Power Steering Pump and Air
Conditioning) (Check) P.00-39.)
Fusible link
Abnormal noise from the alternator while the
engine is running.
2. Turn the ignition switch to the "LOCK" (OFF)
position.
3. Disconnect the negative battery cable.
Never use clips to connect the wire. Loose
connections (for example, using clips) will
lead to a serious accident because of high
current.
4. Connect a clamp-type DC test ammeter with a
range of 0
120 A to the alternator "B" terminal
output wire.
5. Connect a voltmeter with a range of 0
20 V
between the alternator "B" terminal and ground.
(Connect the positive lead of the voltmeter to the
"B" terminal, and then connect the negative lead
of the voltmeter to ground.)
6. Connect the negative battery cable.
7. Connect an engine tachometer or diagnostic tool.
8. Leave the hood open.9. Check to be sure that the reading on the voltmeter
is equal to the battery positive voltage.
NOTE: If the voltage is 0 V, the cause is probably
an open circuit in the wire or fusible link between
the alternator "B" terminal and the battery positive
terminal or malfunctioning voltmeter.
10.After turning on the headlights, start the engine.
NOTE: Because the current from the battery will
soon drop after the engine is started, step 11
should be carried out as quickly as possible in
order to obtain the maximum current output value.
11.Immediately after setting the headlights to high
beam and turning the heater blower switch to the
highest position, increase the engine speed to
2,500 r/min and read the maximum current output
value displayed on the ammeter.
Limit value: 70 % of nominal current output
NOTE: For the nominal current output, refer to the
Alternator Specifications.
NOTE: The current output value will depend on
the electrical load and the temperature of the
alternator body.
NOTE: If the electrical load is small while testing,
the specified level of current may not be output
even though the alternator is normal. In such
cases, increase the electrical load by leaving the
headlights turned on for some time to discharge
the battery or by using the lighting system in
another vehicle, and then test again.
NOTE: The specified level of current also may not
be output if the temperature of the alternator body
or the ambient temperature is too high. In such
cases, cool the alternator and then test again.
12.The reading on the ammeter should be above the
limit value. If the reading is below the limit value
and the alternator output wire is normal, remove
the alternator from the engine and check the
alternator.
13.Run the engine at idle speed after the test.
14.Turn the ignition switch to the "LOCK" (OFF)
position.
15.Disconnect the engine tachometer or diagnostic
tool.
16.Disconnect the negative battery cable.
17.Disconnect the ammeter and voltmeter .
18.Connect the negative battery cable.
19.Run the engine for 10 minutes at an idle.
Page 988 of 1500
CHARGING SYSTEM
ENGINE ELECTRICAL16-11
11.Increase the engine speed to 2,500 r/min.
12.Read the value displayed on the voltmeter when
the current output by the alternator becomes 10 A
or less.
13.If the voltage reading conforms to the value in the
voltage regulation table, then the voltage regulator
is operating normally.
If the voltage is outside the standard value, there
is a malfunction of the voltage regulator or the
alternator (Refer to the following table).14.After the test, lower the engine speed to idle.
15.Turn the ignition switch to the "LOCK" (OFF)
position.
16.Disconnect the engine tachometer or diagnostic
tool .
17.Disconnect the negative battery cable.
18.Disconnect the ammeter and voltmeter.
19.Connect the negative battery cable.
20.Run the engine for 10 minutes at an idle.
VOLTAGE REGULATION TABLE
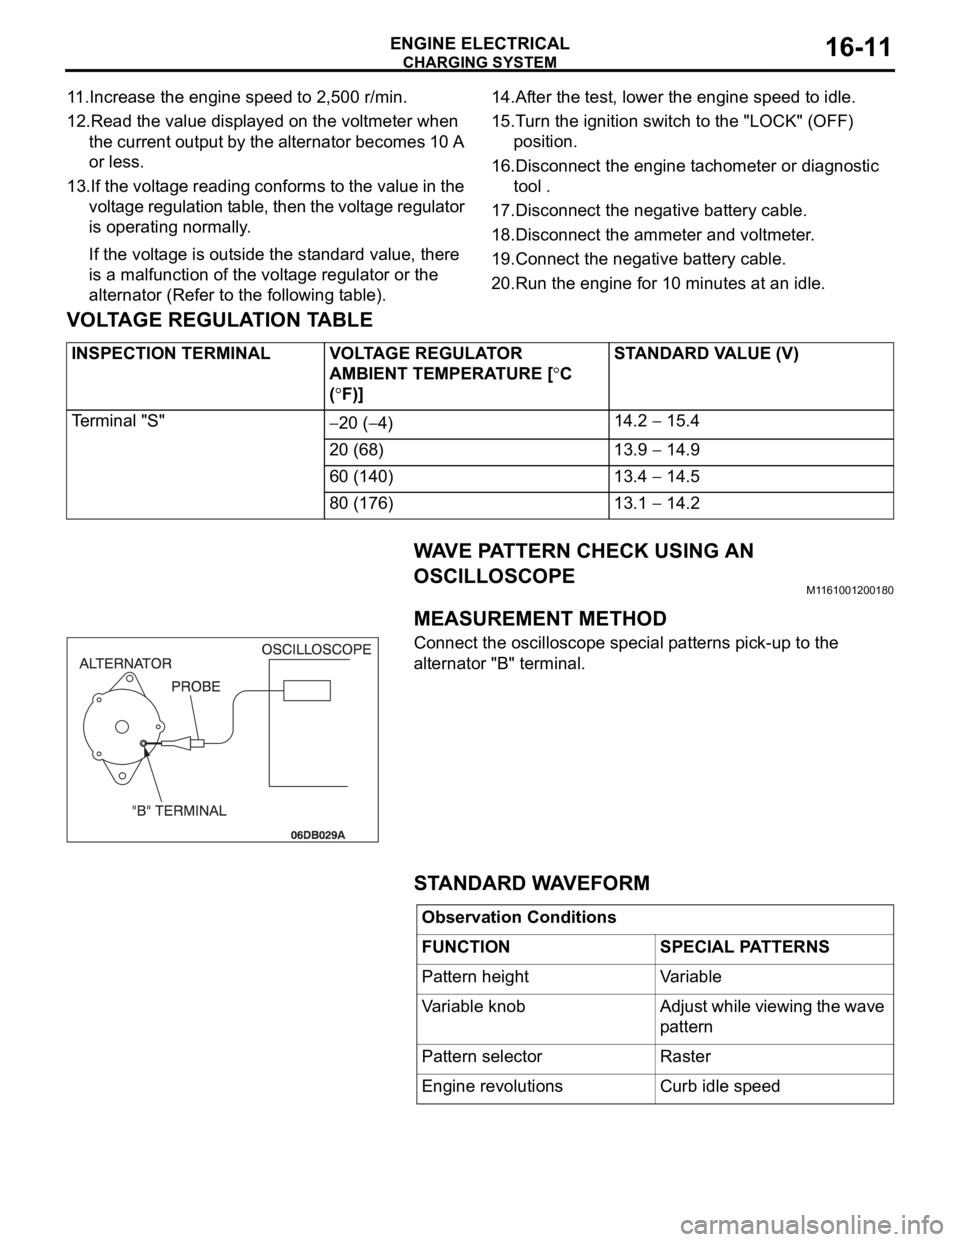
WAVE PATTERN CHECK USING AN
OSCILLOSCOPE
M1161001200180.
MEASUREMENT METHOD
Connect the oscilloscope special patterns pick-up to the
alternator "B" terminal.
.
STANDARD WAVEFORM
INSPECTION TERMINAL VOLTAGE REGULATOR
AMBIENT TEMPERATURE [
C
(
F)]STANDARD VALUE (V)
Te r m i n a l " S "
20 (4)14.2 15.4
20 (68) 13.9
14.9
60 (140) 13.4
14.5
80 (176) 13.1
14.2
Observation Conditions
FUNCTION SPECIAL PATTERNS
Pattern height Variable
Variable knob Adjust while viewing the wave
pattern
Pattern selector Raster
Engine revolutions Curb idle speed
Page 1049 of 1500
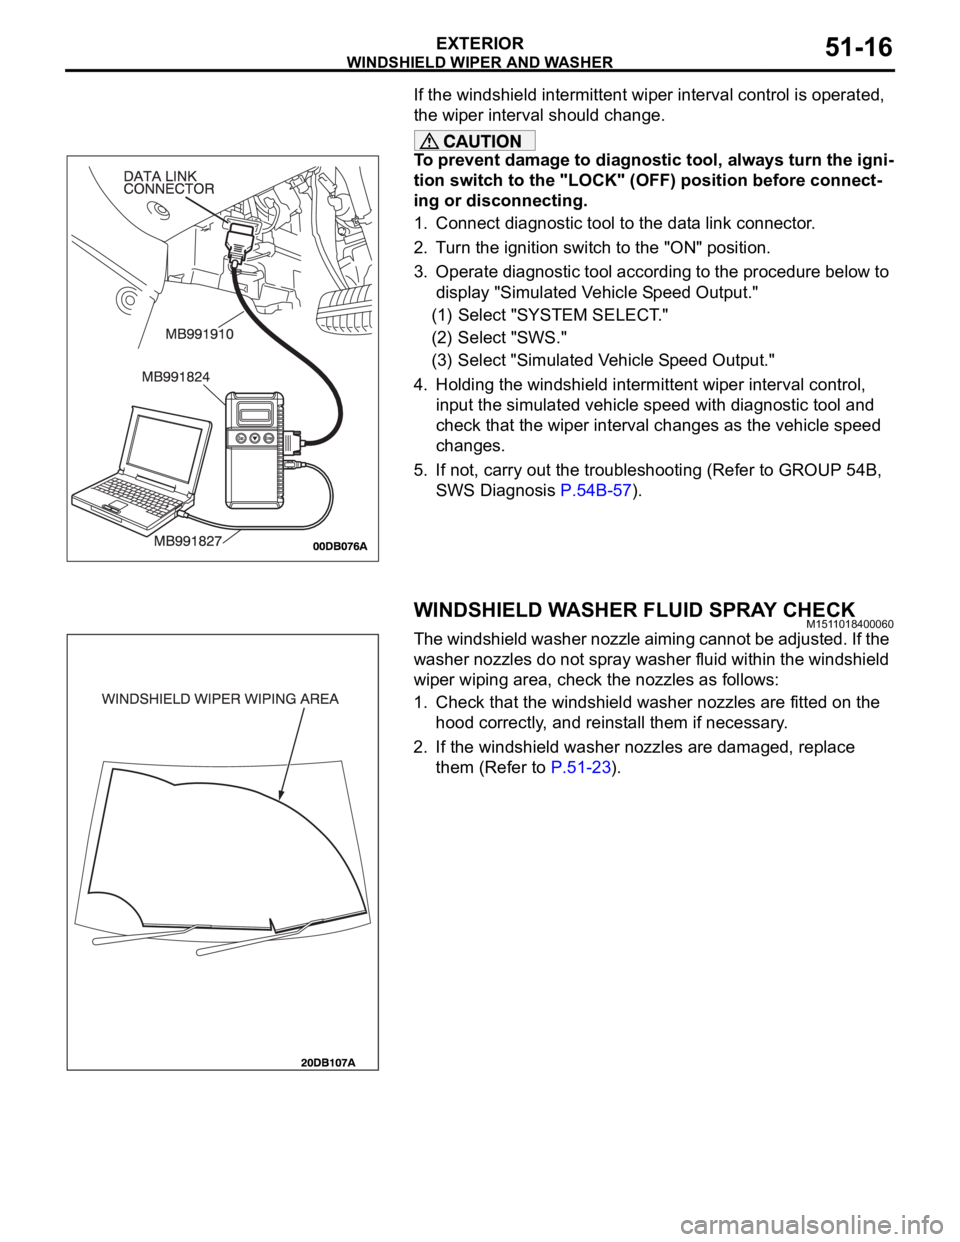
WINDSHIELD WIPER AND WASHER
EXTERIOR51-16
If the windshield intermittent wiper interval control is operated,
the wiper interval should change.
To prevent damage to diagnostic tool, always turn the igni-
tion switch to the "LOCK" (OFF) position before connect-
ing or disconnecting.
1. Connect diagnostic tool to the data link connector.
2. Turn the ignition switch to the "ON" position.
3. Operate diagnostic tool according to the procedure below to
display "Simulated Vehicle Speed Output."
(1) Select "SYSTEM SELECT."
(2) Select "SWS."
(3) Select "Simulated Vehicle Speed Output."
4. Holding the windshield intermittent wiper interval control,
input the simulated vehicle speed with diagnostic tool and
check that the wiper interval changes as the vehicle speed
changes.
5. If not, carry out the troubleshooting (Refer to GROUP 54B,
SWS Diagnosis P.54B-57).
WINDSHIELD WASHER FLUID SPRAY CHECKM1511018400060
The windshield washer nozzle aiming cannot be adjusted. If the
washer nozzles do not spray washer fluid within the windshield
wiper wiping area, check the nozzles as follows:
1. Check that the windshield washer nozzles are fitted on the
hood correctly, and reinstall them if necessary.
2. If the windshield washer nozzles are damaged, replace
them (Refer to P.51-23).
Page 1134 of 1500

KEYLESS ENTRY SYSTEM
BODY42-67
KEYLESS ENTRY SYSTEM
GENERAL DESCRIPTIONBGBJABIE
Antenna and receiver are incorporated in the
ETACS-ECU.
ID code can be registered by using Diagnostic
tool (MUT-III).
Transmitter is a key holder type, which incorpo-
rates lock button, unlock button, trunk button and
panic button
When the transmitter unlock button is pressed
once, the driver's door will be unlocked. If the but-
ton is pressed twice, all the doors will be
unlocked. The adjustment function also allows
you to open all the doors by pressing the unlock
button only once. For further details on using the
multi-center display to adjust the unlock opera-
tion, refer to GROUP 54B, On-vehicle Service
P.54B-486.
When the transmitter is operated, the answer-
back function will work as follows:
The answerback operation can be altered as fol-
lows:NOTE: Enabling/disabling the hazard warning
light flashing, the horn sounding in accordance
with the answerback function. For further details
on using the transmitter to adjust answerback,
P.42-72 see the section below. For further details
on using the multi-center display to adjust
answerback, refer to GROUP 54B, On-vehicle
Service P.54B-486. ITEM OPERATION
DOORS LOCKED DOORS UNLOCKED
Dome light Flashes once Illuminates for 15 seconds
Turn-signal lights (RH and LH) Flashes once Flashes twice
Horn Sounds once when the lock button
is pressed with all the doors locked-
ITEM ADJUSTMENT ITEM ADJUSTMENT DETAIL
Keyless entry system
confirmation by turn
signal lightsAdjustment of hazard answerback
when the transmitter is used to
lock doorsWhen adjusting hazard answerback after the
doors are locked with the transmitter, the
following flashing conditions can be selected.
a. Flash (default)
b. No flash
Adjustment of hazard answerback
when the transmitter is used to
unlock doorsWhen adjusting hazard answerback after the
doors are unlocked with the transmitter, the
following flashing conditions can be selected.
a. Flash (default)
b. No flash
Keyless entry system
confirmation by hornAdjustment of horn answerback
when the transmitter is used to
lock doorsWhen adjusting horn answerback after the
doors are locked with the transmitter, the
following horn conditions can be selected.
a. Horn sounds
b. Horn sounds if doors are already locked
(default)
c. Horn does not sound