MITSUBISHI ECLIPSE 1991 Service Manual
Manufacturer: MITSUBISHI, Model Year: 1991, Model line: ECLIPSE, Model: MITSUBISHI ECLIPSE 1991Pages: 1216, PDF Size: 67.42 MB
Page 991 of 1216
AUTOMATIC TRANSAXLE - Transaxle Assembly
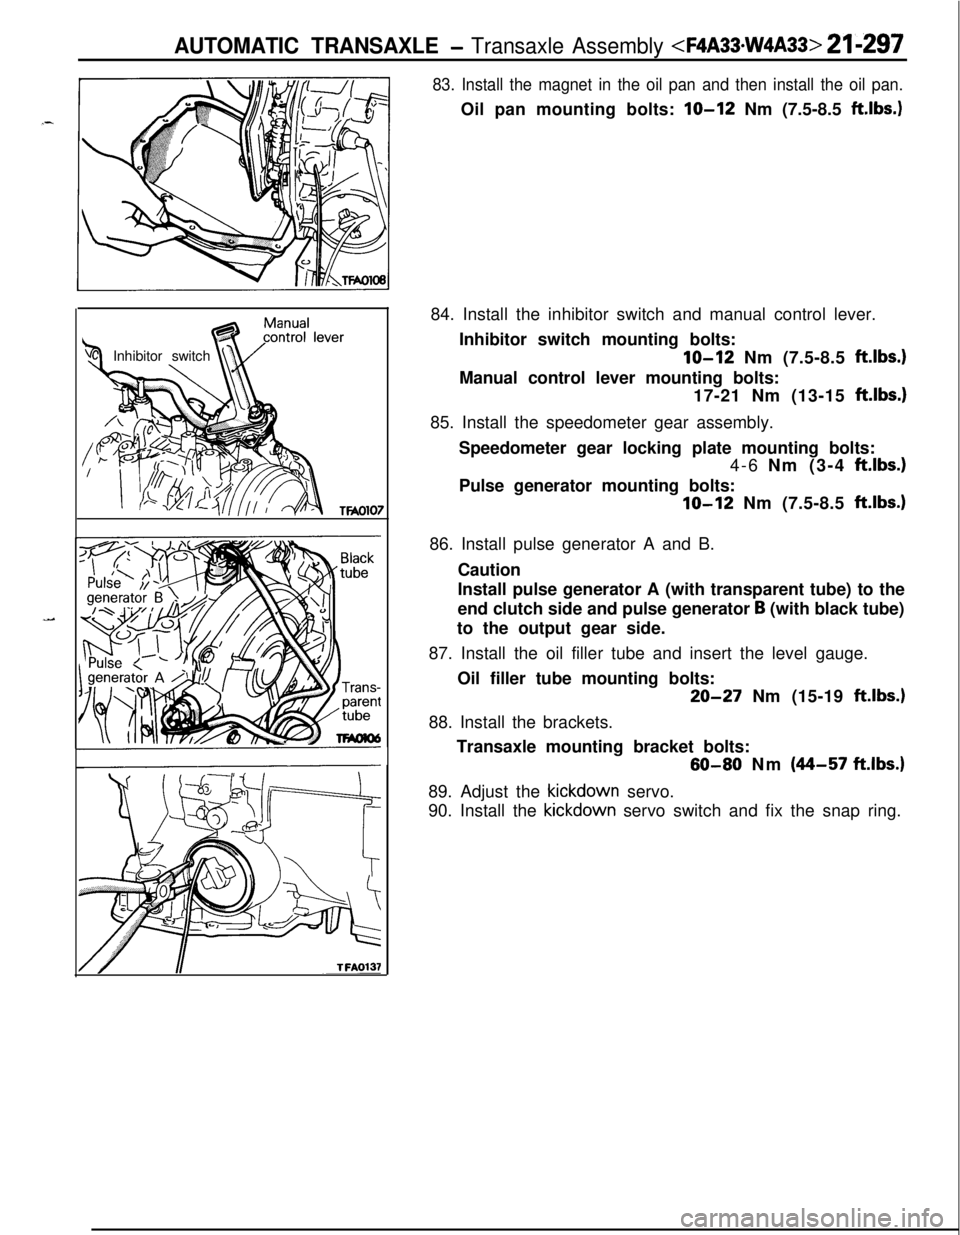
83. Install the magnet in the oil pan and then install the oil pan.Oil pan mounting bolts:
IO-12 Nm (7.5-8.5 ft.lbs.)84. Install the inhibitor switch and manual control lever.
Inhibitor switch mounting bolts:
lo-12 Nm (7.5-8.5 ft.lbs.)Manual control lever mounting bolts:
17-21 Nm (13-15
ftlbs.)85. Install the speedometer gear assembly.
Speedometer gear locking plate mounting bolts:
4-6 Nm (3-4
ftlbs.)Pulse generator mounting bolts:
lo-12 Nm (7.5-8.5 ft.lbs.)86. Install pulse generator A and B.
Caution
Install pulse generator A (with transparent tube) to the
end clutch side and pulse generator
B (with black tube)
to the output gear side.
87. Install the oil filler tube and insert the level gauge.
Oil filler tube mounting bolts:
20-27 Nm (15-19 ft.lbs.)88. Install the brackets.
Transaxle mounting bracket bolts:
60-80 Nm (44-57 ftlbs.)89. Adjust the kickdown servo.
90. Install the kickdown servo switch and fix the snap ring.
Page 992 of 1216
21-298 AUTOMATIC TRANSAXLE - Transaxle Assembly
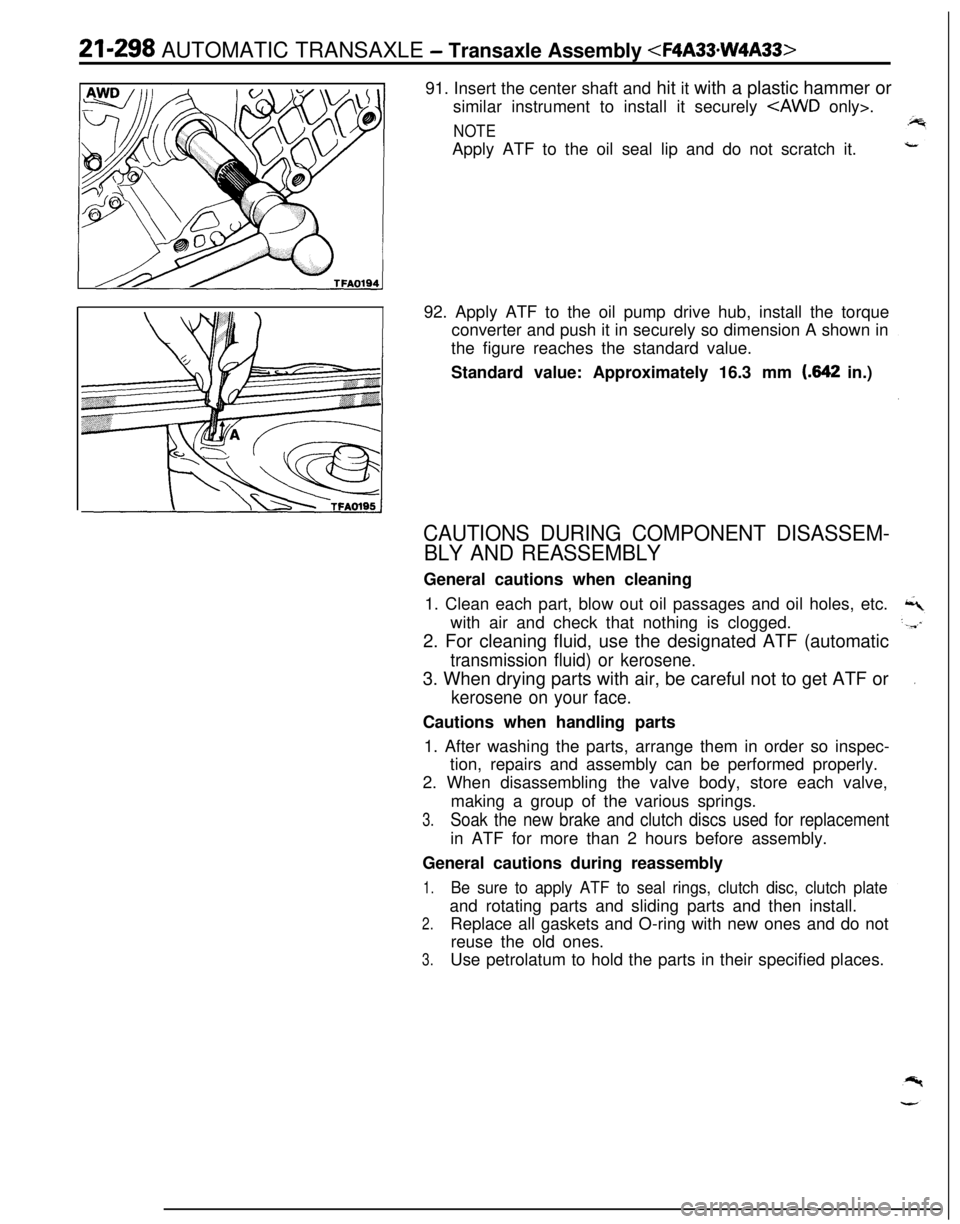
similar instrument to install it securely
NOTEApply ATF to the oil seal lip and do not scratch it.
92. Apply ATF to the oil pump drive hub, install the torque
converter and push it in securely so dimension A shown in
the figure reaches the standard value.
Standard value: Approximately 16.3 mm
(.642 in.)
CAUTIONS DURING COMPONENT DISASSEM-
BLY AND REASSEMBLYGeneral cautions when cleaning
1. Clean each part, blow out oil passages and oil holes, etc.
with air and check that nothing is clogged.
2. For cleaning fluid, use the designated ATF (automatic
transmission fluid) or kerosene.3. When drying parts with air, be careful not to get ATF or
kerosene on your face.Cautions when handling parts
1. After washing the parts, arrange them in order so inspec-
tion, repairs and assembly can be performed properly.
2. When disassembling the valve body, store each valve,
making a group of the various springs.
3.Soak the new brake and clutch discs used for replacementin ATF for more than 2 hours before assembly.
General cautions during reassembly
1.Be sure to apply ATF to seal rings, clutch disc, clutch plateand rotating parts and sliding parts and then install.
2.Replace all gaskets and O-ring with new ones and do not
reuse the old ones.
3.Use petrolatum to hold the parts in their specified places.
Page 993 of 1216
AUTOMATIC TRANSAXLE - Oil Pump21-299OIL PUMP
- DISASSEMBLY AND REASSEMBLY
NZlLGAK
11 Nm8 ft.lbs.
NOTE(I) Reverse the disassembly procedures to reassemble.(2) +I) : Refer to ;Servjce Pojnts of Disassembly”.I:/ &B : Refer to Serwce Points of Reassembly .: Non-reusable parts
TFAO?AS
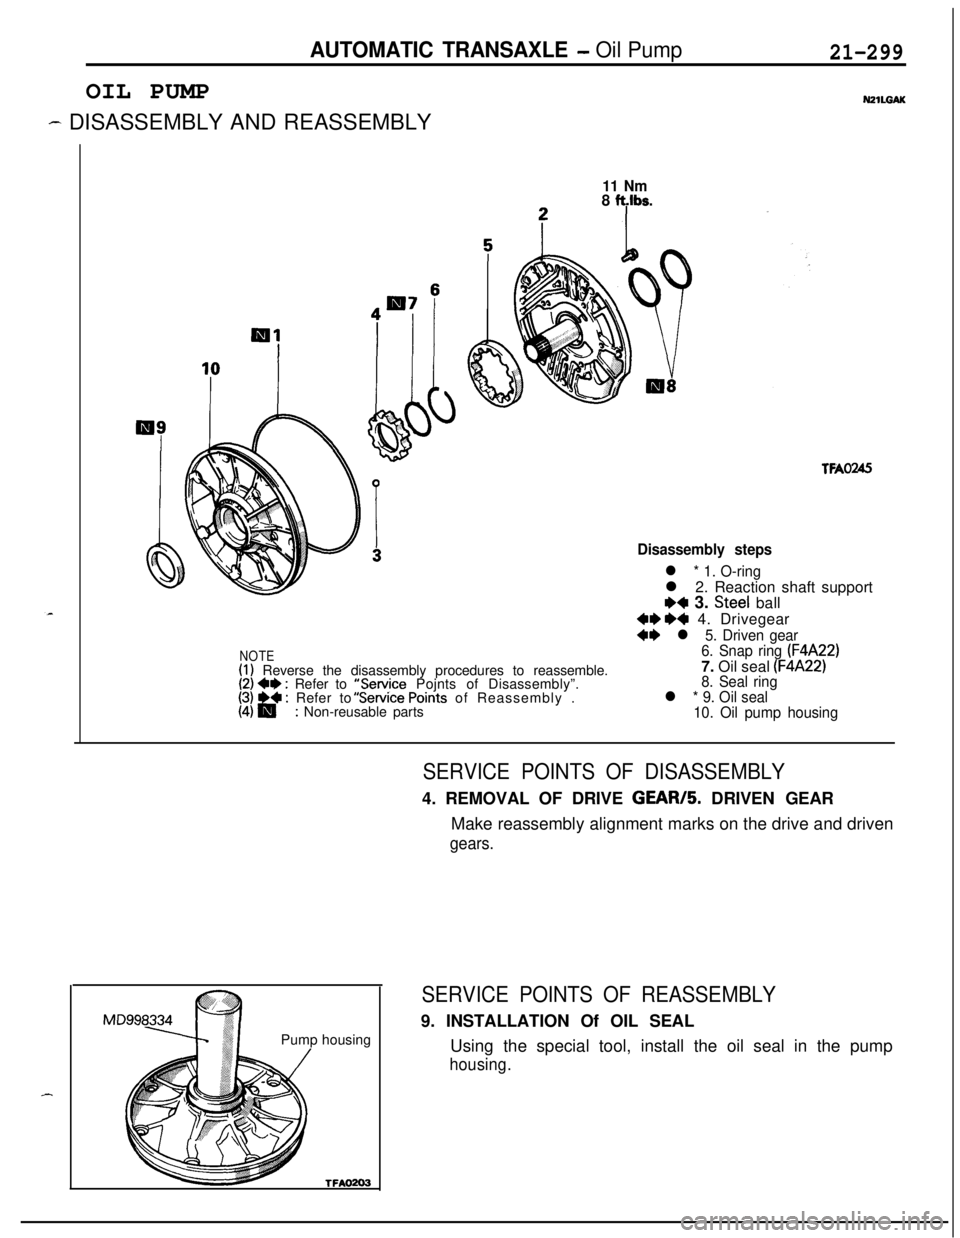
Disassembly steps
l
* 1. O-ringl 2. Reaction shaft support
I)+ 3. Steel ball
We+ 4. Drivegear
+I) l 5. Driven gear
6. Snap ring (F4A22)7. Oil seal
(F4A22)8. Seal ringl * 9. Oil seal
10. Oil pump housingPump housingTFAO203
SERVICE POINTS OF DISASSEMBLY4. REMOVAL OF DRIVE GEAR/5. DRIVEN GEAR
Make reassembly alignment marks on the drive and driven
gears.
SERVICE POINTS OF REASSEMBLY9. INSTALLATION Of OIL SEAL
Using the special tool, install the oil seal in the pump
housing.
Page 994 of 1216
21-300AUTOMATIC TRANSAXLE - Oil Pump
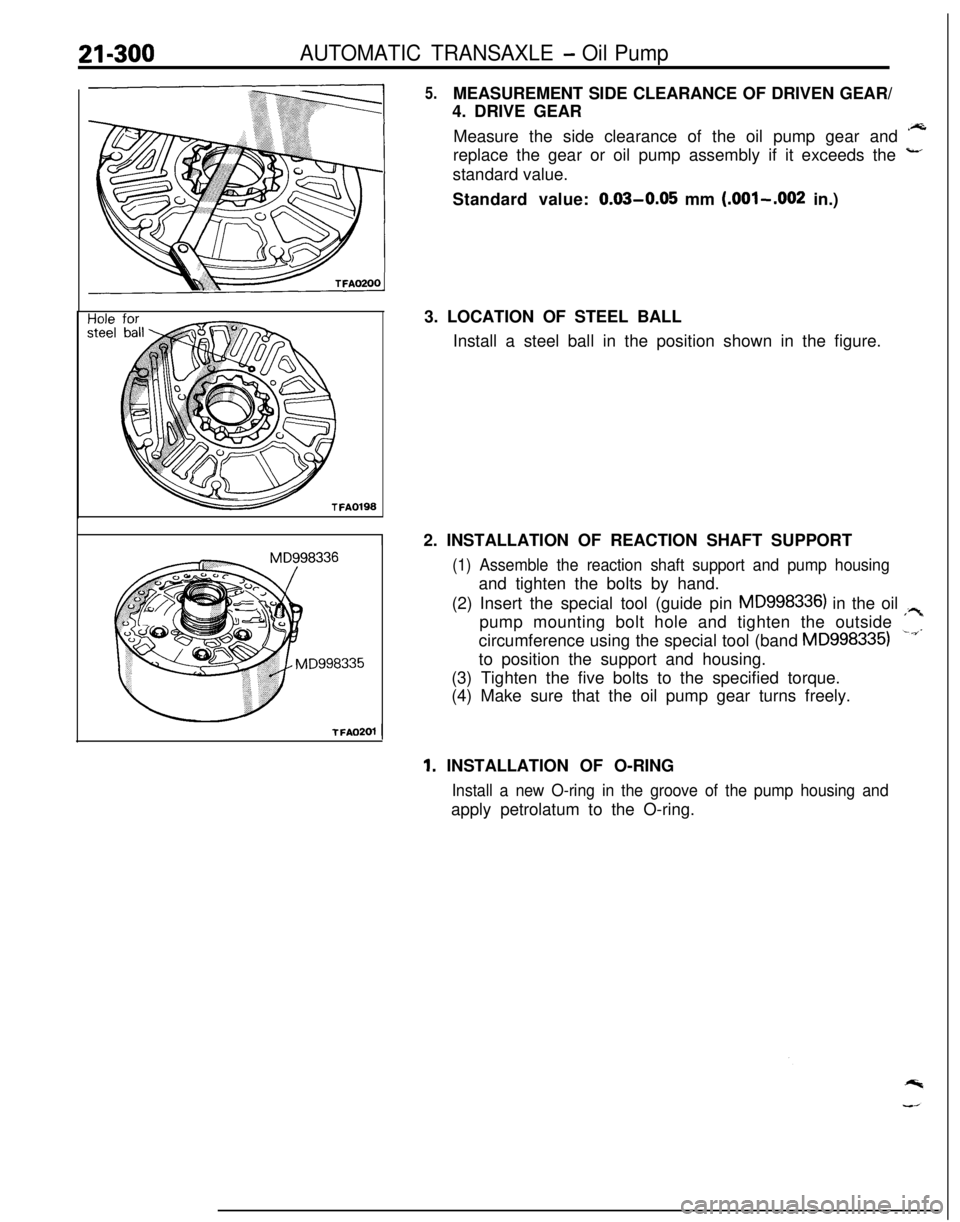
5.MEASUREMENT SIDE CLEARANCE OF DRIVEN GEAR/
4. DRIVE GEAR
Measure the side clearance of the oil pump gear and *A
replace the gear or oil pump assembly if it exceeds the
-’standard value.
Standard value:
0.03-0.05 mm (.OOl-.002 in.)
3. LOCATION OF STEEL BALL
Install a steel ball in the position shown in the figure.
2. INSTALLATION OF REACTION SHAFT SUPPORT
(1) Assemble the reaction shaft support and pump housingand tighten the bolts by hand.
(2) Insert the special tool (guide pin
MD998336) in the oil ;?pump mounting bolt hole and tighten the outside
‘II.circumference using the special tool (band
MD9983351to position the support and housing.
(3) Tighten the five bolts to the specified torque.
(4) Make sure that the oil pump gear turns freely.
ITFA0201
1
1. INSTALLATION OF O-RING
Install a new O-ring in the groove of the pump housing andapply petrolatum to the O-ring.
Page 995 of 1216
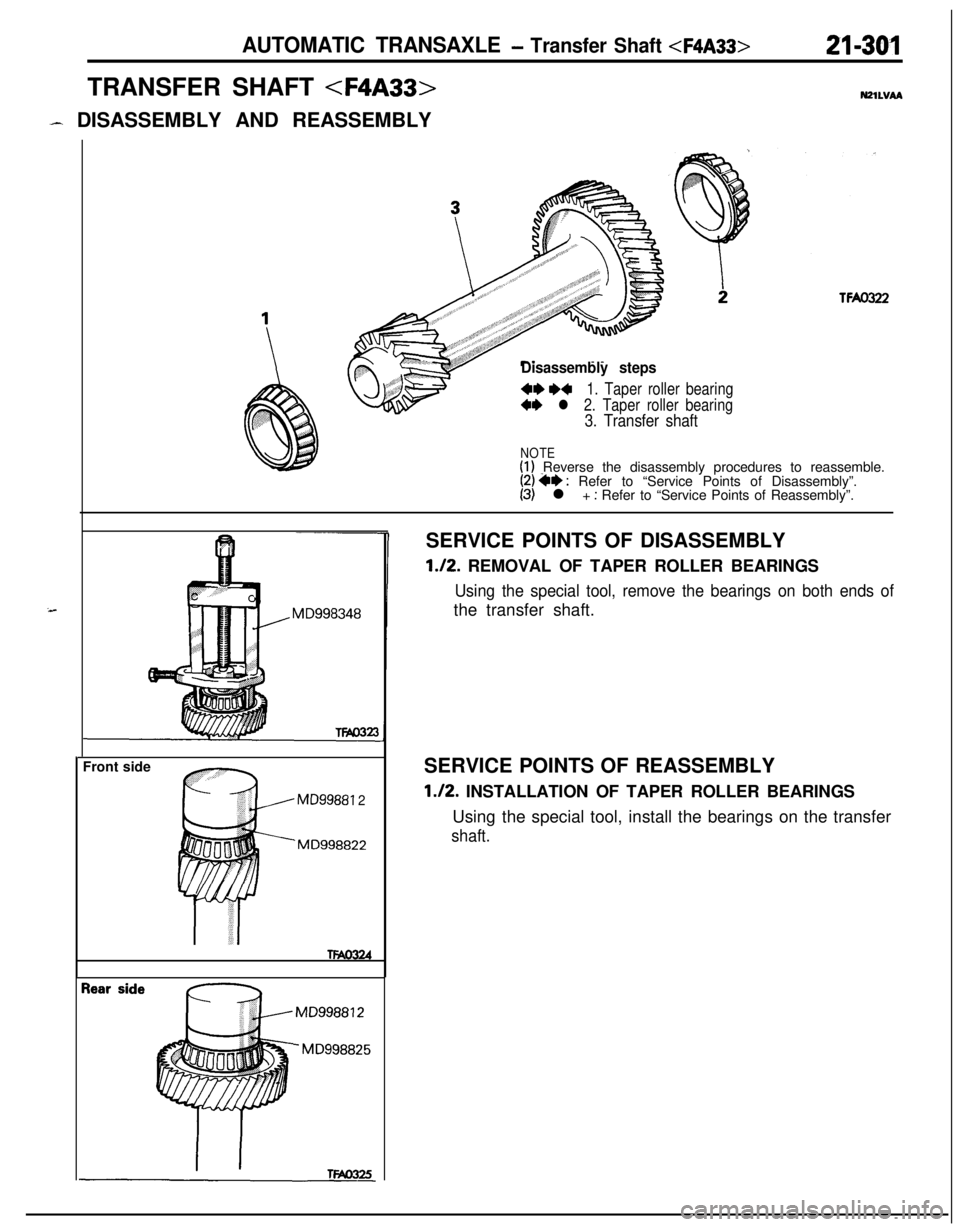
AUTOMATIC TRANSAXLE - Transfer Shaft
- DISASSEMBLY AND REASSEMBLY
TFAO322
Disassembly steps
4+ W1. Taper roller bearing
4+ l 2. Taper roller bearing
3. Transfer shaft
NOTE(I) Reverse the disassembly procedures to reassemble.(2) *e : Refer to “Service Points of Disassembly”.(3) l + : Refer to “Service Points of Reassembly”.
Front side
MD99881 2
MD998822SERVICE POINTS OF DISASSEMBLY
1.12. REMOVAL OF TAPER ROLLER BEARINGS
Using the special tool, remove the bearings on both ends ofthe transfer shaft.
SERVICE POINTS OF REASSEMBLY
1.12. INSTALLATION OF TAPER ROLLER BEARINGS
Using the special tool, install the bearings on the transfer
shaft.
Page 996 of 1216
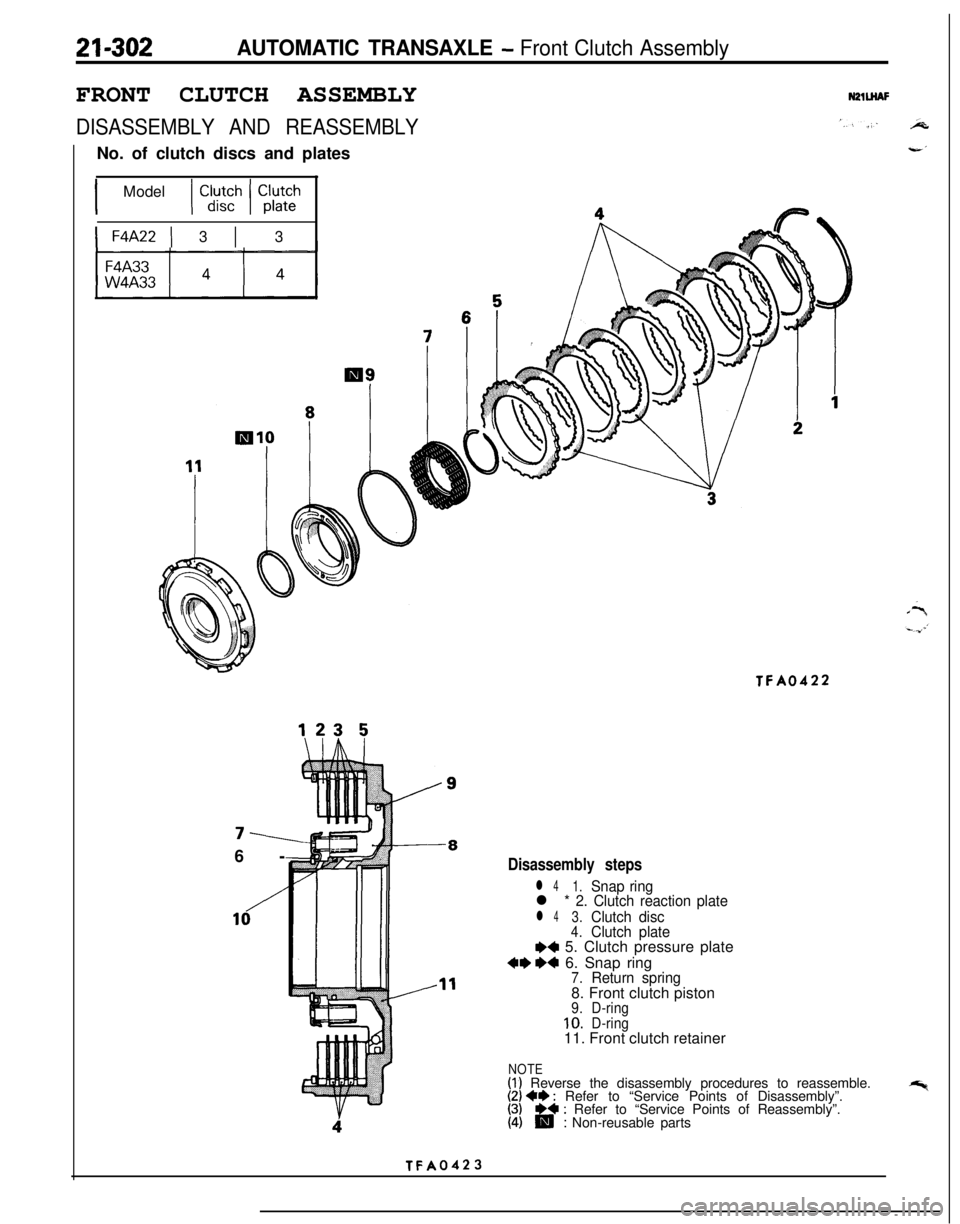
21-302AUTOMATIC TRANSAXLE - Front Clutch AssemblyFRONT CLUTCH ASSEMBLY
DISASSEMBLY AND REASSEMBLYNo. of clutch discs and plates
1 Model ( Cldy;c,h ( Cl;,:“h
1 F4A22 ) 3 1 3
NZlUAF6-
TFA0422
Disassembly steps
l 41.Snap ringl * 2. Clutch reaction plate
l 43.Clutch disc4.Clutch plate~~ 5. Clutch pressure plate
+eW 6. Snap ring7.Return spring8. Front clutch piston
9.D-ring10.D-ring11. Front clutch retainer
NOTE(I) Reverse the disassembly procedures to reassemble.(2) +I) : Refer to “Service Points of Disassembly”.(3): Refer to “Service Points of Reassembly”.(4): Non-reusable parts
TFAQ423
Page 997 of 1216
AUTOMATIC TRANSAXLE - Front Clutch Assemblv21-303
1750266
MD998337
\
1750264
/TFA0498Clutch
reactior
TFA0424
i
269
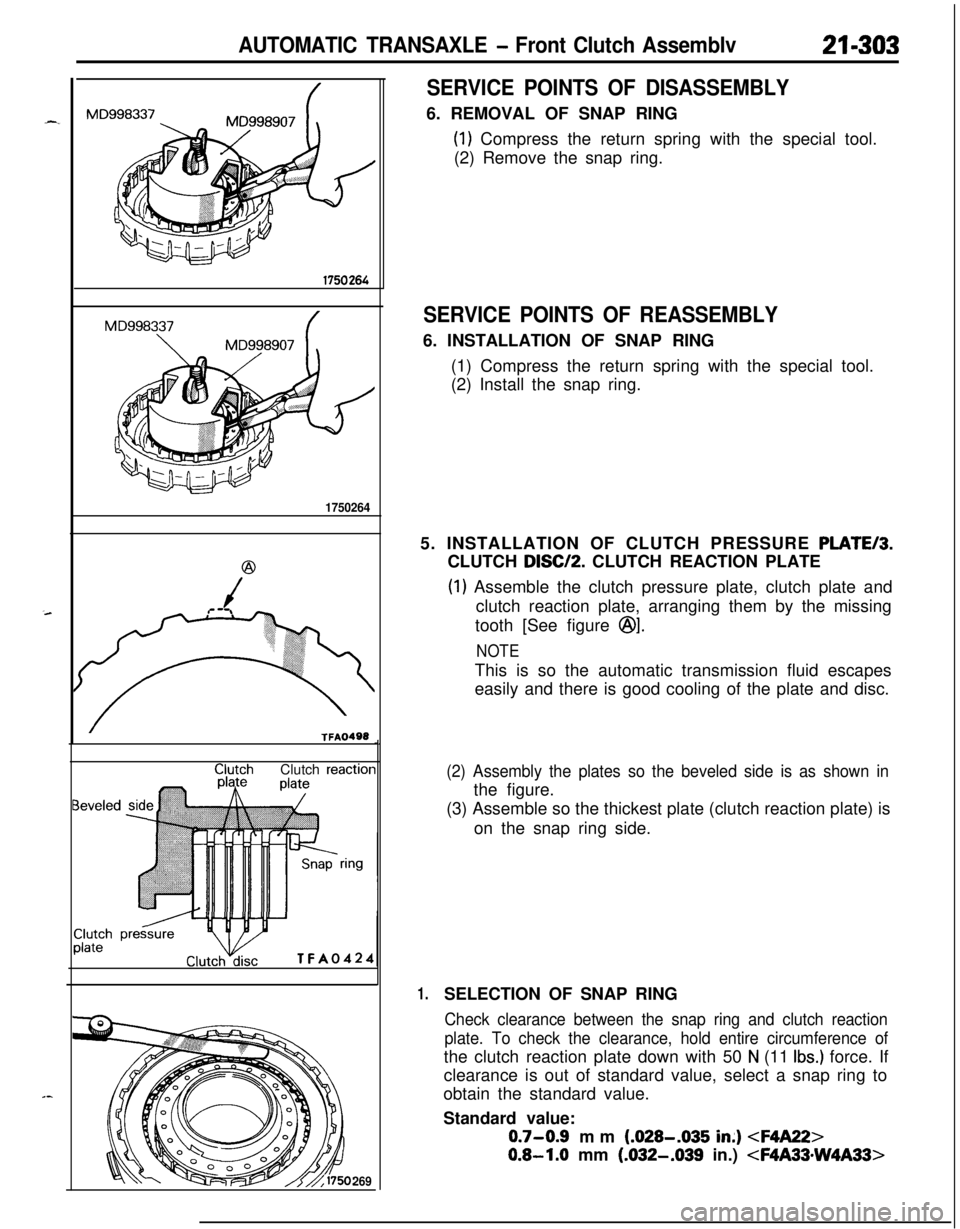
SERVICE POINTS OF DISASSEMBLY6. REMOVAL OF SNAP RING
(1) Compress the return spring with the special tool.
(2) Remove the snap ring.
SERVICE POINTS OF REASSEMBLY6. INSTALLATION OF SNAP RING
(1) Compress the return spring with the special tool.
(2) Install the snap ring.
5. INSTALLATION OF CLUTCH PRESSURE
PLATE/3.CLUTCH
DISC/P. CLUTCH REACTION PLATE
(1) Assemble the clutch pressure plate, clutch plate and
clutch reaction plate, arranging them by the missing
tooth [See figure
@I.
NOTEThis is so the automatic transmission fluid escapes
easily and there is good cooling of the plate and disc.
(2) Assembly the plates so the beveled side is as shown inthe figure.
(3) Assemble so the thickest plate (clutch reaction plate) is
on the snap ring side.
1.SELECTION OF SNAP RING
Check clearance between the snap ring and clutch reaction
plate. To check the clearance, hold entire circumference ofthe clutch reaction plate down with 50
N (11 Ibs.) force. If
clearance is out of standard value, select a snap ring to
obtain the standard value.
Standard value:
0.7-0.9 mm (.028-.035 in;)
0.8-1.0 mm (.032-.039 in.)
Page 998 of 1216
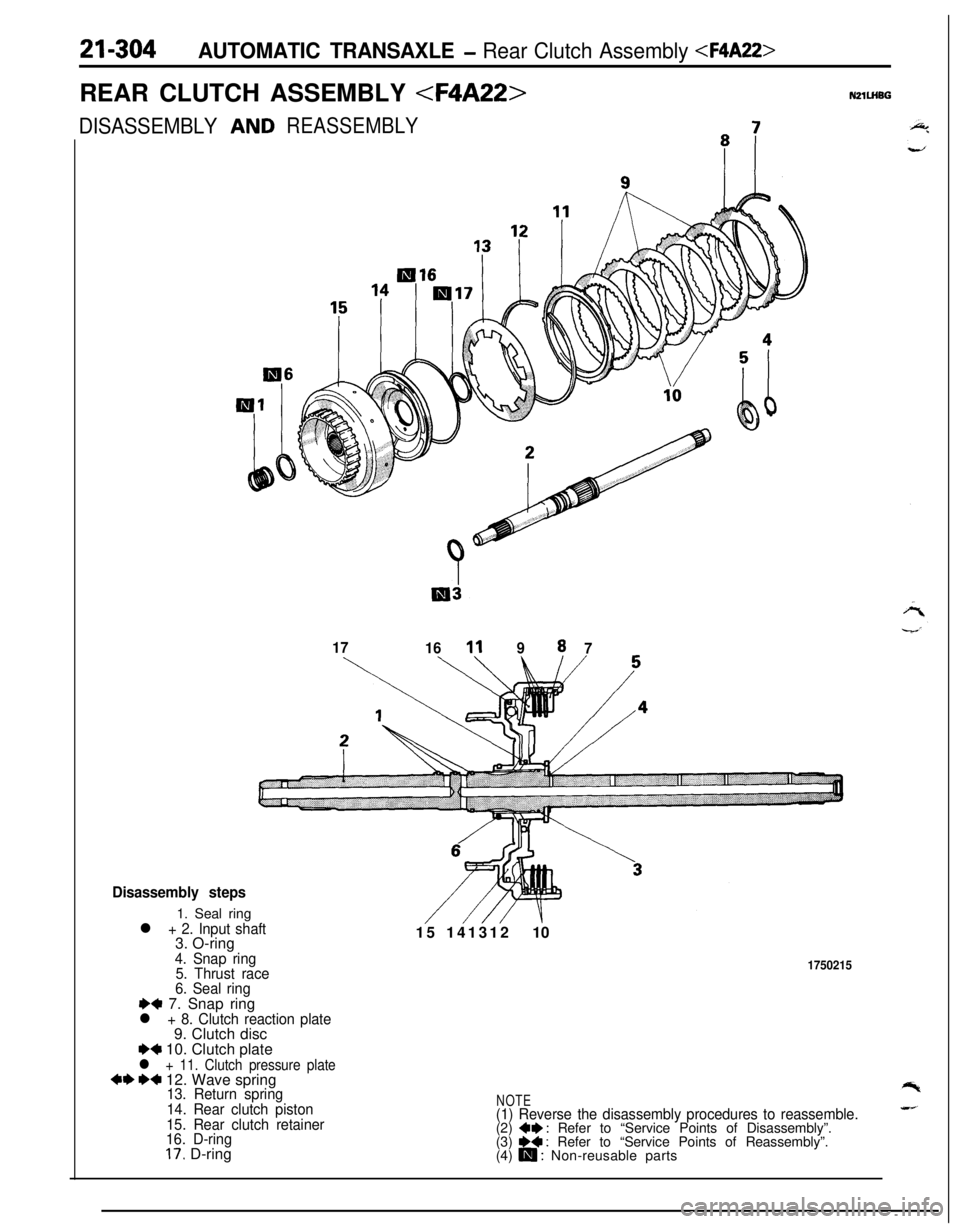
21-304AUTOMATIC TRANSAXLE - Rear Clutch Assembly
DISASSEMBLY
REASSEMBLY
17
161198
7
\
Disassembly steps1. Seal ring
l + 2. Input shaft3. O-ring
4. Snap ring
5. Thrust race
6. Seal ring
++ 7. Snap ring15 14131210
1750215
l + 8. Clutch reaction plate9. Clutch disc
I)+ 10. Clutch plate
l + 11. Clutch pressure plate++ I)+ 12. Wave spring13. Return spring
14. Rear clutch piston
15. Rear clutch retainer
16. D-ring
17. D-ring
NOTE(1) Reverse the disassembly procedures to reassemble.(2) +I) : Refer to “Service Points of Disassembly”.
(3) e+ : Refer to “Service Points of Reassembly”.
(4) m : Non-reusable parts
Page 999 of 1216

AUTOMATIC TRANSAXLE - Rear Clutch Assemblv
MD998337Shear droop
Clutch disc
TFA0501
\1750275
SERVICE POINTS OF DISASSEMBLY12. REMOVAL OF WAVE SPRING
(1) Compress the return spring with the special tool.
(2) Using a screwdriver, remove the wave spring.
SERVICE POINTS OF REASSEMBLY12. INSTALLATION OF WAVE SPRING
(1) Compress return spring with the special tool.
(2) Install the wave spring.
11. INSTALLATION OF CLUTCH PRESSURE
PLATE/IO.CLUTCH
PLATE/8. CLUTCH REACTION PLATE
(1) Install the clutch pressure plate, clutch plates and clutchreaction plate with their missing tooth portions
(@ in
the illustration) in alignment.
NOTE
This design is to facilitate escape of automatic transmis-sion fluid and improve the cooling efficiency of the
plates and disc.
(2) Install the clutch reaction plate with its shear droop
directed as shown in the illustration.
7. SELECTION OF SNAP RING
Check clearance between the snap ring and clutch reaction
plate. To check the clearance, hold entire circumference ofthe clutch reaction plate down with 50
N (11 Ibs.) force. If
clearance is out of standard value, select a snap ring to
obtain the standard value.
Standard value:
0.3-0.5 mm (.012-.020 in.)
Page 1000 of 1216
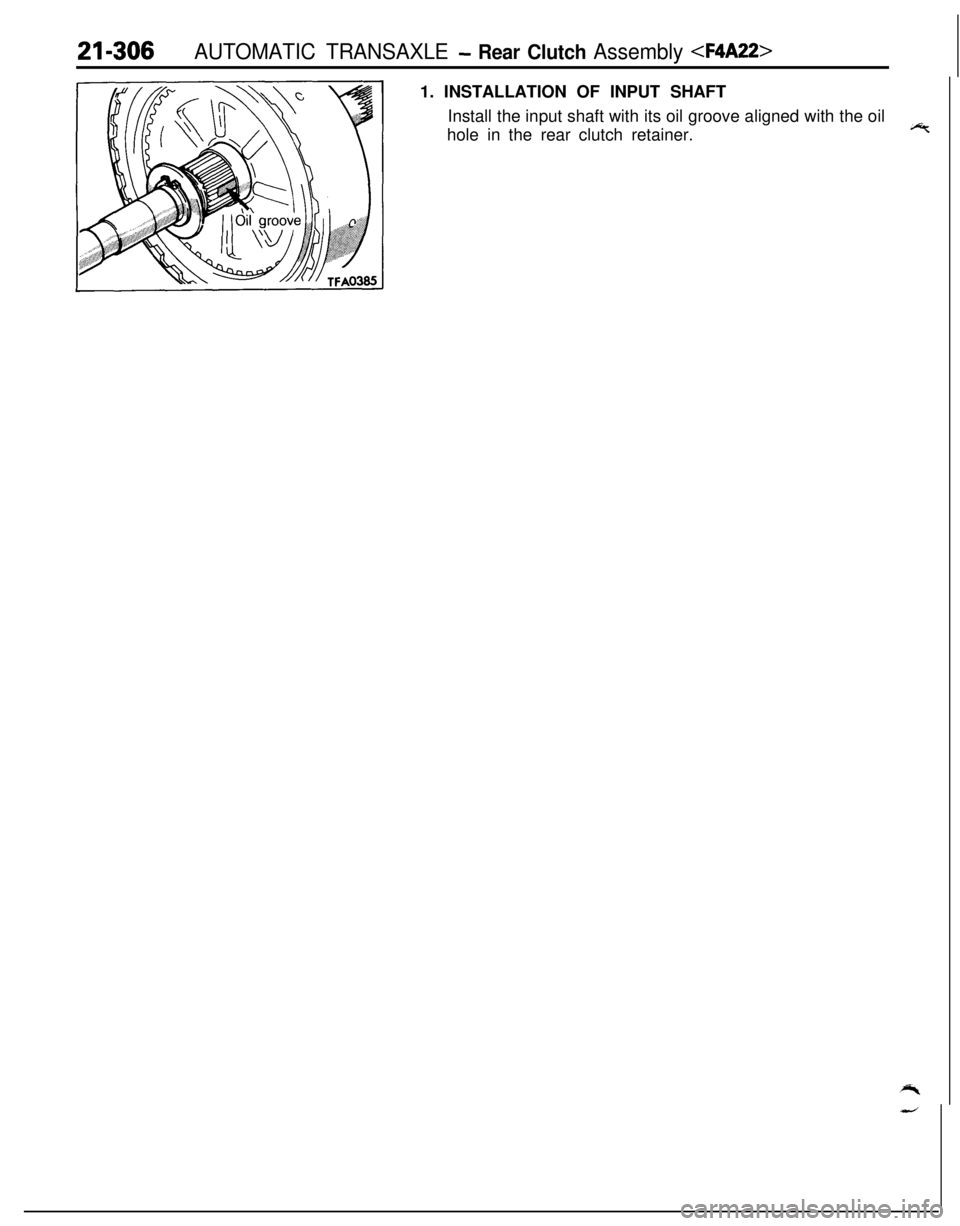
21-306AUTOMATIC TRANSAXLE - Rear Clutch Assembly
Install the input shaft with its oil groove aligned with the oil
hole in the rear clutch retainer.cF