MITSUBISHI ECLIPSE 1991 Service Manual
ECLIPSE 1991
MITSUBISHI
MITSUBISHI
https://www.carmanualsonline.info/img/19/57104/w960_57104-0.png
MITSUBISHI ECLIPSE 1991 Service Manual
Trending: sensor, ESP, key, open hood, flat tire, steering wheel, towing
Page 1031 of 1216
AUTOMATIC TRANSAXLE- Extension Housing Assembly 211337
EXTENSION HOUSING ASSEMBLY
- DISASSEMBLY AND REASSEMBLY
NZlVGAA
>-
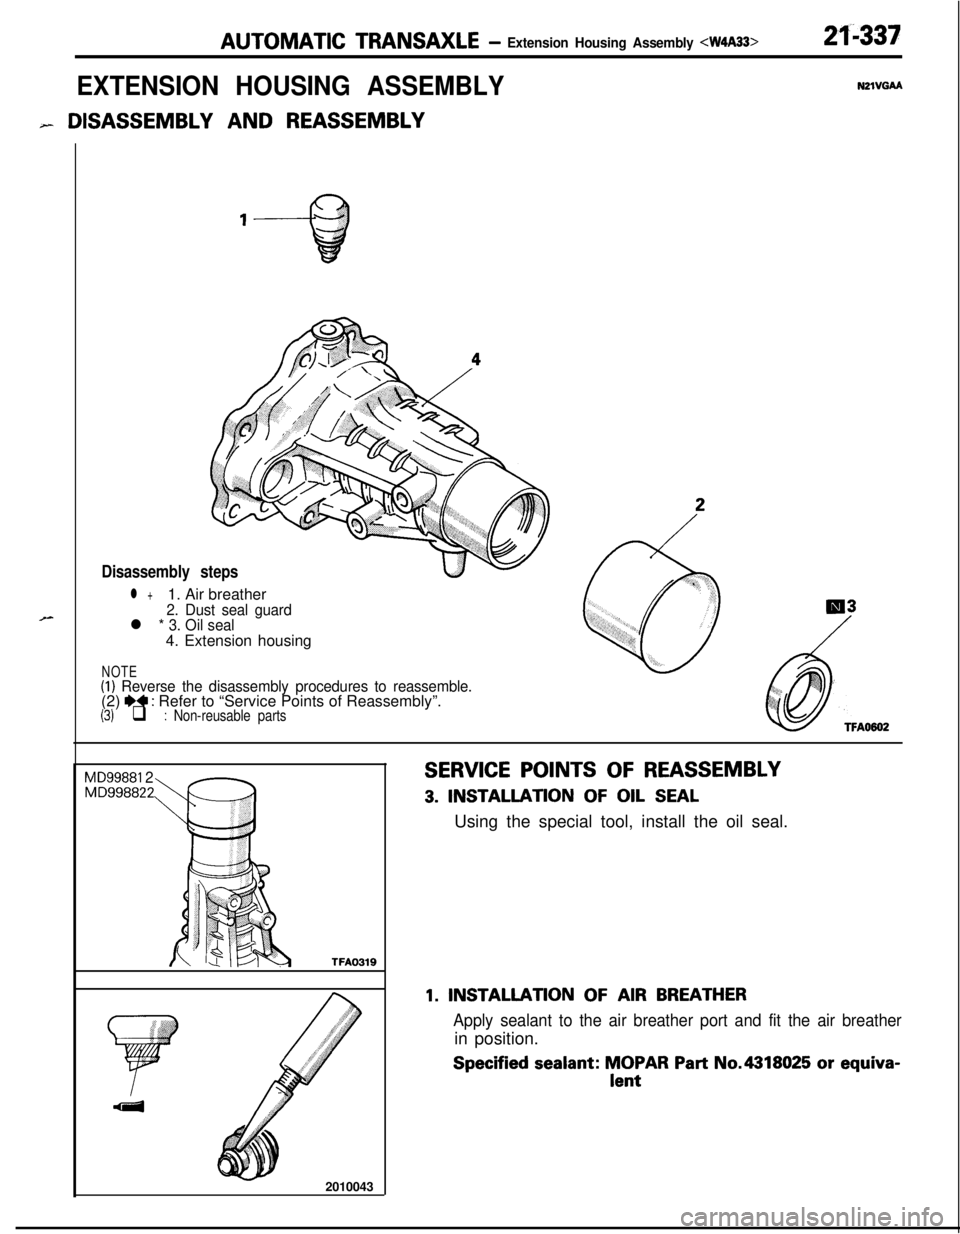
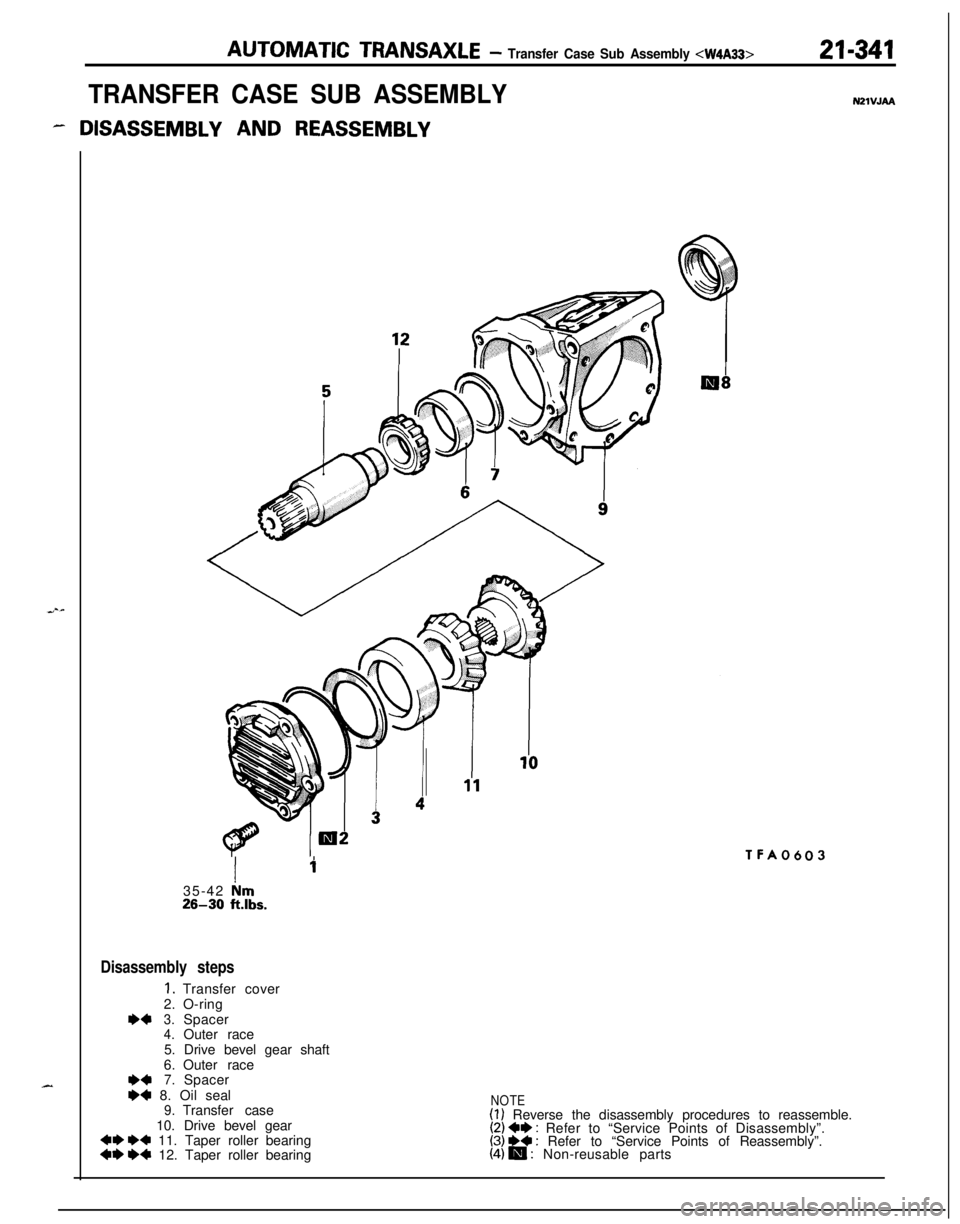
Disassembly steps
l +1. Air breather2. Dust seal guardl * 3. Oil seal4. Extension housing
NOTE(I) Reverse the disassembly procedures to reassemble.(2) W : Refer to “Service Points of Reassembly”.(3) q : Non-reusable parts
R3
MD99881 2MD998822
TFA03192010043
SERVICE POINTS OF REASSEMBLY
3. INSTALLATION OF OIL SEALUsing the special tool, install the oil seal.
1. INSTALLATION OF AIR BREATHER
Apply sealant to the air breather port and fit the air breatherin position.
Specified sealant: MOPAR Part No.4318025 or equiva-lent
Page 1032 of 1216
21-338AUTOMATIC TRANSAXLE- Transfer Case Adapter Sub Assembly 4W4A33>
TRANSFER CASE ADAPTER SUB ASSEMBLY N21VlAADISASSEMBLY
AND REASSEMBLY
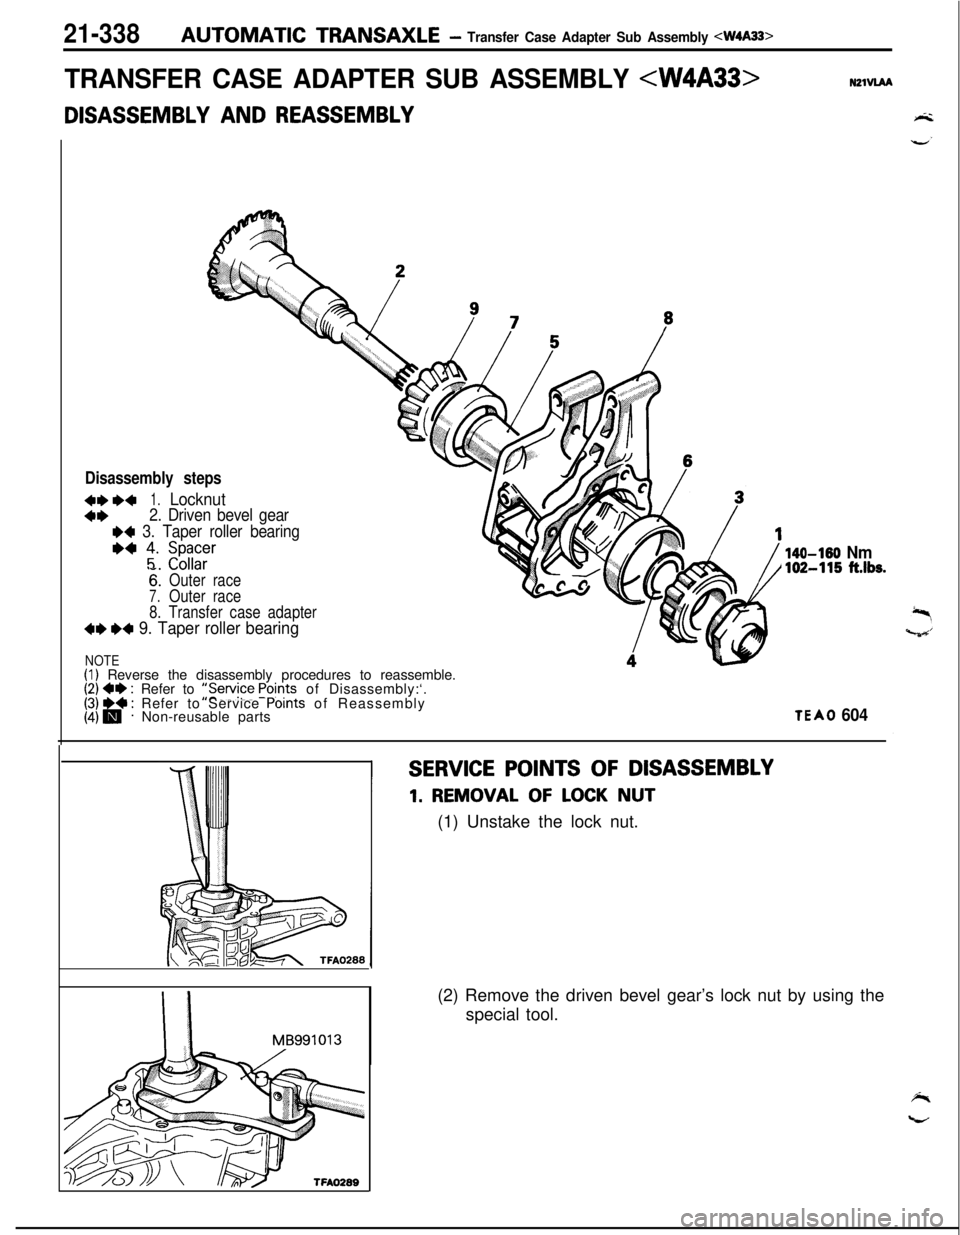
Disassembly steps
4**+1.Locknut
4*2. Driven bevel gear
I)4 3. Taper roller bearing
*4 ;. ;z;;r
6:Outer race
7.Outer race
8. Transfer case adapter
4e W 9. Taper roller bearing
NOTE(I) Reverse the disassembly procedures to reassemble.(2) 4e : Refer to ::Service Points of Disassembly:‘.[j &@ j Refer to Service Points of Reassembly
Non-reusable parts
140-150 Nm102-115 ft.lbs.
TEA0 604
SERVICE POINTS OF DISASSEMBLY
1. REMOVAL OF LOCK NUT
(1) Unstake the lock nut.
I IMB991013
TFAO289(2) Remove the driven bevel gear’s lock nut by using the
special tool.
Page 1033 of 1216
AUTOMATIC TRANSAXLE - Transfer Case Adapter Sub Assembly 21-339
TFAO290
MD99881 2
MD99881 3
M D998825
I
MD99881 4
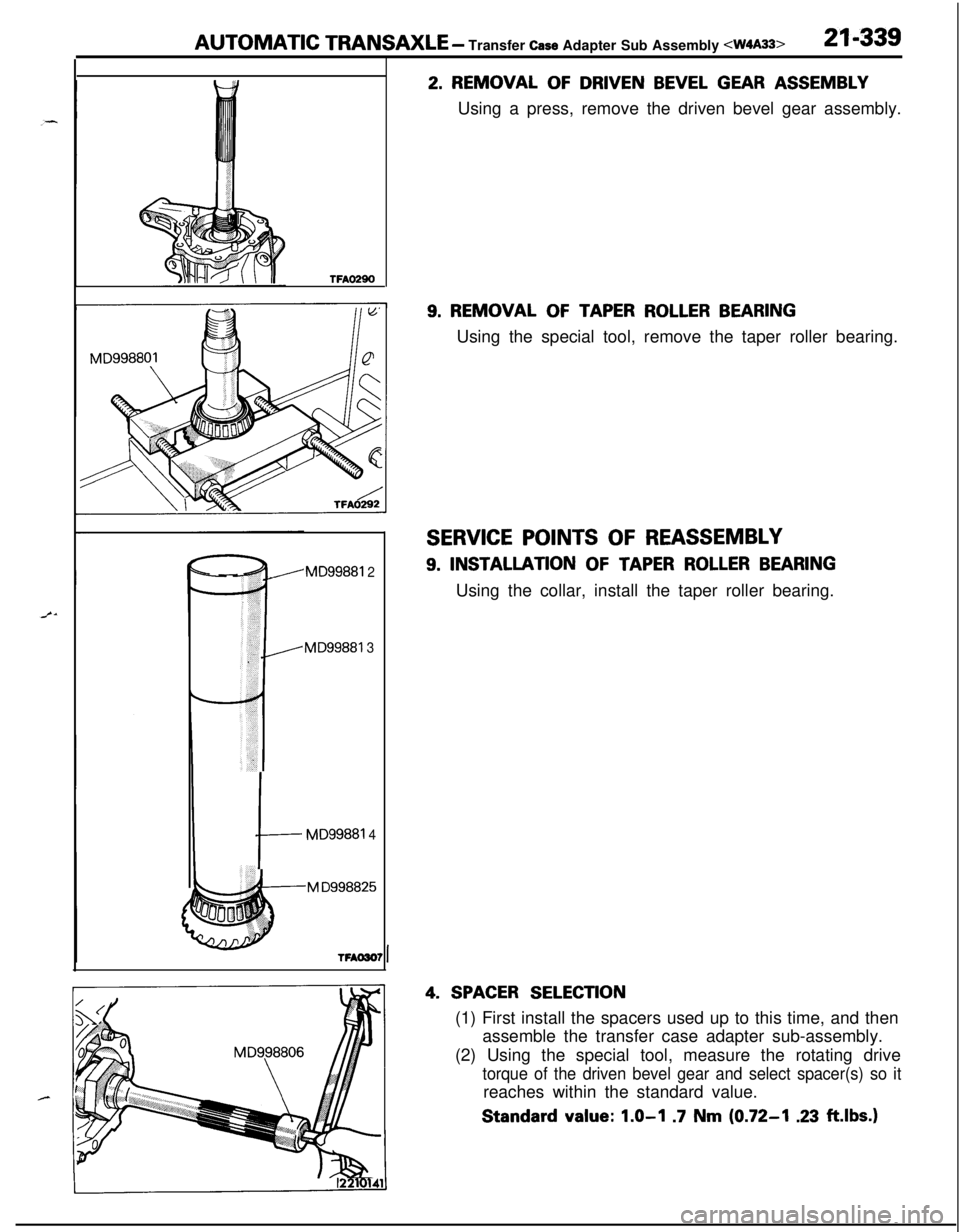
2. REMOVAL OF DRIVEN BEVEL GEAR ASSEMBLY
Using a press, remove the driven bevel gear assembly.
9. REMOVAL OF TAPER ROLLER BEARINGUsing the special tool, remove the taper roller bearing.
SERVICE POINTS OF REASSEMBLY
9. INSTALLATION OF TAPER ROLLER BEARINGUsing the collar, install the taper roller bearing.
4. SPACER SELECTION(1) First install the spacers used up to this time, and then
assemble the transfer case adapter sub-assembly.
(2) Using the special tool, measure the rotating drive
torque of the driven bevel gear and select spacer(s) so itreaches within the standard value.Standard
value: 1.0-l .7 Nm (0.72-I .23 ft.lbs.)
Page 1034 of 1216
21-340 AUTOMATIC TRANSAXLE -Transfer Case Adapter Sub Assembly Fb
MD99881 2
MD99881 4
MD998822
TFAO311
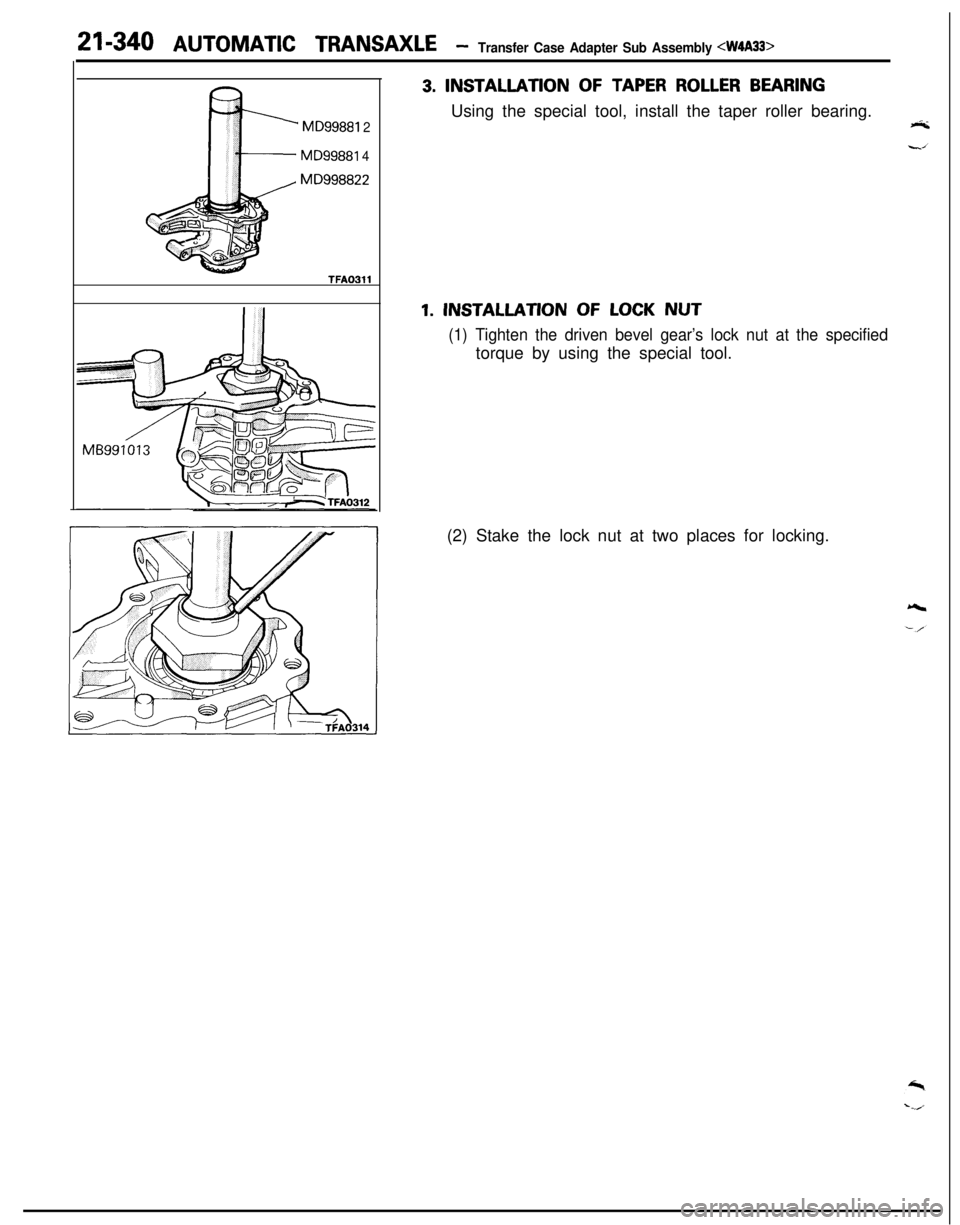
3. INSTALLATION OF TAPER ROLLER BEARINGUsing the special tool, install the taper roller bearing.
1. INSTALLATION OF LOCK NUT
(1) Tighten the driven bevel gear’s lock nut at the specifiedtorque by using the special tool.
(2) Stake the lock nut at two places for locking.
Page 1035 of 1216
AUTOMATIC TRANSAXLE- Transfer Case Sub Assembly 21-341
TRANSFER CASE SUB ASSEMBLY
- DISASSEMBLY AND REASSEMBLY
NZlVJAA
Ii35-42
irn26-30 ftlbs.
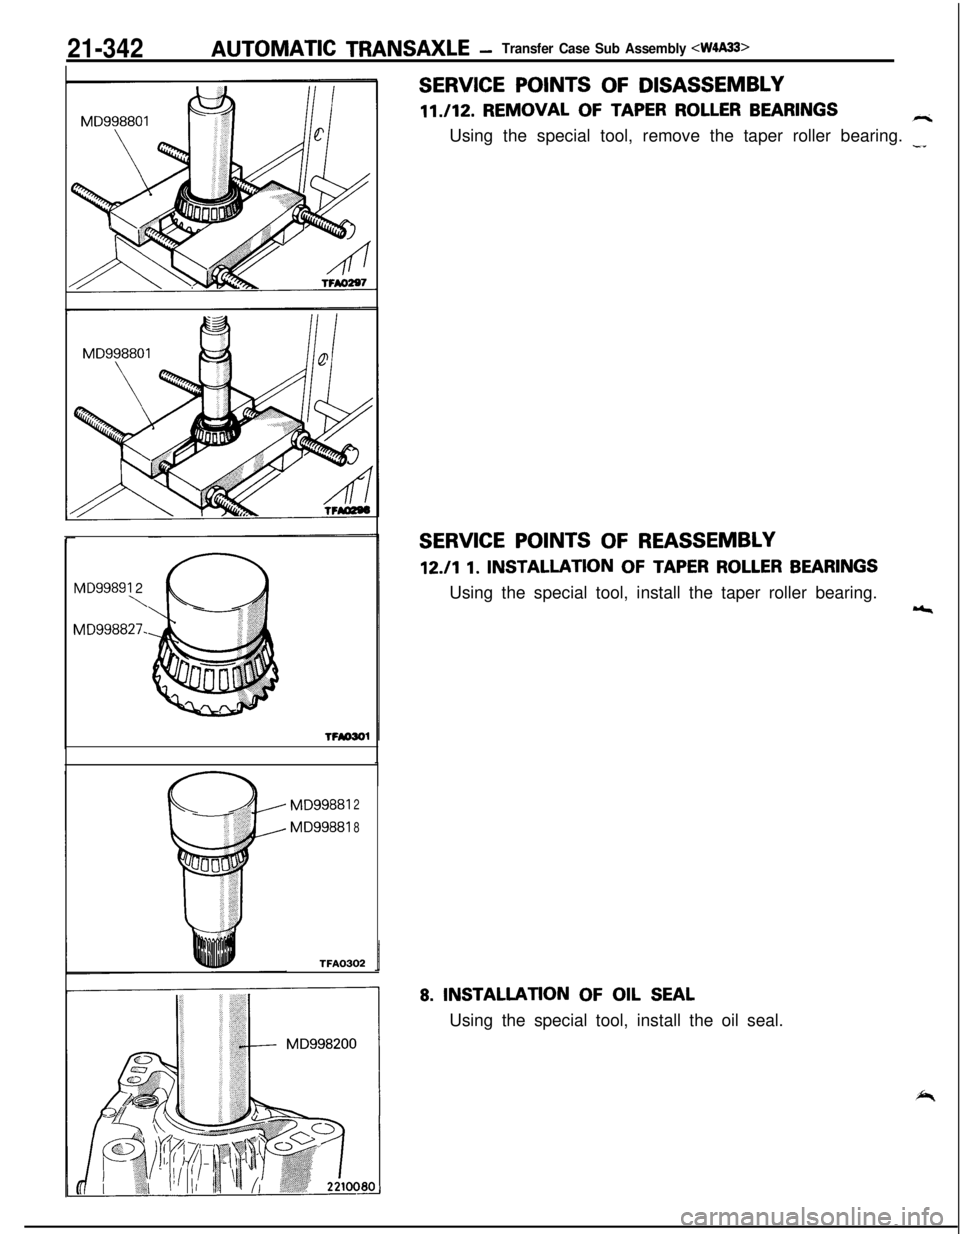
Disassembly steps
1.Transfer cover
2.O-ring
r)+3.Spacer4.Outer race
5. Drive bevel gear shaft
6.Outer race
**7.Spacer
I)+ 8. Oil seal9.Transfer case
10. Drive bevel gear
~~ e+ 11. Taper roller bearing~~ e+ 12. Taper roller bearing
TFA0603
NOTE(1) Reverse the disassembly procedures to reassemble.(2) +e : Refer to “Service Points of Disassembly”.(3) ~~ : Refer to “Service Points of Reassembly”.(4) m : Non-reusable parts
Page 1036 of 1216
21-342AUTOMATIC TRANSAXLE -Transfer Case Sub Assembly
MD99891 2\
MD998827.
MD998812
MD998818
TFA0302
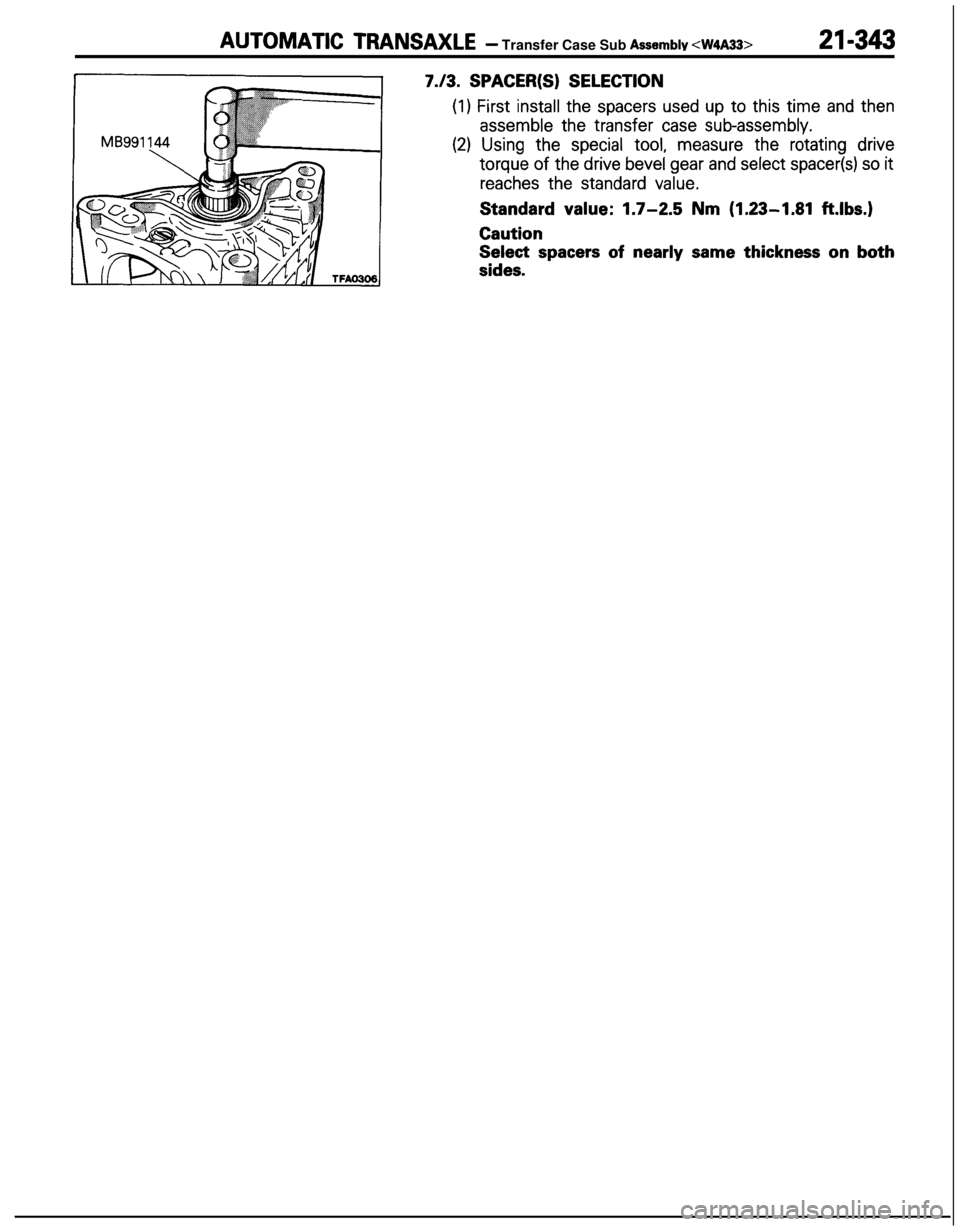
SERVICE POINTS OF DISASSEMBLY11./12. REMOVAL
OF TAPER ROLLER BEARINGSriUsing the special tool, remove the taper roller bearing.
-I
SERVICE POINTS OF REASSEMBLY
12./l 1. INSTALLATION OF TAPER ROLLER BEARINGSUsing the special tool, install the taper roller bearing.
r,
8. INSTALLATION OF OIL SEALUsing the special tool, install the oil seal.
Page 1037 of 1216
AUTOMATIC TRANSAXLE- Transfer Case Sub Assembly 21-343
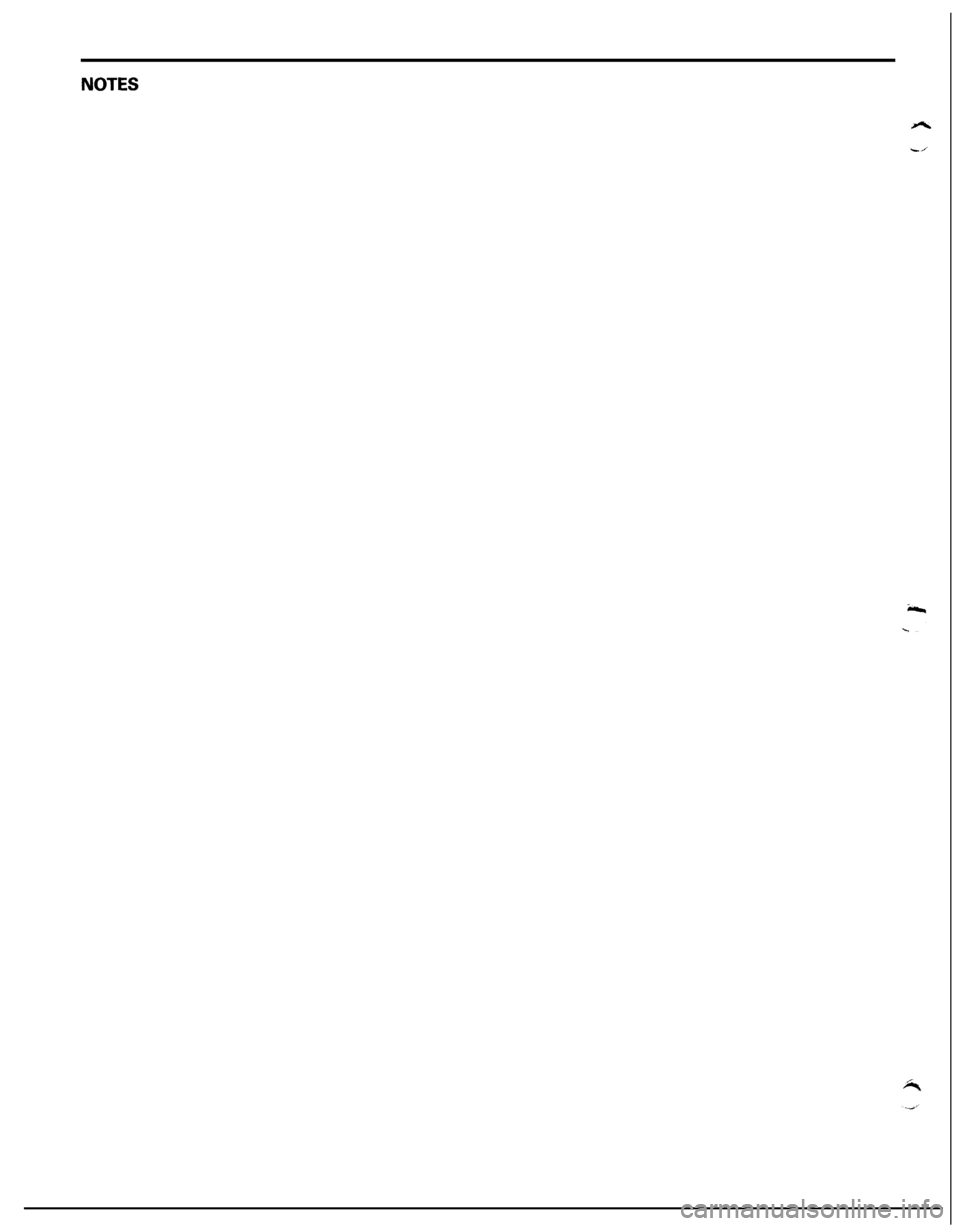
7.13. SPACER(S) SELECTION
(1) First install the spacers used up to this time and then
assemble the transfer case subassembly.
(2) Using the special tool, measure the rotating drive
torque of the drive bevel gear and select spacer(s) so it
reaches the standard value.Standard value:
1.7-2.5 Nm (1.23-1.81 ft.lbs.)CautionSelect
spacers of nearly same thickness on both
sides.
Page 1038 of 1216
Page 1039 of 1216
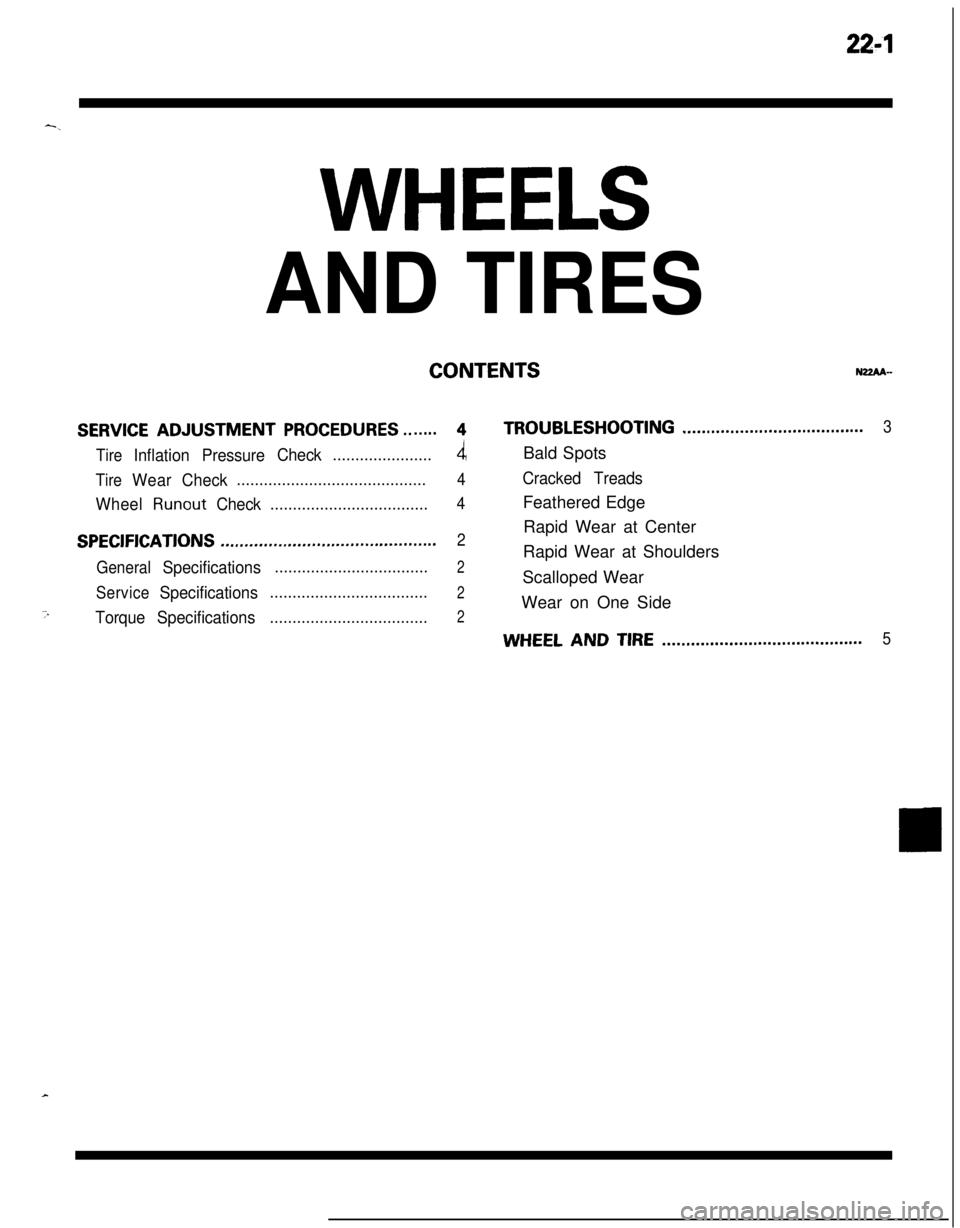
22-l-.
WHEELS
AND TIRES
CONTENTSNZZAA-
SERVICE ADJUSTMENT PROCEDURES.......4TROUBLESHOOTING......................................3
Tire
InflationPressureCheck......................4Bald Spots
TireWearCheck..........................................4Cracked Treads
Wheel
RunoutCheck...................................4Feathered Edge
SPECIFICATIONSRapid Wear at Center.............................................2
General
Specifications..................................2Rapid Wear at Shoulders
ServiceSpecificationsScalloped Wear...................................2Wear on One Side
7TorqueSpecifications...................................2
WHEEL AND TIRE..........................................5
Page 1040 of 1216
5 22-2WHEELS AND TIRES - Specifications
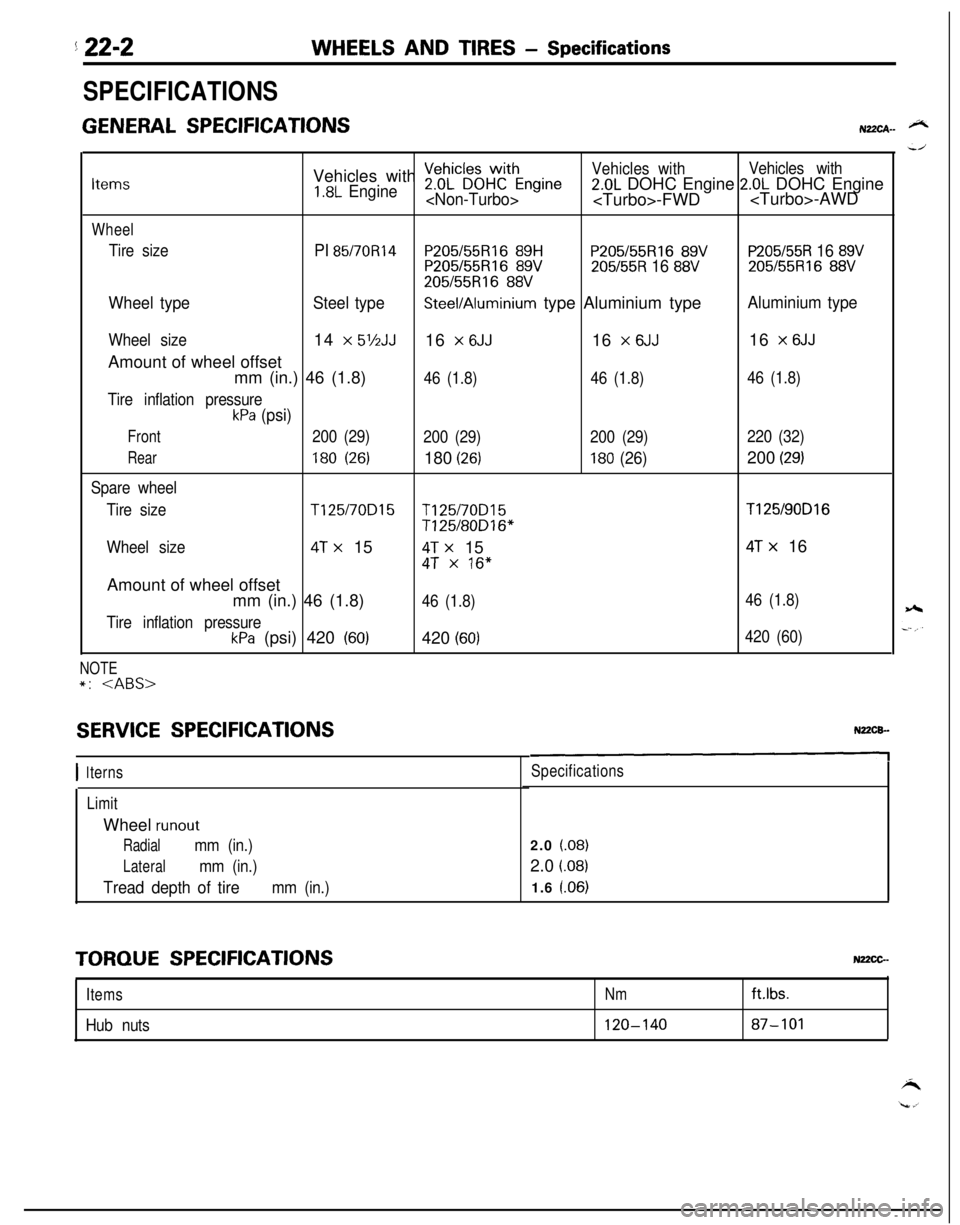
SPECIFICATIONS
GENERAL SPECIFICATIONSN22CA- @NVehicles with
~eDhL”~~HWCthEngineVehicles withVehicles withItems1.8L Engine2.0L DOHC Engine 2.0L DOHC Engine-FWD-AWD
Wheel
Tire sizePI 85/70R14P205155Rl6 89HP205/55R16 89VP205/55R 16 89VP205155R16 89V205/55R 16 88V205/55R16 88V
205/55R16 88V
Wheel typeSteel typeSteel/Aluminium type Aluminium typeAluminium type
Wheel size14 x 5’/2JJ16 x 6JJ16 x 6JJ16 x 6JJAmount of wheel offset
mm (in.) 46 (1.8)
46 (1.8)46 (1.8)46 (1.8)
Tire inflation pressure
kPa (psi)
Front200 (29)
200 (29)200 (29)220 (32)
Rear180 (26)180 (26)180 (26)200 (29)
Spare wheel
Tire size
T125/70D15T125/70D15T125/90D16
T125/80D16*
Wheel size
4T x 154T x 154T x 16
4T x 16”Amount of wheel offset
mm (in.) 46 (1.8)
46 (1.8)46 (1.8)
Tire inflation pressure
kPa (psi) 420 (60)420 (60)420 (60)
NOTE*:
SERVICE SPECIFICATIONS
I 1terns
LimitWheel
runout
Radialmm (in.)
Lateralmm (in.)
Tread depth of tiremm (in.)
Specifications2.0
(.08)2.0
i.08)1.6 l.06)
TORQUE SPECIFICATIONSNz2cG-
ItemsNm
Hub nuts120-140ftlbs.87-101
Trending: roof, Mpi, windshield wipers, height, compression ratio, oil temperature, fuel reserve
