lock MITSUBISHI ECLIPSE 1991 Service Manual
[x] Cancel search | Manufacturer: MITSUBISHI, Model Year: 1991, Model line: ECLIPSE, Model: MITSUBISHI ECLIPSE 1991Pages: 1216, PDF Size: 67.42 MB
Page 310 of 1216
9-26ENGINE <1.8L Engine> -Service Adjustment Procedures
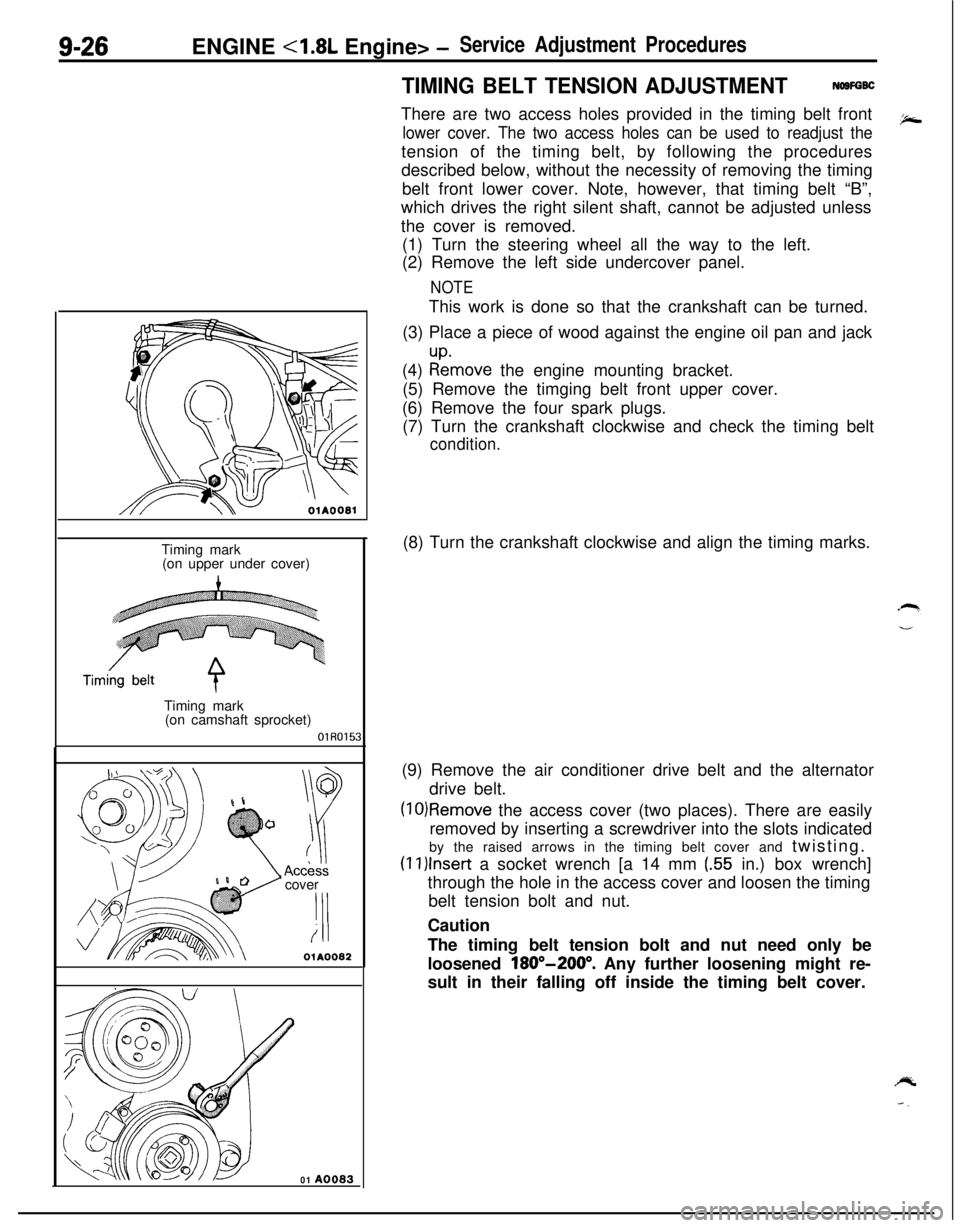
TIMING BELT TENSION ADJUSTMENTNOSFGBCThere are two access holes provided in the timing belt front
lower cover. The two access holes can be used to readjust thetension of the timing belt, by following the procedures
described below, without the necessity of removing the timing
belt front lower cover. Note, however, that timing belt “B”,
which drives the right silent shaft, cannot be adjusted unless
the cover is removed.
(1) Turn the steering wheel all the way to the left.
(2) Remove the left side undercover panel.
NOTEThis work is done so that the crankshaft can be turned.
(3) Place a piece of wood against the engine oil pan and jack
(4)
:tmove the engine mounting bracket.
(5) Remove the timging belt front upper cover.
(6) Remove the four spark plugs.
(7) Turn the crankshaft clockwise and check the timing belt
condition.
OlAOOBlTiming mark
(on upper under cover)
Timing mark
(on camshaft sprocket)
OlR0153cover
‘I!i
OlA0082
01 A0083(8) Turn the crankshaft clockwise and align the timing marks.
(9) Remove the air conditioner drive belt and the alternator
drive belt.
(10)Remove the access cover (two places). There are easily
removed by inserting a screwdriver into the slots indicated
by the raised arrows in the timing belt cover and twisting.
(1l)lnser-t a socket wrench [a 14 mm (.55 in.) box wrench]
through the hole in the access cover and loosen the timing
belt tension bolt and nut.
Caution
The timing belt tension bolt and nut need only be
loosened
180”-200”. Any further loosening might re-
sult in their falling off inside the timing belt cover.
Page 311 of 1216
ENGINE <1.8L Engine> -Service Adjustment Procedures9-27
I.
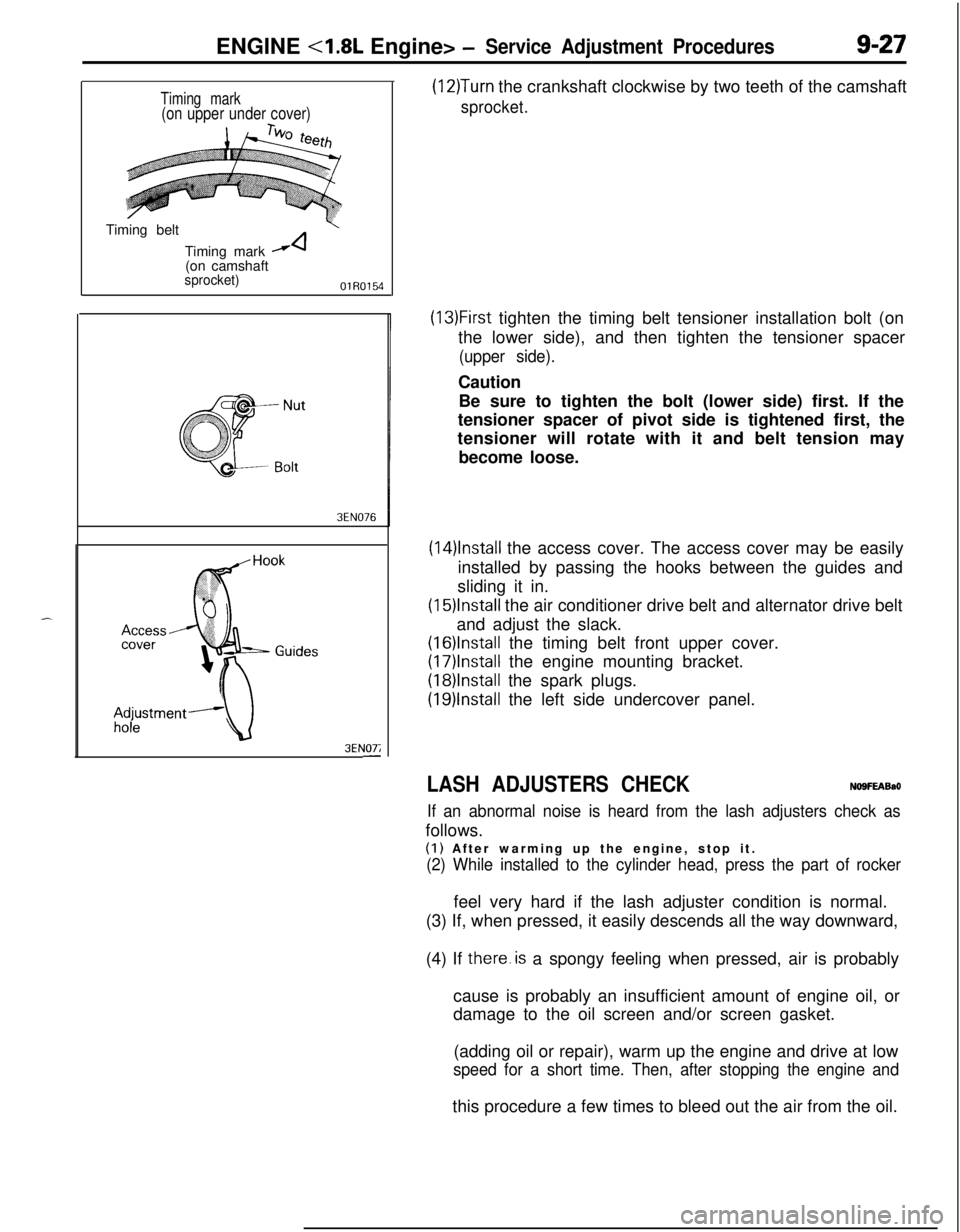
Timing mark(on upper under cover)Timing belt
Timing mark
A(on camshaft
sprocket)OlR0154
3EN076
3EN07;-
(12)Turn the crankshaft clockwise by two teeth of the camshaft
sprocket.
(13)First tighten the timing belt tensioner installation bolt (on
the lower side), and then tighten the tensioner spacer
(upper side).Caution
Be sure to tighten the bolt (lower side) first. If the
tensioner spacer of pivot side is tightened first, the
tensioner will rotate with it and belt tension may
become loose.
(14)lnstall the access cover. The access cover may be easily
installed by passing the hooks between the guides and
sliding it in.
(15)lnstall the air conditioner drive belt and alternator drive belt
and adjust the slack.
(16)lnstalI the timing belt front upper cover.
(17)lnstall the engine mounting bracket.
(18)lnstalI the spark plugs.
(19)lnstall the left side undercover panel.
LASH ADJUSTERS CHECKNO9FEABaO
If an abnormal noise is heard from the lash adjusters check asfollows.
(I) After warming up the engine, stop it.
(2) While installed to the cylinder head, press the part of rockerfeel very hard if the lash adjuster condition is normal.
(3) If, when pressed, it easily descends all the way downward,
(4) If there.is a spongy feeling when pressed, air is probably
cause is probably an insufficient amount of engine oil, or
damage to the oil screen and/or screen gasket.
(adding oil or repair), warm up the engine and drive at low
speed for a short time. Then, after stopping the engine andthis procedure a few times to bleed out the air from the oil.
Page 316 of 1216
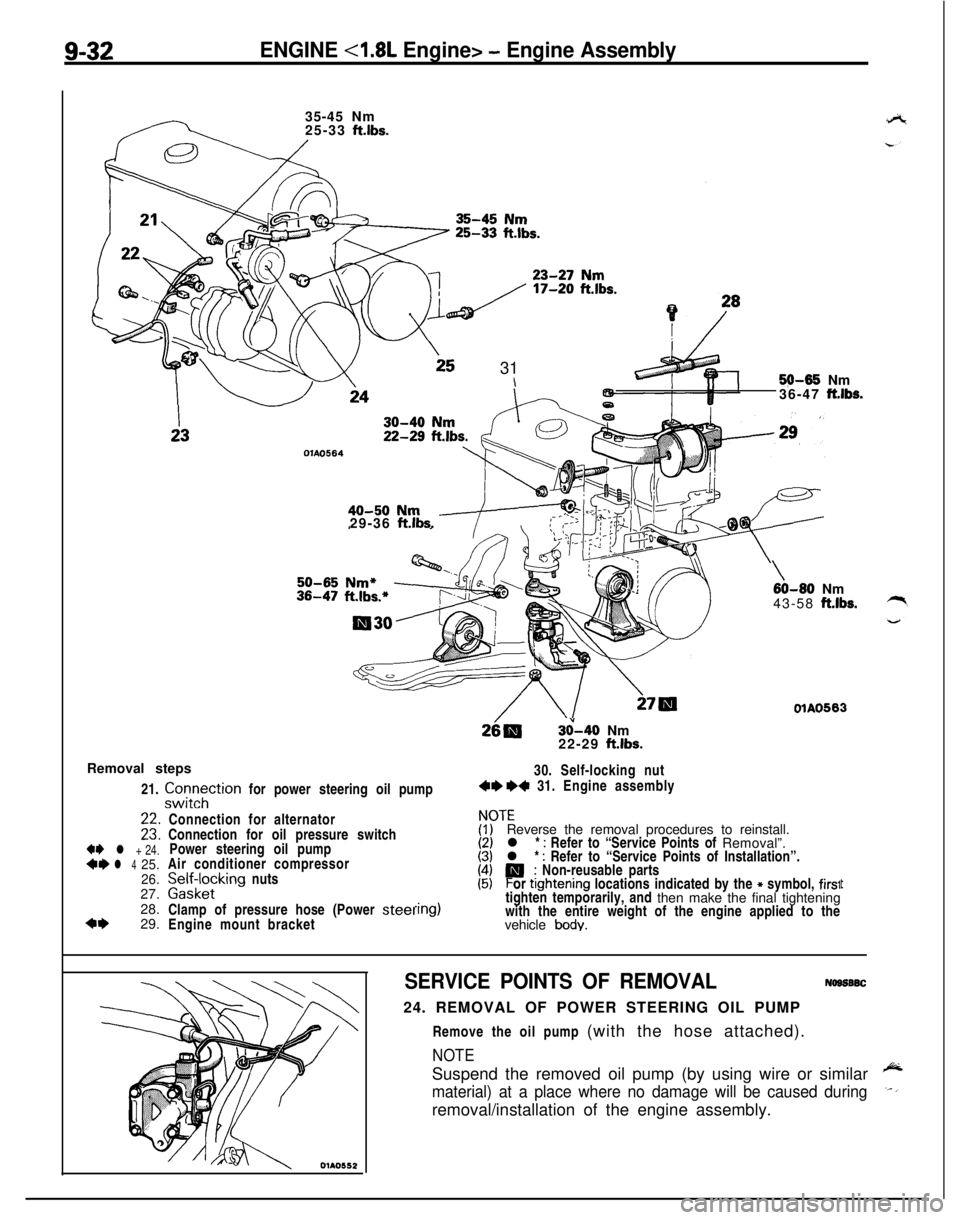
9-32ENGINE <1.8L Engine> - Engine Assembly35-45 Nm
25-33
ft.lbs.
25 31\5$M35 Nm
36-47 ft.lbs.
OlAO56429-36
ft.lbs.
3&40 Nm
22-29 ft.lbs.
Removal steps
21.
zztTtion for power steering oil pump30. Self-locking nut4e +4 31. Engine assembly
+e l + 24.*I)l 425.
26.27.
28.
4+29.
\60-80 Nm
43-58 ft.lbs.
OlAO563Connection for alternator
Connection for oil pressure switch
Power steering oil pump
Air conditioner compressor
palffz,cklng nuts
Clamp of pressure hose (Power
steelEngine mount bracket
ITEReverse the removal procedures to reinstall.
l *
: Refer to “Service Points of Removal”.
l * : Refer to “Service Points of Installation”.
P; Non-reusable parts
or ttghtening locations indicated by the * symbol, firs1tighten temporarily, and then make the final tightening
with the entire weight of the engine applied to the
vehicle
body.
t
SERVICE POINTS OF REMOVALNogs6SC24. REMOVAL OF POWER STEERING OIL PUMP
Remove the oil pump (with the hose attached).
NOTESuspend the removed oil pump (by using wire or similar
material) at a place where no damage will be caused duringremoval/installation of the engine assembly.
Page 317 of 1216
ENGINE <1.8L Engine> - Engine Assemblv9-33
c
!
OlAO582
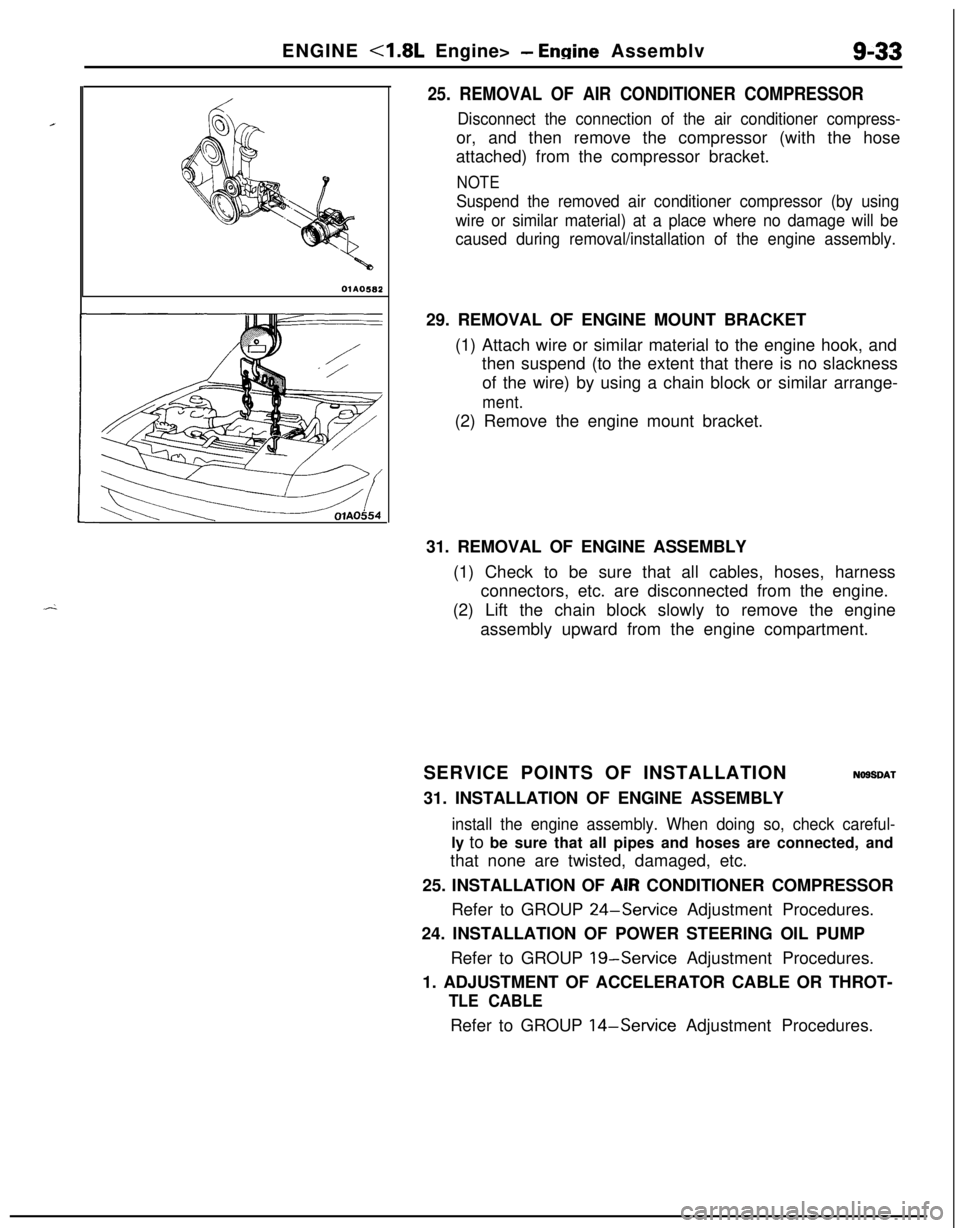
25. REMOVAL OF AIR CONDITIONER COMPRESSOR
Disconnect the connection of the air conditioner compress-or, and then remove the compressor (with the hose
attached) from the compressor bracket.
NOTE
Suspend the removed air conditioner compressor (by using
wire or similar material) at a place where no damage will be
caused during removal/installation of the engine assembly.29. REMOVAL OF ENGINE MOUNT BRACKET
(1) Attach wire or similar material to the engine hook, and
then suspend (to the extent that there is no slackness
of the wire) by using a chain block or similar arrange-
ment.(2) Remove the engine mount bracket.
31. REMOVAL OF ENGINE ASSEMBLY
(1) Check to be sure that all cables, hoses, harness
connectors, etc. are disconnected from the engine.
(2) Lift the chain block slowly to remove the engine
assembly upward from the engine compartment.
SERVICE POINTS OF INSTALLATION
NOSSDAT31. INSTALLATION OF ENGINE ASSEMBLY
install the engine assembly. When doing so, check careful-ly to be sure that all pipes and hoses are connected, and
that none are twisted, damaged, etc.
25. INSTALLATION OF AIR CONDITIONER COMPRESSOR
Refer to GROUP
24-Service Adjustment Procedures.
24. INSTALLATION OF POWER STEERING OIL PUMP
Refer to GROUP
19-Service Adjustment Procedures.
1. ADJUSTMENT OF ACCELERATOR CABLE OR THROT-
TLE CABLERefer to GROUP
14-Service Adjustment Procedures.
Page 318 of 1216
-
c/
(Refer to GROUP O-Maintenance
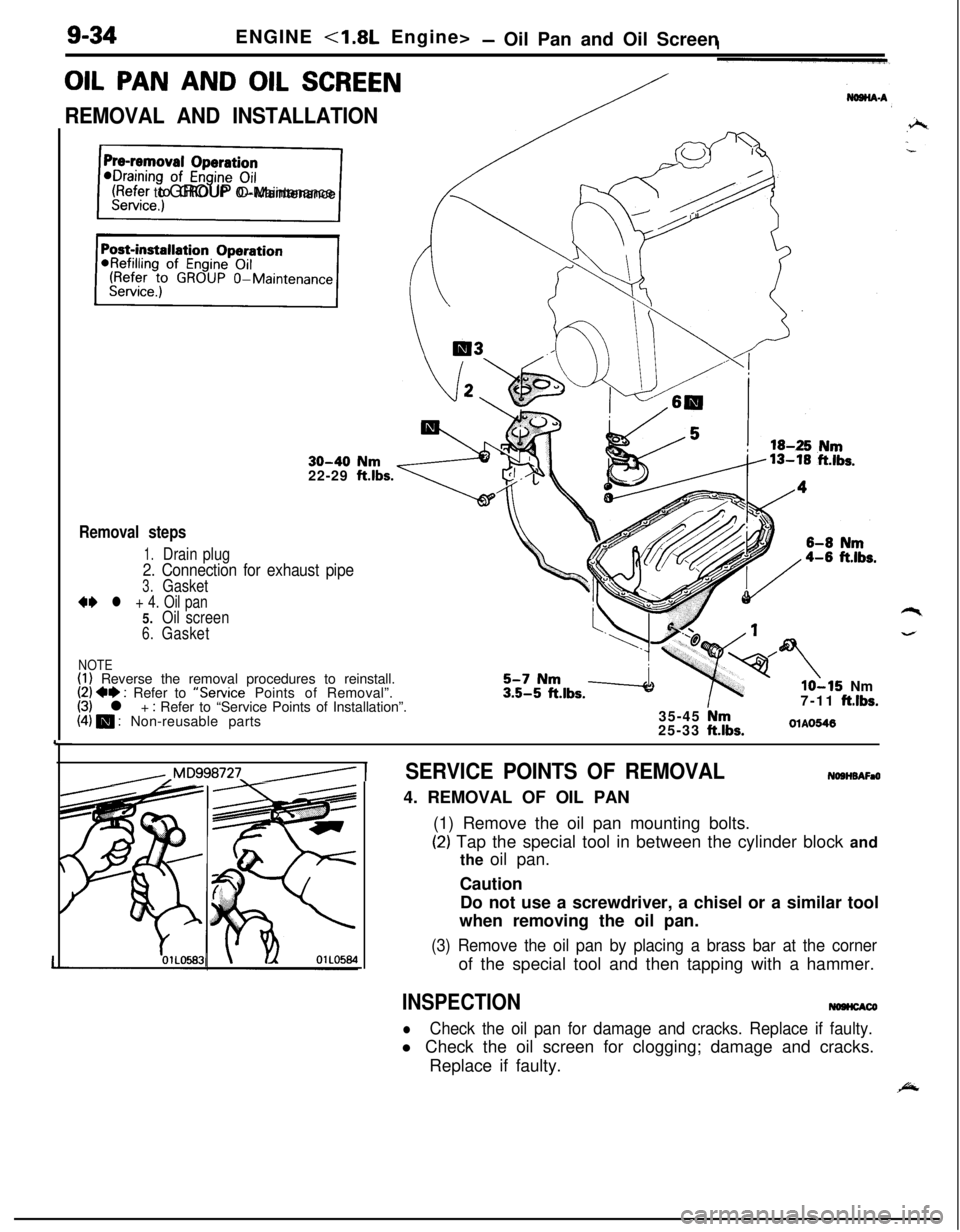
9-34ENGINE <1.8L Engine>- Oil Pan and Oil Screen
OIL PAN AND OIL SCREEN
REMOVAL AND INSTALLATION
30-40 Nm22-29 ftlbs.
Removal steps
1.Drain plug
2. Connection for exhaust pipe
3.Gasket
** l + 4. Oil pan5.Oil screen
6.Gasket
NOTE(1) Reverse the removal procedures to reinstall.(2) +e : Refer to “Service Points of Removal”.(3) l + : Refer to “Service Points of Installation”.(4) m : Non-reusable parts
lo-15 Nm
7-11 ftlbs.35-45 Nm25-33 ftlbs.OlAO546
,,Mq998727_/ 1SERVICE POINTS OF REMOVALNOSHBAFaO4. REMOVAL OF OIL PAN
(1) Remove the oil pan mounting bolts.
(2) Tap the special tool in between the cylinder block and
the oil pan.
Caution
Do not use a screwdriver, a chisel or a similar tool
when removing the oil pan.
(3) Remove the oil pan by placing a brass bar at the cornerof the special tool and then tapping with a hammer.
INSPECTIONNOHCACO
lCheck the oil pan for damage and cracks. Replace if faulty.l Check the oil screen for clogging; damage and cracks.
Replace if faulty.
Page 319 of 1216
ENGINE - Oil Pan and Oil Screen9-35
SERVICE POINTS OF INSTALLATIONIYW~DU)4. INSTALLATION OF OIL PAN
(1)Use a wire brush or other tool to scrape clean all gasketsurfaces of the cylinder block and oil pan so that all
loose material is removed.
(2) Gasket surfaces must be free of oil and dirt.
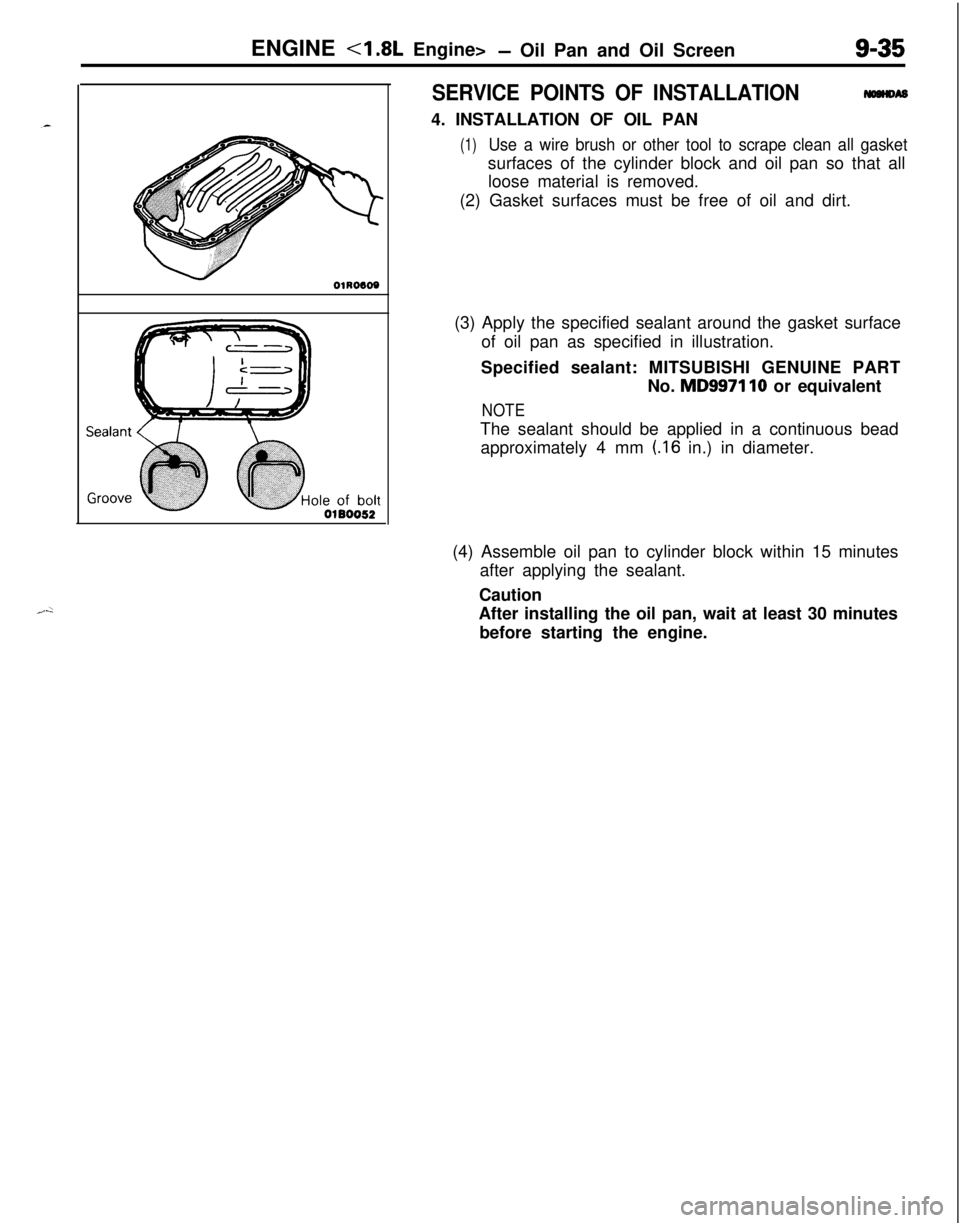
(3) Apply the specified sealant around the gasket surface
of oil pan as specified in illustration.
Specified sealant: MITSUBISHI GENUINE PART
No.
MD9971 10 or equivalent
NOTEThe sealant should be applied in a continuous bead
approximately 4 mm
(.I6 in.) in diameter.
(4) Assemble oil pan to cylinder block within 15 minutes
after applying the sealant.
Caution
After installing the oil pan, wait at least 30 minutes
before starting the engine.
Page 321 of 1216
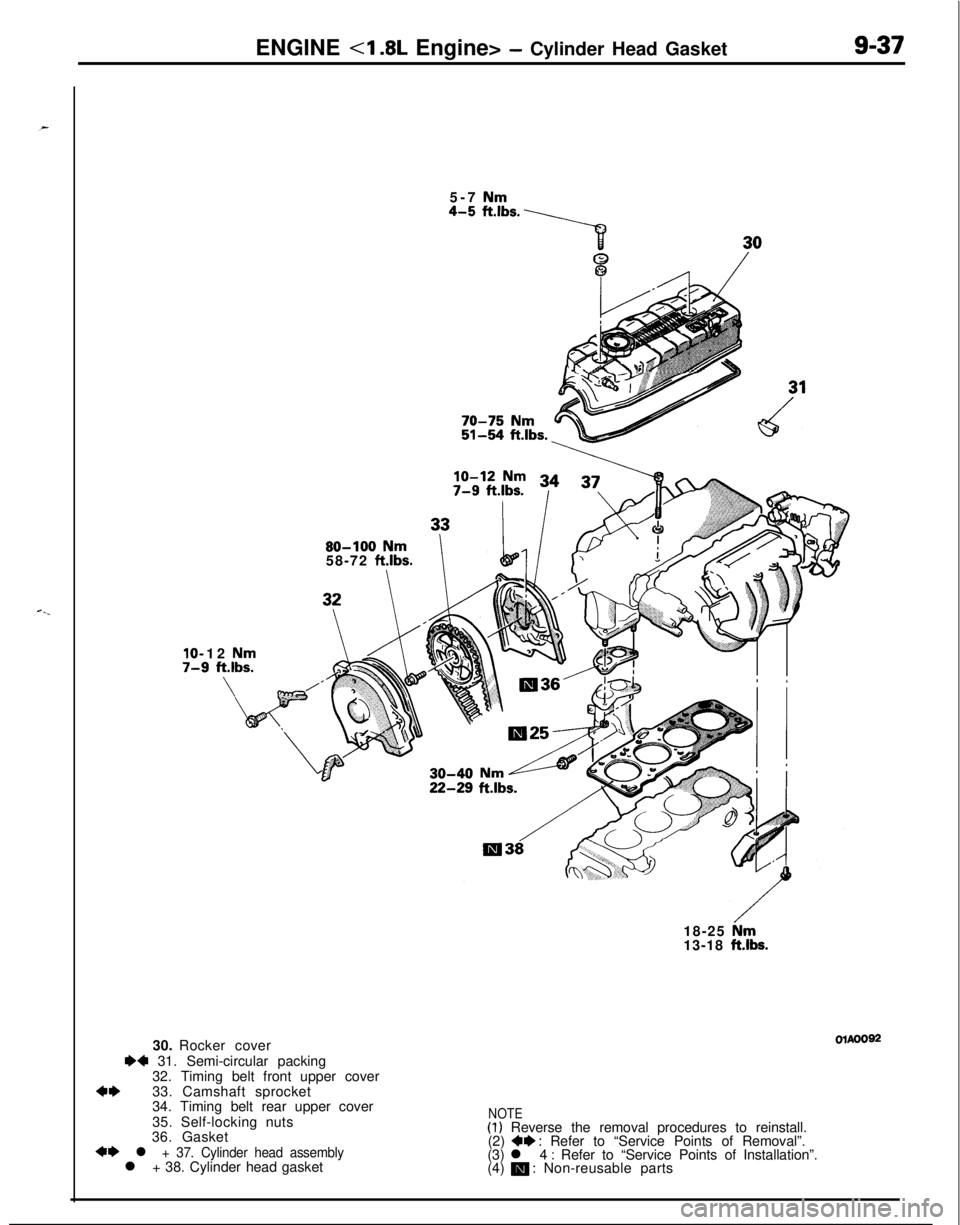
ENGINE - Cylinder Head Gasket9-375-7 Nm
70-75 Nm51-54 ftlbs.
80-100 Nm
58-72 ftlbs.I-12
Nm.9 ft.lbs.
ii-29 ft.lbs.
18-25
hm13-18 ft.lbs.30. Rocker cover
M 31. Semi-circular packing
32. Timing belt front upper cover
4*33. Camshaft sprocket
34. Timing belt rear upper cover
35. Self-locking nuts
36. Gasket
+* l + 37. Cylinder head assemblyl + 38. Cylinder head gasketOlAoO92
NOTE(1) Reverse the removal procedures to reinstall.
(2) *I) : Refer to “Service Points of Removal”.
(3) l 4 : Refer to “Service Points of Installation”.
(4) m : Non-reusable parts
Page 322 of 1216
9-38ENGINE <1.8L Engine> - Cylinder Head Gasket
04UOO27Timing mark
\Timing mark
OlR0153
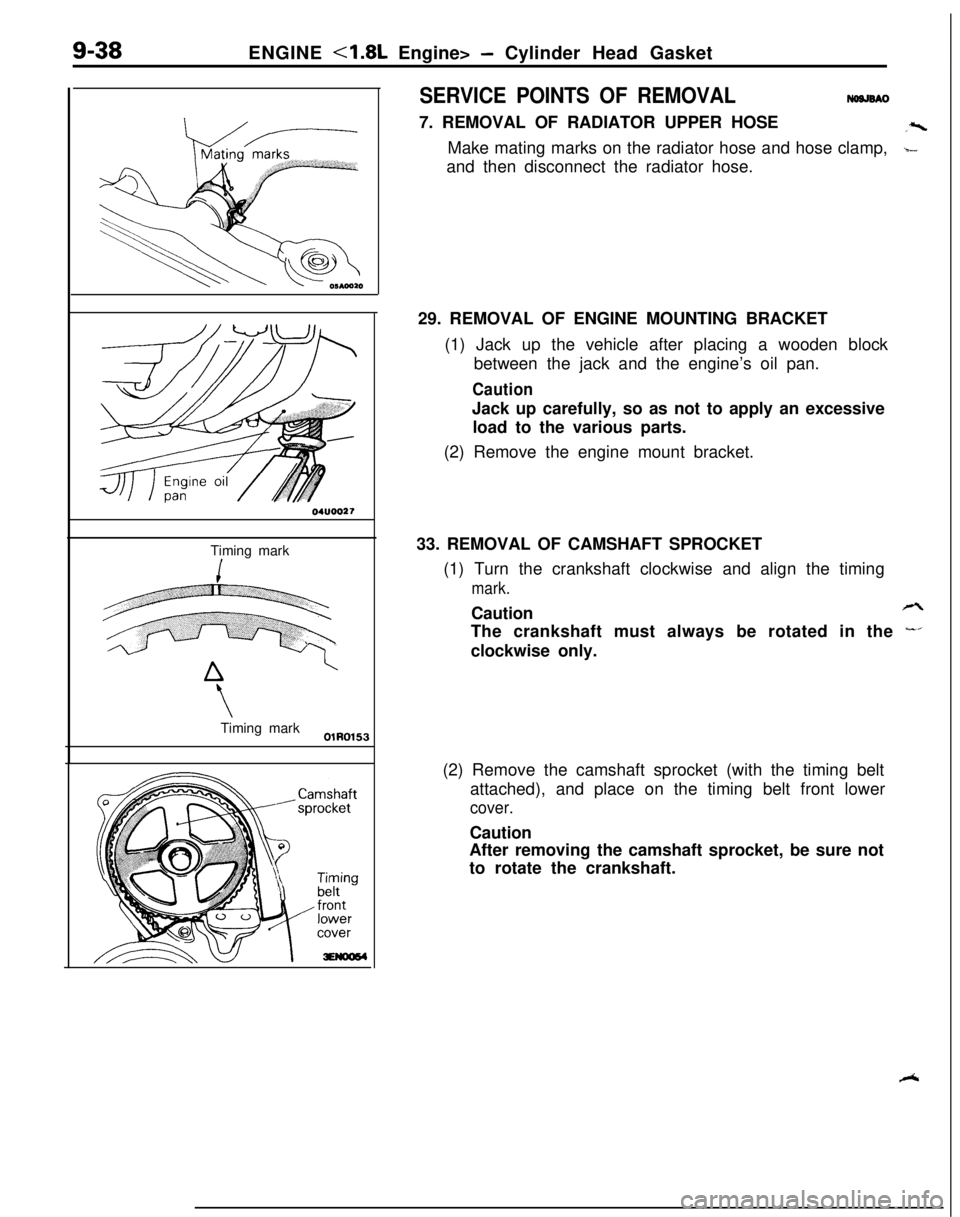
SERVICE POINTS OF REMOVALNWJSAO7. REMOVAL OF RADIATOR UPPER HOSE
,zMake mating marks on the radiator hose and hose clamp,
b-and then disconnect the radiator hose.
29. REMOVAL OF ENGINE MOUNTING BRACKET
(1) Jack up the vehicle after placing a wooden block
between the jack and the engine’s oil pan.
CautionJack up carefully, so as not to apply an excessive
load to the various parts.
(2) Remove the engine mount bracket.
33. REMOVAL OF CAMSHAFT SPROCKET
(1) Turn the crankshaft clockwise and align the timing
mark.Caution
rzThe crankshaft must always be rotated in the
-’clockwise only.
(2) Remove the camshaft sprocket (with the timing belt
attached), and place on the timing belt front lower
cover.Caution
After removing the camshaft sprocket, be sure not
to rotate the crankshaft.
R
Page 323 of 1216
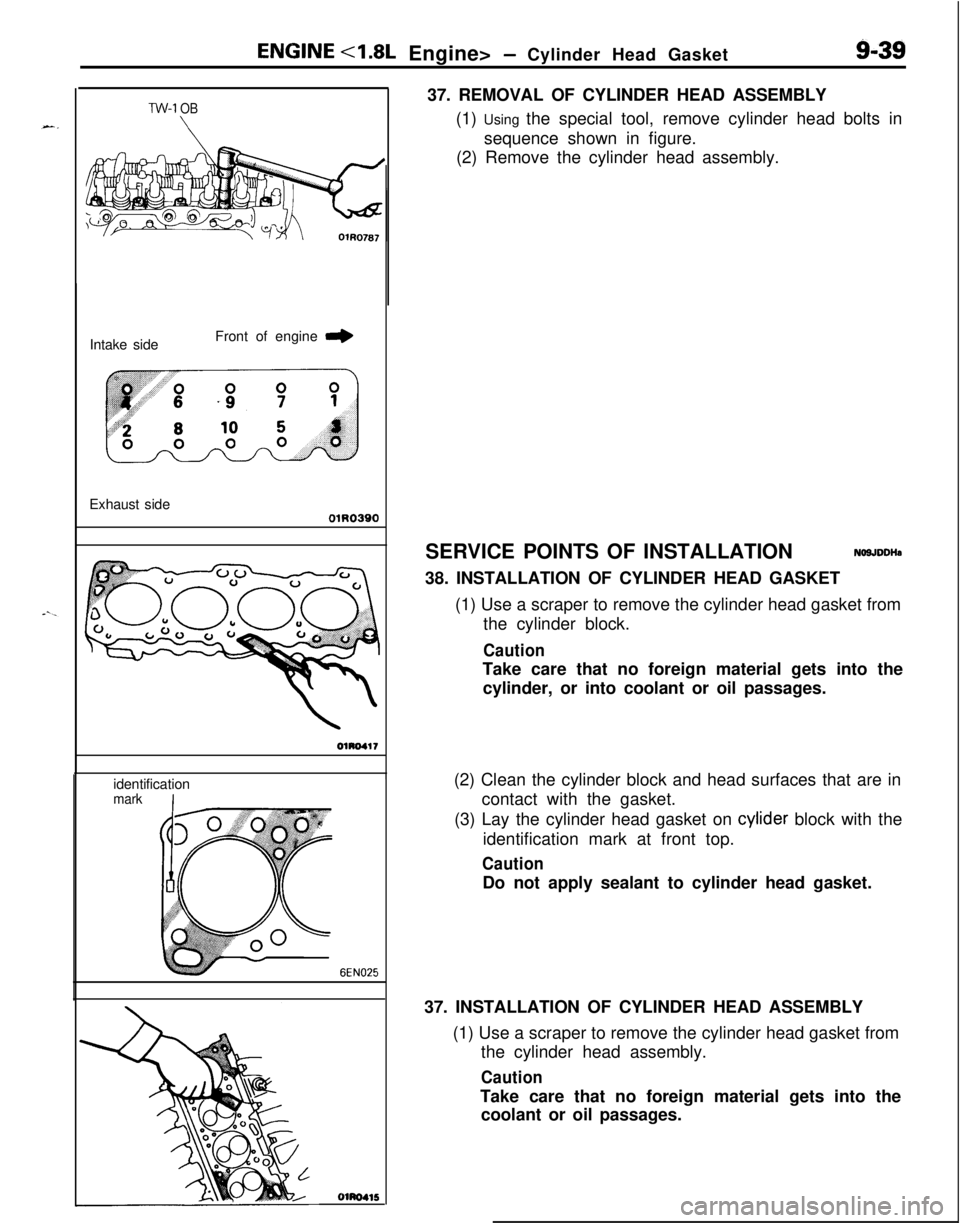
ENGlNE <1.8L Engine> - Cylinder Head Gasket9-3937. REMOVAL OF CYLINDER HEAD ASSEMBLY
(1) Using the special tool, remove cylinder head bolts in
sequence shown in figure.
(2) Remove the cylinder head assembly.
TW-1 OBIntake sideFront of engine
r,Exhaust side
01R0390identification
I
mark
6EN025
Olm415SERVICE POINTS OF INSTALLATION
NO9JDDHs38. INSTALLATION OF CYLINDER HEAD GASKET
(1) Use a scraper to remove the cylinder head gasket from
the cylinder block.
CautionTake care that no foreign material gets into the
cylinder, or into coolant or oil passages.
(2) Clean the cylinder block and head surfaces that are in
contact with the gasket.
(3) Lay the cylinder head gasket on cylider block with the
identification mark at front top.
CautionDo not apply sealant to cylinder head gasket.
37. INSTALLATION OF CYLINDER HEAD ASSEMBLY
(1) Use a scraper to remove the cylinder head gasket from
the cylinder head assembly.
CautionTake care that no foreign material gets into the
coolant or oil passages.
Page 326 of 1216
g-42ENGINE <1.8L Engine> - Timing Belt
r-04UOO27
,Timing mark
Timing‘mark
lEN0017
c
li
OlA0550SERVICE POINTS OF REMOVAL
NO9KBBCa2. REMOVAL OF ENGINE MOUNT BRACKET
a(1) Jack up the vehicle after placing a wooden block
:.between the jack and the engine’s oil pan.
CautionJack up carefully so as not to apply an excessive
load to the various parts.
(2) Remove the engine mount bracket.
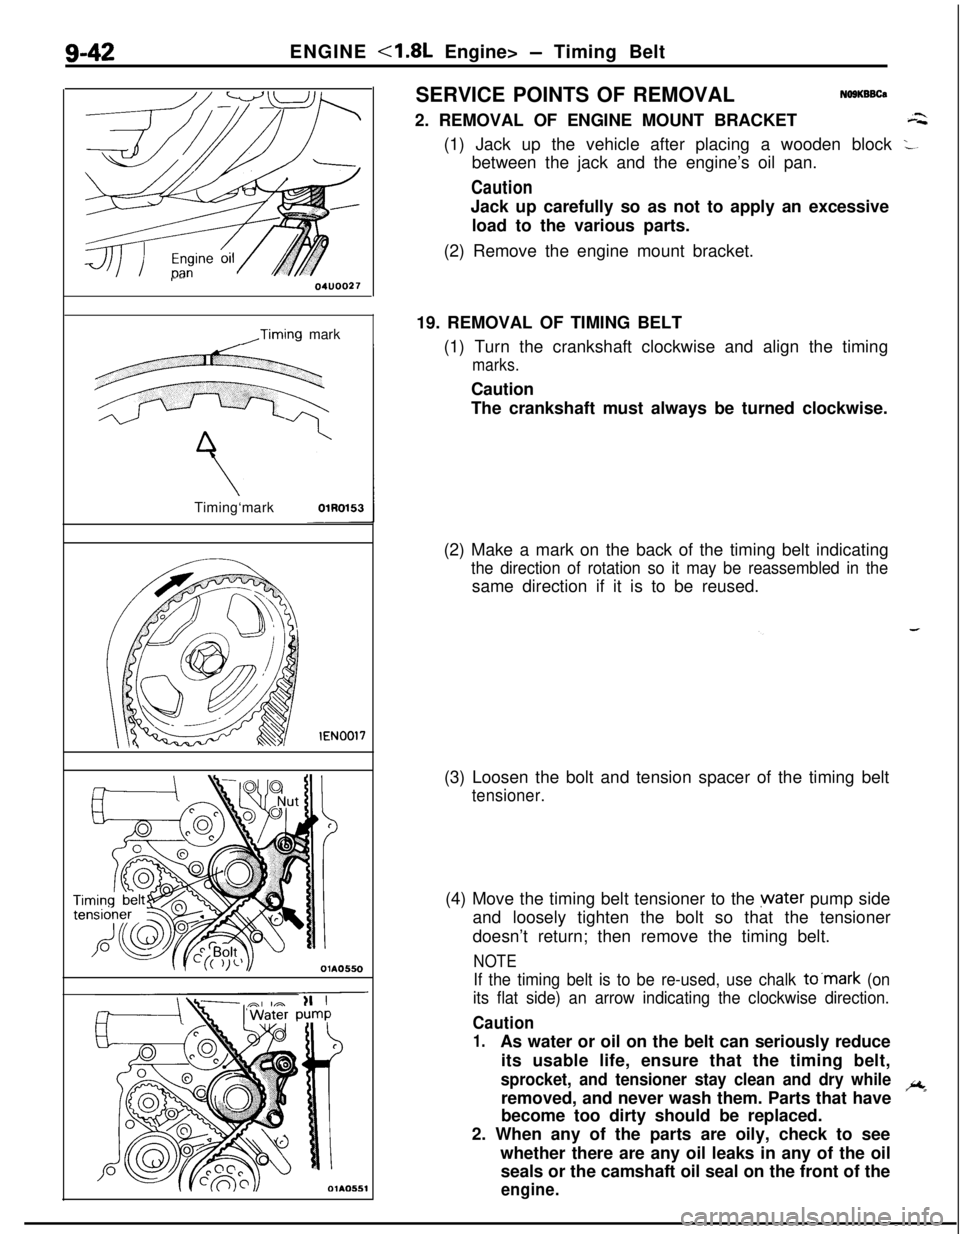
19. REMOVAL OF TIMING BELT
(1) Turn the crankshaft clockwise and align the timing
marks.Caution
The crankshaft must always be turned clockwise.
(2) Make a mark on the back of the timing belt indicating
the direction of rotation so it may be reassembled in thesame direction if it is to be reused.
(3) Loosen the bolt and tension spacer of the timing belt
tensioner.(4) Move the timing belt tensioner to the water pump side
and loosely tighten the bolt so that the tensioner
doesn’t return; then remove the timing belt.
NOTE
If the timing belt is to be re-used, use chalk to’mark (on
its flat side) an arrow indicating the clockwise direction.
Caution
1.As water or oil on the belt can seriously reduce
its usable life, ensure that the timing belt,
sprocket, and tensioner stay clean and dry whileremoved, and never wash them. Parts that haveic
*become too dirty should be replaced.
2. When any of the parts are oily, check to see
whether there are any oil leaks in any of the oil
seals or the camshaft oil seal on the front of the
engine.