lock MITSUBISHI ECLIPSE 1991 Service Manual
[x] Cancel search | Manufacturer: MITSUBISHI, Model Year: 1991, Model line: ECLIPSE, Model: MITSUBISHI ECLIPSE 1991Pages: 1216, PDF Size: 67.42 MB
Page 373 of 1216
ENGINE <2.0L DOHC Engine> - Oil Pan and Oil Screen9-89
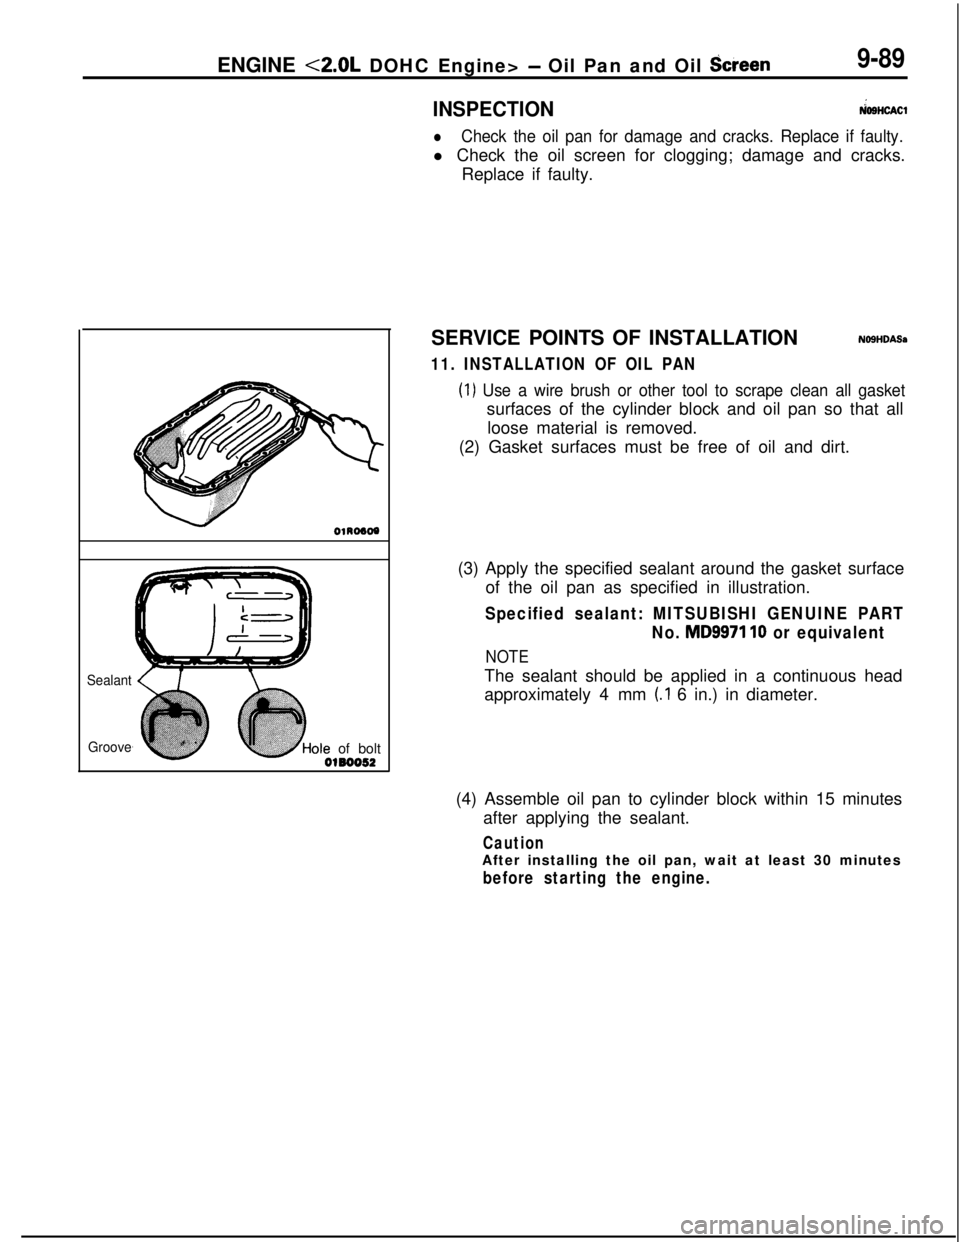
Sealant
Grooveole of bolt
0180052
INSPECTION&SHOW
lCheck the oil pan for damage and cracks. Replace if faulty.l Check the oil screen for clogging; damage and cracks.
Replace if faulty.
SERVICE POINTS OF INSTALLATION
NOSHDASa
11. INSTALLATION OF OIL PAN
(1) Use a wire brush or other tool to scrape clean all gasketsurfaces of the cylinder block and oil pan so that all
loose material is removed.
(2) Gasket surfaces must be free of oil and dirt.
(3) Apply the specified sealant around the gasket surface
of the oil pan as specified in illustration.
Specified sealant: MITSUBISHI GENUINE PART
No.
MD9971 10 or equivalent
NOTEThe sealant should be applied in a continuous head
approximately 4 mm
(.I 6 in.) in diameter.
(4) Assemble oil pan to cylinder block within 15 minutes
after applying the sealant.
CautionAfter installing the oil pan, wait at least 30 minutes
before starting the engine.
Page 375 of 1216
ENGINE <2.0L DOHC Engine> - Cvlinder Head Gasket9-91-_
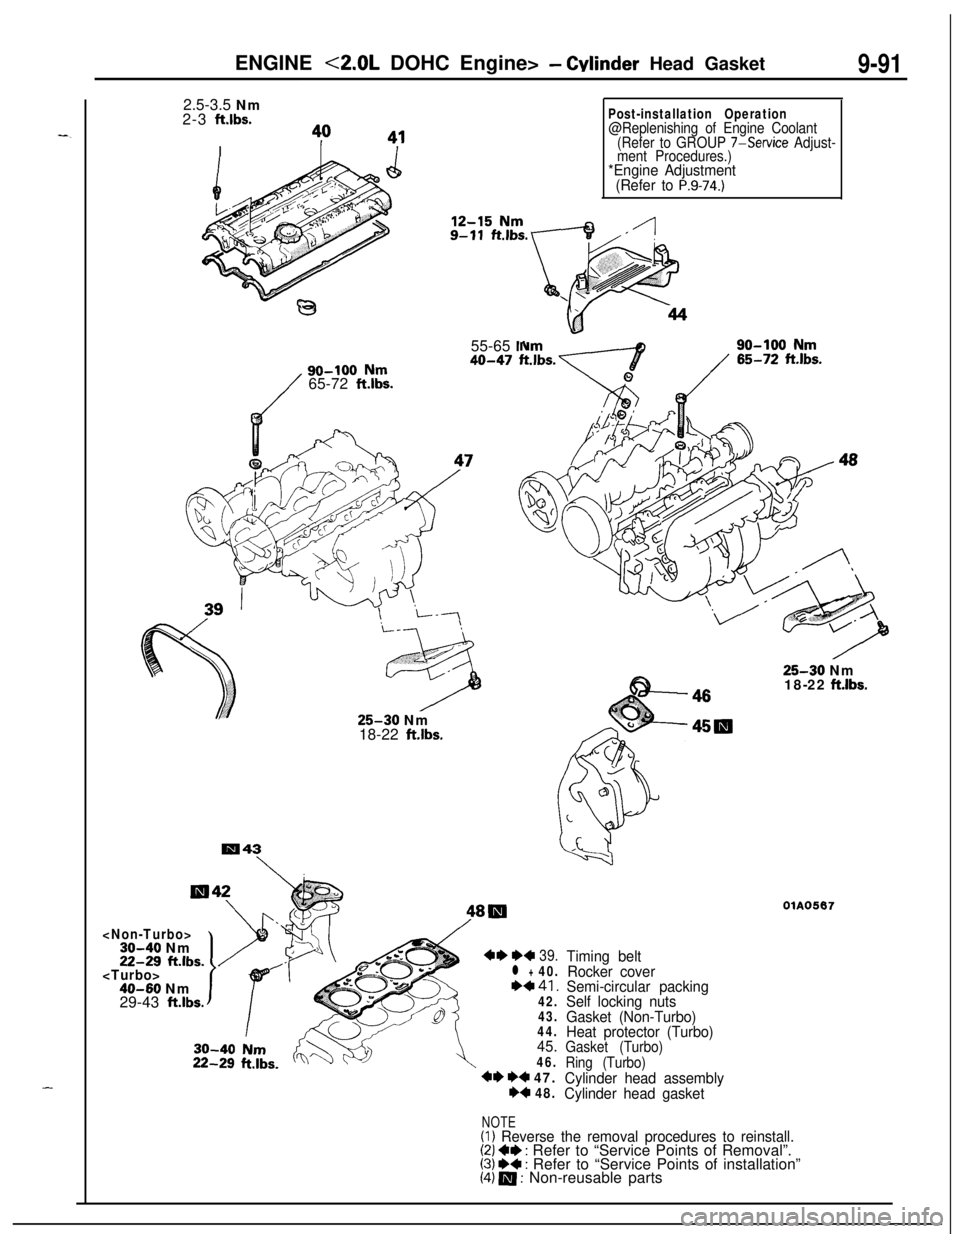
-2.5-3.5 Nm
2-3
ft.lbs.
I
/
So-100 Nm65-72 ft.lbs.
‘L-\
925-30 Nm
18-22
ft.lbs.55-65 Nm
40-47 ftJbs.27
m43
\
ft.lbs.
29-43
ft.lbs.
Post-installation Operation@Replenishing of Engine Coolant
(Refer to GROUP 7-Service Adjust-
ment Procedures.)
*Engine Adjustment
(Refer to P.9-74.)
48046
45m
4*+439.l +40.+441.42.
43.
44.
22-29 ft.lbs.
45.46.
4* +4 47.+4 48.25-30 Nm
18-22
ft.lbs.
OlA0567
Timing belt
Rocker cover
Semi-circular packing
Self locking nuts
Gasket (Non-Turbo)
Heat protector (Turbo)
Gasket (Turbo)
Ring (Turbo)
Cylinder head assembly
Cylinder head gasket
NOTE(I) Reverse the removal procedures to reinstall.(2) 4e : Refer to “Service Points of Removal”.(3) ++ : Refer to “Service Points of installation”(4) m : Non-reusable parts
Page 377 of 1216
ENGINE <2.0L DOHC Engine> - Cylinder Head Gasket9-93
DlADD3fFront of
engine+Exhaust side
OlR0391Cylinder
he/d-Ani-circularpackingSERVICE POINTS OF INSTALLATIONNOSJDDls
48. INSTALLATION OF CYLINDER HEAD GASKET
(1)Use a scraper to clean the gasket surface of the cylinder
block.
Caution
Take care that no foreign material gets into the
cylinder, or into coolant passages or oil passages.(2) Make sure that the gasket has the proper identification
mark for the engine.
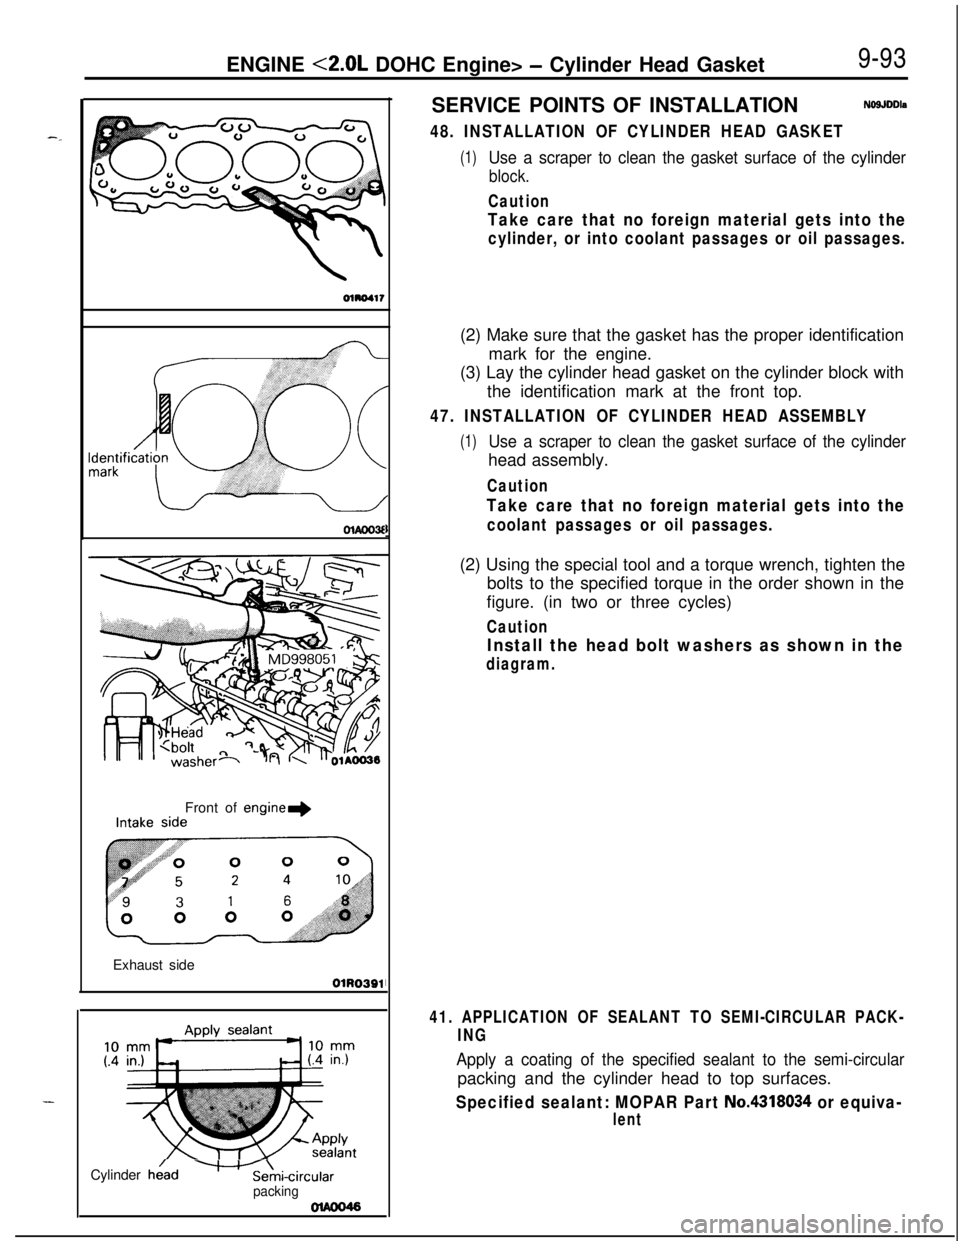
(3) Lay the cylinder head gasket on the cylinder block with
the identification mark at the front top.
47. INSTALLATION OF CYLINDER HEAD ASSEMBLY
(1)Use a scraper to clean the gasket surface of the cylinderhead assembly.
Caution
Take care that no foreign material gets into the
coolant passages or oil passages.(2) Using the special tool and a torque wrench, tighten the
bolts to the specified torque in the order shown in the
figure. (in two or three cycles)
Caution
Install the head bolt washers as shown in the
diagram.
41. APPLICATION OF SEALANT TO SEMI-CIRCULAR PACK-
ING
Apply a coating of the specified sealant to the semi-circularpacking and the cylinder head to top surfaces.
Specified sealant: MOPAR Part No.4318034 or equiva-
lent
Page 381 of 1216
--ENGINE
<2.0L DOHC Engine> - Timing Belt9-97
ExhaustIntake cam-
CrankshaftsproketsprockekOlhw51
1r
SERVICE POINTS OF REMOVAL-a3. REMOVAL OF ENGINE MOUNT BRACKET
(1) With a wooden block placed against the oil pan part of
the engine, jack up the vehicle.
CautionJack up gently, so as not to apply a load to the
various parts.
(2) Remove the engine mount bracket,
5. REMOVAL OF DRIVE BELT (ALTERNATOR)
Before removing the drive belt, loosen the water pump
pulley mounting bolts.
21. REMOVAL OF AUTO TENSIONER
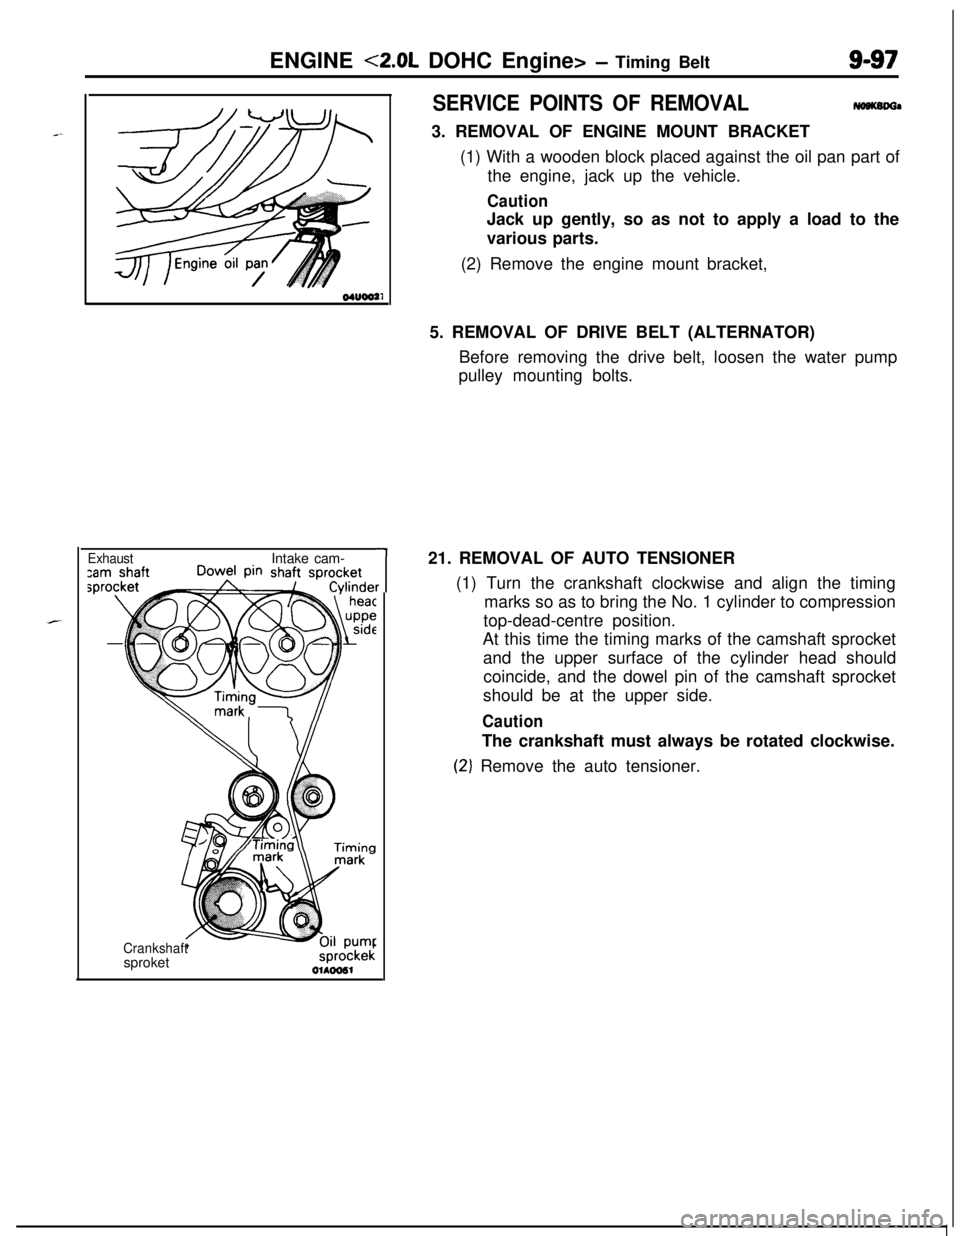
(1) Turn the crankshaft clockwise and align the timing
marks so as to bring the No. 1 cylinder to compression
top-dead-centre position.
At this time the timing marks of the camshaft sprocket
and the upper surface of the cylinder head should
coincide, and the dowel pin of the camshaft sprocket
should be at the upper side.
CautionThe crankshaft must always be rotated clockwise.
(2‘) Remove the auto tensioner.
Page 382 of 1216
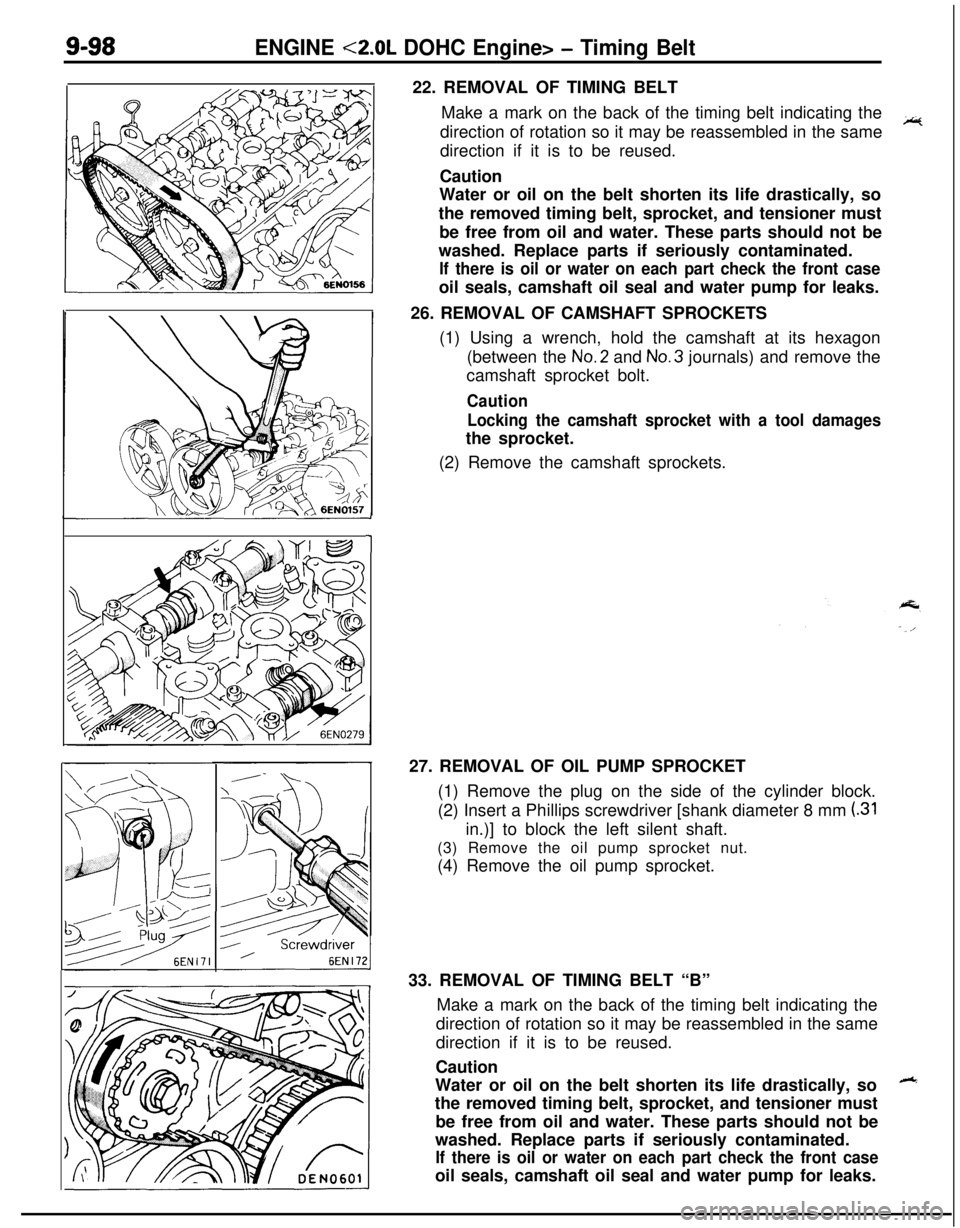
9-98ENGINE <2.0L DOHC Engine> - Timing Belt22. REMOVAL OF TIMING BELT
Make a mark on the back of the timing belt indicating the
direction of rotation so it may be reassembled in the same
~direction if it is to be reused.
Caution
Water or oil on the belt shorten its life drastically, so
the removed timing belt, sprocket, and tensioner must
be free from oil and water. These parts should not be
washed. Replace parts if seriously contaminated.
If there is oil or water on each part check the front caseoil seals, camshaft oil seal and water pump for leaks.
26. REMOVAL OF CAMSHAFT SPROCKETS
(1) Using a wrench, hold the camshaft at its hexagon
(between the No.2 and No.3 journals) and remove the
camshaft sprocket bolt.
Caution
Locking the camshaft sprocket with a tool damagesthe sprocket.
(2) Remove the camshaft sprockets.
127. REMOVAL OF OIL PUMP SPROCKET
(1) Remove the plug on the side of the cylinder block.
(2) Insert a Phillips screwdriver [shank diameter 8 mm
(.31in.)] to block the left silent shaft.
(3) Remove the oil pump sprocket nut.
(4) Remove the oil pump sprocket.
33. REMOVAL OF TIMING BELT “B”
Make a mark on the back of the timing belt indicating the
direction of rotation so it may be reassembled in the same
direction if it is to be reused.
Caution
Water or oil on the belt shorten its life drastically, so
++the removed timing belt, sprocket, and tensioner must
be free from oil and water. These parts should not be
washed. Replace parts if seriously contaminated.
If there is oil or water on each part check the front caseoil seals, camshaft oil seal and water pump for leaks.
Page 386 of 1216
S-102ENGINE <2.0L DOHC Engine> - Timing Belt
Crankshaftsyocket “B”
Crankshaft
sprocketdrankshaft 6fN272
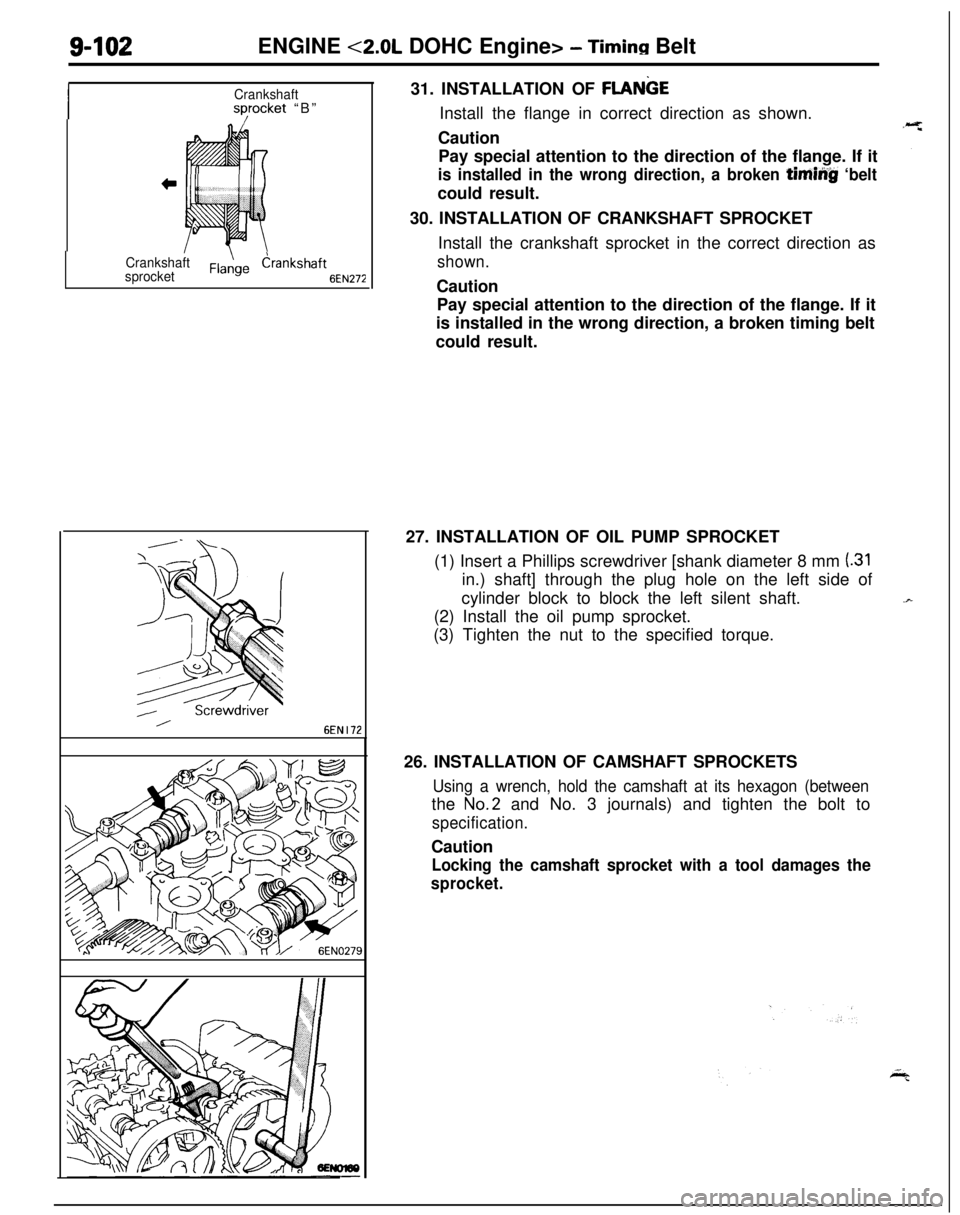
6EN I1231. INSTALLATION OF
FLANGEInstall the flange in correct direction as shown.
Caution
Pay special attention to the direction of the flange. If it
is installed in the wrong direction, a broken timiiig ‘beltcould result.
30. INSTALLATION OF CRANKSHAFT SPROCKET
Install the crankshaft sprocket in the correct direction as
shown.Caution
Pay special attention to the direction of the flange. If it
is installed in the wrong direction, a broken timing belt
could result.
27. INSTALLATION OF OIL PUMP SPROCKET
(1) Insert a Phillips screwdriver [shank diameter 8 mm
(.31in.) shaft] through the plug hole on the left side of
cylinder block to block the left silent shaft.
(2) Install the oil pump sprocket.
(3) Tighten the nut to the specified torque.
26. INSTALLATION OF CAMSHAFT SPROCKETS
Using a wrench, hold the camshaft at its hexagon (betweenthe
No.2 and No. 3 journals) and tighten the bolt to
specification.Caution
Locking the camshaft sprocket with a tool damages the
sprocket.
Page 388 of 1216
ENGINE <2.0L DOHC Engine> - Timing BeltDowelCamshaft sprocket
Timing mark
6EN0264
Tim
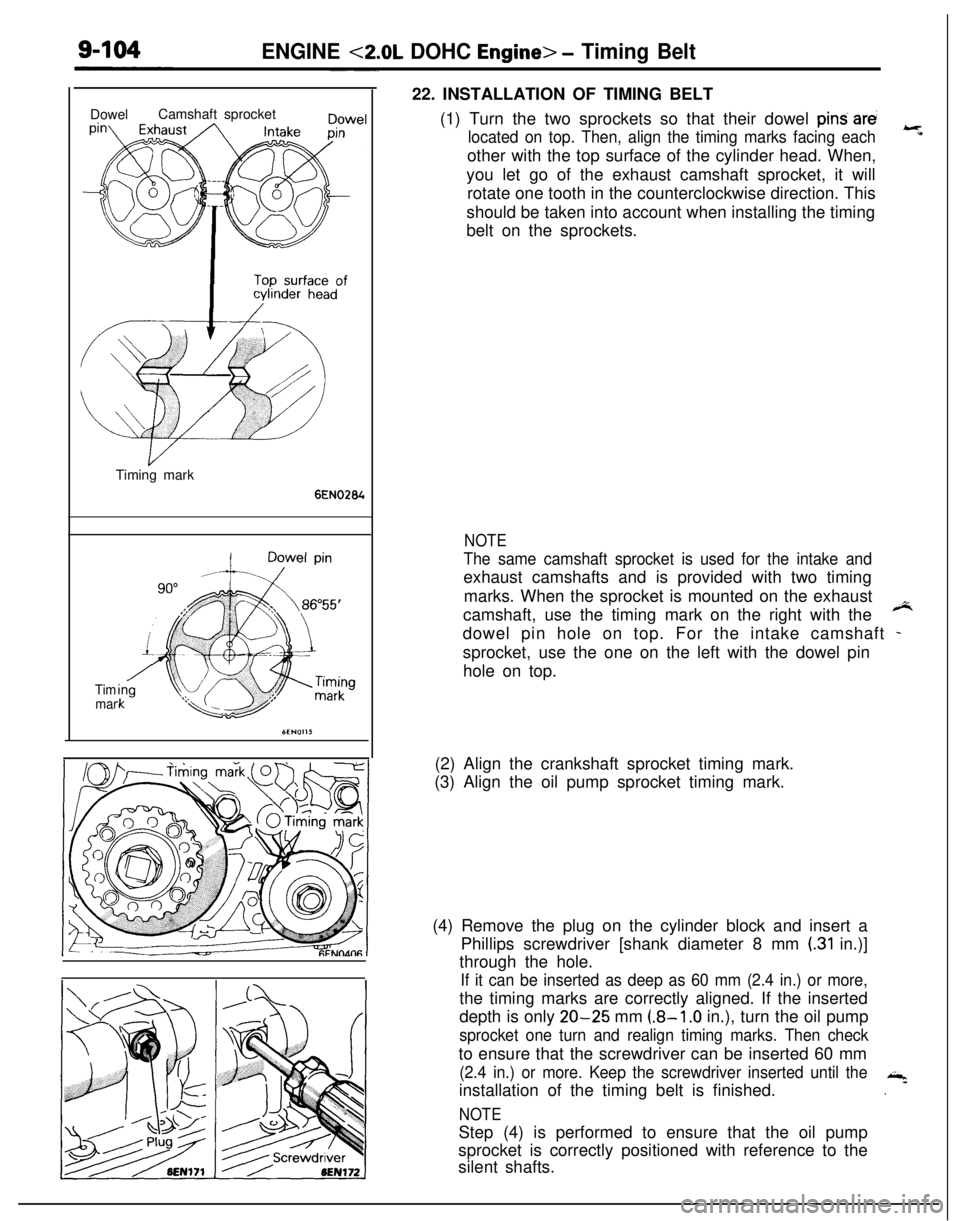
mar22. INSTALLATION OF TIMING BELT
(1) Turn the two sprockets so that their dowel
pind arti
located on top. Then, align the timing marks facing each
-
*other with the top surface of the cylinder head. When,
you let go of the exhaust camshaft sprocket, it will
rotate one tooth in the counterclockwise direction. This
should be taken into account when installing the timing
belt on the sprockets.
NOTE
The same camshaft sprocket is used for the intake andexhaust camshafts and is provided with two timing
marks. When the sprocket is mounted on the exhaust
camshaft, use the timing mark on the right with the
*dowel pin hole on top. For the intake camshaft
-sprocket, use the one on the left with the dowel pin
hole on top.
(2) Align the crankshaft sprocket timing mark.
(3) Align the oil pump sprocket timing mark.
(4) Remove the plug on the cylinder block and insert a
Phillips screwdriver [shank diameter 8 mm
(.31 in.)]
through the hole.
If it can be inserted as deep as 60 mm (2.4 in.) or more,the timing marks are correctly aligned. If the inserted
depth is only
20-25 mm (.8-l .O in.), turn the oil pump
sprocket one turn and realign timing marks. Then checkto ensure that the screwdriver can be inserted 60 mm
(2.4 in.) or more. Keep the screwdriver inserted until theinstallation of the timing belt is finished.,+
.
NOTEStep (4) is performed to ensure that the oil pump
sprocket is correctly positioned with reference to the
silent shafts.
Page 389 of 1216
ENGINE <2.0L DOHC Engine> - Timing Belt9405
I
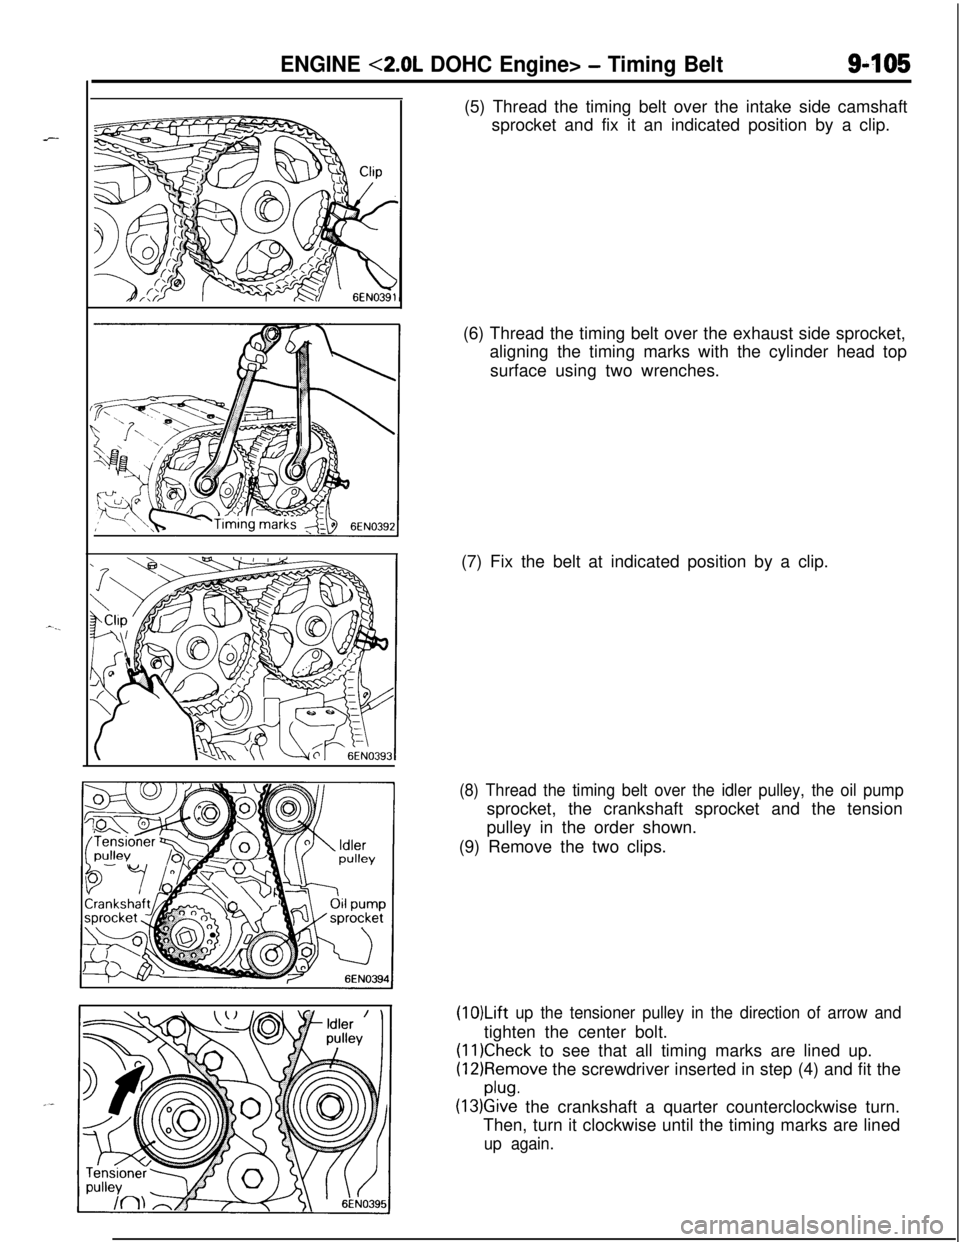
P(5) Thread the timing belt over the intake side camshaft
sprocket and fix it an indicated position by a clip.
(6) Thread the timing belt over the exhaust side sprocket,
aligning the timing marks with the cylinder head top
surface using two wrenches.
(7) Fix the belt at indicated position by a clip.
(8) Thread the timing belt over the idler pulley, the oil pumpsprocket, the crankshaft sprocket and the tension
pulley in the order shown.
(9) Remove the two clips.
(1O)Lift up the tensioner pulley in the direction of arrow andtighten the center bolt.
(11)Check to see that all timing marks are lined up.
(12)Remove the screwdriver inserted in step (4) and fit the
plug.
(13)Give the crankshaft a quarter counterclockwise turn.
Then, turn it clockwise until the timing marks are lined
up again.
Page 390 of 1216
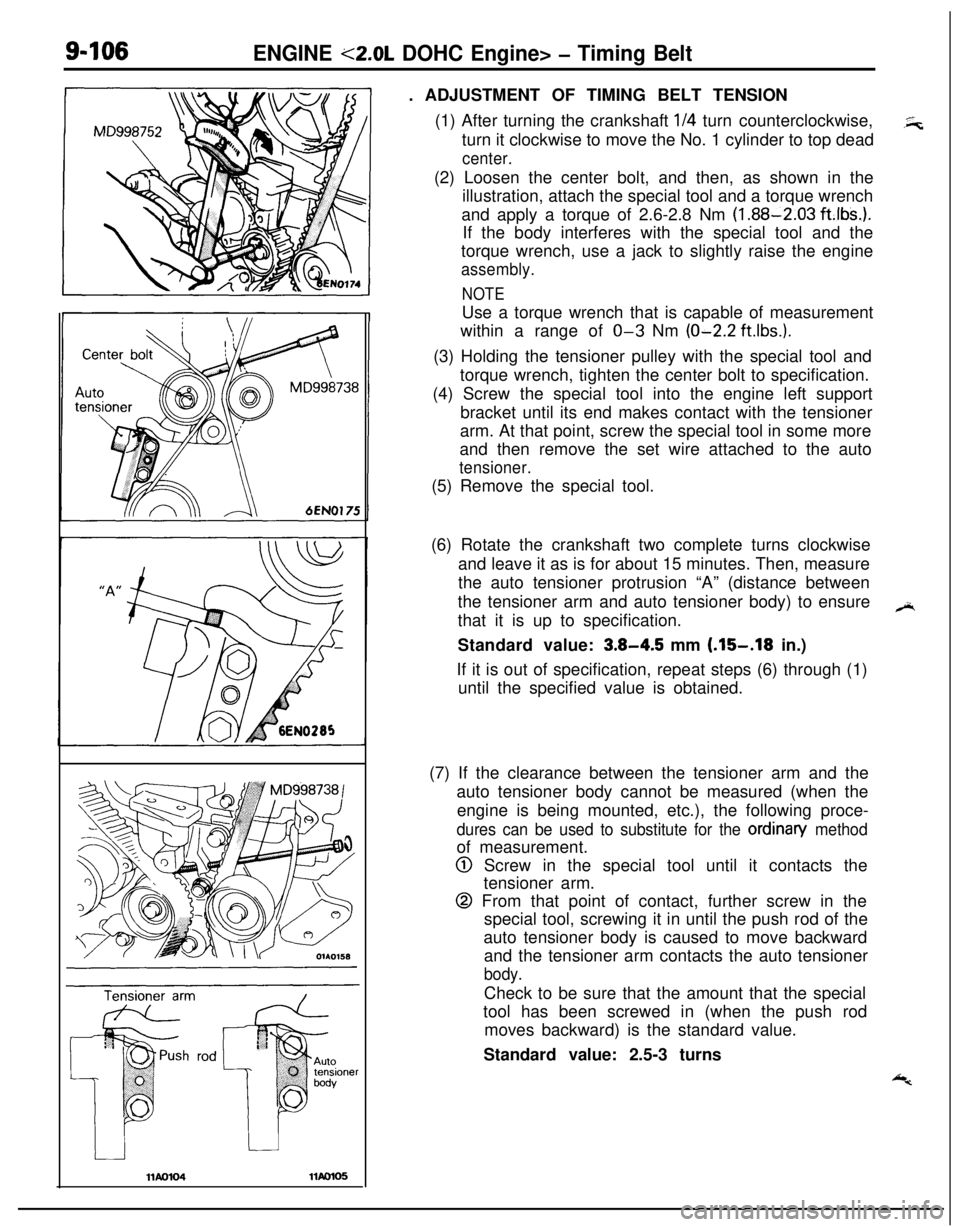
9-106ENGINE <2.0L DOHC Engine> - Timing Belt. ADJUSTMENT OF TIMING BELT TENSION
(1) After turning the crankshaft
l/4 turn counterclockwise,.5;;turn it clockwise to move the No. 1 cylinder to top dead
center.(2) Loosen the center bolt, and then, as shown in the
illustration, attach the special tool and a torque wrench
and apply a torque of 2.6-2.8 Nm
(1.88-2.03 ft.lbs.).If the body interferes with the special tool and the
torque wrench, use a jack to slightly raise the engine
assembly.
NOTEUse a torque wrench that is capable of measurement
within a range of
O-3 Nm (O-2.2 ft.lbs.).(3) Holding the tensioner pulley with the special tool and
torque wrench, tighten the center bolt to specification.
(4) Screw the special tool into the engine left support
bracket until its end makes contact with the tensioner
arm. At that point, screw the special tool in some more
and then remove the set wire attached to the auto
tensioner.(5) Remove the special tool.
(6) Rotate the crankshaft two complete turns clockwise
and leave it as is for about 15 minutes. Then, measure
the auto tensioner protrusion “A” (distance between
the tensioner arm and auto tensioner body) to ensure,.+
that it is up to specification.
Standard value:
3.8-4.5 mm (.15-.18 in.)
If it is out of specification, repeat steps (6) through (1)
until the specified value is obtained.
(7) If the clearance between the tensioner arm and the
auto tensioner body cannot be measured (when the
engine is being mounted, etc.), the following proce-
dures can be used to substitute for the ordinan/ methodof measurement.
@ Screw in the special tool until it contacts the
tensioner arm.
@ From that point of contact, further screw in the
special tool, screwing it in until the push rod of the
auto tensioner body is caused to move backward
and the tensioner arm contacts the auto tensioner
body.Check to be sure that the amount that the special
tool has been screwed in (when the push rod
moves backward) is the standard value.
Standard value: 2.5-3 turns
Page 393 of 1216
ENGINE <2.0L DOHC Engine> - Camshaft and Rocker Arm9-l 09
CAMSHAFT AND ROCKER ARMNo9LE-B
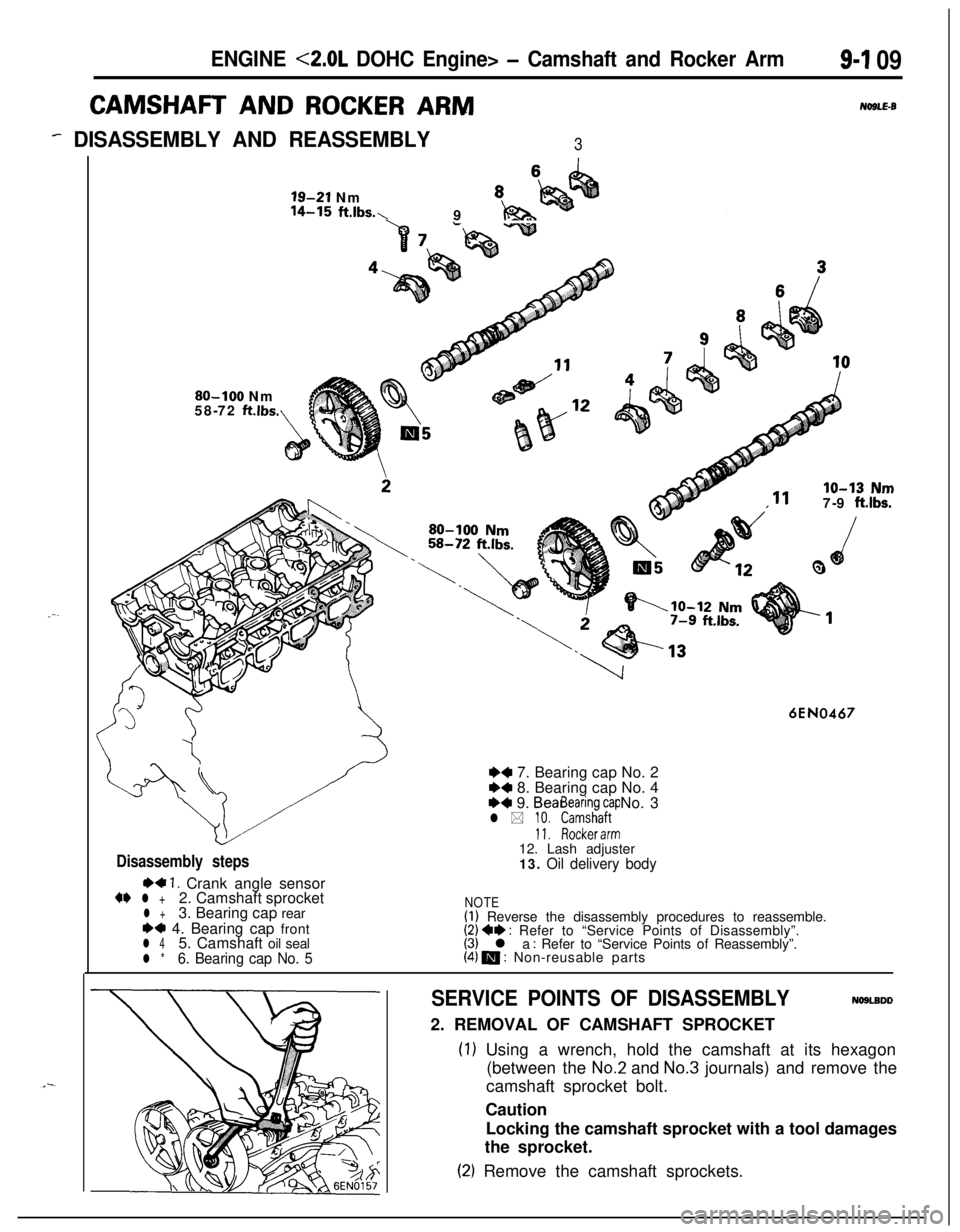
- DISASSEMBLY AND REASSEMBLY3
19-21 Nm8,14-15 ftlbs.,9 IQ&”
80-100 Nm
58-72 ftlbs.
,11IO-13 Nm7-9 ftlbs.
6EN0467
Disassembly steps
r)+ 1. Crank angle sensor+* l +2. Camshaft sprocketl +3. Bearing cap rear*4 4. Bearing cap frontl 45. Camshaft oil seall *6. Bearing cap No. 5
++ 7. Bearing cap No. 2+a 8. Bearing cap No. 4~~ 9. Beanng cap No. 3l * 1;: kz$&;;m12. Lash adjuster
13. Oil delivery body
NOTE(I) Reverse the disassembly procedures to reassemble.(2) 4e : Refer to “Service Points of Disassembly”.(3) l a : Refer to “Service Points of Reassembly”.(4) m : Non-reusable parts
SERVICE POINTS OF DISASSEMBLYNOSLBDD2. REMOVAL OF CAMSHAFT SPROCKET
(1) Using a wrench, hold the camshaft at its hexagon
(between the
No.2 and No.3 journals) and remove the
camshaft sprocket bolt.
Caution
Locking the camshaft sprocket with a tool damages
the sprocket.
(2) Remove the camshaft sprockets.