lock MITSUBISHI ECLIPSE 1991 Service Manual
[x] Cancel search | Manufacturer: MITSUBISHI, Model Year: 1991, Model line: ECLIPSE, Model: MITSUBISHI ECLIPSE 1991Pages: 1216, PDF Size: 67.42 MB
Page 721 of 1216
MANUAL TRANSAXLE
206001E
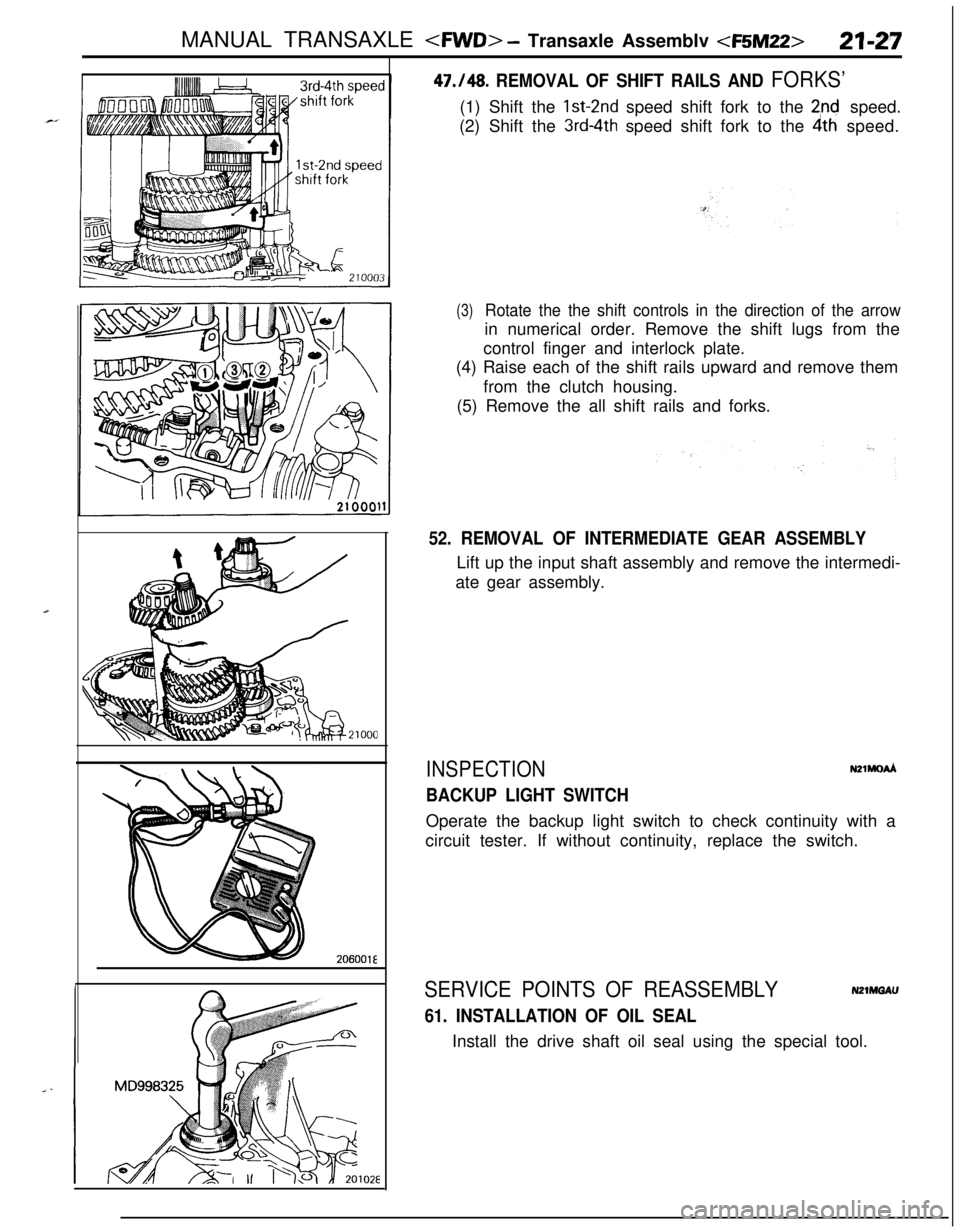
47./48. REMOVAL OF SHIFT RAILS AND FORKS’(1) Shift the Ist-2nd speed shift fork to the
2nd speed.
(2) Shift the
3rd~4th speed shift fork to the 4th speed.
(3)Rotate the the shift controls in the direction of the arrowin numerical order. Remove the shift lugs from the
control finger and interlock plate.
(4) Raise each of the shift rails upward and remove them
from the clutch housing.
(5) Remove the all shift rails and forks.
52. REMOVAL OF INTERMEDIATE GEAR ASSEMBLYLift up the input shaft assembly and remove the intermedi-
ate gear assembly.
INSPECTION
BACKUP LIGHT SWITCH
N21MOdOperate the backup light switch to check continuity with a
circuit tester. If without continuity, replace the switch.
SERVICE POINTS OF REASSEMBLYN2mnGAU
61. INSTALLATION OF OIL SEALInstall the drive shaft oil seal using the special tool.
Page 723 of 1216
MANUAL TRANSAXLE
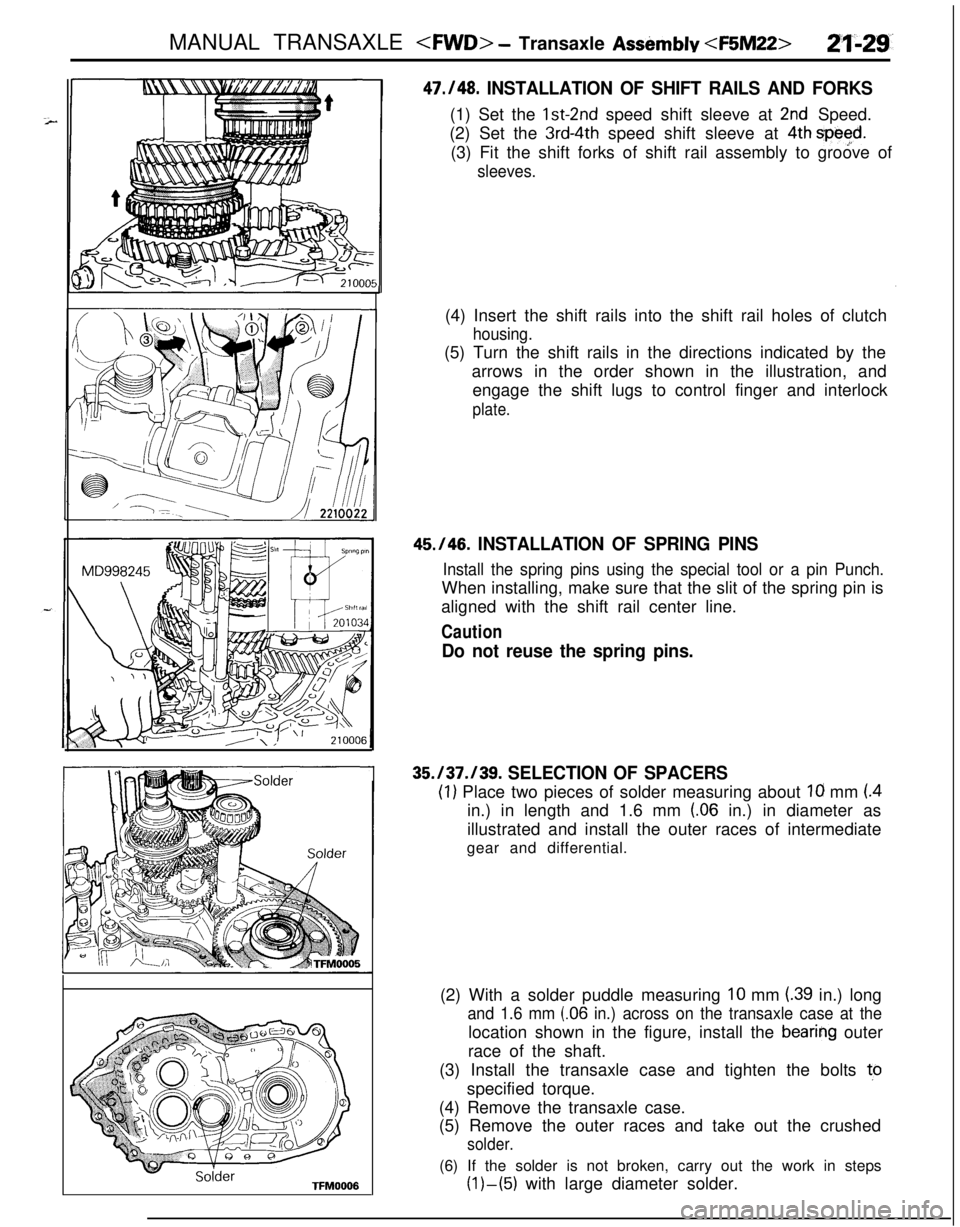
47./48. INSTALLATION OF SHIFT RAILS AND FORKS(1) Set the
lst-2nd speed shift sleeve at 2nd Speed.
(2) Set the
3rd-4th speed shift sleeve at 4th spe$d.(3) Fit the shift forks of shift rail assembly to groove of
sleeves.(4) Insert the shift rails into the shift rail holes of clutch
housing.(5) Turn the shift rails in the directions indicated by the
arrows in the order shown in the illustration, and
engage the shift lugs to control finger and interlock
plate.
45.146. INSTALLATION OF SPRING PINS
Install the spring pins using the special tool or a pin Punch.When installing, make sure that the slit of the spring pin is
aligned with the shift rail center line.
Caution
Do not reuse the spring pins.
35.137.139. SELECTION OF SPACERS
(1) Place two pieces of solder measuring about Ia mm (.4in.) in length and 1.6 mm
(.06 in.) in diameter as
illustrated and install the outer races of intermediate
gear and differential.
(2) With a solder puddle measuring
10 mm (.39 in.) long
and 1.6 mm (.06 in.) across on the transaxle case at thelocation shown in the figure, install the
bearing outer
race of the shaft.
(3) Install the transaxle case and tighten the bolts to
specified torque.
(4) Remove the transaxle case.
(5) Remove the outer races and take out the crushed
solder.(6) If the solder is not broken, carry out the work in steps
(l)-(5) with large diameter solder.
Page 725 of 1216
![MITSUBISHI ECLIPSE 1991 Service Manual MANUAL TRANSAXLE <WD> - Transaxle Assembly <F5M22>2%3T
IMD998245(5)
Insert a Phillips screwdriver [8 mm (.32 in.) shaft
diameter] into the bolt hole in the case, as shown in thefigure, and use it to MITSUBISHI ECLIPSE 1991 Service Manual MANUAL TRANSAXLE <WD> - Transaxle Assembly <F5M22>2%3T
IMD998245(5)
Insert a Phillips screwdriver [8 mm (.32 in.) shaft
diameter] into the bolt hole in the case, as shown in thefigure, and use it to](/img/19/57104/w960_57104-724.png)
MANUAL TRANSAXLE
IMD998245(5)
Insert a Phillips screwdriver [8 mm (.32 in.) shaft
diameter] into the bolt hole in the case, as shown in thefigure, and use it to align the threaded hole of the
reverse idler gear shaft with the bolt
hole in the
transaxle case.
(6) Install the reverse idler gear shaft bolt and tighten the
bolt by fingers.
(7) Tighten the all transaxle tightening bolts to specified
(8)
E$r& the reverse idle gear shaft bolt to specified
torque.
15./ 16. INSTALLATION OF LOCK NUTS(1) Install the special tool to the splined end of input shaft.
(2) Screw a bolt
(10 mm) into the hole on the periphery of
clutch housing and attach a spinner handle to the
special tool.
(3) Shift the transmission in reverse using control lever andselect lever.
(4) Tighten the lock
nut,to specified torque, while ‘using the
bolt attached in the above step as a spinner handle
stopper.(5) Loosen the lock nuts.
(6) Retighten the lock nuts to the specified torque.
(7) Stake the lock nut.
14. INSTALLATION OF SPRING PIN(1) Install the spring pin using the special tool or a pin
punch.
Caution
Do not reuse the spring pins.
Page 726 of 1216
21-32MANUAL TRANSAXLE
Slit
201034
2010043
APPLY a
TFM0041TFM0044
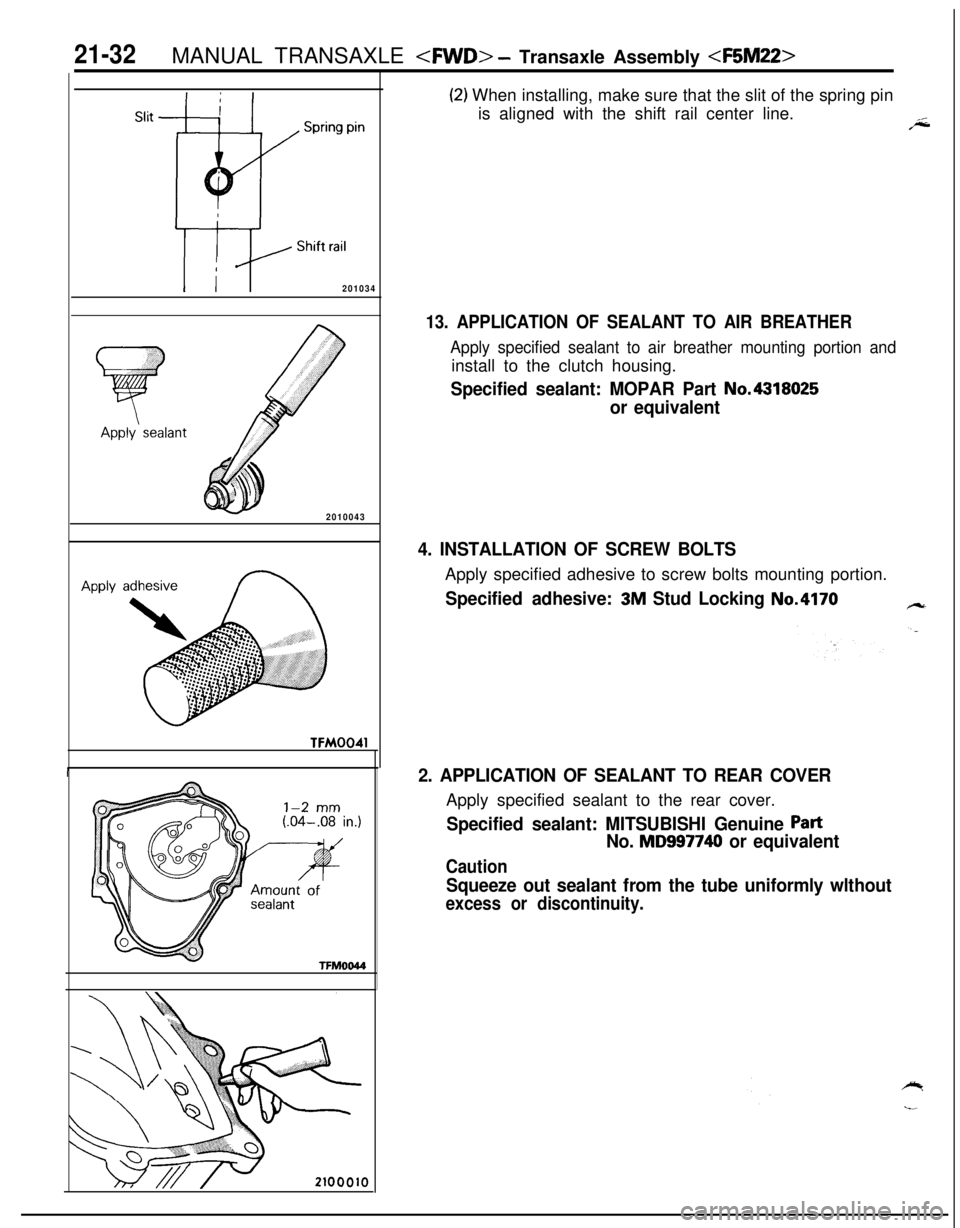
(2) When installing, make sure that the slit of the spring pin
is aligned with the shift rail center line.
fi
13. APPLICATION OF SEALANT TO AIR BREATHER
Apply specified sealant to air breather mounting portion andinstall to the clutch housing.
Specified sealant: MOPAR Part No.4318025
or equivalent
4. INSTALLATION OF SCREW BOLTSApply specified adhesive to screw bolts mounting portion.
Specified adhesive: 3M Stud Locking No.4170-
2. APPLICATION OF SEALANT TO REAR COVERApply specified sealant to the rear cover.
Specified sealant: MITSUBISHI Genuine Part
No. MD997740 or equivalent
Caution
Squeeze out sealant from the tube uniformly wlthout
excess or discontinuity.
Page 727 of 1216
MANUAL TRANSAXLE
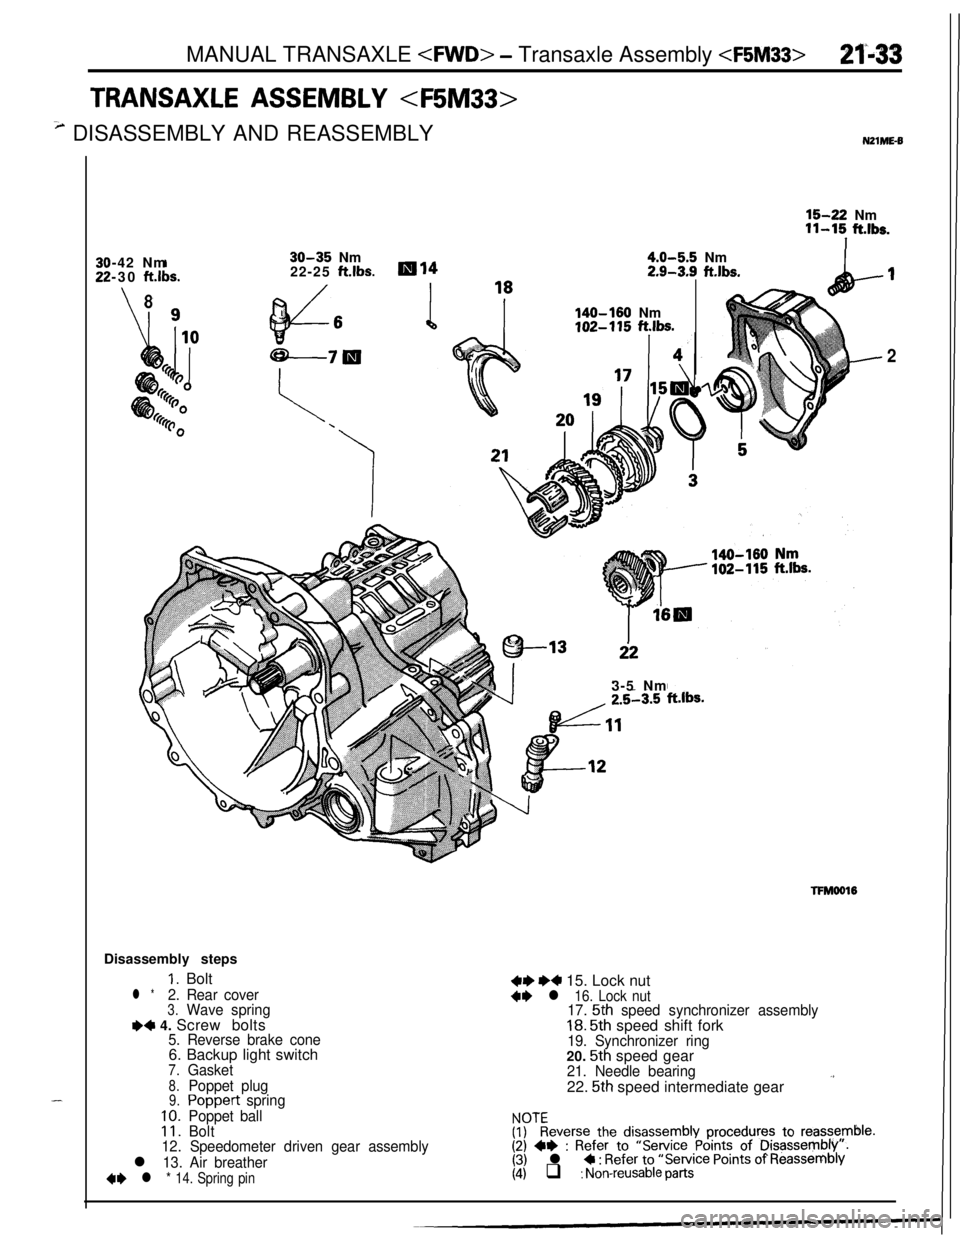
TRANSAXLE ASSEMBLY
3 DISASSEMBLY AND REASSEMBLYNZlME-6
--42 Nm
-30
ft.lbs.
\8I Q
30-35Nm
22-25ft.lbs.ml4
ff3d6 i
18
4.0-5.5Nm2.9-3.9ft.lbs.
-n
140-160 Nm102-115ft.&s.
3-5 Nm
16-22 Nm11-15 ft.lbs.1Disassembly steps
‘I. Bolt
l *2. Rear cover3.Wave springe4 4. Screw bolts5. Reverse brake cone6. Backup light switch
7.Gasket
8.Poppet plug9.Poppert spring
10.Poppet ball11.Bolt
12. Speedometer driven gear assembly
l 13. Air breather
4* l * 14. Spring pin
,I
2
TFMool6
4+ e4 15. Lock nut+e l 16. Lock nut17. 5th speed synchronizer assembly18. 5th speed shift fork19. Synchronizer ring20. 5th speed gear21. Needle bearing22.
5th speed intermediate gear.’
$?everse the disassembly procedures to reassemble.(2) +e : Refer to “Service Points of Disassembly:.(3) l C : Refer to “Service Points of Reassembly(4) q : Non-reusable parts
Page 730 of 1216
IMD99801 9I
21-36MANUAL TRANSAXLE
SERVICE POINTS OF DISASSEMBLYNZlMFAS
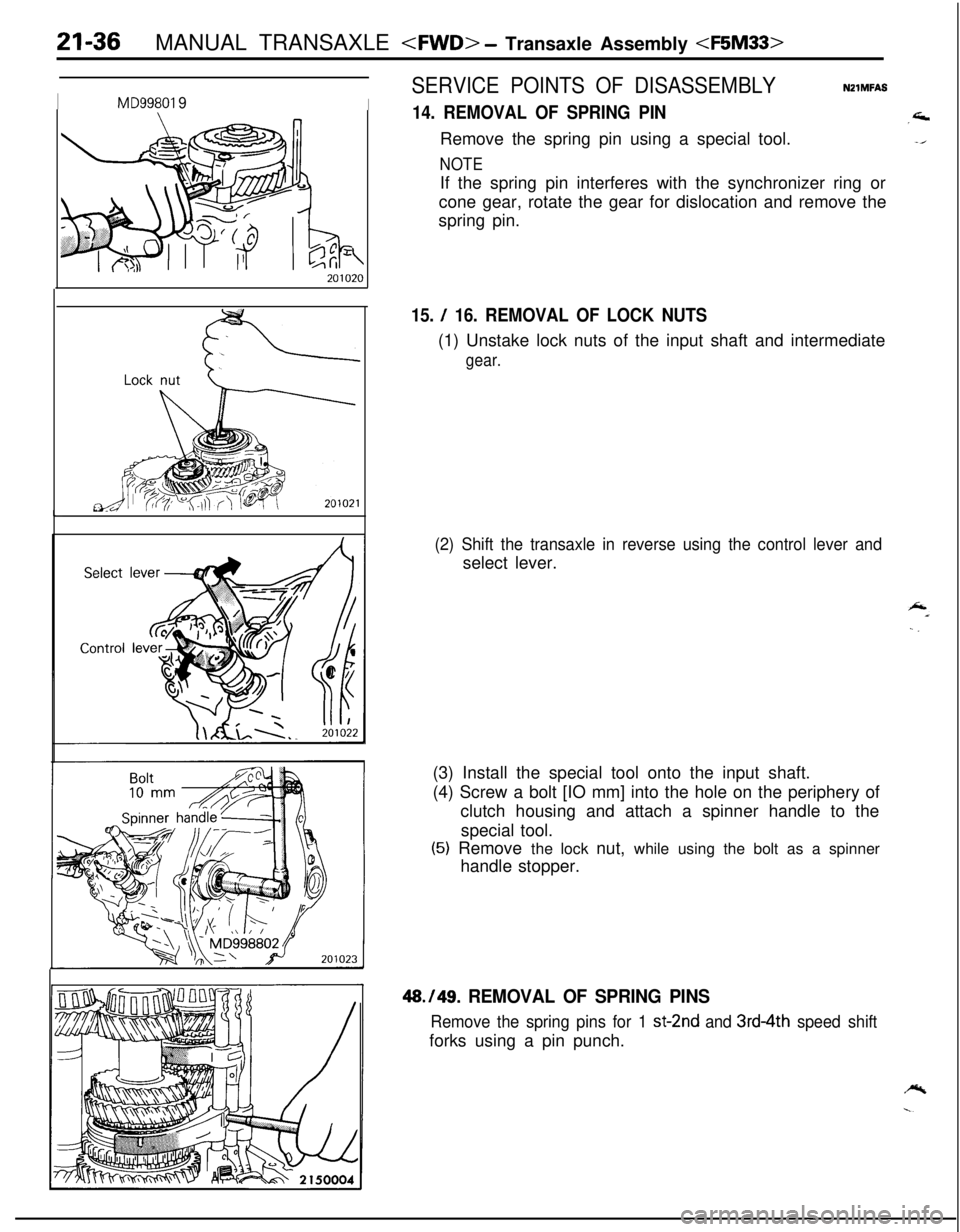
14. REMOVAL OF SPRING PINRemove the spring pin using a special tool.
NOTEIf the spring pin interferes with the synchronizer ring or
cone gear, rotate the gear for dislocation and remove the
spring pin.
15. / 16. REMOVAL OF LOCK NUTS(1) Unstake lock nuts of the input shaft and intermediate
gear.
(2) Shift the transaxle in reverse using the control lever andselect lever.
(3) Install the special tool onto the input shaft.
(4) Screw a bolt [IO mm] into the hole on the periphery of
clutch housing and attach a spinner handle to the
special tool.
(5) Remove the lock nut, while using the bolt as a spinner
handle stopper.
48.149. REMOVAL OF SPRING PINS
Remove the spring pins for 1 st-2nd and 3rd-4th speed shiftforks using a pin punch.
Page 732 of 1216
21-38 MANUAL TRANSAXLE
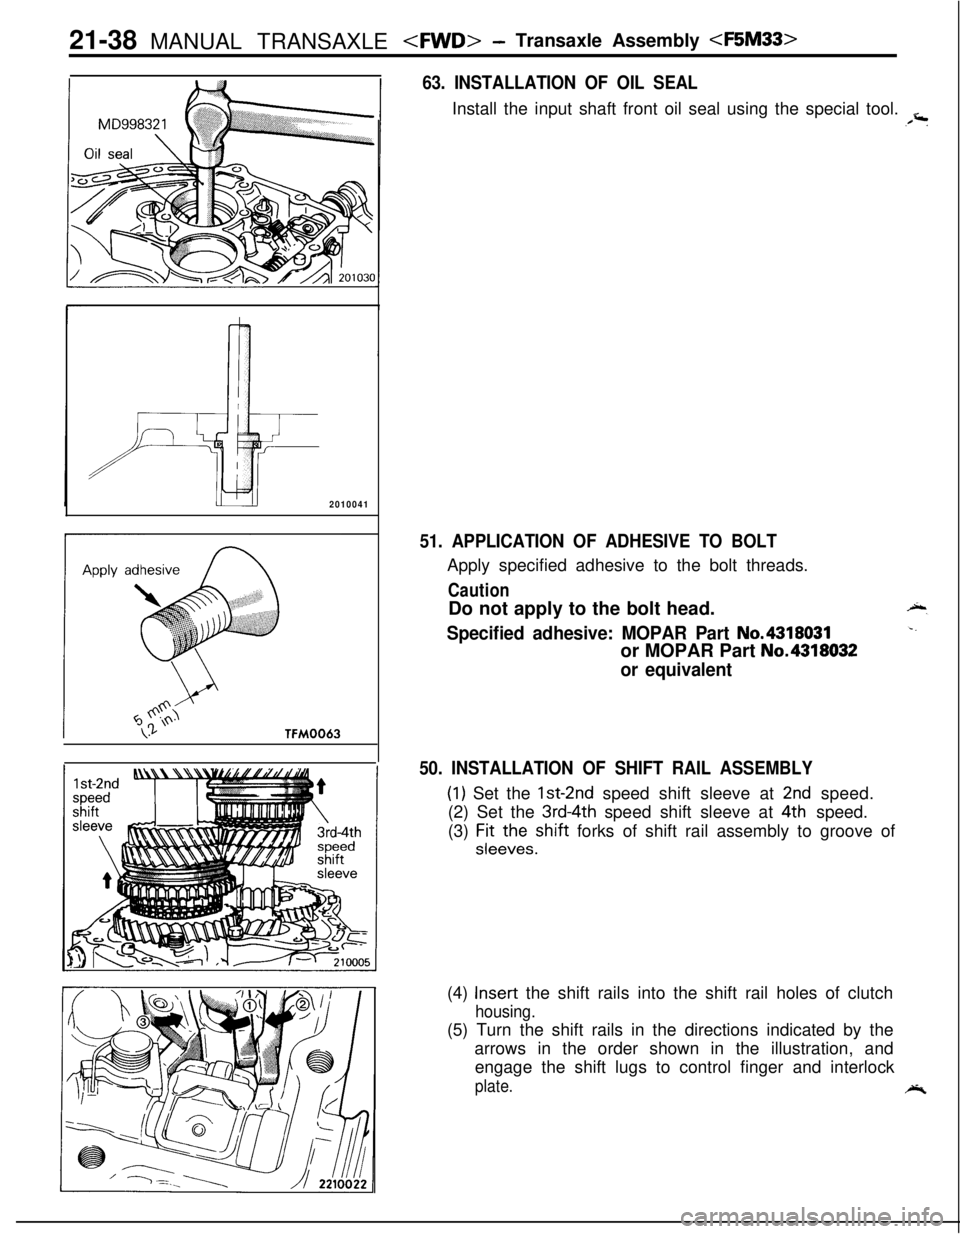
63. INSTALLATION OF OIL SEALInstall the input shaft front oil seal using the special tool.
,,=
2010041
51. APPLICATION OF ADHESIVE TO BOLTApply specified adhesive to the bolt threads.
CautionDo not apply to the bolt head.
Specified adhesive: MOPAR Part No.4318031or MOPAR Part
No.4318032
or equivalent
50. INSTALLATION OF SHIFT RAIL ASSEMBLY
(1) Set the lst-2nd speed shift sleeve at 2nd speed.
(2) Set the
3rd-4th speed shift sleeve at 4th speed.
(3) FJtt~~~shift forks of shift rail assembly to groove of
(4)
Insert the shift rails into the shift rail holes of clutch
housing.(5) Turn the shift rails in the directions indicated by the
arrows in the order shown in the illustration, and
engage the shift lugs to control finger and interlock
plate.A
Page 735 of 1216
MANUAL TRANSAXLE
10 mm (.40 in.)
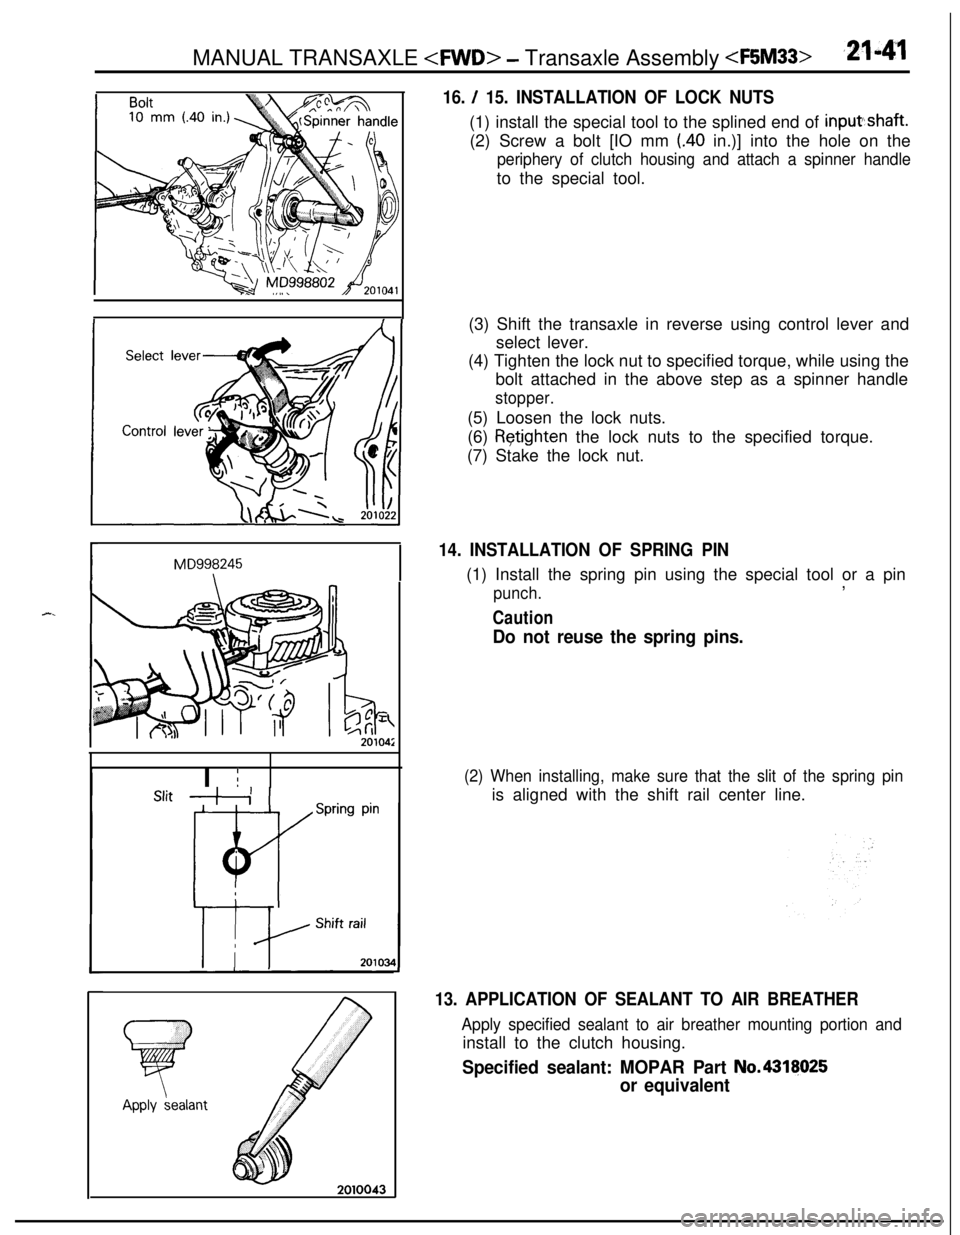
16. / 15. INSTALLATION OF LOCK NUTS(1) install the special tool to the splined end of inputshaft.
(2) Screw a bolt [IO mm
(.40 in.)] into the hole on the
periphery of clutch housing and attach a spinner handleto the special tool.
MD998245\ISlit
,+i 1I I
r
Spring pin
, Shift rail(3) Shift the transaxle in reverse using control lever and
select lever.
(4) Tighten the lock nut to specified torque, while using the
bolt attached in the above step as a spinner handle
stopper.(5) Loosen the lock nuts.
(6)
&tighten the lock nuts to the specified torque.
(7) Stake the lock nut.
14. INSTALLATION OF SPRING PIN(1) Install the spring pin using the special tool or a pin
punch.,
Caution
Do not reuse the spring pins.
(2) When installing, make sure that the slit of the spring pinis aligned with the shift rail center line.
13. APPLICATION OF SEALANT TO AIR BREATHER
Apply specified sealant to air breather mounting portion andinstall to the clutch housing.
Specified sealant: MOPAR Part No.4318025
or equivalent
Page 756 of 1216
21-62MANUAL TRANSAXLE
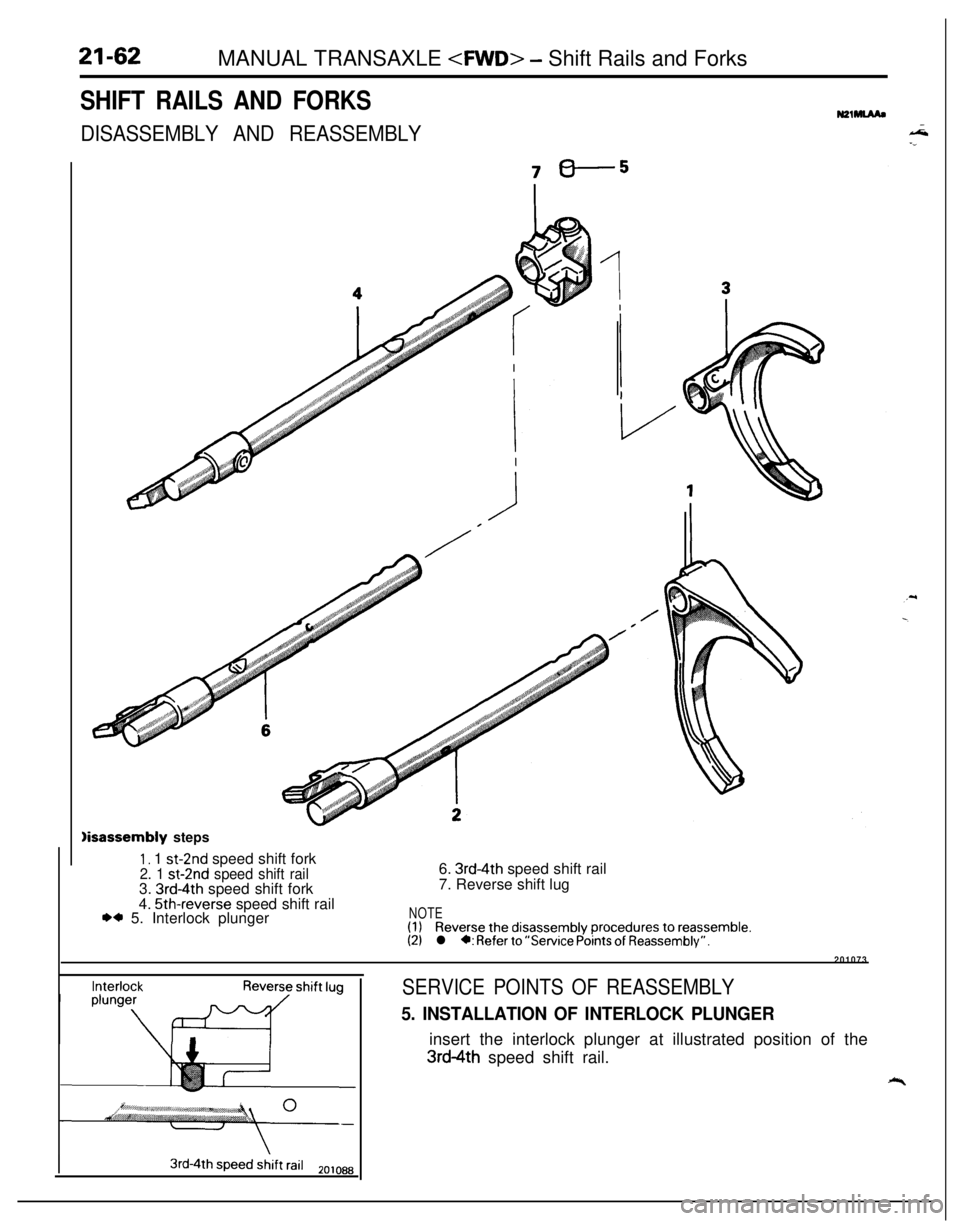
SHIFT RAILS AND FORKS
DISASSEMBLY AND REASSEMBLY
N21-
sbdisassembly steps
1, 1 st-2nd speed shift fork2. 1 st-2nd speed shift rail3. 3rd-4th speed shift fork
4. 5th-reverse speed shift rail** 5. Interlock plunger6.
3rd-4th speed shift rail
7. Reverse shift lug
NOTE(1)Reverse the disassembly procedures to reassemble.(2)l *: Refer to “Service Points of Reassembly”.
201073
InterlockReverse shift lugSERVICE POINTS OF REASSEMBLY
5. INSTALLATION OF INTERLOCK PLUNGERinsert the interlock plunger at illustrated position of the
3rd4th speed shift rail.
“r
3rd-4th speed shift rail2ojoaa
Page 757 of 1216
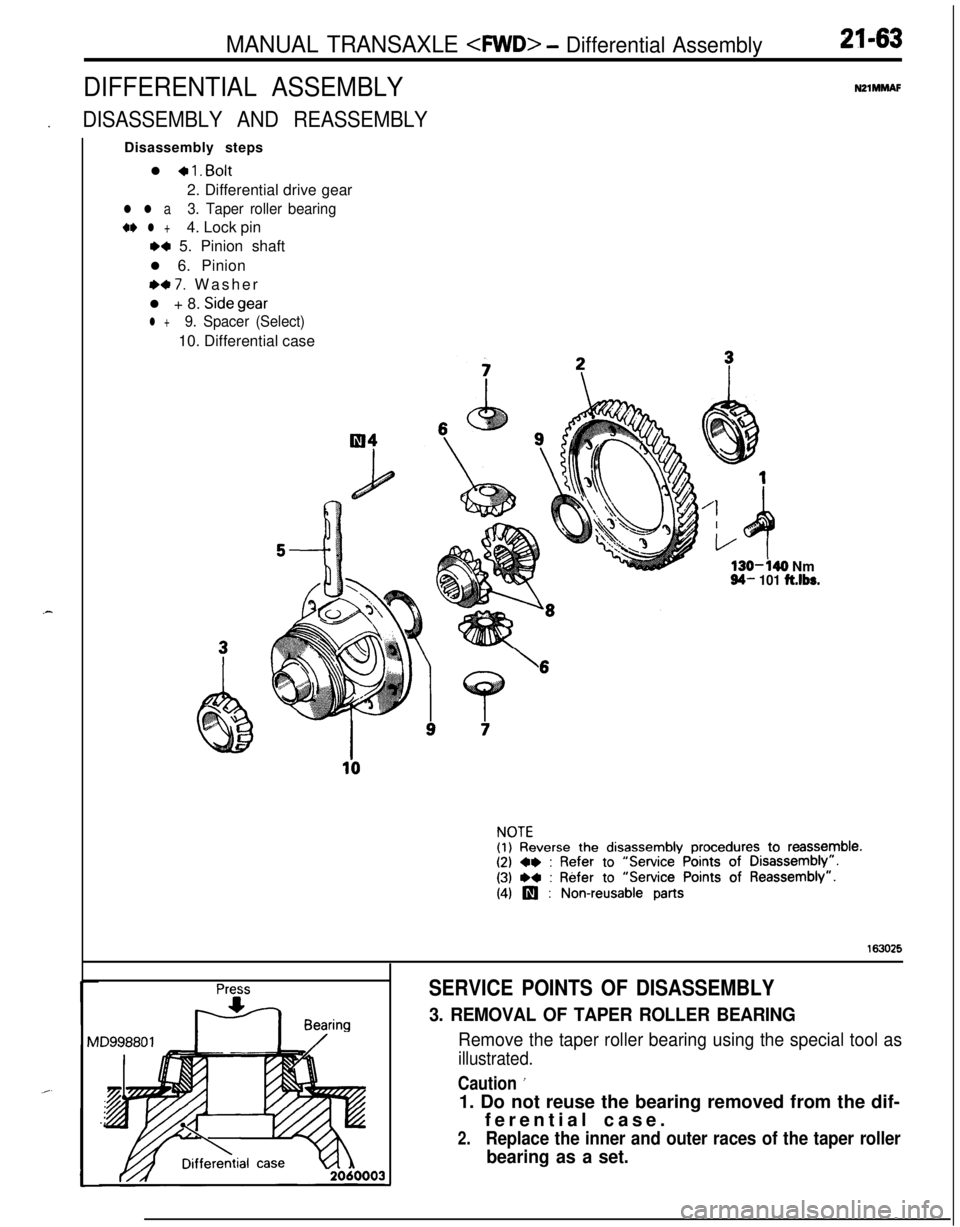
MANUAL TRANSAXLE 4WD> - Differential Assembly21-63
DIFFERENTIAL ASSEMBLYNZlMMAF.
DISASSEMBLY AND REASSEMBLYDisassembly steps
l
+ 1. Bolt2. Differential drive gear
l l a3. Taper roller bearing
+e l +4. Lock pin
M 5. Pinion shaft
l 6. Pinion
e+ 7. Washer
l + 8. Sidegear
l +9. Spacer (Select)10. Differential case
130-440 Nm94- 101 ft.lbs.
\6
NOTE(1) Reverse the disassembly procedures to reassemble.(2) ~~ : Refer to “Service Points of Disassembly”.
(3) ,+ : Refer to “Service Points of Reassembly”.
(4) p : Non-reusable parts
163025
Press
F+ Bearing
SERVICE POINTS OF DISASSEMBLY
3. REMOVAL OF TAPER ROLLER BEARING
Remove the taper roller bearing using the special tool as
illustrated.
Caution ’1. Do not reuse the bearing removed from the dif-
ferential case.
2.Replace the inner and outer races of the taper roller
bearing as a set.