lock MITSUBISHI ECLIPSE 1991 Service Manual
[x] Cancel search | Manufacturer: MITSUBISHI, Model Year: 1991, Model line: ECLIPSE, Model: MITSUBISHI ECLIPSE 1991Pages: 1216, PDF Size: 67.42 MB
Page 613 of 1216
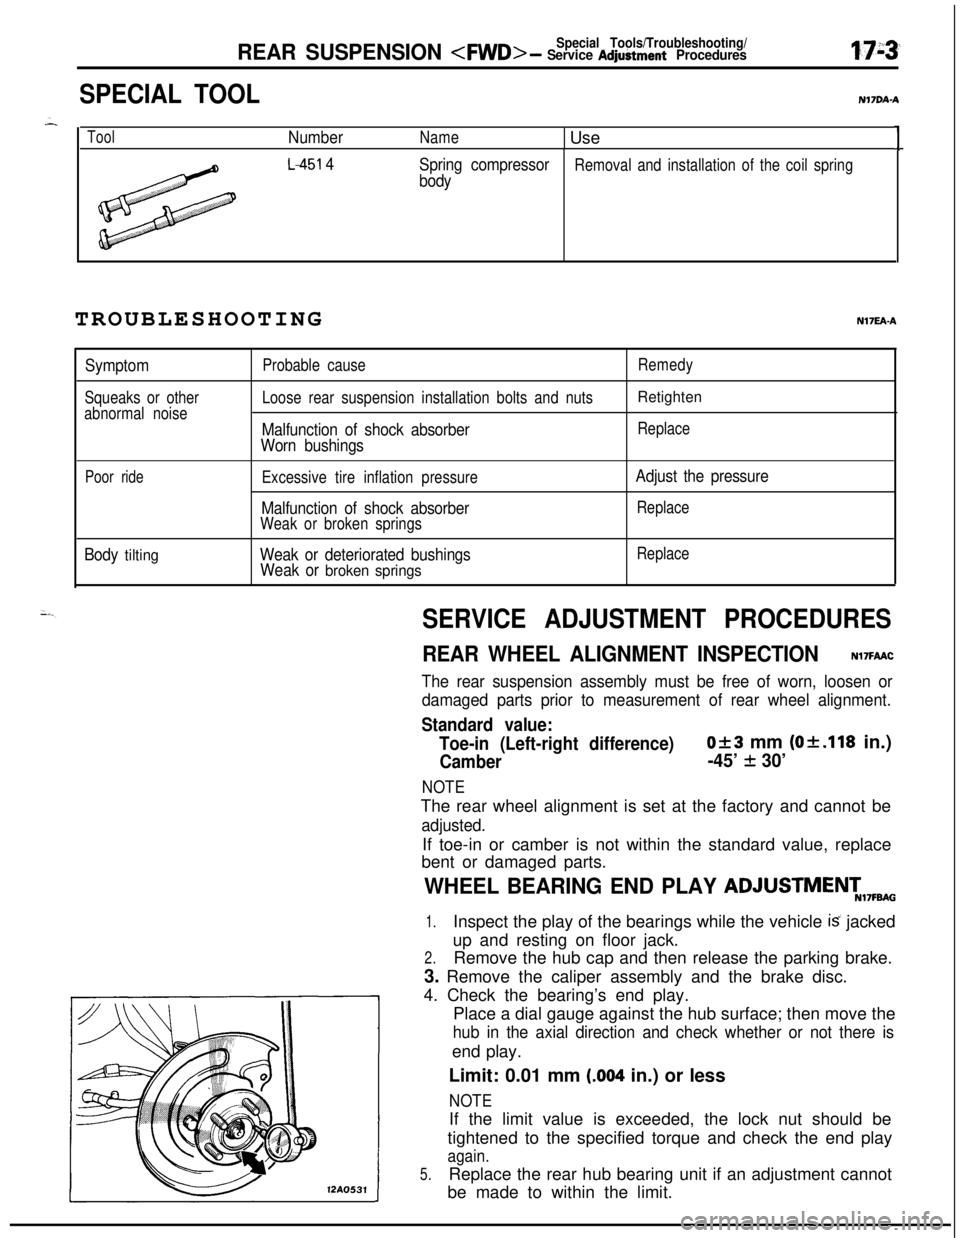
Special Tools/Troubleshooting/REAR SUSPENSION
SPECIAL TOOLN17DA.A
ToolNumberName1 Use1
L-451 4
Spring compressorRemoval and installation of the coil spring
bodyTROUBLESHOOTINGNI’IEA-A
Symptom
Squeaks or other
abnormal noiseProbable cause
Loose rear suspension installation bolts and nuts
Malfunction of shock absorber
Worn bushings
Remedy
Retighten
Replace
Poor rideExcessive tire inflation pressure
Malfunction of shock absorberWeak or broken springs
Adjust the pressure
Replace
Body tiltingWeak or deteriorated bushings
Weak or broken springs
Replace
SERVICE ADJUSTMENT PROCEDURES
REAR WHEEL ALIGNMENT INSPECTIONN17FAAC
The rear suspension assembly must be free of worn, loosen or
damaged parts prior to measurement of rear wheel alignment.
Standard value:
Toe-in (Left-right difference)
Of3 mm (Of.118 in.)
Camber-45’ + 30’
NOTEThe rear wheel alignment is set at the factory and cannot be
adjusted.If toe-in or camber is not within the standard value, replace
bent or damaged parts.
WHEEL BEARING END PLAY ADJUSTMENT,7FBA0
1.Inspect the play of the bearings while the vehicle is jacked
up and resting on floor jack.
2.Remove the hub cap and then release the parking brake.
3. Remove the caliper assembly and the brake disc.
4. Check the bearing’s end play.
Place a dial gauge against the hub surface; then move the
hub in the axial direction and check whether or not there isend play.
Limit: 0.01 mm
(.004 in.) or less
NOTE12AO531If the limit value is exceeded, the lock nut should be
tightened to the specified torque and check the end play
again.
5.Replace the rear hub bearing unit if an adjustment cannot
be made to within the limit.
Page 616 of 1216
17-6REAR SUSPENSION
Drive out
BayArbor
Race
BearingSERVICE POINTS OF REMOVAL
Nl7QBh
1.REMOVAL OF REAR SPEED SENSOR
5-Wheel Speed Sensor.
11. REMOVAL OF LATERAL ROD MOUNTING BOLT
(1) Remove the lateral rod mounting bolt.
(2) Secure and hold the lateral rod to the axle beam with
wire, etc.
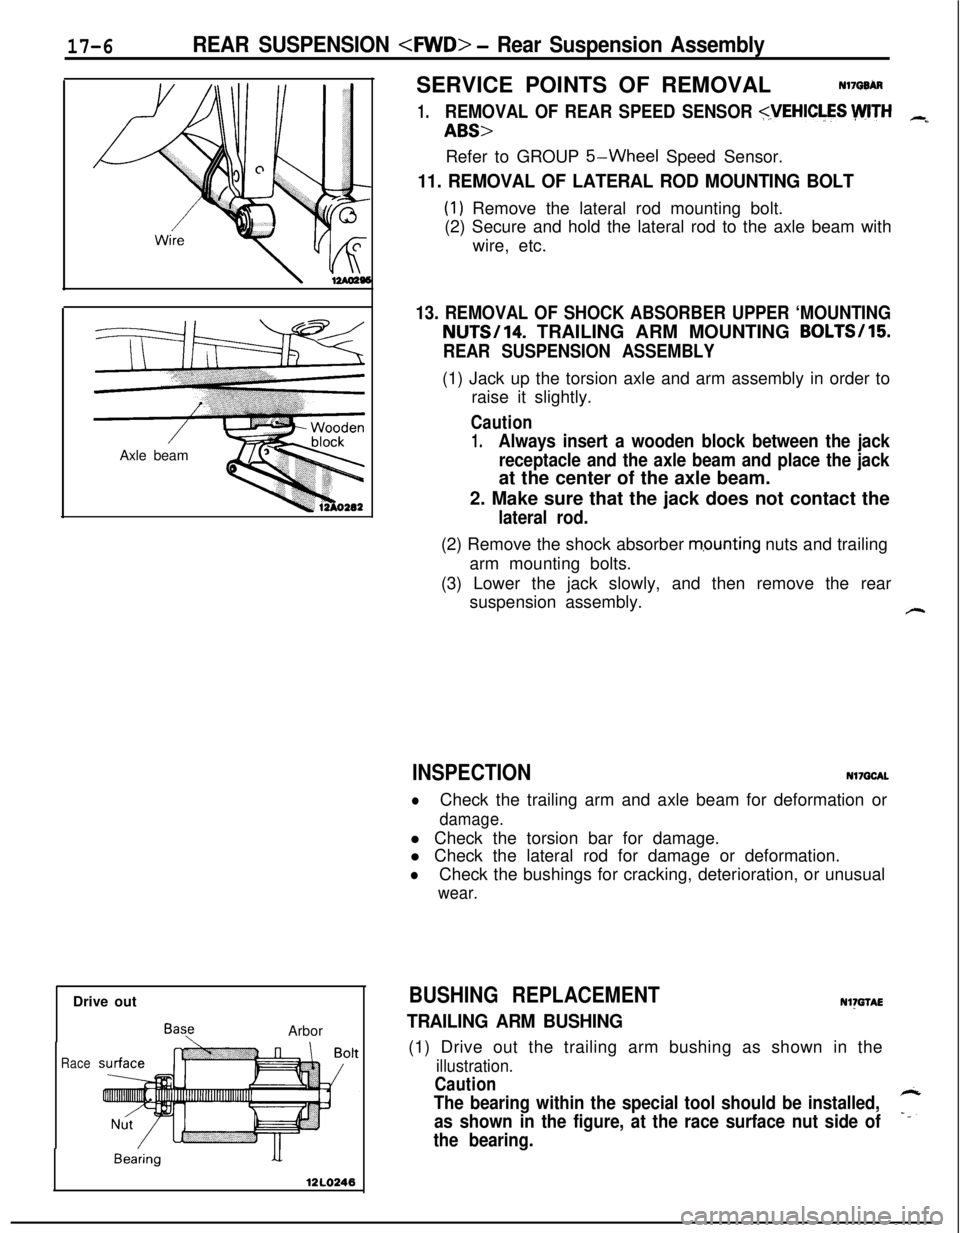
13. REMOVAL OF SHOCK ABSORBER UPPER ‘MOUNTINGNUTS/14. TRAILING ARM MOUNTING BOLTS/15
REAR SUSPENSION ASSEMBLY(1) Jack up the torsion axle and arm assembly in order to
raise it slightly.
Caution
1.Always insert a wooden block between the jack
receptacle and the axle beam and place the jackat the center of the axle beam.
2. Make sure that the jack does not contact the
lateral rod.(2) Remove the shock absorber
m,ounting nuts and trailing
arm mounting bolts.
(3) Lower the jack slowly, and then remove the rear
suspension assembly.
#-
INSPECTIONNl7QCAL
lCheck the trailing arm and axle beam for deformation or
damage.l Check the torsion bar for damage.
l Check the lateral rod for damage or deformation.
lCheck the bushings for cracking, deterioration, or unusual
wear.
BUSHING REPLACEMENTNl)GTAE
TRAILING ARM BUSHING(1) Drive out the trailing arm bushing as shown in the
illustration.
Caution
The bearing within the special tool should be installed,
as shown in the figure, at the race surface nut side of7
the bearing.
Page 618 of 1216
17-8REAR SUSPENSION
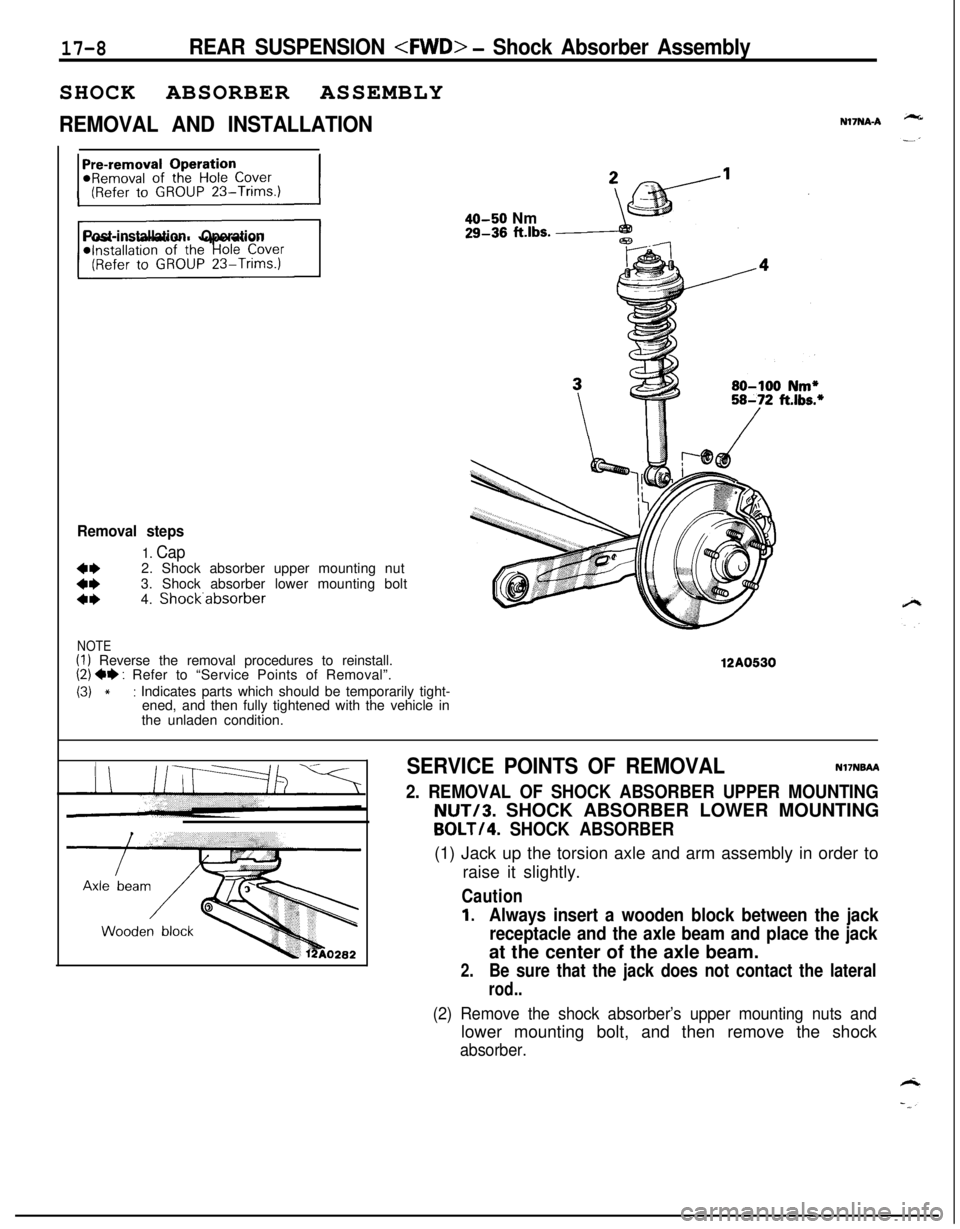
REMOVAL AND INSTALLATIONN17NA-A
Post-installation Operation
Removal steps
1. Cap
::2. Shock absorber upper mounting nut
3. Shock absorber lower mounting bolta*4. Shock.absorber
NOTE(I) Reverse the removal procedures to reinstall.(2) ** : Refer to “Service Points of Removal”.
(3) *: Indicates parts which should be temporarily tight-
ened, and then fully tightened with the vehicle in
the unladen condition.
40-50 Nm29-36 ft.lbs.
12A0530
SERVICE POINTS OF REMOVALNI’INBAA
2. REMOVAL OF SHOCK ABSORBER UPPER MOUNTINGNUT/3. SHOCK ABSORBER LOWER MOUNTING
BOLT/4. SHOCK ABSORBER(1) Jack up the torsion axle and arm assembly in order to
raise it slightly.
Caution
1.Always insert a wooden block between the jack
receptacle and the axle beam and place the jackat the center of the axle beam.
2.Be sure that the jack does not contact the lateral
rod..
(2) Remove the shock absorber’s upper mounting nuts andlower mounting bolt, and then remove the shock
absorber.
Page 623 of 1216
REAR SUSPENSION
Inut
-
-Spindle
14AO419
SERVICE POINTS OF REMOVALNliP9AG
1.REMOVAL OF REAR SPEED SENSOR
5-Wheel Speed Sensor.
4. REMOVAL OF CALIPER ASSEMBLYRemove the caliper assembly and suspend it with a piece
of wire.
9. REMOVAL OF REAR HUB BEARING UNIT
NOTERear hub bearing unit cannot be disassemble.
12. REMOVAL OF SHOCK ABSORBER LOWER MOUNTING
BOLT/lB. TRAILING ARM MOUNTING BOLT/ 14.
TORSION AXLE AND ARM ASSEMBLY
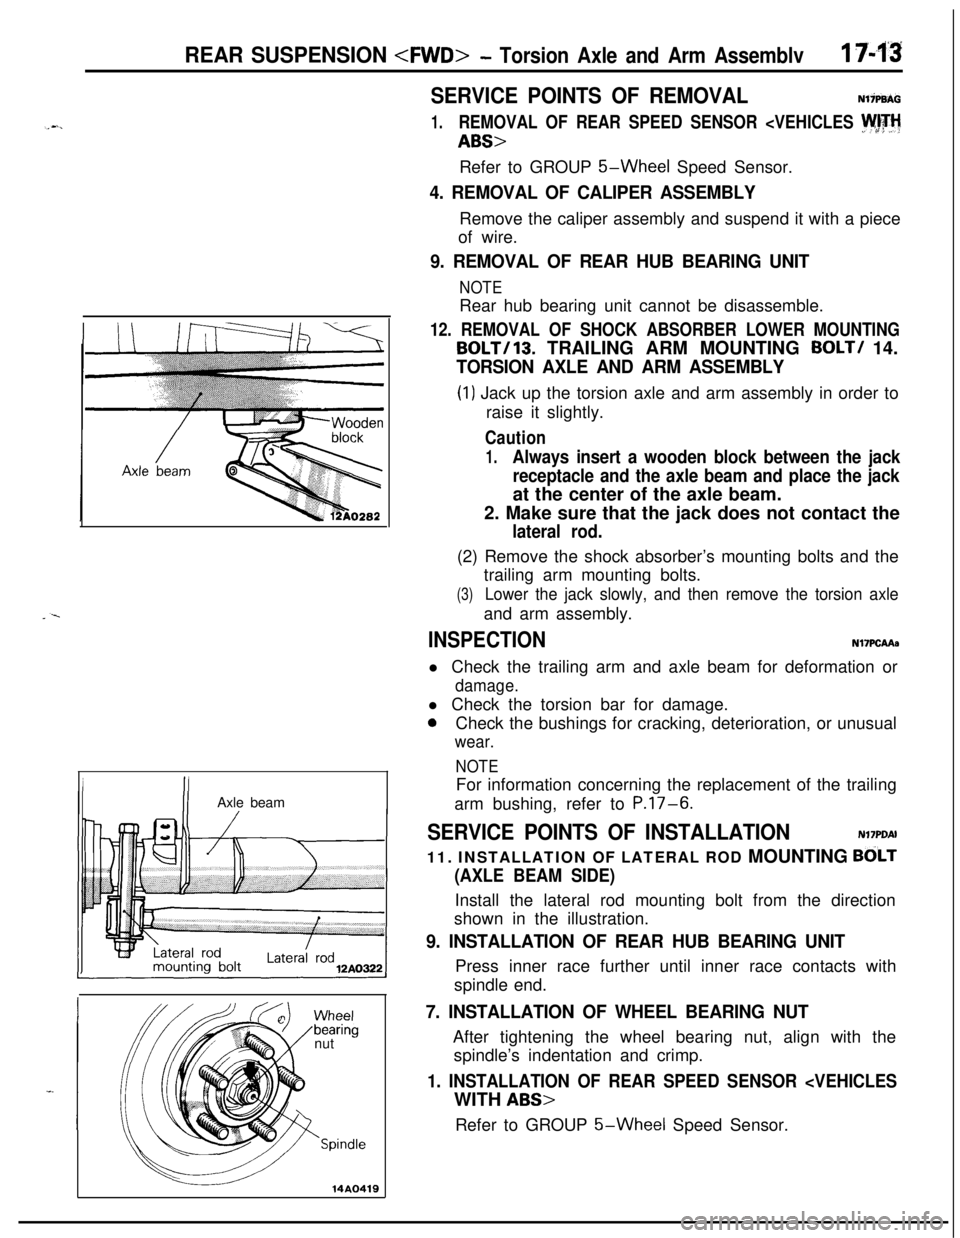
(1) Jack up the torsion axle and arm assembly in order to
raise it slightly.
Caution
1.Always insert a wooden block between the jack
receptacle and the axle beam and place the jackat the center of the axle beam.
2. Make sure that the jack does not contact the
lateral rod.(2) Remove the shock absorber’s mounting bolts and the
trailing arm mounting bolts.
(3)Lower the jack slowly, and then remove the torsion axleand arm assembly.
INSPECTIONN17PCAAa
l Check the trailing arm and axle beam for deformation or
damage.l Check the torsion bar for damage.
0Check the bushings for cracking, deterioration, or unusual
wear.
NOTEFor information concerning the replacement of the trailing
arm bushing, refer to
P.17-6.
SERVICE POINTS OF INSTALLATIONN17PDAI
11. INSTALLATION OF LATERAL ROD MOUNTING
BdLT
(AXLE BEAM SIDE)Install the lateral rod mounting bolt from the direction
shown in the illustration.
9. INSTALLATION OF REAR HUB BEARING UNITPress inner race further until inner race contacts with
spindle end.
7. INSTALLATION OF WHEEL BEARING NUTAfter tightening the wheel bearing nut, align with the
spindle’s indentation and crimp.
1. INSTALLATION OF REAR SPEED SENSOR
5-Wheel Speed Sensor.
Page 632 of 1216
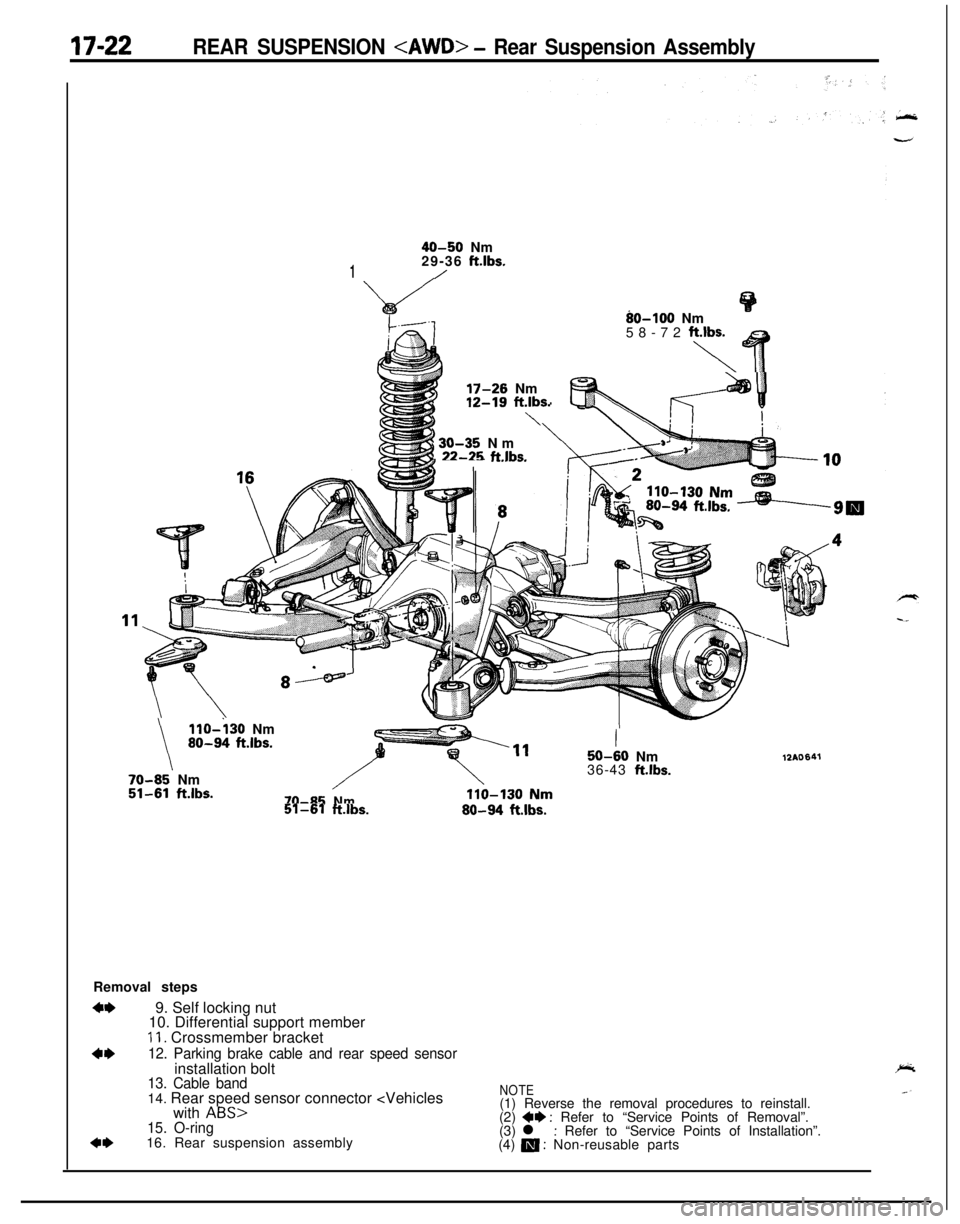
17-22REAR SUSPENSION
40-50 Nm
129-36 ft.lbs./
80-100 Nm
58-72 fiq T
i) 30-35 Nm,22-25 ftlbs.-- -- .-._--.I
17-26 Nm
t
12-19 ft.lbs.\
\
llO-i30 Nm80-94 ft.lbs.
70-85’ Nm51-61ftlbs.
I50-60Nm
36-43 ft.lbs.
70-85Nm51-61ft.lbs.80-94ftlbs.
12AO641Removal steps
+*9. Self locking nut
10. Differential support member
11. Crossmember bracket
4*12. Parking brake cable and rear speed sensorinstallation bolt
13. Cable band
4*14. Rear speed sensor connector
ABS15. O-ring16. Rear suspension assembly
NOTE(1) Reverse the removal procedures to reinstall.
(2)
+e : Refer to “Service Points of Removal”.
(3) l : Refer to “Service Points of Installation”.
(4) a : Non-reusable parts
Page 633 of 1216
REAR SUSPENSION
14AO520
12AOlOQ
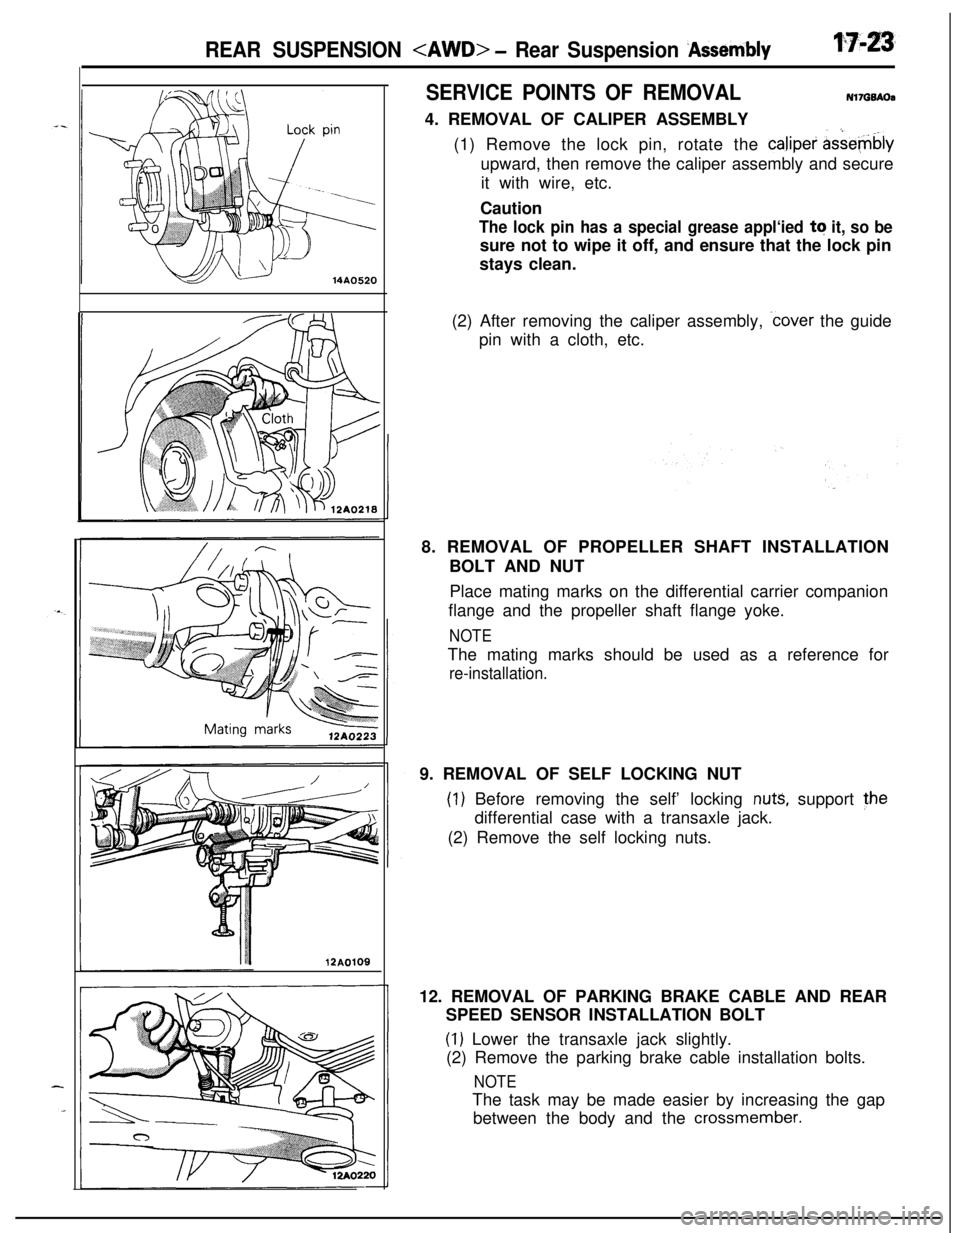
SERVICE POINTS OF REMOVALN17GQAOa4. REMOVAL OF CALIPER ASSEMBLY
(1) Remove the lock pin, rotate the calipei
&&e-@blyupward, then remove the caliper assembly and secure
it with wire, etc.
Caution
The lock pin has a special grease appl‘ied tq it, so besure not to wipe it off, and ensure that the lock pin
stays clean.
(2) After removing the caliper assembly,
.cover the guide
pin with a cloth, etc.
8. REMOVAL OF PROPELLER SHAFT INSTALLATION
BOLT AND NUT
Place mating marks on the differential carrier companion
flange and the propeller shaft flange yoke.
NOTEThe mating marks should be used as a reference for
re-installation.9. REMOVAL OF SELF LOCKING NUT
(1) Before removing the self’ locking nuts, support the
differential case with a transaxle jack.
(2) Remove the self locking nuts.
12. REMOVAL OF PARKING BRAKE CABLE AND REAR
SPEED SENSOR INSTALLATION BOLT
(1) Lower the transaxle jack slightly.
(2) Remove the parking brake cable installation bolts.
NOTEThe task may be made easier by increasing the gap
between the body and the
crossmember.
Page 634 of 1216
17-24REAR SUSPENSION
1
II
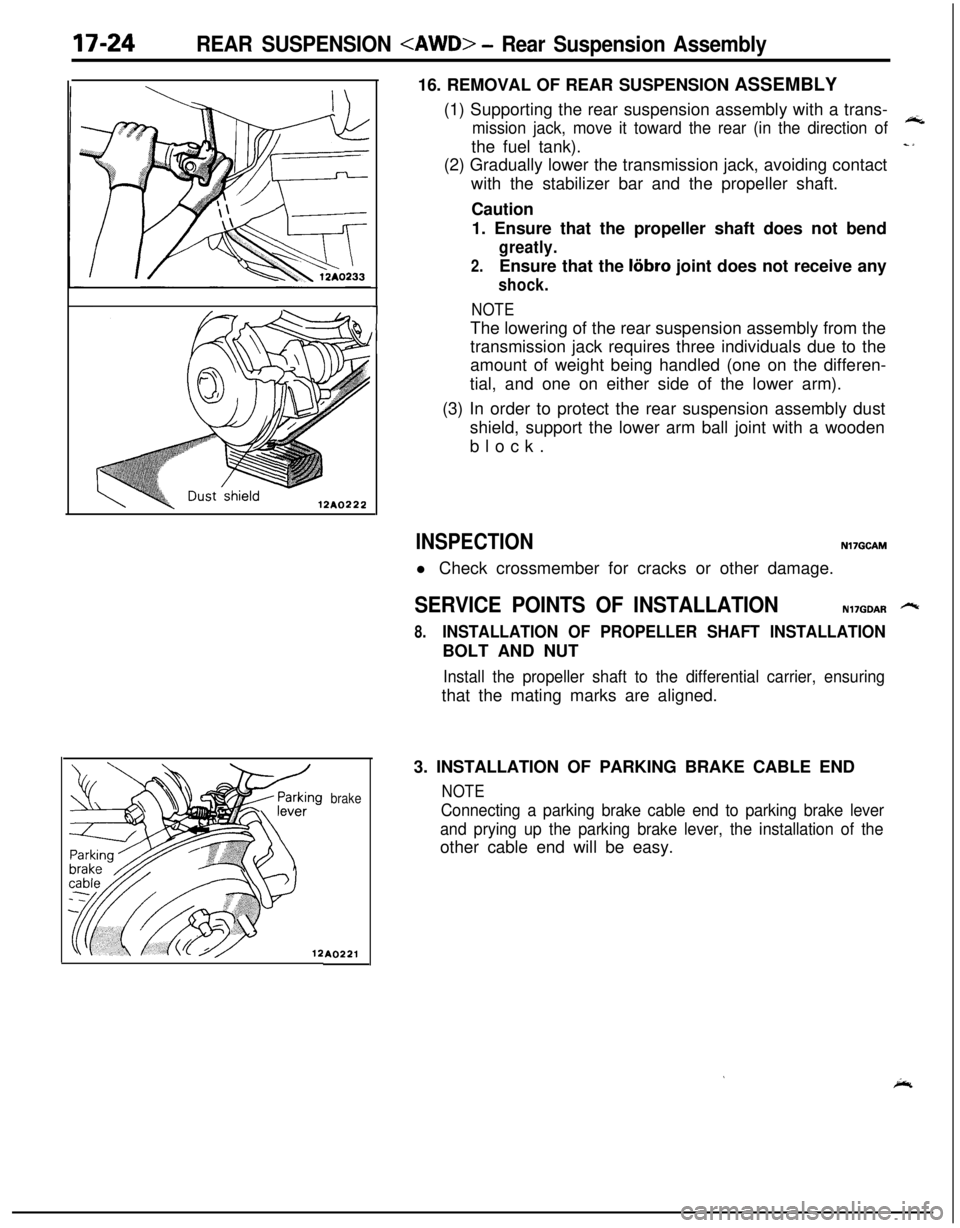
brakeA022116. REMOVAL OF REAR SUSPENSION ASSEMBLY
(1) Supporting the rear suspension assembly with a trans-
mission jack, move it toward the rear (in the direction of
wtthe fuel tank).
c1(2) Gradually lower the transmission jack, avoiding contact
with the stabilizer bar and the propeller shaft.
Caution
1. Ensure that the propeller shaft does not bend
greatly.
2.Ensure that the liibro joint does not receive any
shock.
NOTEThe lowering of the rear suspension assembly from the
transmission jack requires three individuals due to the
amount of weight being handled (one on the differen-
tial, and one on either side of the lower arm).
(3) In order to protect the rear suspension assembly dust
shield, support the lower arm ball joint with a wooden
block.
INSPECTIONNl7GCAMl Check crossmember for cracks or other damage.
SERVICE POINTS OF INSTALLATIONN17GOAR -
8.INSTALLATION OF PROPELLER SHAFT INSTALLATIONBOLT AND NUT
Install the propeller shaft to the differential carrier, ensuringthat the mating marks are aligned.
3. INSTALLATION OF PARKING BRAKE CABLE END
NOTE
Connecting a parking brake cable end to parking brake lever
and prying up the parking brake lever, the installation of theother cable end will be easy.
’ice,
Page 635 of 1216
REAR SUSPENSION
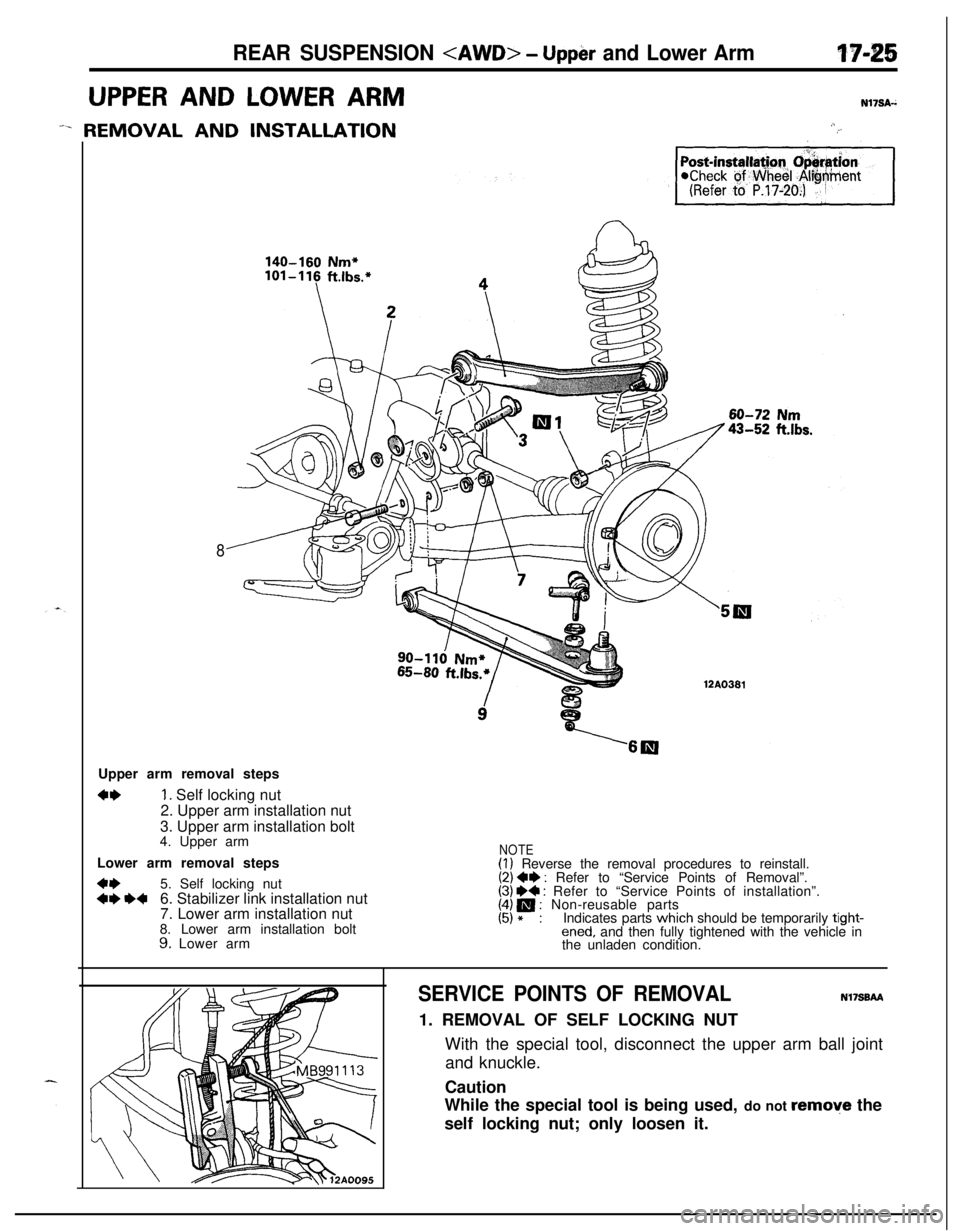
UPPER AND LOWER ARM
-. REMOVAL AND INSTALLATION
140-160 Nm+/cc?!4
,.1;’
Post-installa~o~ O&N tion-1
8
a12A0381Upper arm removal steps
4+1. Self locking nut
2. Upper arm installation nut
3. Upper arm installation bolt
4. Upper arm
Lower arm removal steps
4*5. Self locking nut+I) H6. Stabilizer link installation nut
7. Lower arm installation nut
8. Lower arm installation bolt
9. Lower arm
NOTE(I) Reverse the removal procedures to reinstall.(2) ++ : Refer to “Service Points of Removal”.(3) e+ : Refer to “Service Points of installation”.[;I p i Non-reusable parts
Indicates parts which should be temporarily tight-
ened, and then fully tightened with the vehicle in
the unladen condition.
SERVICE POINTS OF REMOVALNl7S0AA1. REMOVAL OF SELF LOCKING NUT
With the special tool, disconnect the upper arm ball joint
and knuckle.
Caution
While the special tool is being used, do not remove the
self locking nut; only loosen it.
Page 636 of 1216
17-26REAR SUSPENSION
I12A0090
wrench12A0099
, MB990800Dust cover
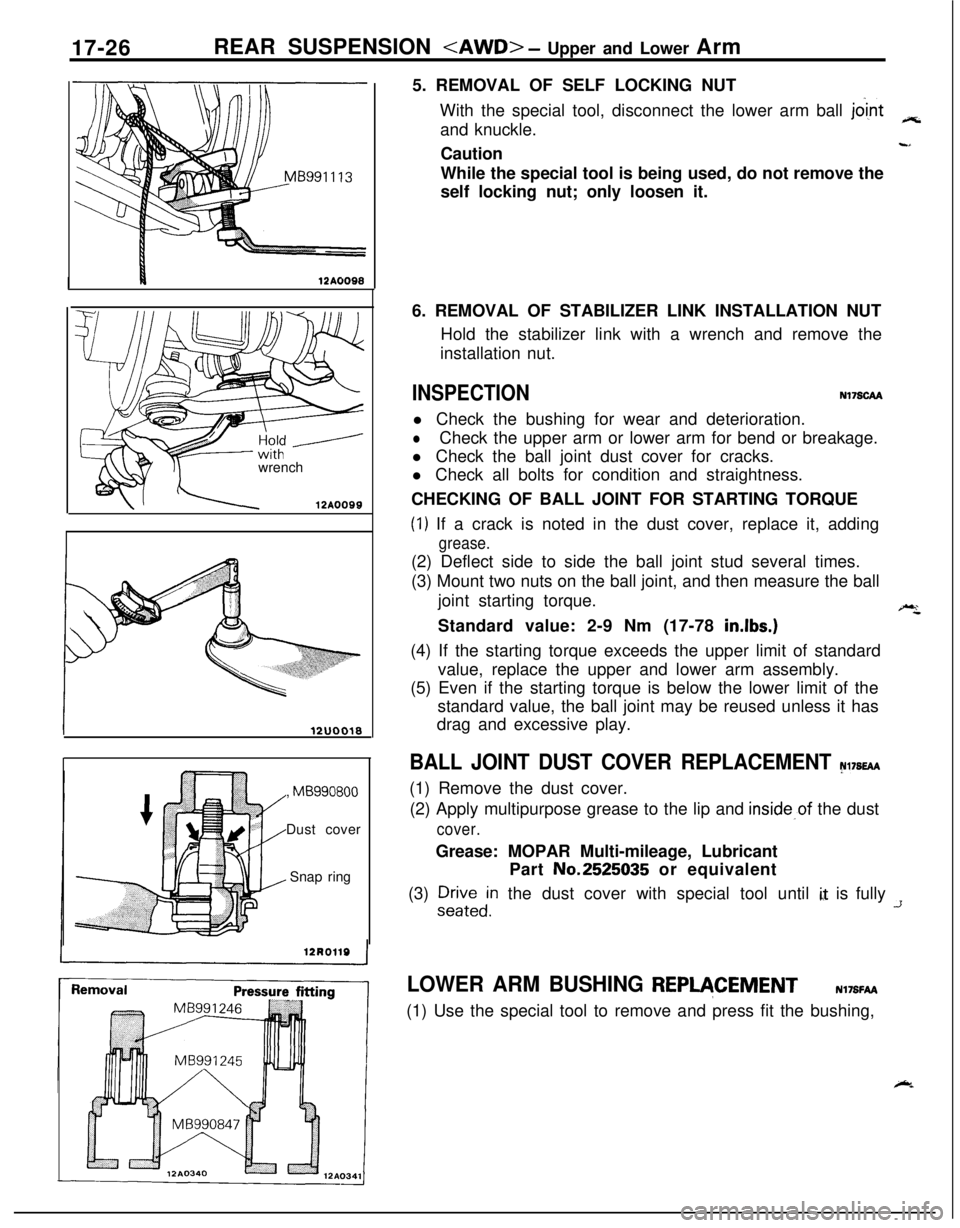
Snap ring5. REMOVAL OF SELF LOCKING NUT
With the special tool, disconnect the lower arm ball
jo’intand knuckle.3cCaution
wtWhile the special tool is being used, do not remove the
self locking nut; only loosen it.
6. REMOVAL OF STABILIZER LINK INSTALLATION NUT
Hold the stabilizer link with a wrench and remove the
installation nut.
INSPECTIONN17SCAAl Check the bushing for wear and deterioration.
lCheck the upper arm or lower arm for bend or breakage.
l Check the ball joint dust cover for cracks.
l Check all bolts for condition and straightness.
CHECKING OF BALL JOINT FOR STARTING TORQUE
(1) If a crack is noted in the dust cover, replace it, adding
grease.(2) Deflect side to side the ball joint stud several times.
(3) Mount two nuts on the ball joint, and then measure the ball
joint starting torque.
“,Standard value: 2-9 Nm (17-78
in.lbs.)(4) If the starting torque exceeds the upper limit of standard
value, replace the upper and lower arm assembly.
(5) Even if the starting torque is below the lower limit of the
standard value, the ball joint may be reused unless it has
drag and excessive play.
BALL JOINT DUST COVER REPLACEMENT N17s~(1) Remove the dust cover.
(2) Apply multipurpose grease to the lip and
inside,of the dust
cover.Grease: MOPAR Multi-mileage, Lubricant
Part No.2525035 or equivalent
(3)
:;Fedin the dust cover with special tool until i,, is fully -T
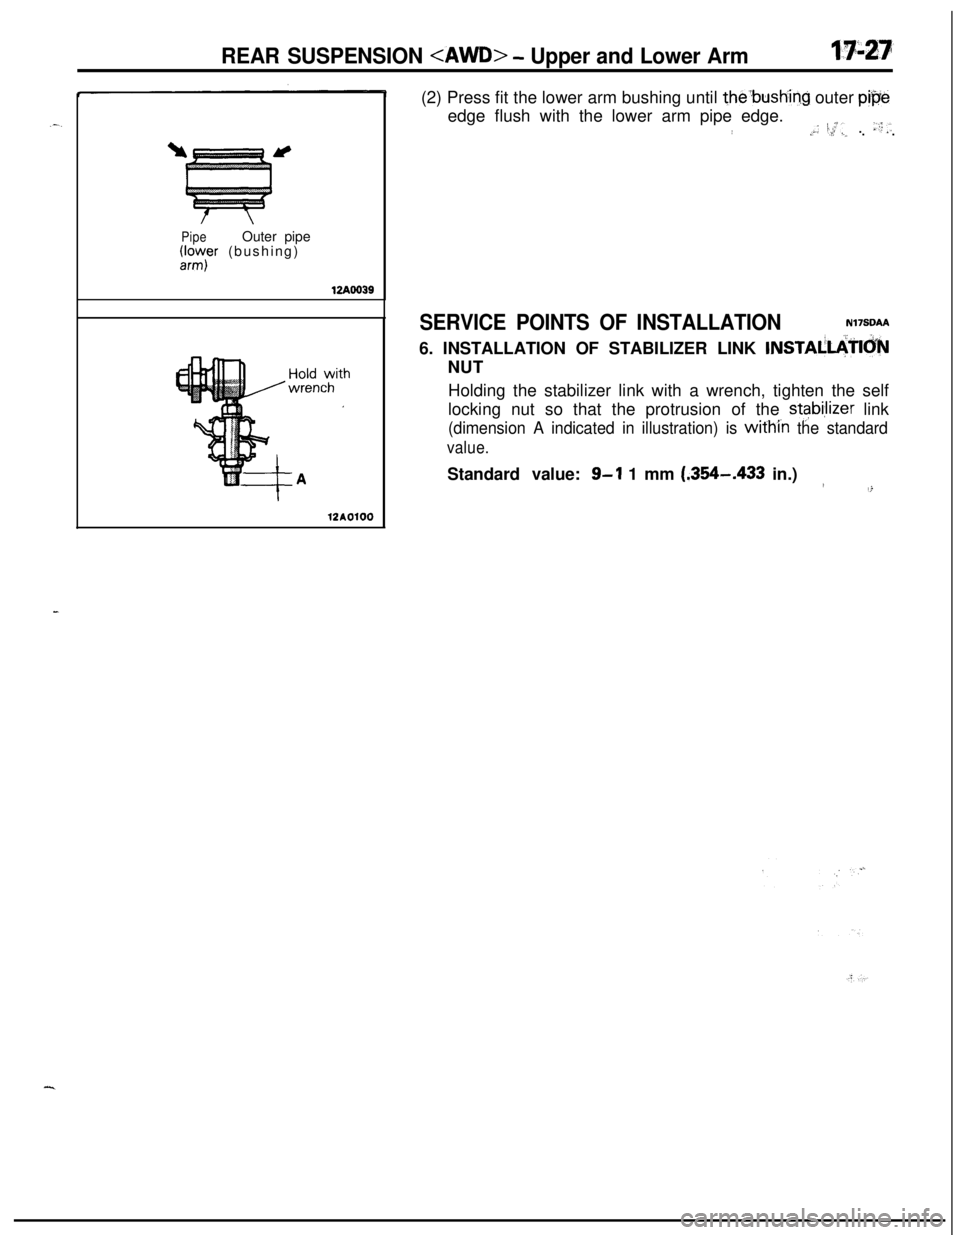
LOWER ARM BUSHING REPVCEMENTN17SFAA(1) Use the special tool to remove and press fit the bushing,
k
Page 637 of 1216
REAR SUSPENSION
PipeOuter pipe(II;;’ (bushing)
12AOo39
12AOlOO(2) Press fit the lower arm bushing until
the:bushing outer p&e
edge flush with the lower arm pipe edge.
i,,_: I;.:., . “-:,,. .
SERVICE POINTS OF INSTALLATIONN17SDAA6. INSTALLATION OF STABILIZER LINK
INSTAl!L&?hNUT
Holding the stabilizer link with a wrench, tighten the self
locking nut so that the protrusion of the
stabilizer link
(dimension A indicated in illustration) is within the standard
value.Standard value:
9-l 1 mm (.364-43 in.)/8.4