auto stop MITSUBISHI ECLIPSE CROSS 2018 (in English) User Guide
[x] Cancel search | Manufacturer: MITSUBISHI, Model Year: 2018, Model line: ECLIPSE CROSS, Model: MITSUBISHI ECLIPSE CROSS 2018Pages: 417, PDF Size: 74.06 MB
Page 123 of 417
Power panoramic sunroof (if so equipped) 5-44 Features and controls
5
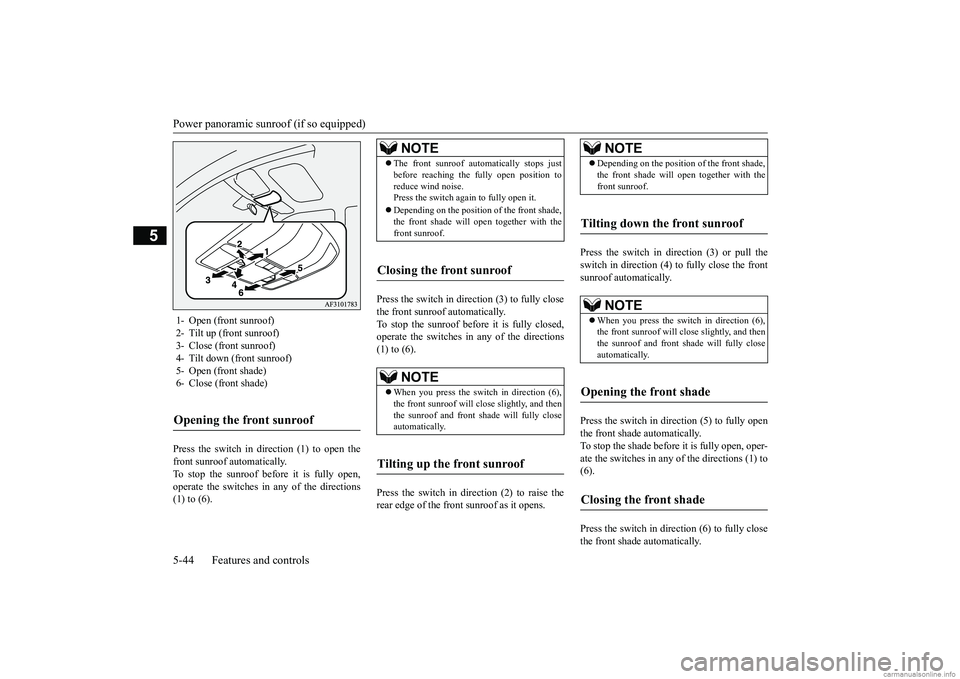
Press the switch in direction (1) to open the front sunroof automatically. To stop the sunroof before it is fully open, operate the switches in any of the directions(1) to (6).
Press the switch in direction (3) to fully close the front sunroof automatically. To stop the sunroof before it is fully closed, operate the switches in any of the directions(1) to (6). Press the switch in direction (2) to raise the rear edge of the front sunroof as it opens.
Press the switch in direction (3) or pull the switch in direction (4) to fully close the frontsunroof automatically. Press the switch in direction (5) to fully open the front shade automatically. To stop the shade before it is fully open, oper- ate the switches in any of the directions (1) to(6). Press the switch in direction (6) to fully close the front shade automatically.
1- Open (front sunroof) 2- Tilt up (front sunroof) 3- Close (front sunroof) 4- Tilt down (front sunroof)5- Open (front shade) 6- Close (front shade)Opening the front sunroof
NOTE
The front sunroof automatically stops just before reaching the fully open position to reduce wind noise. Press the switch again to fully open it. Depending on the position of the front shade, the front shade will open together with the front sunroof.
Closing the front sunroof
NOTE
When you press the switch in direction (6), the front sunroof will close slightly, and then the sunroof and front shade will fully close automatically.
Tilting up the front sunroof
NOTE
Depending on the position of the front shade, the front shade will open together with the front sunroof.
Tilting down the front sunroof
NOTE
When you press the switch in direction (6), the front sunroof will close slightly, and then the sunroof and front shade will fully close automatically.
Opening the front shade
Closing the front shade
BK0252700US.bo
ok 44 ページ 2017年10月4日 水曜日 午後4時54分
Page 125 of 417
Parking brake 5-46 Features and controls
5
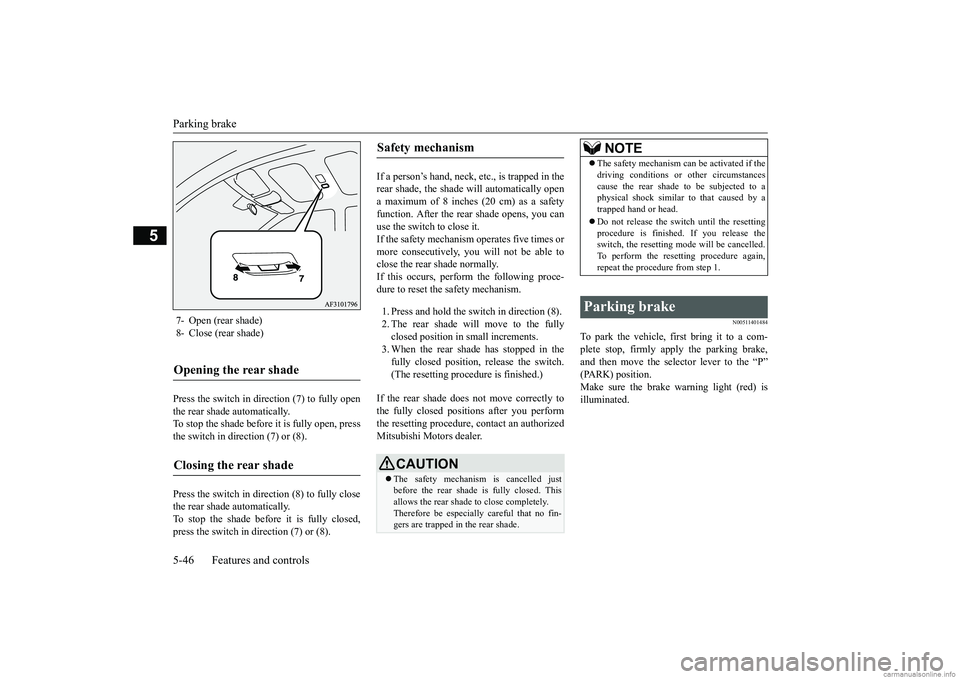
Press the switch in direction (7) to fully open the rear shade automatically.To stop the shade before
it is fully open, press
the switch in direction (7) or (8). Press the switch in direction (8) to fully close the rear shade automatically. To stop the shade before it is fully closed,press the switch in direction (7) or (8).
If a person’s hand, neck, etc., is trapped in the rear shade, the shade will automatically opena maximum of 8 inches (20 cm) as a safety function. After the rear shade opens, you can use the switch to close it.If the safety mechanism operates five times or more consecutively, you will not be able to close the rear shade normally.If this occurs, perform the following proce-dure to reset the safety mechanism. 1. Press and hold the switch in direction (8). 2. The rear shade will move to the fully closed position in small increments.3. When the rear shade has stopped in the fully closed position, release the switch. (The resetting procedure is finished.)
If the rear shade does not move correctly to the fully closed positions after you perform the resetting procedure, contact an authorized Mitsubishi Motors dealer.
N00511401484
To park the vehicle, first bring it to a com-plete stop, firmly apply the parking brake, and then move the selector lever to the “P” (PARK) position.Make sure the brake warning light (red) is illuminated.
7- Open (rear shade) 8- Close (rear shade)Opening the rear shade
Closing the rear shade
Safety mechanism
CAUTION The safety mechanism is cancelled just before the rear shade is fully closed. Thisallows the rear shade to close completely. Therefore be especially careful that no fin- gers are trapped in the rear shade.
NOTE
The safety mechanism can be activated if the driving conditions or other circumstances cause the rear shade to be subjected to a physical shock similar to that caused by a trapped hand or head. Do not release the switch until the resetting procedure is finished. If you release theswitch, the resetting mode will be cancelled. To perform the resetting procedure again, repeat the procedure from step 1.
Parking brake
BK0252700US.bo
ok 46 ページ 2017年10月4日 水曜日 午後4時54分
Page 128 of 417
Parking brake
Features and controls 5-49
5
When the accelerator pedal is depressed slowly while all of the following conditionsare met, the Electric parking brake is auto- matically released. The engine is running. The selector lever is in the “D” (DRIVE) or the “R” (REVERSE) position. The driver’s seat belt is fastened.
When the Electric parking brake is released, the brake warning light (red) and the indicator light on the Electric parking brake switch go off. Before driving, be sure that the parking brake is released and brake warning light is off.
When the ignition switch or the operation mode is other than ON, if the parking brake is applied, the Electric parking brake indica- tor light comes on for a while. If the Electric parking brake switch is repeat- edly operated in a short time, the following warning display will appear in the multi-information display and the Electric parking brake will temporarily stop working. In such case, wait for approximately 1 minute untilthe warning display disappears, and operate the Electric parking brake switch again. The brake warning light (red) and the indica- tor light on the Electric parking brake switch may blink. This does not indicate a malfunc- tion, the lights go off when/if the Electricparking brake is released. Depending on the situation, the Electric parking brake may be applied automatically. Refer to “Brake auto hold” on page 5-74.NOTE
To release
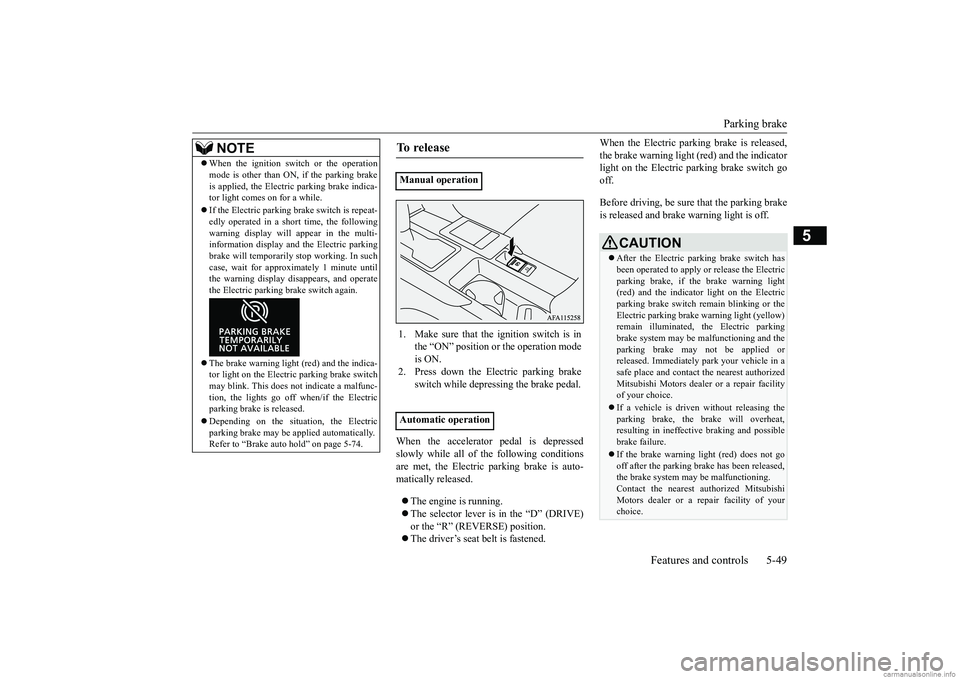
Manual operation 1. Make sure that the ignition switch is in
the “ON” position or the operation mode is ON.
2. Press down the Electric parking brake
switch while depressing the brake pedal.
Automatic operation
CAUTION After the Electric parking brake switch has been operated to apply or release the Electric parking brake, if the brake warning light(red) and the indicator light on the Electric parking brake switch remain blinking or the Electric parking brake warning light (yellow)remain illuminated, the Electric parking brake system may be malfunctioning and the parking brake may not be applied orreleased. Immediately park your vehicle in a safe place and contact the nearest authorized Mitsubishi Motors dealer or a repair facilityof your choice. If a vehicle is driven without releasing the parking brake, the brake will overheat, resulting in ineffective braking and possible brake failure. If the brake warning light (red) does not go off after the parking brake has been released, the brake system may be malfunctioning. Contact the nearest authorized MitsubishiMotors dealer or a repair facility of your choice.
BK0252700US.bo
ok 49 ページ 2017年10月4日 水曜日 午後4時54分
Page 129 of 417
Steering wheel height and reach adjustment 5-50 Features and controls
5
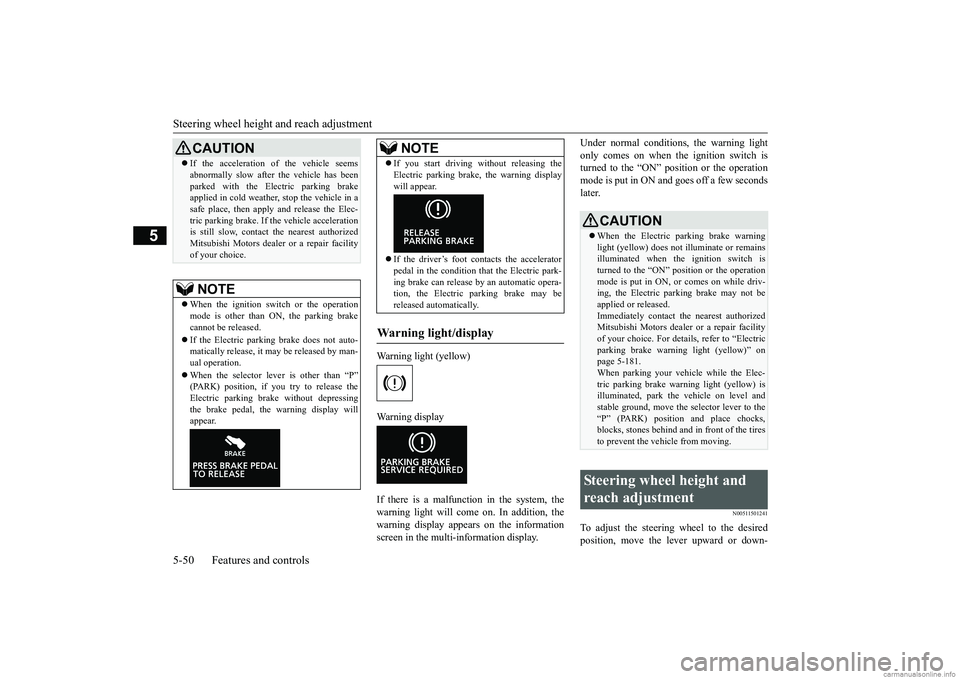
Warning light (yellow) Warning display If there is a malfunction in the system, the warning light will come on. In addition, thewarning display appears on the informationscreen in the multi-information display.
Under normal conditions, the warning light only comes on when the ignition switch is turned to the “ON” position or the operation mode is put in ON and goes off a few secondslater.
N00511501241
To adjust the steering wheel to the desiredposition, move the lever upward or down-
If the acceleration of the vehicle seems abnormally slow after the vehicle has been parked with the Electric parking brake applied in cold weather, stop the vehicle in a safe place, then apply and release the Elec-tric parking brake. If the vehicle acceleration is still slow, contact the nearest authorized Mitsubishi Motors dealer or a repair facilityof your choice.NOTE
When the ignition switch or the operation mode is other than ON, the parking brake cannot be released. If the Electric parking brake does not auto- matically release, it may be released by man-ual operation. When the selector lever is other than “P” (PARK) position, if you try to release the Electric parking brake without depressing the brake pedal, the warning display willappear.CAUTION
If you start driving without releasing the Electric parking brake, the warning display will appear. If the driver’s foot contacts the accelerator pedal in the condition that the Electric park-ing brake can release by an automatic opera- tion, the Electric parking brake may be released automatically.
Warning light/display
NOTE
CAUTION When the Electric parking brake warning light (yellow) does not illuminate or remains illuminated when the ignition switch isturned to the “ON” position or the operation mode is put in ON, or comes on while driv- ing, the Electric parking brake may not beapplied or released. Immediately contact the nearest authorized Mitsubishi Motors dealer or a repair facilityof your choice. For details, refer to “Electric parking brake warning light (yellow)” on page 5-181.When parking your vehicle while the Elec- tric parking brake warning light (yellow) is illuminated, park the vehicle on level andstable ground, move the selector lever to the “P” (PARK) position and place chocks, blocks, stones behind and in front of the tiresto prevent the vehicle from moving.
Steering wheel height and reach adjustment
BK0252700US.bo
ok 50 ページ 2017年10月4日 水曜日 午後4時54分
Page 132 of 417
Outside rearview mirrors
Features and controls 5-53
5
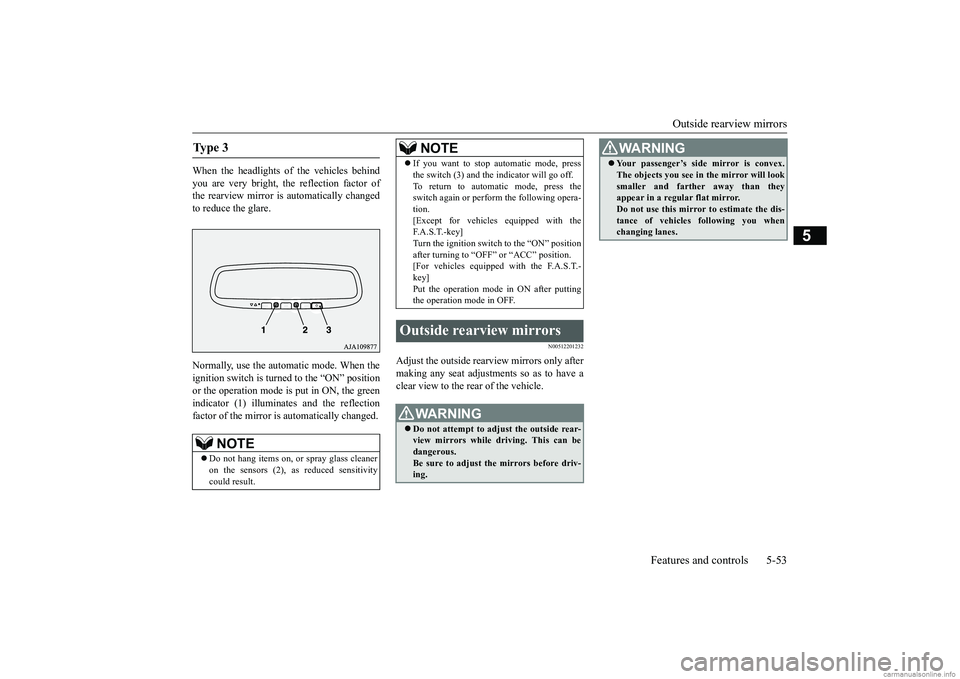
When the headlights of the vehicles behind you are very bright, the reflection factor of the rearview mirror is automatically changedto reduce the glare. Normally, use the automatic mode. When the ignition switch is turned to the “ON” position or the operation mode is put in ON, the greenindicator (1) illuminates and the reflectionfactor of the mirror is automatically changed.
N00512201232
Adjust the outside rearview mirrors only aftermaking any seat adjustments so as to have a clear view to the rear of the vehicle.
Ty p e 3
NOTE
Do not hang items on, or spray glass cleaner on the sensors (2), as reduced sensitivity could result.
If you want to stop automatic mode, press the switch (3) and the indicator will go off. To return to automatic mode, press the switch again or perform the following opera- tion.[Except for vehicles equipped with the F. A . S . T. - k e y ] Turn the ignition switch to the “ON” positionafter turning to “OFF” or “ACC” position. [For vehicles equipped with the F.A.S.T.- key]Put the operation mode in ON after putting the operation mode in OFF.
Outside rearview mirrors
WA R N I N G Do not attempt to adjust the outside rear- view mirrors while driving. This can be dangerous. Be sure to adjust the mirrors before driv-ing.NOTE
Your passenger’s side mirror is convex. The objects you see in the mirror will look smaller and farther away than they appear in a regular flat mirror. Do not use this mirror to estimate the dis-tance of vehicles following you when changing lanes.WA R N I N G
BK0252700US.bo
ok 53 ページ 2017年10月4日 水曜日 午後4時54分
Page 137 of 417
Starting the engine 5-58 Features and controls
5
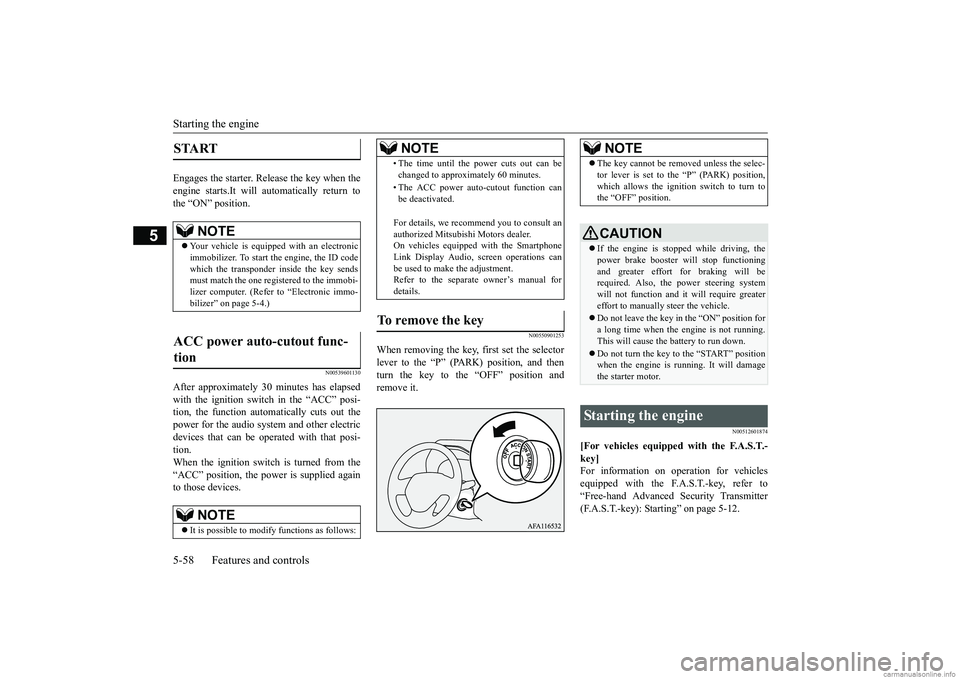
Engages the starter. Release the key when the engine starts.It will automatically return tothe “ON” position.
N00539601130
After approximately 30 minutes has elapsed with the ignition switch in the “ACC” posi- tion, the function automatically cuts out thepower for the audio system and other electric devices that can be operated with that posi- tion.When the ignition switch is turned from the “ACC” position, the power is supplied again to those devices.
N00550901253
When removing the key, first set the selectorlever to the “P” (PARK) position, and thenturn the key to the “OFF” position and remove it.
N00512601874
[For vehicles equipped with the F.A.S.T.- key]For information on operation for vehicles equipped with the F.A.S.T.-key, refer to “Free-hand Advanced Security Transmitter(F.A.S.T.-key): Starting” on page 5-12.
START
NOTE
Your vehicle is equipped with an electronic immobilizer. To start the engine, the ID code which the transponder inside the key sendsmust match the one registered to the immobi- lizer computer. (Refer to “Electronic immo- bilizer” on page 5-4.)
ACC power auto-cutout func- tion
NOTE
It is possible to modify functions as follows:
• The time until the power cuts out can be changed to approximately 60 minutes. • The ACC power auto-cutout function can be deactivated. For details, we recommend you to consult an authorized Mitsubishi Motors dealer. On vehicles equipped with the Smartphone Link Display Audio, screen operations canbe used to make the adjustment. Refer to the separate owner’s manual for details.
To remove the key
NOTE
NOTE
The key cannot be removed unless the selec- tor lever is set to the “P” (PARK) position, which allows the ignition switch to turn to the “OFF” position.CAUTION If the engine is stopped while driving, the power brake booster will stop functioning and greater effort for braking will be required. Also, the power steering systemwill not function and it will require greater effort to manually steer the vehicle. Do not leave the key in the “ON” position for a long time when the engine is not running. This will cause the battery to run down. Do not turn the key to the “START” position when the engine is running. It will damagethe starter motor.
Starting the engine
BK0252700US.bo
ok 58 ページ 2017年10月4日 水曜日 午後4時54分
Page 139 of 417
Turbocharger operation 5-60 Features and controls
5
2. While depressing the brake pedal, press the accelerator pedal halfway and hold it there, then crank the engine. Release the accelerator pedal, immediately after theengine starts. 3. If the engine still will not start, the engine could be flooded with too much gasoline.While depressing the brake pedal, push the accelerator pedal all the way down and hold it there, then crank the engine for5 to 6 seconds. Return the ignition switchto the “OFF” and release the accelerator pedal. Wait a few seconds, and then crank the engine again for 5 to 6 seconds whiledepressing the brake pedal, but do not push the accelerator pedal. Release the ignition switch if the engine starts. If theengine fails to start, repeat these proce- dures. If the engine st
ill will not start, con-
tact your local Mitsubishi Motors dealeror a repair facility of your choice for assistance.
When the ambient temperature is -22 °F (-30 °C) or lower, it may not be possible tostart from a standstill even with the selector
lever in the “D” (DRIVE) or “R” (REVERSE) position. This occurs because the transaxle has not warmed up sufficiently; it does not indicate aproblem. If this occurs, place the selector lever in the “P” (PARK) position and let the engine idle for at least 10 minutes.The transaxle will warm up, and you will be able to start normally. Do not leave the vehicle during warm-upoperation.
N00537301087
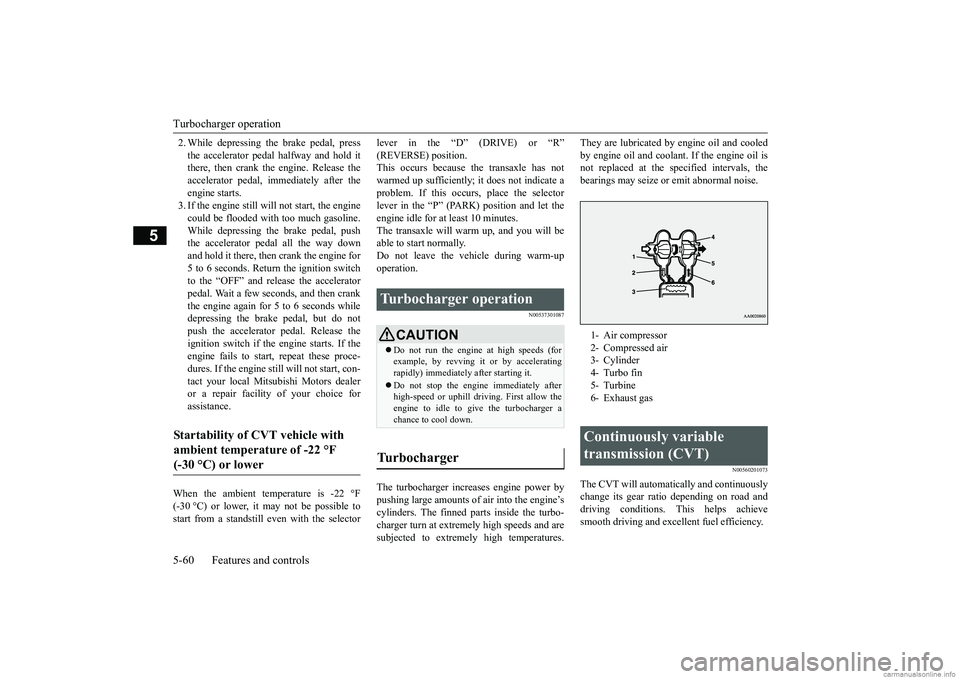
The turbocharger increases engine power bypushing large amounts of air into the engine’s cylinders. The finned parts inside the turbo- charger turn at extremely high speeds and aresubjected to extremely high temperatures.
They are lubricated by
engine oil and cooled
by engine oil and coolan
t. If the engine oil is
not replaced at the specified intervals, the bearings may seize or emit abnormal noise.
N00560201073
The CVT will automati
cally and continuously
change its gear ratio depending on road and driving conditions. This helps achievesmooth driving and excellent fuel efficiency.
Startability of CVT vehicle with ambient temperature of -22 °F (-30 °C) or lower
Turbocharger operation
CAUTION Do not run the engine at high speeds (for example, by revving it or by acceleratingrapidly) immediately after starting it. Do not stop the engine immediately after high-speed or uphill driving. First allow the engine to idle to give the turbocharger a chance to cool down.
Turbocharger
1- Air compressor 2- Compressed air3- Cylinder 4- Turbo fin 5- Turbine6- Exhaust gasContinuously variable transmission (CVT)
BK0252700US.bo
ok 60 ページ 2017年10月4日 水曜日 午後4時54分
Page 143 of 417
Continuously variable transmission (CVT) 5-64 Features and controls
5
N00560601110
This position locks the transmission to pre- vent the vehicle from moving. The engine canbe started in the “P” (PARK) position. Move the lever to this position only after the vehicle has come to a complete stop. At this position, the transmission is disen- gaged. It is the same as the neutral position on a manual transaxle and should be used when the vehicle is not moving for an extendedlength of time during driving, such as in a traffic jam.
This position is used for most city and high- way driving. The transmission will automati- cally and continuously change its gear ratiodepending on road and driving conditions.
CAUTION If a malfunction occurs in the CVT while driving, the warning display or the warning display will appear on the informa- tion screen in the multi-information display. In this case, follow these procedures: [When warning display is showing] The CVT fluid is overheating. The engine control may activate to lower the CVT fluid temperature, causing the engine revolutionsand vehicle speed to decrease, In this case, take one of the following procedures.• Slow down your vehicle.• Stop your vehicle in a safe place, put the selector lever in the “P” (PARK) position, and open the engine hood with the engine running to allow the engine to cool down.After a while, confirm that the warning display is no longer showing. It is safe to continue driving if the display is no longer showing. If the warning display remains orflashes frequently, have your vehicle inspected by an authorized Mitsubishi Motors dealer or a repair facility of your choice. [When warning display is showing] It may be that there is something unusual happening in the CVT, causing a safetydevice to activate. Have your vehicle inspected by an authorized Mitsubishi Motors dealer or a repair facility of yourchoice immediately.
Selector lever positions “P” PARK “R” REVERSE
CAUTION Never shift into the “P” (PARK) or “R” (REVERSE) position while
the vehicle is in
motion. If the lever is shifted into the “P”(PARK) or “R” (REVERSE) position while the vehicle is in motion, the transmission may be damaged.
“N” NEUTRAL
WA R N I N G Never move the selector lever to the “N” (NEUTRAL) position while driving since you could accidentally slip it into the “P” (PARK) or “R” (REVERSE) position, damaging the transmission. To prevent the vehicle from rolling when stopped on a slope, the engine should bestarted in the “P” (PARK) position, not in “N” (NEUTRAL) position. To prevent rolling, always keep your foot on the brake pedal when the vehicle is in “N” (NEUTRAL) position, or when shift-ing into or out of “N” (NEUTRAL) posi- tion.
“D” DRIVE
CAUTION To prevent transmission damage, never shift into the “D” (DRIVE) position from the “R” (REVERSE) position whil
e the vehicle is in
motion.
BK0252700US.bo
ok 64 ページ 2017年10月4日 水曜日 午後4時54分
Page 144 of 417
Continuously variable transmission (CVT)
Features and controls 5-65
5
N00560701108
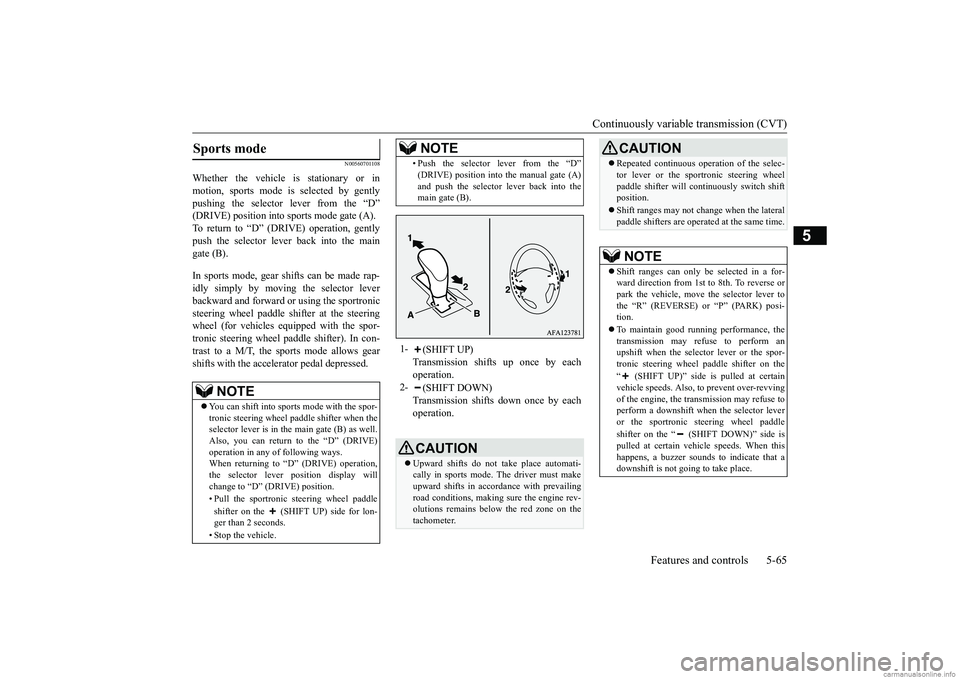
Whether the vehicle is stationary or in motion, sports mode is selected by gentlypushing the selector lever from the “D” (DRIVE) position into sports mode gate (A). To return to “D” (DRIVE) operation, gentlypush the selector lever back into the main gate (B). In sports mode, gear shifts can be made rap- idly simply by moving the selector lever backward and forward or using the sportronicsteering wheel paddle shifter at the steering wheel (for vehicles equipped with the spor- tronic steering wheel paddle shifter). In con-trast to a M/T, the sports mode allows gear shifts with the accelerator pedal depressed.Sports mode
NOTE
You can shift into sports mode with the spor- tronic steering wheel paddle shifter when theselector lever is in the main gate (B) as well. Also, you can return to the “D” (DRIVE) operation in any of following ways. When returning to “D” (DRIVE) operation, the selector lever position display willchange to “D” (DRIVE) position. • Pull the sportronic steering wheel paddle shifter on the (SHIFT UP) side for lon- ger than 2 seconds. • Stop the vehicle.
• Push the selector lever from the “D” (DRIVE) position into the manual gate (A) and push the selector lever back into the main gate (B).
1-
(SHIFT UP) Transmission shifts up once by eachoperation.
2-
(SHIFT DOWN) Transmission shifts down once by eachoperation.CAUTION Upward shifts do not take place automati- cally in sports mode. The driver must make upward shifts in accordance with prevailing road conditions, making sure the engine rev-olutions remains below the red zone on the tachometer.NOTE
Repeated continuous operation of the selec- tor lever or the sportronic steering wheel paddle shifter will continuously switch shift position. Shift ranges may not change when the lateral paddle shifters are operated at the same time.NOTE
Shift ranges can only be selected in a for- ward direction from 1st to 8th. To reverse orpark the vehicle, move the selector lever to the “R” (REVERSE) or “P” (PARK) posi- tion. To maintain good running performance, the transmission may refuse to perform anupshift when the selector lever or the spor- tronic steering wheel paddle shifter on the “ (SHIFT UP)” side is pulled at certain vehicle speeds. Also, to prevent over-revving of the engine, the transmission may refuse toperform a downshift when the selector lever or the sportronic steering wheel paddle shifter on the “ (SHIFT DOWN)” side is pulled at certain vehicle speeds. When this happens, a buzzer sounds to indicate that adownshift is not going to take place.CAUTION
BK0252700US.bo
ok 65 ページ 2017年10月4日 水曜日 午後4時54分
Page 145 of 417
Continuously variable transmission (CVT) 5-66 Features and controls
5
N00560901083
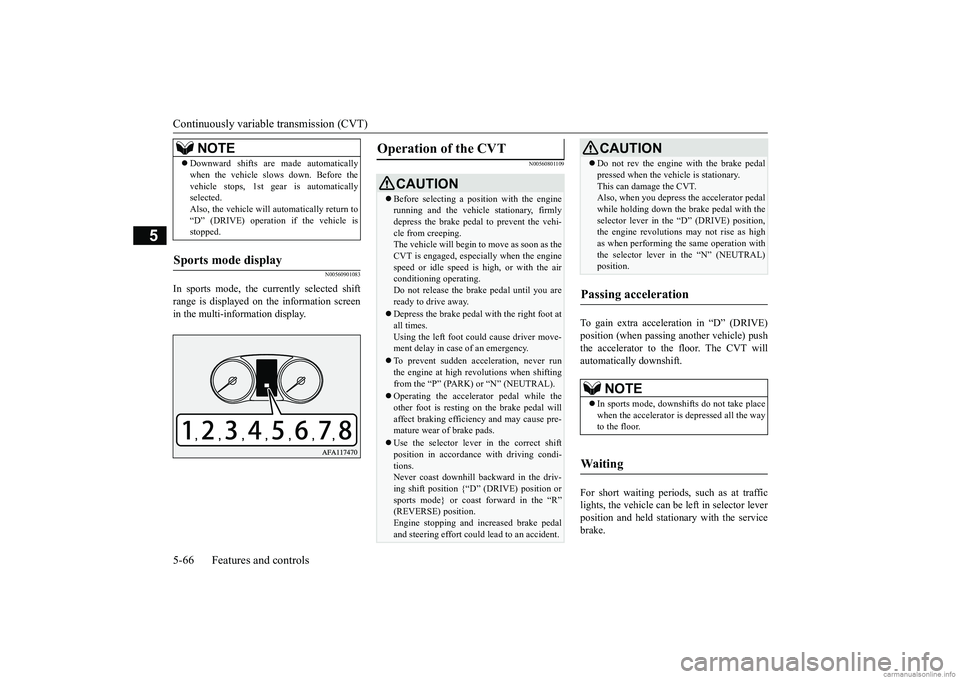
In sports mode, the currently selected shift range is displayed on the information screen in the multi-information display.
N00560801109
To gain extra acceleration in “D” (DRIVE) position (when passing another vehicle) push the accelerator to the floor. The CVT will automatically downshift. For short waiting periods, such as at traffic lights, the vehicle can be left in selector lever position and held stationary with the service brake.
Downward shifts are made automatically when the vehicle slows down. Before the vehicle stops, 1st gear is automatically selected. Also, the vehicle will automatically return to“D” (DRIVE) operation if the vehicle is stopped.
Sports mode display
NOTE
Operation of the CVT
CAUTION Before selecting a position with the engine running and the vehicle stationary, firmly depress the brake pedal to prevent the vehi- cle from creeping.The vehicle will begin to move as soon as the CVT is engaged, especially when the engine speed or idle speed is high, or with the airconditioning operating. Do not release the brake pedal until you are ready to drive away. Depress the brake pedal
with the right foot at
all times.Using the left foot could cause driver move- ment delay in case of an emergency. To prevent sudden acceleration, never run the engine at high revolutions when shifting from the “P” (PARK) or “N” (NEUTRAL). Operating the accelerator pedal while the other foot is resting on the brake pedal willaffect braking efficiency and may cause pre- mature wear of brake pads. Use the selector lever in the correct shift position in accordance with driving condi- tions. Never coast downhill backward in the driv- ing shift position {“D” (DRIVE) position orsports mode} or coast forward in the “R” (REVERSE) position. Engine stopping and increased brake pedaland steering effort could lead to an accident.
Do not rev the engine with the brake pedal pressed when the vehicle is stationary. This can damage the CVT. Also, when you depress the accelerator pedal while holding down the brake pedal with theselector lever in the “D” (DRIVE) position, the engine revolutions may not rise as high as when performing the same operation withthe selector lever in the “N” (NEUTRAL) position.
Passing acceleration
NOTE
In sports mode, downshifts do not take place when the accelerator is depressed all the way to the floor.
Wa i t i n g
CAUTION
BK0252700US.bo
ok 66 ページ 2017年10月4日 水曜日 午後4時54分