MITSUBISHI ENDEAVOR 2004 Service Repair Manual
ENDEAVOR 2004
MITSUBISHI
MITSUBISHI
https://www.carmanualsonline.info/img/19/57105/w960_57105-0.png
MITSUBISHI ENDEAVOR 2004 Service Repair Manual
Trending: battery output, table, park assist, Windows, instrument panel, trailer, coolant level
Page 1971 of 3870
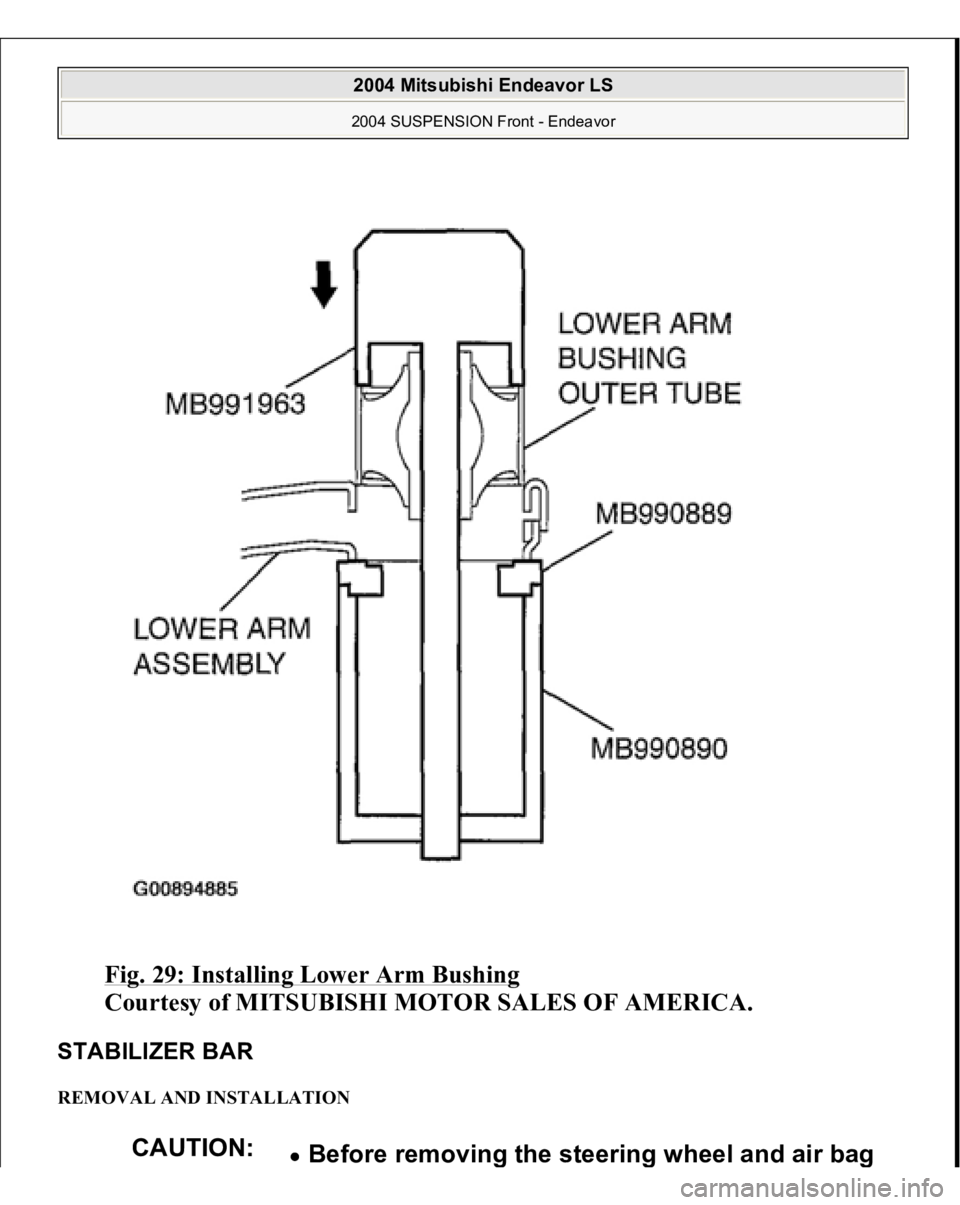
Fig. 29: Installing Lower Arm Bushing
Courtesy of MITSUBISHI MOTOR SALES OF AMERICA.
STABILIZER BAR REMOVAL AND INSTALLATION
CAUTION:
Before removin
g the steerin
g wheel and air ba
g
2004 Mitsubishi Endeavor LS 2004 SUSPENSION Front - Endeavor
Page 1972 of 3870
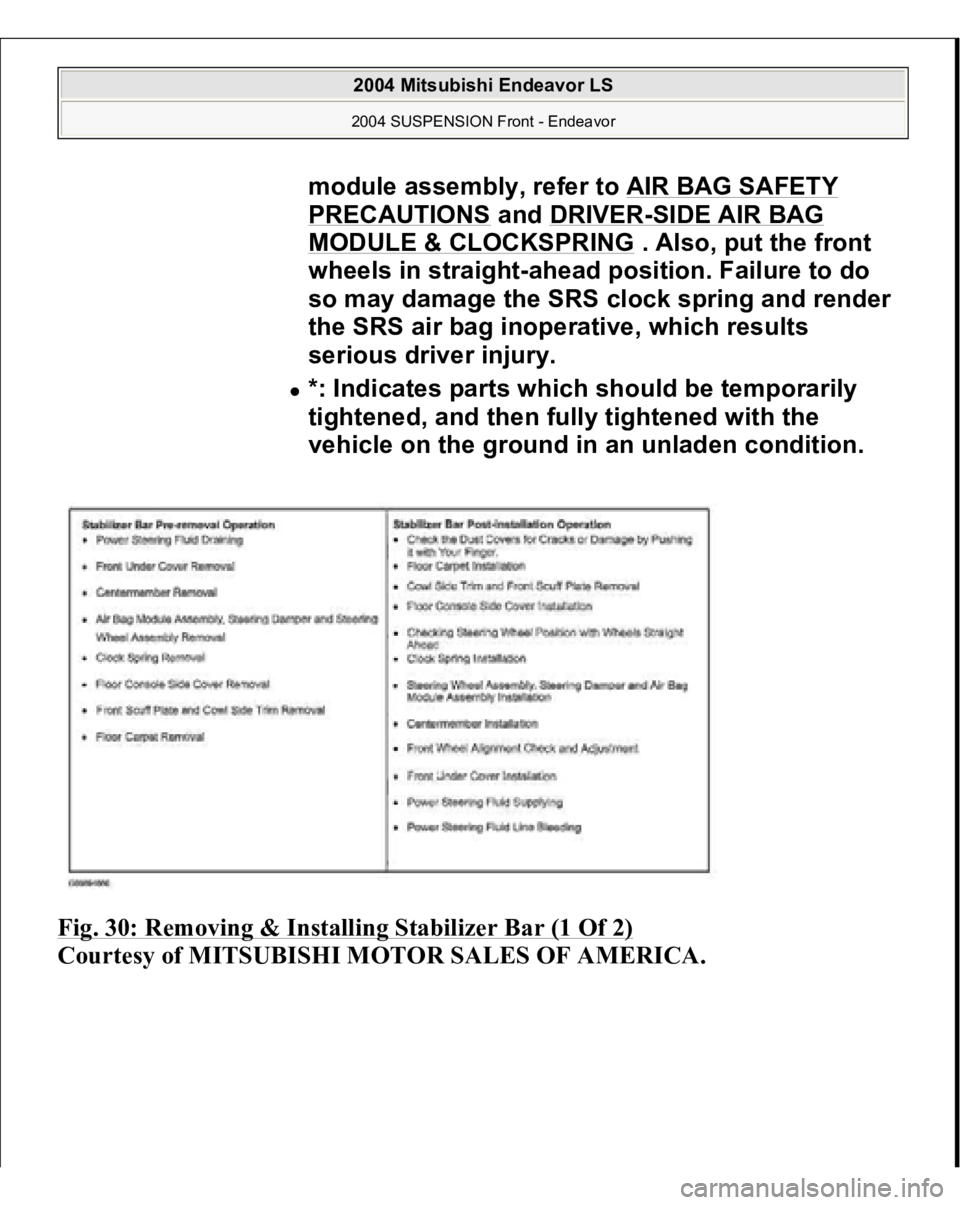
Fig. 30: Removing & Installing Stabilizer Bar (1 Of 2)
Courtes
y of MITSUBISHI MOTOR SALES OF AMERICA
.
module assembly, refer to AIR BAG SAFETY PRECAUTIONS
and DRIVER
-SIDE AIR BAG
MODULE & CLOCKSPRING
. Also, put the front
wheels in straight-ahead position. Failure to do
so may damage the SRS clock spring and render
the SRS air bag inoperative, which results
serious driver injury.
*: Indicates parts which should be temporarily
tightened, and then fully tightened with the
vehicle on the ground in an unladen condition.
2004 Mitsubishi Endeavor LS 2004 SUSPENSION Front - Endeavor
Page 1973 of 3870
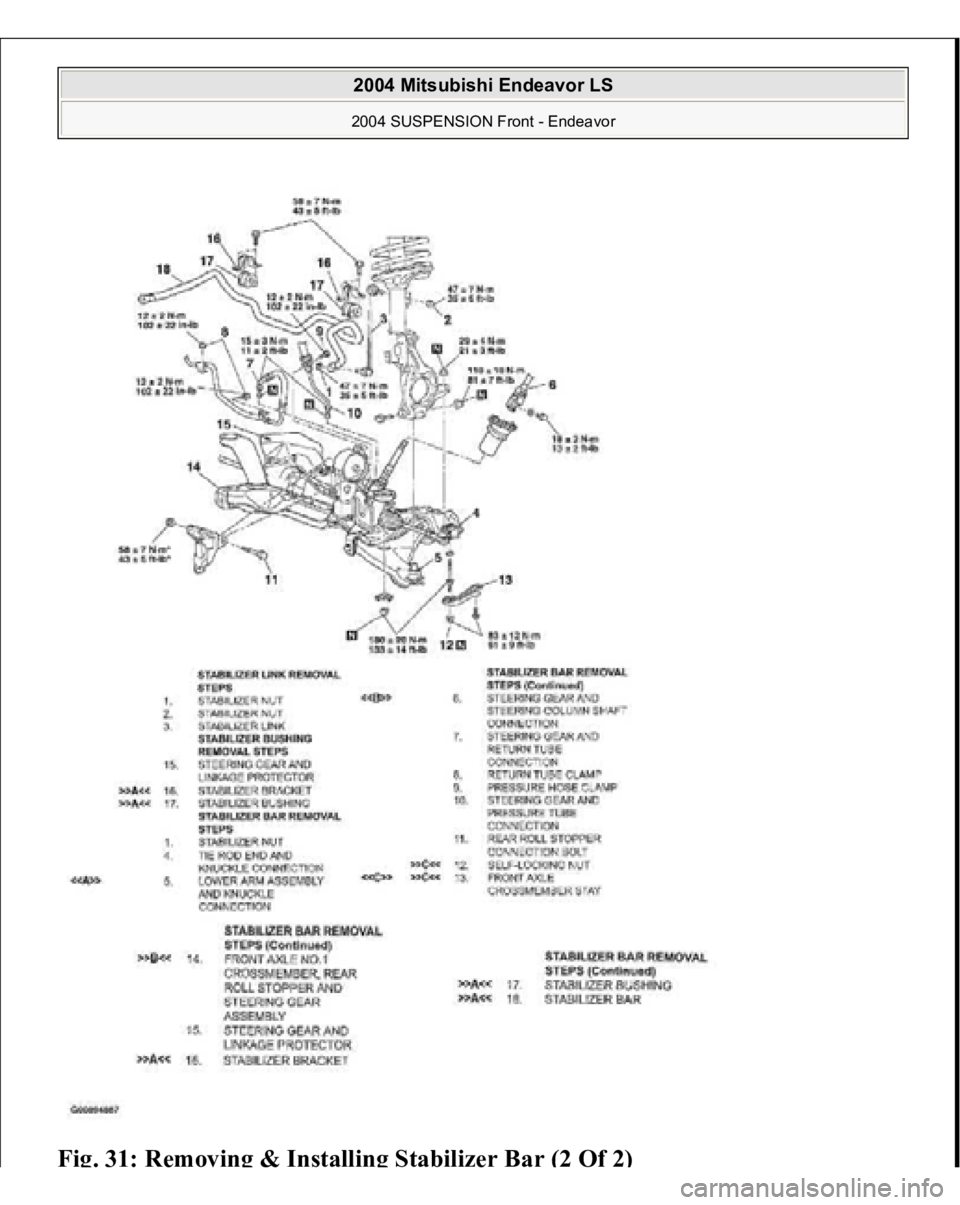
Fig. 31: R
emoving & In
stallin
g Stabiliz
er Bar
(2 Of 2
)
2004 Mitsubishi Endeavor LS 2004 SUSPENSION Front - Endeavor
Page 1974 of 3870
Page 1975 of 3870
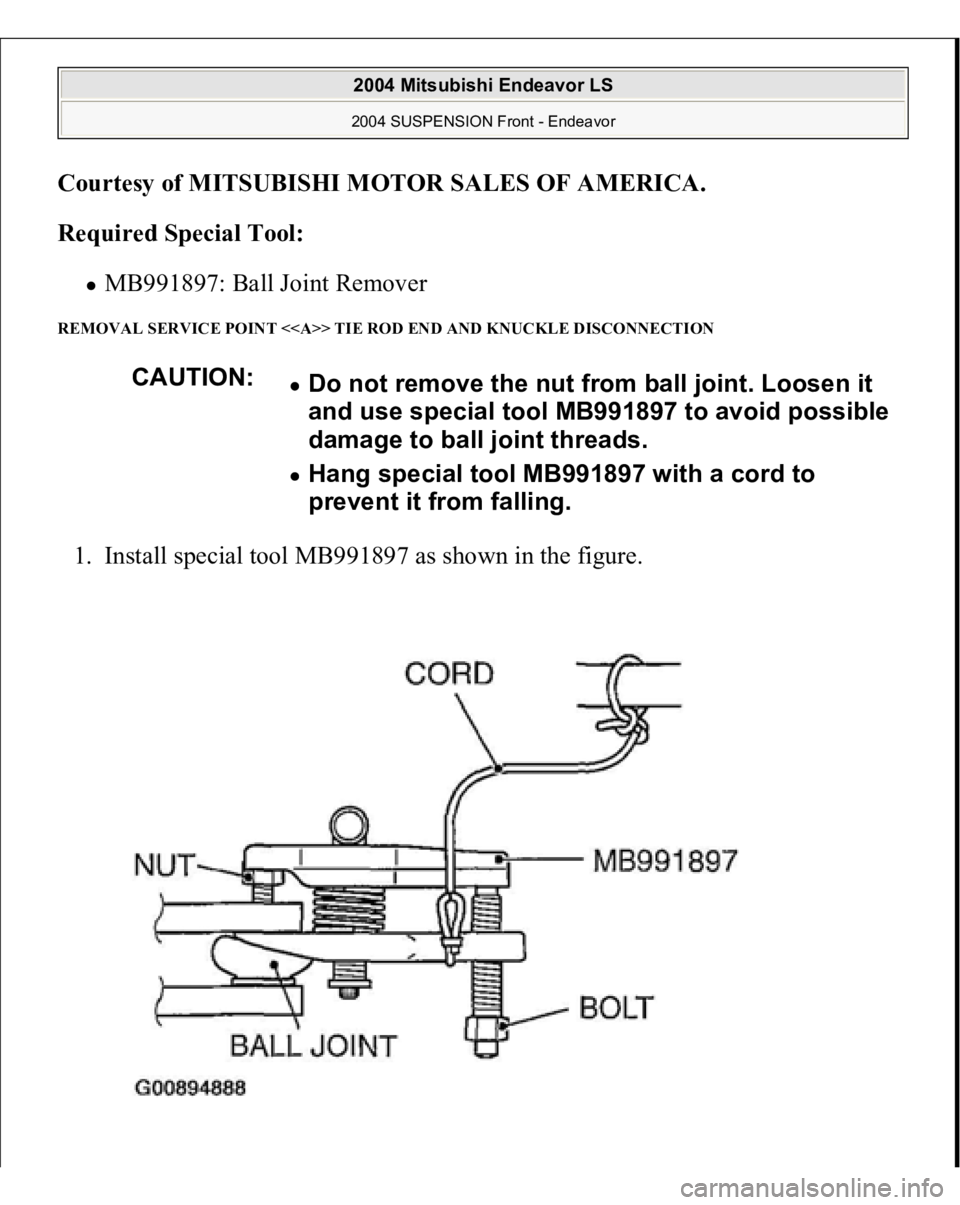
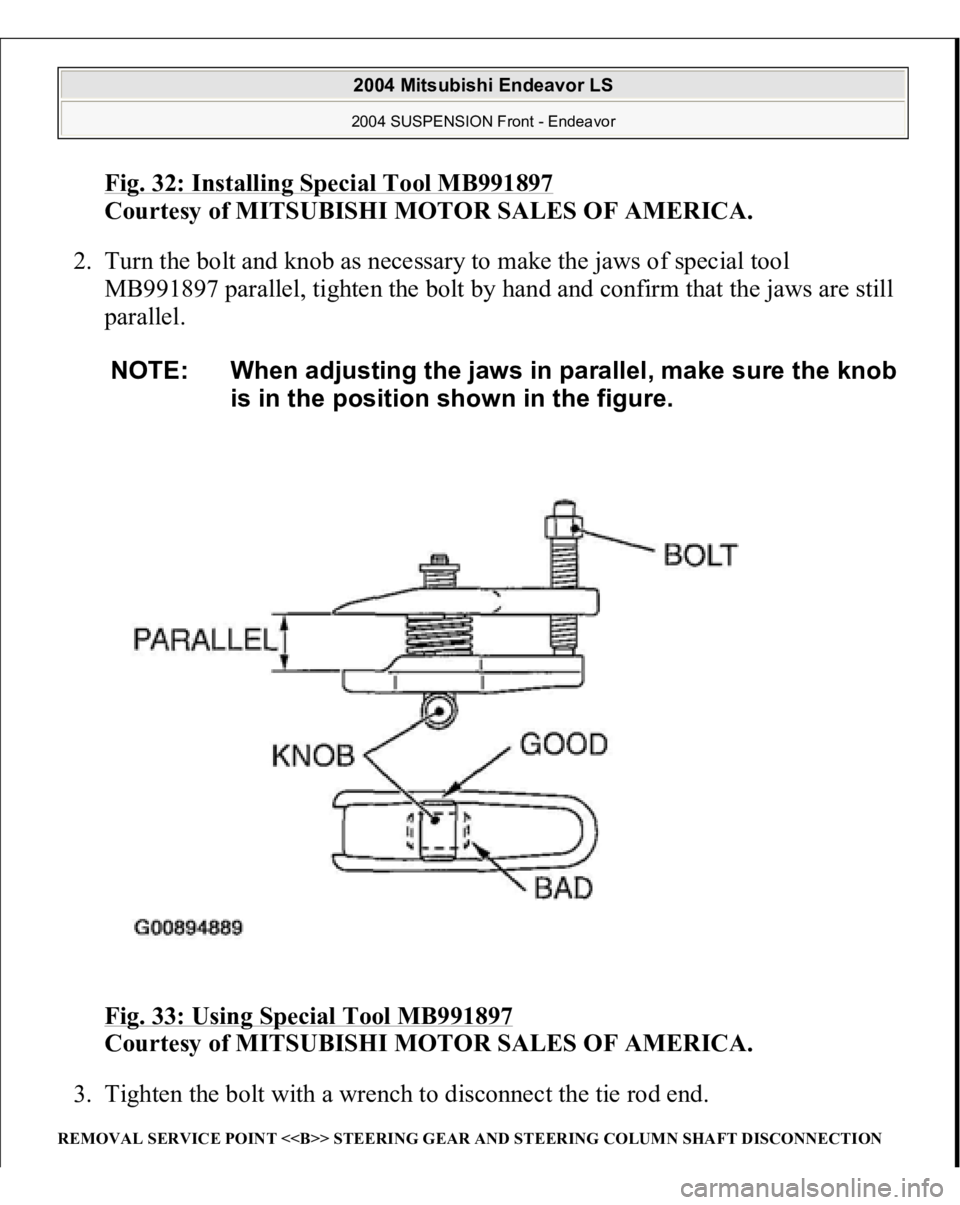
Fig. 32: Installing Special Tool MB991897
Courtesy of MITSUBISHI MOTOR SALES OF AMERICA.
2. Turn the bolt and knob as necessary to make the jaws of special tool
MB991897 parallel, tighten the bolt by hand and confirm that the jaws are still
parallel.
Fig. 33: Using Special Tool MB991897
Courtesy of MITSUBISHI MOTOR SALES OF AMERICA.
3. Tighten the bolt with a wrench to disconnect the tie rod end.
REMOVAL SERVICE POINT <> STEERING GEAR AND STEERING COLUMN SHAFT DISCONNECTION
NOTE: When adjusting the jaws in parallel, make sure the knob
is in the position shown in the figure.
2004 Mitsubishi Endeavor LS 2004 SUSPENSION Front - Endeavor
Page 1976 of 3870
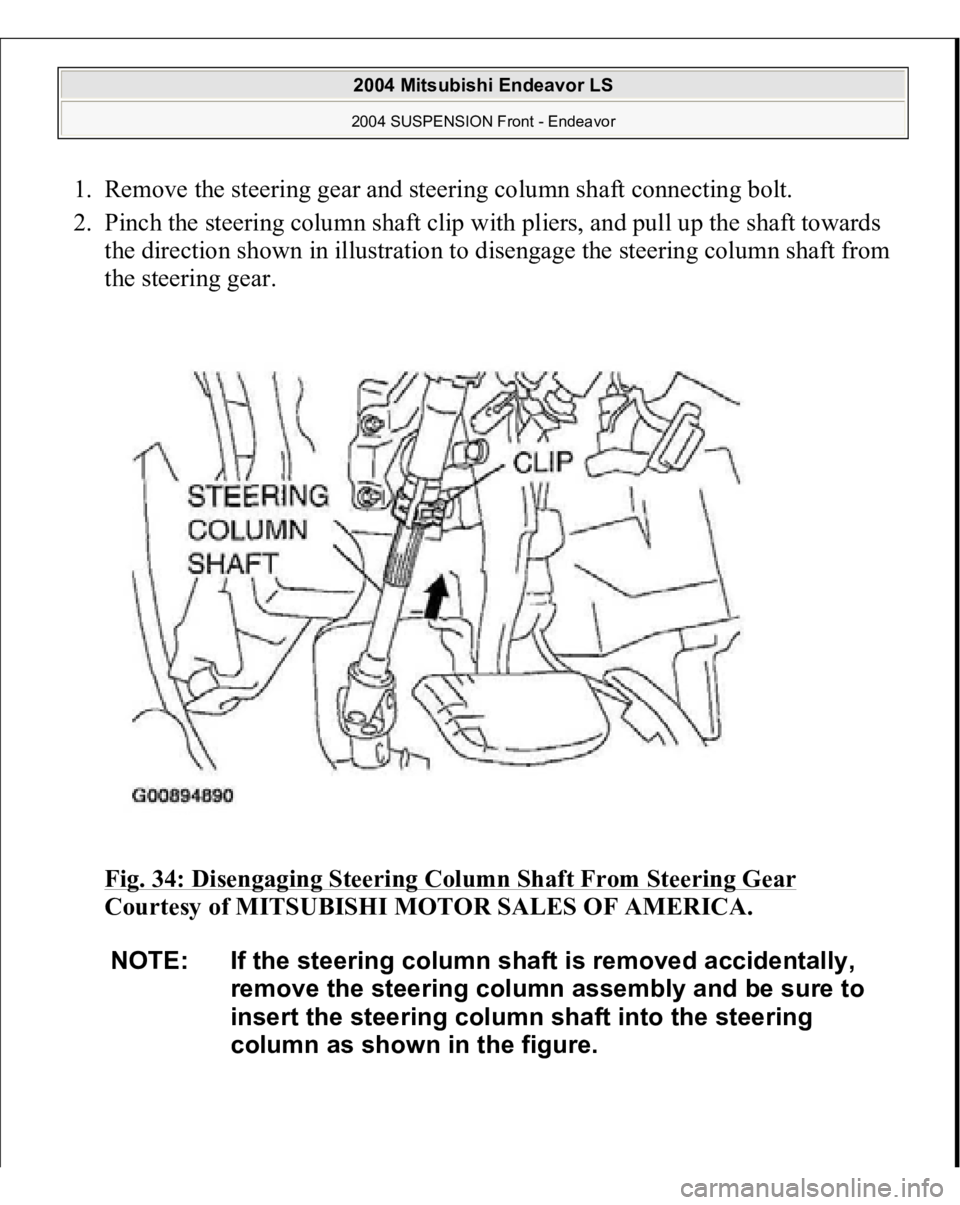
1. Remove the steering gear and steering column shaft connecting bolt.
2. Pinch the steering column shaft clip with pliers, and pull up the shaft towards
the direction shown in illustration to disengage the steering column shaft from
the steering gear.
Fig. 34: Disengaging Steering Column Shaft From Steering Gear
Courtesy of MITSUBISHI MOTOR SALES OF AMERICA.
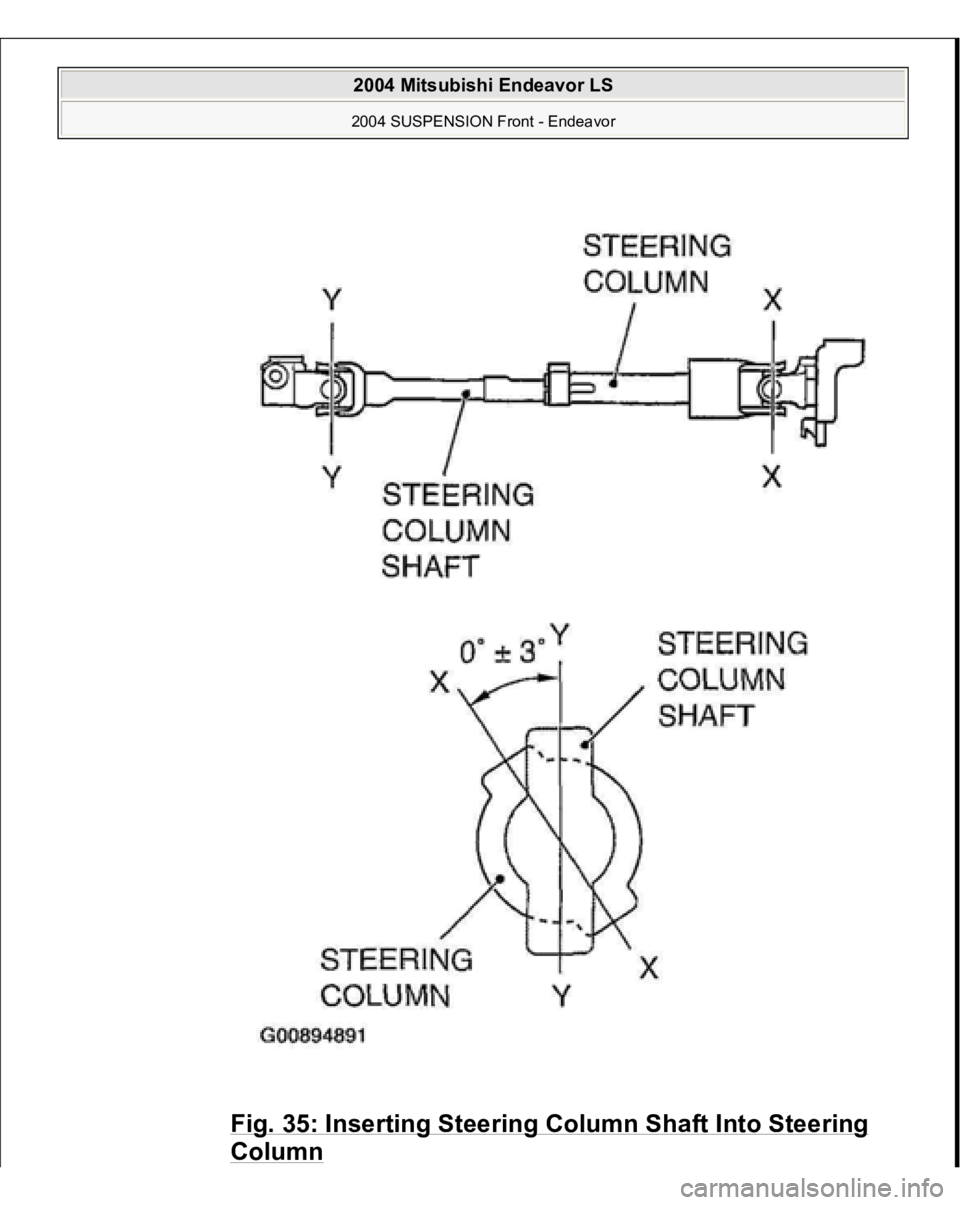
NOTE: If the steering column shaft is removed accidentally,
remove the steering column assembly and be sure to
insert the steering column shaft into the steering
column as shown in the figure.
2004 Mitsubishi Endeavor LS 2004 SUSPENSION Front - Endeavor
Page 1977 of 3870
Fig. 35: Inserting Steering Column Shaft Into Steering Column
2004 Mitsubishi Endeavor LS 2004 SUSPENSION Front - Endeavor
Page 1978 of 3870
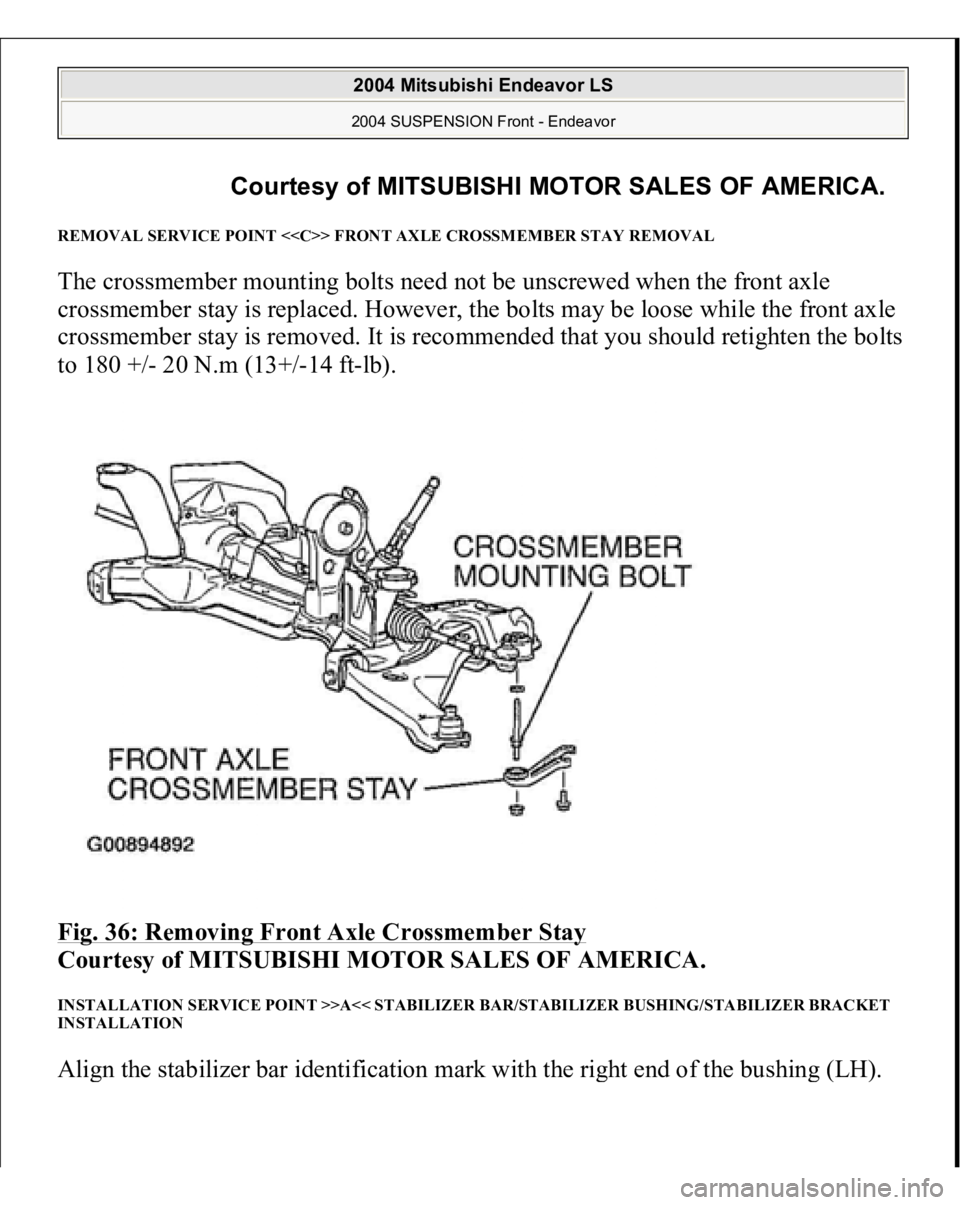
REMOVAL SERVICE POINT <> FRONT AXLE CROSSMEMBER STAY REMOVAL The crossmember mounting bolts need not be unscrewed when the front axle
crossmember stay is replaced. However, the bolts may be loose while the front axle
crossmember stay is removed. It is recommended that you should retighten the bolts
to 180 +/- 20 N.m (13+/-14 ft-lb).
Fig. 36: Removing Front Axle Crossmember Stay
Courtesy of MITSUBISHI MOTOR SALES OF AMERICA.
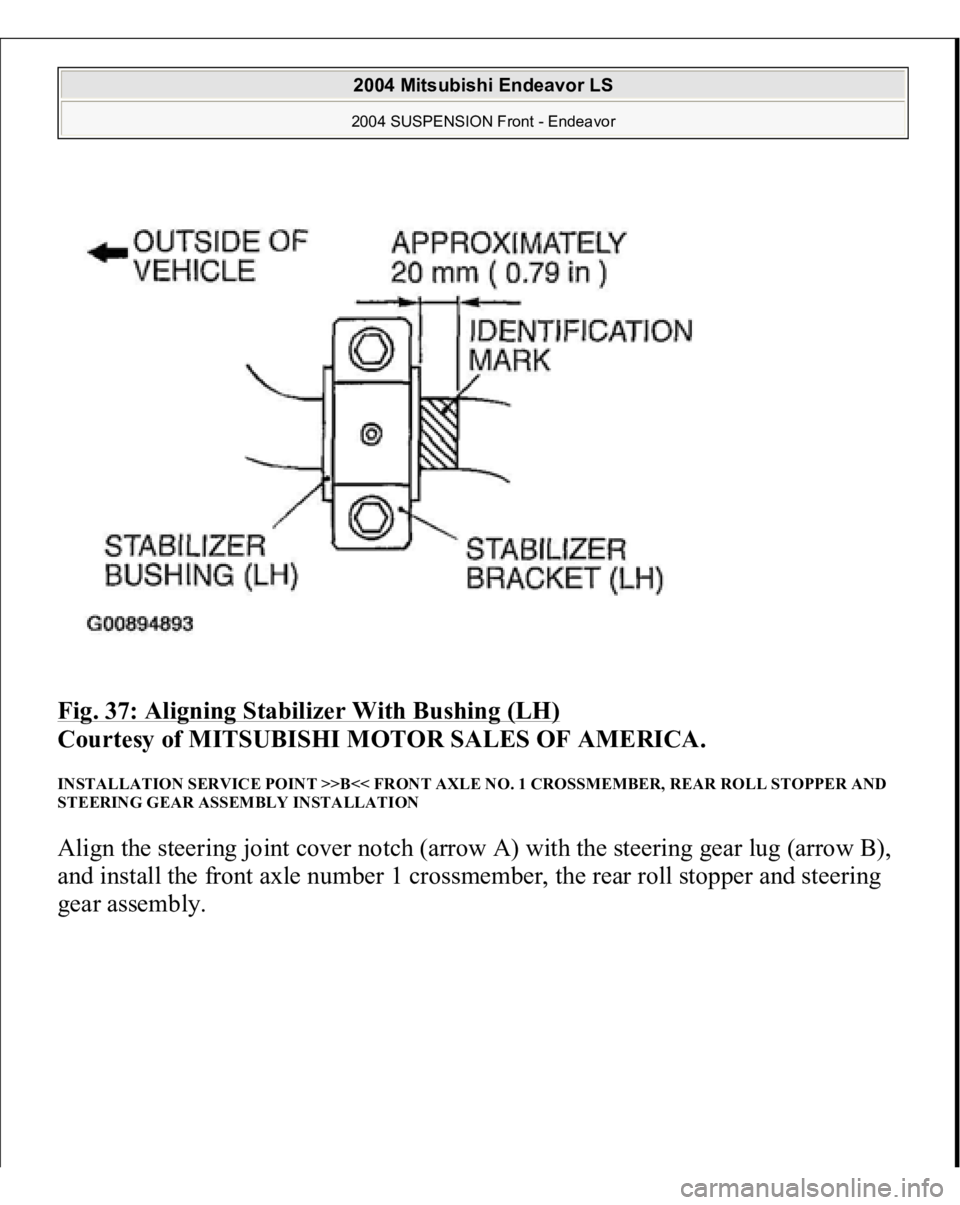
INSTALLATION SERVICE POINT >>A<< STABILIZER BAR/STABILIZER BUSHING/STABILIZER BRACKET
INSTALLATION Ali
gn the stabilizer bar identification mark with
the ri
ght end of the bushin
g (LH
).
Courtesy of MITSUBISHI MOTOR SALES OF AMERICA.
2004 Mitsubishi Endeavor LS 2004 SUSPENSION Front - Endeavor
Page 1979 of 3870
Fig. 37: Aligning Stabilizer With Bushing (LH)
Courtesy of MITSUBISHI MOTOR SALES OF AMERICA.
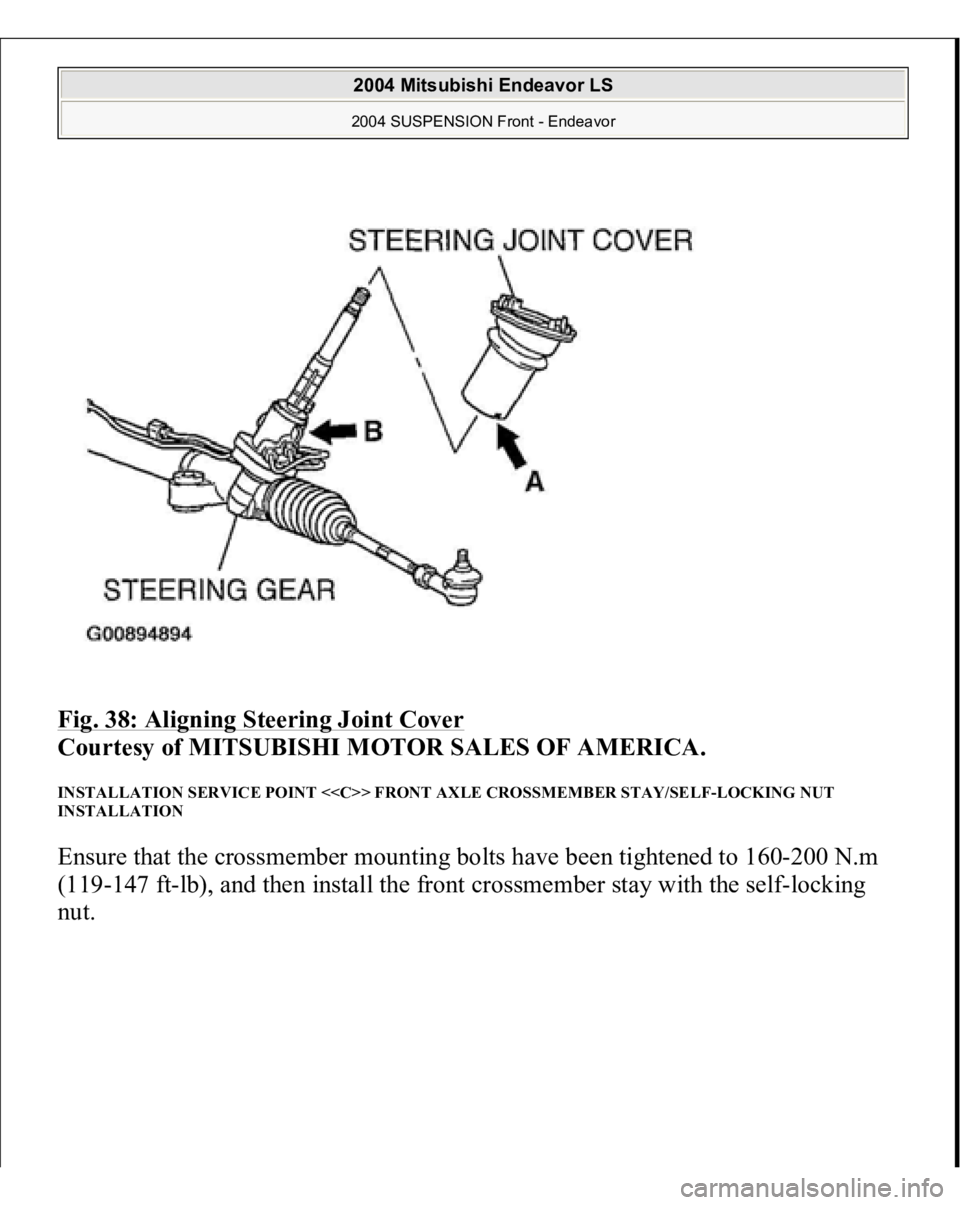
INSTALLATION SERVICE POINT >>B<< FRONT AXLE NO. 1 CROSSMEMBER, REAR ROLL STOPPER AND
STEERING GEAR ASSEMBLY INSTALLATION Align the steering joint cover notch (arrow A) with the steering gear lug (arrow B),
and install the front axle number 1 crossmember, the rear roll stopper and steering
gear assembly.
2004 Mitsubishi Endeavor LS 2004 SUSPENSION Front - Endeavor
Page 1980 of 3870
Fig. 38: Aligning Steering Joint Cover
Courtesy of MITSUBISHI MOTOR SALES OF AMERICA.
INSTALLATION SERVICE POINT <> FRONT AXLE CROSSMEMBER STAY/SELF-LOCKING NUT
INSTALLATION Ensure that the crossmember mounting bolts have been tightened to 160-200 N.m
(119-147 ft-lb), and then install the front crossmember stay with the self-locking
nut.
2004 Mitsubishi Endeavor LS 2004 SUSPENSION Front - Endeavor
Trending: jump cable, rocker cover, Abs sensor, USB port, tailgate, engine diagram, Figure 37
