MITSUBISHI ENDEAVOR 2004 Service Repair Manual
ENDEAVOR 2004
MITSUBISHI
MITSUBISHI
https://www.carmanualsonline.info/img/19/57105/w960_57105-0.png
MITSUBISHI ENDEAVOR 2004 Service Repair Manual
Trending: ELECTRICAL DIAGRAM, PURGE CONTROL SOLENOID, thermostat, crankshaft position sensor, Windows, brake fluid, deactivate
Page 1951 of 3870
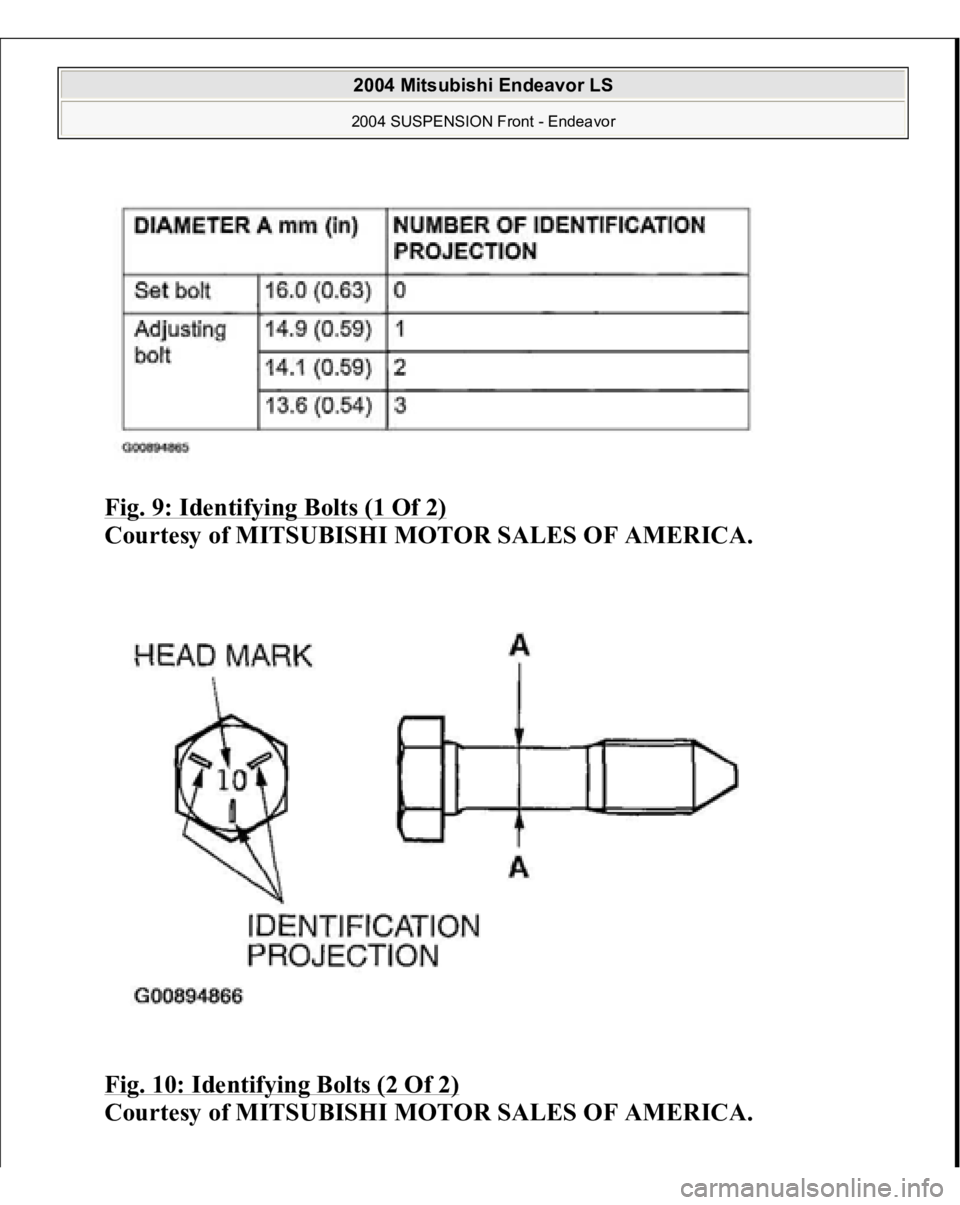
Fig. 9: Identifying Bolts (1 Of 2)
Courtesy of MITSUBISHI MOTOR SALES OF AMERICA.
Fig. 10: Identifying Bolts (2 Of 2)
Courtesy of MITSUBISHI MOTOR SALES OF AMERICA.
2004 Mitsubishi Endeavor LS 2004 SUSPENSION Front - Endeavor
Page 1952 of 3870
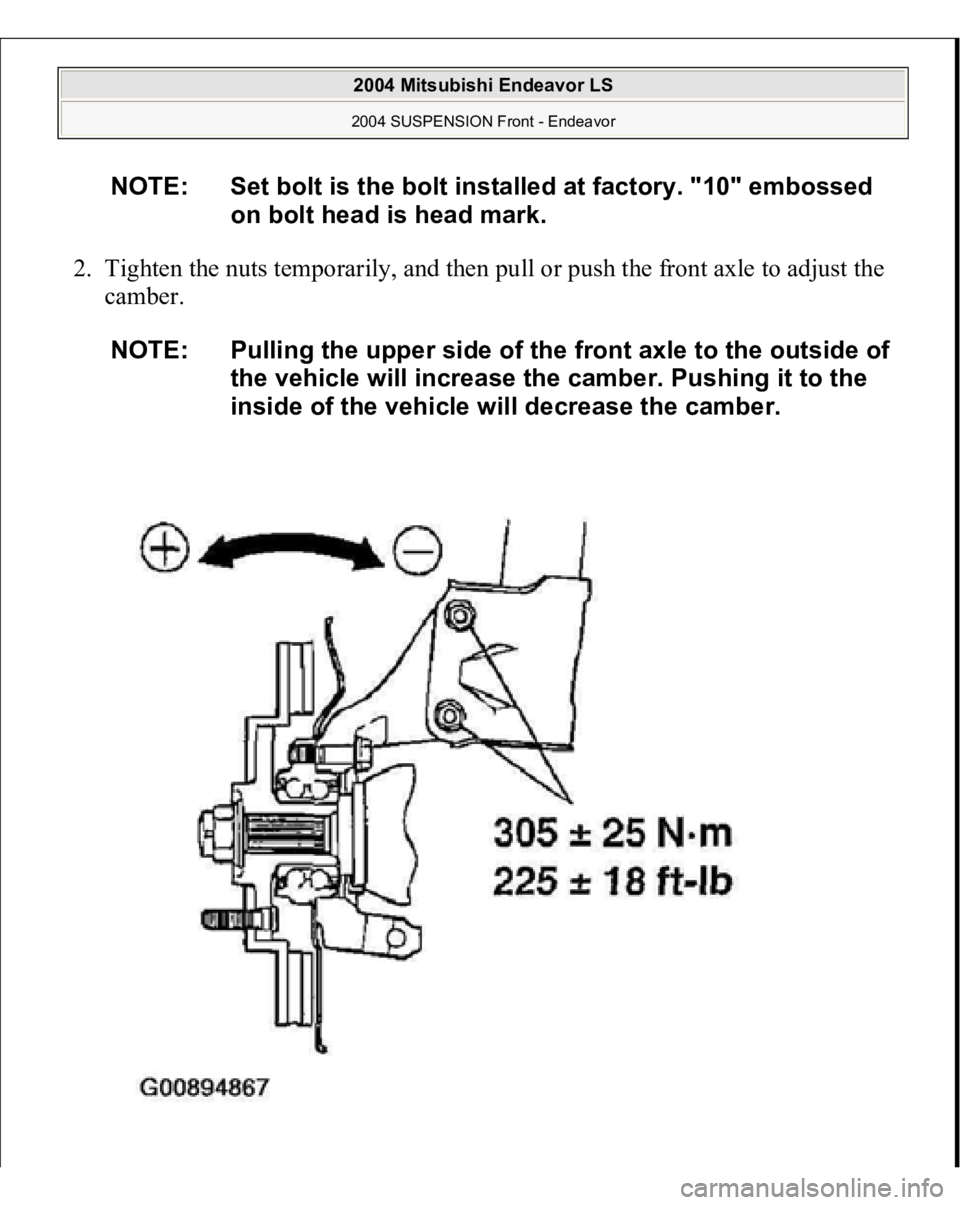
2. Tighten the nuts temporarily, and then pull or push the front axle to adjust the
camber.
NOTE: Set bolt is the bolt installed at factory. "10" embossed
on bolt head is head mark.
NOTE: Pulling the upper side of the front axle to the outside of
the vehicle will increase the camber. Pushing it to the
inside of the vehicle will decrease the camber.
2004 Mitsubishi Endeavor LS 2004 SUSPENSION Front - Endeavor
Page 1953 of 3870
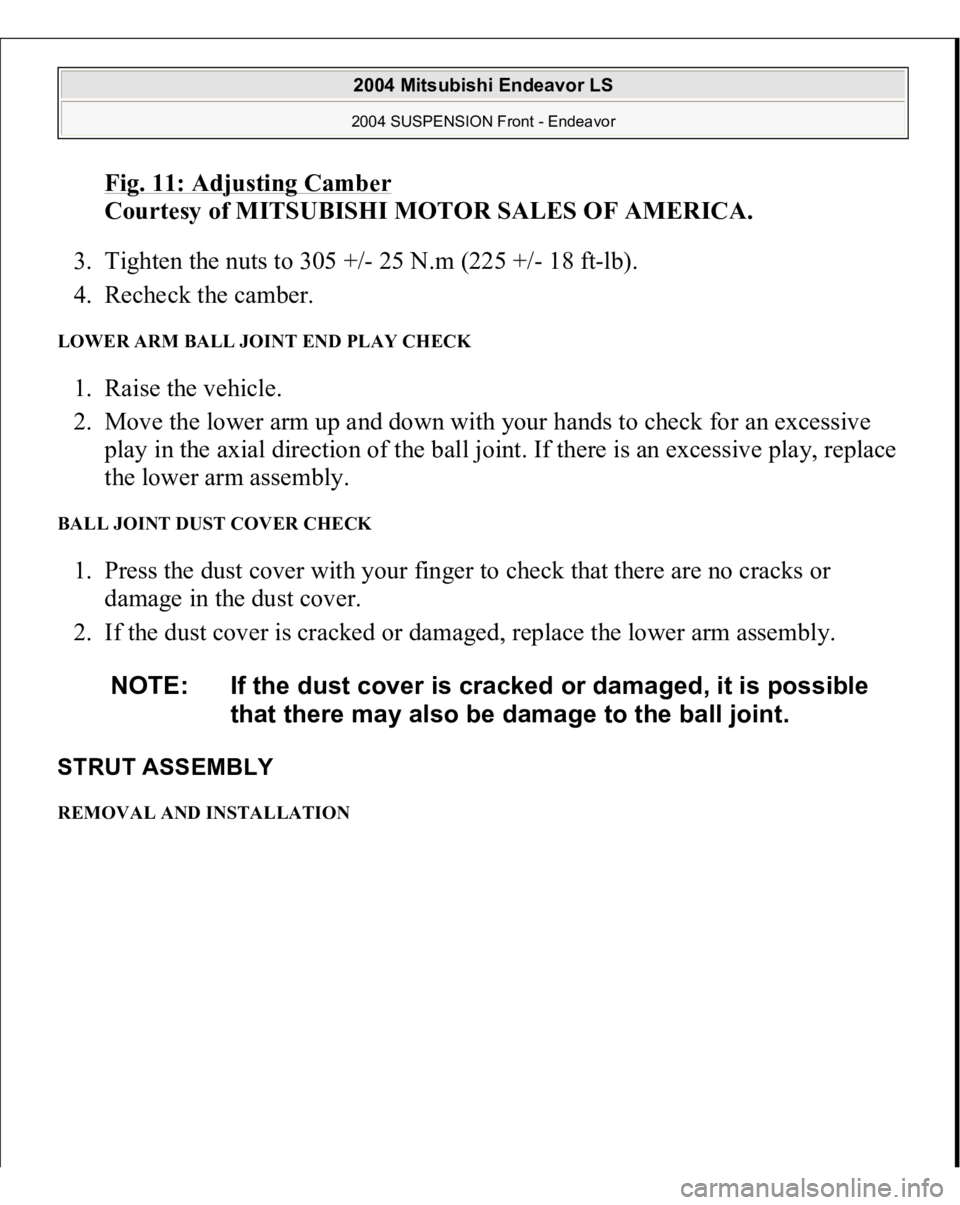
Fig. 11: Adjusting Camber
Courtesy of MITSUBISHI MOTOR SALES OF AMERICA.
3. Tighten the nuts to 305 +/- 25 N.m (225 +/- 18 ft-lb).
4. Recheck the camber.
LOWER ARM BALL JOINT END PLAY CHECK 1. Raise the vehicle.
2. Move the lower arm up and down with your hands to check for an excessive
play in the axial direction of the ball joint. If there is an excessive play, replace
the lower arm assembly. BALL JOINT DUST COVER CHECK 1. Press the dust cover with your finger to check that there are no cracks or
damage in the dust cover.
2. If the dust cover is cracked or damaged, replace the lower arm assembly. STRUT ASSEMBLY REMOVAL AND INSTALLATION
NOTE: If the dust cover is cracked or damaged, it is possible
that there may also be damage to the ball joint.
2004 Mitsubishi Endeavor LS 2004 SUSPENSION Front - Endeavor
Page 1954 of 3870
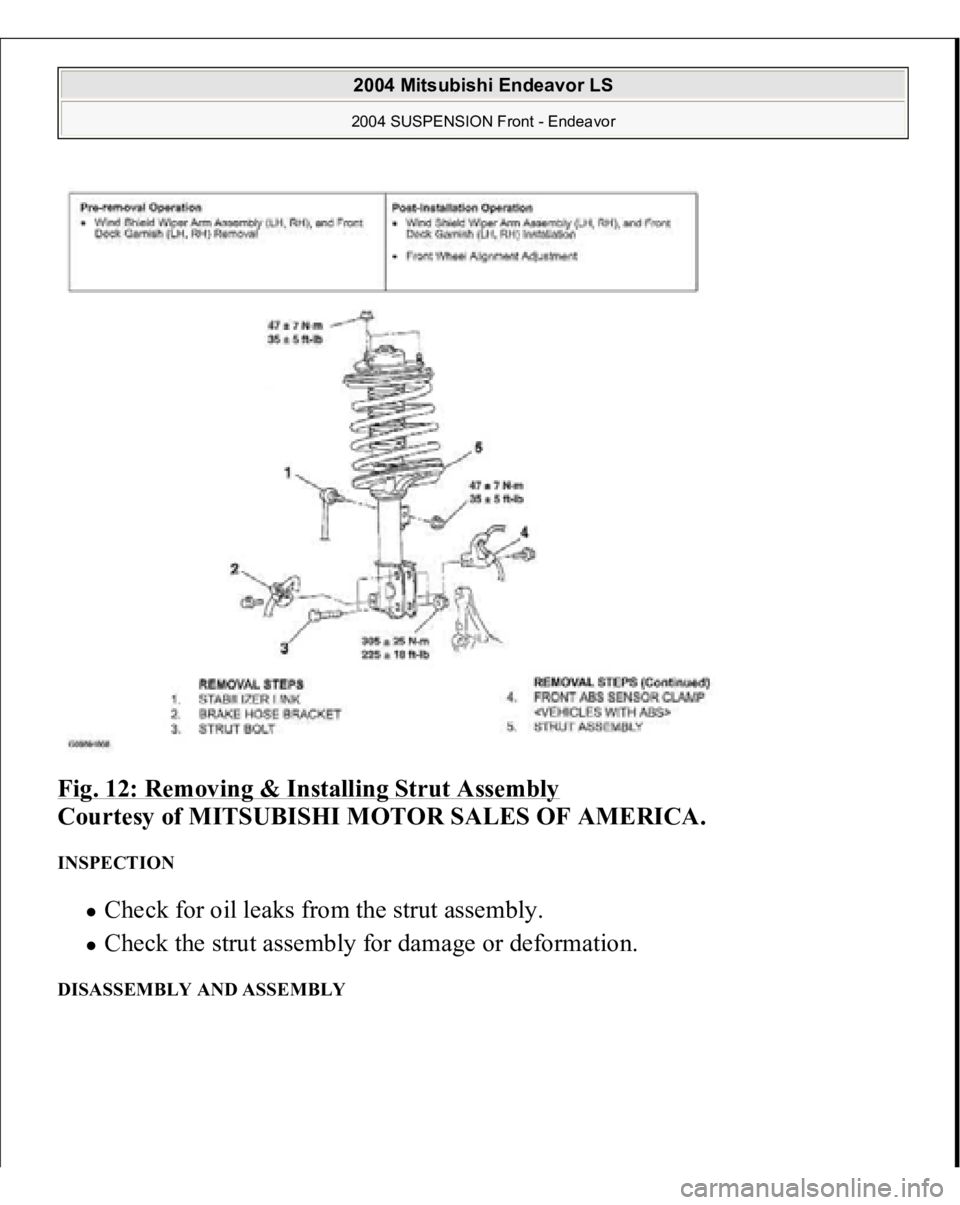
Fig. 12: Removing & Installing Strut Assembly
Courtesy of MITSUBISHI MOTOR SALES OF AMERICA.
INSPECTION
Check for oil leaks from the strut assembly. Check the strut assembly for damage or deformation.
DISASSEMBLY AND ASSEMBLY
2004 Mitsubishi Endeavor LS 2004 SUSPENSION Front - Endeavor
Page 1955 of 3870
Page 1956 of 3870
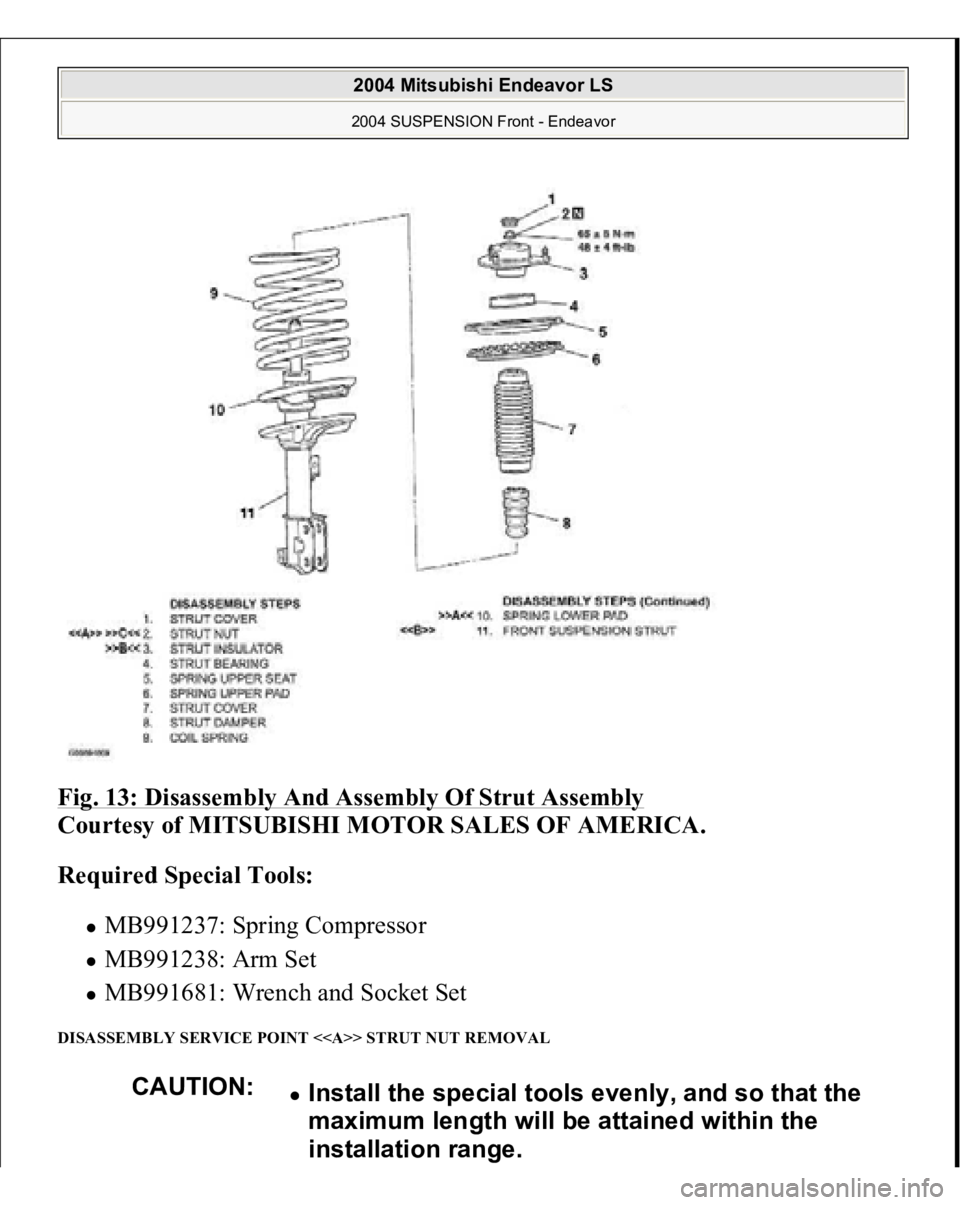
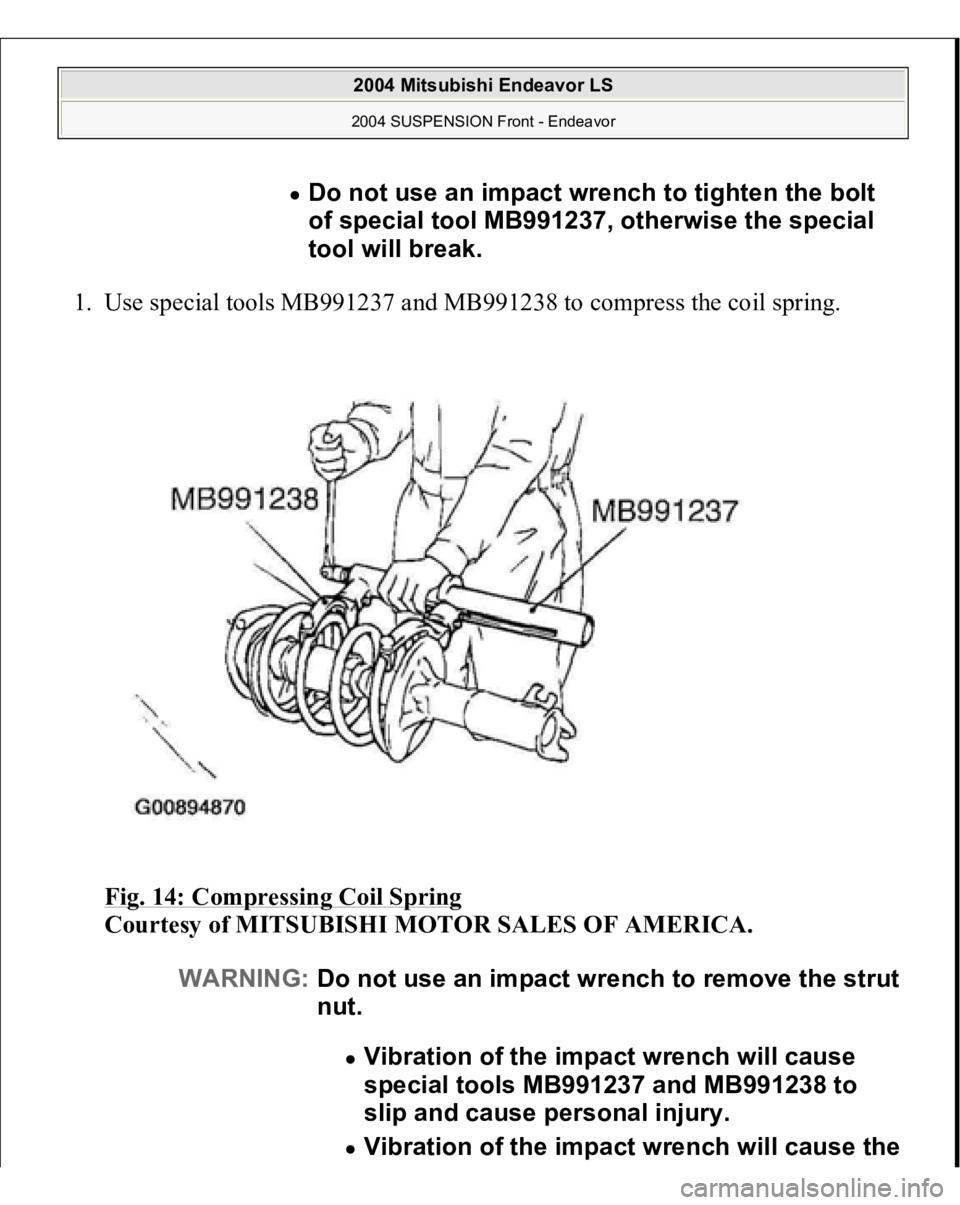
1. Use special tools MB991237 and MB991238 to compress the coil spring.
Fig. 14: Compressing Coil Spring
Courtesy of MITSUBISHI MOTOR SALES OF AMERICA.
Do not use an impact wrench to tighten the bolt
of special tool MB991237, otherwise the special
tool will break.
WARNING:Do not use an impact wrench to remove the strut
nut.
Vibration of the impact wrench will cause
special tools MB991237 and MB991238 to
slip and cause personal injury. Vibration of the impact wrench will cause the
2004 Mitsubishi Endeavor LS 2004 SUSPENSION Front - Endeavor
Page 1957 of 3870
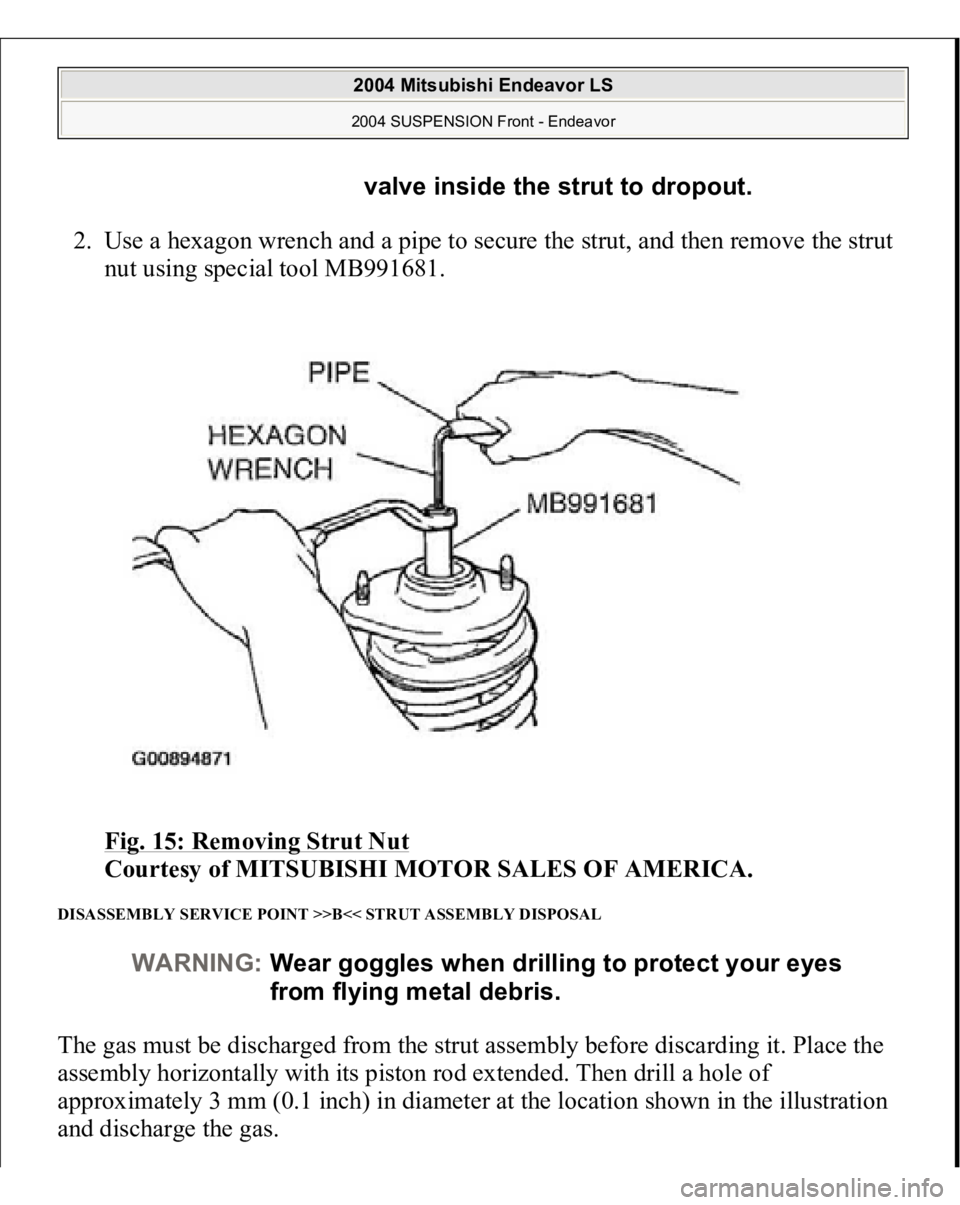
2. Use a hexagon wrench and a pipe to secure the strut, and then remove the strut
nut using special tool MB991681.
Fig. 15: Removing Strut Nut
Courtesy of MITSUBISHI MOTOR SALES OF AMERICA.
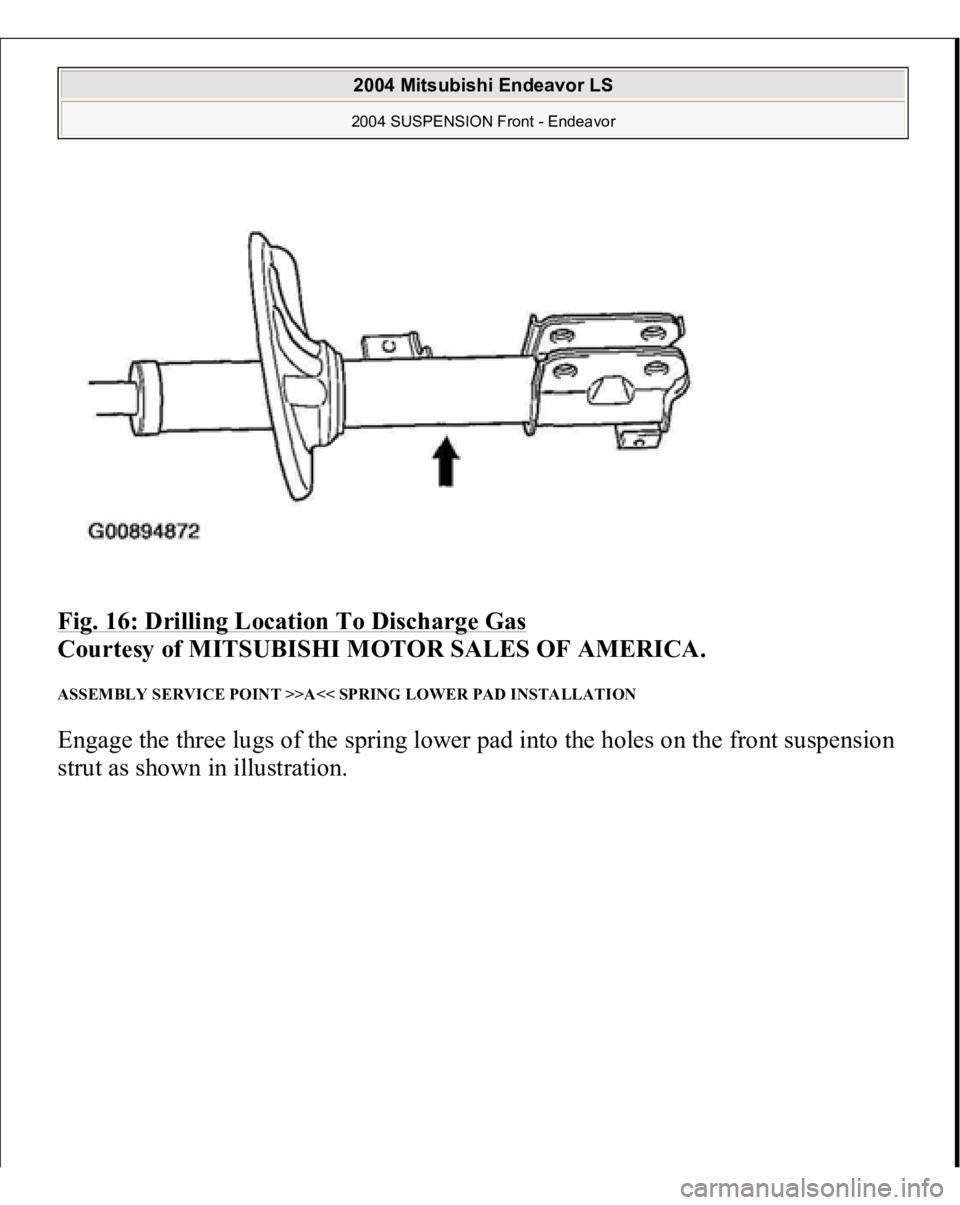
DISASSEMBLY SERVICE POINT >>B<< STRUT ASSEMBLY DISPOSAL The gas must be discharged from the strut assembly before discarding it. Place the
assembly horizontally with its piston rod extended. Then drill a hole of
approximately 3 mm (0.1 inch) in diameter at the location shown in the illustration
and discharge the gas.
valve inside the strut to dropout.
WARNING:Wear goggles when drilling to protect your eyes
from flying metal debris.
2004 Mitsubishi Endeavor LS 2004 SUSPENSION Front - Endeavor
Page 1958 of 3870
Fig. 16: Drilling Location To Discharge Gas
Courtesy of MITSUBISHI MOTOR SALES OF AMERICA.
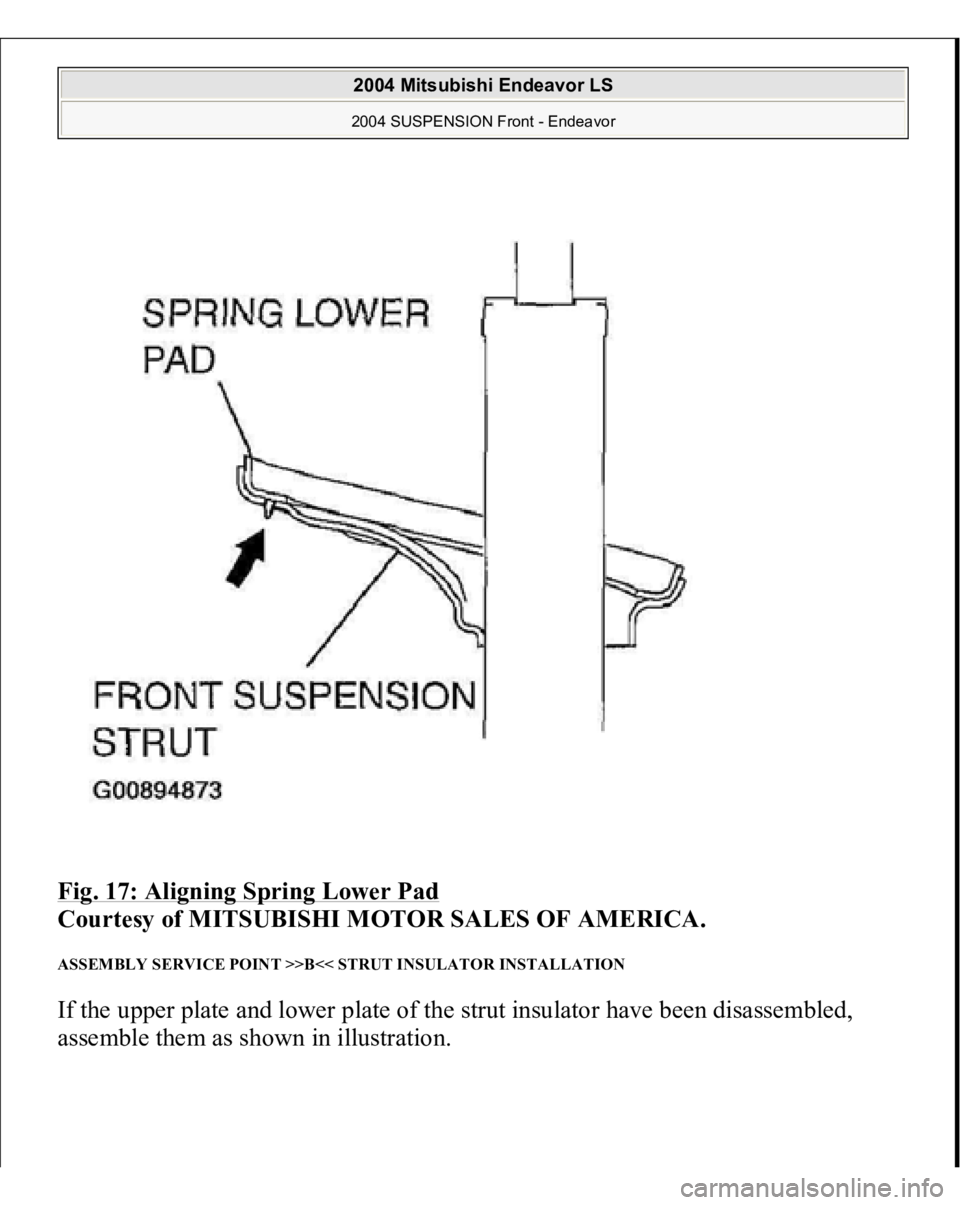
ASSEMBLY SERVICE POINT >>A<< SPRING LOWER PAD INSTALLATION Engage the three lugs of the spring lower pad into the holes on the front suspension
strut as shown in illustration.
2004 Mitsubishi Endeavor LS 2004 SUSPENSION Front - Endeavor
Page 1959 of 3870
Fig. 17: Aligning Spring Lower Pad
Courtesy of MITSUBISHI MOTOR SALES OF AMERICA.
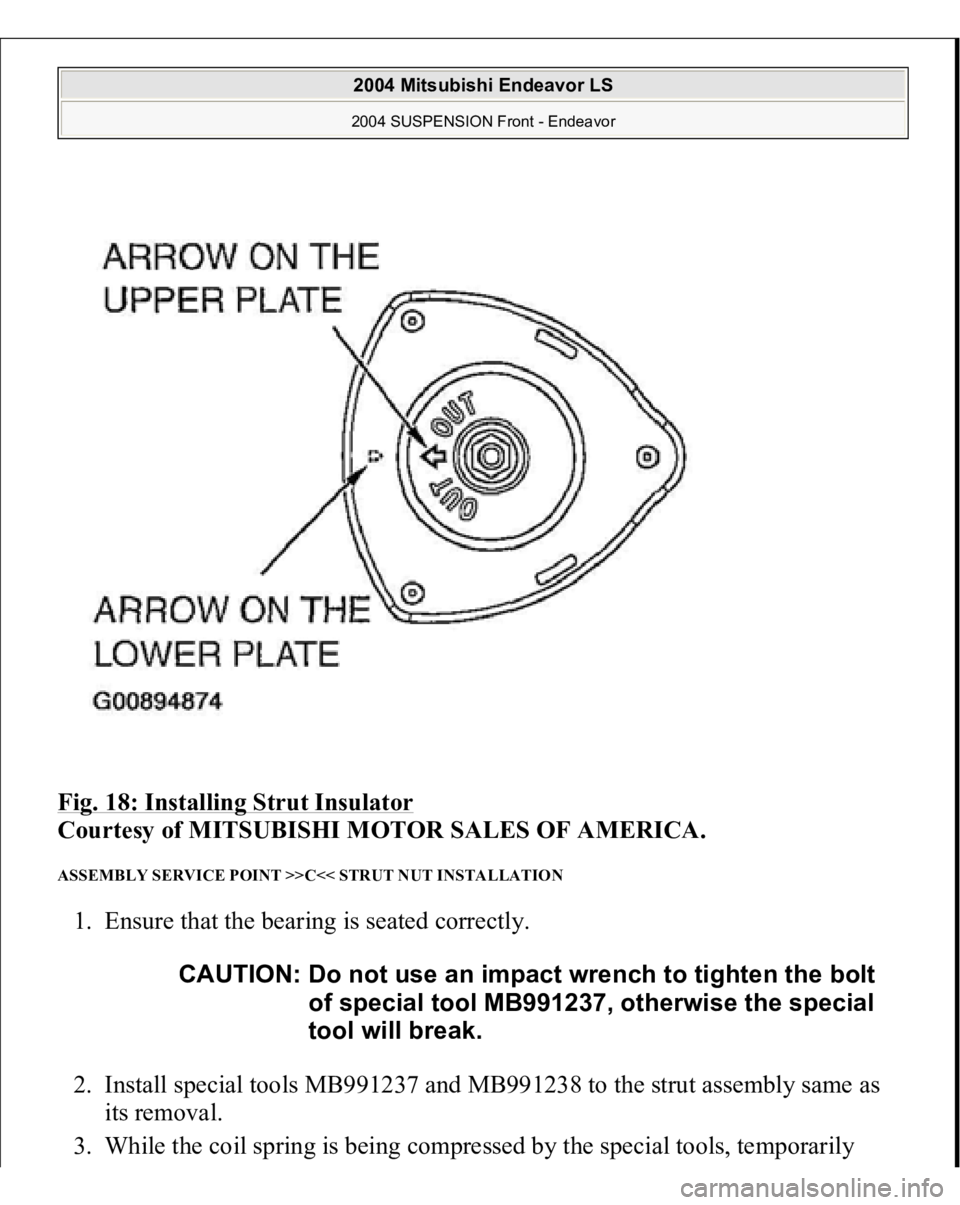
ASSEMBLY SERVICE POINT >>B<< STRUT INSULATOR INSTALLATION If the upper plate and lower plate of the strut insulator have been disassembled,
assemble them as shown in illustration.
2004 Mitsubishi Endeavor LS 2004 SUSPENSION Front - Endeavor
Page 1960 of 3870
Fig. 18: Installing Strut Insulator
Courtesy of MITSUBISHI MOTOR SALES OF AMERICA.
ASSEMBLY SERVICE POINT >>C<< STRUT NUT INSTALLATION 1. Ensure that the bearing is seated correctly.
2. Install special tools MB991237 and MB991238 to the strut assembly same as
its removal.
3. While the coil s
prin
g is bein
g com
pressed b
y the s
pecial tools, tem
poraril
y
CAUTION: Do not use an impact wrench to tighten the bolt
of special tool MB991237, otherwise the special
tool will break.
2004 Mitsubishi Endeavor LS 2004 SUSPENSION Front - Endeavor
Trending: Battery terminals, ac coil, refrigerant type, check engine light, Rear Crossmember, service reset, bank 1 sensor 1
